Lyngdorf TDAI-2170 User manual

Quick Start Guide TDAI-2170

Welcome
Congratulations on your purchase of the Lyngdorf Audio TDAI-2170 fully digital amplifier with RoomPerfect™.
With this purchase, you have joined the ranks of an elite group of people who believe that perfect sound
is more than a luxury. It’s a requirement. The TDAI-2170 will deliver an audio experience that will far
exceed your expectations. We thank you for placing your confidence in Lyngdorf Audio.
This manual will give you an overview of how to set up your system. Please read the manual carefully to
better understand the capabilities of your TDAI-2170. For more in-depth information about
the technologies used in Lyngdorf Audio products, please visit www.lyngdorf.com.

What’s in the box.............................................................................................................................7
Remote control ................................................................................................................................8
Front panel controls .......................................................................................................................9
Setup guide.................................................................................................................................... 11
Setup guide....................................................................................................................... 12
Installing the USB streaming audio driver ................................................................................ 13
Speaker placement.............................................................................................................14
Tips for setting up speakers..................................................................................................15
Connecting the subwoofer....................................................................................................16
Subwoofer placement ......................................................................................................... 18
Measuring distances ........................................................................................................... 19
RoomPerfect™ .............................................................................................................................. 21
Placing the microphone in the focus position ..........................................................................24
Measuring the focus position ...............................................................................................26
Measuring random room positions .......................................................................................27
Room measurements above 90% RoomKnowledge ...............................................................30

6 7
Microphone stand
What’s in the box
12 3
456
7
digital info
analog
A/B random repeat
AMP
channel
ENTER
volume
RCS CD TUNER
menu
8
0
9
Mains cord 8 m (26.25 feet) XLR – XLR cable Microphone
Quick start guide USB stickRemote control Lyngdorf Audio TDAI-2170

8 9
Front panel controls
12 3
456
7
digital info
analog
A/B random repeat
AMP
channel
ENTER
volume
RCS CD TUNER
menu
8
0
9
26
7
4
5
3
1
123
1. Source/menu Press and hold to access the menu, press to select a menu item,
press and hold to exit a menu.
Rotate left and right to toggle between audio sources and browse while in the menu.
2. Volume wheel Adjust the volume with left or right rotation.
3. Standby button Turns the TDAI-2170 on and into standby.
Remote control
- the most used buttons
1. Standby Turns the TDAI-2170 on and into standby.
2. Digital and Analog Selects, or if already active, cycles to the next input.
3. Channel -/+ Toggles between active inputs.
4. Up/Down Toggles between the available RoomPerfect™ filters. Increases
and decreases settings in the menu.
5. Left/Right Toggles between neutral and the available voicings.
Used to browse in the menu.
6. Info Shows information of level and type of input signal.
7. Menu Press to enter the menu. When in the menu press to go back or cancel.
Note: If the TDAI-2170 isn’t responding to the remote, press the AMP key and
try again. If that doesn´t work, check the batteries.

10
Setup guide

12 13
Setup guide
When starting up the TDAI-2170, you will be
prompted to start the setup guide. This tip sheet
will provide setup guide help.
When connecting the speakers, always connect “+” and
“-” from the amplifier to the corresponding “+” and “-”
terminals on the speaker.
Warning: Never connect the
TDAI-2170´s speaker output
to other amplifiers’ output
terminals, a setting also known
as bridge mode.
ANALOG
INPUT OUTPUT INPUT OUTPUT
A2 MICROPHONE
L
R
RIGHT
0,1ȍ
CLASS 2 WIRING
LEFT
DIGITAL
D2
D1
D3 D4 D5 D6 RS232
TRIGGER
IN
TRIGGER
OUT
SW
UPDATE TDAI2170
A1
USBAUDIO IN
USBMODULE
L
R
ANALOGAUDIO MODULE
A6RIGHT A6 LEFT
A4 A5A3
HDMIMODULE
HDMI1 HDMI 3
HDMI2 HDMI 4 OUT
INPUT OUTPUT
Installing the USB streaming audio driver
To stream audio from a Windows PC to the TDAI-2170, you need to install the Windows driver. The
driver can be found on the USB key that came with the product and on Lyngdorf.com. Mac users do not
need to install any drivers to stream audio to the TDAI-2170.
Windows:
1. When the PC prompts for installation of drivers, go to the “Drivers For USB” folder.
2. Select the Windows folder that matches your version number and run the driver installation
program.
Using the USB streaming audio input
To stream music to the TDAI-2170, connect it to your computer via a USB cable.
Select “USB” as input on the TDAI-2170 and start playing music on your computer.

14 15
Speaker placement
For an optimal listening experience, we
recommend you place your speakers against
the back wall. This will ensure the back wall
audio reflection and the direct sound will reach
your ears at the same time, giving you perfect
timing.
If your speakers have a bass-reflex port on the
back, you should allow for a 5cm/2in clearance
to the back wall. This will ensure there is no
disruption to the functionality of the port.
Tips for setting up speakers
Tip: With hard floors, you can reduce reflections from the floor by positioning a carpet between you and
the speakers. With hard surface walls, you can use a painting, a book shelf, or other furnishings.
Find the position of the diffusers by having someone hold a mirror against the wall opposite the speaker.
When you can see the speaker in the mirror from the listening position, you have found the optimal
position for the diffuser.
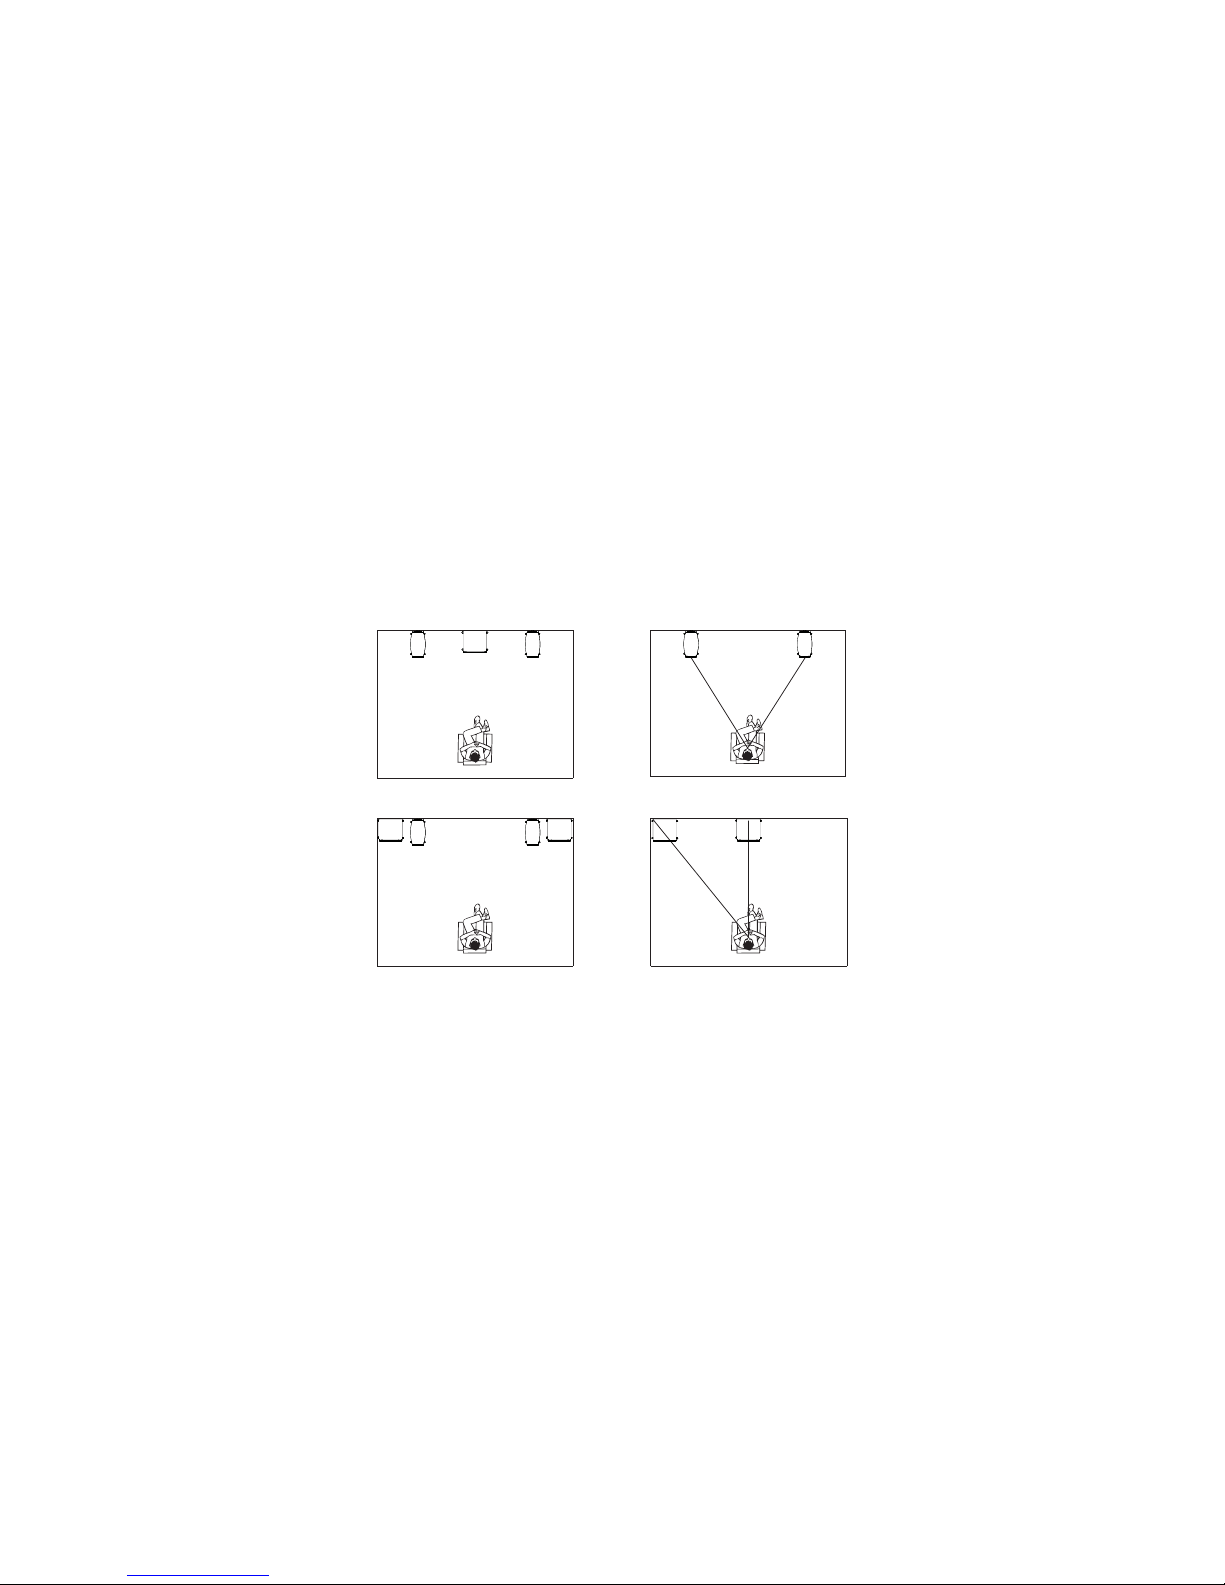
Stereo triangle
You can use the stereo triangle as a good rule
of thumb when determining where to place your
speakers. The distance between the speakers should
be the same as the distance from your listening
position to both speakers.

16 17
Connecting the subwoofer
In a traditional single subwoofer setup, connect the subwoofer to the left analog out on the TDAI-2170.
For a stereo subwoofer setup, or if you have a subwoofer which has stereo input, use both left and right
analog out.
Warning: Do not connect the
TDAI-2170 to a subwoofer with
speaker terminal inputs if they
are grounded. The TDAI-2170
+/+ speaker output terminals
must never touch each other,
likewise the -/- speaker output
terminals.
ANALOG
INPUT OUTPUT INPUT OUTPUT
A2 MICROPHONE
L
R
RIGHT
0,1ȍ
CLASS2 WIRING
LEFT
DIGITAL
D2
D1
D3 D4 D5 D6 RS232
TRIGGER
IN
TRIGGER
OUT
SW
UPDATE
100-240V~ 50/60Hz 80W
Designedandmanufactured in
DenmarkbySL Audio A/S
www.lyngdorf.com
TDAI2170
Avertissement:Pourréduirele
risqued'incendieetdedécharge
électriquel'appareilnedoitpas
êtreexposéàl'eauou à l'humidité
Warning.Toreducetherisk of fire
orelectricshock,donot expose
thisapparatustorainor moisture
AudioEquipment
3YZ9
A1
USBAUDIOIN
USBMODULE
L
R
ANALOGAUDIOMODULE
A6RIGHT A6LEFT
A4 A5A3
HDMIMODULE
HDMI1 HDMI3
HDMI2 HDMI4 OUT
INPUT OUTPUT
ANALOG
INPUT OUTPUT
A2
L
R
A1
Subwoofer controls
1. Phase adjustment should be 0°.
2. The subwoofer cut-off frequency should be set to the highest possible frequency range.
3. Level should be set to 50% of maximum volume.
Phase Cut off
180020040
Level
1000

18 19
Subwoofer placement
With a single subwoofer, we recommend placing the
subwoofer against the wall between the main speakers.
With two subwoofers, you should position one in each front
corner, in line with the main speakers.
Measuring distances
When measuring the distance to your main speakers, measure
from the focus position to the front of the speakers.
When measuring the distance to a subwoofer, measure from
the focus position to the back corner of the subwoofer.

20

22 23
RoomPerfect™
RoomPerfect™ is designed to analyze and correct for the negative effects that the listening room has
on the speaker sound.
Global listening The global filter improves sound quality across the whole room. When you are moving
around a room, the global filter gives the best result.
Focus listening The focus filter improves the sound quality at a specific listening position. This makes
the focus filter the best solution for optimal sound quality at a single listening position.
Voicings A voicing is an equalizer filter that can be activated to amplify or attenuate certain frequencies
according to your personal preferences. This equalization is an addition to the RoomPerfect™
corrections. The equalizer settings of a given voicing can be seen on the display of the amplifier.
Without RoomPerfect With RoomPerfect
3
Frequency (Hz)
10
55
65
70
75
80
85
90
95
100
105
Sound Pressure Level (dB)
60
Frequency (Hz)
55 20 100 1k 10k 20k
65
70
75
80
85
90
95
100
105
Sound Pressure Level (dB)
60

24 25
Placing the microphone in the focus position
When you are prompted to place the microphone in the focus position, connect the microphone to the
microphone input on the back panel and place the microphone, using the microphone stand, in your
primary listening position. The height and the orientation of the microphone should correspond to your
head’s height and direction.
Press enter and a test signal will start from the left speaker. The TDAI-2170 will give an estimated
optimal volume for calibrating the system or will accept the current volume. Adjust the volume if
required and retry the measurement.
The calibration volume should not be so loud that it is inconvenient to you, or that it causes damage
to your loudspeakers. If this is the case, set it to a lower and more appropriate level. A low volume can
result in a longer calibration time or a measurement time out. A low volume and long measurement will
not affect the quality of the end result.

26 27
Measuring the focus position
When the calibration volume has been set, RoomPerfect™ will send a range of tones to measure the
focus position.
If there is noise in the room, the measurement may take longer.
This will not affect the quality of the end result.
See RoomPerfect™ troubleshooting if the measurement will stop prematurely, and then retry the
measurement.
Measuring random room positions
When the focus position has been measured, the next step is to measure the acoustical properties of
the room. It is important to perform well spaced measurements to get a comprehensive image of the
acoustical properties of the room. See RoomPerfect™ troubleshooting if the measurement will stop
prematurely.
Keep taking measurements until RoomKnowledge reaches 90%.

28 29
These are the rules of thumb when measuring the room:
• the microphone should be in random and varying positions, heights, and orientations.
Point it up/down/sideways, the more random positions the better.
• the measurements should cover the entire room, not only your listening area.
• do not take measurements behind plants, furniture, ext.
0.5 m / 1.5ft
0.5 m / 1.5ft
Min.
0.5m /
1.5ft 1m /
3ft
• the microphone should not be be closer than 0.5m/1.5ft from the floor, ceiling and walls.
• the microphone should be at least 1m/3ft from the front of the loudspeakers.
• there should be at least 50cm/1.5ft between each measurement.
• do not take symmetrical measurements in the room.
Min.
0.5m
1.5ft
1m /
3ft
0.5 m / 1.5ft

30 31
Room measurements above 90% RoomKnowledge
When RoomKnowledge has reached 90%, you can decide to add room measurements or can elect to do it
at a later time. We recommend taking a couple of measurements within 50cm/.5ft of the walls and ceiling
when above 90% RoomKnowledge
To fully optimize RoomPerfect™’s understanding of the room’s acoustical properties, we recommend you
keep doing measurements until the RoomKnowledge is above 95%. The higher the RoomKnowledge, the
more accurate the room correction filters will be.
Calculation of focus and global filters
When room measurements are complete, the TDAI-2170 will calculate the focus and global filters
automatically.
0.5 m / 1.5ft
0.5 m / 1.5ft
Min.
0.5m /
1.5ft 1m /
3ft

www.lyngdorf.com
290114_v1.0
Other manuals for TDAI-2170
3
Table of contents
Other Lyngdorf Amplifier manuals