M-Elec MIRAGE Series User manual

Solar area lights
The Mirage series is the latest generation of high powered solar
area lights from M-Elec. With up to 100% brighter output and an
impressive 200lm/W efficacy across the range, the Mirage series
features true LiFePO4 battery technology and advanced PWM
solar charging to deliver continuous shining performance from
dusk till dawn. The smart remote allows effortless set up of motion
and dimming operation modes to maximise performance. Mirage
solar area lights also include a fully adjustable 80 x 150 degree
beam and slip fit pole mount bracket making installation fast and
final adjustments easy.
• 200lm/W efficacy
• LifePO4 battery technology
• Built in solar panel with advanced PWM solar charging
• Adjustable light module & mounting bracket
• Intergrated motion sensor
*1 year for battery
TECHNICAL INFORMATION
Total power consumed 8W
Power supply 17W Solar panel, 5.8AH LiFePO4 battery 36W Solar panel, 17.4AH LiFePO4 battery 54W Solar panel, 29AH LiFePO4 battery
Run time (full power)
Lumen Output
Efficacy
Color Temperature 5000K
CRI
Beam angle 80X150 (H X V)
Light module tilt ±40°
Charge time 7hrs
Dimmable Yes, via remote
Average life
LED Chip brand
LED Test
Temperature range
IP rating
Mounting method
Compliance
Construction
Kit includes
Net weight
Dimensions (LxWxH)
Warranty
year warranty
*1 year for battery
Solar area lights
The Mirage series is the latest generation of high powered solar
area lights from M-Elec. With up to 100% brighter output and an
impressive 200lm/W efficacy across the range, the Mirage series
features true LiFePO4 battery technology and advanced PWM
solar charging to deliver continuous shining performance from
dusk till dawn. The smart remote allows effortless set up of motion
and dimming operation modes to maximise performance. Mirage
solar area lights also include a fully adjustable 80 x 150 degree
beam and slip fit pole mount bracket making installation fast and
final adjustments easy.
• 200lm/W efficacy
• LiFePO4 battery technology
• Built in solar panel with advanced PWM solar charging
• Programmable operating modes via remote
• Adjustable light module & mounting bracket
• Integrated motion sensor
MLMSL8W MLMSL20W MLMSL30W
Total power con-
sumed: 8W 20W30W
Power supply: 17W Solar panel, AH LiFePO4 battery 36W Solar panel, 17.4AH LiFePO4 battery 54W Solar panel, 29AH LiFePO4 battery
Run time (full power): 7 hrs 9 hrs 10 hrs
Lumen output: 1600lm 4000lm 6000lm
Dimensions: L 500mm | W 290mm | H 80mm L 660mm | W 420mm | H 94mm L 900mm | W 420mm | H 94mm
Net weight: 6.6kg 11kg 14.8kg
Colour temperature: 5000K
CCT: Single CCT
CRI: 70+
Efficacy: 200lm/W
Beam angle: 80 x 150 H x V
Charge time: 7 hrs
Dimmable: Yes, via remote
Warranty: 5 Years warranty * 1 year for battery
Life: 50000hrs** (LED), up to 2000 cycles
(battery)
LED chip brand: Lumileds 5050
Body: Black
Mounting method: 4564mm slip fit adjustable pole mount
Light module tilt: ± 40°
Temperature range: 0° to 65°C
IP rating: IP65
LED tests: LM80
Accessories: Additional remote (ML-MSLRM)
Material type: Cast aluminium body, pc lens, stainless
fittings
Compliance: CISPR15 (EMC), UN38.3, Level 12 wind test,
EN 6059823:2003 + A1:2011
Kit includes: Solar light, instructions, remote control,
slip fit adjustable bracket
754mm
80mm
185mm
290mm
876mm
100mm
280mm
420mm
1154mm
120mm
280mm
420mm
*LiFePO4 solar battery & remote - 1 year warranty
**Average life is calculated on expected average lifespan
500mm 660mm
900mm
T. 1300 222 445 | www.melec.com.au For further information about our Warranties please go to: melec.com.au/legal/warranties
TECHNICAL INFORMATION
PRODUCT INFORMATION
Product information
INSTALLATION GUIDE
Pre-installation notes:
• The average full sun exposure period in the installation location
should be above 3.5 hrs per day in order to ensure a normal
battery function
• Always install the solar light in a position with the solar panel
facing the equator for charging optimisation (north in southern
hemisphere).
• For best results, adjust tilt to at least 15 degrees for northern
states and up to 35 degrees for southern states. This helps with
charging optimisation and self cleaning.
• Ensure the angle of the solar panel is adjusted to capture the
most sun and is away from shade where possible.
Pre-installation checks & tests:
• Please make sure you conduct these tests and checks before
mounting the solar light.
•
•
•
• If the red indicator light within the sensor is illuminated, cover
the panel and check if the solar light turns on (normally within 1
minute).
• If the green indicator light within the sensor is illuminated instead
are not included in each box but are available upon request. It
may require a few hours to charge the inbuilt battery.
•
below.
• We highly recommend charging all solar lights before installation
for a minimum of 4 hours before installation to ensure maximum
operation, particularly in times of minimal sunlight or areas of
• To ensure battery life, the solar lights should be charged every 3
months when unused.
• Ensure the pole or mounting surface you are installing the solar
light on is suitable for mounting the weight and wind effects on
the solar light.
Red light Greenlight
Slow blinking Lit Battery >10%
Lit Fully charged Slow blinking Battery <10%
Fast blinking Error
Light module
Sensor
Installation:
1.
2. Install the bracket onto the light and adjust the angle to suit the
installation (15-35 degrees recommended in instructions above).
3.
control. The default setting is induction mode 40%-100%.
4. Mount the solar light to the pole securely and adjust the LED
module angle to suit the installation.
Remote control operation & settings:
1. ON/OFF
disabled).
To sync the remote control with the light, press and release the
button. To test, press it once. After 10 seconds of test mode, the light
goes back to the previous mode.
This mode allows a constant 40% brightness (from dusk to dawn)
unless motion is detected and then increases to 100% output for 120
seconds.
4.
This mode allows a constant 20% brightness (from dusk to dawn)
unless motion is detected and then increases to 80% brightness for
30 seconds. This mode increases the run time of the light and is very
helpful for areas with decreased charging time frames.
“ON/OFF” Working/Standby key
Induction mode Suitable for areas and seasons with short sunshine time
Time control mode Suitable for areas and seasons with long sunshine time
Constant brightness mode Suitable for areas and seasons with long sunshine time
Test mode: Test the function of the product is normal
MPPT - DCLi controller LED indications and Faults & Alarms
Red indicator::
1. Under charging, the red light flashing slowly
2. Full charged, the red light stay lit
3. charge fault, the red light flashing quickly
Green indicator::
1. Battery power more than 10%, the green light stay lit
2. Battery power less than 10%, the green light flash slowly
Mode switching indication of remote control:
The light module will flash twice when the light fixture received the signal from remote control
last 2 minutes when it was triggered
last 2 minutes when it was triggered
8W:Light last 9.5 hours
20W:Light last 10 hours
30W:Light last 12 hours
8W:Light last 13.5 hours
20W:Light last 14 hours
30W:Light last 17 hours
8W:Light last 23.5 hours
20W:Light last 25 hours
30W:Light last 30 hours
light module
Red and green indicator
1
3
5
7
2
4
6
8
9
10
11
12
Induction mode
40% - 100%
Sync/test
Induction mode
20% - 80%
Time conrol
mode A
Time conrol
mode B
100%
70%
40%
Timer disabled
Timer mode 8H
Timer mode 4H
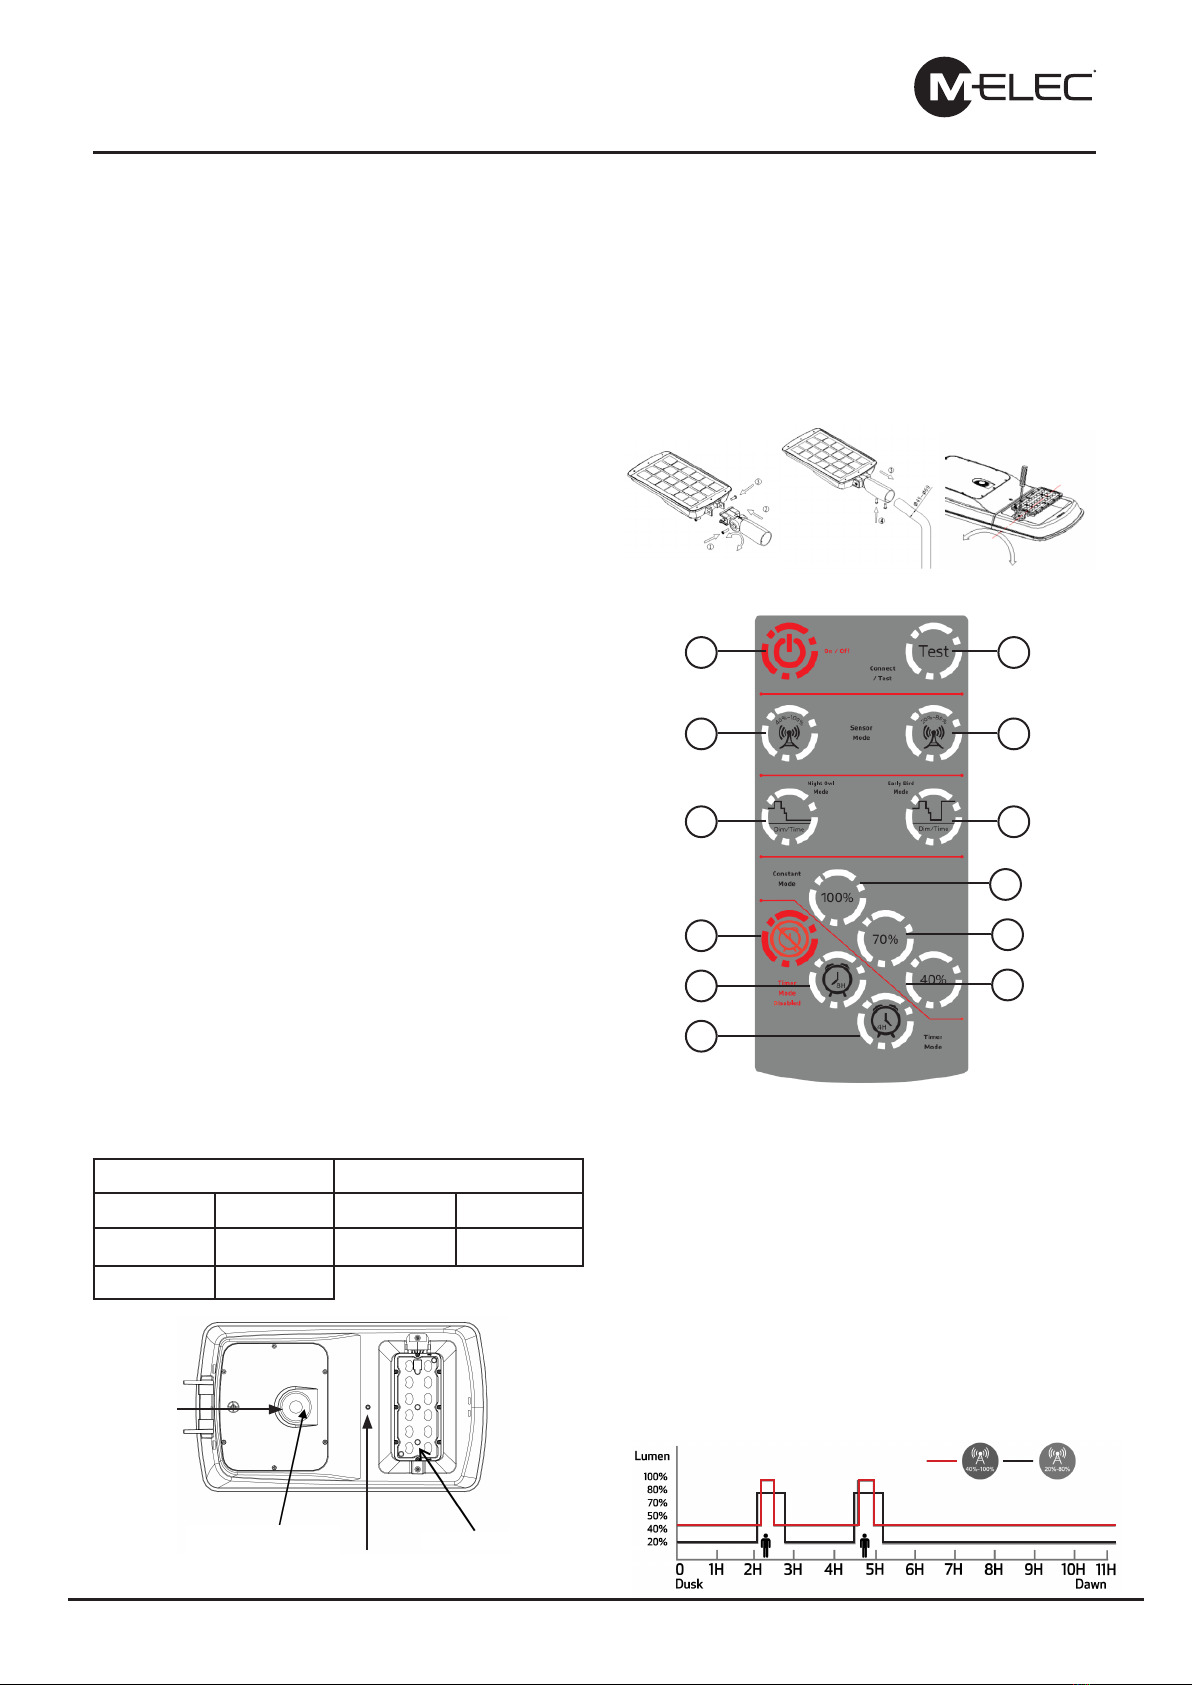
1. ON/OFF
Turn the light ON or OFF (when turned OFF solar charging is disabled).
2. Sync/test
To sync the remote control with the light, press and release the button. To test,
press it once. After 10 seconds of test mode, the light goes back to the previous
mode.
3. Induction mode 40% - 100%
This mode allows a constant 40% brightness (from dusk to dawn) unless motion is
detected and then increases to 100% output for 120 seconds.
4. Induction mode 20% - 80%
This mode allows a constant 20% brightness (from dusk to dawn) unless motion
is detected and then increases to 80% brightness for 30 seconds. This mode
increases the run time of the light and is very helpful for areas with decreased
charging time frames.
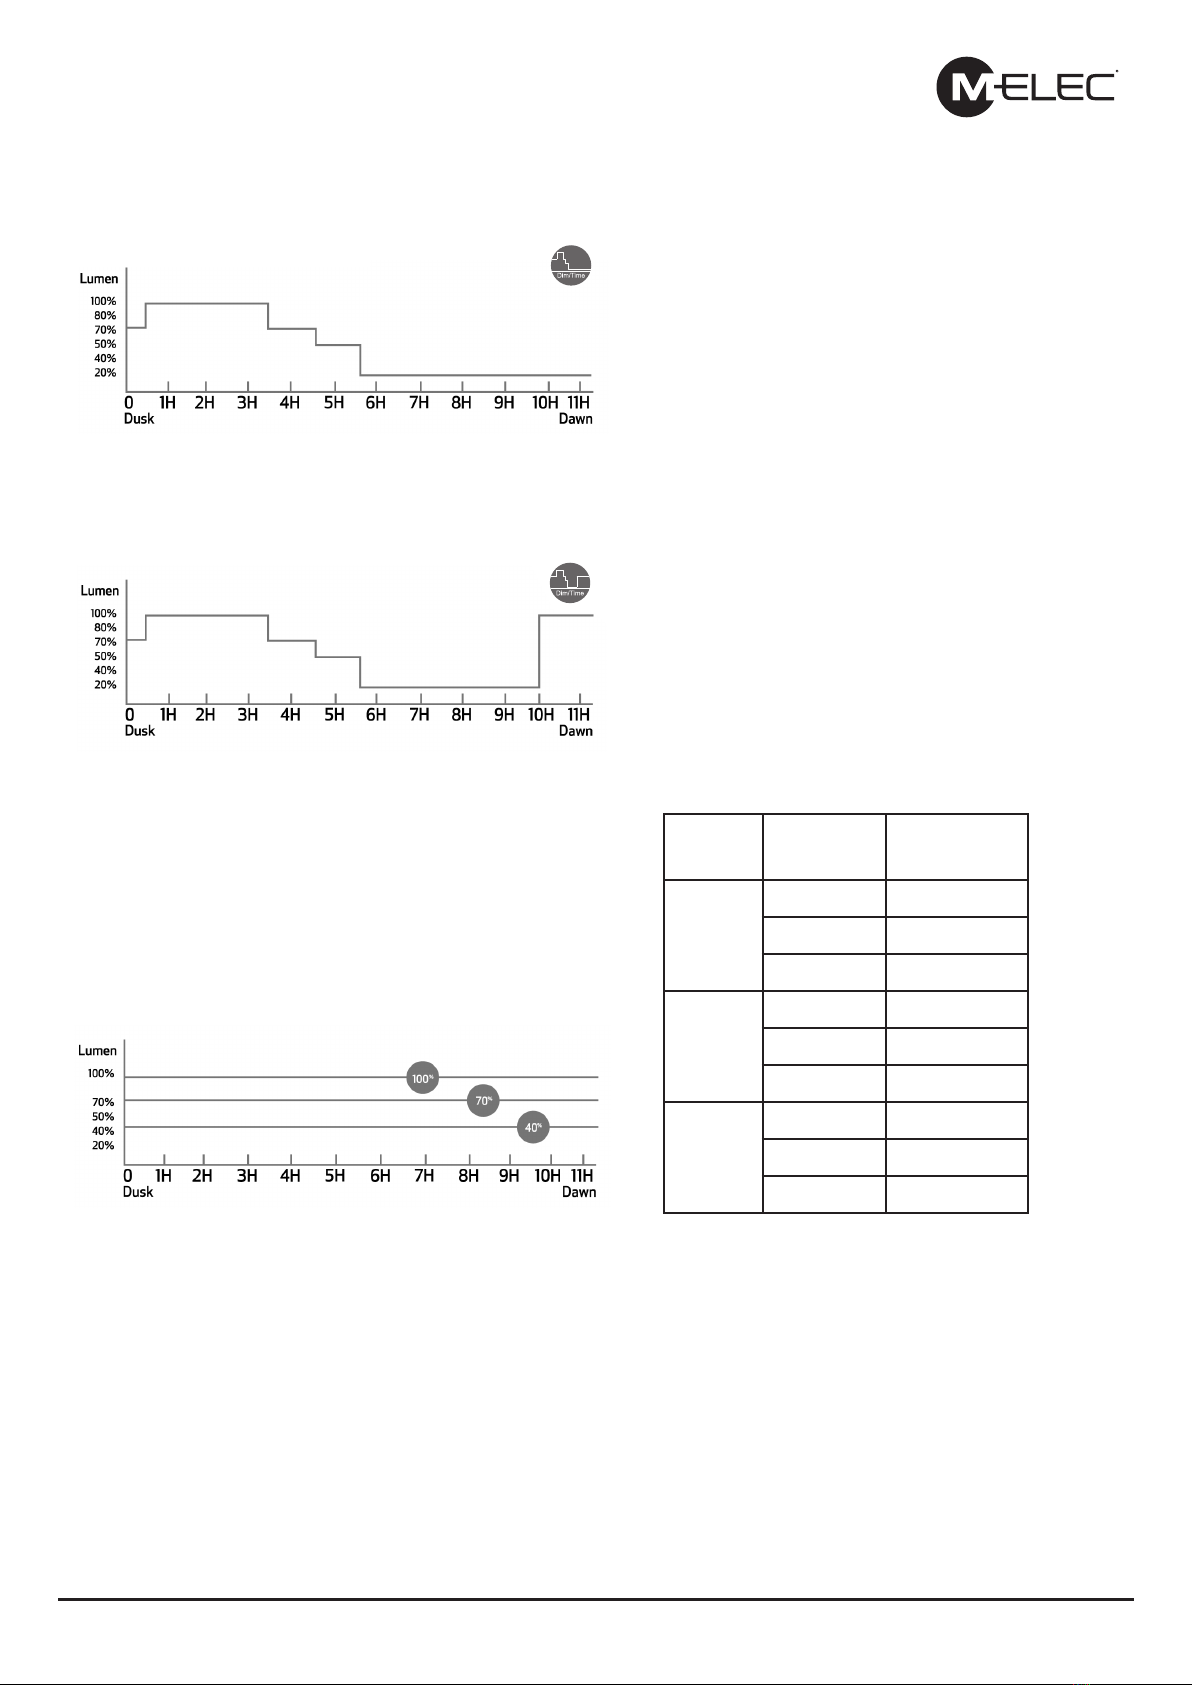
5. Time control mode A
This mode is a time based control mode. After dusk the first 0.5 hr is at 70%
brightness, the following 3 hrs is at 100% brightness, the following 1 hr is at 70%
brightness, the following 1hr is at 50% brightness, and then the final 5.5 hrs or until
dawn it is at 20% brightness.
6. Time control mode B
This mode is the second time based control mode. After dusk the first 0.5 hr is at
70% brightness, the following 3 hrs is at 100% brightness, the following 1 hr is at
70% brightness, the following 1 hr is at 50% brightness, the following 4.5 hrs is at
20% brightness and the final 1hr it is at 100% brightness.
PLEASE FOLLOW INSTRUCTIONS FOR CORRECT INSTALLATION!
• The average full sun exposure period in the installation location should be
above 3.5 hrs per day in order to ensure a normal battery function.
• Always install the solar light in a position with the solar panel facing the equator
for charging optimisation (north in southern hemisphere).
• For best results, adjust tilt to at least 15 degrees for northern states and up to
35 degrees for southern states. This helps with charging optimisation and self
cleaning.
• Ensure the angle of the solar panel is adjusted to capture the most sun and is
away from shade where possible.
• Please make sure you conduct these tests and checks before mounting the
solar light.
• Remove the security plug from the remote control.
• Press the ON/OFF button on the remote control.
• Check that the red indicator light within the sensor is illuminated.
• If the red indicator light within the sensor is illuminated, cover the panel and
check if the solar light turns on (normally within 1 minute).
• If the red indicator light within the sensor is not illuminated, use a charger
to charge the inbuilt battery. Chargers are not included in each box but are
available upon request. It may require a few hours to charge the inbuilt battery.
• Before installation ensure battery is charged. Reference diagram below.
• We highly recommend charging all solar lights before installation for a minimum
of 4 hours before installation to ensure maximum operation, particularly in times
of minimal sunlight or areas of limited sunlight. (lights need to be ON to enable
solar charging)
• To ensure battery life, the solar lights should be charged every 3 months when
unused.
• Ensure the pole or mounting surface you are installing the solar light on is
suitable for mounting the weight and wind effects on the solar light.
1. Remove the light and bracket from the box.
2. Install the bracket onto the light and adjust the angle to suit the installation (15-
35 degrees recommended in instructions above).
3. Use the remote control to set the operation mode. The light module will flash
twice when receiving signal from the remote control. The default setting is
induction mode 40%-100%.
4. Mount the solar light to the pole securely and adjust the LED module angle to
suit the installation.
Red light Green light
Slow blinking Charging Lit Battery >10%
Lit Fully charged Slow blinking Battery <10%
Fast blinking Error
ON/OFF Sync/test
Constant mode 100%Constant mode 70%
Induction mode
40% - 100%
Induction mode
20% - 80%
Constant mode 40%Timer disabled
Time control
mode A Time control
mode B
Timer mode 4 hours Timer mode 8 hours
Sensor Charging point
DC 14.6 V 3.75 A MAX
INSTALLATION INSTRUCTIONS
T. 1300 222 445 | www.melec.com.au For further information about our Warranties please go to: melec.com.au/legal/warranties
Pre-installation notes
Pre-installation checks & tests
Installation
Remote control operation & settings
T. 1300 222 445 | www.melec.com.au
melec.com.au/legal/warranties
Data subject to change, visit our website for up to date information
T. 1300 222 445 | www.melec.com.au
melec.com.au/legal/warranties
Data subject to change, visit our website for up to date information
Remote control operation & settings continued
5. Time control mode A
hr is at 70% brightness, the following 3 hrs is at 100% brightness,
the following 1 hr is at 70% brightness, the following 1hr is at 50%
brightness.
1. ON/OFF
Turn the light ON or OFF (when turned OFF solar charging is disabled).
2. Sync/test
To sync the remote control with the light, press and release the button. To test,
press it once. After 10 seconds of test mode, the light goes back to the previous
mode.
3. Induction mode 40% - 100%
This mode allows a constant 40% brightness (from dusk to dawn) unless motion is
detected and then increases to 100% output for 120 seconds.
4. Induction mode 20% - 80%
This mode allows a constant 20% brightness (from dusk to dawn) unless motion
is detected and then increases to 80% brightness for 30 seconds. This mode
increases the run time of the light and is very helpful for areas with decreased
charging time frames.
5. Time control mode A
This mode is a time based control mode. After dusk the first 0.5 hr is at 70%
brightness, the following 3 hrs is at 100% brightness, the following 1 hr is at 70%
brightness, the following 1hr is at 50% brightness, and then the final 5.5 hrs or until
dawn it is at 20% brightness.
6. Time control mode B
This mode is the second time based control mode. After dusk the first 0.5 hr is at
70% brightness, the following 3 hrs is at 100% brightness, the following 1 hr is at
70% brightness, the following 1 hr is at 50% brightness, the following 4.5 hrs is at
20% brightness and the final 1hr it is at 100% brightness.
PLEASE FOLLOW INSTRUCTIONS FOR CORRECT INSTALLATION!
• The average full sun exposure period in the installation location should be
above 3.5 hrs per day in order to ensure a normal battery function.
• Always install the solar light in a position with the solar panel facing the equator
for charging optimisation (north in southern hemisphere).
• For best results, adjust tilt to at least 15 degrees for northern states and up to
35 degrees for southern states. This helps with charging optimisation and self
cleaning.
• Ensure the angle of the solar panel is adjusted to capture the most sun and is
away from shade where possible.
• Please make sure you conduct these tests and checks before mounting the
solar light.
• Remove the security plug from the remote control.
• Press the ON/OFF button on the remote control.
• Check that the red indicator light within the sensor is illuminated.
• If the red indicator light within the sensor is illuminated, cover the panel and
check if the solar light turns on (normally within 1 minute).
• If the red indicator light within the sensor is not illuminated, use a charger
to charge the inbuilt battery. Chargers are not included in each box but are
available upon request. It may require a few hours to charge the inbuilt battery.
• Before installation ensure battery is charged. Reference diagram below.
• We highly recommend charging all solar lights before installation for a minimum
of 4 hours before installation to ensure maximum operation, particularly in times
of minimal sunlight or areas of limited sunlight. (lights need to be ON to enable
solar charging)
• To ensure battery life, the solar lights should be charged every 3 months when
unused.
• Ensure the pole or mounting surface you are installing the solar light on is
suitable for mounting the weight and wind effects on the solar light.
1. Remove the light and bracket from the box.
2. Install the bracket onto the light and adjust the angle to suit the installation (15-
35 degrees recommended in instructions above).
3. Use the remote control to set the operation mode. The light module will flash
twice when receiving signal from the remote control. The default setting is
induction mode 40%-100%.
4. Mount the solar light to the pole securely and adjust the LED module angle to
suit the installation.
Red light Green light
Slow blinking Charging Lit Battery >10%
Lit Fully charged Slow blinking Battery <10%
Fast blinking Error
ON/OFF Sync/test
Constant mode 100%Constant mode 70%
Induction mode
40% - 100%
Induction mode
20% - 80%
Constant mode 40%Timer disabled
Time control
mode A Time control
mode B
Timer mode 4 hours Timer mode 8 hours
Sensor Charging point
DC 14.6 V 3.75 A MAX
INSTALLATION INSTRUCTIONS
T. 1300 222 445 | www.melec.com.au For further information about our Warranties please go to: melec.com.au/legal/warranties
Pre-installation notes
Pre-installation checks & tests
Installation
Remote control operation & settings
6. Time control mode B
is at 70% brightness, the following 3 hrs is at 100% brightness, the
it is at 20% brightness.
7.
This mode offers 100% brightness from dusk till dawn. Suitable for
This mode offers 70% brightness from dusk till dawn. Suitable for
9.
This mode offers 40% brightness from dusk till dawn. Suitable for
7. Constant mode 100%
This mode offers 100% brightness from dusk till dawn. Suitable for areas and
seasons with sufficient sunlight charging during the day.
8. Constant mode 70%
This mode offers 70% brightness from dusk till dawn. Suitable for areas and
seasons with sufficient sunlight charging during the day.
9. Constant mode 40%
This mode offers 40% brightness from dusk till dawn. Suitable for areas and
seasons with sufficient sunlight charging during the day.
10. Timer disabled
This button is used to turn off “Timer mode”. Settings default to the mode
selected prior to timer activation.
11. Timer mode 4 hours
This mode turns the light completely off 4 hrs after dusk. For example: Press this
button at any time: if the light turns on at 7pm, it will turn off at 11pm. The mode
stays active until disabled with the “Timer disabled” button (10).
12. Timer mode 8 hours
This mode turns the light completely off 8hrs after dusk. For example: Press this
button at any time: if the light turns on at 7pm, it will turn off at 3am. The mode
stays active until disabled with the “Timer disabled” button (10).
T. 1300 222 445 | www.melec.com.au For further information about our Warranties please go to: melec.com.au/legal/warranties
Remote control operation & settings continued
• MUST BE INSTALLED BY LICENSED ELECTRICIAN
• Due to our policy of continuous product improvement, we reserve the right
to discontinue or update product specifications or designs at any time
without notice.
• Please visit www.melec.com.au for the latest information on our products.
PLEASE NOTE!
This button is used to turn off “Timer mode”. Settings default to the
mode selected prior to timer activation.
11.
This mode turns the light completely off 4 hrs after dusk. For
it will turn off at 11pm. The mode stays active until disabled with the
“Timer disabled” button (10).
This mode turns the light completely off 8hrs after dusk. For
it will turn off at 3am. The mode stays active until disabled with the
“Timer disabled” button (10).
1. ON/OFF
Turn the light ON or OFF (when turned OFF solar charging is disabled).
2. Sync/test
To sync the remote control with the light, press and release the button. To test,
press it once. After 10 seconds of test mode, the light goes back to the previous
mode.
3. Induction mode 40% - 100%
This mode allows a constant 40% brightness (from dusk to dawn) unless motion is
detected and then increases to 100% output for 120 seconds.
4. Induction mode 20% - 80%
This mode allows a constant 20% brightness (from dusk to dawn) unless motion
is detected and then increases to 80% brightness for 30 seconds. This mode
increases the run time of the light and is very helpful for areas with decreased
charging time frames.
5. Time control mode A
This mode is a time based control mode. After dusk the first 0.5 hr is at 70%
brightness, the following 3 hrs is at 100% brightness, the following 1 hr is at 70%
brightness, the following 1hr is at 50% brightness, and then the final 5.5 hrs or until
dawn it is at 20% brightness.
6. Time control mode B
This mode is the second time based control mode. After dusk the first 0.5 hr is at
70% brightness, the following 3 hrs is at 100% brightness, the following 1 hr is at
70% brightness, the following 1 hr is at 50% brightness, the following 4.5 hrs is at
20% brightness and the final 1hr it is at 100% brightness.
PLEASE FOLLOW INSTRUCTIONS FOR CORRECT INSTALLATION!
• The average full sun exposure period in the installation location should be
above 3.5 hrs per day in order to ensure a normal battery function.
• Always install the solar light in a position with the solar panel facing the equator
for charging optimisation (north in southern hemisphere).
• For best results, adjust tilt to at least 15 degrees for northern states and up to
35 degrees for southern states. This helps with charging optimisation and self
cleaning.
• Ensure the angle of the solar panel is adjusted to capture the most sun and is
away from shade where possible.
• Please make sure you conduct these tests and checks before mounting the
solar light.
• Remove the security plug from the remote control.
• Press the ON/OFF button on the remote control.
• Check that the red indicator light within the sensor is illuminated.
• If the red indicator light within the sensor is illuminated, cover the panel and
check if the solar light turns on (normally within 1 minute).
• If the red indicator light within the sensor is not illuminated, use a charger
to charge the inbuilt battery. Chargers are not included in each box but are
available upon request. It may require a few hours to charge the inbuilt battery.
• Before installation ensure battery is charged. Reference diagram below.
• We highly recommend charging all solar lights before installation for a minimum
of 4 hours before installation to ensure maximum operation, particularly in times
of minimal sunlight or areas of limited sunlight. (lights need to be ON to enable
solar charging)
• To ensure battery life, the solar lights should be charged every 3 months when
unused.
• Ensure the pole or mounting surface you are installing the solar light on is
suitable for mounting the weight and wind effects on the solar light.
1. Remove the light and bracket from the box.
2. Install the bracket onto the light and adjust the angle to suit the installation (15-
35 degrees recommended in instructions above).
3. Use the remote control to set the operation mode. The light module will flash
twice when receiving signal from the remote control. The default setting is
induction mode 40%-100%.
4. Mount the solar light to the pole securely and adjust the LED module angle to
suit the installation.
Red light Green light
Slow blinking Charging Lit Battery >10%
Lit Fully charged Slow blinking Battery <10%
Fast blinking Error
ON/OFF Sync/test
Constant mode 100%Constant mode 70%
Induction mode
40% - 100%
Induction mode
20% - 80%
Constant mode 40%Timer disabled
Time control
mode A Time control
mode B
Timer mode 4 hours Timer mode 8 hours
Sensor Charging point
DC 14.6 V 3.75 A MAX
INSTALLATION INSTRUCTIONS
T. 1300 222 445 | www.melec.com.au For further information about our Warranties please go to: melec.com.au/legal/warranties
Pre-installation notes
Pre-installation checks & tests
Installation
Remote control operation & settings
Model
mode
Light lasts
MSL8
100% 13 Hrs
70% 18.5 Hrs
40% 32 Hrs
MSL20
100% 11 Hrs
70% 15 Hrs
40% 27 Hrs
MSL30
100% 11.5 Hrs
70% 16 Hrs
40% 28 Hrs
T. 1300 222 445 | www.melec.com.au
melec.com.au/legal/warranties
Data subject to change, visit our website for up to date information
BATTERY AUTONOMY & OPERATING TIME
setting and the number of sensor activations of the Mirage solar light. An example of duration under
Model Power Setting Output Power
Watts
Output
Lumens
Operational
Time Hours
Days of Autonomy (2hr at 100%
8hr at 20%)
MSL30
30 6000 11.5 2.78
MSL20 20 4000 11 2.5
MSL8 8 1600 13 1.94
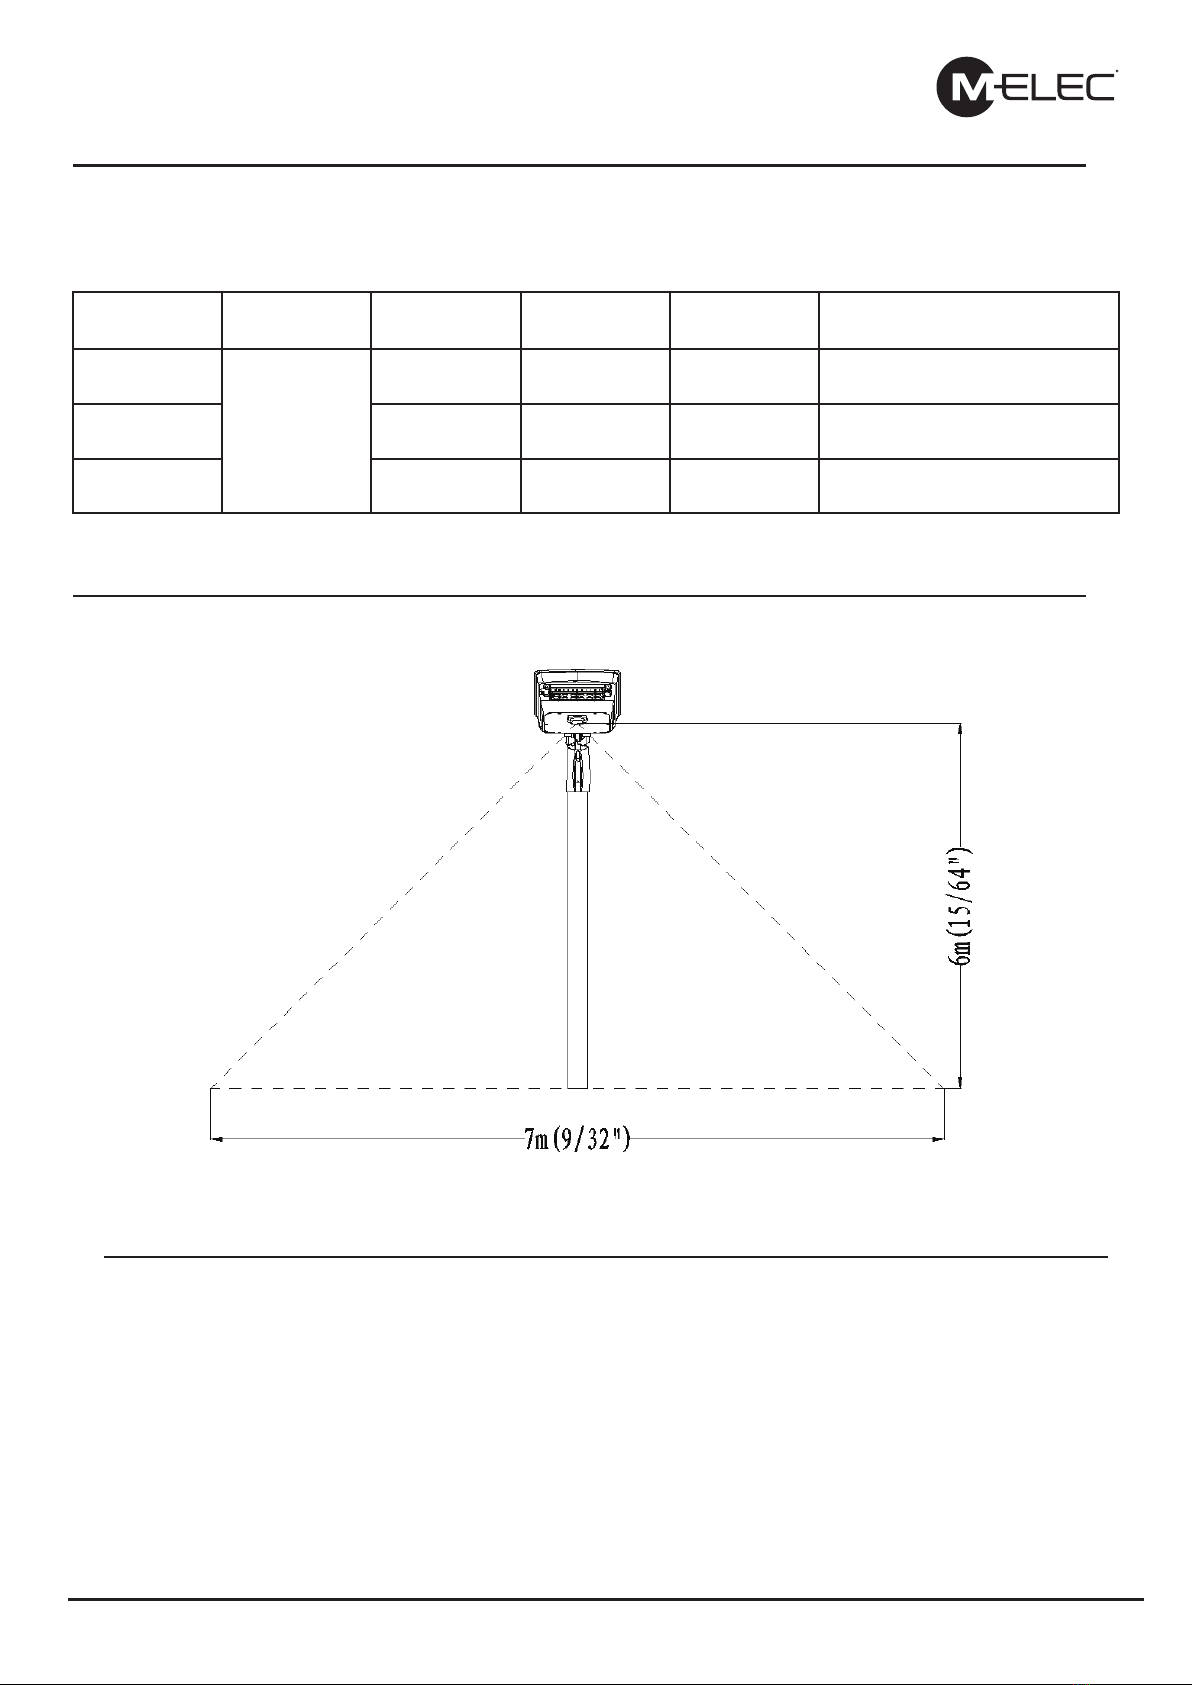
SENSE AREA DIAGRAM
PLEASE NOTE
•
• Disconnect power before installing or servicing
• This fitting is for outdoor use and should not be used in areas with limited ventilation or high ambient temperatures
• Do not extend low voltage cables from the output of power supply
• All components must not be mechanically stressed
• Be careful not to damage or destroy conductive paths on the circuit board
• 000)
•
under warranty
• Damage by corrosion will not be honoured as a material defect claim. It is the user’s responsibility to provide suitable protection against
corrosive agents such as moisture, condensation and other harmful elements

ONSITE WARRANTY
EXCLUSIVE TO
MEMBERS ONLY
FREE
MEMBERS ONLY
MEMBERS ONLY
F
F
R
R
E
E
E
E
O
O
N
N
S
S
I
I
T
T
E
E
W
W
A
A
R
R
R
R
A
A
N
N
T
T
Y
Y
F
F
O
O
R
R
3
3
Y
Y
E
E
A
A
R
R
S
S
I
I
N
N
C
C
L
L
U
U
D
D
E
E
S
S
P
P
A
A
R
R
T
T
S
S
&
&
L
L
A
A
B
B
O
O
U
U
R
R
_
_
_
_
_
_
_
_
_
_
_
_
_
_
_
_
_
_
_
_
_
_
_
_
_
_
_
_
_
_
_
_
_
_
_
_
_
_
_
_
_
_
_
_
_
_
_
_
_
_
_
_
_
_
_
_
_
_
_
_
_
_
_
_
_
_
_
_
_
_
_
_
_
_
_
_
I
I
n
n
c
c
o
o
n
n
j
j
u
u
n
n
c
c
t
t
i
i
o
o
n
n
w
w
i
i
t
t
h
h
y
y
o
o
u
u
r
r
s
s
t
t
a
a
n
n
d
d
a
a
r
r
d
d
p
p
r
r
o
o
d
d
u
u
c
c
t
t
w
w
a
a
r
r
r
r
a
a
n
n
t
t
y
y
Version 6
This manual suits for next models
6
Table of contents
Other M-Elec Outdoor Light manuals


Popular Outdoor Light manuals by other brands


Stahl
Stahl PanSiG 8013/3 Series operating instructions

Argos
Argos BELIZE TABLE LAMP instructions

BEGA
BEGA 84 061 Installation and technical information

Aveo Engineering
Aveo Engineering VeoLite PurpleTube Unit 254 Series manual

Somogyi
Somogyi home MX 639 instruction manual

Dale Tiffany
Dale Tiffany GT13266 Assembly instructions


