M-Elec ML-MSL8-W User manual
Solar area lights
DESIGN |FUNCTION |TRUSTwww.melec.com.au
Product information
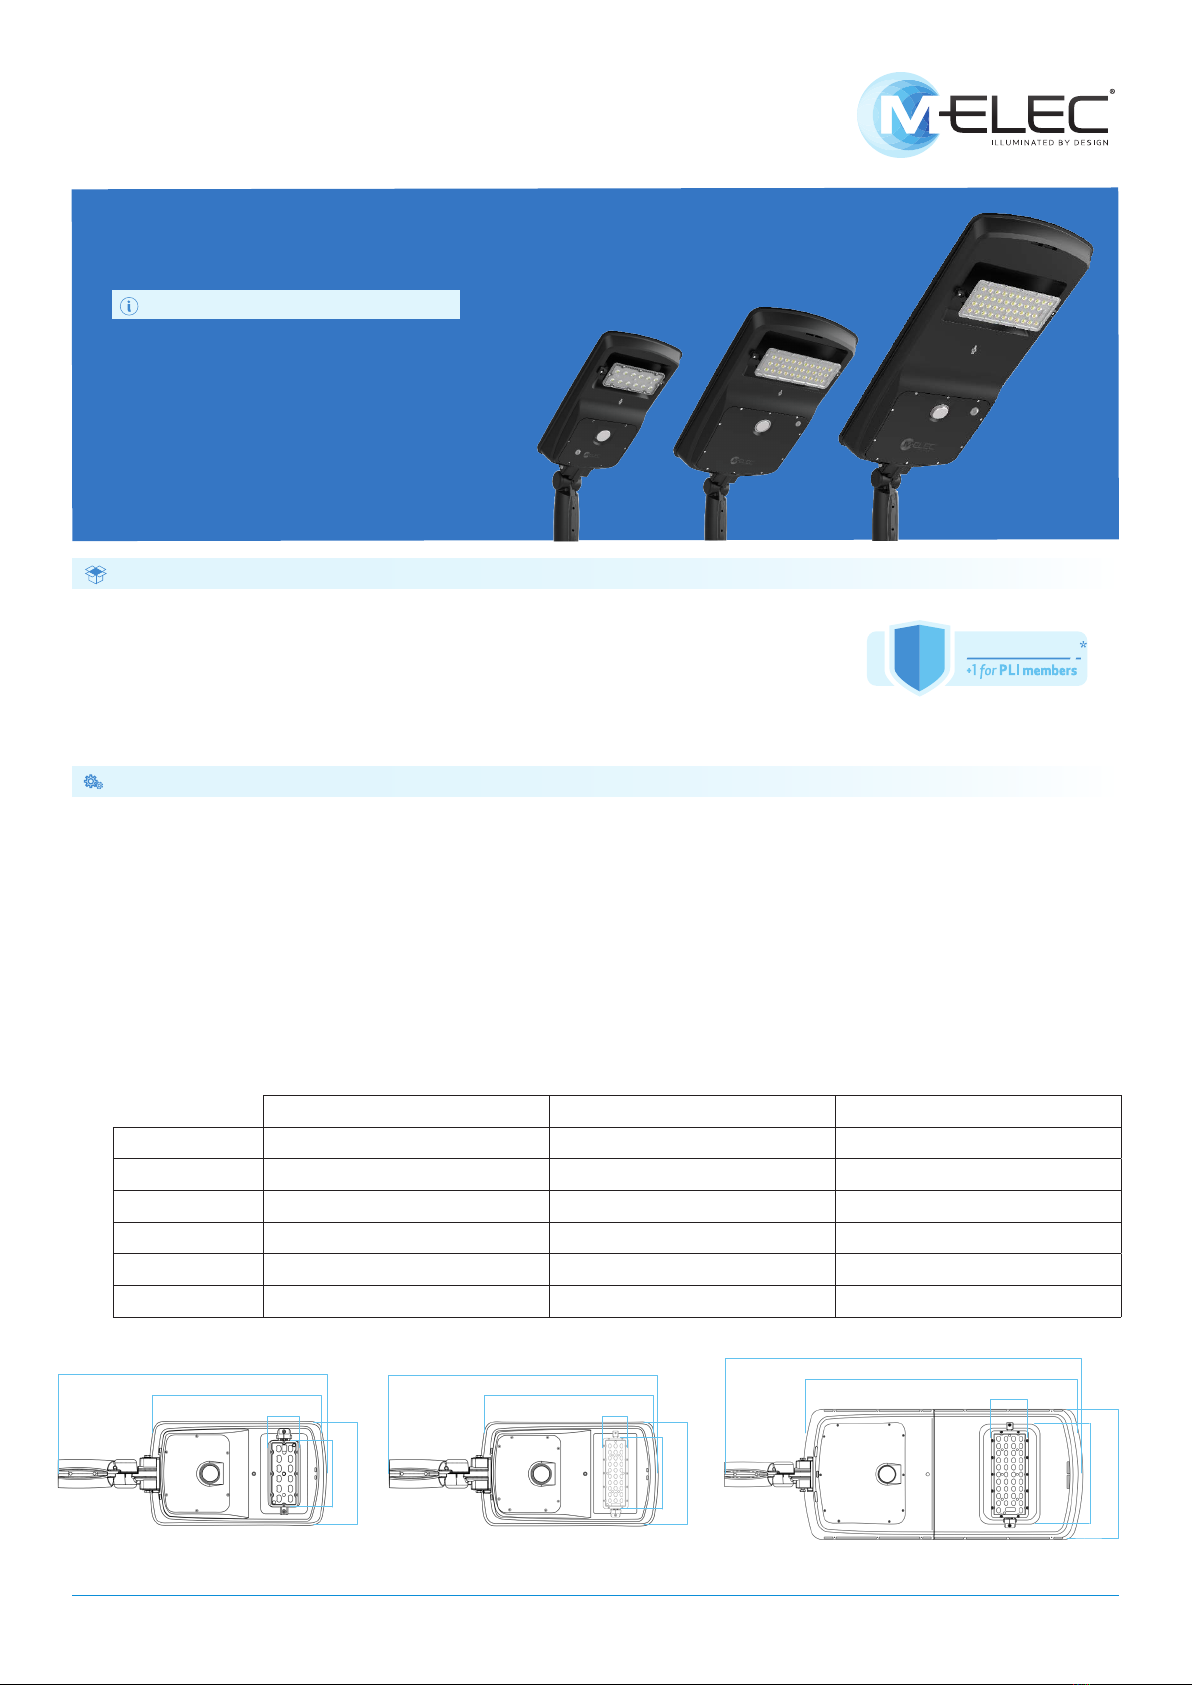
The Mirage series is the latest generation of high powered solar
area lights from M-Elec. With up to % brighter output and
an impressive lm/W efficacy across the range, the Mirage
series features true LiFePO baery technology and advanced
PWM solar charging to deliver continuous shining performance
from dusk till dawn. The smart remote allows effortless set up of
motion and dimming operation modes to maximise performance.
Mirage solar area lights also include a fully adjustable x
degree beam and slip fit pole mount bracket making installation
fast and final adjustments easy.
Mirage series solar area lights
Due to our policy of continuous product improvement, we reserve the right to discontinue or update product specifications
or designs at any time without notice. Please visit www.melec.com.au for the latest information on our products.
Features and benefits
- lm/W efficacy
- LiFePO baery technology
- Built in solar panel with advanced PWM solar charging
- Programmable operating modes via remote
- Adjustable light module & mounting bracket
-Integrated motion sensor
Technical details
MLMSLW MLMSLW MLMSLW
Total power consumed: 8W W W
Power supply: W Solar panel, .AH LiFePO baery W Solar panel, .AH LiFePO baery W Solar panel, AH LiFePO baery
Run time (full power): hrs hrs hrs
Lumen output: lm lm lm
Dimensions: Lmm | Wmm | Hmm Lmm | Wmm | Hmm Lmm | Wmm | Hmm
Net weight: .kg kg .kg
Colour temperature: K
CCT: Single CCT
CRI: +
Efficacy: lm/W
Beam angle: x H x V
Charge time: hrs
Dimmable: Yes, via remote
Warranty: Year warranty + PLI*
Life: hrs** (LED), up to cycles (baery)
LED chip brand: Lumileds
Body: Black
Mounting method: mm slip fit adjustable pole mount
Light module tilt: ± °
Temperature range: ° to °C
IP rating: IP6
LED tests: LM8
Accessories: Additional remote (ML-MSLRM)
Material type: Cast aluminium body, pc lens, stainless fiings
Compliance: CISPR (EMC), UN., Level wind test, EN
: A:
Kit includes: Solar light, instructions, remote control,
slip fit adjustable bracket
mm
mm
mm
mm
mm
mm
mm
mm
mm
mm
mm
mm
*LiFePO solar baery & remote - 1 year warranty
**Average life is calculated on expected average lifespan
mm mm mm
year warranty
2
PLEASE FOLLOW INSTRUCTIONS
FOR CORRECT INSTALLATION:
• The average full sun exposure period in the installation location should be above
. hrs per day in order to ensure a normal battery function.
• Always install the solar light in a position with the solar panel facing the equator
for charging optimisation (north in southern hemisphere).
• For best results, adjust tilt to at least degrees for northern states and up to
degrees for southern states.This helps with charging optimisation and self
cleaning.
• Ensure the angle of the solar panel is adjusted to capture the most sun and is
away from shade where possible.
Pre-installation notes
Pre-installation checks and tests
• Please conduct these tests and checks before mounting the solar light.
• Before installation, press the power switch and check that the red indicator light
within the sensor is illuminated. Place the solar light on a flat surface facing up
or cover the panel (to activate the night time mode) and check the light module
illuminates (normally within minute).
• Before installation ensure the battery is charged.
• Ensure the pole or mounting surface you are installing the solar light on is suitable
for mounting the weight and wind effects on the solar light.
Solar area lights
1. Remove the light and bracket from the box.
2. Install the bracket onto the light and adjust the angle to suit the installation (
degrees recommended in instructions above).
3. Press the power switch and check that the red light on the sensor is illuminated.
If not, press the ON/OFF button on the remote control. If the indicator light is still
not on, use a charger to charge the solar lights inbuilt battery. We recommend a
DCV A (MAX) charger.
4. Use the supplied remote control to set the operation mode.The light module will
flash twice when receiving signal from the remote control. The default setting is
induction mode %-%.
5. Mount the solar light to the pole securely and adjust the LED module angle to suit
the installation.
Installation
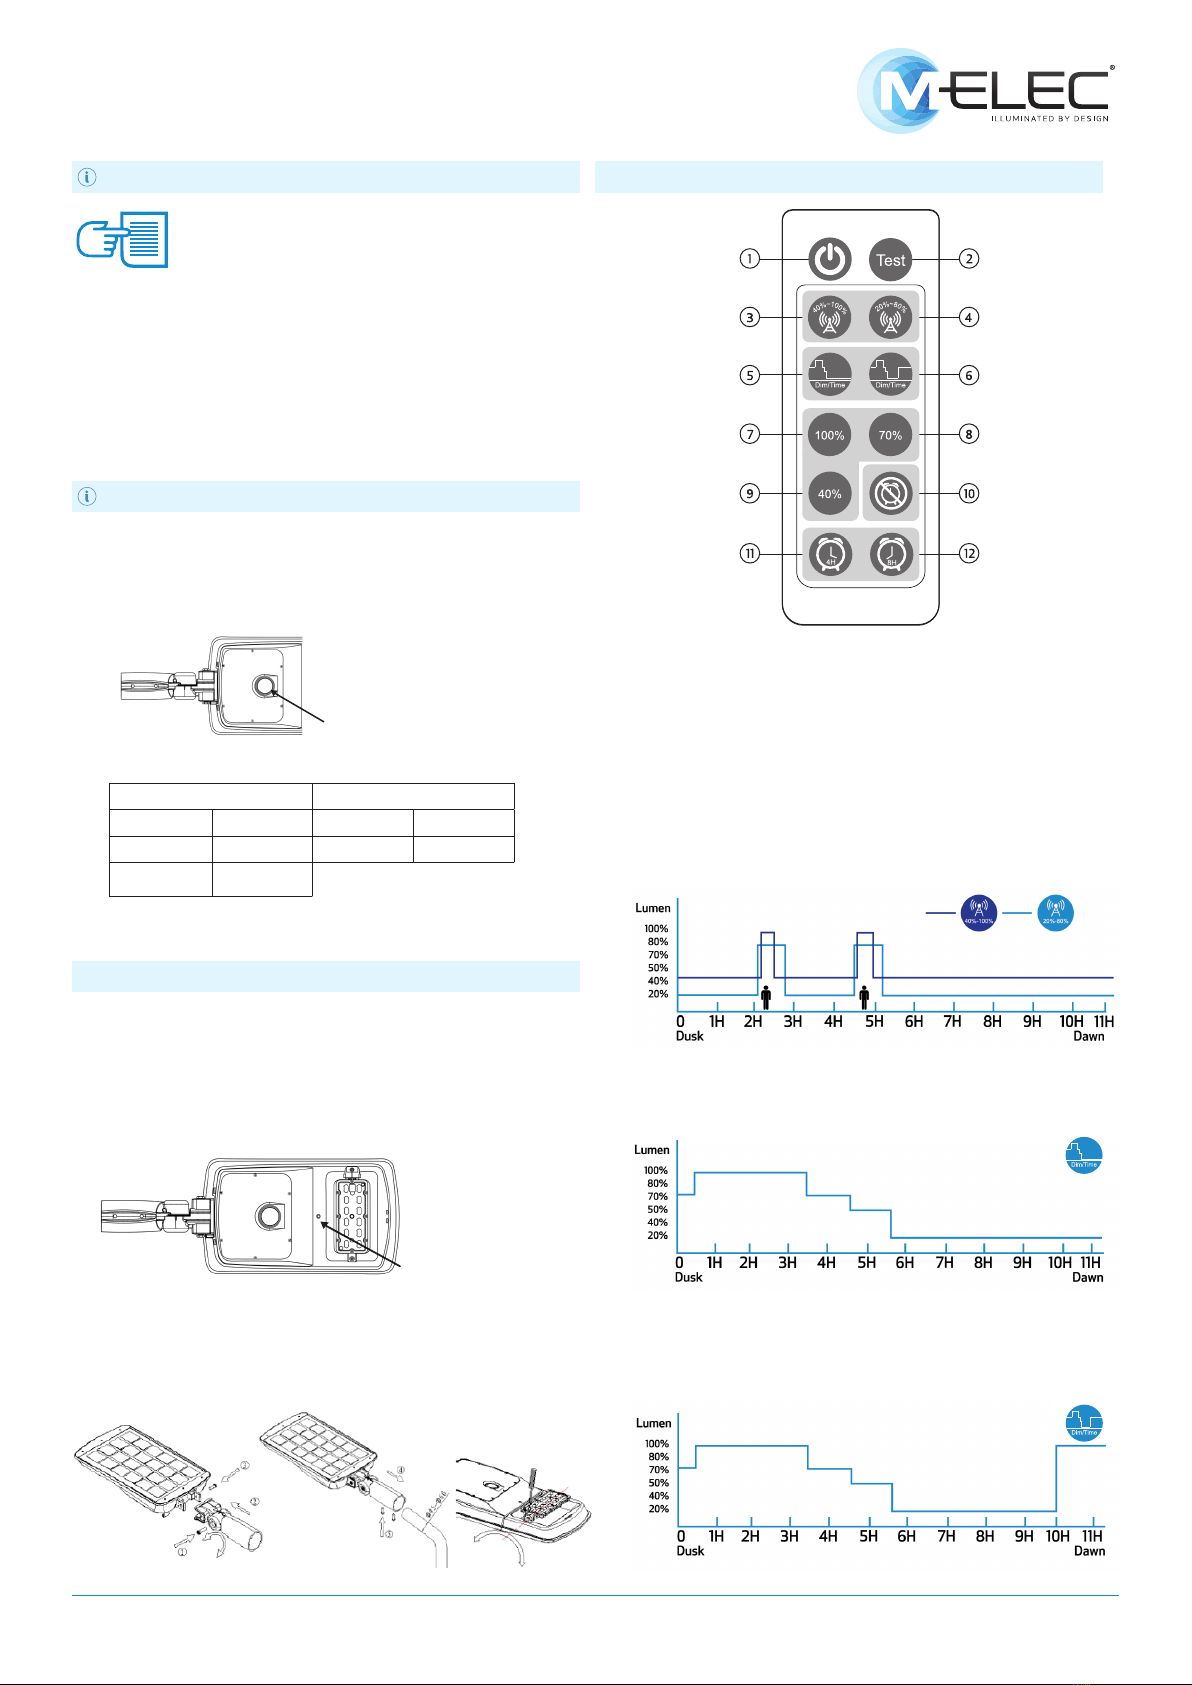
Remote control operation and seings
Red light Green light
Slow blinking Charging Lit Battery >%
Lit Fully charged Slow blinking Battery <%
Fast blinking Error
DESIGN |FUNCTION |TRUSTwww.melec.com.au Due to our policy of continuous product improvement, we reserve the right to discontinue or update product specifications
or designs at any time without notice. Please visit www.melec.com.au for the latest information on our products.
ON/OFF Sync/test
Constant mode % Constant mode %
Induction mode
% - %
Induction mode
% - %
Constant mode % Timer disabled
Time control
mode A Time control
mode B
Timer mode hours Timer mode hours
1. ON/OFF
Turn the light ON or OFF (when turned OFF solar charging is disabled).
2. Sync/test
To sync the remote control with the light, press and release the button. To test, press
it once. After seconds of test mode, the light goes back to the previous mode.
3. Induction mode % - %
This mode allows a constant % brightness (from dusk to dawn) unless motion is
detected and then increases to % output for seconds.
4. Induction mode % - %
This mode allows a constant % brightness (from dusk to dawn) unless motion is
detected and then increases to % brightness for seconds.This mode increases
the run time of the light and is very helpful for areas with decreased charging time
frames.
5. Time control mode A
This mode is a time based control mode. After dusk the first . hr is at %
brightness, the following hrs is at % brightness, the following hr is at %
brightness, the following 1hr is at % brightness, and then the final . hrs or until
dawn it is at % brightness.
6. Time control mode B
This mode is the second time based control mode. After dusk the first . hr is at
% brightness, the following hrs is at % brightness, the following hr is at
% brightness, the following hr is at % brightness, the following . hrs is at
% brightness and the final hr it is at % brightness.
Sensor
Charging point,
DC V A MAX

Warranty disclaimer
MELEC TRANSFORMERS/DRIVERS
M-Elec provides warranty against defects of M-Elec drivers on the following terms and conditions.
Please refer to the M-Elec website (below) for information on the warranty period of each product.
The driver must be properly installed by a qualified electrician and in accordance with our installation
guidelines and any relevant codes and standards.
The warranty does not apply to M-Elec drivers that fail as a result of neglect, mistake, misuse,
alteration, exposure to the elements, or that is improperly installed and implemented.This includes
but is not limited to: improper wiring, installation under improper and non-approved operating
environments such as temperature, humidity, corrosion or voltage conditions; improper installation
using components that are not approved or are not M-Elec manufactured products.
It is the responsibility of the purchaser to obtain all necessary approvals and to understand the
products intended use and all relevant instructions, recommendations and guidelines for the proper
installation and use of any M-Elec driver product and related ‘manufactured products’ used in
conjunction with same.
M-Elec is not liable for the accuracy and completeness of any statements, technical information and
recommendations in any form of product literature or instructions are not guaranteed and are not part
of this warranty and does not in any way constitute a warranty. The purchaser is solely responsible for
determining suitability of the M-Elec drivers for installation and full implementation must determine
potential applications and installations independently.
To make a claim on this warranty, you must do so within the warranty period (from place of purchase)
please read our returns policy for further information (hps://melec.com.au/returns-policy/) and
deliver the driver to M-Elec (at your cost) at the address listed on website. We will assess the warranty
claim and if we grant the warranty claim, we will replace the product or refund your money, at our
election.
M-Elec is not responsible or liable for any injuries, damages, or death caused by the use, misuse or
failure of products purchased from us.This warranty is in addition to any other rights the consumer
may have under the Australian Consumer Law.
MELEC LED PRODUCTS OTHER
Please refer to the M-Elec website (melec.com.au) for information on the warranty period of each
product. Each of our LED product warranties is separate and subject to the following terms and
conditions:
M-Elec products must be properly installed by a qualified electrician and in accordance with any
relevant guidelines, codes and standards.This includes wiring and connection to proper approved
components and product working environments.
This warranty is void and does not apply to products that fail as a result of neglect, mistake
misuse, alteration, or that is improperly installed and implemented.This includes but is not limited
to: improper wiring, installation under improper and non-approved operating environments such as
temperature, humidity, corrosion or voltage conditions; improper installation using components that are
not approved or are not M-Elec manufactured products.
It is the responsibility of the purchaser to obtain all necessary approvals and to understand the products
intended use and all relevant instructions, recommendations and guidelines for the proper installation and
use of any M-Elec products and related ‘manufactured products’ used in conjunction with same.
M-Elec is not liable for the accuracy and completeness of any statements, technical information and
recommendations in any form of product literature or instructions are not guaranteed and are not part
of this warranty and does not in any way constitute a warranty. The purchaser is solely responsible
for determining suitability of the M-Elec LED products for installation and full implementation must
determine potential applications and installations independently.
The LED product warranties do not cover LEDs that continue to light, but exhibit varying/differing forward
voltage drops, light output, or colour/wavelength.
Warranty is void if LEDs are cut in any way (outside of LED strip instructions) or damaged by neglect.
Warranty is void if products have been altered, opened/modified in any way that is outside the bounds of
normal electrical work. Please note: This does not include removing or hard wiring downlight drivers or the
hard wiring of a flex on an M-Elec flood light.
To make a claim on any of M-Elec’s products, you must do so within the warranty period (from place
of purchase) please read our returns policy for further information (hps://melec.com.au/returns-
policy/) and deliver the product to M-Elec (at your cost) at the address listed online. M-Elec will assess
the warranty claim by conducting electrical tests, making sure the contacts still exist on the LED and
visual and microscopic inspection to make sure there is no visible physical damage. If M-Elec grants the
warranty claim, we will replace the product or refund your money, at our election.
M-Elec is not responsible or liable for any injuries, damages, or death caused by the use, misuse or
failure of products purchased from us.This warranty is in addition to any other rights the consumer may
have under the Australian Consumer Law.
To the fullest extent permied by law, no warranties other than those described above are given in
respect of M-Elec products. M-Elec’s liability is limited, to the fullest extent permied by law, to the
refund or replacement of the M-Elec products. We expressly do not warrant that an M-Elec product will
last any particular length of time nor guarantee is made as to fitness to a particular application, since we
have no control of the electrical supply or circuits you are using to drive the LEDs.
M-Elec goods come with guarantees that cannot be excluded under the Australian Consumer Law.
Please read our returns policy procedure for further information on M-Elec website melec.com.au or
request it via phone from our customer care consultants.
Installation accessories and installation
Solar area lights
Remote control operation and seings cont.
7. Constant mode %
This mode offers % brightness from dusk till dawn. Suitable for areas and
seasons with sufficient sunlight charging during the day.
8. Constant mode %
This mode offers % brightness from dusk till dawn. Suitable for areas and
seasons with sufficient sunlight charging during the day.
9. Constant mode %
This mode offers % brightness from dusk till dawn. Suitable for areas and
seasons with sufficient sunlight charging during the day.
10. Timer disabled
This button is used to turn off “Timer mode”. Settings default to the mode selected
prior to timer activation.
11. Timer mode hours
This mode turns the light completely off hrs after dusk. For example: Press this
button at any time: if the light turns on at pm, it will turn off at pm. The mode
stays active until disabled with the “Timer disabled” button ().
12. Timer mode 8 hours
This mode turns the light completely off 8hrs after dusk. For example: Press this
button at any time: if the light turns on at pm, it will turn off at am. The mode
stays active until disabled with the “Timer disabled” button ().
DESIGN |FUNCTION |TRUSTwww.melec.com.au Due to our policy of continuous product improvement, we reserve the right to discontinue or update product specifications
or designs at any time without notice. Please visit www.melec.com.au for the latest information on our products.
This manual suits for next models
6
Other M-Elec Outdoor Light manuals


