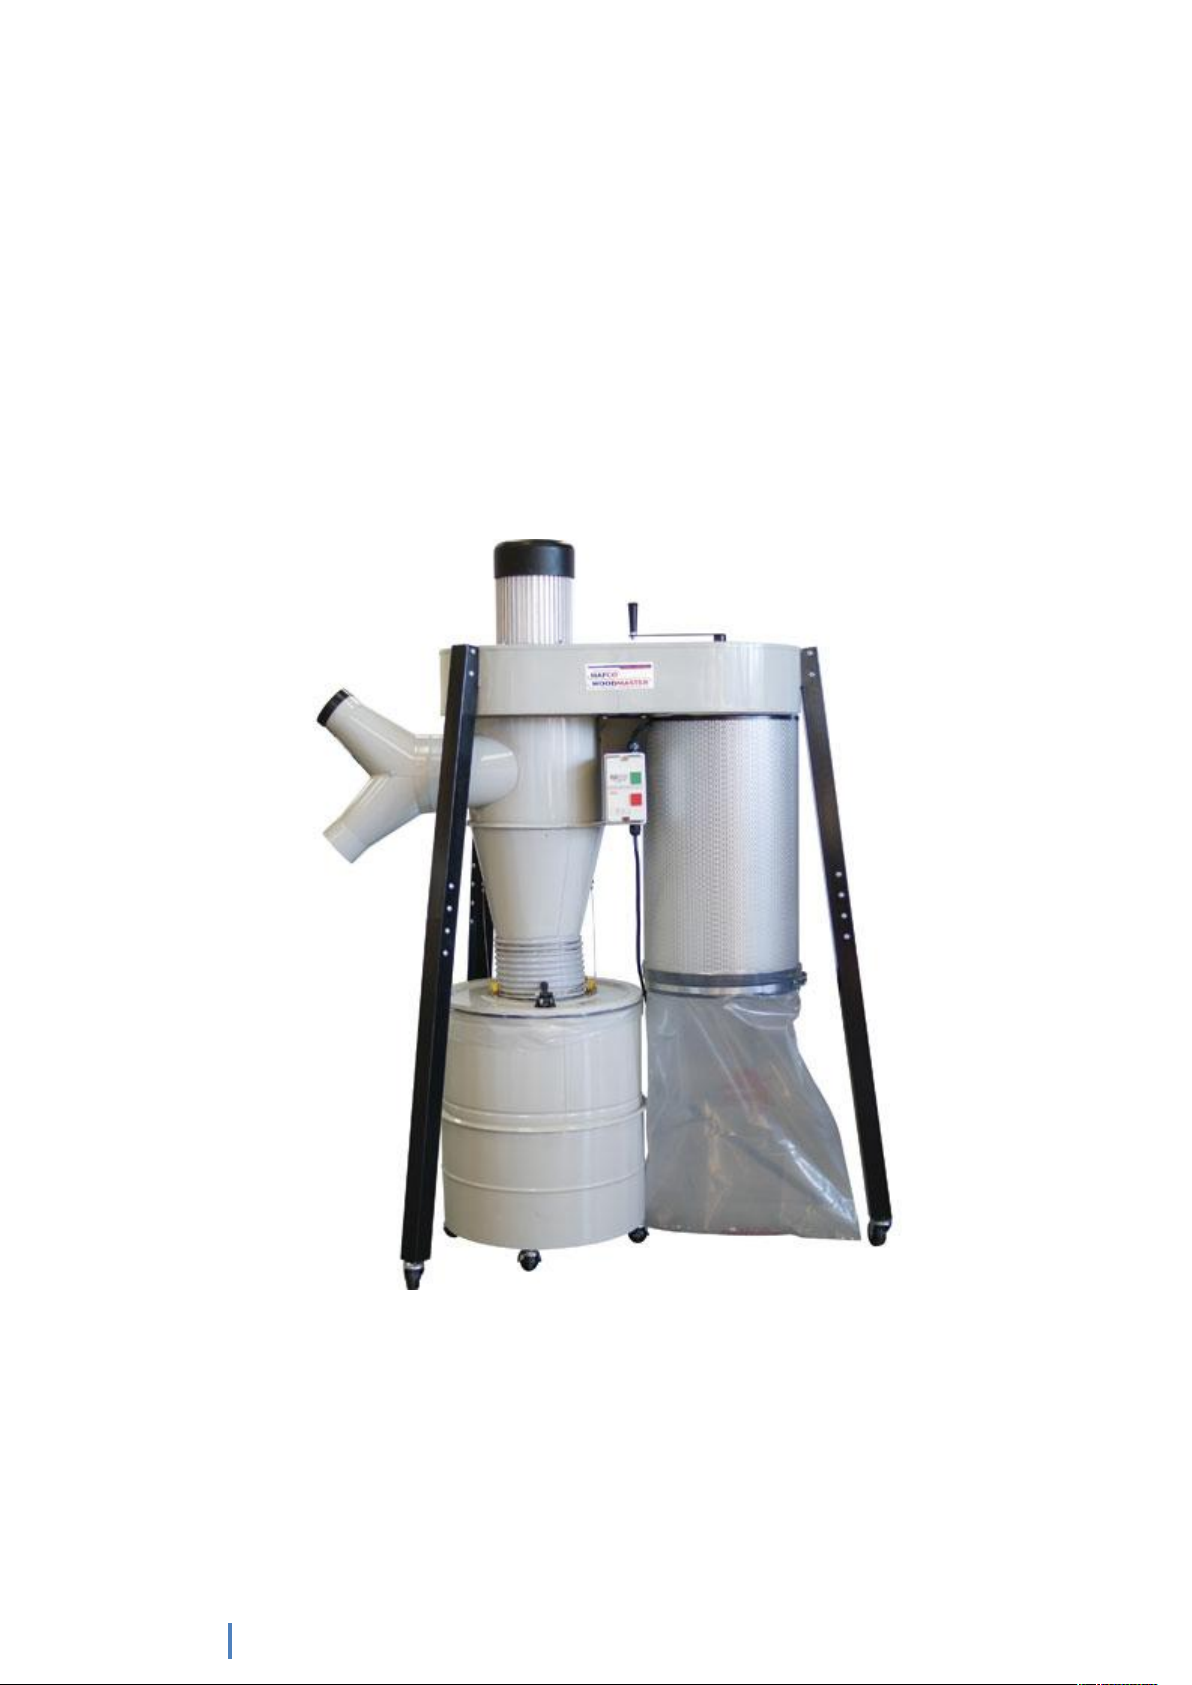
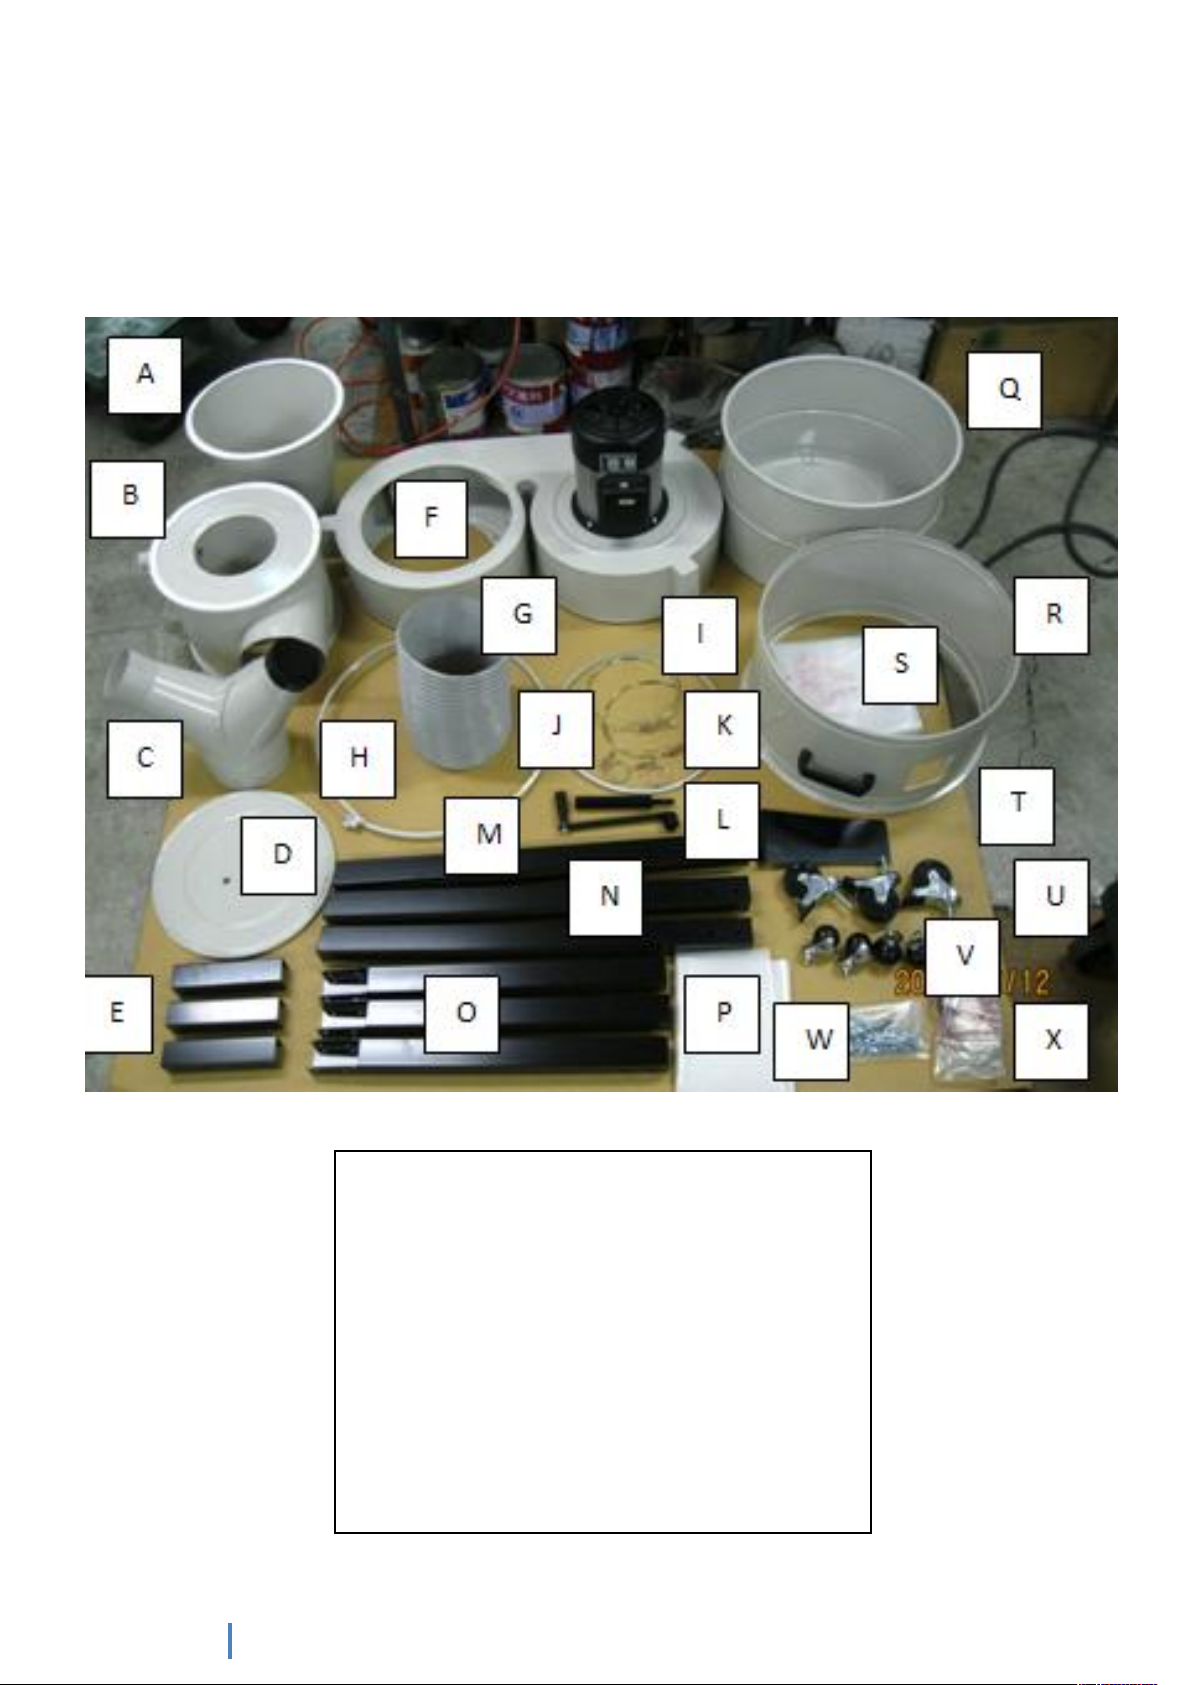
MachineryHouse Hafco Woodmaster CD-2 User manual

1
29-6-11
HAFCO WOODMASTER
# W317
CD-2
CANISTER DUST COLLECTOR

2

3

4
INVENTORY LIST
A. Reducing Collector M. N Type Handle
B. Round Collector N. Lower Leg
C.7”*4” Y-adapter O. Upper Leg
D. Housing Cover P. PE Bag (Small)
E. Connecting Bracket Q. Lower Dust Drum
F. Main Housing Assembly R. Upper Dust Drum
G. 8”Hose S. PE Bag(Big)
H. Round Clamp (L) T. Switch Plate
I. Round Clamp(S) U. Caster
J. 1-3/4”Hose Clamp V. Ball Caster
K. 8” Hose Clamp W. Hardware Bag
L. Connecting Spindle X. Belt Clamp

5
Machine Assembly
Step 2 Fit legs to body
Use the packaging removed out of the carton under the upside down main unit to steady it to assemble
the legs on.
The use of a soft face hammer to tap the legs on the bracket will assist.
Fit the end bolts first
Then push leg in towards the unit to fit the upper ones
Step 1.Assemble Legs
Connect the upper leg with connecting bracket by 5/16”
button HD Screw
Connect the Lower Leg with connecting bracket by 5/16”
button HD Screw
Screw on the swivel castors to the bottom each leg
Fit these First

6
Step 4 Fit switch
Step 6 Turn unit upright onto its Legs now!
3 People will be needed to do this to avoid damage to Legs of machine.
Step 3 Round Collector Assembly
Place the Round Collector with main Housing as photo
fix by M5 x 10 socket head cap screws ., Note the
position of the small pipe coming out and the large
inlet pipe in the side of the Collector.
Step 5 Assembly Canister with Main Housing
Carefully turn dust collector on its side to assist in the
assembly of the main filter to the housing
Use 6 x Flange head 5/16” x 3/4” long Whitworth bolts
supplied.
Step 7 Assemble Canister Filter Spindle .
Place the connecting Spindle on the Canister spindle as
photo and fix by 2 pcs M6 Cap Screw
Assemble the Magnetic Switch
Place the Magnetic Switch under the Main Housing as
photo and fixing by 5/16” Flange bolt.
Small
Pipe

7
Step 8 Fit top lid
Please the main Housing cover with Main Housing
and fit as photo M5 x 10 socket head cap screws.
Step 9 Assembly canister filter cleaning Handle
Place the N Type Handle on the Canister and fix by the
M6 set Screw.
Assemble the Y-adapter to the intake round collector
suction port and fix by 3/16”Round HD Screw
Step 11 Assemble dust drum
Assemble Dust Drum
Fix the 2” Ball Caster under the lower dust drum as
photo
Step 10 Assembly Y-Adaptor
Fit as shown and fasten with 3 x 3/16” Round Head
screws

8
Step 12.
Place the upper dust drum with lower dust drum as
photo and connecting by the big round clamp. Fix the
Round Clamp by 1/4”*4” L Hex Screw and Nut.
When fitting top drum half on top of bottom base
centralize it the best you can then fit clamp and
tighten it progressively while lightly tapping on the
clamp ring with a soft face hammer around the
outside.
Step 13.
Fit Handle to Drum using 2 off ¼” x ¾” long
Truss head bolt as shown, with Washer and
dome nut fitted on inside.
Step 14.
Please the big PE Bag inside the dust drum.
And try to get air between the Drum and
PE bag out as much as better as photo.

9
Ensure
Step 17
Fit Static Earth wire
Place this assembly on top of the mobile collection
drum
Step 15 Assemble reducer cone to drum lid
Assemble Lid-Flexible hose and top cone as shown.
Noting the position of the earth wire coming of cone is
at rear of lid assembly
The hose is a tight fit and the careful use of a pair of
pliers and or screwdriver as a lever will assist in its
assembly!
Step 16
Drum Lid open system cable fixing
Pull up one of two Drum Lid open system cable and
using the 1/4 Hex bolt to fixing on the screw hold of
reducing collector and tighten from inside by the 1/4”
nylock nut.
Do as above method to fix the other cable

10
Step 18 Reducer Collector Assembly
Wheel the Drum/lid assembly under the machine with the lid lever to the front of machine (Switch side)
Step 19 Small PE Bag Installation
Place the small PE bag as the photo on the canister
button and fixing by the Belt clamp.
Step 20 Assemble the 1-1/2” Hose
Step 1.
Slide the 1-1/2” hose as photo on the 38mm
tube of the round collector and fix by the1-3/4”
hose clamp.
Place the Reducing Collector with Round
Collector as photo. And connecting by small
Round Clamp fix by 1/4” *4”L Hex Screw and 1/4”
Nut
When fitting centralize it the best you can then
fit clamp and tighten it progressively while lightly
tapping on the clamp ring with a soft face
hammer around the outside

11
Now . The cyclone is ready for running testing
Step 21.
Slide the 1-1/2” hose the other side as photo on the
38mm tube of the dust drum and fix by the1-3/4” hose
clamp.

12
Part Diagram
N TYPE HANDLE
Auto Clean System
HANDLE

13
Part List
ITEM NO.
Description
Q'TY
1
MOTOR
1
2
COLLECTOR BODY SET
1
3
12''-3/4"IMPELLER(2HP&3HP)
1
4
COLLECTOR
1
5
REDUCING CONNECTOR
1
6
FRONT SUPPORT LEG
3
7
ㄇ TYPE CONNECTOR BOARD
3
8
LOWER REAR SUPPORT LEG
3
9
8"HOSE
1
10
LARGE PLASTIC BAG
1
11
SMALL PLASTIC BAG
1
12
DRUM SUPPORT WHEEL
4
13
WHEEL
3
14
CLAMP
1
15
HOSE
1
16
HANDLE
1
17
MAGNETIC SWITCH BOARD
1
18
MAGNETIC SWITCH 2HP
1
19
8"HOSE CLAMP
2
20
1-3/4"HOSE CLAMP
2
21
1.5mm WIRE
2
22
MOTOR CORD
1
23
POWER CORD
1
24
OPEN DEVICE
1
25
BOTTOM HEAD SCREW 3/16x1
31
26
5/16"*1/2"HEX HEAD SCREW
8
27
3/8"*1-1/2"HEX HEAD SCREW
4
28
3/8" NUTS
4
29
PHILLIPS HEAD SCREWM5_10mm
10
30
370 BELT CLAMP
1
31
1/2" NUTS
3
32
HEX SOCKET SCREW 5/16"
36
33
HEX SOCKET SCREW M6_16mm
1
34
WASHER
1
35
HANDLE
1
36
NUTS 1/4
2
37
PHILLIPS HEAD SCREW1/4
2

14
38
SPONGE
1
39
CANISTER WINDOW
1
40
M5 RIVET
1
41
CAP
1
42
BUSHING
1
43
RUBBER FLAP
3
44
BEAR FIXING BOARD
2
45
HEX. HEAD BOLT M6x10L
6
46
PHILLIPS HEAD SCREW1/4''x4''
2
47
FLAT WASHER1/4"x18
2
48
1/4'' NUT
2
49
LOWER CANISTER
1
50
BLET CLAMP
1
51
UPPER DRUM 150H
1
52
Y-INLET
1
53
LOWER FIXING BOARD
2
54
CANISTER SPINDLE
1
55
200H DRUM UPPER COVER
1
56
RIVET
8
57
CANISTER
1
OPTION
AUTO
ITEM NO.
PARTS LIST
Q'TY
1
MOTOR
1
2
REDUCTION DEVICE
1
3
UPPER SWEEP
1
4
LOWER SWEEP
1
5
CANISTER SPINDLE
1
6
HEX. HEAD BOLT M6_10mm
2
7
B171-006 COLLECTOR BODY
1
OPTION
HAND
ITEM NO.
PARTS LIST
Q'TY
1
SHAFT COUPLING
1
2
MAIN SPINDLE
1
3
HEX. HEAD BOLTM6_10mm
2

General Machinery Safety Instructions
1. Read the entire Manual before starting
machinery. Machinery may cause serious injury if
not correctly used.
2. Always use correct hearing protection when
operating machinery. Machinery noise may cause
permanent hearing damage.
3. Machinery must never be used when tired, or
under the influence of drugs or alcohol. When
running machinery you must be alert at all times.
4. Wear correct Clothing. At all times remove all loose
clothing, necklaces, rings, jewelry, etc. Long hair
must be contained in a hair net. Non-slip protective
footwear must be worn.
5. Always wear correct respirators around fumes
or dust when operating machinery. Machinery
fumes & dust can cause serious respiratory illness.
Dust extractors must be used where applicable.
6. Always wear correct safety glasses. When
machining you must use the correct eye protection
to prevent injuring your eyes.
7. Keep work clean and make sure you have good
lighting. Cluttered and dark shadows may cause
accidents.
8. Personnel must be properly trained or well
supervised when operating machinery. Make
sure you have clear and safe understanding of the
machine you are operating.
9. Keep children and visitors away. Make sure
children and visitors are at a safe distance for you
work area.
10. Keep your workshop childproof. Use padlocks,
Turn off master power switches and remove start
switch keys.
11. Never leave machine unattended. Turn power off
and wait till machine has come to a complete stop
before leaving the machine unattended.
12. Make a safe working environment. Do not use
machine in a damp, wet area, or where flammable
or noxious fumes may exist.
13. Disconnect main power before service
machine. Make sure power switch is in the off
position before re-connecting.
14. Use correct amperage extension cords.
Undersized extension cords overheat and lose
power. Replace extension cords if they become
damaged.
15. Keep machine well maintained. Keep blades
sharp and clean for best and safest performance.
Follow instructions when lubricating and changing
accessories.
16. Keep machine well guarded. Make sure guards
on machine are in place and are all working
correctly.
17. Do not overreach. Keep proper footing and
balance at all times.
18. Secure workpiece. Use clamps or a vice to
hold the workpiece where practical. Keeping the
workpiece secure will free up your hand to operate
the machine and will protect hand from injury.
19. Check machine over before operating. Check
machine for damaged parts, loose bolts, Keys and
wrenches left on machine and any other conditions
that may effect the machines operation. Repair and
replace damaged parts.
20. Use recommended accessories. Refer to
instruction manual or ask correct service officer
when using accessories. The use of improper
accessories may cause the risk of injury.
21. Do not force machinery. Work at the speed and
capacity at which the machine or accessory was
designed.
22. Use correct lifting practice. Always use the
correct lifting methods when using machinery.
Incorrect lifting methods can cause serious injury.
23. Lock mobile bases. Make sure any mobile bases
are locked before using machine.
24. Allergic reactions. Certain metal shavings and
cutting fluids may cause an ellergic reaction in
people and animals, especially when cutting as the
fumes can be inhaled. Make sure you know what
type of metal and cutting fluid you will be exposed
to and how to avoid contamination.
25. Call for help. If at any time you experience
difficulties, stop the machine and call you nearest
branch service department for help.
Machinery House
requires you to read this entire Manual before using this machine.

Metal & Wood Dust Collector Safety Instructions
1. Maintenance. Make sure the Dust collector is
turned off and disconnect from the main power
supply and make sure all moving parts have come to
a complete stop before any inspection, adjustment
or maintenance is carried out.
2. Dust collector Condition. Dust collector must be
maintained for a proper working condition. Never
operate a Dust collector that has damaged or
worn parts. Scheduled routine maintenance should
performed on a scheduled basis.
3. Inlet Hazard. Do not place hands or tools near the
open inlets during operation for any reason. The
impeller could cause serious damage to body parts if
touched while spinning.
4. Avoiding Entanglement. Guards and dust bags
must be used at all times. Remove loose clothing,
belts, or jewelry items. Tie up long hair and use the
correct hair nets to avoid any entanglement with the
Dust collector.
5. Understand the machines controls. Make sure you
understand the use and operation of all controls.
6. Power outage. In the event of a power failure
during use of the Dust collector, turn off all switches
to avoid possible sudden start up once power is
restored.
7. Work area hazards. Keep the area around the Dust
collector clean from oil, tools, chips. Pay attention to
other persons in the area and know what is going on
around the area to ensure unintended accidents.
8. Hearing protection and hazards. Always wear
hearing protection as noise generated from dust
collector can cause permanent hearing loss over
time.
9. Dust Collector use. This Dust Collector is designed
to be used with wood & Metal only. Do not pick
up material that can not safety pass through the
impeller.
10. Fire Hazard. Ensure machines and hoses are
thoroughly cleaned inside and out of all wood
dust and chips before using this machine for steel
dust. Ensure the dust extraction hose used is heat
resistant and flame retardant and a minimum length
of 2 meters between machine and dust collector.
11. Bags & guards. All safety bags and guards must
be used at all times. Bags must be replaced when
damaged.
12. Emptying bags hazard. Always wear a respirator
and safety glasses when emptying dust into
approved containers and dispose of properly.
13. Wood dust may cause allergic reactions. Make
sure you know what type of dust you are exposed
to as it may cause you an allergic reaction. Always
wear an approved respirator.
14. Call for help. If at any time you experience
difficulties, stop the machine and call you nearest
branch service department for help.
Machinery House
requires you to read this entire Manual before using this machine.

Manager:
Ensure machines and hoses are thoroughly cleaned inside and out of all wood dust and chips
before using this machine for steel dust.
Ensure the dust extraction hose used is heat resistant and flame retardant and a minimum length
of 2 meters between machine and dust collector
Revised Date:
www.machineryhouse.com.au
www.machineryhouse.co.nz
Aug-08
OTHER HAZARDS, NOISE.
H
ELECTRICAL
MEDIUM
Plant Safety Program to be read in conjunction with manufactures instructions
All electrical enclosures should only be opened with a tool that is not to be kept with the machine.
Ensure hose remains fitted to prevent access to fan blade.
Wear hearing protection as required.
MEDIUM
LOW
Risk Control Strategies
(Recommended for Purchase / Buyer / User)
Isolate power to machine prior to any checks or maintenance being carried out.
Ensure dust collector is on level solid ground and in a safe place to avoid tipping.
Keep body parts away from moving parts.
Do not adjust or clean dust collector until fully stopped.
B
M
CRUSHING
PUNCTURING
Assessment
O
HIGH TEMPERATURE or FIRE
C
PLANT SAFETY PROGRAM
No.
Hazard
Identification
Hazard
Metal & Wood Dust Collector
Safety officer:
LOW
Developed in Co-operation Between A.W.I.S.A and Australia Chamber of Manufactures
This program is based upon the Australian Worksafe Standard for Plant(NOHSC:1010-1994)
NEW MACHINERY HAZARD IDENTIFICATION, ASSESSMENT & CONTROL
Item
Authorised and signed by:
MEDIUM
CUTTING, STABBING,
This manual suits for next models
1
Table of contents
Other MachineryHouse Dust Collector manuals
Popular Dust Collector manuals by other brands

Metabo
Metabo SPA 1200 Original operating instructions

Powermatic
Powermatic PM1900TX Instructions and parts manual

Woodstock
Woodstock SHOP FOX W1809 owner's manual

Oneida Air Systems
Oneida Air Systems Super Dust Gorilla owner's manual

Blastrac
Blastrac BDC-66 Service manual

Grizzly
Grizzly G0785 owner's manual

Ebmpapst
Ebmpapst NOVA FLAIR TAIFUN II Premium GreenTech operating instructions

Contec
Contec TORNADO B instruction manual

Lumberjack
Lumberjack UDE130 Safety and operating manual

Delta
Delta 50-820 instruction manual

Power Fist
Power Fist 8353229 user manual

Rikon Power Tools
Rikon Power Tools 60-100 instruction manual