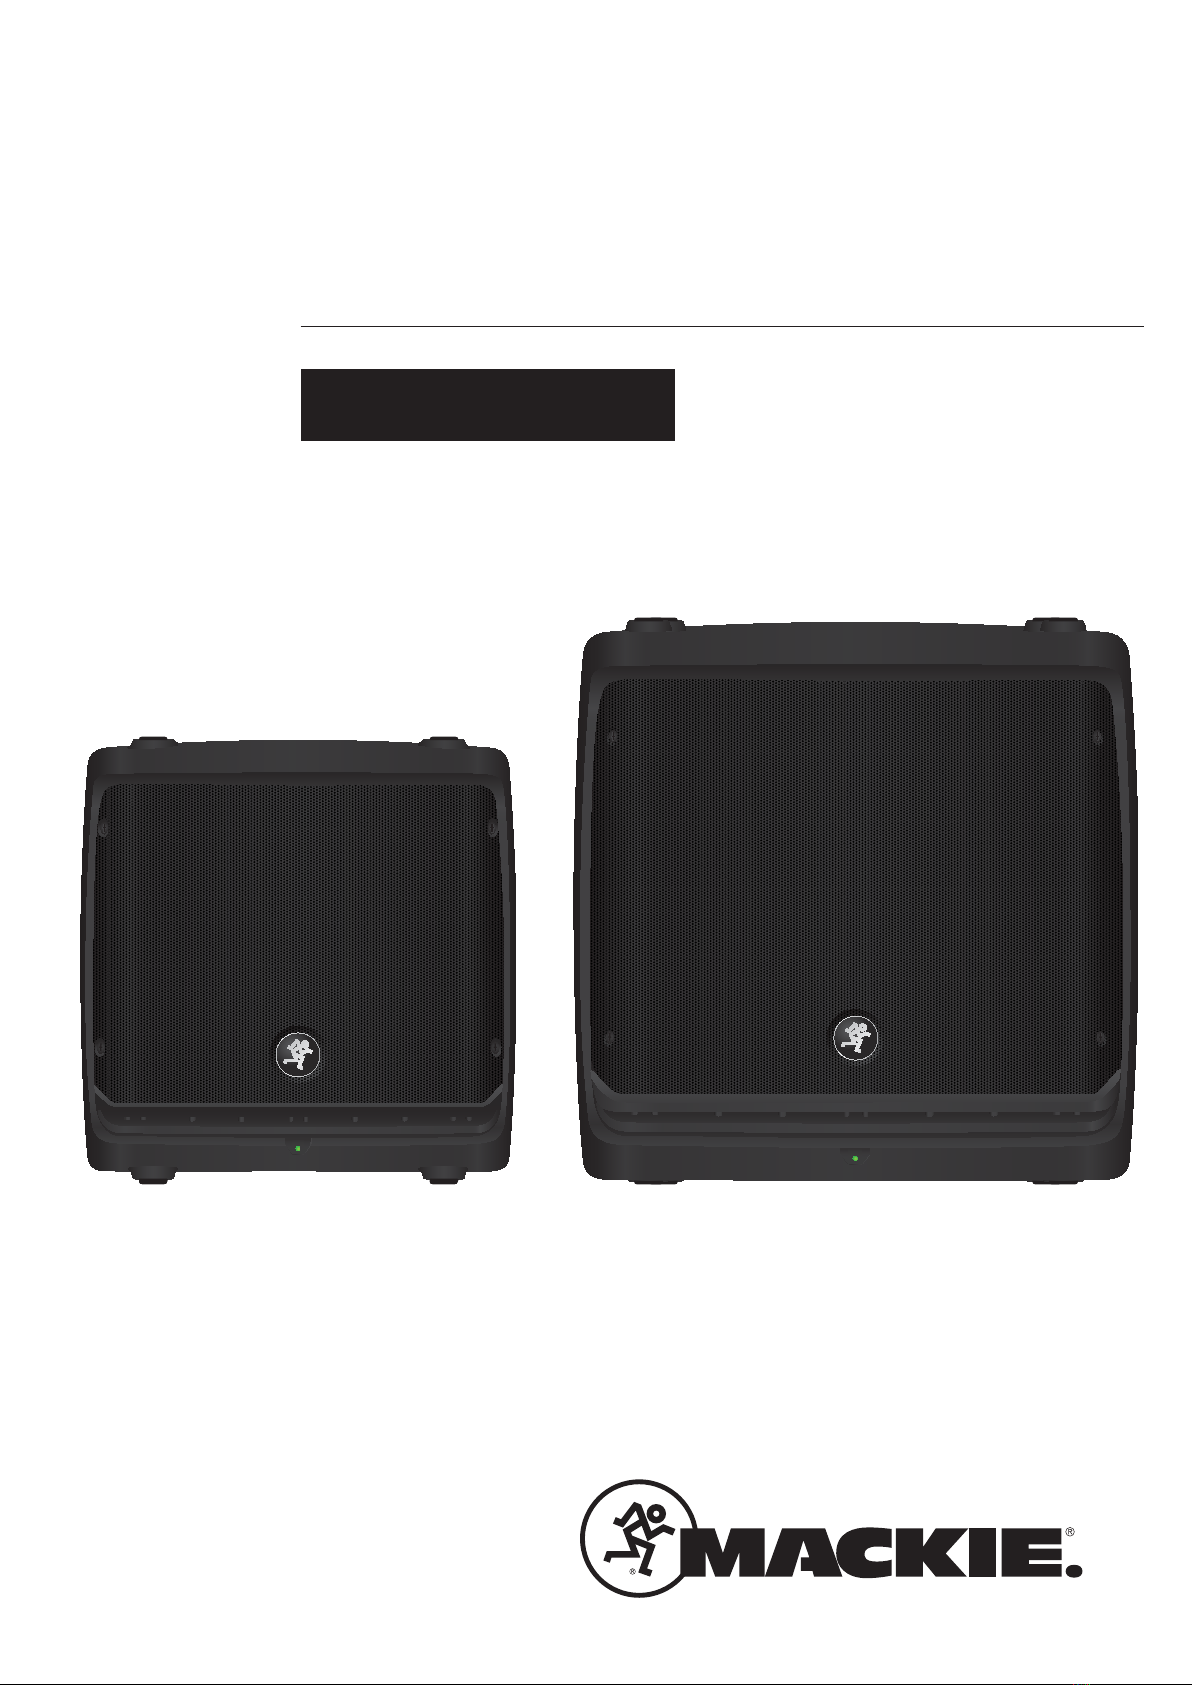
Mackie DLM12 User manual

OWNER’S MANUAL
2000W Powered Loudspeakers with DL2 Digital Mixer
DLM8 and DLM12

DLM8/12 Powered Loudspeakers
2
DLM8/12 Powered Loudspeakers
1. Read these instructions.
2. Keep these instructions.
3. Heed all warnings.
4. Follow all instructions.
5. Do not use this apparatus near water.
6. Clean only with a dry cloth.
7. Do not block any ventilation openings. Install in accordance with the manu-
facturer’s instructions.
8. Do not install near any heat sources such as radiators, heat registers, stoves,
or other apparatus (including amplifiers) that produce heat.
9. Do not defeat the safety purpose of the polarized or grounding-type plug.
A polarized plug has two blades with one wider than the other. A grounding-
type plug has two blades and a third grounding prong. The wide blade or
the third prong are provided for your safety. If the provided plug does not fit
into your outlet, consult an electrician for replacement of the obsolete outlet.
10.
Protect the power cord from being walked on or pinched particularly at plugs,
convenience receptacles, and the point where they exit from the apparatus.
11.
Only use attachments/accessories specified by the manufacturer.
12.
Use only with a cart, stand, tripod, bracket, or table
specified by the manufacturer, or sold with the
apparatus. When a cart is used, use caution when
moving the cart/apparatus combination to avoid injury
from tip-over.
13.
Unplug this apparatus during lightning storms or when
unused for long periods of time.
14.
Refer all servicing to qualified service personnel. Servicing is required when
the apparatus has been damaged in any way, such as power-supply cord
or plug is damaged, liquid has been spilled or objects have fallen into the
apparatus, the apparatus has been exposed to rain or moisture, does not
operate normally, or has been dropped.
15.
This apparatus shall not be exposed to dripping or splashing, and no object
filled with liquids, such as vases or beer glasses, shall be placed on the
apparatus.
16.
Do not overload wall outlets and extension cords as this can result in a risk
of fire or electric shock.
17.
This apparatus has been designed with Class-I construction and must be
connected to a mains socket outlet with a protective earthing connection
(the third grounding prong).
18.
This apparatus has been equipped with a rocker-style AC mains power
switch. This switch is located on the rear panel and should remain readily
accessible to the user.
19.
The MAINS plug or an appliance coupler is used as the disconnect device,
so the disconnect device shall remain readily operable.
20.NOTE: This equipment has been tested and found to comply with
the limits for a Class B digital device, pursuant to part 15 of the FCC
Rules. These limits are designed to provide reasonable protection
against harmful interference in a residential installation. This equipment
generates, uses, and can radiate radio frequency energy and, if not
installed and used in accordance with the instructions, may cause
harmful interference to radio communications. However, there is no
guarantee that interference will not occur in a particular installation.
If this equipment does cause harmful interference to radio or television
reception, which can be determined by turning the equipment off and
on, the user is encouraged to try to correct the interference by one or
more of the following measures:
• Reorientorrelocatethereceivingantenna.
• Increasetheseparationbetweentheequipmentandthereceiver.
• Connecttheequipmentintoanoutletonacircuitdifferentfromthat
to which the receiver is connected.
• Consultthedealeroranexperiencedradio/TVtechnicianforhelp.
CAUTION: Changes or modifications to this device not expressly approved
by LOUD Technologies Inc. could void the user's authority to operate the
equipment under FCC rules.
21.
This apparatus does not exceed the Class A/Class B (whichever is
applicable)
limits for radio noise emissions from digital apparatus as
set
out in the radio interference regulations of the Canadian Department
of
Communications.
ATTENTION —
Le présent appareil numérique n’émet pas de bruits radioélec-
triques dépassant las limites applicables aux appareils numériques de class
A/de class B (selon le cas) prescrites dans le réglement sur le brouillage
radioélectrique édicté par les ministere des communications du Canada.
22.
Exposure to extremely high noise levels may cause permanent hearing
loss. Individuals vary considerably in susceptibility to noise-induced hearing
loss, but nearly everyone will lose some hearing if exposed to sufficiently
intense noise for a period of time. The U.S. Government’s Occupational
Safety and Health Administration (OSHA) has specified the permissible
noise level exposures shown in the following chart.
According to OSHA, any exposure in excess of these permissible limits
could result in some hearing loss. To ensure against potentially dangerous
exposure to high sound pressure levels, it is recommended that all persons
exposed to equipment capable of producing high sound pressure levels
use hearing protectors while the equipment is in operation. Ear plugs or
protectors in the ear canals or over the ears must be worn when operating
the equipment in order to prevent permanent hearing loss if exposure is in
excess of the limits set forth here:
PORTABLE CART
WARNING
CAUTION
RISK OF ELECTRIC SHOCK. DO NOT OPEN
CAUTION: TO REDUCE THE RISK OF ELECTRIC SHOCK DO NOT REMOVE COVER (OR BACK)
NO USER-SERVICEABLE PARTS INSIDE. REFER SERVICING TO QUALIFIED PERSONNEL
The lightning flash with arrowhead symbol within an equilateral triangle is
intended to alert the user to the presence of uninsulated "dangerous
voltage" within the product's enclosure, that may be of sufficient magnitude
to constitute a risk of electric shock to persons.
The exclamation point within an equilateral triangle is intended to alert the
user of the presence of important operating and maintenance (servicing)
instructions in the literature accompanying the appliance.
WARNING — To reduce the risk of fire or electric shock, do not
expose this apparatus to rain or moisture.
Duration, per
day in hours Sound Level dBA,
Slow Response Typical Example
8 90 Duo in small club
6 92
4 95 Subway Train
3 97
2 100 Veryloudclassicalmusic
1.5 102
1 105 John screaming at Troy about deadlines
0.5 110
0.25 or less 115 Loudest parts at a rock concert
Correct Disposal of this product: This symbol indicates that this product should not be disposed of with your household waste, according to the WEEE Directive
(2002/96/EC) and your national law. This product should be handed over to an authorized collection site for recycling waste electrical and electronic equipment (EEE). Improper handling
of this type of waste could have a possible negative impact on the environment and human health due to potentially hazardous substances that are generally associated with EEE. At the
same time, your cooperation in the correct disposal of this product will contribute to the effective usage of natural resources. For more information about where you can drop off your waste
equipment for recycling, please contact your local city office, waste authority, or your household waste disposal service.
Important Safety Instructions

Owner’s Manual
3
Owner’s Manual
Contents Features
Part No. SW0942 Rev. B 12/12
©2012 LOUD Technologies Inc. All Rights Reserved.
• 2000Wsystempowerviaultra-efcientClass-D
amplication
• TruSource™technology
• Mackiedesigned,vertically-aligned,
common-magnetTruSourcedriver
• 8"LFwoofer/1.75"HFdriver[DLM8]
• 12"LFwoofer/1.75"HFdriver[DLM12]
• Incrediblycompact,lightweightdesign
• PowerfulTruSourceDSPdeliversseamless
clarity,consistentdispersionandunmatched
delity
• DL2IntegratedDigitalMixer
• Powerful,one-touchdigitalmixerwithbright
OLEDscreen
• Twohighly-versatileinputchannelswithFX
• Independentchannellevel,3-bandEQ
andeffectscontrol
• 16great-soundingeffectsincludereverb,
chorusanddelay
• XLR/TRScomboanddualRCAconnectors
• Handlesmic,line,stereoandinstrument
signals
• Unmatchedsystemcontrolforprofessional
applications
• Multi-bandfeedbackdestroyer
• Sixspeakermodesdelivertheperfect
voicingforyourapplication
• Alignmentdelayupto300msfordelaystack,
balcony,etc.
• Threememorylocationsforinstantvenue
settingrecall
• SmartProtectDSPdynamicallyprotects
amp/driver
• Innovativeultra-compactdesign
• 1/3smallerthanatraditional2-waydesign
• FitanentireDLMsysteminnearlyanycar
• Stackthemupforstorage
• Pole-mountableontripodoratopDLM12S
usingSPM300speakerpole
• FlyableviastandardM10rigginghardware
• Wall-mountthemusingSWM300articulated
armforstealthy,powerfulinstallsystem
• RoadworthyPC-ABScabinetwithproblack
nishandergonomictopcarryhandle
• Rugged,powder-coated20gaugesteelgrille
• Integratedkickstanddeliverstheperfect
angleforpersonalmonitoruse
• Ridiculouslylightweight
• 21.4lb/9.7kg[DLM8]
• 30lb/13.6kg[DLM12]
Important Safety Instructions .................................. 2
Contents................................................................. 3
Features................................................................. 3
Introduction............................................................ 4
How To Use This Manual ......................................... 4
Getting Started....................................................... 4
Things To Remember................................................ 4
Hookup Diagrams.................................................... 5
DLM8/12 Loudspeaker: Rear Panel Features.......... 10
1. Power Connection ....................................... 10
2. Power Switch ............................................. 10
3. Fan Vents................................................... 10
4. Kickstand ................................................... 10
5. XLR and 1/4" Combo Inputs........................ 11
6. Mic/Line Switch [Channel 1 Only]................ 11
7. RCA Inputs [Channel 2 Only] ....................... 11
8. Thru Output................................................ 11
9. Ch 1/Mix Switch [Thru Output]................... 11
10. OLED Display............................................ 11
11. Channel 1 and 2 Buttons............................ 12
12. Front LED On / Limit / Off........................ 12
13. SYS Button............................................... 13
14. MEM Button ............................................. 14
15. Control Lock ............................................. 14
16. + and – Buttons........................................ 14
17. 2000W/2W Switch.................................. 14
Smart Protect ....................................................... 15
Limiting.......................................................... 15
Overexcursion Protection ................................ 15
Thermal Protection.......................................... 15
FYI ............................................................... 15
AC Power............................................................. 15
Placement............................................................. 16
Room Acoustics............................................... 16
Rigging ............................................................... 17
Rigging Design Practices.................................. 17
Rigging Hardware and Accessories................... 17
Rigging Notes................................................. 17
Important Rigging Reminder ............................ 18
Care and Maintenance ........................................... 18
Appendix A: Service Information ............................ 19
Appendix B: Connections ....................................... 21
Appendix C: Technical Information .......................... 22
DLM Loudspeaker Dimensions.......................... 24
DLM Loudspeaker Frequency Responses ........... 25
DLM Loudspeaker Block Diagrams.................... 26
Appendix D: Table of Effects Presets ...................... 27
Mackie Limited Warranty....................................... 28

DLM8/12 Powered Loudspeakers
4
DLM8/12 Powered Loudspeakers
Getting Started
Introduction
TheMackieDLM8andDLM12eachdeliver2000
wattsintothemostcompact,professionalportable
loudspeakerdesignever.FeaturingTruSource™
technology,theDLMloudspeakersareequipped
withMackie’sTruSourcedriverthatincorporates
thehigh-output8"[DLM8]and12"[DLM12]woofer
and1.75"compressiondriverintoanincredibly
compactcommon-magnetdesign.PowerfulTruSource
DSPdeliversseamlessclarity,consistentdispersion
andunmatcheddelity.
TheseversatileloudspeakersfeaturetheMackie
DL2integrateddigitalmixer,providingadual-channel
mixingsolutionforawidearrayofpossibleconnections
withincrediblechannelfeatureslike3-bandEQand
16great-soundingeffects.Plus,systemprocessinglike
amulti-bandfeedbackdestroyer,sixspeakermodes
andSmartProtecttechnologyprovidethetools
neededfortrulyprofessionalapplications.
Withcongurationoptionsthatincludepole/wall
mountingandying,thesleekDLMloudspeakers
areapowerfulsolutionforhigh-endinstalls.The
ultra-compactformfactorincludesaruggedPC-ABS
cabinet,powder-coatedgrilleandintegratedkickstand
forpersonalmonitoruse.
Thenewshapeofsound–MackieDLM8andDLM12.
How to Use This Manual:
Afterthisintroduction,agettingstartedguidewill
helpyougetthingssetupfast.Thehookupdiagrams
showsometypicalsetups,whiletheremainingsections
providedetailsoftheDLM8andDLM12loudspeakers.
Thisiconmarksinformationthatiscritically
importantoruniquetotheloudspeakers.For
yourowngood,readandrememberthem.
Thisiconleadsyoutoin-depthexplanations
offeaturesandpracticaltips.Theyusually
havesomevaluablenuggetsofinformation.
Thisicondrawsattentiontocertainfeatures
andfunctionsrelatingtotheusageofthe
loudspeakers.
Thefollowingstepswillhelpyousetupthe
loudspeakersquickly.
1.Makeallinitialconnectionswiththepower
switchesOFFonallequipment.Makesurethemaster
volume,level,orgaincontrolsareallthewaydown.
2.Connecttheline-leveloutputsfromthemixing
console(orothersignalsource)totheinputsonthe
rearpaneloftheDLM8/12loudspeakers.
3.ConnectthesuppliedACpowercordstothe
IECsocketsontherearpanelofeachloudspeaker.
PlugtheotherendintoanACoutletproperlycongured
withthecorrectvoltageasindicatedtotheleftofthe
IECsocket.
4.Turnthemixer(orothersignalsource)on.
5.Turntheloudspeakerson.
6.Startthesignalsourceandraisethemixer’s
mainL/Rfaderupuntilaudiomaybeheard
throughtheloudspeakers.
7.Adjustthemastervolumeofthemixertoa
comfortablyloudlisteninglevel.
8.Readtherestofthismanualtolearnhowtousethe
DL2integrateddigitalmixertoreallydialinasoundfor
thevenue.
Things to Remember:
• Neverlistentoloudmusicforprolongedperiods.
PleaseseetheSafetyInstructionsonpage2for
informationonhearingprotection.
• Asageneralguide,DLMloudspeakersshould
beturnedonlast,afteranymixerorothersignal
source.Assuch,theyshouldalsobeturnedoff
rst.Thiswillreducethepossibilityofanyturn-on
orturn-offthumpsandothernoisesgenerated
byanyupstreamequipmentfromcomingoutof
thespeakers.
• Savetheshippingboxesandpackingmaterials!
Youmayneedthemsomeday.Besides,the
catswillloveplayinginthemandjumpingoutat
youunexpectedly.Remembertopretendlikeyou
aresurprised!
• Saveyoursalesreceiptinasafeplace.

Owner’s Manual
5
Owner’s Manual
Hookup Diagrams
Small Coffee Shop
BASS +2
TREBLE +2
AUX
LEVEL
R
L
100-240V
50-60Hz 250W
POWER
Line
Mic
Ch1
Mix
THISDEVICE COMPLIESWITH PART 15 OF THE FCC RULES FOR
THEU.S.AND ICES-003, FOR CANADA. OPERATION IS SUBJECT TO
THEFOLLOWINGTWO CONDITIONS: (1) THIS DEVICE MAY NOT
CAUSEHARMFUL INTERFERENCE, AND (2)THIS DEVICE MUST
ACCEPTANYINTERFERENCE RECEIVED, INCLUDING INTERFERENCE
THATMAYCAUSE UNDESIRED OPERATION.
REVISION
SERIALNUMBER
WARNING:
AVIS:RISQUEDE CHOC ELECTRIQUE - NE PAS OUVRIR
TOREDUCETHE RISK OF FIRE OR ELECTRIC
SHOCK,DO NOT EXPOSE THIS EQUIPMENT TO RAIN OR
MOISTURE.DO NOT REMOVE COVER. NO USER SERVICEABLE
PARTSINSIDE.REFER SERVICING TO QUALIFIED PERSONNEL.
1THRU2
TRS=
TRS=Line
XLR
RISKOFELECTRIC SHOCK
DONOTOPEN
AVIS:
N'OUVREZPAS LA COUVERTURE. N'EXPOSEZ
PASCETÉQUIPEMENT À LA PLUIE OU À L'HUMIDITÉ.
MEMSYS21
2000WDigital Loudspeaker
DLM loudspeakers are the perfect tool for singer-songwriters touring the local coffee shops.
Bring your favorite axe and mic, DLM loudspeakers and cables and power cords.
Compact and portable perfection.
In this example, a dynamic microphone is connected to the channel 1 input of a DLM12 loudspeaker.
Be sure that the mic/line switch is down in order to get an extra 30 dB boost for the mic. Be sure the
switch is OUT if anything other than a microphone is attached to the channel 1 input. Adjust the level
and EQ, as described on page 12.
Now grab your axe and plug it directly into the channel 2 input. Or if you use effects, connect the guitar
to the effects input and another cable from the effects output to the channel 2 input. Adjust the level and
EQ for the guitar now.
An additional DLM8 or DLM12 loudspeaker is great for monitoring. Simply connect a cable from the
main DLM loudspeaker’s THRU jack to the monitor loudspeaker’s channel 1 input [mic/line switch OUT!].
Also, make sure the Ch 1/Mix switch is down on the main DLM, as well, so a mix of the vocals and
guitar is relayed to the monitor. Release the kickstand for a perfect angle
For the output, you will want to set a speaker mode, described in detail on page 13. For this type of
setup, PA works well for the main DLM12. However, don’t count out the soloist mode! It has a nice low cut
and a brilliant high end. Select the monitor mode for the DLM12 monitor. Lastly, you can ring out before
you play, utilizing the DLM’s feedback destroyer [page 13] or just let it kill the feedback while playing.

DLM8/12 Powered Loudspeakers
6
DLM8/12 Powered Loudspeakers
Hookup Diagrams continued...
Small Club System
BASS +2
TREBLE +2
AUX
LEVEL
R
L
100-240V
50-60Hz 250W
POWER
Line
Mic
Ch1
Mix
THISDEVICE COMPLIESWITH PART 15 OF THE FCC RULES FOR
THEU.S.AND ICES-003, FOR CANADA. OPERATION IS SUBJECT TO
THEFOLLOWINGTWO CONDITIONS: (1) THIS DEVICE MAY NOT
CAUSEHARMFUL INTERFERENCE, AND (2)THIS DEVICE MUST
ACCEPTANYINTERFERENCE RECEIVED, INCLUDING INTERFERENCE
THATMAYCAUSE UNDESIRED OPERATION.
REVISION
SERIALNUMBER
WARNING:
AVIS:RISQUEDE CHOC ELECTRIQUE - NE PAS OUVRIR
TOREDUCETHE RISK OF FIR E OR ELECTRIC
SHOCK,DO NOTEXPOSE THIS EQUIPMENT TO RAIN OR
MOISTURE.DONOT REMOVE COVER. NO USER SERVICEABLE
PARTSINSIDE.REFER SERVICING TO QUALIFIED PERSONNEL.
1THRU2
TRS=
TRS= Line
XLR
RISKOFELECTRIC SHOCK
DONOTOPEN
AVIS:
N'OUVREZPAS LA COUVERTURE. N'EXPOSEZ
PASCETÉQUIPEMENT À LA PLUIE OU À L'HUMIDITÉ.
MEMSYS21
2000WDigital Loudspeaker
100-240V
50-60Hz 250W
POWER
THISDEVICE COMPLIESWITH PART 15 OF THE FCC RULES FOR
THEU.S.AND ICES-003, FOR CANADA. OPERATION IS SUBJECT TO
THEFOLLOWINGTWO CONDITIONS: (1) THIS DEVICE MAY NOT
CAUSEHARMFUL INTERFERENCE, AND (2)THIS DEVICE MUST
ACCEPTANYINTERFERENCE RECEIVED, INCLUDING INTERFERENCE
THATMAYCAUSE UNDESIRED OPERATION.
REVISION
SERIALNUMBER
WARNING:
AVIS:RISQUEDE CHOC ELECTRIQUE - NE PAS OUVRIR
TOREDUCETHE RISK OF FIRE OR ELECTRIC
SHOCK,DONOT EXP OSE THIS EQUIPMENT TO RAIN OR
MOISTURE.DONOT REMOVE COVER. NO USER SERVICEABLE
PARTSINSIDE.REFER SERVICING TO QUALIFIED PERSONNEL.
RISKOFELECTRIC SHOCK
DONOTOPEN
AVIS:
N'OUVREZPAS LA COUVERTURE. N'EXPOSEZ
PASCETÉQUIPEMENT À LA PLUIE OU À L'HUMIDITÉ.
INPUTS FULLRANGEHIGHPASS
A
B
A
B
STEREO
MONO
NORMAL
INVERT
A
MEMSYS21
BASS +2
TREBLE +2
AUX
LEVEL
2000WDigital Subwoofer
13DELAY1 (300ms)
14DELAY2 (380ms)
15DELAY3 (480ms)
16REVERB + DLY (250ms)
8K4K2K1K500250125
15
15
10
10
5
5
0
15
15
10
10
5
5
0
TAPE
IN
STRETURN MAINOUT PHONES
FOOTSWITCH
PHONES
TAPE
OUT
L
R
L
(UNBALANCED)
R
0dB=0dBu
MAIN
METERS
RL
OL
4
6
3
10
15
7
10
20
30
0
2
BREAK
(MUTESALL CHANNELS)
PHANTOM
POWER
POWER
STEREO GRAPHIC EQ
FXSEND
MID
2.5kHz
MID
2.5kHz
MID
2.5kHz
MID
2.5kHz
MID
2.5kHz
80Hz
LOW
U
+15-15
U
+15-15
U
+15-15
INSERT
RL
LOWCUT
100Hz
U
GAIN
M
I
C
G
A
I
N
U+50
-20dB +30dB
OL
1
EQ
12kHz
HI
PAN
AUX
U
+15
OO
MON
FX
U
+15
OO
80Hz
LOW
U
+15-15
U
+15-15
U
+15-15
RL
LOWCUT
100Hz
U
GAIN
M
I
C
G
A
I
N
U+50
-20dB +30dB
2
EQ
12kHz
HI
PAN
AUX
U
+15
OO
MON
FX
U
+15
OO
80Hz
LOW
U
+15-15
U
+15-15
U
+15-15
LINEIN 2LINE/HI-ZIN 1
INSERT
BAL/
UNBAL
(MONO) (MONO) (MONO) (MONO)
LINEIN 3
LINEIN 4
BAL/
UNBAL LINEIN 5
RL
LOWCUT
100Hz
GAIN
3/4
EQ
12kHz
HI
PAN
AUX
U
+15
OO
MON
FX
U
+15
OO
80Hz
LOW
U
+15-15
U
+15-15
U
+15-15
RL
LOWCUT
100Hz
GAIN
M
I
C
G
A
I
N
U+50
M
I
C
G
A
I
N
U+50
5/6
EQ
12kHz
HI
LEVEL
SET
LEVEL
SET
LEVEL
SET
LEVEL
SET
PAN
AUX
U
+15
OO
MON
FX
U
+15
OO
GAIN
MICMICMICMIC
80Hz
LOW
U
+15-15
U
+15-15
U
+15-15
U
+20-20
RL
7/8 ST RTN FX RTN
EQ
12kHz
HI
PAN
AUX
U
+15
OO
MON
FX
U
+15
OO
U
+15
FXTO MON
FXMASTER
U
+15
OO
OO
dB
30
20
10
10
OO
40
50
5
5
U
60
dB
30
20
10
10
OO
40
50
5
5
U
60
dB
30
20
10
10
OO
40
50
5
5
U
60
dB
30
20
10
10
OO
40
50
5
5
U
60
dB
30
20
10
10
OO
40
50
5
5
U
60
dB
30
20
10
10
OO
40
50
5
5
U
60
dB
30
20
10
10
OO
40
50
5
5
U
60
dB
30
20
10
10
OO
40
50
5
5
U
60
dB
30
20
10
10
OO
40
50
5
5
U
60
L
R
LINEIN 6
BAL/
UNBAL
L
R
LINEIN 7
LINEIN 8
BAL/
UNBAL
L
R
BAL/
UNBAL
L
R
BAL/
UNBAL
L
R
MONSEND
BAL/
UNBAL
BAL/
UNBAL
MUTE
PRESETS
FXPRESETS
OL OL OL OL OL
INPUTLEVEL
USB
OO
+20
U
TAPELEVEL
OO
+20
U
MON MAIN
1 2 3/4 5/6 7/8
OL
USB THRU
LINE
HI-Z
MAINMIX
MON
EQIN
BYPASS
01BRIGHT ROOM
02WARMLOUNGE
03SMALL STAGE
04WARMTHEATER
05WARMHALL
06CONCERT HALL
07PLATEREVERB
08CATHEDRAL
09CHORUS
10CHORUS + REV
11DOUBLER
12TAPESLAP
OO
MAX
LINE
HI-Z
MUTE MUTE MUTE MUTE MUTE MUTE
48V
PROFESSIONALMIC/LINE MIXER WITH FX
In this example, a Mackie DLM12S subwoofer and additional DLM loudspeaker have been added to the
mix, giving our sound system a little extra beef. It is a perfect setup for a small club.
Here, the L/R outputs of a Mackie ProFX8 mixer are connected directly to the channel A and B inputs
of a single Mackie DLM12S subwoofer.
The channel A and B high pass outputs of the Mackie DLM12S subwoofer are connected directly to the
channel 1 inputs of each DLM loudspeaker. Be sure the mic/line switch is OUT. Or be ready to be blasted
with an additional 30 dB! Select the DLM12 crossover on the DLM12S for a perfectly matched system
tuning.
DLM loudspeakers are also perfect for using as stage monitors. Simply connect a cable from each aux
send to the channel 1 input of each DLM loudspeaker used as a monitor.
For the output, you will want to set a speaker mode, described in detail on page 13. For this type of
setup, we recommend selecting the PA speaker mode for live sound on your DLM loudspeakers. If using
any DLM loudspeakers as monitors, select the monitor speaker mode.

Owner’s Manual
7
Owner’s Manual
DJ System
100-240V
50-60Hz 250W
POWER
THISDEVICECOMPLIES WITH PART 15 OF THE FCC RULES FOR
THEU.S.AND ICES-003, FOR CANADA. OPERATION IS SUBJECT TO
THEFOLLOWINGTWO CONDITIONS: (1) THIS DEVICE MAY NOT
CAUSEHARMFULINTERFERENCE, AND (2) THIS DEVICE MUST
ACCEPTANYINTERFERENCE RECEIVED, INCLUDINGINTERFERENCE
THATMAYCAUSEUNDESIRED OPERATION.
REVISION
SERIALNUMBER
WARNING:
AVIS:RISQUEDE CHOC ELECTRIQUE - NE PAS OUVRIR
TOREDUCETHE RISK OF FIRE OR ELECTRIC
SHOCK,DONOT EXPOSE THIS EQUIPMENT TO RAIN OR
MOISTURE.DONOT REMOVE COVER. NO USER SERVICEABLE
PARTSINSIDE.REFER SERVICING TO QUALIFIED PERSONNEL.
RISKOFELECTRIC SHOCK
DONOTOPEN
AVIS:
N'OUVREZPAS LA COUVERTURE. N'EXPOSEZ
PASCETÉQUIPEMENT À LA PLUIE OU À L'HUMIDITÉ.
INPUTS FULLRANGEHIGHPASS
A
B
A
B
STEREO
MONO
NORMAL
INVERT
A
MEMSYS21
BASS+2
TREBLE+2
AUX
LEVEL
2000WDigital Subwoofer
BASS +2
TREBLE +2
AUX
LEVEL
R
L
100-240V
50-60Hz 250W
POWER
Line
Mic
Ch1
Mix
THISDEVICE COMPLIESWITH PART 15 OF THE FCC RULES FOR
THEU.S.AND ICES-003, FOR CANADA. OPERATION IS SUBJECT TO
THEFOLLOWINGTWO CONDITIONS: (1) THIS DEVICE MAY NOT
CAUSEHARMFUL INTERFERENCE, AND (2)THIS DEVICE MUST
ACCEPTANYINTERFERENCE RECEIVED, INCLUDING INTERFERENCE
THATMAYCAUSE UNDESIRED OPERATION.
REVISION
SERIALNUMBER
WARNING:
AVIS:RISQUEDE CHOC ELECTRIQUE - NE PAS OUVRIR
TOREDUCETHE RISK OF FIRE OR ELECTRIC
SHOCK,DONOT EXPOSE THIS EQUIPMENT TO RAIN OR
MOISTURE.DONOT REMOVE COVER. NO USER SERVICEABLE
PARTSINSIDE.REFER SERVICING TO QUALIFIED PERSONNEL.
1THRU2
TRS=
TRS=Line
XLR
RISKOFELECTRIC SHOCK
DONOTOPEN
AVIS:
N'OUVREZPAS LA COUVERTURE. N'EXPOSEZ
PASCETÉQUIPEMENT À LA PLUIE OU À L'HUMIDITÉ.
MEMSYS21
2000WDigital Loudspeaker
O
N
Y
X
M
I
C
P
R
E
LR
2 1
MONITOROUT
BAL/UNBAL
USB
BAL/UNBAL
O
N
Y
X
M
I
C
P
R
E
Perhaps you’re a DJ playing bumpin’ tunes in the middle of the night to a crowd that’s groovin’
and dancin’ to your fine selection.
In this example, a laptop is connected to the channel 1 and 2 inputs of a Mackie Onyx Blackjack
and a set of headphones are connected to the phones jack.
The L/R monitor outputs of the Mackie Onyx Blackjack are connected directly to the channel A inputs
of each DLM12S subwoofer.
The channel A high pass output of each Mackie DLM12S subwoofer are connected directly to the
channel 1 input of each Mackie DLM loudspeaker. Be sure the mic/line switch is OUT. Or be ready
to be blasted with an additional 30 dB! Select the DLM12 crossover on the DLM12S for a perfectly
matched system tuning.
For the output, you will want to set a speaker mode, described in detail on page 13. For this type of
setup, we recommend selecting either the PA or DJ speaker mode. The DJ speaker mode has more bass
and sparkling high end. Try them both out and go with the one that best suits your needs.
Hookup Diagrams continued...

DLM8/12 Powered Loudspeakers
8
DLM8/12 Powered Loudspeakers
Daisy-Chaining Multiple DLM Loudspeakers
R
L
Line
Mic
Ch 1
Mix
1 THRU2
TRS =
TRS = Line
XLR
MEMSYS21
R
L
Line
Mic
Ch 1
Mix
1 THRU2
TRS =
TRS = Line
XLR
MEMSYS21
2000W Digital Loudspeaker
R
L
Line
Mic
Ch 1
Mix
1 THRU2
TRS =
TRS = Line
XLR
MEMSYS21
R
L
Line
Mic
Ch 1
Mix
1 THRU2
TRS =
TRS = Line
XLR
MEMSYS21
/
2000W Digital Loudspeaker
/
2000W Digital Loudspeaker
/
2000W Digital Loudspeaker
/
DL1608 Mixer
To next DLM
loudspeaker
input
To next DLM
loudspeaker
input
Main
Outs
Hookup Diagrams continued...
DLM loudspeakers may be daisy-chained via the male XLR connector labeled “THRU”. Simply plug the
signal source (i.e., mixer output) into the input jack(s), and patch that loudspeaker’s THRU jack to the next
loudspeaker’s input jack, and so on, daisy-chaining multiple DLM loudspeakers. See above for a visual
representation of daisy-chaining.
The THRU jack on DLM loudspeakers are fully buffered with 100 balanced output impedance
drivers, so there is no additional loading to the inputs when daisy-chaining. In other words, you
could conceivably daisy-chain DLM loudspeakers indefinitely. If you do that, we want pictures!

Owner’s Manual
9
Owner’s Manual
Large Club System
100-240V
50-60Hz 250W
POWER
THISDEVICECOMPLIES WITH PART 15 OF THE FCC RULES FOR
THEU.S.AND ICES-003, FOR CANADA. OPERATION IS SUBJECT TO
THEFOLLOWINGTWO CONDITIONS: (1) THIS DEVICE MAYNOT
CAUSEHARMFULINTERFERENCE, AND (2) THIS DEVICE MUST
ACCEPTANYINTERFERENCE RECEIVED,INCLUDING INTERFERENCE
THATMAYCAUSEUNDESIRED OPERATION.
REVISION
SERIALNUMBER
WARNING:
AVIS:RISQUEDE CHOC ELECTRIQUE - NE PAS OUVRIR
TOREDUCETHE RISK OF FIRE OR ELECTRIC
SHOCK,DONOT EXPOSE THIS EQUIPMENT TO RAIN OR
MOISTURE.DONOT REMOVE COVER. NO USER SERVICEABLE
PARTSINSIDE.REFER SERVICING TO QUALIFIED PERSONNEL.
RISKOFELECTRIC SHOCK
DONOTOPEN
AVIS:
N'OUVREZPAS LA COUVERTURE. N'EXPOSEZ
PASCETÉQUIPEMENT À LA PLUIE OU À L'HUMIDITÉ.
INPUTS FULLRANGEHIGH PASS
A
B
A
B
STEREO
MONO
NORMAL
INVERT
A
MEMSYS21
BASS+2
TREBLE+2
AUX
LEVEL
2000WDigital Subwoofer
100-240V
50-60Hz 250W
POWER
THISDEVICECOMPLIES WITH PART 15 OF THE FCC RULES FOR
THEU.S.AND ICES-003, FOR CANADA. OPERATION IS SUBJECT TO
THEFOLLOWINGTWO CONDITIONS: (1) THIS DEVICE MAYNOT
CAUSEHARMFULINTERFERENCE, AND (2) THIS DEVICE MUST
ACCEPTANYINTERFERENCE RECEIVED,INCLUDING INTERFERENCE
THATMAYCAUSEUNDESIRED OPERATION.
REVISION
SERIALNUMBER
WARNING:
AVIS:RISQUEDE CHOC ELECTRIQUE - NE PAS OUVRIR
TOREDUCETHE RISK OF FIRE OR ELECTRIC
SHOCK,DONOT EXPOSE THIS EQUIPMENT TO RAIN OR
MOISTURE.DONOT REMOVE COVER. NO USER SERVICEABLE
PARTSINSIDE.REFER SERVICING TO QUALIFIED PERSONNEL.
RISKOFELECTRIC SHOCK
DONOTOPEN
AVIS:
N'OUVREZPAS LA COUVERTURE. N'EXPOSEZ
PASCETÉQUIPEMENT À LA PLUIE OU À L'HUMIDITÉ.
INPUTS FULLRANGEHIGH PASS
A
B
A
B
STEREO
MONO
NORMAL
INVERT
A
MEMSYS21
2000WDigital Subwoofer
BASS+2
TREBLE+2
AUX
LEVEL
R
L
100-240V
50-60Hz 250W
POWER
Line
Mic
Ch1
Mix
THISDEVICECOMPLIES WITH PART 15 OF THE FCC RULES FOR
THEU.S.AND ICES-003, FOR CANADA. OPERATION IS SUBJECT TO
THEFOLLOWINGTWO CONDITIONS: (1) THIS DEVICE MAY NOT
CAUSEHARMFULINTERFERENCE, AND (2) THIS DEVICE MUST
ACCEPTANYINTERFERENCE RECEIVED, INCLUDINGINTERFERENCE
THATMAYCAUSEUNDESIRED OPER ATION.
REVISION
SERIALNUMBER
WARNING:
AVIS:RISQUEDE CHOC ELECTRIQUE - NE PAS OUVRIR
TOREDUCETHE RISK OF FIRE OR ELECTRIC
SHOCK,DONOT EXPOSE THIS EQUIPMENT TO RAIN OR
MOISTURE.DONOT REMOVE COVER. NO USER SERVICEABLE
PARTSINSIDE.REFER SERVICING TO QUALIFIED PERSONNEL.
1THRU2
TRS=
TRS=Line
XLR
RISKOFELECTRIC SHOCK
DONOTOPEN
AVIS:
N'OUVREZPAS LA COUVERTURE. N'EXPOSEZ
PASCETÉQUIPEMENT À LA PLUIE OU À L'HUMIDITÉ.
MEMSYS21
2000WDigital Loudspeaker
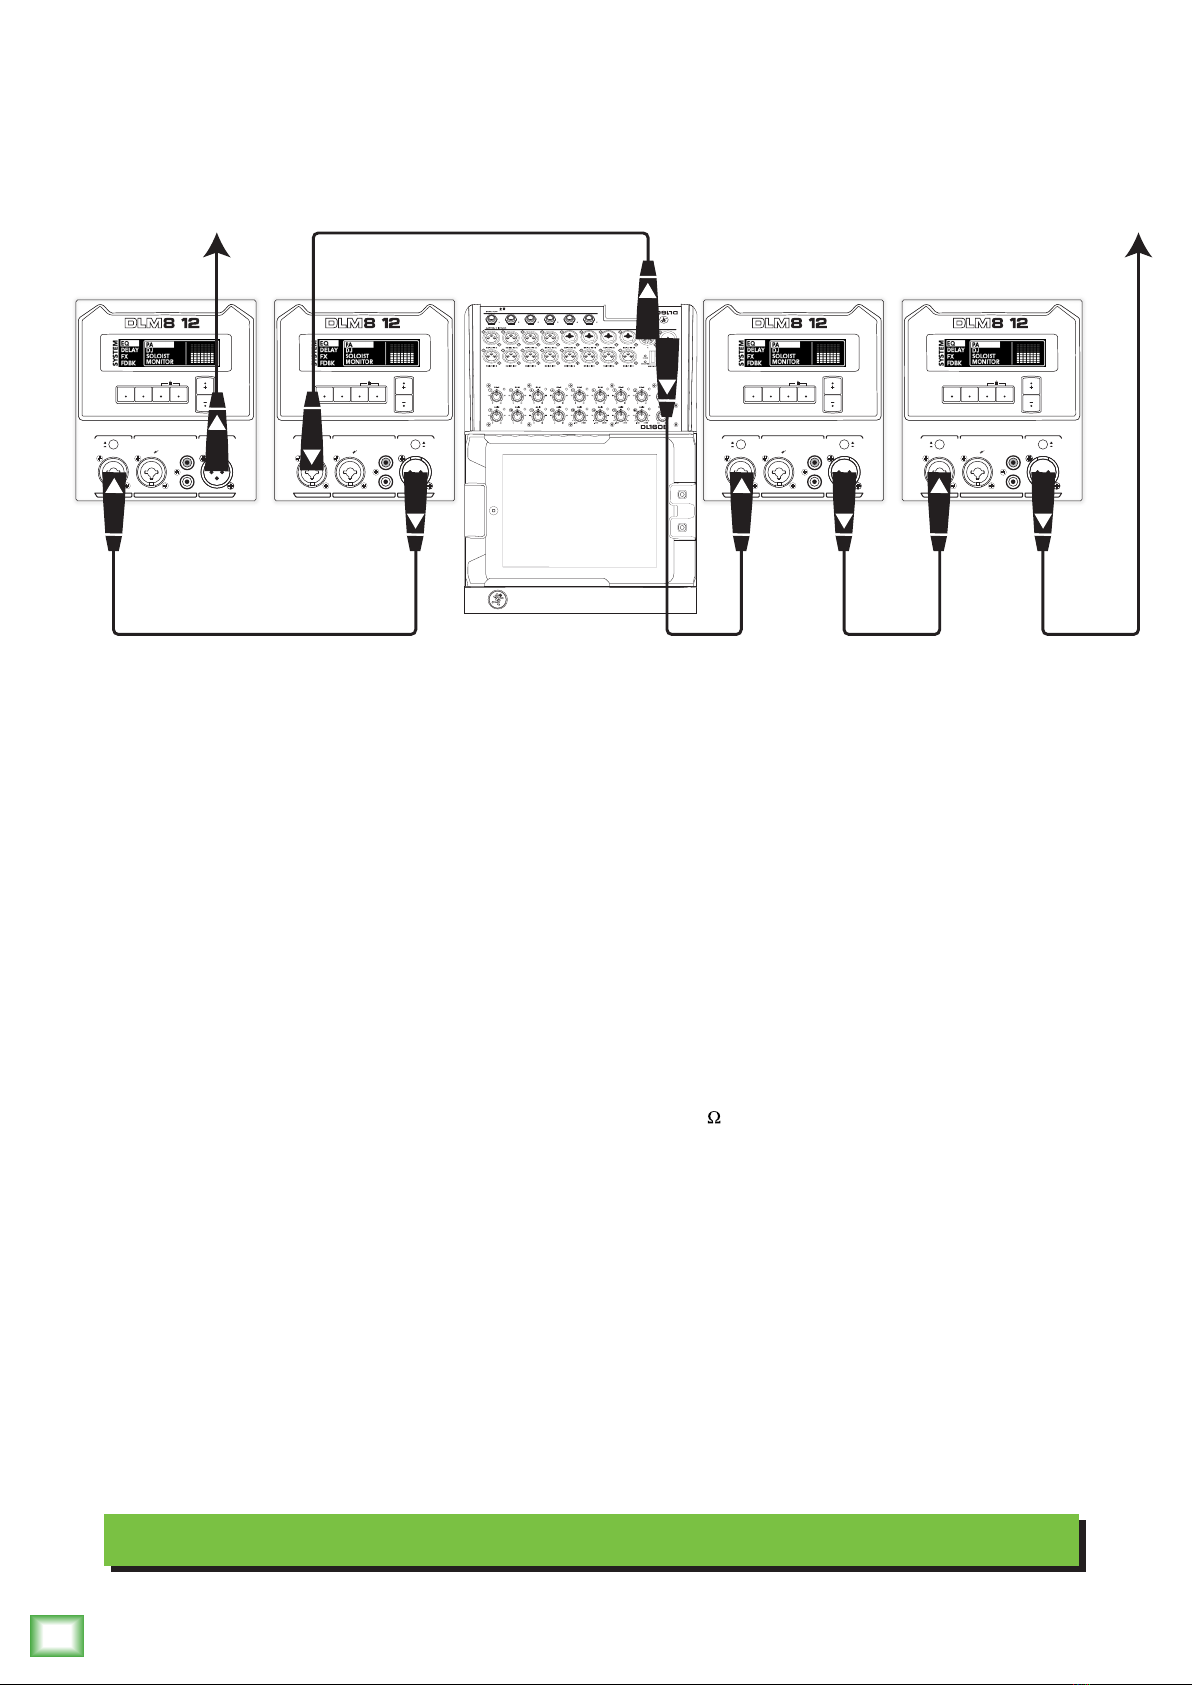
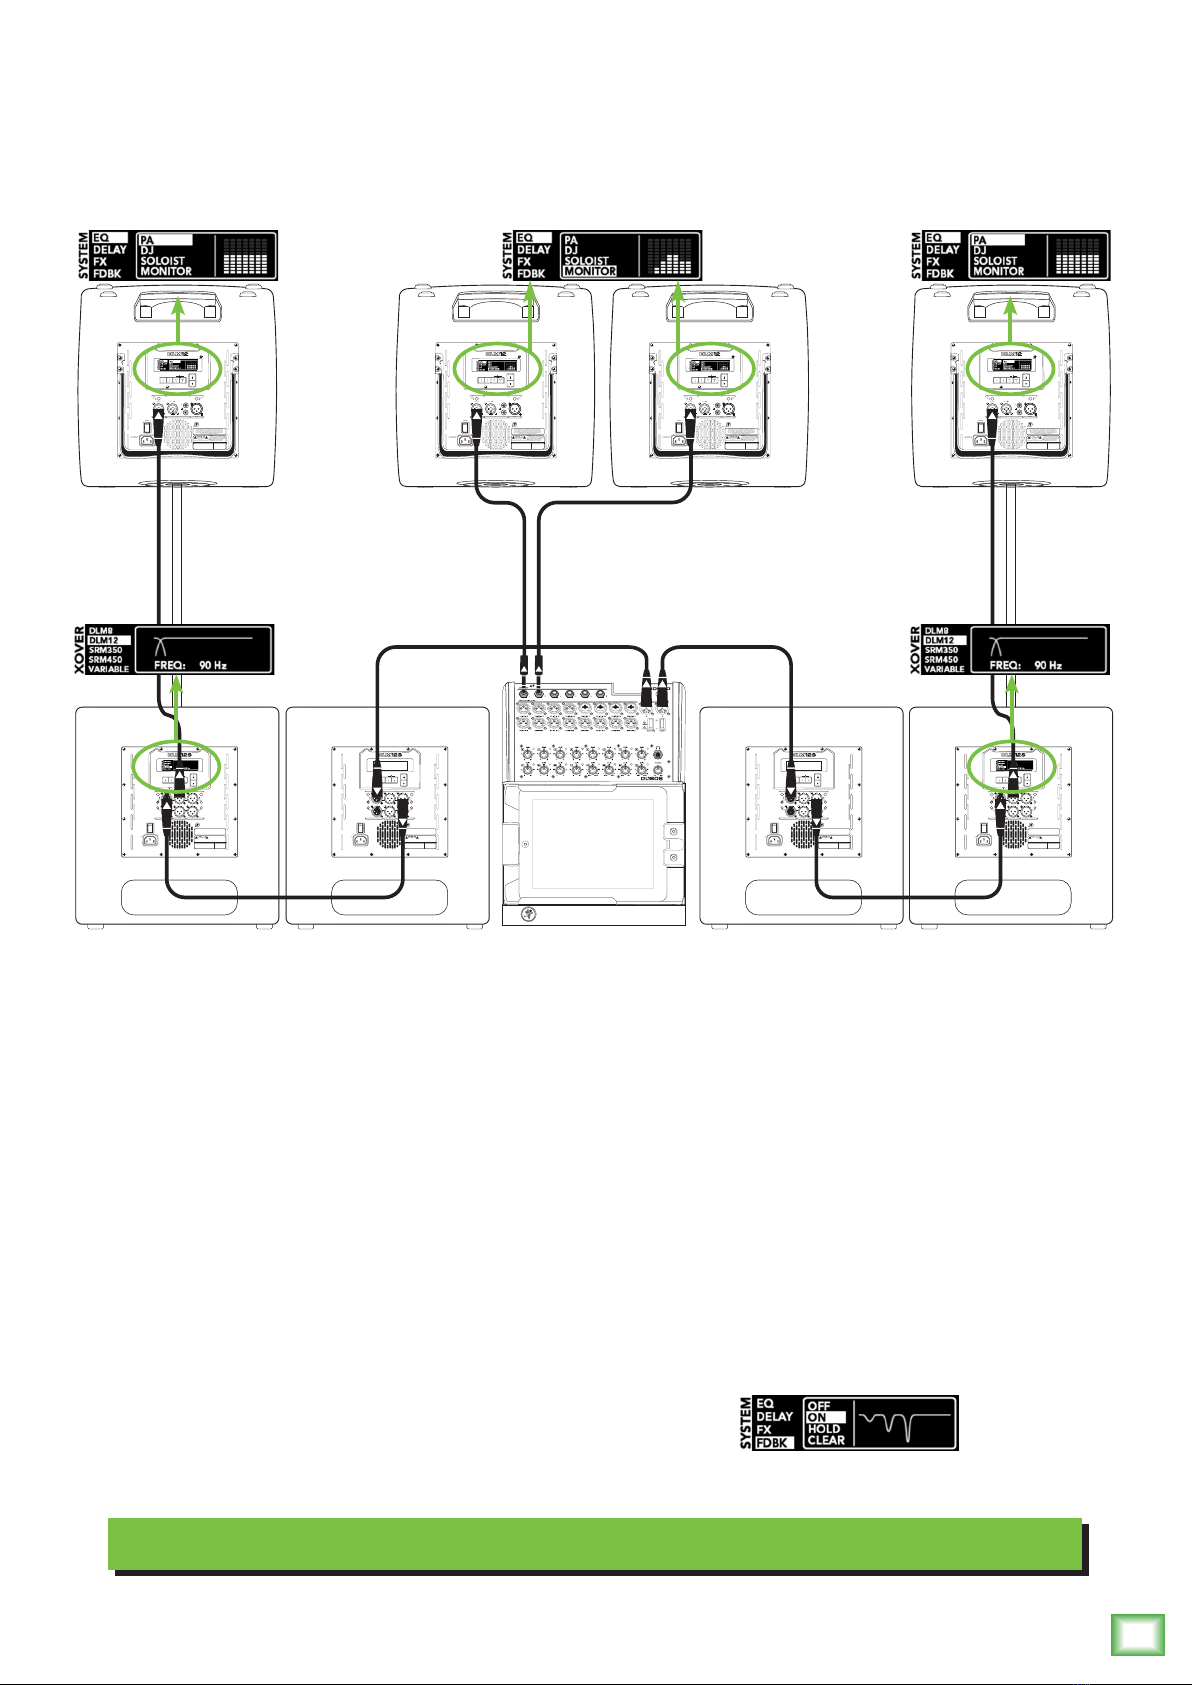
Here’s how to set up a large club system using all Mackie gear. In this example, the L/R outputs of
a Mackie DL1608 mixer are connected directly to the channel A inputs of two DLM12S subwoofers.
The channel A full range outputs of these two DLM12S subwoofers are connected directly to the channel
A inputs of another set of DLM12S subwoofers. Talk about beefy low end, that’s 8000 watts, yo!
And we’ve only connected the subs.
The channel A high pass outputs of the last two DLM12S subwoofers are connected directly to the
channel 1 inputs of the main pair of DLM loudspeakers. Be sure the mic/line switch is OUT.
Or be ready to be blasted with an additional 30 dB! Select the DLM12 crossover on each DLM12S
for a perfectly matched system tuning.
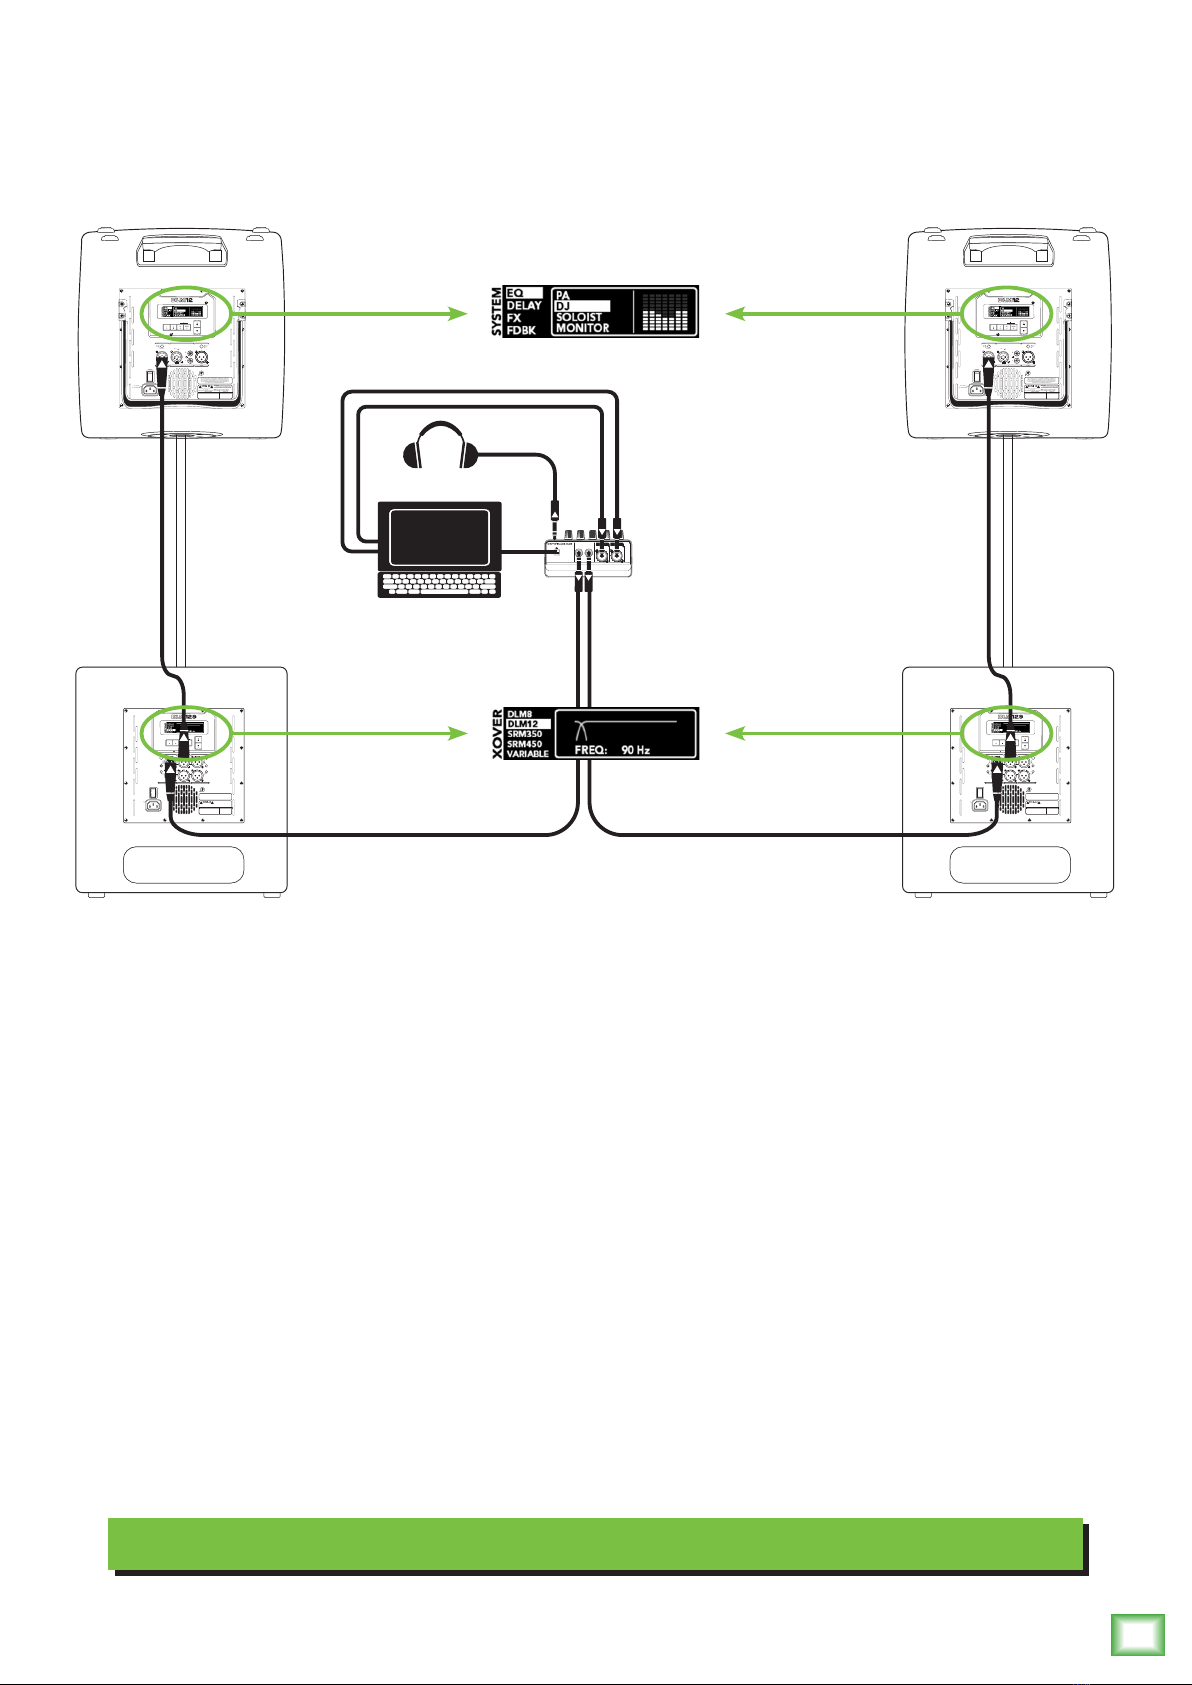
DLM loudspeakers are also perfect for using as stage monitors. Simply connect a cable from an aux
send to the channel 1 input of a DLM loudspeaker. For the aux to monitor output, you will want to set
a speaker mode, described in detail on page 13. Since these are monitors, select the appropriately
named monitor speaker mode.
Select PA speaker mode for the main loudspeakers. You will want
to turn the feedback eliminator ON on all four DLM loudspeakers.
Hookup Diagrams continued...

DLM8/12 Powered Loudspeakers
10
DLM8/12 Powered Loudspeakers
DLM8/12 Loudspeaker: Rear Panel Features
1.Power Connection
Thisisastandard3-prongIECpowerconnector.
Connectthedetachablepowercord(includedin
thepackagingwiththeloudspeaker)tothepower
receptacle,andplugtheotherendofthepower
cordintoanACoutlet.
MakesurethattheACpowerismatchedto
theACpowerindicatedontherearpanel
(totheleftoftheIECreceptacle).
Disconnectingtheplug’sgroundpinis
dangerous.Don’tdoit!
2.Power Switch
Pressthetopofthisrockerswitchinwardstoturnon
theloudspeaker.ThefrontpanelpowerLEDwillglow
withhappiness...oratleastitwilliftheloudspeakeris
pluggedintoasuitableliveACmainssupply.
Pressthebottomofthisrockerswitchinwardstoturn
offtheloudspeaker.
Asageneralguide,DLMloudspeakersshould
beturnedonlast,afteranymixerorother
signalsource.Assuch,theyshouldalsobe
turnedoffrst.Thiswillreducethepossibilityofany
turn-onorturn-offthumpsandothernoisesgenerated
byanyupstreamequipmentfromcomingoutofthe
speakers.
BASS +2
TREBLE +2
AUX
LEVEL
R
L
100 - 240V
50 -60Hz 250W
POWER
Line
Mic
Ch 1
Mix
THIS DEVICE COMPLIES WITH PART 15 OF THE FCC RULES FOR
THE U.S. AND ICES-003, FOR CANADA. OPERATION IS SUBJECT TO
THE FOLLOWING TWO CONDITIONS: (1) THIS DEVICE MAY NOT
CAUSE HARMFUL INTERFERENCE, AND (2) THIS DEVICE MUST
ACCEPT ANY INTERFERENCE RECEIVED, INCLUDING INTERFERENCE
THAT MAY CAUSE UNDESIRED OPERATION.
REVISION
SERIAL NUMBER
WARNING:
AVIS: RISQUE DE CHOC ELECTRIQUE - NE PAS OUVRIR
TO REDUCE THE RISK OF FIRE OR ELECTRIC
SHOCK, DO NOT EXPOSE THIS EQUIPMENT TO RAIN OR
MOISTURE. DO NOT REMOVE COVER. NO USER SERVICEABLE
PARTS INSIDE. REFER SERVICING TO QUALIFIED PERSONNEL.
1 THRU2
TRS =
TRS = Line
XLR
2000W
2W
POWER
RISK OF ELECTRIC SHOCK
DO NOT OPEN
AVIS:
N'OUVREZ PAS LA COUVERTURE. N'EXPOSEZ
PAS CET ÉQUIPEMENT À LA PLUIE OU À L'HUMIDITÉ.
MEMSYS21
2000W Digital Loudspeaker
/
3.Fan Vents
Donotobstructtheventilationopenings
oftheloudspeaker.Fansmoveairoverthe
heatsinkstocooldownthepowertransistors.
Iftheseventsarerestricted,thentheloudspeakermay
overheatandshutdown.
4. Kickstand
ThekickstandontheDLMloudspeakerworks
similarlytoakickstandonabicycle.Simplypull
thekickstandoutuntilitlocksinplace.Nowtiltthe
loudspeakerbacksoitleansonthekickstand.Ata50˚
angle(andaimedatyourears,notyourknees),the
kickstandisidealforusingtheloudspeakerasa
monitor.Bicyclesaren’tusedasmonitors,onlyasmains.
Becarefulnottounplugtheunitwhen
engagingthekickstand...unlessyou’reinto
thatsortofthing.
1
5
6
11
12 15
1413
16
10
917
87
2 3
4

Owner’s Manual
11
Owner’s Manual
DLM8/12 Loudspeaker: Rear Panel Features continued...
5.XLR and 1/4" Combo Inputs
Channel1mayacceptamicorline-levelsignalvia
XLRorline-levelsignalviaTRS1/4"cable.Beawareof
thepositionofthemic/lineswitch[6].
Channel2mayacceptHi-Zsources(suchasguitars)
viathe1/4"inputwithouttheneedforaseparateDIbox
orline-levelsignalviaXLR.
NEVERconnecttheoutputofanamplier
directlytotheinputoftheloudspeaker.
Thiscoulddamagetheinputcircuitry
oftheactiveloudspeaker.
6. Mic/Line Switch [Channel 1 Only]
Leavethisswitchoutwhenconnectingaline-level
signaltothechannel1inputconnector(fromamixer,
keyboard,orotherline-levelsignalsource).
Pushthisswitchinwhenconnectingamicrophone
directlytothechannel1inputconnector.Sincea
microphoneproducesamuchweakersignalthana
line-levelsource,thisprovidesanadditional30dBof
gaintoboostthemicrophonesignaltoalinelevel.
Readtheparagraphlistedaboveagain...
30dBofgainisalot,sobesuretheswitch
isengagedonlyifamicisconnectedtothe
channel1input!
7. RCA Inputs [Channel 2 Only]
ThestereounbalancedRCAinputsallowyouto
playaCDplayer,iPod®,orotherline-levelsource.
Thetapeinjacksacceptanunbalancedsignalusing
standardhi-[RCA]hookupcables.
8. Thru Output
ThisisamaleXLR-typeconnectorthatproduces
exactlythesamesignalthatisconnectedtothe
maininputjackoramixofchannels1and2.Useitto
daisy-chainseveralDLMloudspeakerstogetheroff
thesamesignalsource(s).Seepage8tolearnmore
aboutdaisy-chainingDLMloudspeakers.
9. Ch 1/Mix Switch [Thru Output]
Thisswitchallowsyoutochoosewhetheronlythe
channel1signalissentouttothenextloudspeaker
[switchout–Ch1]orifamixofthechannel1
and2signalsaresentouttothenextloudspeaker
[switchin–Mix].
10. OLED Display
TheOLEDDisplayisoneofthemostvitalfeatures
oftheDLMloudspeaker.Itdisplaysloudspeaker
informationincluding(butnotlimitedto)level,
EQ,FXselectedandlevelsandotherparameters.
WhenaDLMloudspeakerispoweredup,thelast
stateitwasinwillloadupandtheOLEDDisplaywill
presentthechannel1screenandsettings.
DLMloudspeakerswilldisplayarunningRunning
Manscreensaverifparametershaven’tbeenchangedin
awhile.SimplytouchoneoftheDL2buttonsto“wake
up”thedisplay.
BASS +2
TREBLE +2
AUX
LEVEL
R
L
Line
Mic
Ch 1
Mix
1 THRU2
TRS =
TRS = Line
XLR
MEMSYS21
2000W Digital Loudspeaker
/
2000W
2W
POWER
5
6
17
11
12 15
13 14
16
10
9
87

DLM8/12 Powered Loudspeakers
12
DLM8/12 Powered Loudspeakers
DLM8/12 Loudspeaker: Rear Panel Features continued...
11. Channel 1 and 2 Buttons
PresstheChannel1or2buttonrepeatedlyuntil
theparameteryouwanttochange(forthatchannel)
ishighlighted:
• Level
• Low
• Mid
• High
• FXSend[Reverb,Chorus,Delay]
Oncetheparameteryouwanttochangeis
highlighted,pressthe+or–button[16]repeatedly
untilyouhaveachievedtheperfectparametervalue.
Let’stakeamoredetailedlookateachoftheve
inputchannelparameters:
Level:
Leveladjuststheoverallsignallevelattheinputs
tothebuilt-inpowerampliers.Itrangesfromoff
(– dB)to+10dB.
Channel Equalization (EQ):
BothDLMinputchannelshave3-bandEQwith
shelvinghigh,peakingmidandshelvinglow.
Shelvingmeansthatthecircuitryboostsorcutsall
frequenciespastthespeciedfrequency.Forexample,
thelowEQboostsbassfrequenciesbelow80Hzand
continuingdowntothelowestnoteyouneverheard.
Peakingmeansthatcertainfrequenciesforma“hill”
aroundthecenterfrequency.
WithtoomuchEQ,youcanreallyupsetthings.
We’vedesignedalotofboostandcutintoeach
equalizercircuitbecauseweknowthateveryone
willoccasionallyneedthat.ButifyoumaxtheEQ
oneverychannel,you’llgetmixmush.Ifyound
yourselfrepeatedlyusingalotofboostorcut,consider
alteringthesoundsource,suchasplacingamic
differently,tryingadifferentkindofmic,adifferent
vocalist,changingthestrings,orgargling.
Low:
ThelowEQprovidesupto15dBofboostorcut
below80Hz.Thecircuitisatatthecenterposition.
Thisfrequencyrepresentsthepunchinbassdrums,
bassguitar,fatsynthpatches,andsomereallyserious
malesingerswhoeatrawbeefforbreakfast.Thisband
changesincrementallyby±3dB.
Mid:
Shortfor“midrange,”thisEQprovidesupto
15dBofboostorcut,centeredat2.5kHz,alsoatat
thecenterposition.MidrangeEQisoftenthoughtofas
themostdynamic,becausethefrequenciesthatdene
anyparticularsoundarealmostalwaysfoundinthis
range.YoucancreatemanyinterestingandusefulEQ
changesbyturningthemidEQdownaswellasup.
Thisbandchangesincrementallyby±3dB.
High:
ThehighEQprovidesupto15dBofboostorcut
above12kHz,anditisalsoat(noboostorcut)at
thecenterposition.Useittoaddsizzletocymbals,an
overallsenseoftransparency,oranedgetokeyboards,
vocals,guitarandbaconfrying.Turnitdownalittle
toreducesibilanceortomasktapehiss.Thisband
changesincrementallyby±3dB.
FX Send:
Thiscontrolsendsthechannelinputtothebuilt-in
FXprocessor.The16built-inFXmaybeselectedfrom
theSYSscreen[13].Reverb,chorusanddelaymakeup
the16choices.Thechoseneffectisglobal.Besureto
checkoutamoredetaileddescriptionofeacheffectin
AppendixB.
12. Front LED On / Limit / Off
Pressingthechannel1andchannel2buttons[11]
simultaneouslygivesyoutheoptiontoturnthefront
LEDon,offorlimit.Pressthe+or–button[16]to
makeachoice,followedbyanyotherbuttontoexitthe
screen.ChoosinglimitmeanstheLEDisonfull-time.
However,itwillickerwhenthelimiterisactive
[3dBofattenuation,averaged].

Owner’s Manual
13
Owner’s Manual
DLM8/12 Loudspeaker: Rear Panel Features continued...
13. SYS Button
DLMloudspeakershavepowerfulsystemprocessing
toolsbuiltin.Simplypressthesystem[SYS]button
repeatedlyuntiltheparameteryouwanttochangeis
highlighted:
• EQ
• Delay
• FX
• Feedback
Oncetheparameteryouwanttochangeis
highlighted,pressthe+or–button[16]repeatedly
untilyouhaveachievedthesettingyouwantforthe
loudspeakersystem.
Let’stakeamoredetailedlookateachofthefour
factorysystempresetparameters:
EQ:
Hereyouareabletochangetheloudspeaker’s
speakermodetotailorittobestsuityourparticular
application.Therearesevenmodes,includingPA,DJ,
Soloist,Monitor,EQK,EQYandEQJ.
PA Speaker Mode–Thismodeisfullrange,but
focusesonmid-rangeclaritywherevocalsoftenreside.
DJ Speaker Mode–Thismodebumpsthelowsand
highswithamildtucktothemids,perfectformusic
playback.
Soloist Speaker Mode–Thismodefeaturesalow
frequencyroll-offtogetridofunwantedthumps
andaddsboostandsparkletomid-rangeandhigh
frequencies.Thismodeisperfectforplug-and-play
singer-songwriters.
Monitor Speaker Mode–Thismodefeaturesalow
frequencyroll-offandareductionaround2kHzto
ensuremaximumgainbeforefeedbackinmonitor
applications.
KYJ Speaker Modes–Thesemodesmimicthe
voicingsofpopularcompetitiveloudspeakers,allowing
youtoaddMackieDLMloudspeakerstoanexisting
systemwhilemaintainingsoniccontinuitythroughout
thesystem.
Delay:
Delay“delays”theaudiosignalforasetperiodof
time.WithDLMloudspeakers,it’susedforaligning
delaystacks,balconylls,etc,notasaneffect.DLM
delaytimesrangefrom0ms[0.0feet/0.0meters]
to300ms[337.8feet/102.9meters].
FX:
DLMloudspeakersinclude16“gigready”effects,
includingvariousreverbs,delays,chorusesand
combinationsofthese,aswell.Selectyourpreferred
effectfromthelistthenreturntochannel1or2[11]to
adjusttheappropriatelevelforeachsource.
Besuretocheckoutamoredetaileddescriptionof
eacheffectinAppendixD.
Feedback desTROYer:
Themulti-bandFeedbackDestroyerhuntsdown
offendingfeedbackfrequenciesandappliesuptosix
notchltersautomaticallytodestroyfeedbackand
maximizegainpriortofeedback.Thisisagreattoolfor
whenanengineerisnotpresent.
TherearefourFeedbackDestroyersettingstochoose
from:
Off [Default]–TheFeedbackDestroyerisnot
engaged.Ifltershavebeenapplied,thissettingwill
retainitscurrentltersettingsifthereareany,butthey
willnotbeengageduntilitisturnedbackon.Thisis
indicatedbythegrayedoutltergraphic.
On–WhentheautomaticFeedbackDestroyeris
turnedon,scanningoccurscontinuously.Thesixlters
willengagesequentiallywhenfeedbackispresentuntil
allareusedandthenitwillbelocked.Iffeedbackis
identiedonanexistinglter,thenotchwilldeepenin
threestepstofurtherdestroytheoffendingfeedback
frequency.Prettycool,huh?!
Clear–Thisclearsalllters.
Hold–Holdallowsausertoturnoffthecontinuous
scan.Inthismode,ltersthathavebeenappliedare
stillon,butthecircuitisnolongerlookingforfeedback.

DLM8/12 Powered Loudspeakers
14
DLM8/12 Powered Loudspeakers
14. MEM Button
SettingsforDLMloudspeakersmaybesavedto
memoryandrecalledatalatertimebyutilizingthe
memory[MEM]button.
Pressthisbuttonrepeatedlyuntilthepresetspot
youwanttosavesettingsto(orrecallsettingsfrom)is
highlighted.Therearethreeuserpresetsandafourthto
recallthefactorydefaultsettings.
Oncethepresetyouwanttosaveto(orrecallfrom)
ishighlighted,pressthe“+”button[16]tosavethe
currentsettings,orpressthe“–”buttontorecalla
presetthatwaspreviouslysaved.
15. Control Lock
TheDLMinterfacemaybelockedbypressingthe
SYS[13]andMEM[14]buttonssimultaneously.
Animageofapadlockwillappeartoindicatethatthe
loudspeakerislocked.Whenlocked,theDLMissafe
fromaccidentalbuttonpresses.Simplypressthe
buttonsagaintounlocktheloudspeaker.
DLM8/12 Loudspeaker: Rear Panel Features continued...
16. + and – Buttons
Thesebuttonsworkinconjunctionwiththebuttons
mentionedpreviously:channel1and2,MEMandSYS.
Increaseordecreasethelevel,EQsettingsandFXlevel
onchannels1and2;selectafactorysystemEQandFX,
changethedelaytime/distanceandturnthefeedback
onoroffintheSYSsection;andusethesebuttonsto
saveandrecallpresetsintheMEMsection.
17. 2000W/2W Switch1
AtMackiewearealwaysstrivingtopushthe
envelope,dreamingupnewawesomeproductstodesign
inordertoexpandtheboundariesoftheproaudio
world.Assuch,sometimesthelittleguygetsleftout.
Nothere!
Leavethisswitchoutwhenyouwanttorunthe
loudspeakerasintended.Wedesigneditwith2000W
inmind,soleavethisswitchouttokeepitat2000W.
Orpushthisswitchintoruntheloudspeakerata
mere2Winstead.Thisisagreattrickforfoolingfriends
intowondering,“what’sthatnoiseIbarelyhear?”They
willbeshockedthatit’syour2000WDLMloudspeaker
runningat2W!
1 People want more power, not less! As such, this “feature” has been shelved. Power to the people!

Owner’s Manual
15
Owner’s Manual
Smart Protect
ThereareadvancedDSPprotectionmechanisms
designedintotheDLM8/12tosafeguardthe
loudspeakersandampliersfrominadvertentdamage.
Theprotectioncircuitsaredesignedto
protecttheloudspeakersunderreasonable
andsensibleconditions.Shouldyouchoose
toignorethewarningsigns[e.g.excessivedistortion],
youcanstilldamagethespeakerbyoverdrivingitpast
thepointofamplierclipping.Suchdamageisbeyond
thescopeofthewarranty.
Limiting
Thedriverhasitsowncompressioncircuitwhich
helpsprotectitfromdamagingtransientpeaks.
Thecompressorisdesignedtobetransparentand
isnotnoticeableundernormaloperatingconditions.
ThefrontLEDwillpulsewheninlimit.Turnthe
volumedown!
Overexcursion Protection
A36dB/octavehigh-passlterjustpriortothelow-
frequencyamplierpreventsverylowfrequenciesfrom
beingamplied.Excessivelow-frequencyenergycan
damagethewooferbycausingitto“bottomout,”also
knowasoverexcursion,whichisequivalenttoa
mechanicalformofclipping.
Thermal Protection
Allampliersproduceheat.DLMloudspeakersare
designedtobeefcientbothelectricallyandthermally.
Theampliermodulehasinternalheatsinksand
adigitallycontrolledvariablespeedfan.AstheDSP
recognizesvaryinginternalheatlevels,itwillturn
onatanappropriatespeedtodrawcoolairinover
theamplierandexitviathesidevents.
Intheunlikelyeventoftheamplieroverheating,
abuilt-inthermalswitchwillactivate,mutingthe
signalandrampingthefanuptotopspeed.Anerror
messagewillalsoappearontheOLEDDisplay:
Whentheamplierhascooleddowntoasafe
operatingtemperature,thethermalswitchresetsitself,
andtheDLMloudspeakerresumesnormaloperation.
Ifthethermalswitchactivates,tryturningdownthe
levelcontrolanotchortwoonthemixingconsole(or
thebackoftheloudspeaker)toavoidoverheatingthe
amplier.Beawarethatdirectsunlightand/orhotstage
lightsmaybetheculpritofanamplieroverheating.
FYI
TheFYIscreendisplaysthelatestUIversion,DSP
version,AmpB+[voltage]andcurrenttemperature.
Nothingmaybechangedorupdatedhere,justanFYI
asstated.Thisscreenisdisplayedwhenpressingthe
Channel1[11]andMEMbuttons[14]simultaneously.
AC Power
BesuretheDLMloudspeakerispluggedintoan
outletthatisabletosupplythecorrectvoltagespecied
foryourmodel.Itwillcontinuetooperateatlower
voltages,butwillnotreachfullpower.
Besuretheelectricalservicecansupplyenough
amperageforallthecomponentsconnectedtoit.
Werecommendthatastiff(robust)supplyofAC
powerbeusedbecausetheampliersplacehigh
currentdemandsontheACline.Themorepowerthatis
availableontheline,thelouderthespeakerswillplay
andthemorepeakoutputpowerwillbeavailablefora
cleaner,punchierbass.Asuspectedproblemof“poor
bassperformance”isoftencausedbyaweakACsupply
totheampliers.
Beawareofanyerrormessagesthatmaybedisplayed
ontheOLEDDisplay:
Neverremovethegroundpinonthepower
cordoranyothercomponentoftheDLM
loudspeaker.Thisisverydangerous.

DLM8/12 Powered Loudspeakers
16
DLM8/12 Powered Loudspeakers
Placement
WARNING:Installationshouldonlybedone
byanexperiencedtechnician.Improper
installationmayresultindamagetothe
equipment,injuryordeath.Makesurethatthe
loudspeakerisinstalledinastableandsecureway
inordertoavoidanyconditionsthatmaybedangerous
forpersonsorstructures.
ADLMloudspeakerisdesignedtositontheoor
orstageaspartofthemainPAorasamonitor.Itmay
alsobepole-mountedviathebuilt-insocketonthe
bottomofthecabinet.Besurethepoleiscapableof
supportingtheweightoftheloudspeaker.TheMackie
SPM300isagreatoptionwhenusingaDLM12S
subwoofer,asitallowsforgreaterextensionthan
mostotherpolesavailablenorthoftheSouthPole.
ADLMloudspeakermayalsobeownviaitsthree
integratedypointsasdetailedonthenextpage.
BesuretoreadthePA-A3 Eyebolt Installation
Instructions,aswell.
OrmaybeyouprefertomountDLMloudspeakerson
thewall.ThisispossiblewiththeSWM300SwivelWall
MountKit.BesuretoreadtheSWM300 Swivel Wall
Mount Installation Instructions.
Checktomakesurethatthesupportsurface
(e.g.oor,etc.)hasthenecessarymechanical
characteristicstosupporttheweightofthe
loudspeaker(s).
Whenpole-mountingloudspeakers,besurethatthey
arestabilizedandsecuredfromfallingoverorbeing
accidentallypushedover.Failuretofollowthese
precautionsmayresultindamagetotheequipment,
personalinjury,ordeath.
Aswithanypoweredcomponents,protectthemfrom
moisture.Avoidinstallingtheloudspeakerinplaces
exposedtoharshweatherconditions.Ifyouaresetting
themupoutdoors,makesuretheyareundercoverifyou
expectrain.
Room Acoustics
Roomacousticsplayacrucialroleintheoverall
performanceofasoundsystem.Herearesome
additionalplacementtipstohelpovercomesome
typicalroomproblemsthatmightarise:
• Placingloudspeakersinthecornersofaroom
increasesthelowfrequencyoutputandcan
causethesoundtobemuddyandindistinct.
• Placingloudspeakersagainstawallincreases
thelowfrequencyoutput,thoughnotasmuch
ascornerplacement.However,thisisagood
waytoreinforcethelowfrequencies,ifso
desired.
• Avoidplacingthespeakersdirectlyona
hollowstageoor.Ahollowstagecanresonate
atcertainfrequencies,causingpeaksanddips
inthefrequencyresponseoftheroom.Itis
bettertoplacethemonasturdystanddesigned
tohandletheweightoftheDLMloudspeaker.
• Highlyreverberantrooms,likemany
gymnasiumsandauditoriums,area
nightmareforsoundsystemintelligibility.
Multiplereectionsoffthehardwalls,ceiling,
andoorplayhavocwiththesound.Depending
onthesituation,youmaybeabletotakesome
stepstominimizethereections,suchas
puttingcarpetingontheoors,closing
draperiestocoverlargeglasswindows,or
hangingtapestriesorothermaterialsonthe
wallstoabsorbsomeofthesound.
However,inmostcases,theseremediesarenot
possibleorpractical.Sowhatdoyoudo?
Makingthesoundsystemloudergenerally
doesn’tworkbecausethereectionsbecome
louder,too.Thebestapproachistoprovideas
muchdirectsoundcoveragetotheaudience
aspossible.Thefartherawayyouarefrom
thespeaker,themoreprominentwillbethe
reectedsound.
Usemorespeakersstrategicallyplacedsothey
areclosertothebackoftheaudience.Ifthe
distancebetweenthefrontandbackspeakers
ismorethanabout100feet,youshoulduse
theDL2delaytotime-alignthesound.(Since
soundtravelsabout1footpermillisecond,it
takesabout1/10ofasecondtotravel100feet.)
KeepinmindthattheDL2channelandsystem
processorisagreatwaytocompensateforsomeof
theseissues.Seepages12-13formoreinformation
[11,13].

Owner’s Manual
17
Owner’s Manual
Rigging
DLMloudspeakersmaybeindividuallyownusing
M10x17mmforgedshouldereyebolts.
WARNING:Installationshouldonlybedoneby
anexperiencedtechnician.Improper
installationmayresultindamagetothe
equipment,injuryordeath.Makesurethatthe
loudspeakerisinstalledinastableandsecurewayin
ordertoavoidanyconditionsthatmaybedangerousfor
personsorstructures.
WARNING:Thecabinetissuitableforrigging
viaitsypoints.NEVERattempttosuspenda
DLMloudspeakerbyitshandle.
Rigging Design Practices
Riggingaloudspeakerrequiresdetermining:
1.Theriggingmethodsandhardwarethatmeetstatic,
shock,dynamic,andanyotherloadrequirementsfor
supportingtheloudspeakerfromstructure.
2.ThedesignfactorandrequiredWLL(WorkingLoad
Limit)forthissupport.
Mackiestronglyrecommendsthefollowingrigging
practices:
1.Documentation:Thoroughlydocumentthedesign
withdetaileddrawingsandpartslists.
2.Analysis:Haveaqualiedprofessional,suchasa
licensedProfessionalEngineer,reviewandapprovethe
designbeforeitsimplementation.
3.Installation:Haveaqualiedprofessionalriggerdo
theinstallationandinspection.
4.Safety:Useadequatesafetyprecautionsand
back-upsystems.
Rigging Hardware and Accessories
RiggingMackieloudspeakerswillinvariablyrequire
hardwarenotsuppliedbyMackie.Varioustypesof
load-ratedhardwareareavailablefromavarietyof
third-partysources.Thereareanumberofsuch
companiesspecializinginmanufacturinghardwarefor,
designing,andinstallingriggingsystems.Eachoneof
thesetasksisadisciplineinitsownright.Becauseof
thehazardousnatureofriggingworkandthepotential
liability,engagecompaniesthatspecializeinthese
disciplinestodotheworkrequired.
Mackiedoesoffercertainaccessoryriggingitems,
primarilyforattachmenttothehardwareintegralwith
theloudspeaker.Someitems,suchaseyeboltsandwall
mountbrackets,maybeusedwithavarietyofproducts.
Whiletheseaccessoriesareintendedtofacilitate
installation,thewidevarietyofpossibleinstallation
conditionsandarraycongurationsdonotpermit
Mackietodeterminetheirsuitabilityorloadrating
foranyparticularapplication.
Mackieisnotinthebusinessofprovidingcomplete
riggingsystems,eitherasdesigners,manufacturers,or
installers.Itistheresponsibilityoftheinstallerto
provideaproperlyengineered,load-certiedrigging
systemforsupportingtheloudspeakerfromstructure.
Rigging Notes
TheDLMloudspeaker’sintegralmountingpoints
aredesignedtosupportonlytheweightoftheirown
loudspeakerwithsuitable,externalhardware.This
meansthateachDLMloudspeakermustbesupported
independentlyofanyotherDLMloudspeakerandany
otherloads.Allthreeriggingpointsmustbeusedto
hanganDLMloudspeaker.
3 Fly Points
MP=MountingPoint
MP MP
MP
Top Bottom

DLM8/12 Powered Loudspeakers
18
DLM8/12 Powered Loudspeakers
Important Rigging Reminder:
Toreiterate,Mackieisnotinthebusinessof
providingcompleteriggingsystems,eitherasdesigners,
manufacturers,orinstallers.Itistheresponsibility
oftheinstallertoprovideaproperlyengineered,
load-certiedriggingsystemforsupportingthe
loudspeakerfromstructure.
Flown at a 30˚ angle
TopFly
Points
BottomFlyPoint
(adjustsangle)
Flown at a 45˚ angle
TopFly
Points BottomFlyPoint
(adjustsangle)
Care and Maintenance
YourMackieloudspeakerswillprovidemanyyearsof
reliableserviceifyoufollowtheseguidelines:
• Avoidexposingtheloudspeakerstomoisture.
Iftheyaresetupoutdoors,besuretheyare
undercoverifrainisexpected.
• Avoidexposuretoextremecold(below
freezingtemperatures).Ifyoumustoperate
theloudspeakersinacoldenvironment,warm
upthevoicecoilsslowlybysendingalow-level
signalthroughthemforabout15minutesprior
tohigh-poweroperation.
• Useadryclothtocleanthecabinets.Onlydo
thiswhenthepoweristurnedoff.Avoidgetting
moistureintoanyoftheopeningsofthe
cabinet,particularlywherethedriversare
located.

Owner’s Manual
19
Owner’s Manual
Appendix A: Service Information
Poor bass performance
• Checkthepolarityoftheconnectionsbetweenthe
mixerandtheloudspeakers.Youmayhaveyour
positiveandnegativeconnectionsreversedatone
endofonecable,causingoneloudspeakertobe
out-of-phasewiththeother.
• Poorbassperformancemaybetheresultofbad
ACpower.Seethesectiontitled‘ACPower’on
thepreviouspageforfurtherdetails.
Poor sound
• Isitloudanddistorted?Makesurethatyou’renot
overdrivingastageinthesignalchain.Verifythat
alllevelcontrolsaresetproperly.
• Istheinputconnectorpluggedcompletelyinto
thejack?Besureallconnectionsaresecure.
Noise
• Whatisthepositionofthemic/lineswitch?
ItshouldbeINwhenamicisconnectedand
OUTwhenaline-levelsignalisconnectedto
thechannel1input.
• Makesureallconnectionstotheactive
loudspeakersaregoodandsound.
• Makesurenoneofthesignalcablesarerouted
nearACcables,powertransformers,orother
EMI-inducingdevices.
• IstherealightdimmerorotherSCR-baseddevice
onthesameACcircuitastheDLM8/12?Usean
AClinelterorplugtheloudspeakerintoa
differentACcircuit.
Hum
• Trydisconnectingthecableconnectedtothemain
inputjack.Ifthenoisedisappears,itcouldbe
a“groundloop,”ratherthanaproblemwiththe
DLMloudspeaker.Trysomeofthefollowing
troubleshootingideas:
• Usebalancedconnectionsthroughoutyoursystem
forthebestnoiserejection.
• Wheneverpossible,plugalltheaudioequipment’s
linecordsintooutletswhichshareacommon
ground.Thedistancebetweentheoutletsandthe
commongroundshouldbeasshortaspossible.
IfyouthinkyourMackieproducthasaproblem,
pleasecheckoutthefollowingtroubleshootingtipsand
doyourbesttoconrmtheproblem.VisittheSupport
sectionofourwebsite(www.mackie.com/support)
whereyouwillndlotsofusefulinformationsuchas
FAQsandotherdocumentation.Youmayndtheanswer
totheproblemwithouthavingtosendyourMackie
productaway.
Troubleshooting
No power
• Ourfavoritequestion:Isitpluggedin?Makesure
theACoutletislive[checkwithatesterorlamp].
• Ournextfavoritequestion:Isthepowerswitch
on?Ifnot,tryturningiton.
• IsthepowerLEDonthefrontpanelglowing
green?Ifnot,makesuretheACoutletislive.
Ifso,referto“Nosound”below.
• TheinternalAClinefusemaybeblown.Thisis
notauserserviceablepart.Ifyoususpectthe
AClinefuseisblown,pleaseseethe"Repair"
sectionnext.
No sound
• Istheinputlevelcontrolfortheinputsource
turnedallthewaydown?Verifythatallthelevel
controlsinthesystemareproperlyadjusted.
Lookatthelevelmetertoensurethatthemixer
isreceivingasignal.
• Isthesignalsourceworking?Makesurethe
connectingcablesareingoodrepairandsecurely
connectedatbothends.Makesuretheoutput
levelcontrolonthemixingconsoleisturnedup
sufcientlytodrivetheinputsofthespeaker.
• Makesurethemixerdoesnothaveamuteonora
processorloopengaged.Ifyoundsomethinglike
this,makesurethelevelisturneddownbefore
disengagingtheoffendingswitch.
• Hasitshutdown?Makesurethereisatleast
sixinchesoffreespacebehindeachDLM
loudspeaker.

DLM8/12 Powered Loudspeakers
20
DLM8/12 Powered Loudspeakers
Repair
Forwarrantyservice,refertothewarranty
informationonpage28.
Non-warrantyserviceforMackieproductsis
availableatafactory-authorizedservicecenter.To
locatethenearestservicecenter,visitwww.mackie.com,
click“Support”andselect“LocateaServiceCenter.”
ServiceforMackieproductslivingoutsidetheUnited
Statescanbeobtainedthroughlocaldealersor
distributors.
Ifyoudonothaveaccesstoourwebsite,youmaycall
theTechSupportdepartmentat1-800-898-3211,
Monday-Friday,duringnormalbusinesshours,Pacic
Time,toexplaintheproblem.TechSupportwilltellyou
wherethenearestfactory-authorizedservicecenteris
locatedinyourarea.
This manual suits for next models
1
Table of contents
Other Mackie Speakers manuals

Mackie
Mackie REACH User manual

Mackie
Mackie SRM450v2 User manual

Mackie
Mackie Monitor Series MR4T User manual

Mackie
Mackie TH-15A User manual

Mackie
Mackie REACH Manual

Mackie
Mackie SRM350 2-WAY User manual

Mackie
Mackie SRM-Flex User manual

Mackie
Mackie SRM 450 User manual

Mackie
Mackie Hotwire EX12 User manual

Mackie
Mackie S215 User manual

Mackie
Mackie MR5mk3 User manual

Mackie
Mackie C300z User manual

Mackie
Mackie SRM 450 Guide

Mackie
Mackie TH-15A User manual

Mackie
Mackie SP400C User manual

Mackie
Mackie SRM 450 User manual

Mackie
Mackie Monitor Series MR4 User manual

Mackie
Mackie SP400C Manual

Mackie
Mackie C200 User manual

Mackie
Mackie FreePlay HOME User manual