Macrom M-DVD9901 User manual

English
ALDINET S.P.A.
VIALE C.COLOMBO, 8
20090 TREZZANO S/N (MI)
ITALY

Precautions
Identification of controls
When using remote control
Quick Guide
Turning the power on and off
Stopping playback
Fast-forwarding/ fast-reversing
Finding the beginning of chapters or tracks
Changing the default settings(setup)
Others
1- 3
4-6
7- 10
9
10
7
8
12-13
17-18
Source
Remote control
Front panel
Playing a disc
Tuning the sound on and off
Playing from the desired location
Chapter/track/title repeat playback
Displaying the disc status
Convenient Functions 11
Installation and connections 14-16
In case of difficulty
Specifications
17
18
Loading and unloading a disc
Setting volume level

This digital versatile disc (DVD) video player uses 12V DC.
+20%
-10%
For future reference, record the model and serial number
(located on the case of the DVD player) in the space provided.
CAUTION:
This DVD VIDEO PLAYER IS A CLASS 1 LASER PRODUCT.
USE OF CONTROLS OR ADJUSTMENTS OR PERFORMANCE OF PROCEDURES OTHER
THAN THOSE SPECIFIED HEREIN MAY RESULT IN HAZARDOUS RADIATION EXPOSURE.
AS THE LASER BEAM USED IN THIS DVD VIDEO PLAYER IS HARMFUL TO THE EYES.
DO NOT ATTEMPT TO DISASSEMBLE THE CABINET.
REFER SERVICING TO QUALIFIED PERSONNEL ONLY.
WARNING : class 1 laser product - avoid long term viewing of direct laser radiation.
WARNING OF DEW FORMATION
Dew may form on the pickup lens in the following conditions.
- Immediately after a heater has been turned on.
- In a steamy or very humid room.
When the unit is suddenly moved form a cold environment to a warm one.
If dew forms inside this unit ,it may not operate properly.
In this case, turn on the power and wait about 2 or 3 hours for the dew to evaporate.
When the unit is used under low temperatures.
The pick up lens might warm up very fast and dew will form.
In this case ,turn on the power and wait a while for the dew to evaporate.


Direct sun and heat High humidity and water Excessive dust Excessive vibrations
Make sure the unit will not be installed in a location subjected to:
sure safety, always contact the dealer where you purchased this product to have the work done
Caution This symbol means important instructions.
Failure to heed them can result in injury or property damage.
Be sure the temperature inside the vehicle is between +55 C (+131 F) and -5 C(+23 F)
before turning your unit on.
3

SRC
POWE R / SOUR CE STOP SKIP SKIP PAU SE PL AY EJ ECT
PLAYER AU X MONITOR
SRC
POWER / SOURCE STOP SKIP SKIP PAUSE PLAY EJECT
PLAYER AU X MONI TOR
Disc solt/
open, close indicator
SRC
POWER /SOURCE
button
STOP
button
SKIP-
button
PLAYER/AUX
button
SKIP+
button
PLAY/PAUSE
button
EJECT
button
Front panel
The button
Short press is POWER function to power on/off ,
long press is SOURCE function to select different
source ( player or AUX )
To stop playback
To locate previous/next chapter or track
Play/ pause
To eject a disc
Resetting the unit
Press the RESET button with a pointed object,
such as a ballpoint pen, as shown.
Unit will turn off momentary after the
RESET button is pressed.
Note: pressing the RESET button
will erase some stored contents.
RESET button
4

GOTO button to location
power on/off button
by entering its corresponding track
number,chapter number or time
Long press is CLEAR function
to clear the wrong number you entered.
REPEAT.button
AUDIO button-toselect DVD audio
or VCD audio stereo
SETUP button
To change the default settings
DISPLAY button to display the disc staus
MENU button
to locate a specific DVD root MENU
Long press is TITLE function
to locate a specific title chapter or track or VCD PBC on/off.
VOL button
mute button
playing with no sound
GOTO
AUDIO
CLEA R
ANGL E
5
SUB.
DISPLAY
SOURCE button
to select different sources
(DVD or AUX)
to select the DVD disc subtitle
Long press is SUBTITLE function
button to eject the disc


SRC
POWE R / SOUR CE STOP SKIP SKIP PAUSE PL AY EJEC T
PLAYER AUX USB
SRC
POWE R / SOUR CE STOP SKIP SKIP PAUSE PL AY EJEC T
PLAYER AUX USB
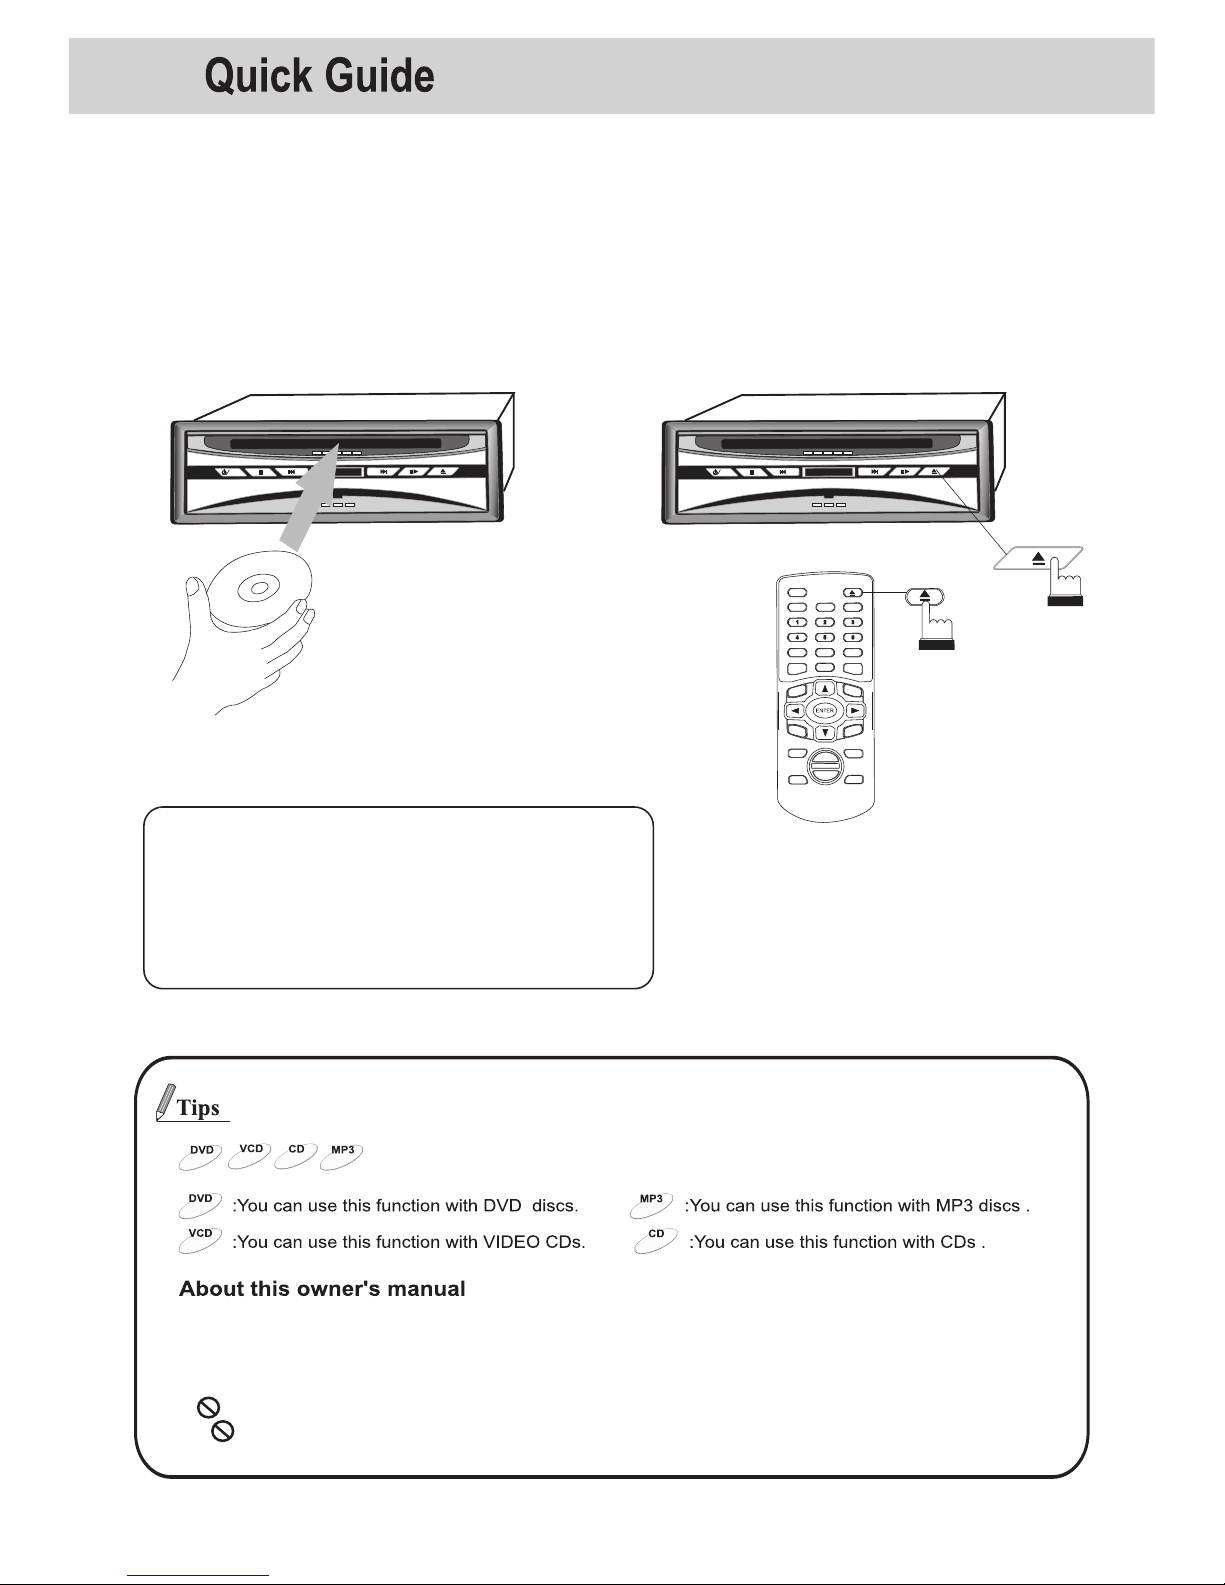
Loadi ng and un loading a di sc
Turn on the power before loading and unloading discs.
1Insert the disc with the side containing
words diagrams facing upwards.
Once the disc is partially inserted, it is
drawn in automatically. Playback starts.
2Unloading disc
Press EJECT button, the disc is
automatically ejected.
Notes:
If wrong disc, upside-down discs or dirty discs
have been inserted, “NO DISC” is displayed.
Remove the disc.
Do not put any objects other than discs into the
disc slot. doing so may cause the player to
malfunction.
This owner’s manual explains the basic instructions of this DVD player, some DVD
disc are produced in a manner that allows specific or limited operation during playback.
As such, the DVD player may not respond to all operating commands. This is not a
defect in the DVD player. Refer to the instruction notes of discs.
“ “may appear on the screen during operation.
A “ “ means that the operation is not permitted by the DVD player or the disc.
These indicate the disc for which the function can be used.
7

Press the button of
the remote control, the power turns off.
To turn the power on, press the button
again.
1
2 SOURCE
Select DVD player or AUX input
by pressing the SOURCE button.
Connect
Using AUDIO and VIDEO IN,
connect the DVD video player
to a VTR, TV/VTR combination
or video selector.
AUX
SOURCE
During playback pree ,no sound
is played.Press to resume normal
playback with sound.
3 Setting volume level
First press VOL button on the remote
,
then press the button to
increase or decrease voloume level
4
During playback,
press DISPLAY buttonto
appear the playback status ;
press DISPLAY button again to turn off
the playback status.
5
SUB.
8


10

AUDIO
AUDIO
AUDIO
pressing button
AUDIO
pressing button
SUB.
SUB. SUB.
pressing button
During playback, press GOTO.
Playing form
the desired location
Locating a specific location by entering
the track number, the chapter number
or the time
2
3
Input the chapter the title or the time
from which you want to start playback
using the joystick and the number
keys(0~9).
Press ENTER
Playback starts from the selected chapter,
track or the time.
5
GOTO
GOTO
Notes:
Input the hours first, followed by the
minutes, then the seconds.
Press CLEAR to delete all digits you
input.
AUDIO
AUDIO
SUB.
GOTO
RPT.
RPT.
RPT.
11

TV System : Multi
Language
Video
1 Language setup
2 Video setup
12

Digital output :PCM
Night Mode :Off
3 Audio setup
4 Rating setup
5 Others setup
13

1,2,3
14

3A
SRC
POWE R / SOUR CE STOP SKIP SKIP PAUSE PL AY EJEC T
PLAYER AUX USB
WA RNI NG :
MOV E THE SCR EWS BEF ORE FIX ING!
!
Note:
The are 2 mounting screws on the case of
DVD player to protect unit during shipping.
Be sure to remove these screws before
installing the unit. Cover the holes with
the dustproof paster.
Two black sticking papers
Mounting bracket
(half sleeve)
Removable trim ring
equipped on the unit
Rear strap
(brace)
Mounting screw M5
X1
Key
x2
x2
15

3A
Rear of product
REAR VIDEO OUT
FRONT VIDEO OUT
MONITOR VIDEO IN
EXTERIOR VIDEO IN
AUDIO OUT (LEFT)
AUDIO OUT (RIGHT)
AUDIO IN (LEFT)
AUDIO IN (RIGHT)
To monitor with rear-viem camera input
RCA input for rear-view camera
To headrest or ceiling mount monitors
RCA input for video games
AUDIO output (RCA)
AUDIO input (RCA)
GREEN - PARKING BRAKE
RED - +12V ACC
YELLOW - +12V BATT
BLUE - STANDBY OUT
BROWN - REVERSE INPUT
BLACK - POWER GROUND
USB jack(optional)
remote control sensor jack
BLACK: (-) neg . ground input. To vehicle chassis
BROWN: (+) pos. reverse wire input (for rear view camera option)
BLUE: (+) 300mA max. standby output
YELLOW: (+) pos. 12 volt constant input
RED: (+) pos. 12 volt accessory input
GREEN: Used to detect the On/Off status of the parking brake ,This lead must be connected
to the power supply side of the parking brake switch.
YELLOW
Left(WHITE)
Right(RED)
16
Note
1.We advise to connect the EX-VIDEO-CON lead.
And so the front display only will be on while detecting the
parking brake ON.
Or if the
EX-VIDEO-CON and MONITOR VIDEO IN are used,
the front display will be on while backing the car.
2. This product’s REAR VIDEO OUT is for connections of displays
to enable passengers in the rear seats to watch the DVD
or Video CD.
Warning
NEVER install the display in a location that enables the driver
to watch the DVD or Video CD while driving.
This products whether your car’s parking brake is engaged or not,
and prevents you from watching a DVD or Video CD on the display
connected to FRONT VIDEO OUT while driving.
Example: When you attempt to watch a DVD, the screen is black.
When you parking your car in a safe place and apply the parking
brake, the picture appears on the screen.

17

Power requirement: 12
Power consumption: less than 20 W
V DC
Dimensions(approx.): 178x50x183mm
(w/h/d) incl. Projecting parts
Weight: 1.4Kg
Design and specifications are subject to change without notice.
Power
General
Audio output : 1.9 0.2V 100k (analog)
Video output: 1 0.2V
Resolution: more than 500 line
Audio
Video
+20%
-10%
Normal operating temperature range: -5°C(+23°F) TO+55° C(+131° F)
The illustrations in this manual may appear different from the
actual product due to printing conditions.
75
18
Other Macrom DVD Player manuals