MAF AJ-600 User manual

INSTALLATION MANUAL
FOR THE AJ-600 24S SOLAR SYSTEM
A SOLAR SYSTEM THAT SUITS YOUR DAILY NEEDS

WARNING:
CAREFULLY FOLLOW THE INSTRUCTIONS AND PROCEDURE FOR THE INSTALLATION
BE CAREFUL NOT TO SHORT CIRCUIT THE BATTERY TERMINALS AT ANYTIME AS IT IS DANGEROUS
MAKE SURE THE BATTERIES ARE OUT OF REACH FROM KIDS
DO NOT USE CABLES THAT ARE DAMAGED (ELECTRICAL SHOCK)
MAKE SURE THE INVERTER DOES NOT GET IN CONTACT WITH WATER (RAIN)
IF YOU WANT TO INCLUDE YOUR AJ SYSTEM INTO YOUR EXISTING HOUSE WIRING, YOU WILL HAVE TO
CONTACT A CERTIFIED ELECTRICIAN TO DO THAT

THE MANUAL CONTENT HIGHLIGHTS WHAT IS COVERED IN THE MANUAL.
CAREFULLY FOLLOW THE STEP BY STEP GUIDE.
TOOL REQUIREMENT
AJ-600 SYSTEM INSTALLATION
OVERVIEW
MANUAL STEP-BY-STEP GUIDE
SETTING UP THE INVERTER
SETTING UP THE BATTERY
SETTING UP THE SOLAR PANEL
COMMISSIONING THE SYSTEM
SETTING UP THE APPLIANCES
COMPATIBLE APPLIANCES
LOAD CALCULATIONS FOR THE
AJ STUDER SOLAR SYSTEM
AJ-600 SOLAR KIT
MAINTENANCE
CONTACT DETAILS
MANUAL CONTENT
MANUAL CONTENT
PAGE 2
PAGE 3
PAGE 3
PAGE 4
PAGE 4
PAGE 4
PAGE 5
PAGE 5
PAGE 5
PAGE 6
PAGE 3
PAGE 6

8X SCREW WITH SOCKET HEAD
4X RAIL
1X ALLEN KEY
4X END CLAMP
1X SOLAR PANEL
2X BATTERY 12V/100A
15 METER SOLAR CABLE
INVERTER AJ-600 24S
MULTI PAL ADAPTER/ POWER BOARD
1X BATTERY CONDUCTOR
2
TOOL REQUIREMENTS
TOOL REQUIREMENTS
PLEASE NOTE, THIS IS JUST A GUIDE, AND YOU MAY REQUIRE ADDITIONAL TOOLS THAN
WHAT IS LISTED HERE

3
AJ 600 INVERTER
2X 12V/100Ah battery 4 port Multiple Adapter
370W solar panel
Lable
Red Terminal / Positive Cable
Black Terminal / Negative Cable
Power cable for adapter
Positive
Negative
Key Symbols
Solar Panel Cable
An overview diagram for the AJ-600
Solar installation
Battery 2 Battery 1

MANUAL
MANUAL
- STEP BY STEP GUIDE
SETTING UP THE INVERTER
MANUAL
MANUAL
- STEP BY STEP GUIDE
SETTING UP THE BATTERY
CONNECT CONDUCTOR TO BATTERIES
INSTALLING THE INVERTER
SOLAR CABLE TO INVERTER
Setting up the inverter - Find a good place for the inverter that is steady and out
of reach from children. You can use a firm board or holder that is a heat proof
(non-burnable) surface as the inverter can get hot while in use.
Using a Phillips screwdriver or a drill, screw the inverter to sit firmly on it's
holder.
Make sure the inverter is protected from weather and there is enough airflow
around the inverter. Do not place anything on top of the inverter and also make
sure that there are no burnable items near it.
The red marked solar cable needs to be connected to the red terminal. Reverse
polarity will damage the inverter!. Push in the cable until it holds. To remove the
cable, you would have to push a small screwdriver in the opening next to the
terminal and gently push the leaver with the screwdriver while gently pulling the
cable out.
Setting up the batteries - Never place the batteries directly on the ground. Make
sure the surface is clean and won't damage the battery. You can place the battery
on a steady flat firm wood or flat surface.
Connecting the red inverter cable to the red marked terminal of battery 1.
Connect the black inverter cable to the black terminal of battery 2. THIS IS
VERY IMPORTANT to connect it right! Tighten the terminals fast with a shifter,
however do not over tighten them!
Connecting the conductor to the batteries - Use the conductor to connect the
batteries together. Connect the black terminal of battery 1 to the red terminal of
battery 2. Please refer to page 3.
You will have to unscrew the screw from the battery terminal, then place the
conductor on-top and lock it by screwing the nut back on top of the conductor.Do
the same for the others.
Be aware that it can spark a little so hold the conductor firmly to the terminal
while you are tightening the screws.
The inverter should come on automatically.
CONNECT RED AND BLACK TERMINAL
TO BATTERIES

4
MANUAL
MANUAL
- STEP BY STEP GUIDE
SETTING UP THE SOLAR PANEL
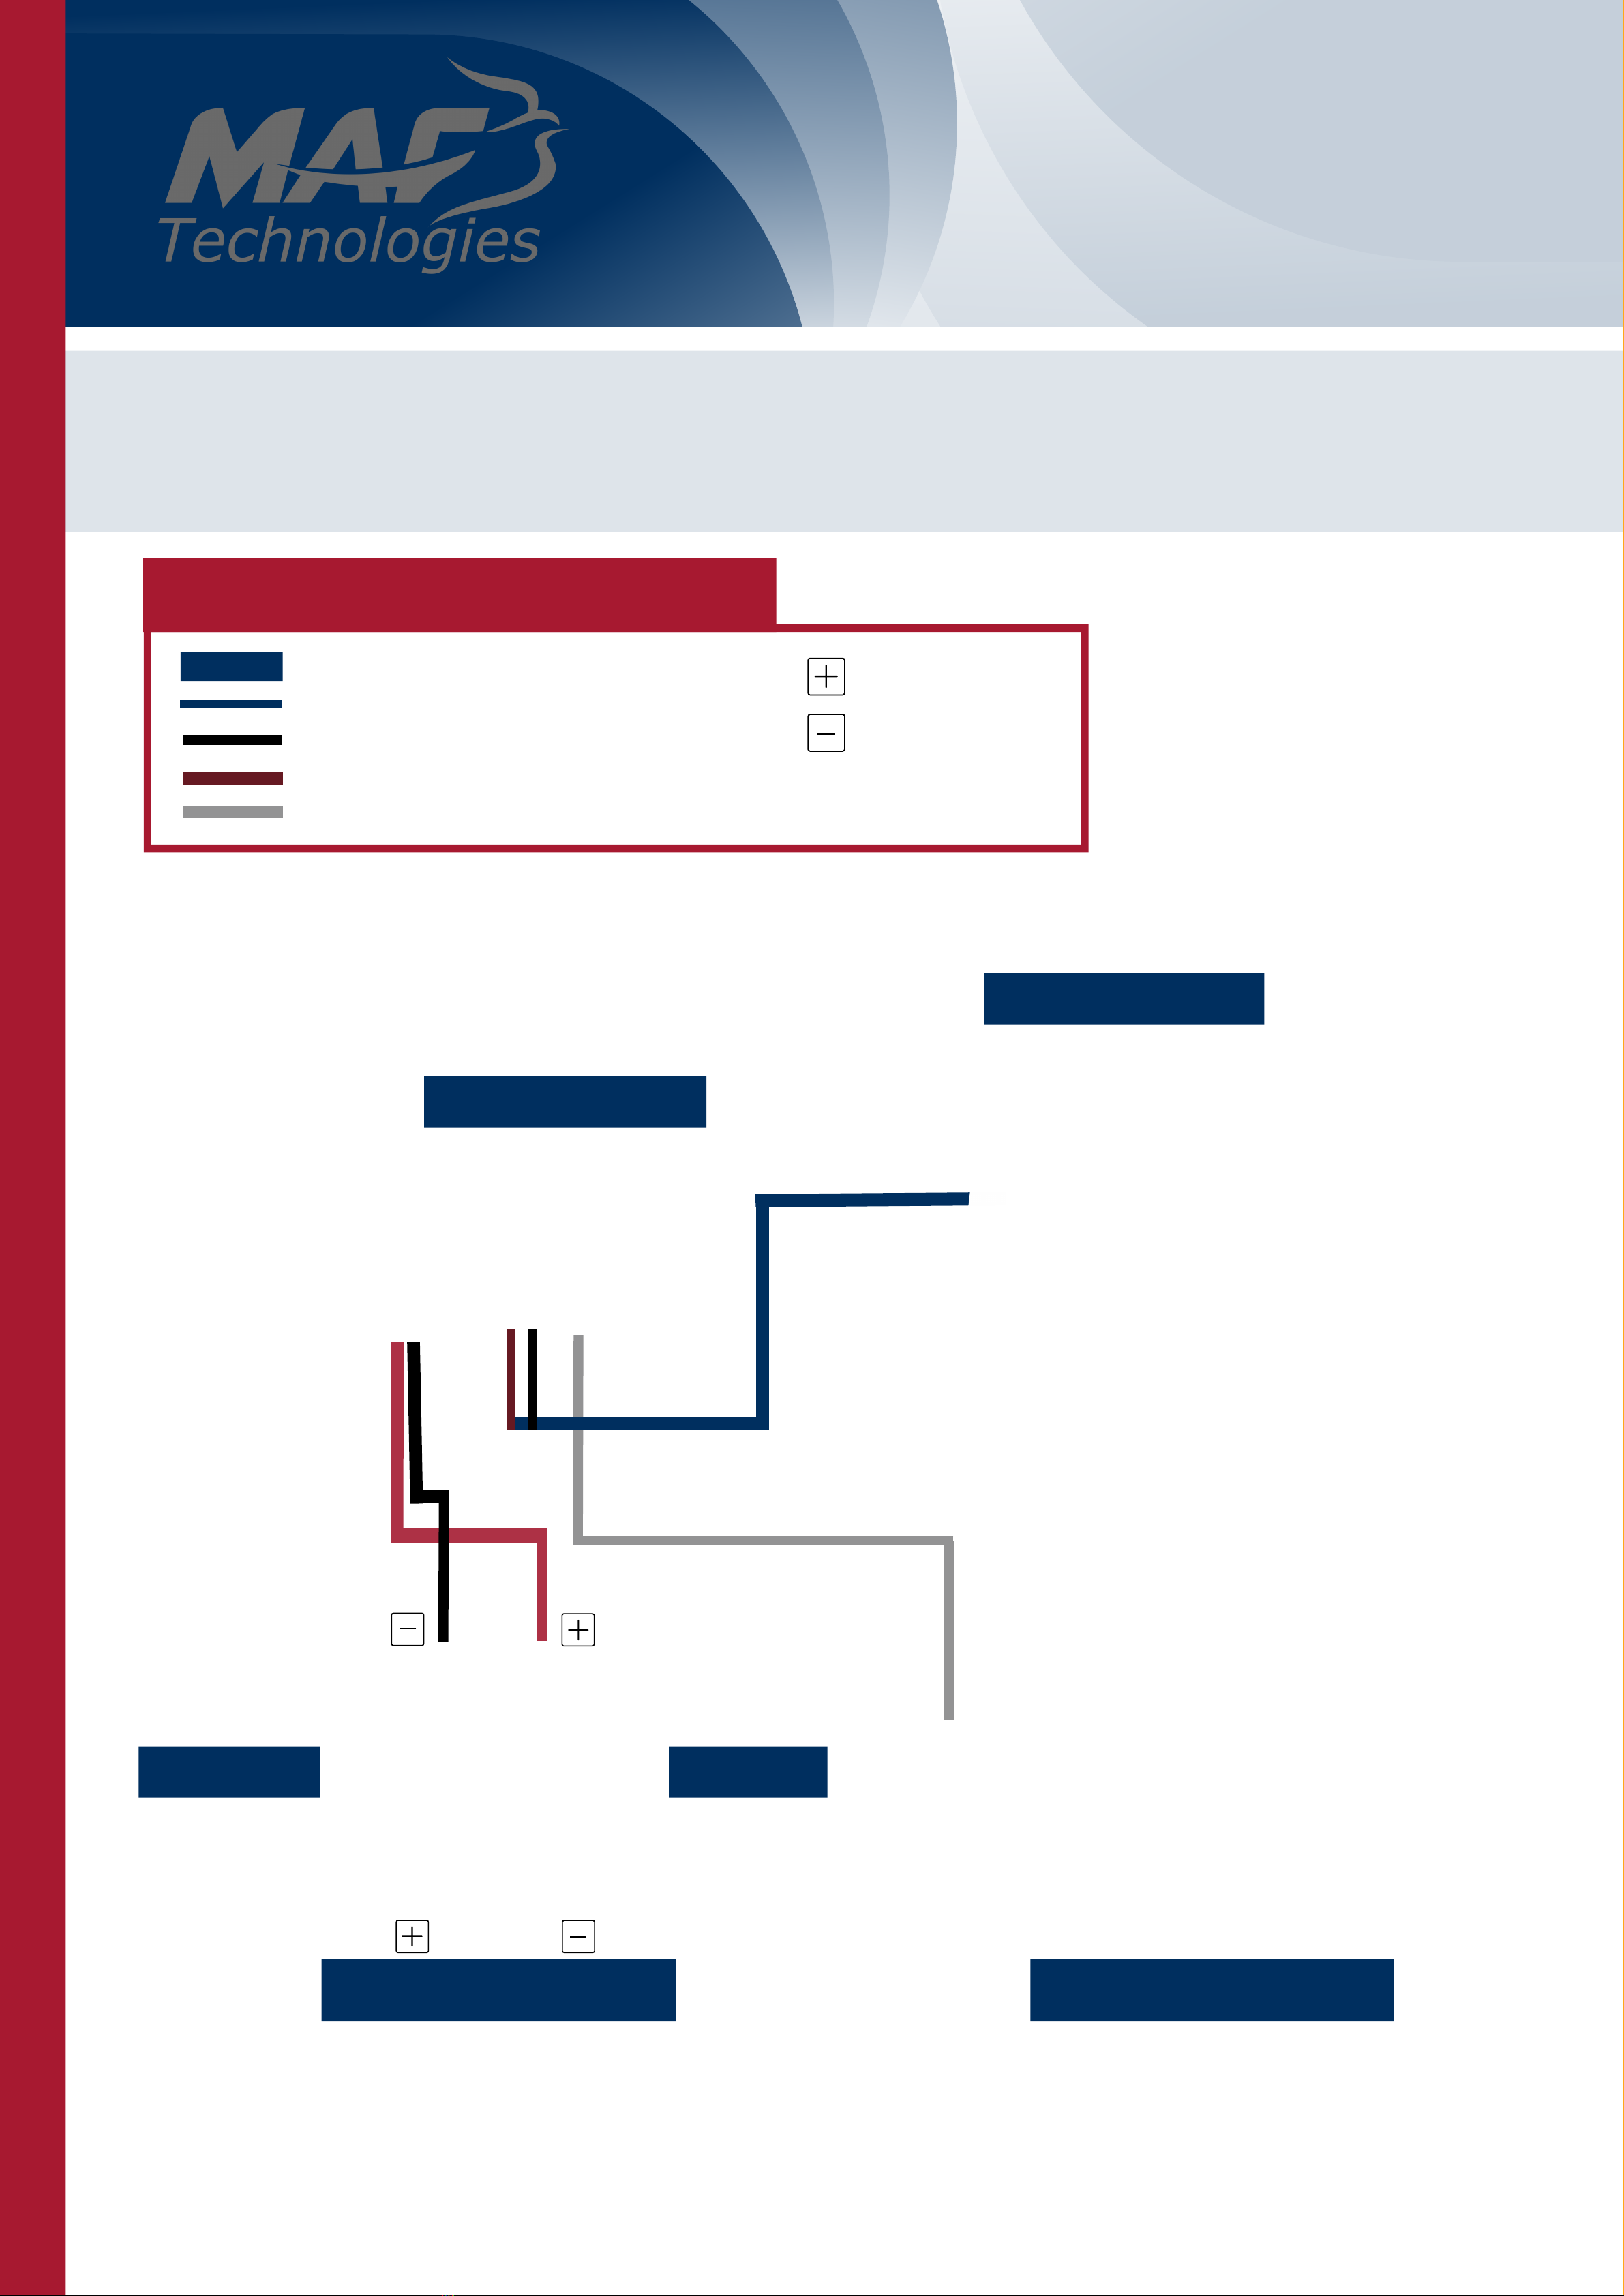
Setting up the Solar Panel - Find a good spot on the roof for the solar panel
and if possible, face the solar panel towards north to take in more sun light.
Align the solar panel - Before installing the solar panel, make sure to align
the railings directly inline with the solar panel on the roof so that the solar
panel can sit perfectly on-top of the railings.You can do this by using a black
marker to marker each corners of the panel.
When aligning and marking the railing for the solar panel make sure that the
railing is slightly or half way exposed from underneath the solar panel. This
will make it easier to clamp and lock the solar panel by the end of the aligning
process.
Make sure to place the rails in a way that the screws will go into the roof
structure underneath the roof.
Once you've marked the spot where the railing will be placed (to hold the solar
panel) using a hammer to hammer down the screw into the holes of the rails
then use the allen key to lock the screw firmly to the roof (kappa). Repeat this
step for the other rails. You can also use a drill if you have one.
Make sure the rail is locked firmly and directly on top of the slop of the roof
(kappa) and not screwed in between the slope of the roof (kappa) to avoid
causing leaks in the roof.
Connecting the Solar Cable - Confirm that the solar cable is connected to the
inverter. Do this by gently but firmly connecting the cable to the solar panel
cable until you hear a click.
Setting up before clamping the rails to the solar panel - Once the solar
cable is locked to the solar panel, place the solar panel directly on-top of the
rails and make sure that the rails are slightly visible from underneath the solar
panel before you can clamp the solar panel to the railings.
To do this, slide the clamp in between the spaces of the rail and make sure the
top of the clap holds the solar panels then use the allen key to tighten the
clamp until it's firm and holds the solar panel in place.
ALIGN THE SOLAR PANEL
HAMMERING THE SCREW
CONNECT THE SOLAR CABEL
INSTALLING THE CLAMP

MANUAL
MANUAL
- STEP BY STEP GUIDE
COMMISSIONING THE SYSTEM
Double Check - Make sure the inverter, batteries and solar panel are connected and
installed before starting up the system.
Connect the adapter - connect the multiple adapter and include the appliances (have a
light with an extension lead)
now you can switch on the switch at the power bar and your appliances gets power.
The system indicator -The LED with the sun symbol shows that the solar panel is
producing energy, if it flashes quick, the battery is full and it has stopped to charge.
the LED with the flash shows if the inverter is supplying 240V to the output while steady
green, if it flashes the inverter is on standby. Once load gets connected, it automatically
switches the inverter on again.
The BLO LED shows when the battery has been discharged to much and the protection
is active. Try to reduce the load for the next day if it blinks several times in a row.
If BLO LED does not show up that means that the connected load is in a good range
If you overload the inverter or the battery gets drained all the way, the inverter will
automatically switch off. Keep in account how much you are loading . You do not want
to overload. Please make sure you reduce your load.
By pressing the power button the inverter can be switched off/switched on.
You can now connect your appliances to the multiple adapter
and enjoy using the power that the system provides.
MANUAL
MANUAL
- STEP BY STEP GUIDE
SETTING UP THE APPLIANCES
SWITCH ON THE INVERTER
SYSTEM INDICATOR

Appliances
Est. Consumption
Can run on AJ-600
5
LOAD CALCULATIONS FOR THE AJ-600 STUDER SOLAR SYSTEM:
RICE COOKER
240V LED LIGHT
100L BAR FRIDGE
TV + PLAYBOX
SMALL POWER TOOLS
FREEZER SOUND SYSTEM
INKJET PRINTER
LAPTOP
CHARGING PHONES + TABLETS
COMPATIBLE APPLIANCES
IN THE TABLE BELOW, YOU CAN FIND THE ESTIMATIONS FOR DIFFERENT APPLIANCES. THIS WILL HELP YOU TO MAKE
A ROUGH CALCULATION FOR YOUR SOLAR NEEDS. PLEASE KEEP IN MIND THAT THIS ARE ESTIMATIONS AND THAT
THE FIGURES IN YOUR INDIVIDUAL CASE CAN BE DIFFERENT (DEPENDING ON THE APPLIANCE AND THE
ENVIRONMENT).
5 W/h
10 W/h
18 W/h
25 W/h
20 W/h
35 W/h
250 W/h
300 W/day
750 W/day
700 W/h
1000 W/h
1200 W/h
1200 W/h
Mobile phone, tablet
LED light short
LED light long
LED TV small
Inkjet printer
Sat box
Church sound system
Bar fridge (100l)
Small freezer (100l)
Rice cooker 1.8l
Micro wave
Davey water pump
Angle grinder

Appliances
Consumption
Hours
Watt Hours (WH)
Appliances
Consumption
Hours
Watt Hours (WH)
1
1
1
10 W/h
10 W/h
25 W/h
35 W/h
50 W/h
LED light (short)
LED security light (short)
TV
Sat box
Laptop during the day
5
12
3
3
8
100
240
75
105
400
2
2
1
1
1
920WhTotal Consumption
750 W/day
300 W/day
700 W/h
Freezer (100l)
Fridge (100l)
Rice cooker 2
750
300
1400
2450 WhTotal Consumption
LET’S FIND OUT, IF A AJ- 600 CAN POWER UP THE FOLLOWING APPLIANCES
AS THE LOADS ABOVE ADD UP TO LESS THAN 1200WH PER DAY, THE SYSTEM WILL BE SUFFICIENT TO PROVIDE
THE REQUIRED POWER.
THE CALCULATIONS ABOVE EXCEED 1200 WH, SO THE LOAD IS TOO HIGH FOR A AJ-600 SYSTEM. TO USE THE
APPLIANCES THAT ARE CALCULATED ABOVE, YOU WILL NEED THE BIGGER SOLAR SYSTEM (STUDER AJ-1300).
AJ-600 SOLAR KIT:
THE AJ-600 SYSTEM PRODUCES ABOUT 1200 WH ON A SUNNY DAY. YOU CAN NOW CALCULATE HOW MANY LOADS CAN BE
POWERED UP DEPENDING ON YOUR NEEDS:
QUANTITY X CONSUMPTION X HOURS = CONSUMPTION IN WH (WATT HOURS)

6
MAINTENANCE:
MAKE SURE YOU CLEAN THE PANELS FROM TIME TO TIME IF DIRTY
KEEP THE INVERTER FREE OF DUST AN BUGS
IF THE SYSTEM STOPS FUNCTIONING, IT'S MOST LIKELY THAT YOU HAVE USED TOO MUCH LOADS
TO AVOID THIS, REDUCE THE LOAD AND LET IT CHARGE FOR SOMETIME
MAF Technologies
P.O.Box 1307, Morchhauser street
Goroka, 441, EHP,
Papua New Guinea
Address
Landline:(+675) 532 2670
BMobile:(+675) 7528 1345
Digicel: (+675) 7250 3958
Contact
CONTACT DETAILS
IF YOU ARE STUCK DURING THE PROCESS OF SET UP OR NEED CONFIRMATION REGARDING THE AJ SYSTEM SET
UP THEN CONTACT OUR ELECTRONIC TECHNICIANS WHO WILL BE ABLE TO ASSIST YOU WITH ANY QUIRES OR
CONCERNS.
Facebook | Instagram | Whatsapp | YouTube
Table of contents
Popular Inverter manuals by other brands

ecoclima
ecoclima EC/I-09QC Service manual

ULTRA BRIGHT
ULTRA BRIGHT UB-SFPL-S-4 Series instructions

Step Electric
Step Electric AS500 Series Using instructions

Lenze
Lenze i510 Series operating instructions

K2 Systems
K2 Systems S-DOME SYSTEM Assembly instructions

Growatt
Growatt MIN 3 K-11.4K TL-XH-US Commissioning Guide