Magene S314 User manual


Safety Warnings and Product InformationProduct IntroductionWarnings
Failure to notice the potential dangers listed below may lead
to severe harm or even fatal accidents.
Battery-related warnings
2The product uses a CR2032 button cell.
Failure to follow the instructions listed below may shorten
the battery's shelf life, damage the device, or cause fire,
chemical burns, battery leakage, or the risk of injury.
• Do not disassemble, modify, puncture, or damage the
device or the battery.
• Do not expose the device or the battery to fire, explosion, or
other hazards.
• Do not place or store the device near a dryer, in a car under
direct sunlight, or in other high-temperature environment.
• Do not immerse the battery in water or other liquids.
• Do not use any sharp object when removing the button cell.
• Keep the battery out of reach of children. Swallowing the
battery may cause chemical burns, soft tissue perforation, or
even death. Seek immediate medical help if the battery is
swallowed.
S314 supports standard Bluetooth and ANT+ protocols.
When installed properly on the crank or hub, it accurately
measures your cadence or speed. S314 allows you to do
scientific and pleasant training when installed on a device
supporting standard Bluetooth and ANT+ protocols, such
as bike computers, sports watches, and cycling apps.
With the battery installed, the sensor is in speed mode if the
green indicator blinks and in cadence mode if the red
indicator blinks.
1. LED indicators (only visible when the battery being
installed and when the sensor is switching between modes)
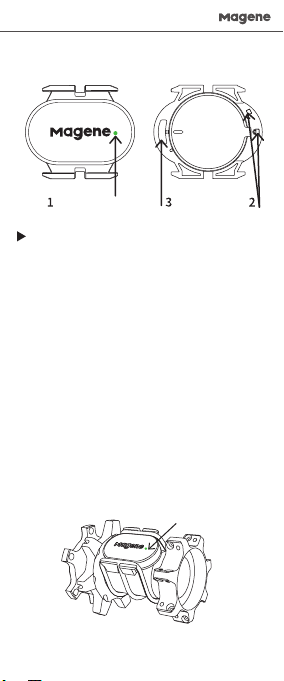
Green light flashes
3Sensor Installation2. Rotation position for the battery holder
3. Installation position of the silicone pad
1. The sensor can be switched between speed and cadence
modes by reinstalling the battery or using the Magene Utility
app. The sensor can be in only one mode.
2.Use the silicone pad or silicone ring as required by actual
conditions.
3.To prevent the sensor from being damaged or being lost
after falling off, after installing the sensor, ensure that the
sensor and the silicone ring do not have friction against your
shoes and bike.
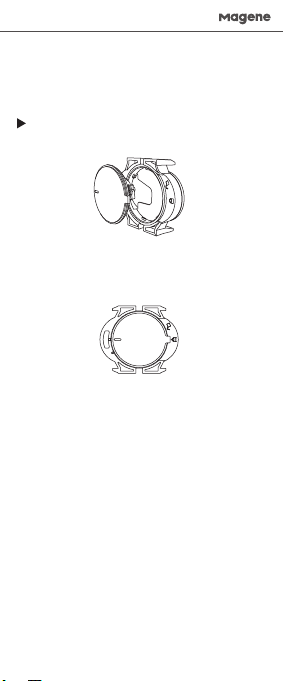
1.With the battery installed, the sensor is in speed mode if the
green indicator blinks and in cadence mode if the red
indicator blinks.
2.Install the silicone pad at the bottom of the sensor and use
the silicone ring to install the sensor on the front hub.
3.Rotate the wheels and search the sensor using a device
supporting the Bluetooth or ANT+ protocol.
Notes:
Speed Mode
English

4Red light flashes
Pairing and SettingsIndicator
Green indicator blinks
Red indicator blinks
Device Status
Speed Mode
Cadence Mode
Low battery
Red and green
indicators blink
alternately
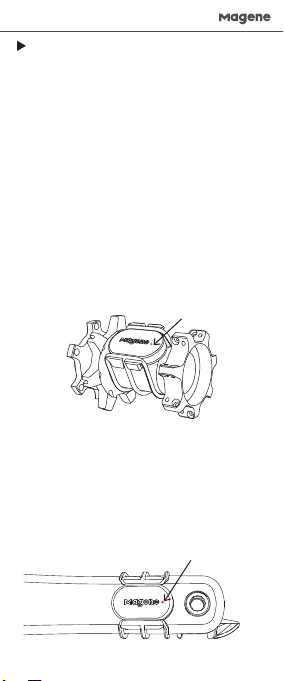
1. Reinstall the battery. The red indicator blinking indicates
that the sensor is in cadence mode.
3. Rotate the crank and search the sensor using a device
supporting the Bluetooth or ANT+ protocol.
2. Install the silicone pad at the bottom of the sensor and use
the silicone ring to install the sensor on the internal side of the
left crank.
Cadence Mode
1. The sensor only broadcasts via Bluetooth or ANT+ when
properly installed and being used. At this time, you can search
and connect to the sensor using the corresponding device or
app.
2. If using the Bluetooth protocol, the sensor can only be
connected to a single device or app. To use another device or
app, disconnect the sensor first.
3. To connect the sensor to an app, search and connect the
sensor using the app. This cannot be done via the system
Bluetooth of the phone.
English
5Battery Replacement
1. Rotate the position mark on the battery cover anticlockwise
from the locking position to the opening position. Then open
the battery holder.
4.If using the ANT+ protocol, the sensor can be connected to
multiple devices simultaneously.
5.To reduce power consumption, the sensor will automatically
enter sleep mode after 60 seconds of inactivity.
2. Place a new battery into the battery holder. Align the
position mark to the opening position and press down the
battery cover. After pressing the whole cover into the battery
holder, rotate the position mark clockwise to the locking
position.
English

Installation des Sensors
Achtung:
Geschwindigkeit-Modus
1. Sie können den Geschwindigkeit-Modus und den
Trittfrequenz-Modus durch den Wiedereinbau der Batterie oder
den App „Magene Utility“wechseln. Gleichzeitig kann nur ein
Modus ausgewählt werden.
2. Bitte verwenden Sie die Silikonauflage und -scheibe nach
Ihren tatsächlichen Bedürfnissen.
3. Achten Sie bitte nach der Installation des Sensors darauf,
dass der Sensor und die Silikonscheibe beim Fahren nicht an
Schuhen oder Fahrrad reiben, um Schäden oder Verlust des
Sensors während des Gebrauchs zu vermeiden.
1. Nach dem Wiedereinbau der Batterie blinkt die grüne
Anzeige, um anzuzeigen, dass sich der Sensor im
Geschwindigkeit-Modus befindet.
2. Setzen Sie die Silikonauflage auf der Unterseite des
Sensors ein und installieren den Sensor mit der Silikonscheibe
an der Vorderradnabe.
3. Drehen Sie das Rad und suchen Sie mit Geräten, die das
Standard-Bluetooth- oder ANT+-Protokoll unterstützen.
Trittfrequenz-Modus
1. Nach dem Wiedereinbau der Batterie blinkt die rote
Anzeige, um anzuzeigen, dass sich der Sensor im
Trittfrequenz-Modus befindet.
Grünes Licht blinkt
Deutsche
2. Setzen Sie die Silikonauflage auf der Unterseite des Sensors
ein und installieren den Sensor mit der Silikonscheibe an der
Innenseite der linken Kurbel.
3. Drehen Sie die Kurbel und suchen Sie mit Geräten, die das
Standard-Bluetooth oder ANT+-Protokoll unterstützen.
Rotes Licht blinkt
6

7Verbindung und Einstellung
Anzeige Gerätestatus
Die grüne Anzeige blinkt. Geschwindigkeit-Modus
Die rote Anzeige blinkt. Trittfrequenz-Modus
Die Sensorbatterie ist schwach
Die grüne und rote Anzeige
blinkt abwechselnd.
1. Der Sensor wird erst dann mit der Bluetooth- und ANT+-
Sendung beginnen, nachdem er ordnungsgemäß installiert
und verwendet wurde. Zu diesem Zeitpunkt können Sie es
mit den entsprechenden Geräten oder dem App suchen und
eine Verbindung herstellen.
2. Bei Verwendung des Bluetooth-Protokolls kann es nur mit
einem Gerät oder einem App verbunden werden. Wenn Sie
das Gerät oder den App ändern möchten, trennen Sie bitte
zuerst die Verbindung.
Deutsche
3. Wenn Sie den App im Mobiltelefon verwenden, müssen Sie
in der App nach dem Sensor suchen und ihn mit dem App
verbinden . Die Suche nach dem Sensor und Verbindung damit
über die Bluetooth-Funktion des Mobiltelefonsystems
funktioniert nicht.
4. Mit dem ANT+-Protokoll kann es von mehreren Geräten
gleichzeitig verbunden werden.
5. Nachdem der Sensor 60 Sekunden lang stationär war,
wechselt er automatisch in den Ruhezustand, um Strom zu
sparen.
Wechsel der Batterie
1.Drehen Sie die Positionsmarkierung auf dem
Batterieabdeckel gegen den Uhrzeigersinn von der
verriegelten Position in die offene Position, um das Batteriefach
zu öffnen.
2. Setzen Sie die neue Batterie in das Batteriefach ein, richten
Sie die Positionsmarkierung des Batteriedeckels auf die offene
Position aus und drücken Sie sie hinein. Sobald der
Batterieabdeckel vollständig eingedrückt ist, drehen Sie die
Batterieabdeckung im Uhrzeigersinn in die verriegelte Position.
8Montage du capteur1. Passez du mode Vitesse au mode Cadence en réinstallant
la pile ou installant l’application Magene Utility, vous ne
pouvez utiliser qu’un seul mode en même temps.
2.Veuillez utiliser le tampon et l'anneau en silicone en fonction
de votre situation réelle.
3.Veuillez vous assurer que le capteur soit installé de manière
à ce que le capteur et l'anneau en silicone ne frottent pas
contre les chaussures et le vélo pendant la pédale afin
d’éviter d'endommager ou de faire détacher et perdre le
capteur pendant l'utilisation.
1.Réinstallez la pile et le voyant clignote en vert pour indiquer
que le capteur est en mode Vitesse.
2.Fixez le tampon en silicone au bas du capteur et installez le
capteur au moyeu avant à l’aide de l’anneau en silicone.Attention :
Mode Vitesse
Le voyant vert clignote
3.Tournez la roue, recherchez à l'aide d'un appareil prenant
en charge les protocoles standard Bluetooth ou ANT+.
1. Réinstallez la pile et le voyant clignote en rouge pour
indiquer que le capteur est en mode Cadence.
2. Fixez le tampon en silicone au bas du capteur et installez
le capteur au côté intérieur de la manivelle gauche à l’aide de
l’anneau en silicone.
Mode Cadence
Français
3. Tournez la manivelle, recherchez à l'aide d'un appareil
prenant en charge les protocoles standard Bluetooth ou
ANT+.
Le voyant rouge clignote
9Jumelage et réglagesVoyant État de l’appareil
Le voyant clignote en vert Mode Vitesse
Le voyant clignote en rouge Mode Cadence
Pile du capteur faible
Le voyant clignote alternativement
en vert et en rouge
1. Le capteur ne commencera à transmettre des émissions
Bluetooth et ANT+ que lorsqu'il sera correctement installé et
utilisé. Il pourra alors être recherché et connecté à l'aide d’un
dispositif ou d’une application approprié.
2. Lorsque vous utilisez le protocole Bluetooth, le capteur ne
peut être connecté que par un seul appareil ou une seule
application. Pour changer l'appareil ou l'application, veuillez
d'abord vous déconnecter.
3. Lorsque vous utilisez l'application du téléphone mobile,
vous devez rechercher et connecter le capteur dans
l'application, l'utilisation de la fonction Bluetooth du système
du téléphone mobile pour rechercher et connecter le capteur
n'est pas disponible.
Français
4.Grâce au protocole ANT+, le capteur peut être connecté par
plusieurs appareils en même temps.
5.Le capteur se met automatiquement en veille après 60
secondes d'inactivité pour réduire la consommation
d'énergie.
1. Ouvrez le compartiment à piles en tournant le couvercle du
compartiment à piles dans le sens antihoraire de manière à
ce que le repère de position est tournée de la position
verrouillée à la position ouverte.2. Placez la nouvelle pile dans le compartiment à piles,
replacez le couvercle du compartiment à piles avec le repère
de position alignée avec la position ouverte, assurez-vous
qu'il est complètement enfoncé, puis tournez le couvercle du
compartiment à piles dans le sens horaire jusqu’à ce que le
repère de position soit alignée avec la position verrouillée.
Remplacement de la pile

10Установка датчикаВнимание:
1.Переустановите аккумуляторную батарею или
приложение Magene Utility для переключения между
режимами скорости и каденса, одновременно можно
использовать только один режим.
2.Выберите силиконовые прокладки и кольцо в
соответствии с вашей реальной ситуацией.
1. Переустановите аккумуляторную батарею, мигание
индикатора красным указывает на то, что датчик
находится в режиме каденса.
3.После установки датчика убедитесь, что датчик и
силиконовое кольцо не будут тереть обувь и велосипед во
время езды, чтобы избежать повреждения или потери
датчика во время использования.1. Переустановите аккумуляторную батарею, мигание
индикатора зеленым указывает на то, что датчик
находится в режиме скорости.
2. Установите силиконовую прокладку на дне датчика, и
установите датчик на передней ступице с помощью
силиконового кольца.
3. Поверните колесо и выполните поиск с помощью
устройства, поддерживающего стандартные протоколы
Bluetooth или ANT+.
Режим скорости
Режим каденса
Мигает зеленый свет
русский язык2. Установите силиконовую прокладку на дне датчика, и
установите датчик на внутренней стороне левого
кривошипа с помощью силиконового кольца.
3. Поверните кривошип и выполните поиск с помощью
устройства, поддерживающего стандартные протоколы
Bluetooth или ANT+. Красный свет мигает
Table of contents
Languages:


