United Electric Company, L.P. • 501 Galveston • Wichita Falls, TX 76301 • 940-397-2100 • Fax 940-397-2166
10
1-16-07 Part #: 010-200002-000
START-UP
Ensure that ALL RED shipping bolts/screws are removed
and all other bolts and screws are tight.The red hold-
down shipping bolts are located on both sides of the
blower/motor mounting rails and are accessible through
the side access panels.The red sheet metal screws are
located on the discharge duct collar.All must be removed
for the blower assembly to be isolated from the cabinet. See
figure page 11. Check the sheaves to see if they are in
alignment and ensure the set screws are tight. Check for
proper rotation of the blower pulley.Three phase motor
rotation can be reversed by exchanging two of the three
leads at the motor.Not all installations will be on starter.
The rotation of single phase motors can be reversed by
exchanging leads inside the motor junction box. Refer to
motor nameplate. Ensure all filters are installed. Do this
with all doors, panels, etc. in place. Check the amperage
draw of the motor.This should not exceed the nameplate
amps shown on the motor serial plate. Never assume the
voltage and phase on the unit name plate is the same as the
motor is wired.
OPERATIONAND MAINTENANCE
WARNING
Disconnect electrical power to all circuits before servicing
unit.Failure to do so may result in personal injury from
electrical shock or moving parts.
RETURN AIR FILTERS – Filter access is from either side of
unit. Inspect on a regular basis (at least monthly) and clean
or replace.
CAUTION
Never operate unit without a filter or with filter access
door removed.Damage to blower motor may result.
Water Piping -All Drain
Coil is easily cleaned when dry.To check or clean, remove
unit access panel, filter access door and filters. Use
accepted industry methods for cleaning. Remove all foreign
matter from pan and condensate drain line. Check for rust
and holes.
BELTAND PULLEY - Proper pulley alignment and belt
tension must be maintained at all times. Speed is reduced
by adjusting pulley faces so they are farther apart; speed is
increased with faces closer together.Check pulley setscrews
and bolts.
MOTOR - Use electric motor oil or SAE20 nondetergent
oil.Tighten motor mount bracket and base bolts as
required. DO NOT OVER-OIL!!
BLOWER - Check bearing for wear.Replace as required.
Check wheel for accumulation of dirt and clean as
required.
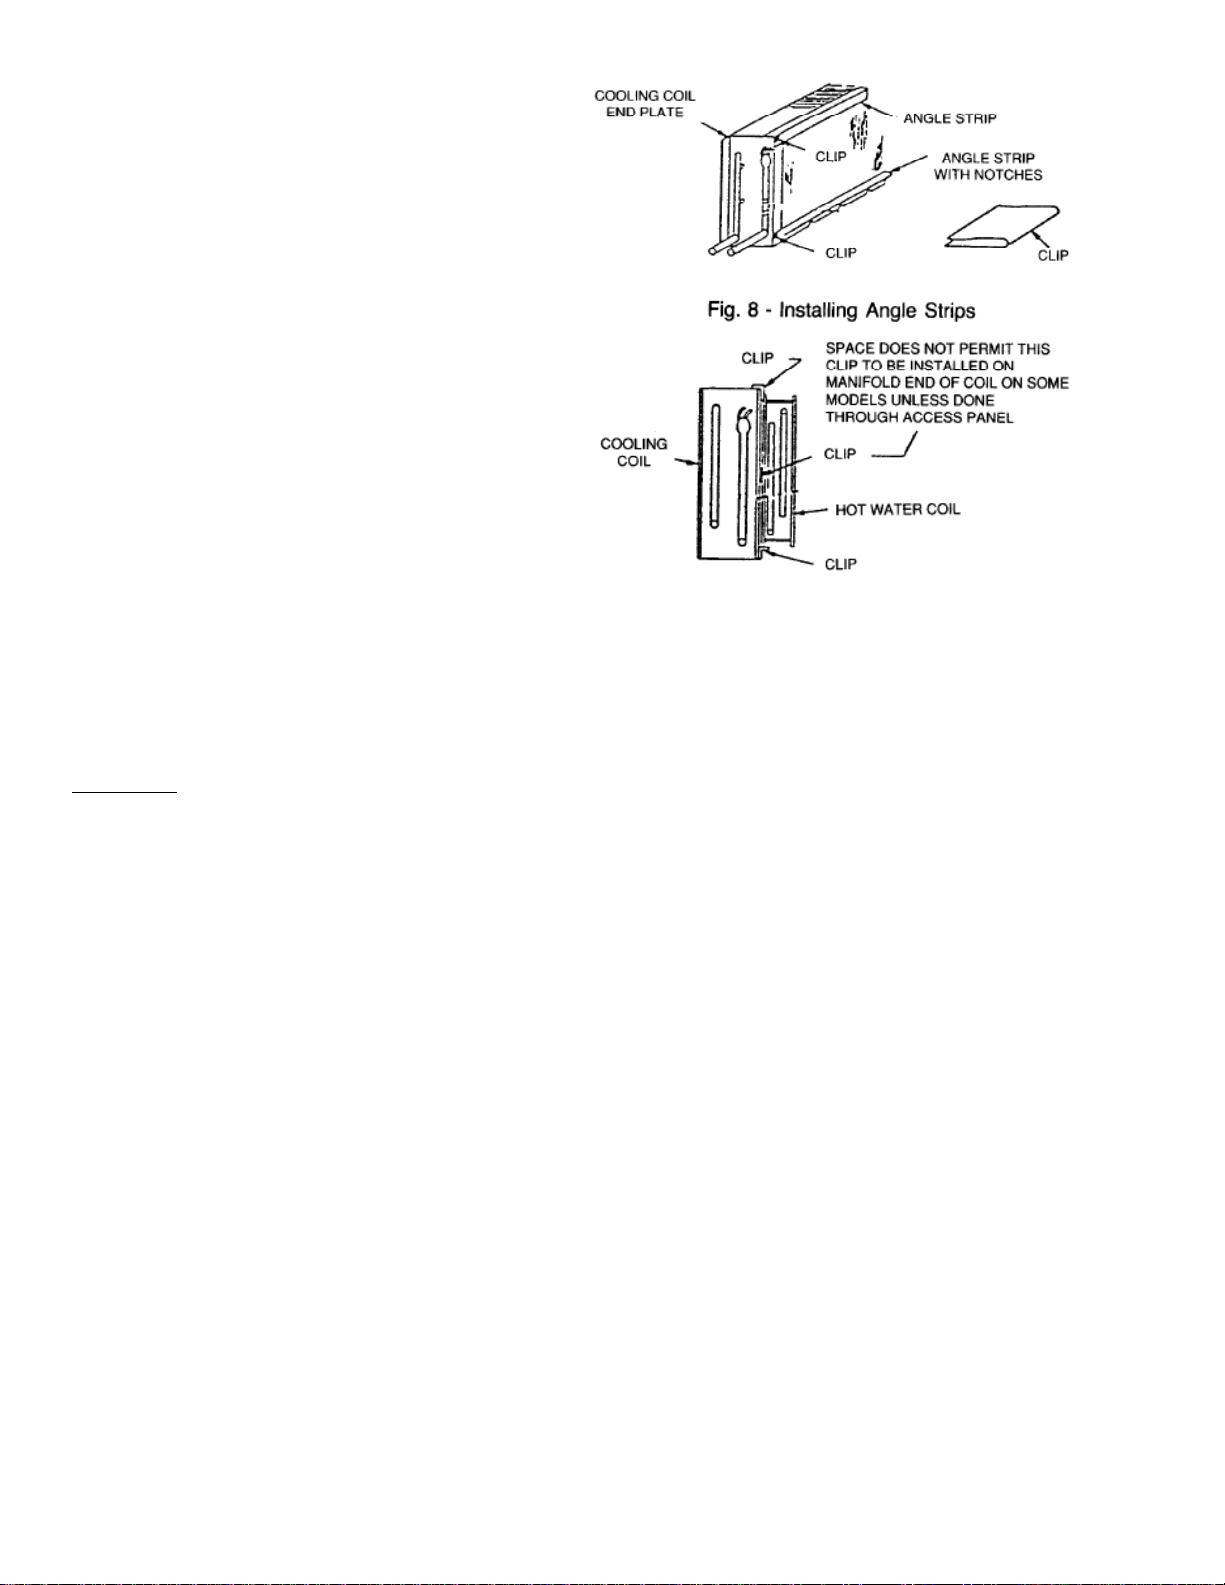
HOTWATER COIL INSTALLATION INSTRUCTIONS
(in reheat position) ON CHILLED WATER COIL UNITS
1. Remove access panel from both sides of cabinet. See (Fig.
8).
2. Remove knockouts from hot water coil stubouts. Coils
stub out the cabinet for left-hand connections (facing
Fig. 9
airflow).
3. Remove 2 galvanized strips from hot water coil package.
Install angle strip with notches resting in drain pan, and 1/2
in. flange pointing toward blower. Secure this angle strip to
end plate of cooling coil by clips supplied in package (Fig.
9). Place clips at each end of strip as close as possible to
flange.
Fig. 8 - Installing Angle Strips
4. Install other angle strip at top of cooling coil, with 1/2 in.
flange resting on top of cooling coil, pointing to rear.
Place clip as high as possible on this strip. Secure it to
end plate of cooling coil. Metal strips prevent air from
bypassing heating coil and serve as support for coil.
5.After strips are secured, install coil inside through access
door opposite side where connections stub out. Raise coil
slightly above drain pan and line up stubouts with
knockout holes in cabinet.When stubouts are extended
through holes, hot water coil should rest on flange of
bottom angle strip with hot water coil and cooling coil end
plates lined up evenly.
6. Secure hot water coil to cooling coil by fastening 2 clips
over cooling coil and hot water coil end plates (Fig. 9).
Note: It is not recommended but, when used in reheat
position with DX coil, install a freeze-stat in system to
prevent freeze-up.MagicAire is not responsible for HW coi
l failure due to freezing from DX system.
HOTWATER COIL INSTALLATION INSTRUCTIONS
(in preheat position)
Follow same procedures as before except cooling coil must
be removed from cabinet.