Magikitch'n LPAGA Series User manual

SERIES: LPAGA
OPERATION MANUAL
ULTIMATE SERIES OUTDOOR CHARBROILERS

Outdoor Gas CharBroiler Models:
LPAGA-30S & LPAGA-60S
OUTDOOR GAS CHARBROILERS
All gas operated Magikitch’n®charbroilers are intended
for use with the type of gas specified on the rating plate
and for installation will be in accordance with National
Fuel Gas Code ANSI Z223.1 (latest edition).
Please retain this manual for future references.
This equipment is design engineered for commercial
use only.
FOR YOUR SAFETY: Do not store or use gasoline
or other flammable vapors or liquids in the vicinity
of this or any other appliance.
WARNING
Improper installation, adjustment, alteration,
service or maintenance can cause property
damage, injury or death. Read the installation,
operating and maintenance instructions
thoroughly before installing or servicing this
equipment.
WARNING
MAGIKITCH’N
265 Hobson Street, Smithville, TN 37166
Phone: 800.264.7827 | info@star-mfg.com | magikitchn.com
P/N 8839310 REV A 3/20
California Residents Only
WARNING: This product can expose you to
chemicals including chromium which is known to
the State of California to cause cancer and birth
defects or other reproductive harm. For more
information go to www.P65Warnings.ca.gov.
WARNING
OUTDOOR GAS CHARBROILER OPERATION MANUAL

1
OUTDOOR GAS CHARBROILER OPERATION MANUAL
TABLE OF CONTENTS
INSTALLATION INSTRUCTIONS 1
Safety Precautions 1
Unpacking Instructions 3
Assembly 3
Connecting The Gas Lines To The Propane Tanks 4
Installing Tank Caddies 5
Leak Testing 5
LIGHTING INSTRUCTIONS 6
Lighting Instructions 6
Shutdown Instructions 6
INSTALLATION INSTRUCTIONS
MAINTENANCE INSTRUCTIONS 7
Cleaning Instructions 7
Burner/Orifice Inspection 7
Troubleshooting Chart 8
ACCESSORIES 9
Instructions for Installing Char Broiler Accessories 9
EXPLODED VIEWS & PARTS LISTS 10
WARRANTY 13
Gas Specifications
Model Number Propane Gas
BTU/HR @ 10” W.C.
LPAGA-60S 160,000
LPAGA-30S 80,000
Model Definitions
Model Number Width
LPAGA-30S Overall Width = 32”
LPAGA-60S Overall Width = 62 1/2”
Safety Precautions
This symbol warns of imminent hazard which will
result in serious injury or death.
DANGER
This symbol refers to a potential hazard or unsafe
practice, which could result in serious injury or
death.
WARNING
This symbol refers to a potential hazard or unsafe
practice, which may result in or moderate injury or
product or property damage.
CAUTION
This symbol refers to information that needs
special attention or must be fully understood even
though not dangerous.
NOTICE

2
OUTDOOR GAS CHARBROILER OPERATION MANUAL
Safety Precautions
(Must Be Posted In A Prominent Location)
INSTALLATION INSTRUCTIONS
If You Smell Gas:
• Shut off gas supply to appliance
• Extinguish open flames
• Immediately call your gas supplier
For your safety, the following safety precautions
should be followed and enforced.
WARNING
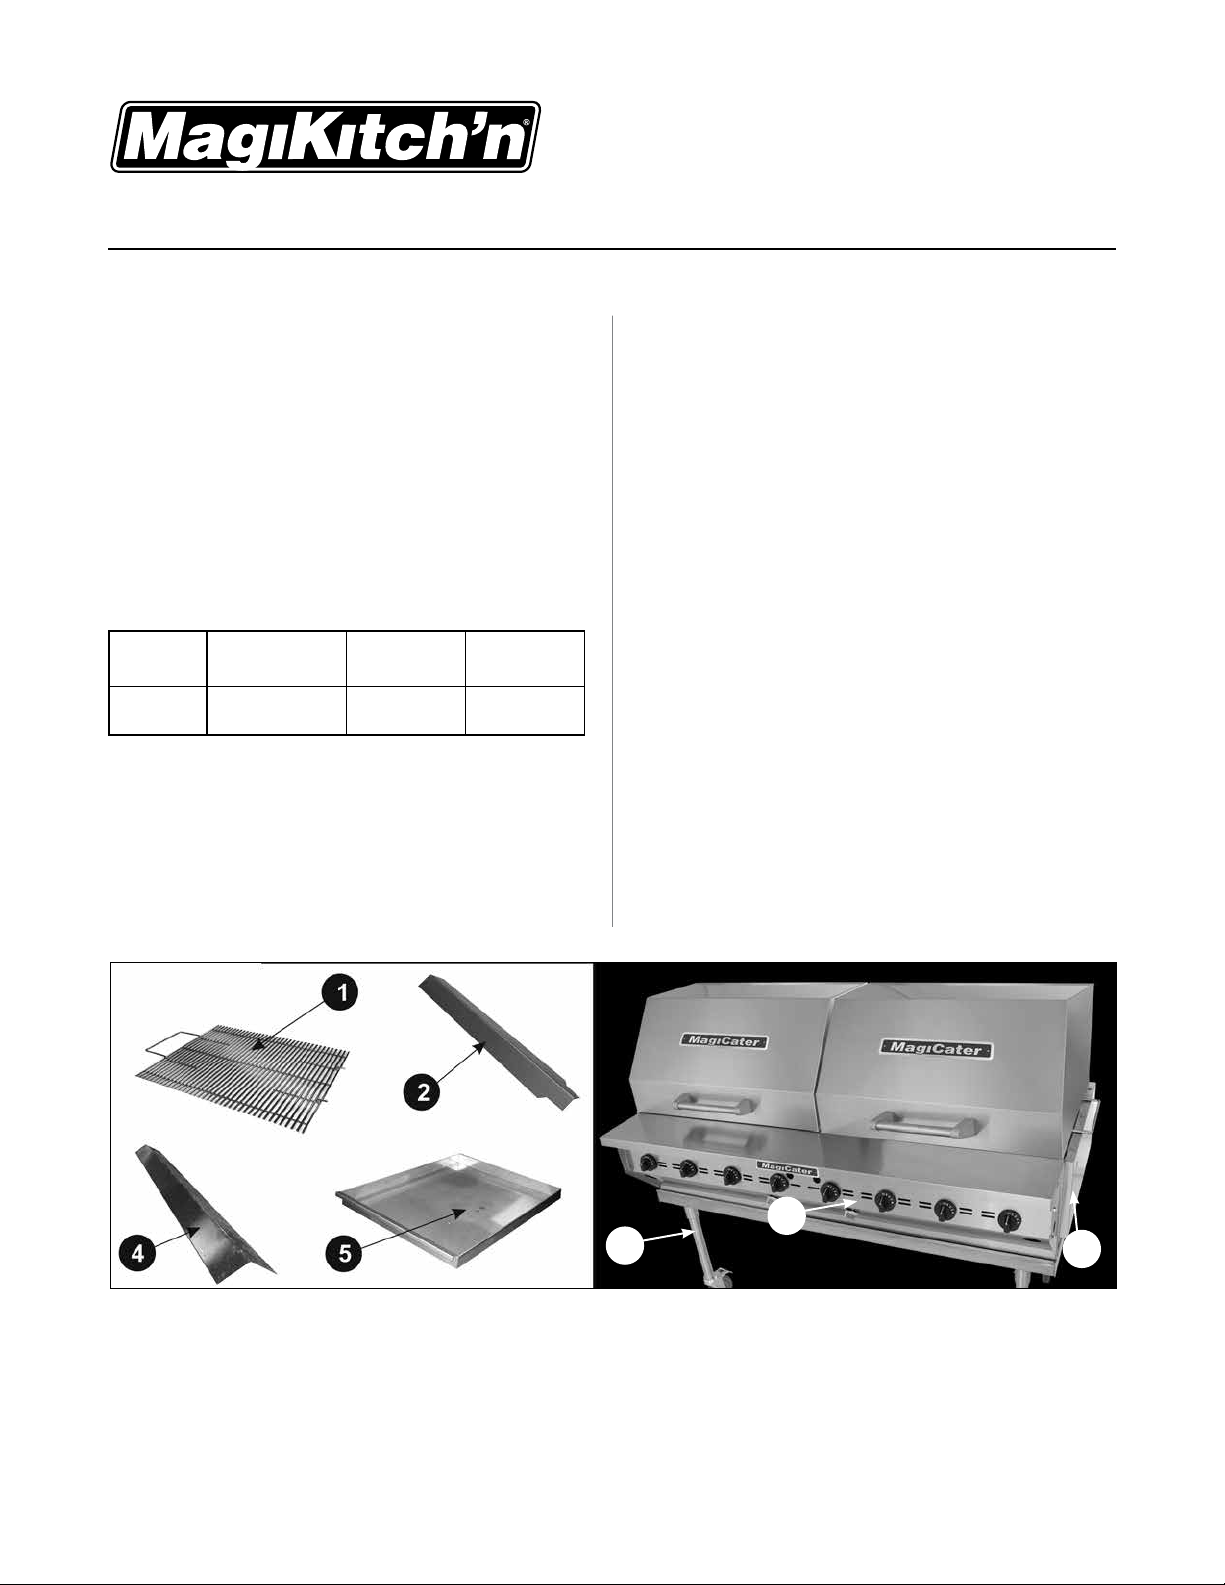
1. This unit should be only operated outdoors.
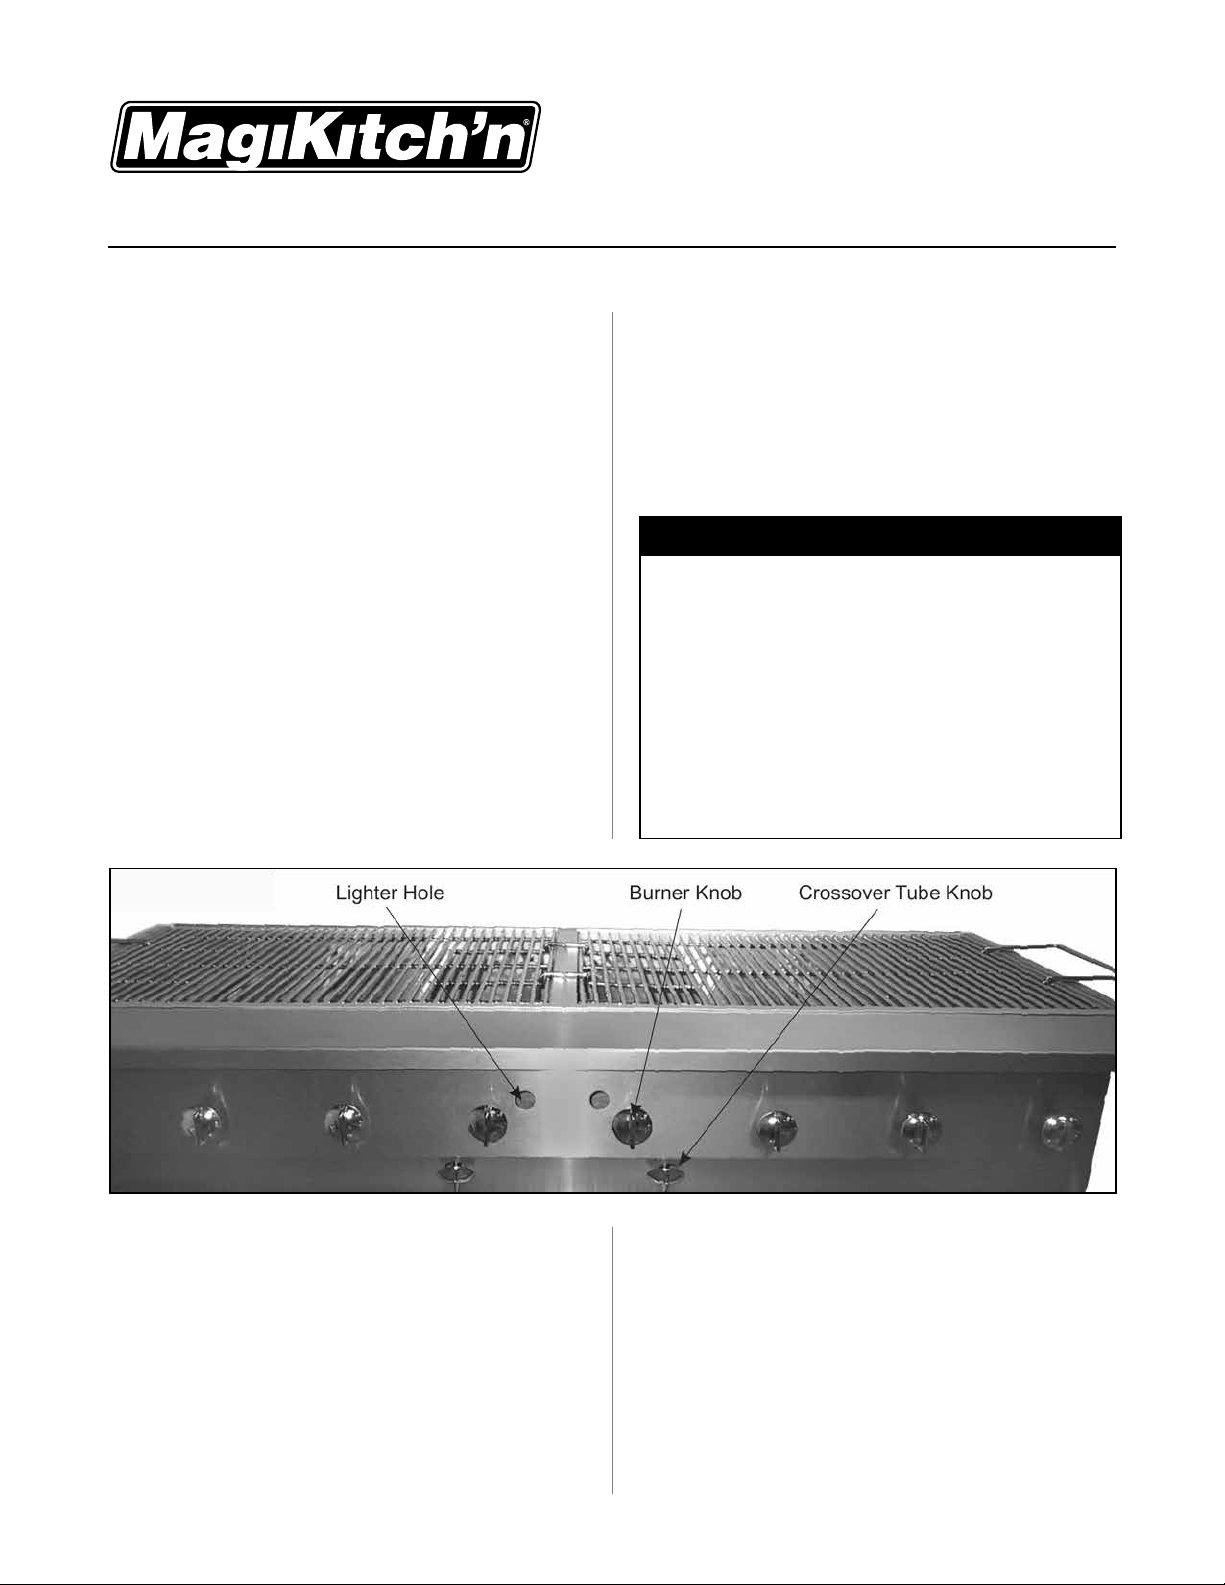
2. LIGHTING: Follow the instructions in the Lighting
Instructions section and from the label attached
to right side of the broiler.
3. Do not place or use unapproved accessories or items
on the broiling area or on any part of this unit.
4. Do not place combustibles or non-combustible
materials in the proximity of the broiler as this
could cause fires or obstruct airflow to the main
burners.
5. This unit may be operated with 0” minimum
clearance to non-combustible construction in
areas that are non- combustible locations. For
combustible construction installations: Minimum
12” each side, 24” back.
6. This installation must conform to local codes, or
in absence of local codes to the National Fuel
Gas Code ANSI Z223.1, latest edition. In Canada,
it must conform to current National Standard
CAN/CGA B 149. 1 & 2. - natural gas/propane
installation code.
7. Use only the legs and casters provided with the
unit. Always lock the caster brakes to prevent
movement while the appliance is in use.
Instructions must be posted in a prominent
location. All safety precautions must be taken in
the event the user smells gas. Safety information
can be obtained from your local gas supplier.
NOTICE
8. Broiler must be disconnected from gas supply
during any pressure testing of pipelines in excess
of ½ psig (3.45 kPa), and isolated (by turning off
gas shut-off valve) during any testing less than ½
psig.
9. Inspect the flexible gas hose(s) prior to each use.
If excessive abrasion or wear occurs, or if the
hose is cracked or damaged it must be replaced.
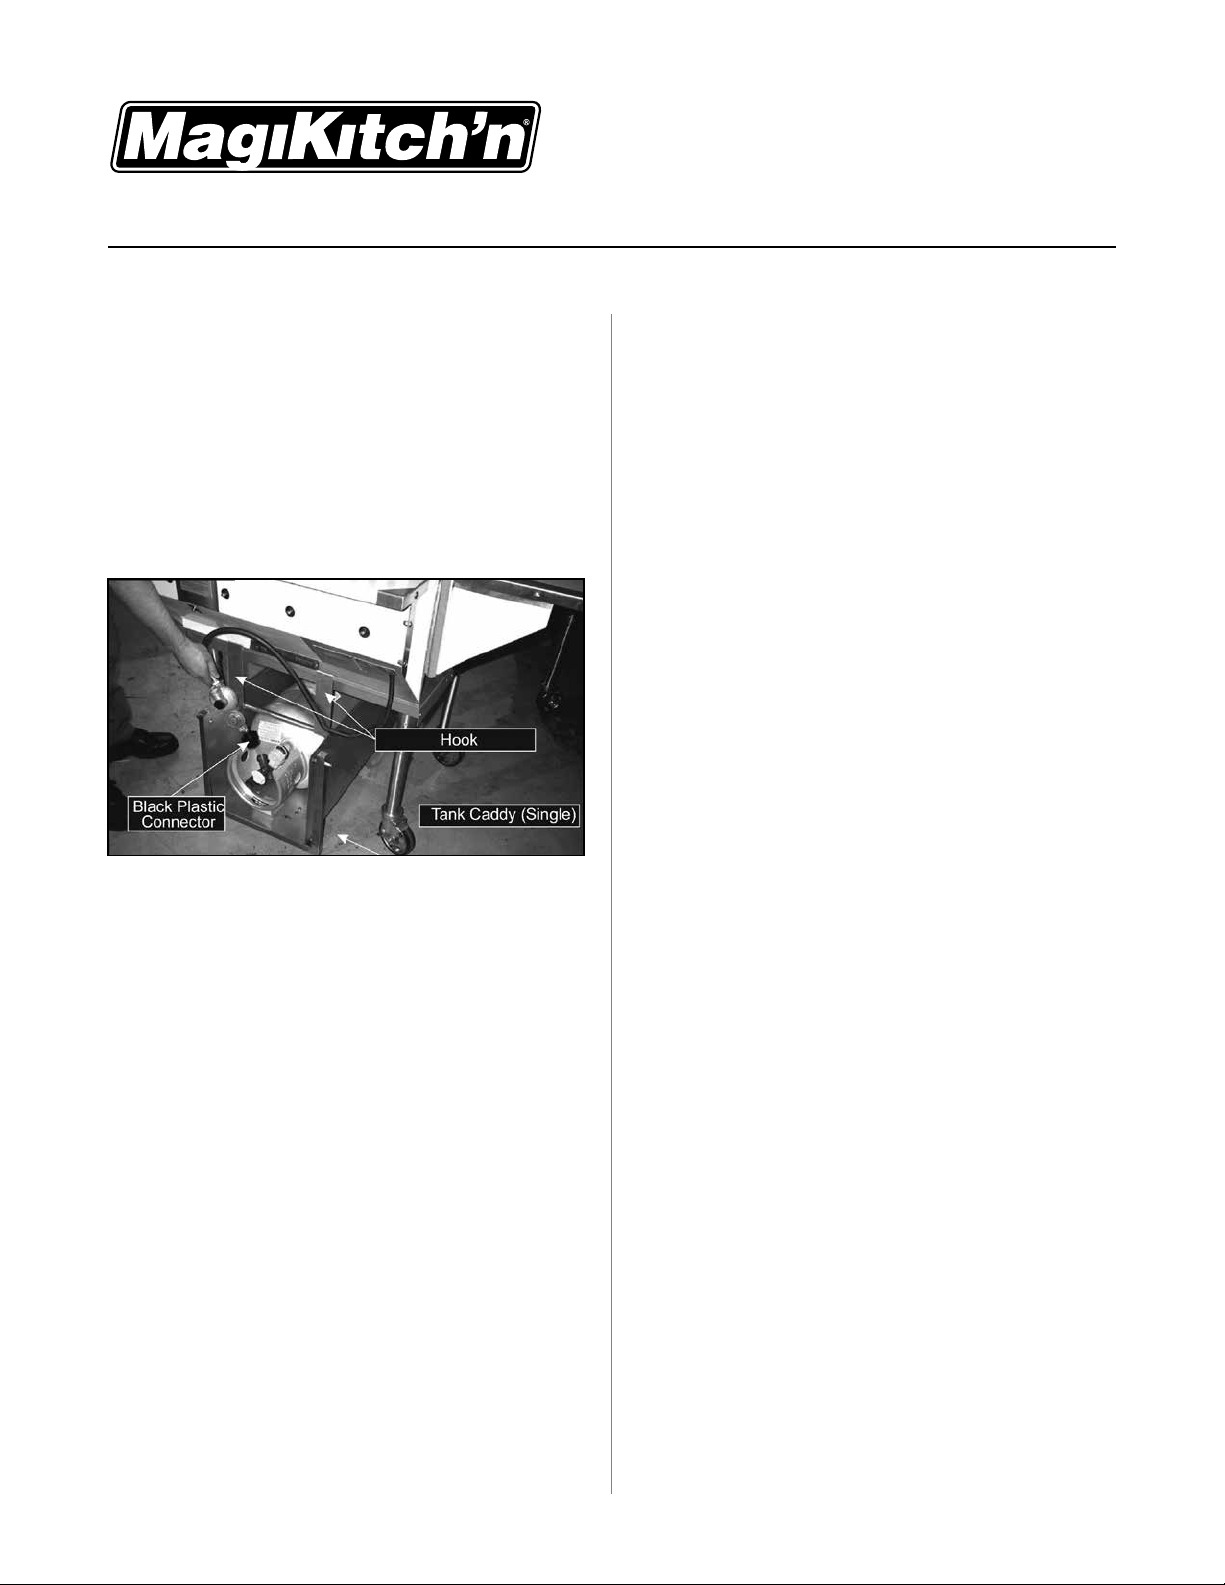
10. LP cylinders used with the broiler must conform
to the specifications of the US Department
of Transportation (DOT), or in Canada to the
Canadian Transport Commission. The construction
must include a collar to protect the service valve
from physical damage; they must have a safety
relief device that communicates directly with
the vapor space of the cylinder and a system
to withdraw vapor in the vertical position. The
cylinder must have proper marking, shutoff valve
and a Type I (QCC1) service outlet connection.
11. Any attempt to fit the regulator(s) with anything
other than the mating Type I (QCC1) connector
will negate the important safety features designed
into the Type I system. Fitting a standard #510
POL connector will not provide the flow control or
temperature shutoff safety features build into the
complete Type I system.
12. Propane cylinders must be stored outdoors in a
well-ventilated area out of the reach of children.
13. The handling, filling, use, storage and
transportation of all sizes of LP gas cylinders
must be in accordance with NFPA 58, Storage
and Handling of LP Gases, or CAN/CGA B149.2,
Propane Gas Installation Code.
14. Surfaces of unit will become hot during normal
operation and can cause burns and/or serious
injury. Do not touch a hot unit without protective
clothing. Allow the unit to cool before cleaning or
disassembling.
15. High winds may adversely affect burner
performance.
16. The minimum ambient temperature for proper
operation of this appliance is 50°F (10° C).
17. Retain this manual for future reference.

3
OUTDOOR GAS CHARBROILER OPERATION MANUAL
INSTALLATION INSTRUCTIONS
Unpacking Instructions:
Carefully unpack the broiler and inspect immediately for
shipping damages. Your outdoor boiler was shipped in a
carton designed to give maximum protection in normal
handling. It was thoroughly inspected before leaving the
factory and the carrier accepted and signed for it. File
any claims for shipping damage or irregularities with the
carrier.
Assembly: (Refer To Figure “A”)
These unassembled parts should be included in your
charbroiler package:
1 Grate (s) 3 Frame assembly 5 Water Pan (s) 7 Leg & Caster
Assemblies
2 Radiants 4 Carryover tube
cover (s)
6 Base
1. Remove shipping bands from carton.
2. Remove top of carton.
3. Remove grates from the unit and set them aside.
4. Remove and unwrap any small parts packages
that are located underneath the grates. If
stainless steel parts are coated with PVC film,
remove it prior to installation.
5. Lift frame assembly from carton and set aside.
6. Lift base from carton and place it upside down on
ground.
7. Install legs & caster assemblies and flip the stand
over into the upright position.
8. Place the broiler on the stand.
9. Place the carryover tubes cover(s) on their
brackets to cover the tubes.
10. Place the radiants on their front and rear support
pins over each burner.
11. Place grates into frame assembly.
Figure A
7
3
6

4
OUTDOOR GAS CHARBROILER OPERATION MANUAL
INSTALLATION INSTRUCTIONS
Connecting The Gas Lines To The Propane Tanks
• New propane tanks are shipped empty with no
pressure and must be purged of air and filled
with propane per NPGA (National Propane Gas
Association)
• Install the green plastic connector onto the
external thread on the tank valve. Turn it
clockwise and hand tighten. The plastic nut is
designed for easy grip and allows user friendly,
wrench-less connection. It is thermally sensitive
and will shut off the flow of gas if subjected to
temperatures between 240°F and 300°F. Type I
(Q.C.C. 1) connection system will not allow gas
to flow until a positive seal has been made (See
Figure “A-3”).
• Make sure the vent on the regulator is facing
down (toward the ground) so that water and other
liquids do not get into the regulator.
The 40-lb LP cylinders have a Type I ACME
service valve with a one-way valve that only
allows propane to flow out of the valve. The 40-lb
cylinder cannot be filled through this Type I ACME
service valve. The 40-lb cylinders have a 1-3/4”
ACME male fill connection with a built in OPD to
protect the cylinder from being overfilled. Be sure
that your local propane supplier has the correct
adapter to fill through a 1-3/4” ACME male filling
connector.
40-lb cylinders must be used in the horizontal
(laying down) position.
NOTICE

5
OUTDOOR GAS CHARBROILER OPERATION MANUAL
INSTALLATION INSTRUCTIONS
Installing Tank Caddy:
• Our unit is equipped with a tank caddy. It has to
be placed underneath the broiler and secured in
place by (2) hooks provided (see fig. “A-3”). The
front of the caddy will be raised off the ground to
prevent possible movement and putting strain on
connection hoses.
• LP gas cylinder(s) have to be securely mounted to
the caddy with thumb screws. They will only work
in the horizontal position.
Figure A3
Leak Testing:
The plumbing must now be tested for gas leaks before
use. Turn all propane tank, burner control and carryover
control valves to the OFF position. Wet all gas line
fittings and connectors with a solution of soapy water
(or commercial leak disclosing liquid). Slowly open the
propane tank valve(s) and look for bubbles of foam at
any of the joints of the system. If a leak is found, close
the tank valves immediately and call your local dealer or
the manufacturer. If the gas connections are leak-free,
the unit is ready to use. Follow the lighting instructions.
Note: Although each 30” x 30” cooking area of the
LPAGA will deliver 80k BTU’s, it is not intended that
the unit be routinely operated “full tilt”. This extra high
capacity was intended to allow the cook to load the unit
with a full complement of product and still have enough
heat to maintain cooking time. If the cook is running the
LPAGA at the full 80k BTU’s with a light food load, it is
using propane at a rate that is not needed. The LPAGA
should the “throttled down” to match the food load on
the grill.
Propane dealer will not fill a 40 lb cylinder because
it does not have the correct valve with an OPD
installed:
OPD stands for “Overfill Protection Device”. This is
a safety device that is now required on all 4 through
40 lb propane cylinders to prevent them from being
overfilled. Propane filling stations know that the new 20
lb cylinders with OPD’s have a triangular valve handle
instead of the old round valve handle. If you bring a
propane cylinder to a filling station with a round handle
on the Type I valve, they will not fill it because they know
it does not have the required OPD.
Confusion is caused by the Type I connectors found
on the 40 lb cylinders. On the 40 lb cylinders this is
a special service valve only ( outgoing gas only). It
has an internal one-way valve that will only allow gas
out of the cylinder and not into it. The 40 lb cylinder
cannot be filled through this valve because the one-
way valve will not allow the propane into the cylinder.
Since this valve cannot be used to fill the cylinder, it
does not need an OPD. This valve cannot have the
triangular handle because is does not have the OPD.
The filling connection on a 40 lb cylinder is a plain
male thread without a manual valve on it. The filling
valve opens automatically when the filling connector is
properly attached to the cylinder. The OPD is built into
this automatic valve because this is where the propane
enters the cylinder. All of our 40 lb cylinders are clearly
marked on the cylinder label to identify that they have
the required OPD. Larger propane facilities are very
familiar with the fill valve on the 40 lb cylinder and will
fill them without a problem.

6
OUTDOOR GAS CHARBROILER OPERATION MANUAL
LIGHTING INSTRUCTIONS
Lighting Instructions:
Fill water pans to within 1/2” of top edges (this will
control grease flare-ups, provide for ease of cleaning
and keep cooked food moist). Re-fill pans with water
when they evaporate to within 1/2” of the bottom of the
pans. Failure to keep water in the water pans could lead
to grease fires and will void the warranty.
1. Open the roll-up hood if so equipped. Turn all the
burner knobs and carryover tube knobs to the OFF
position and slowly open the gas tank valves.
2. Turn the carryover tube knob on one side
fully counter-clockwise to the ON position.
Insert a lit, extra-long match or a gas lighter
flame though the hole on the same side in the
front panel. For 60” broilers repeat the same
procedure for the other side.
3. Check that the entire crossover tube is lit by
looking through the lighter hole(s) located on the
front panel. If the carryover tube(s) will not light
or stay lit, shut off the gas supply and do not use
the unit. Wait 5 minutes before attempting to re-
light the unit. (See Figure “B”)
4. After lighting the crossover tube(s), open the
desired burner valves and observe that the burners
light completely from the crossover tube(s).
If the tank valves are not opened very slowly, an
excess flow valve in the tank connector fitting
(a safety feature) may restrict the flow of gas
to the unit resulting in little or no flame at the
burners. Should this happen, follow the shutdown
instructions and be sure to shut off tanks and
remove and re-attach the tank connectors as
instructed. This is necessary to re-set a closed
excess flow valve. Repeat all steps of the lighting
instructions. The appliance should now function
normally.
NOTICE
Shutdown Instructions
To shut down the unit, turn all burners and carryover
tube knobs clockwise to the OFF position. Close gas
tank valve(s), disconnect propane tank(s) and leave
them outdoors.
Figure B

7
OUTDOOR GAS CHARBROILER OPERATION MANUAL
MAINTENANCE INSTRUCTIONS
Cleaning Instructions
• Clean the unit regularly after use.
• Top Grates: after removing from the unit, use warm
soapy water and a stiff bristled brush or plastic
pad. Cooking grates must be removed to steam
clean or pressure wash. Do not use steel wool
or abrasive pads as they may degrade the metal
finish. Always clean stainless steel panels along
the grain.
• Radiants/Covers: These will need little or no
cleaning due to high in-use temperatures. If
necessary, clean as top grates.
• Broiler body: Use warm, soapy water and a stiff
bristle brush or plastic pad. Do not use chlorine,
bleach or other caustic chemicals. Be careful not
to get water into the burners or carryover tubes. Do
not pressure wash.
• Water Pans/Stand: Clean like top grates.
Burner / Orifice Inspection
1. Remove the front shelf by removing the two screws
at the ends.
2. Slide front shelf forward and then lift it off the
unit.
3. The front of the burners, the valve bodies, and
orifices are now exposed for inspection. Looking
down into the unit, compare each assembly with
figure “C” for alignment.
4. If the components are not aligned as shown in
the diagram, discontinue use and contact the
appliance manufacturer.
5. If the components are aligned, carefully replace
the service shelf and re-insert and tighten the
screws. Your unit is ready for use.
Figure C

8
OUTDOOR GAS CHARBROILER OPERATION MANUAL
MAINTENANCE INSTRUCTIONS
Problem Probable Cause Solution
Burners &
carryover will not
turn on
L.P. tank empty Replace with fresh tank.
L.P. tank valve closed. Open valve.
Burners produce
excessive carbon
deposits
Incorrect gas type. Supply correct type gas.
Incorrect gas pressure Call local gas supplier.
Incorrect orifices. Call Magikitch’n®authorized service center.
Primary air not adjusted properly. Adjust air shutter.
Carryover will not
remain lit.
Carryover flame adjusted incorrectly. Adjust carryover flame.
Draft condition. Remove draft.
Carryover clogged w/grease or debris. Clean carryover.
Excessive flare-up Overload of fatty meat Maintain adequate water level in water pan.
Broiler does not
seem hot enough
Orifices may be dirty/clogged. When unit cools, check & clean orifices.
Low gas pressure. Increase gas pressure to 10" W.C. (L.P.)
Grates &/or
radiants &/or
burners &/or gas
valves warp
Usually improper cleaning methods
ie; users cover grate top w/sheet
pans & crank up heat to burn-off
debris
Never cover top grates w/sheet pans. This causes the firebox area to overheat
excessively.
Not enough gas to
the burners
(L.P. ONLY)
Tank is empty. Fill tank.
Cylinder is frozen. If the LPAGA is operated at the full 80k BTU output with a 40lb propane cylinder, the
cylinder may not be able to generate enough vapor pressure to support that flow when
the cylinder is less than half full. If there is frost on the bottom of the cylinder and gas
flow is restricted, this can be improved by placing the cylinder in a container of water.
The water will help heat the cylinder and prevent the ice build-up that prevents the
needed vapor from forming inside the cylinder.
Outside temperature is below 50°F. As the temperature gets below 70 deg. F, the ability to produce the vapor needed
to burn decreases. The lower the temperature, the lower the performance of the
grill because of less vapor available. At temperatures below the 50’s there is just
not enough vapor available to support adequate combustion in these high capacity
burners.
Regulator Freezes
(L.P. ONLY)
Water in the liquid propane. Small amounts of water in liquid propane can form ice crystals in the regulator and
prevent it from working properly. Magikitch’n LP models use a two-stage regulator
that reduces, but does not eliminate this problem.
Drawing liquid propane rather than
gas from a 40# tank.
On a 40# horizontal tank it is possible to have liquid propane in the discharge rather
than propane gas (vapor). This can happen if the tank is overfilled or if it is bounced
around during transportation. A short “J” shaped tube is located inside the tank.
This is called a “dip tube” and it is the point where the propane vapor is taken into
the discharge and then into the regulator. If liquid propane fills this tube it will be
drawn into the regulator where it expands into gas. This will cause frost and ice
to build up on the outside of the regulator and supply hose and will interfere with
normal operation. This can cause the excess flow valve to close and severely restrict
the amount of propane gas allowed to pass through the regulator and hose. If you
suspect an overfilled tank, or that there is liquid in the dip tube, it can be corrected
by running the unit with the tank(s) in the upright or vertical position in front of the
LPAGA. Make sure that the tanks are properly secured in the vertical position so they
cannot be knocked over! After the liquid propane in the dip tube has been burned off,
the tank(s) can be returned to their normal position. Be careful when returning the
tank(s) to the horizontal position so that you don’t cause more liquid propane to be
“sloshed” into the dip tube again or it will be necessary to repeat the process again.
Troubleshooting Guide

9
OUTDOOR GAS CHARBROILER OPERATION MANUAL
ACCESSORIES
Instructions For Installing Outdoor Charbroiler
Accessories
Your new Charbroiler has been shipped in several
cartons, partly assembled. Please follow the instructions
below which detail the assembly of hoods, tank caddy
and stand.
1. Mount top of stand on legs and tighten w/screws provided.
2. Place broiler on stand. Note that mounting screws for hoods are
provided and must be removed from outer flange and used to
mount accessories.
3. Place the hood on top of the shelve(s) with the screws provided.
4. If your unit is equipped with a Tank Caddy, slide it under the
broiler (in the center) and attach with the two Hooks provided for
this purpose.
Optional Richlite Work Deck

10
OUTDOOR GAS CHARBROILER OPERATION MANUAL
EXPLODED VIEWS & PARTS LISTS
Exploded View – LPAGA-30S & LPAGA-60S Exterior / Interior
REV DESCRIPTION BY DATE
ECR
PRODUCT
USED ON
NEXT
ASSY.
PER
ASSY TOTAL
STOCK NUMBER MATERIAL SIZE TYPE SPEC. FINISH
PART NUMBER
PART NAME REV.
SHEET
OF
SCALE
DRAWN
APRVD.
DATE
DATE
DECIMAL-
FRACTION-
ANGLE-
WHEN APPEARS, DEBURR EDGE
QTY REQD
TOLERANCE-
.XX ±
.XXX ±
±
±
Cooking Solutions Group
REV DESCRIPTION BY DATE
ECR
PRODUCT
USED ON
NEXT
ASSY.
PER
ASSY TOTAL
STOCK NUMBER MATERIAL SIZE TYPE SPEC. FINISH
PART NUMBER
PART NAME REV.
SHEET
OF
SCALE
DRAWN
APRVD.
DATE
DATE
DECIMAL-
FRACTION-
ANGLE-
WHEN APPEARS, DEBURR EDGE
QTY REQD
TOLERANCE-
.XX ±
.XXX ±
±
±
Cooking Solutions Group

11
OUTDOOR GAS CHARBROILER OPERATION MANUAL
EXPLODED VIEWS & PARTS LISTS
Item P/N Description
1 21840812 PANEL, CHAMBER BACK 60”
2 21840515 PANEL, CHAMBER SIDE RIGHT
3 8204000 C/S HX HD #5 1/4-20 X 1/2 ZN
4 8431500 NUT, HEX, KEPS, 1/4-20
5 21840813 PANEL, CHAMBER SIDE LEFT
6 21840814 PANEL, CHAMBER FRONT
7 21840517 TRACK, WATER PAN
8 56521 POP RIVET
9 21840818 SUPPORT, CENTER UPPER
10 21840815 SUPPORT, WORK DECK CENTER
11 21840816 SUPPORT, CENTER LOWER
12 21840819 PANEL, OUTER BACK
13 8205500 SCREW, 1/4-20 X 1/2 TR HD
14 21840526 PANEL, OUTER SIDE RIGHT
15 21840527 PANEL, OUTER SIDE LEFT
16 21840545 WELDM’T, MANIFOLD RIGHT
17 21840845 WELDM’T, MANIFOLD LEFT
18 21840522 BRACKET, BURNER TUBE
19 21840514 SUPPORT, WORK DECK RIGHT
20 21840519 SUPPORT, WORK DECK LEFT
21 21840811 PANEL, FRONT 60”
22 2068000 VALVE, GAS, ON-OFF
23 2066655 HOOD, ORIFICE #55
24 2092517 PLUG, 1/8 NPTM
Item P/N Description
25 21840520 BURNER
26 21840530 RADIANT
27 21840523 TUBE, CARRY-OVER RIGHT
28 2068874 ORIFICE #74, LP GAS (CARRY OVER SPUD)
29 21840817 TUBE, CARRY-OVER LEFT
30 21880304 ADAPTER, 1/8(NPT) X 3/16 OD X 90 FEM ELBOW
31 21840524 TUBE, PILOT
32 21840525 COVER, RUNNER TUBE
33 21840512 PAN, WATER
34 21840532 WIRE RACK
35 S1002A HANDLE, DOOR 3/4” X 17 1/2” BC
36 21840840 WELDM’T, SHELF LPAGA-60S
37 21840538 SOCKET, LEG
38 8507800 WASHER, SPLITLOCK 1/4” ZN
39 21840539 LEG & CASTER (SET OF 4)
40 21840824 STABILIZER, STAND 60”
41 05252 NAME PLATE, HOOD & FRONT (NOT SHOWN)
42 8507600 WASHER, FLAT 1/4”
43 8427400 ACORN NUT, 1/4-20 SS
44 8706410 KNOB, METAL (NOT SHOWN)
Item P/N Description
44 21841050 30" In-Line Griddle (not shown)
45 21844540 Vinyl Cover, 30"
46 21841040 Vinyl Cover, 60"
47 21841025 Steamer Support (Full Size)
48 T5104V Brush
Item P/N Description
49 21841021 40" Propane Tank
50 21841040 Stainless Steel Tank Caddy 60"
51 21840560 Stainless Steel Tank Carrier 30"
Note: When ordering, ALWAYS specify Part #, Model #, Serial #, Voltage/Phase & type of Gas.
Exterior/Interior
Accessories
49
51
4645 50
47
48

12
OUTDOOR GAS CHARBROILER OPERATION MANUAL
EXPLODED VIEWS & PARTS LISTS
Exploded View – Manifold, Burner, Valve, Orifice, Pilot Tube
Item P/N Description
57 21840520 Burner
58 2068000 Gas Valve (no knob)
59 8706410 Knob, Gas Valve, ON-OFF
60 2092517 Plug, 1/8”
62 21840511 Hose Assy
63 21840545 Manifold Assy, Right (LPAGA-30/60 LP)
64 21840845 Manifold Assy, Left (60 LP)
68 2068753 Orifice #53 L.P. (Burner)
69 2068874 Orifice, #74 L.P. (Pilot)
Item P/N Description
71 21840817 Carry-over Tube, Left
72 21840523 Carry-over Tube, Right
73 Q1459A Screw, 10-32 x 3/8
74 8205500 Screw, 1/4-20 x 1/2
75 21880304 Adapter, 1/8NPT
76 21840826 Pilot Tube
77 21840525 Runner Tube Cover
78 21840522 Runner Tube Bracket
79 21840512 Water Pan
81 2093300 Reducing Elbow, 3/4 x 3/8 (LP only)
82 2093600 Nipple, 3/8 x 3 1/2 (LP only)
Note: When ordering, ALWAYS specify Part #, Model #, Serial #, Voltage/Phase & type of Gas.

13
MAGIKITCH’N LIMITED WARRANTY
WHAT IS COVERED This warranty covers defects in material and workmanship under normal use, and applies only to the original purchaser
providing that:
• The equipment has not been accidentally or intentionally damaged, altered or misused;
• The equipment is properly installed, adjusted, operated and maintained in accordance with National
and local codes and in accordance with the installation instruction provided with the product;
• The serial number rating plate affixed to the equipment has not been defaced or removed.
WHO IS COVERED This warranty is extended to the original purchaser and applies only to equipment purchased for use in the U.S.A.
COVERAGE PERIOD All Other Products: One (1) Year limited parts and labor. Warranty period begins the date of dealer invoice to customer
or ninety (90) days after shipment date from factory - whichever comes first.
WARRANTY This warranty covers on-site labor, parts and reasonable travel time and travel expenses of the authorized service
COVERAGE Representative up to (100) miles, round trip, and (2) hours travel time. The purchaser, however, shall be responsible for
all expenses related to travel, including time, mileage and shipping expenses on smaller counter models that may be
carried into a Factory Authorized Service Center.
EXCEPTIONS All removable parts in Magikitch’n®Charbroilers, including but not limited to: Burners, Grates, Radiants, Stones and
Valves, are covered for a period of SIX MONTHS.
EXCLUSIONS
INSTALLATION Leveling and installation of decks as well as proper installation and check out of all new equipment —per appropriate
installation and use materials — is the responsibility of the dealer or installer, not the manufacturer.
REPLACEMENT PARTS Magikitch’n genuine Factory OEM parts receive a (90) day materials warranty effective from the date of installation by a
Magikitch’n Factory Authorized Service Center.
This Warranty is in lieu of all other warranties, expressed or implied, and all other obligations or liabilities on the manufacturer’s part. Magikitch’n
shall in no event be liable for any special, indirect or consequential damages, or in any event for damages in excess of the purchase price of the unit.
The repair or replacement of proven defective parts shall constitute a fulfillment of all obligations under the terms of this warranty.
• Negligence or acts of God,
• Failures caused by erratic voltages or gas supplies,
• Thermostat calibrations after (30) days from
equipment installation date,
• Unauthorized repair by anyone other than a
Magikitch’n Factory Authorized Service Center,
• Air and Gas adjustments,
• Damage in shipment,
• Light bulbs,
• Alteration, misuse or improper installation,
• Glass doors and door adjustments,
• Thermostats and safety valves with broken capillary
tubes,
• Fuses,
• Char-broiler work decks and cutting boards,
• Tightening of conveyor chains,
• Adjustments to burner flames and cleaning of pilot
burners,
• Tightening of screws or fasteners.
• Accessories — spatulas, forks, steak turners, grate
lifters, oven brushes, scrapers, peels. etc.,
• Freight — other than normal UPS charges,
• Ordinary wear and tear.
OUTDOOR GAS CHARBROILER OPERATION MANUAL

NOTES
IMPORTANT FOR FUTURE REFERENCE
Please complete this information and retain this manual for the life of the equipment. For Warranty Service and/or
Parts, this information is required.
Model Number Serial Number Date Purchased

NOTES

Be sure to keep up with new product
announcements and events on social media!
265 Hobson Street, Smithville, TN 37166
3.11.20
Socialicon
Square
Onlyuseblueand/or white.
Formoredetailscheck out our
BrandGuidelines.
This manual suits for next models
2
Table of contents
Other Magikitch'n Grill manuals
Popular Grill manuals by other brands

FireMagic
FireMagic Echelon Diamond Series quick start guide

Cascade
Cascade TS29LP use and care manual

Char-Broil
Char-Broil 463722912 Product guide

Holland Grill
Holland Grill The Premier BH-421-SS-1 instruction manual

Monogram
Monogram ZGG36N21 installation instructions

Inoksan
Inoksan Perfect 7IG10 instruction manual