Magnasonic 07MF119 User manual

For Customer Assistance Call:
Pour joindre le Service d’assistance à la
clientèle, composez le:
1-800-663-5954
07MF119
7” Digital Photo Frame with Touch Sensor Keys
Cadre photo numérique 7 po avec touches à effleurement
Instruction Manual
Guide de l’utilisateur
www.magnasonic.ca
Thank you for your purchase of this Magnasonic product. Please read this Instruction Manual carefully before using product to ensure proper use. Keep
this manual in a safe place for future reference.
Merci d’avoir fait l’achat de cet appareil Magnasonic. Veuillez lire le présent guide attentivement avant de faire fonctionner l’appareil pour vous assurer
de l’utiliser correctement. Conservez le
p
résent
g
uide dans un endroit sûr afin de
p
ouvoir vous
y
référer au besoin.

i
TABLE OF CONTENTS
Introduction .......................................................................................................................................................................................................................................1
Important Safety Precautions...........................................................................................................................................................................................................2
Features.............................................................................................................................................................................................................................................4
Location of Controls.........................................................................................................................................................................................................................5
Getting Started ..................................................................................................................................................................................................................................6
Attaching the Stand........................................................................................................................................................................................................................6
Connecting Power..........................................................................................................................................................................................................................6
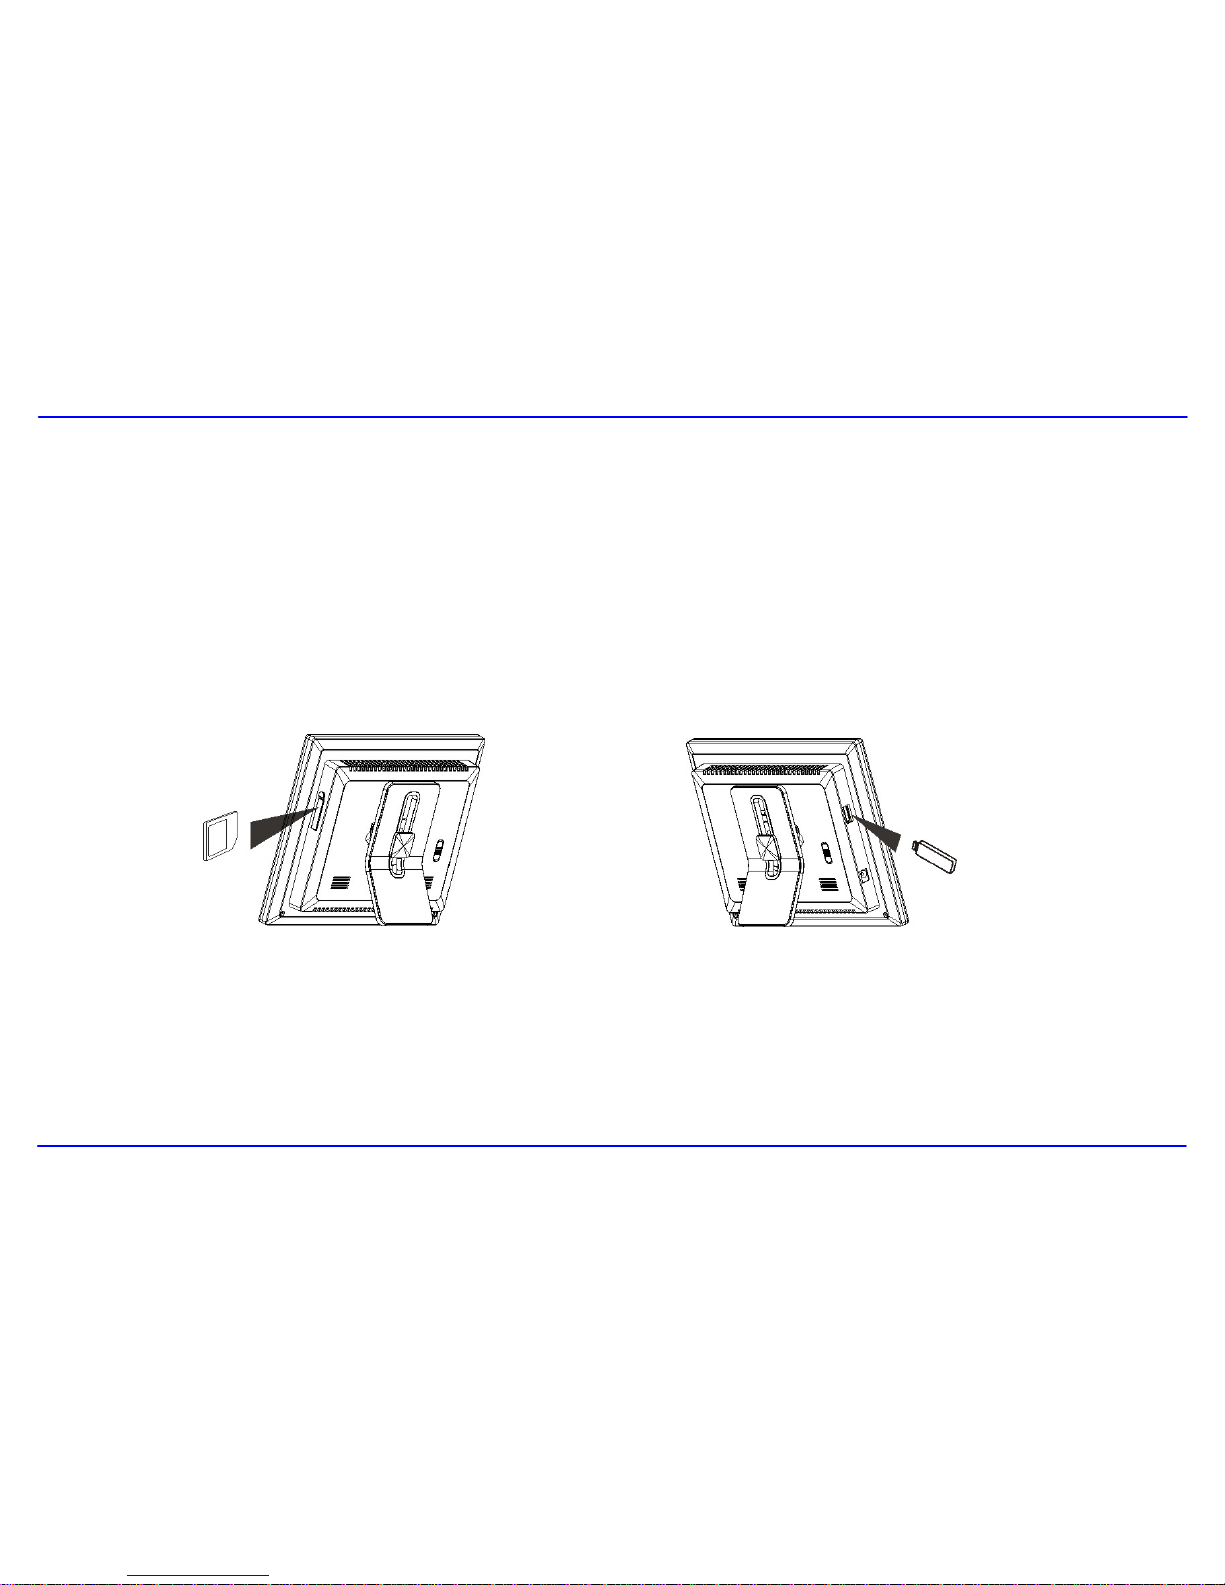
Inserting Media...............................................................................................................................................................................................................................7
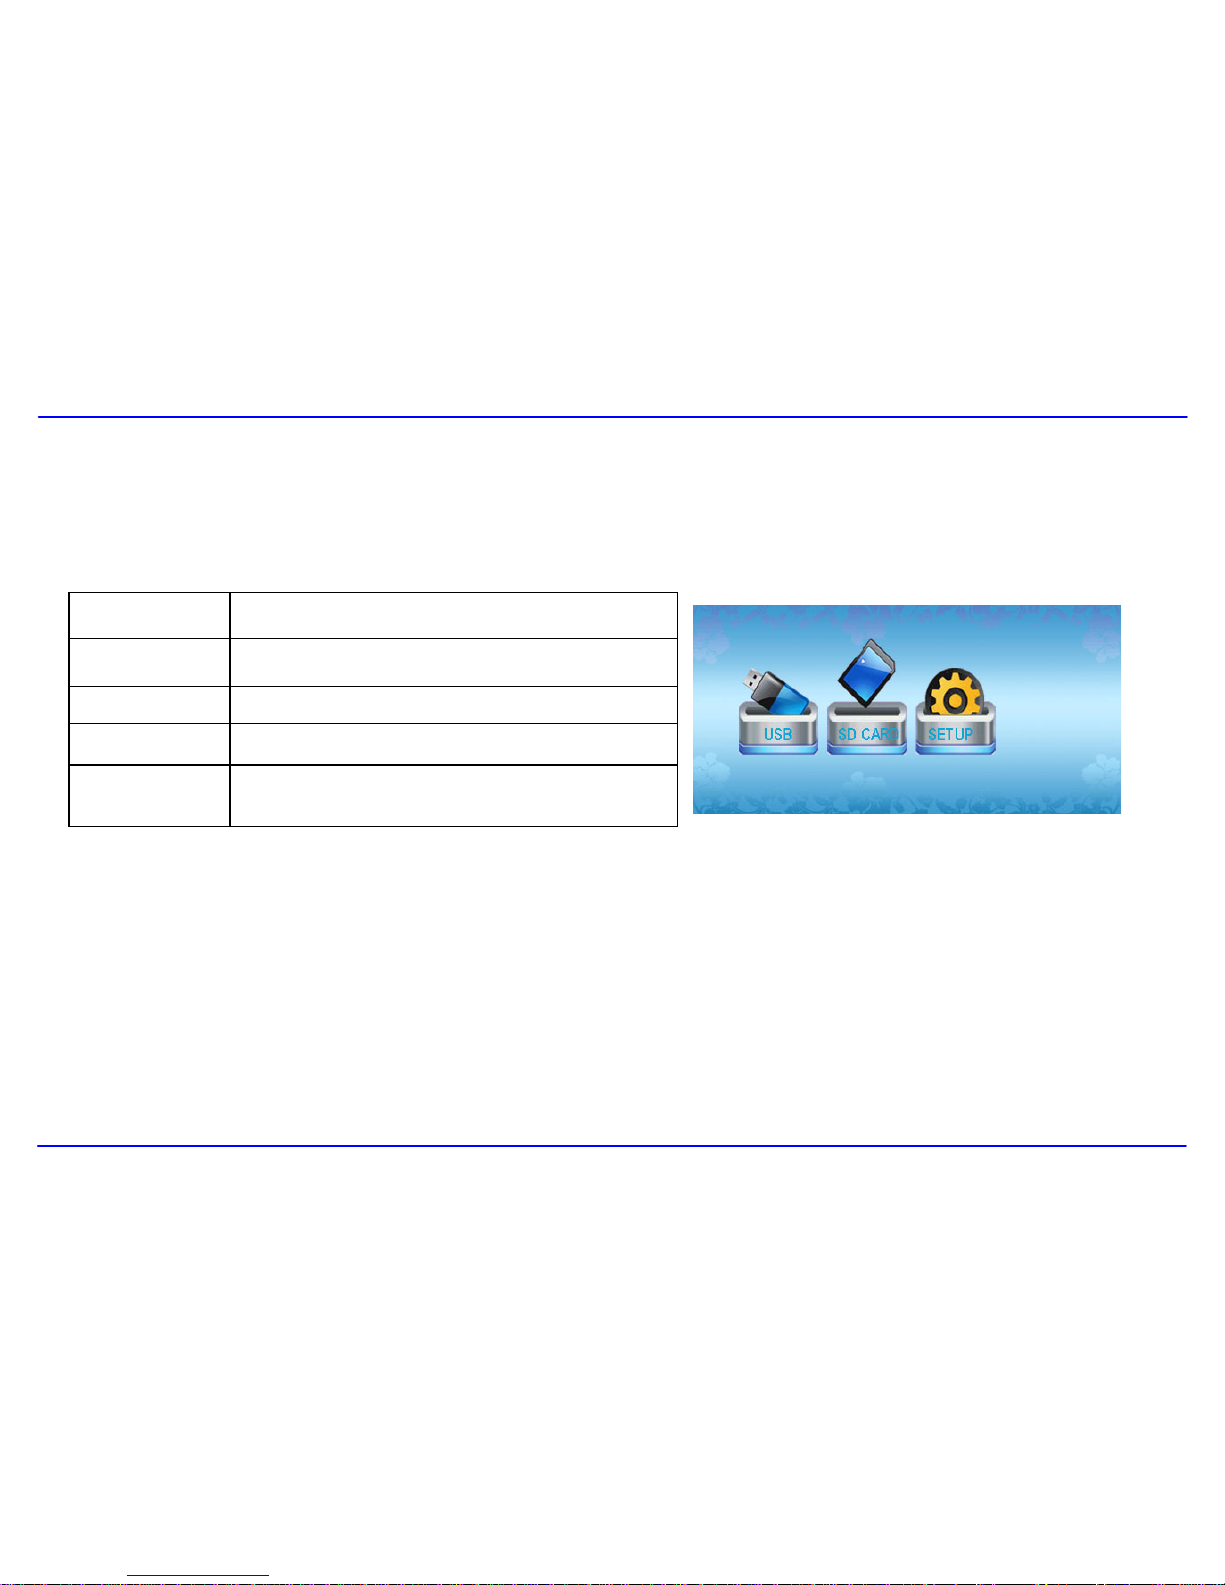
Main Screen...................................................................................................................................................................................................................................8
Viewing Photos..................................................................................................................................................................................................................................9
Viewing Thumbnails .......................................................................................................................................................................................................................9
Browsing a Single Picture...............................................................................................................................................................................................................9
Playing a Slideshow.....................................................................................................................................................................................................................10
Changing Frame Settings...............................................................................................................................................................................................................11
Settings menus.............................................................................................................................................................................................................................11
Frequently Asked Questions..........................................................................................................................................................................................................13
Specification....................................................................................................................................................................................................................................15

1
Introduction
Congratulations on your purchase of this Magnasonic Digital Photo Frame (DPF).
Before operating your Digital Photo Frame, please read this manual thoroughly and keep it for future reference.
This manual will help you to use and explore all of the exciting features of your new Digital Photo Frame.
This Digital Photo Frame is compatible with SD, MMC and MS memory card formats, which enables you to view digital photos directly from your
camera’s memory card.
This manual contains important safety instructions and correct operation information. Please read and adhere to all information advised in the
manual prior to operating this Digital Photo Frame.
The instruction manual is subject to change for improvements without notice.
MAGNASONIC
assumes no responsibility for loss of data caused by improper use of this product.

2
Important Safety Precautions
Please follow the following safety precautions when using this Digital Photo Frame. This will reduce the risk of fire, electric shock, product damage
and personal injury.
yWarning: To reduce the risk of electric shock, do not remove the cover or back. There are no user-serviceable parts inside. Refer servicing
to qualified personnel.
yWarning: To prevent fire or electric shock hazard, do not expose the unit to rain or moisture.
yDo not expose the Digital Photo Frame to water (dripping or splashing) and no objects filled with liquids, such as vases, should be placed on
the unit.
yKeep this Digital Photo Frame away from direct sunlight and heat sources such as radiators or stoves.
yDo not block the ventilation openings. Slots and openings on this unit are provided for ventilation. The openings should never be blocked by
placing this Digital Photo Frame on a cushion, sofa or other similar surface
yDo not place this Digital Photo Frame on an unstable cart, stand, tripod, bracket or table. The unit may fall, resulting in possible damage or
injury.
yNever place heavy or sharp objects on the LCD panel or frame.
yOnly use the AC adapter included with this Digital Photo Frame. Using any other adapter will void your warranty.
yProtect the power cord from being walked on or pinched particularly at plugs, receptacles and the point where the cord attached to the
Digital Photo Frame.
yUnplug the power from the outlet when the unit is not in use.

3
Cleaning
yBefore cleaning the product make sure it is turned off.
yNever spray or pour liquid directly onto the screen or plastic casing.
yTo clean the LCD screen, wipe the screen with a clean, soft, lint-free cloth. This removes dust and other particles. If it still is not clean, apply
a small amount of non-ammonia, non-alcohol based glass cleaner on a clean, soft, lint-free cloth to clean the screen.
yTo clean the plastic casing, use a soft, dry cloth. If it still is not clean, apply a small amount of non-ammonia, non-alcohol based, mildly
non-abrasive detergent on a clean, soft, lint-free cloth to clean the surface.
yTo clean the frame, use a soft, dry cloth.
Disclaimer: MAGNASONIC does not recommend the use of any ammonia or alcohol-based cleaners on the LCD screen or plastic casing. Some
chemical cleaners have been reported to damage the screen and/or display case. MAGNASONIC will not be liable for damage resulting from the use
of any ammonia or alcohol-based cleaners.

4
Features
yTouch buttons on the front panel of the frame for convenient operation
yDisplays digital pictures (JPEG) without a computer
yAutomatic slide show with multiple transition effects and desired interval.
yCompatible with SD/MMC/MS memory cards
yUSB Jack for connecting to a USB massstorage device

5
Location of Controls
1. SD/MMC/MS-card slot
2. USB JACK for connecting the USB device directly.
3. DC 5V 1A Port
4. Frame base
5. [X] Touch to start, pause slideshow or confirm the
selection.
6. [M] Touch to return to the main screen.
7. [2] Touch to return to the previous screen.
8. [g] Touch to move the cursor left or rotate the picture
9. [h] Touch to move the cursor right or rotate the picture.
10. [i] Touch to move the cursor up or select the previous picture
11. [j] Touch to move the cursor down or select the next picture.

6
Getting Started
Attaching the Stand
1. Match the stand to the slot on the back of the frame.
2. Rotate anticlockwise until the stand clicks into a landscape position or portrait position.
3. Push the stand up or down to set a comfortable viewing angle and place it on a flat surface.
Connecting Power
1. Use the supplied power adapter to connect the digital photo frame to an electrical
outlet.
2. Slide the power switch on the back of the photo frame from OFF to ON.
3. To turn off the power of the Digital Photo Frame completely, slide the power switch
from ON to OFF.

7
Inserting Media
Remove the rubber cover on 3-in-1 card slot and insert an SD, MMC or MS cardwith the metallic contacts facing towards the display.
Insert a USB drive into the USB Jack slot as shown.
Note:
yDo not force the memory card into thememory card slot.
yThe 3-in-1 card slot only reads one memory card at a time. Do not insert more than one card into the memory card slot.
yTo remove the cards, pull out the card slowly.

8
Main Screen
Once you switch on the Digital Photo Frame, the main screen appears.
When a memory device is inserted into the Digital Photo Frame, the corresponding icon appears on the main screen.
USB Appears when you inserted a USB device.
SD CARD Appears when you insert a SD card.
MS Card Appears when you insert a MS card.
MMC CARD Appears when you insert a MMC card.
SETUP To customize the settings of this Digital Photo Frame.
Note: The main screen can also be accessed by touching [M] at any time.

9
Viewing Photos
Viewing Thumbnails
The pictures on the selected memory source can be displayed on the screen as
thumbnails. (Up to 12 pictures are displayed at a time).
1. Touch [g] or [h] to select a memory source (e.g. USB or SD CARD) in the main
screen and touch [X] to confirm. The pictures are displayed on the screen as
thumbnails.
2. To navigate through the thumbnails, touch [g], [h], [i] or [j].
Note: You can also touch [2] from a slideshow or a single view to return to the thumbnails view.
Browsing a Single Picture
You can select a single picture to display on the screen, without a slideshow.
1. Select a picture in the thumbnail view, and touch [X]. The selected picture is displayed on the full screen.
yTo view the previous or next photo, touch [i] or [j].
yTo rotate a picture, touch [g] or [h].
2. To return to the thumbnail view, touch [2].
3. To start slide show from the current picture, touch [X].

10
Playing a Slideshow
While browsing a single picture, touch [X] to start the slideshow from the current picture.
yTo pause the slideshow and browse a single picture, touch [X] again.
yTo return to the main screen, touch [M].
yTo return to the thumbnail view, touch [2].
Note: If you insert a memory card or a USB device, the Digital Photo Frame will go to slideshow directly.

11
Changing Frame Settings
The system settings let you customize and configure your Digital Photo Frame.
1. Select the SETUP icon in the main screen and touch [X] to confirm. The Setup
Menu and software version appear on the screen.
2. To select a setting option, touch [i] or [j]
3. To change the value, touch [g] or [h] and touch [X] to confirm.
4. Touch [2] to exit.
Settings menus
Setting options Description
LANGUAGE Choose the on-screen language.
SLIDESHOWTIME Specify how long each picture is displayed in the slideshow.
The available options include: 3s, 5s, 15s, 1 min, 15mins, 1 hour.
TRANSITION EFFECT
Specify the transition effect between pictures in the slideshow.
The available options include: Random, Fading, Vexpand_Top, Vexpand_Bottom, Vexpand_Middle, Off,
Bottom_To_Top, Top_To_Bottom, Left_To_Right, Right_To_Left, Door_Close, Door_Open, Hori_Cross, and
Verti_Cross.

12
TFT Brightness Adjust the brightness of the TFT screen.
The available options include: -3, -2, -1, 0, +1, +2, +3.
TFTContrast Adjust the contrast of theTFT screen.
The available options include: -3, -2, -1, 0, +1, +2, +3.
TFTSaturation Adjust the saturation of the TFTscreen.
The available options include: -3, -2, -1, 0, +1, +2, +3.
DEFAULT Reset all settings to the default setting.

13
Frequently Asked Questions
1. Why can’t the Digital Photo Frame display some files from my Flash card or USB device?
• Some memory cards are not compatible with this Digital Photo Frame. Use a card that matches with the Digital Photo Frame features.
• The file formats on your card or USB device might not be supported (only JPEG pictures are supported).
2. There is a memory card inserted in the Digital Photo Frame, but the device is not able to read the card. What can I do?
• First, make sure that you are using a memory card type that is supported by the Digital Photo Frame.
• Secondly, make sure that the memory card is inserted correctly.
• Thirdly, check if the USB device is inserted into the unit. This Digital Photo Frame always reads the files on the USB device if the USB device
and a memory card are inserted simultaneously.
• The file formats on your card might not be supported (only JPEG pictures are supported).
Note: Some digital cameras save images into non-standard formats. Please consult the operating manual of your camera for assistance.
3. Why do some pictures load faster than others?
• Higher resolution pictures load slower. Use pictures with lower resolution to speed up loading times.
Note: This Digital Photo Frame supports images up to 16 mega-pixels.

14
4. Why does the screen not show anything?
• The device might not have been turned ON or the adapter is not well connected.
5. Can I rotate a picture on the screen?
• YES. Touch [g] or [h] to rotate a picture.
Note: The rotated picture will return to its original orientation after you power off the Digital Photo Frame.
6. What is the best picture resolution displayed on the screen?
• The best resolution is 480*234 pixels, however, this Digital Photo Frame supports images up to 16 mega-pixels.

15
Specification
Display
Digital TFT LCD
Panel size: 7 inches
Screen aspect ratio: 16:9
Resolution: 480*234 pixels
Input DC in
Power adaptor Input: 100~240V AC, 50/60Hz
Output: 5V 1A DC
USB port USB 2.0
Supports USB flash media
Supported peripheral devices SD™ (Secure Digital Card), MMC™ (MultiMedia Card), MS™ (Memory Stick)
Supported photo format JPEG, Maximum resolution:16 mega-pixels
Operating temperature 5
℃
~ 35
℃
Dimension 210*160*28.3mm
Weight 448.8g

1
TABLE DES MATIÈRES
Introduction .......................................................................................................................................................................................................................................1
Importantes consignes de sécurité .................................................................................................................................................................................................2
Caractéristiques................................................................................................................................................................................................................................4
Description de l’appareil...................................................................................................................................................................................................................5
Préparation de l’appareil...................................................................................................................................................................................................................6
Mise en place du support ...............................................................................................................................................................................................................6
Raccordement au réseau électrique...............................................................................................................................................................................................6
Insertion d’un support de données .................................................................................................................................................................................................7
Menu principal................................................................................................................................................................................................................................8
Visualisation de photos....................................................................................................................................................................................................................9
Visualisation de photos en format vignettes ou miniatures.............................................................................................................................................................9
Affichage d’une seule photo...........................................................................................................................................................................................................9
Mode diaporama ..........................................................................................................................................................................................................................10
Configuration des réglages du cadre photo numérique..............................................................................................................................................................11
Menu de configuration..................................................................................................................................................................................................................11
Foire aux questions ........................................................................................................................................................................................................................13
Fiche technique...............................................................................................................................................................................................................................15

1
Introduction
Félicitation de votre achat de ce cadre photo numérique de marque Magnasonic.
Avant d’utiliser votre cadre photo numérique, veuillez attentivement lire le présent guide d’utilisation et conservez-le ensuite pour pouvoir vous y
référer au besoin. Le présent manuel vous aidera à vous servir et à découvrir toutes les excitantes caractéristiques de votre nouveau cadre photo
numérique.
Ce cadre photo numérique est compatible avec les cartes mémoire de type SD, MMC et MS, ce qui vous permet de voir à l’écran des photos
numériques provenant directement de la carte mémoire de votre caméra numérique.
Le présent manuel contient d’importantes consignes de sécurité ainsi que toutes les directives de fonctionnement. Veuillez lire ce document au
complet avant d’utiliser le cadre photo numérique et respecter toutes les consignes qu’il contient.
Le présent guide d’utilisation est sujet à modification, en vue d’amélioration, sans préavis.
MAGNASONIC
décline toute responsabilité pour la perte de données causée par un usage incorrect de cet appareil.

2
Importantes consignes de sécurité
Veuillez respecter les consignes de sécurité suivantes lorsque vous utiliser votre cadre photo numérique. Cela réduira le risque d’incendie,
d’électrocution, de dommage à l’appareil et de blessure.
yAvertissement : Pour réduire le risque d’électrocution, ne tentez pas d’ouvrir le boîtier de l’appareil. Il ne contient aucune pièce réutilisable.
Confiez toute réparation à du personnel qualifié.
yAvertissement : Pour éviter le risque d’électrocution, n’exposez pas cet appareil à la pluie ni à l’humidité.
yN’exposez pas ce cadre photo numérique à de l’eau ou du liquide, qui dégoutterait ou éclabousserait l’appareil. Ne placez jamais sur l’appareil
des objets remplis de liquides, tels les vases.
yCe cadre photo numérique ne doit pas être exposé à la lumière directe du soleil, ni être placé à proximité d’une source de chaleur tel qu’un
appareil de chauffage ou une cuisinière.
yNe bloquez pas les orifices d’aérations. Les fentes et orifices dans l’appareil servent à assurer une bonne aération des composantes internes.
Ceux-ci ne doivent jamais être obstrués en plaçant par exemple le cadre photo numérique sur un coussin, un sofa ou autre source molle
similaire.
yNe placez jamais le cadre photo numérique sur une table, un trépied ou autre meuble instable. Ainsi installé, l’appareil risque de tomber, de
s’endommager et/ou de blesser quelqu’un.
yNe placez jamais des objets lourds ou tranchants sur l’écran ACL du cadre photo numérique.
yUtilisez uniquement l’adaptateur d’alimentation CA/CC vendu avec ce cadre photo numérique. L’utilisation de tout autre cordon d’alimentation
annulera la garantie.
yProtégez le cordon d’alimentation afin d’éviter qu’il soit piétiner ou coincé sous des objets lourds, particulière aux points où le cordon émane
Table of contents
Languages:
Other Magnasonic Digital Photo Frame manuals