Five-Year Limited Warranty
This MAGNUS product is warranted to the original
purchaser to be free from defects in materials and
workmanship under normal consumer use for a period
of one (5) years from the original purchase date or thirty
(30) days after replacement, whichever occurs later.
The warranty provider’s responsibility with respect to
this limited warranty shall be limited solely to repair or
replacement, at the provider’s discretion, of any product
that fails during normal use of this product in its intended
manner and in its intended environment. Inoperability
of the product or part(s) shall be determined by the
warranty provider. If the product has been discontinued,
the warranty provider reserves the right to replace
it with a model of equivalent quality and function.
This warranty does not cover damage or defect caused
by misuse, neglect, accident, alteration, abuse, improper
installation or maintenance. EXCEPT AS PROVIDED
HEREIN, THE WARRANTY PROVIDER MAKES NEITHER
ANY EXPRESS WARRANTIES NOR ANY IMPLIED
WARRANTIES, INCLUDING BUT NOT LIMITED TO
ANY IMPLIED WARRANTY OF MERCHANTABILITY OR
FITNESS FOR A PARTICULAR PURPOSE. This warranty
provides you with specific legal rights, and you may
also have additional rights that vary from state to state.
To obtain warranty coverage, contact the Magnus
Customer Service Department to obtain a return
merchandise authorization (“RMA”) number, and return
the defective product to Magnus along with the RMA
number and proof of purchase. Shipment of the defective
product is at the purchaser’s own risk and expense.
For more information or to arrange service, visit
www.magnustripods.com or call Customer Service at
212-594-2353.
Product warranty provided by the Gradus Group.
www.magnustripods.com
Magnus is a registered trademark of the Gradus Group.
© 2019 Gradus Group LLC. All rights reserved.
Thank you for choosing Magnus.
Magnus REX VT-4000-PRO tripod is designed
with advanced features that professional
videographers and cinematographers require of
their camera-support systems. It’s constructed
with sturdy, high-grade aluminum legs with
flip locks that provide stable support in the
most demanding environments. The video
head boasts professional features that will
accommodate most on-the-go videographers,
and it delivers dependable camera security as
well as smooth fluid movement.
Specifications
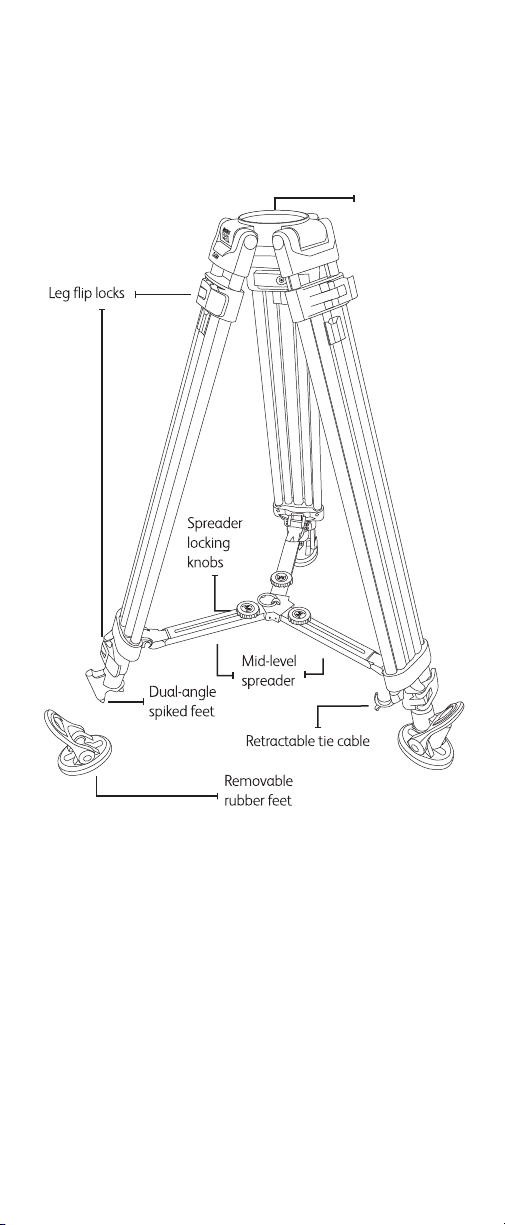
Legs
Material: Anodized aluminum alloy
Head Attachment Fitting: 65 mm bowl
Leg Stages / Sections: Two stage
Leg Lock Type: Flip lock
Independent Leg Spread: Yes
Spreader: Mid level (adjustable)
Spiked / Retractable Feet: Nonretractable spikes with
removable nonslip rubber feet
General
Load Capacity: 11 lb. (5 kg)
Maximum Working Height: 63.5 in. (161.3 cm)
Minimum Working Height: 28.3 in. (72 cm)
Folded Length: 31.5 in. (80 cm)
Weight: 9.9 lb. (4.5 kg)
Materials: Anodized aluminum alloy
Bubble Level: Yes
Head
Counterbalance System: Spring loaded
Quick-Release Plate: 0.3×1.7×2.7 in. (0.7×4.2×6.9cm)
Quick-Release Safety: Yes
Camera Mounting Screw: 1/4-20, 3/8-16
Built-In Balance Plate: Yes
Tilt Drag: Adjustable, fluid
Tilt Range: -65°/+80°
Tilt Lock: Yes
Pan Drag: Fixed, fluid
Pan Range: 360°
Pan Lock: Yes
Pan-Handle Rosettes: 2 (left and right)
Leveling Bubble / Illuminated: Yes, unilluminated
Head Mount Type: 65 mm half ball
Two-Stage Video Tripod
with Fluid Head
VT-4000-PRO
Owner’s
Manual
• Please read and follow these instructions, and keep this
manual in a safe place.
• Never set up or pull down a tripod while a camera is
mounted.
• Do not move the tripod or adjust the legs while a camera
is mounted.
• Do not exceed the maximum weight capacity of the
tripod.
• Never leave a camera unattended on the tripod.
• The camera should be securely fastened to the quick-
release mounting plate before mounting onto the tripod.
• Never mount a camera to the tripod until all tripod legs
are locked and stabilized.
• Do not stand on, rest on, or hang anything from the mid-
level spreader.
• Do not lift or move the tripod by the head.
• Keep hands clear of the inside of the legs, to avoid
trapping fingers.
• Safe operation of the tripod is the user’s responsibility.
• All images are for illustrative purposes only.
Precautions
GG2