MakeProAudio Dino Park Series User manual

MakeProAudio MakeKit Quick Start Guide V1.0
Dino Park Board / MakeKit / MakeKit EX / MakeKit EXL
Quick Start Guide V1.0
1. General 2
1.1 Document Version 2
1.2 Welcome to Dino Park! 2
2. Hardware Quickstart 3
2.1 Hardware Assembly 3
2.2 Rear Faceplate - Connectors 4
2.3 Front Faceplate - Display and Controls 6
2.4 Front Panel Features 6
2.5 Setup Examples 8
3. Dino Park Editor Sotware / VSTis 10
4. Regulatory 11
4.1 Trademarks 11
4.2 Disclaimer 11
4.3 Copyright And Legal Notice 11
1

MakeProAudio MakeKit Quick Start Guide V1.0
1. General
1.1 Document Version
Document Version
Date
Changes
1.0
20.08.2019
Initial Version
1.2 Welcome to Dino Park!
Thanks for purchasing the MakeProAudio Dino Park Board / MakeKit / MakeKit EX / MakeKit EXL!
The greatest pleasures are simple pleasures. A hardware synth like Dino Park is instant-on and instantly
gratifying. Totally dependable and extremely easy to use, it turns any USB MIDI Keyboard into a sound
monster. Combined with the power and lexibility of sotware, Dino Park ofers the best of both worlds!
You may have wondered about the “Dino Park” name? Here is how the name came about. We are huge fans of
the LEGO System* and Dino Park is a name which would fit the LEGO* universe. The theme you will be guessing
already - in Dino Park, you meet the legends - the dinosaurs of analog synthesis!
Please understand that this Quick Start Guide only serves as a quick introduction to the general use of Dino
Park.. More guides and resources are available on
www.makeproaudio.com/support
Once on the main support page, navigate to the Dino Park support pages.
Here you will find
●detailed assembly instructions
●user manuals for the individual synthesizer models
●User manual for the VSTi editor
●MIDI implementation tables
●available sotware updates
●maker reference information (pinouts etc.)
*Disclaimer: LEGO ® is a trademark of the LEGO Group of companies which does not sponsor, authorize or endorse MakeProAudio or their products.
2

MakeProAudio MakeKit Quick Start Guide V1.0
2. Hardware Quickstart
2.1 Hardware Assembly
As a first step you need to assemble the kit we supplied to you. For an overview of how Dino Park is assembled,
refer to the “explosions” below. Detailed step by step assembly instructions are available via our support page.
3

MakeProAudio MakeKit Quick Start Guide V1.0
2.2 Rear Faceplate - Connectors
Note: only MakeKit EX and MakeKit EXL come
with the Breakout Extension board (version
pictured here).
Lower Row, from let to right
POWER SWITCH
Switches your Dino Park on and of. Please avoid switching the device on and of in a quick succession.
12V DC IN
If you purchased a MakeKit, a suitable power supply will be supplied with the kit. If you purchased the Dino
Park Board without a MakeKit, there is no power supply included. You will need to connect a power supply
which conforms to the following specifications:
AC to DC power supply
Output Voltage: 12V
Output Current: 500mA or higher (1A recommended)
Connector: DC barrel connector 5.5 mm x 2.1mm, center positive
USB MIDI HOST
USB Host port (USB 2.0 Full Speed, USB Type A connector) for connecting fully USB MIDI compliant keyboards
and controllers. In this initial release, Dino Park will only accept channel messages on MIDI Channel 1 coming
via the USB MIDI Host port. Also please note that we have seen MIDI gear which was not entirely USB
compliant, and therefore being rejected by Dino Park. We therefore can not guarantee that every device under
the sun will USB Host connect to Dino Park. We hope your devices play fine!
USB MIDI DEVICE
Use this USB port (USB 2.0 Full Speed, USB Type Micro B connector) for connecting the device to a host
computer and to send/receive MIDI over USB. Dino Park should appear as a standard USB MIDI Device and will
not require any device specific drivers under most operating systems. Please note that it is not possible to
power your Dino Park over USB only - the 12V power supply is always required. This USB port is also used for
firmware updates.
ANALOG OUT (Let/Right)
In order to hear Dino Park s audio signals, connect its stereo outputs to the let / right inputs of a mixer, a
computer sound card or a HiFi system.
4

MakeProAudio MakeKit Quick Start Guide V1.0
Upper Row, from let to right - only when Expansion Board is installed (MakeKit EX + EXL)
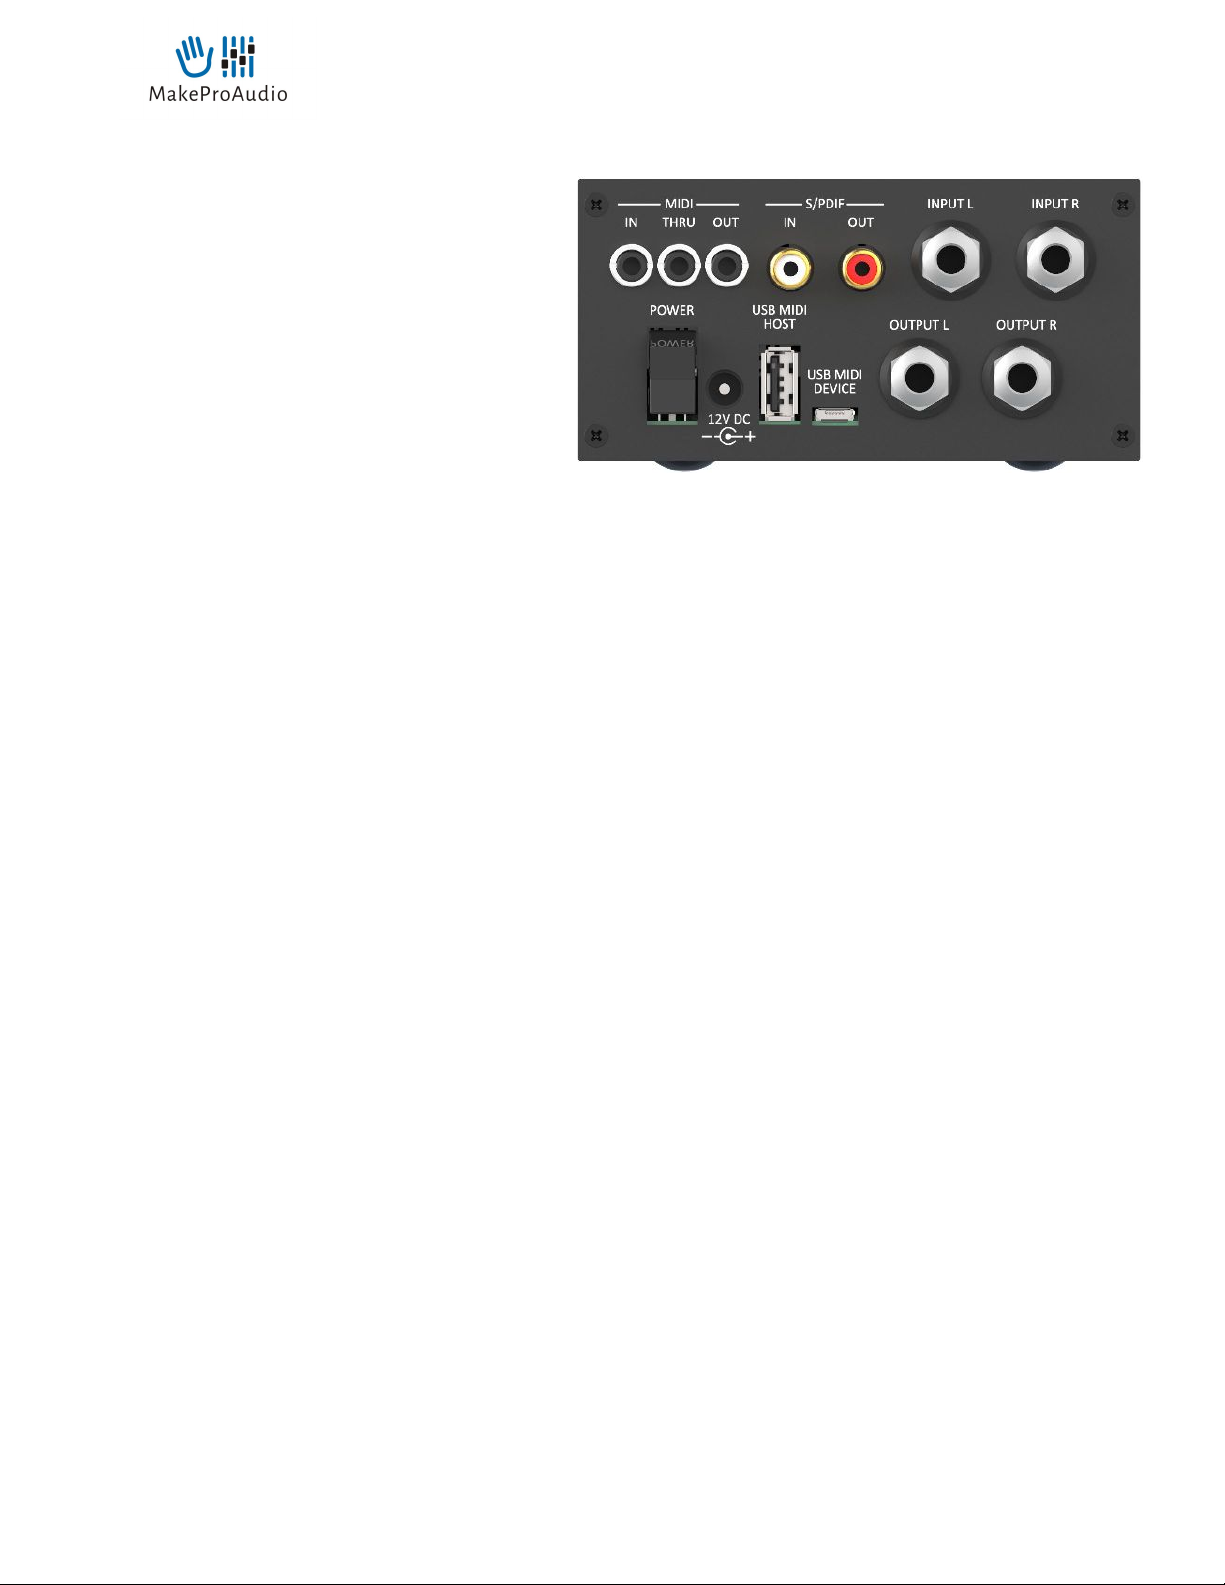
MIDI IN via 3.5mm TRS
Connect the MIDI output of your keyboard, MIDI interface or sequencer to the MIDI IN of your DinoBoard to
send MIDI messages directly to the selected synth model.
* For the pinout of the 3.5mm TRS connector, we follow the the oficial MIDI.org standard RP-054 (formerly TRS MIDI A).
Sadly, the MIDI Industry is divided over the pinout of this connector. The new MIDI standard and Dinopark are compatible
with 3.5mm to DIN5 cables which work with e.g. Korg, AKAI and Line 6. Unfortunately, incompatible are cables used
with Arturia, Novation and others (as of 2019). Amazing job, MMA!
MIDI THRU via 3.5mm TRS
Dino Parks incoming MIDI signals can also control another instrument if you connect the MIDI THRU port to
the instrument's MIDI In. All messages arriving on the MIDI IN port will be forwarded to the MIDI THRU port.
MIDI OUT via 3.5mm TRS
Dino Park mirrors all parameter changes (including all synth parameters on internal preset recall) on the MIDI
OUT. This enables you to connect Dino Park to a computer via conventional MIDI connections - as an alternative
to USB MIDI.
S/PDIF INPUT and OUTPUT
Use the S/PDIF output as a lossless alternative to analog audio. Note that the sampling rate of Dino Park is fixed
at 44.1kHz. You can also use the S/PDIF ports to daisy chain multiple Dino Park units. Just connect a S/PDIF
cable from the output of a unit to the S/PDIF input of a second unit and second unit will play out (via both
analog and S/PDIF) a mix of both Dino Park units.
ANALOG IN (Let/Right)
The line level inputs allow two external audio signals/channels to be mixed with Dino Park synth sounds. Dino
Park features a small digital audio mixer, ofering gain, bass and treble equalization as well as pan/balance and
fader. You can control the mixer from the VST plugin or from any other MIDI controller using NRPN controls
(for MIDI implementation chart see a user manual for a synth model). You can use the inputs to mix Dino Park
with another external Synthesizer and save additional inputs/strips in your audio mixer. In the future, new Dino
Park models may be utilizing these inputs for their very own purpose… stay tuned!
5

MakeProAudio MakeKit Quick Start Guide V1.0
2.3 Front Faceplate - Display and Controls
From let to right
Let Encoder
Encoder for selecting the Plugin Model and the MIDI Channel and DinoBoard (A-B)*
* Board stacking is not yet supported in the V1.0 Release. Please check www.makeproaudio.com/support for news and
updates.
Right Encoder
Encoder for selecting presets and controlling the device volume
Display
Display for visual feedback of selections and parameter data
6

MakeProAudio MakeKit Quick Start Guide V1.0
2.4 Front Panel Features
Selecting Synth Models
The currently loaded model is shown in the display with a little triangle before its name. To change the model,
scroll through available models by turning the encoder to the let of the display. To confirm the selection and
load the new model push the encoder until you hear a click noise. Note that if you do not confirm your selection
within approx. 5 seconds, your selection is rejected and the display will return to the currently loaded model.
Selecting Presets
Select the preset of the currently loaded synth model by turning the encoder right of the display. The currently
loaded preset will be marked with a little triangle before its name. To confirm the selection and load the new
model push the encoder until you hear a click noise. For convenience, if you keep pushing the right encoder you
will keep engaging the next preset (for easy preset browsing).
Selecting MIDI Channel
Select the Channel that the device is receiving and sending from/to by pushing and turning (while pushed) the
encoder let of the display. The current channel will be displayed on the screen. The selection of the MIDI
channel is instant, so there is no need to push the encoders.
5.4 Changing the Device Volume
Change the device volume by pushing and turning (while pushed) the right encoder. The volume will be
displayed on the screen.
* Both shit functions stay on the screen for a little while ater pushing the encoder. As long as the display shows the "shit"
function, editing works without holding the encoder down.
7

MakeProAudio MakeKit Quick Start Guide V1.0
2.5 Setup Examples
Here are two setup examples - one stand-alone, one with a computer connected:
USB MIDI Stand-alone Setup
1. Connect your Dino Park to a power source with the included power supply
2. Connect TRS audio cables from Analog Right / Let to your active speakers
3. Connect a USB MIDI keyboard to the Dino Park USB Host port with a standard USB cable
4. Switch on all devices (please switch on the speakers last)
5. Turn the let encoder to select a synth model, push to confirm
6. Turn the right encoder to select a preset, push to confirm
7. Play the synth model
8

MakeProAudio MakeKit Quick Start Guide V1.0
Computer Setup
1. Connect your Dino Park to a power source with the included power supply
2. Connect TRS audio cables from Analog Right / Let to your audio interface (or directly to active
speakers)
3. Connect a MIDI keyboard to your computer
4. Connect Dino Park to your Computer using the USB Device port, it will appear as a USB MIDI Device
5. Switch on all devices (please switch on the speakers last)
6. Start your DAW and load the VST plugin of your desired model
7. Make sure the VST plugin receives MIDI from DinoPark and sends MIDI to Dino Park
8. Click the “Presets” buttons in the VST plugin to see the preset list, double-click a list entry to engage a
preset. DinoPark should now load the respective plugin and your selected preset.
9. Play notes on the keyboard
10. Change synth parameters via the editor sotware of the selected synth model plugin.
9

MakeProAudio MakeKit Quick Start Guide V1.0
3. Dino Park Editor Sotware / VSTis
Dino Park is perfect to play great sounds in a most compact, robust and easy way . However, the front Display
Panel does not provide access to all sound parameters on the unit. For that reason we have created editor
sotware (VSTi for Mac and PC) which can control all internal parameters of Dino Park from within your DAW /
your MIDI Sequencer.
Use the Dino Park Editor VSTis to:
●use a graphical user interface to access all knobs and switches of your synth models
●design your own sounds from ground up or tweak existing presets your way
●tweak and overwrite/update presets in the Factory Bank
●save your own presets in the User Bank
●control the mixer functions of your Dino Park
Note that although our editor sotware appears just like any other VSTi in your sequencer, it does not perform
any sound processing like other VSTis do. All sounds are still synthesized inside your Dino Park hardware unit.
Our VSTis are mere remote control user interfaces with added preset management, allowing you to design and
manage sounds inside your Dino Park.
Our editor VSTis allow you to save single presets to your computer and load them at a later point - or send them
to a friend. However, preset banks are not stored on your computer - these reside only inside your Dino Park!
When you double click on a preset in the preset list of your VSTi, the VSTi sends a MIDI Program Change
message to the Dino Park hardware unit which engages that preset. When Dino Park engages a preset, it sends
out a bunch of MIDI Control Change messages (CC and NRPN) which the editor sotware is receiving to display
10

MakeProAudio MakeKit Quick Start Guide V1.0
current parameter settings. Therefore, it is critical for the MIDI routing in your sequencer to deliver MIDI events
from the DinoPark MIDI driver to all instances of the Dino Park VSTi Editors.
Download Editor Sotware / VSTi
Go to www.makeproaudio.com/support and then navigate to the Dino Park support pages. There you will find
downloads for Mac and PC as well as documentation on how to install and use our editors.
11

MakeProAudio MakeKit Quick Start Guide V1.0
4. Regulatory
4.1 Trademarks
All brand, product and company names and any other registered names or trademarks mentioned in this
manual belong to their respective owners.
4.2 Disclaimer
MakeProAudio has taken all possible steps to ensure that the information given here is both correct and
complete. In no event can MakeProAudio accept any liability or responsibility for any loss or damage to the
owner of the equipment, any third party, or any equipment which may result from the use of this manual or the
equipment which it describes. The information provided in this document may be modified at any time
without prior notice. Specifications and appearance may difer from those listed and illustrated.
4.3 Copyright And Legal Notice
2019 © MakeProAudio GmbH. All rights reserved.
Contact:
MakeProAudio GmbH
Siegburger Str. 2
53819 Neunkirchen-Seelscheid
Germany
Represented by:
Frank Hund, Managing Director
Company Registration:
Amtsgericht Siegburg HRB 14363
12
This manual suits for next models
4
Table of contents
Other MakeProAudio Synthesizer manuals