Makita XBU02 User manual

INSTRUCTION MANUAL
MANUAL DE INSTRUCCIONES
Cordless Blower
Sopladora Inalámbrica
XBU02
IMPORTANT: Read Before Using.
IMPORTANTE: Lea antes de usar.

2ENGLISH
ENGLISH (Original instructions)
SPECIFICATIONS
Model XBU02
Capacities Air volume (max.) 0 - 13.4 m3/min (0 - 473 cu.ft./min)
Air speed (average) 0 - 54.0 m/s (0 - 120 MPH)
Air speed (max.) 0 - 65.0 m/s (0 - 145 MPH)
Overall length (without long nozzle) 585 mm (23")
(with long nozzle) 830, 880, 930 mm (32-3/4", 34-3/4", 36-5/8")
Rated voltage D.C. 36 V
Net weight 3.5 - 4.2 kg (7.7 - 9.3 lbs)
•
Due to our continuing program of research and development, the specications herein are subject to change without notice.
• Specications and battery cartridge may dier from country to country.
• The weight may dier depending on the attachment(s), including the battery cartridge. The lightest and heavi-
est combinations, according to EPTA-Procedure 01/2014, are shown in the table.
Applicable battery cartridge and charger
Battery cartridge
BL1815N / BL1820B / BL1830 / BL1830B / BL1840B / BL1850B / BL1860B
Charger
DC18RC / DC18RD / DC18RE / DC18SD / DC18SE / DC18SF / DC18SH
•
Some of the battery cartridges and chargers listed above may not be available depending on your region of residence.
WARNING: Only use the battery cartridges and chargers listed above. Use of any other battery cartridges
and chargers may cause injury and/or re.
Recommended cord connected power source
Battery adapter BAP182
Portable power pack PDC01 / PDC1200
• The cord connected power source(s) listed above may not be available depending on your region of residence.
• Before using the cord connected power source, read instruction and cautionary markings on them.
IMPORTANT SAFETY
INSTRUCTIONS
When using an electrical appliance, basic precautions
should always be followed, including the following:
READ ALL INSTRUCTIONS.
BEFORE USING THIS
APPLIANCE
WARNING - To reduce the risk of re, electric shock,
or injury:
1. Do not leave appliance when battery tted.
Remove battery from appliance when not in use
and before servicing.
2. Do not expose to rain. Store indoors.
3. Do not allow to be used as a toy. Close attention is
necessary when used by or near children.
4. Use only as described in this manual. Use only
manufacturer's recommended attachments.
5. Do not use with damaged battery. If appliance is
not working as it should, has been dropped, dam-
aged, left outdoors, or dropped into water, return it
to a service center.
6. Do not put any object into openings. Do not use
with any opening blocked; keep free of dust, lint,
hair, and anything that may reduce air ow.
7. Keep hair, loose clothing, ngers, and all parts of
body away from openings and moving parts.
8. Use extra care when cleaning on stairs.
9. Use only the charger supplied by the manufacturer
to recharge.
SAVE THESE INSTRUCTIONS.
This appliance is intended for commercial use.
BLOWER SAFETY WARNINGS
1. Always use protective goggles, a cap and mask
when using the blower. Ordinary eye or sun
glasses are NOT safety glasses.
2. While operating the machine, always wear sub-
stantial and non-skid footwear and long trousers.
3. Do not wear loose clothing or jewellery that can be
drawn into the air inlet. Keep long hair away from
the air inlets.
4. Never point the nozzle at anyone in the vicinity
when using the blower.

3ENGLISH
5. Never block suction inlet and/or blower outlet.
• Do not block suction inlet or blower outlet to
clean up in dusty areas.
• Do not use the blower with a tapered nozzle
smaller than the original one, such as a new
nozzle obtained by attaching an extra diam-
eter-reduced hose or smaller hose to the
nozzle top end.
• Do not Use the blower to inate balls, rubber
boat or the similar.
Increased motor revolution may cause dangerous
fan breakage and result in serious personal injury.
Heated motor and control circuit may cause a re.
6. AVOID UNINTENTIONAL STARTING. Do not
carry battery tted tool with nger on switch.
7. Some material contains chemicals which may be
toxic. Take caution to prevent dust inhalation and
skin contact. Follow material supplier safety data.
8. Make sure that there are nobody around you when
you work at high places.
9. Recharge only with the charger specied by the
manufacturer. A charger that is suitable for one
type of battery pack may create a risk of re when
used with another battery pack.
10. Use power tools only with specically designated
battery packs. Use of any other battery packs may
create a risk of injury and re.
11. When battery pack is not in use, keep it away from
other metal objects, like paper clips, coins, keys,
nails, screws or other small metal objects, that can
make a connection from one terminal to another.
Shorting the battery terminals together may cause
burns or a re.
12. Under abusive conditions, liquid may be ejected
from the battery; avoid contact. If contact acci-
dentally occurs, ush with water. If liquid contacts
eyes, additionally seek medical help. Liquid
ejected from the battery may cause irritation or
burns.
13. Do not handle charger, including charger plug, and
charger terminals with wet hands.
14. Do not charge the battery outdoors.
SAVE THESE INSTRUCTIONS.
WARNING: DO NOT let comfort or famil-
iarity with product (gained from repeated
use) replace strict adherence to safety
rules for the subject product. MISUSE or
failure to follow the safety rules stated in
this instruction manual may cause serious
personal injury.
Symbols
The followings show the symbols used for tool.
volts
direct current
Important safety instructions for
battery cartridge
1. Before using battery cartridge, read all instruc-
tions and cautionary markings on (1) battery
charger, (2) battery, and (3) product using
battery.
2. Do not disassemble or tamper the battery
cartridge. It may result in a re, excessive heat,
or explosion.
3. If operating time has become excessively
shorter, stop operating immediately. It may
result in a risk of overheating, possible burns
and even an explosion.
4. If electrolyte gets into your eyes, rinse them
out with clear water and seek medical atten-
tion right away. It may result in loss of your
eyesight.
5. Do not short the battery cartridge:
(1) Do not touch the terminals with any con-
ductive material.
(2) Avoid storing battery cartridge in a con-
tainer with other metal objects such as
nails, coins, etc.
(3) Do not expose battery cartridge to water
or rain.
A battery short can cause a large current
ow, overheating, possible burns and even a
breakdown.
6. Do not store and use the tool and battery car-
tridge in locations where the temperature may
reach or exceed 50 °C (122 °F).
7. Do not incinerate the battery cartridge even if
it is severely damaged or is completely worn
out. The battery cartridge can explode in a re.
8. Do not nail, cut, crush, throw, drop the battery
cartridge, or hit against a hard object to the
battery cartridge. Such conduct may result in a
re, excessive heat, or explosion.
9. Do not use a damaged battery.
10. The contained lithium-ion batteries are subject
to the Dangerous Goods Legislation require-
ments.
For commercial transports e.g. by third parties,
forwarding agents, special requirement on pack-
aging and labeling must be observed.
For preparation of the item being shipped, consult-
ing an expert for hazardous material is required.
Please also observe possibly more detailed
national regulations.
Tape or mask o open contacts and pack up the
battery in such a manner that it cannot move
around in the packaging.
11. When disposing the battery cartridge, remove
it from the tool and dispose of it in a safe
place. Follow your local regulations relating to
disposal of battery.
12. Use the batteries only with the products
specied by Makita. Installing the batteries to
non-compliant products may result in a re, exces-
sive heat, explosion, or leak of electrolyte.
13. If the tool is not used for a long period of time,
the battery must be removed from the tool.

4ENGLISH
14. During and after use, the battery cartridge may
take on heat which can cause burns or low
temperature burns. Pay attention to the han-
dling of hot battery cartridges.
15. Do not touch the terminal of the tool imme-
diately after use as it may get hot enough to
cause burns.
16. Do not allow chips, dust, or soil stuck into the
terminals, holes, and grooves of the battery
cartridge. It may result in poor performance or
breakdown of the tool or battery cartridge.
17. Unless the tool supports the use near
high-voltage electrical power lines, do not use
the battery cartridge near high-voltage electri-
cal power lines. It may result in a malfunction or
breakdown of the tool or battery cartridge.
18. Keep the battery away from children.
SAVE THESE INSTRUCTIONS.
CAUTION: Only use genuine Makita batteries.
Use of non-genuine Makita batteries, or batteries that
have been altered, may result in the battery bursting
causing res, personal injury and damage. It will
also void the Makita warranty for the Makita tool and
charger.
Tips for maintaining maximum
battery life
1. Charge the battery cartridge before completely
discharged. Always stop tool operation and
charge the battery cartridge when you notice
less tool power.
2. Never recharge a fully charged battery car-
tridge. Overcharging shortens the battery
service life.
3. Charge the battery cartridge with room tem-
perature at 10 °C - 40 °C (50 °F - 104 °F). Let
a hot battery cartridge cool down before
charging it.
4. When not using the battery cartridge, remove
it from the tool or the charger.
5. Charge the battery cartridge if you do not use
it for a long period (more than six months).
FUNCTIONAL
DESCRIPTION
CAUTION:
• Always be sure that the tool is switched o and
the battery cartridge is removed before adjust-
ing or checking function on the tool.
Installing or removing battery
cartridge
2
3
3
1
2
► 1. Red indicator 2. Button 3. Battery cartridge
CAUTION:
• Always switch o the tool before installing or
removing of the battery cartridge.
• Hold the tool and the battery cartridge rmly
when installing or removing battery car-
tridge. Failure to hold the tool and the battery
cartridge rmly may cause them to slip o your
hands and result in damage to the tool and
battery cartridge and a personal injury.
To remove the battery cartridge, slide it from the tool
while sliding the button on the front of the cartridge.
To install the battery cartridge, align the tongue on the
battery cartridge with the groove in the housing and slip
it into place. Insert it all the way until it locks in place
with a little click. If you can see the red indicator on the
upper side of the button, it is not locked completely.
CAUTION:
• Always install the battery cartridge fully until the
red indicator cannot be seen. If not, it may acci-
dentally fall out of the tool, causing injury to you
or someone around you.
• Do not install the battery cartridge forcibly. If the
cartridge does not slide in easily, it is not being
inserted correctly.
NOTE:
• The tool does not work with only one battery
cartridge.

5ENGLISH
Tool / battery protection system
The tool is equipped with a tool/battery protection sys-
tem. This system automatically cuts o power to the
motor to extend tool and battery life.
The tool will automatically stop during operation if the
tool or battery is placed under one of the following con-
ditions. In some conditions, the indicators light up.
Overload protection
When the tool is operated in a manner that causes it to
draw an abnormally high current, the tool automatically
stops without any indication. In this situation, turn the
tool o and stop the application that caused the tool to
become overloaded. Then turn the tool on to restart.
Overheat protection for tool
On Blinking
When the tool is overheated, the tool stops automat-
ically, the battery indicator blink about 60 seconds. In
this situation, let the tool cool down before turning the
tool on again.
Overdischarge protection
When the battery capacity becomes low, the tool stops
automatically. If the product does not operate even
when the switches are operated, remove the batteries
from the tool and charge the batteries.
Indicating the remaining battery
capacity
(Only for battery cartridges with "B" at the end of the
model number.)
1
2
► 1. Indicator lamps 2. CHECK button
Press the check button on the battery cartridge to indi-
cate the remaining battery capacity. The indicator lamps
light up for few seconds.
Off BlinkingLighted
Indicator lamps
Charge the
battery.
0% to 25%
25% to 50%
50% to 75%
75% to 100%
Remaining
capacity
The battery
may have
malfunctioned.
NOTE:
• Depending on the conditions of use and the
ambient temperature, the indication may dier
slightly from the actual capacity.
Remaining battery capacity indication
(Country specic)
121
► 1. Battery indicator 2. CHECK button
Press the check button to make the battery indicators
show the remaining battery capacities. The battery
indicators correspond to each battery.
Remaining battery capacity indication
Battery indicator status
Remaining battery capacity
50% - 100%
20% - 50%
0% - 20%
Charge the battery
On Off Blinking

6ENGLISH
Switch action
CAUTION:
• Before inserting the battery cartridge into the
tool, always check to see that the switch trigger
actuates properly and returns to the "OFF"
position when released.
1
► 1. Switch trigger
To start the tool, simply pull the switch trigger. Tool
speed is increased by increasing pressure on the switch
trigger. Release the switch trigger to stop.
1
1
► 1. Lock button
For continuous operation, pull the switch trigger, push in
the lock button and then release the switch trigger.
To stop the tool from the locked position, pull the switch
trigger fully, then release it.
Speed change
1
► 1. Adjusting dial
The maximum air volume can be adjusted just by
turning the adjusting dial. This can be done even while
the tool is running. The dial is marked 1 (lowest) to 6
(highest).
NOTICE:
The speed adjusting dial can be turned only as far
as 6 and back to 1. Do not force it past 6 or 1, or
the speed adjusting function may no longer work.
When working in a high temperature circum-
stance, the tool may be stopped because of the
overheat protection system. In that case let the
tool cool down. Avoid setting to speed 6 (highest)
in high temperature circumstances.
ASSEMBLY
CAUTION:
• Always be sure that the tool is switched o and
the battery cartridge is removed before carrying
out any work on the tool.
Installing the long nozzle
1
22
► 1. Long nozzle 2. Triangle marking
To install the long nozzle:
1. Align the small projection of the housing with the
groove of the long nozzle.

7ENGLISH
2. Slide in the long nozzle, and turn it clockwise until
the triangle markings on the long nozzle and the
housing meet each other.
The length of the nozzle can be adjusted by changing
the locking position.
Installing the at nozzle or extension nozzle
Optional accessory
The extension nozzle / at nozzle can be installed on
the tip of the long nozzle in the same way as above.
Installing the gutter nozzle
Optional accessory
The gutter nozzle can be installed on the blower. The
adapter pipe designed exclusively for this model is
required to install the gutter nozzle.
For more details, refer to the instruction manual pro-
vided with the gutter nozzle.
Attaching the shoulder strap
Optional accessory
CAUTION:
When you use the tool in combination of
the backpack-type power supply such as portable power pack,
do not use the shoulder strap included in the tool package.
If you put on the shoulder strap included in the tool
package and the shoulder harness of the back-
pack-type power supply at the same time, removing the
tool or backpack-type power supply is dicult in case of
an emergency, and it may cause an accident or injury.
Hook the shoulder strap onto the hanger of the tool.
Before use, adjust the length of strap so that it is easy
to work with it.
OPERATION
Blowing
CAUTION:
• Do not place the blower on the ground while it is
switched on. Sand or dust may enter from suc-
tion inlet, and they may result in personal injury.
Hold the blower rmly with a hand and perform the
blowing operation by moving it around slowly.
When blowing around a building, a big stone or a vehi-
cle, direct the nozzle away from them.
When performing an operation in corner, start from the
corner and then move to wide area.
MAINTENANCE
CAUTION:
• Always be sure that the tool is switched o and
the battery cartridge is removed before attempt-
ing to perform inspection or maintenance.
•
Never use gasoline, benzine, thinner, alcohol or the
like. Discoloration, deformation or cracks may result.
Cleaning
From time to time, wipe o the outside of the tool using
a cloth dampened in soapy water.

8ENGLISH
To maintain product SAFETY and RELIABILITY,
repairs, any other maintenance or adjustment should
be performed by Makita Authorized or Factory Service
Centers, always using Makita replacement parts.
OPTIONAL
ACCESSORIES
CAUTION:
• These accessories or attachments are recom-
mended for use with your Makita tool specied
in this manual. The use of any other accessories
or attachments might present a risk of injury to
persons. Only use accessory or attachment for
its stated purpose.
If you need any assistance for more details regard-
ing these accessories, ask your local Makita Service
Center.
• Makita genuine battery and charger
• Shoulder strap
• Extension nozzle
• Flat nozzle
• Gutter nozzle
• Adapter pipe
NOTE:
• Some items in the list may be included in the
tool package as standard accessories. They
may dier from country to country.
MAKITA LIMITED WARRANTY
Please refer to the annexed warranty sheet for the
most current warranty terms applicable to this product.
If annexed warranty sheet is not available, refer to the
warranty details set forth at below website for your
respective country.
United States of America: www.makitatools.com
Canada: www.makita.ca
Other countries: www.makita.com

9ESPAÑOL
ESPAÑOL (Instrucciones originales)
ESPECIFICACIONES
Modelo XBU02
Capacidades Volumen de aire (máx.) 0 m3/min - 13,4 m3/min (0 cu.ft./min - 473 cu.ft./min)
Velocidad del aire (promedio) 0 m/s - 54,0 m/s (0 MPH - 120 MPH)
Velocidad del aire (máx.) 0 m/s - 65,0 m/s (0 MPH - 145 MPH)
Longitud total (sin la boquilla grande) 585 mm (23")
(con la boquilla grande) 830, 880, 930 mm (32-3/4", 34-3/4", 36-5/8")
Tensión nominal 36 V c.c.
Peso neto 3,5 kg - 4,2 kg (7,7 lbs - 9,3 lbs)
• Debido a nuestro continuo programa de investigación y desarrollo, las especicaciones aquí incluidas están
sujetas a cambio sin previo aviso.
• Las especicaciones y el cartucho de batería pueden variar de país a país.
• El peso puede variar en función de los accesorios, incluido el cartucho de batería. En la tabla se muestra la
combinación de peso más ligero y más pesado conforme al procedimiento 01/2014 de EPTA.
Cartucho de batería y cargador aplicables
Cartucho de batería
BL1815N / BL1820B / BL1830 / BL1830B / BL1840B / BL1850B / BL1860B
Cargador
DC18RC / DC18RD / DC18RE / DC18SD / DC18SE / DC18SF / DC18SH
• Algunos de los cartuchos de batería y cargadores enumerados arriba podrían no estar disponibles depen-
diendo de su área de residencia.
ADVERTENCIA: Use únicamente los cartuchos de batería y los cargadores indicados arriba. El uso de
cualquier otro cartucho de batería y cargador podría ocasionar una lesión y/o un incendio.
Fuente de alimentación conectada por cable recomendada
Adaptador para batería BAP182
Unidad portátil de alimentación eléctrica PDC01 / PDC1200
• La o las fuentes de alimentación conectadas por cable enumeradas arriba podrían no estar disponibles depen-
diendo de su área de residencia.
• Antes de utilizar la fuente de alimentación conectada por cable, lea las instrucciones e indicaciones de precau-
ción sobre ellas.
INSTRUCCIONES IMPORTANTES
DE SEGURIDAD
Al usar cualquier aparato eléctrico, siempre deben seguirse
las precauciones básicas, incluyendo las siguientes:
LEA TODAS LAS INSTRUCCIONES.
ANTES DE USAR ESTE APARATO
ADVERTENCIA - Para reducir el riesgo de incendio,
descarga eléctrica o lesión:
1. No deje el aparato con la batería puesta. Retire la
batería del aparato cuando no lo use y antes de
hacer algún mantenimiento.
2.
No exponga el equipo a la lluvia. Guarde en lugares cerrados.
3. No permita que sea utilizado como un juguete. Se
requiere de una supervisión cuidadosa durante el
uso al haber niños alrededor.
4. Use solamente como se describe en este manual.
Use los aditamentos recomendados por el fabri-
cante solamente.
5. No use con una batería dañada. Si el aparato no
está funcionando como debiera, se ha dejado
caer, se ha dañado, se ha dejado a la intemperie o
ha caído al agua, llévelo a un centro de servicio.
6. No coloque ningún objeto sobre las hendijas
de ventilación. No use cuando cualquiera de
las hendijas esté bloqueada; mantenga libre de
polvo, hilachas, cabello y cualquier otra cosa que
pudiera reducir el ujo de aire.
7. Mantenga el cabello suelto, la ropa holgada, las
uñas y todas las partes del cuerpo alejadas de las
hendijas y las partes móviles.
8. Tenga precaución adicional al aspirar estando
sobre una escalera.
9. Use solo el cargador que se proporciona por el
fabricante para recargar.
GUARDE ESTAS
INSTRUCCIONES.
Este aparato está diseñado para uso comercial.

10 ESPAÑOL
ADVERTENCIAS DE SEGURIDAD
PARA LA SOPLADORA
1. Siempre use gafas protectoras, gorra y máscara
al usar la sopladora. Los anteojos comunes o
gafas oscuras NO son gafas de seguridad.
2.
Mientras opera el equipo, use siempre calzado resis-
tente con suela antiderrapante y pantalón de trabajo.
3. No use ropa holgada ni joyería que pudiera
succionarse en la rendija de acceso de aire.
Mantenga el cabello largo alejado de las rendijas
de acceso de aire.
4.
Nunca apunte la boquilla en dirección de alguna per-
sona al estar de cerca durante el uso de la sopladora.
5. Nunca obstruya el acceso de succión ni la boquilla
de la sopladora.
• No obstruya la entrada de succión ni la
salida de la sopladora al limpiar en áreas
empolvadas.
• No use la sopladora con una boquilla cónica
menor que el tamaño de la original, tal como
la boquilla nueva que se obtiene al jar una
manguera adicional de diámetro reducido
o una manguera de diámetro menor en el
extremo superior de la boquilla.
• No use la sopladora para inar pelotas,
lanchas inables ni objetos similares.
El aumento de las revoluciones en el motor puede
que cause una rotura peligrosa del ventilador
resultando en lesiones graves a la persona. El
sobrecalentamiento del motor y del circuito de
control puede que genere un incendio.
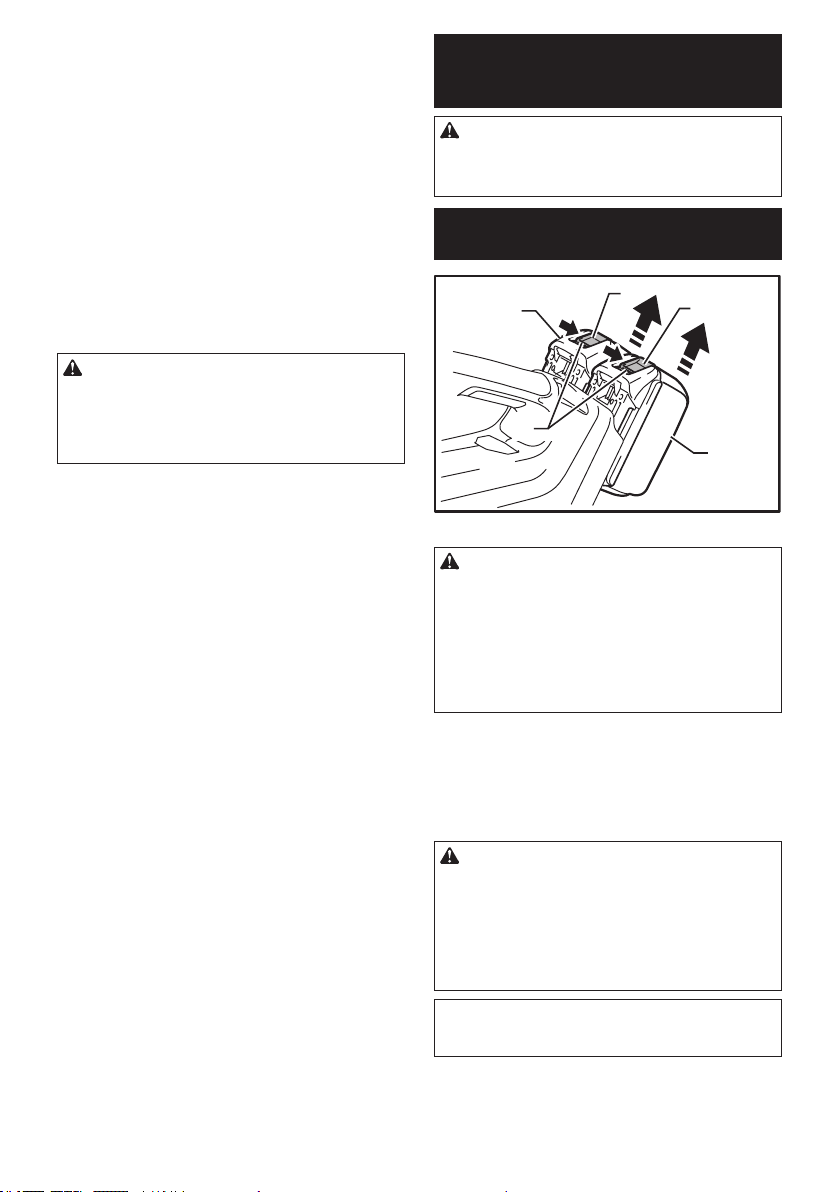
6. EVITE EL ENCENDIDO ACCIDENTAL. No cargue
la herramienta con el dedo en el interruptor al
estar la batería puesta.
7. Algunos materiales contienen sustancias quími-
cas que pueden ser tóxicas. Tome precauciones
para evitar la inhalación de polvo o el contacto
del mismo con la piel. Observe la información de
seguridad sobre los materiales del distribuidor.
8. Asegúrese que no haya nadie a su alrededor al
momento de trabajar en lugares elevados.
9. Recargue sólo con el cargador especicado por el
fabricante. Un cargador que sea adecuado para
un tipo especíco de cartucho de batería puede
generar un riesgo de incendio al usarse con un
cartucho de batería distinto.
10.
Use las herramientas a batería sólo con sus cartuchos
de batería designados. El uso de cualquier otro cartucho
de batería puede generar riesgo de lesión e incendio.
11. Cuando no se esté usando el cartucho de batería,
manténgalo alejado de otros objetos metálicos,
como sujetapapeles (clips), monedas, llaves,
clavos, tornillos u otros objetos pequeños de
metal los cuales pueden actuar creando una
circuito entre las terminales de la batería. Cerrar
el circuito con las terminales de la batería puede
causar quemaduras o incendios.
12. Puede que en condiciones abusivas haya fuga
del líquido de la batería; evite tocarlo. Si lo toca
accidentalmente, enjuague con agua. Si hay
contacto del líquido con los ojos, acuda por aten-
ción médica. Puede que el líquido expulsado de la
batería cause irritación o quemaduras.
13. No manipule el cargador, incluida la toma de
corriente del cargador, y los terminales del carga-
dor con las manos húmedas.
14. No cargue la batería en la intemperie.
GUARDE ESTAS
INSTRUCCIONES.
ADVERTENCIA: NO DEJE que la como-
didad o familiaridad con el producto (a
base de utilizarlo repetidamente) sustituya
la estricta observancia de las normas de
seguridad para dicho producto. El MAL
USO o el no seguir las normas de seguri-
dad establecidas en este manual de ins-
trucciones puede ocasionar graves lesio-
nes personales.
Símbolos
A continuación se muestran los símbolos utilizados
para la herramienta.
volts o voltios
corriente directa o continua
Instrucciones importantes de
seguridad para el cartucho de batería
1.
Antes de utilizar el cartucho de batería, lea todas
las instrucciones e indicaciones de precaución
en el (1) el cargador de batería, (2) la batería, y (3)
el producto con el que se utiliza la batería.
2. No desarme ni modique el cartucho de bate-
ría. Podría ocurrir un incendio, calor excesivo o
una explosión.
3. Si el tiempo de operación se ha acortado en
exceso, deje de operar de inmediato. Podría
correrse el riesgo de sobrecalentamiento,
posibles quemaduras e incluso explosión.
4. En caso de que ingresen electrolitos en sus
ojos, enjuáguelos bien con agua limpia y con-
sulte de inmediato a un médico. Esto podría
ocasionar pérdida de visión.
5. Evite cortocircuitar el cartucho de batería:
(1) No toque las terminales con ningún mate-
rial conductor.
(2) Evite guardar el cartucho de batería en un
cajón junto con otros objetos metálicos,
tales como clavos, monedas, etc.
(3) No exponga el cartucho de batería al
agua o la lluvia.
Un cortocircuito en la batería puede causar
un ujo grande de corriente, sobrecalenta-
miento, posibles quemaduras e incluso una
descompostura.
6. No guarde ni utilice la herramienta y el cartu-
cho de batería en lugares donde la tempera-
tura pueda alcanzar o exceder los 50 °C (122
°F).

11 ESPAÑOL
7. Nunca incinere el cartucho de batería incluso
en el caso de que esté dañado seriamente o
ya no sirva en absoluto. El cartucho de batería
puede explotar si se tira al fuego.
8.
No clave, corte, aplaste, lance o deje caer el cartu-
cho de batería, ni golpee un objeto sólido contra
el cartucho de batería. Dicha acción podría resultar
en un incendio, calor excesivo o en una explosión.
9. No use una batería dañada.
10.
Las baterías de ión de litio están sujetas a los requisi-
tos reglamentarios en materia de bienes peligrosos.
Para el trasporte comercial, por ej., mediante terceros
o agentes de transporte, se deben tomar en cuenta los
requisitos especiales relativos al empaque y el etiquetado.
Para efectuar los preparativos del artículo que se
va a enviar, se requiere consultar a un experto en
materiales peligrosos. Si es posible, consulte ade-
más otras regulaciones nacionales más detalladas.
Pegue o cubra con cinta adhesiva los contactos
abiertos y empaque la batería de manera que ésta
no pueda moverse dentro del paquete.
11. Para deshacerse del cartucho de batería,
sáquelo de la herramienta y deséchelo en un
lugar seguro. Siga las regulaciones locales
relacionadas al desecho de las baterías.
12.
Utilice las baterías únicamente con los produc-
tos especicados por Makita. Instalar las baterías
en productos que no cumplan con los requisitos
podría ocasionar un incendio, un calentamiento
excesivo, una explosión o una fuga de electrolito.
13. Si no se utiliza la herramienta por un
período largo, debe extraerse la batería de la
herramienta.
14. El cartucho de batería podría absorber calor
durante y después de su uso, lo que ocasiona-
ría quemaduras o quemaduras a baja tempe-
ratura. Tenga cuidado con la manipulación de
los cartuchos de batería que estén calientes.
15. No toque el terminal de la herramienta inme-
diatamente después de su uso, ya que el
mismo podría estar lo sucientemente caliente
como para provocarle quemaduras.
16. No permita que las rebabas, el polvo o la tierra
queden atrapados en los terminales, oricios
y ranuras del cartucho de batería. Esto podría
ocasionar un desempeño deciente o descompos-
tura de la herramienta o del cartucho de batería.
17. No utilice el cartucho de batería cerca de
cables eléctricos de alto voltaje, a menos que
la herramienta sea compatible con el uso cer-
cano a estos cables eléctricos de alto voltaje.
Esto podría ocasionar una avería o descompos-
tura de la herramienta o del cartucho de batería.
18. Mantenga la batería alejada de los niños.
GUARDE ESTAS
INSTRUCCIONES.
PRECAUCIÓN: Utilice únicamente baterías
originales de Makita. El uso de baterías no origina-
les de Makita, o de baterías alteradas, puede ocasio-
nar que las baterías exploten causando un incendio,
lesiones personales y daños. Asimismo, esto inva-
lidará la garantía de Makita para la herramienta y el
cargador Makita.
Consejos para alargar al máximo
la vida útil de la batería
1. Cargue el cartucho de batería antes de que
se descargue completamente. Pare siem-
pre la operación y cargue el cartucho de
batería cuando note menos potencia en la
herramienta.
2. No cargue nunca un cartucho de batería que
esté completamente cargado. La sobrecarga
acortará la vida de servicio de la batería.
3. Cargue el cartucho de batería a una tempera-
tura ambiente de 10 °C - 40 °C (50 °F - 104 °F).
Si un cartucho de batería está caliente, déjelo
enfriar antes de cargarlo.
4. Cuando no utilice el cartucho de batería,
sáquelo de la herramienta o del cargador.
5. Cargue el cartucho de batería si no va a utili-
zarlo durante un período prolongado (más de
seis meses).
DESCRIPCIÓN DEL
FUNCIONAMIENTO
PRECAUCIÓN:
• Asegúrese siempre de que la herramienta esté
apagada y el cartucho de batería extraído antes
de realizar cualquier ajuste o comprobación en
la herramienta.
Instalación o desmontaje del
cartucho de batería
2
3
3
1
2
► 1. Indicador rojo 2. Botón 3. Cartucho de batería
PRECAUCIÓN:
• Apague siempre la herramienta antes de colo-
car o quitar el cartucho de batería.
• Sujete la herramienta y el cartucho de
la batería con rmeza al colocar o quitar
el cartucho. Si no se sujeta con rmeza la
herramienta y el cartucho de la batería, puede
ocasionar que se resbalen de sus manos resul-
tando en daños a la herramienta y al cartucho,
así como lesiones a la persona.

12 ESPAÑOL
Para quitar el cartucho de batería, deslícelo de la herra-
mienta mientras desliza el botón sobre la parte delan-
tera del cartucho.
Para colocar el cartucho de batería, alinee la lengüeta
sobre el cartucho de batería con la ranura en la carcasa
y deslice en su lugar. Inserte por completo hasta que
se je en su lugar con un pequeño clic. Si puede ver el
indicador rojo del lado superior del botón, esto indica
que no ha quedado jo por completo.
PRECAUCIÓN:
• Introduzca siempre completamente el cartucho
de batería hasta que el indicador rojo no pueda
verse. Si no, podría accidentalmente salirse de
la herramienta y caer al suelo causando una
lesión a usted o alguien a su alrededor.
• No instale el cartucho de batería a la fuerza:
si el cartucho no se desliza al interior fácil-
mente, se debe a que no está siendo insertado
correctamente.
NOTA:
• La herramienta no funciona con solo un cartu-
cho de batería.
Sistema de protección de la
herramienta / batería
La herramienta está equipada con un sistema de pro-
tección de la herramienta / batería. Este sistema corta
en forma automática el suministro de energía al motor
para prolongar la vida útil de la herramienta y batería.
La herramienta se detendrá automáticamente durante
el funcionamiento si la herramienta o la batería se
somete a una de las siguientes condiciones. En algu-
nas condiciones, las luces indicadoras se encienden.
Protección contra la sobrecarga
Cuando la herramienta es utilizada de tal manera que
cause un consumo anormalmente alto de corriente, la
herramienta automáticamente se para sin indicación
alguna. En este caso, apague la herramienta y detenga
la aplicación que causó que la herramienta se sobre-
cargara. Luego encienda la herramienta y reinicie.
Protección contra el
sobrecalentamiento de la herramienta
Encendido ("ON") Intermitencia
Cuando la herramienta se sobrecalienta, ésta se para
automáticamente, mientras el indicador de la batería
parpadea por alrededor de 60 segundos. En este caso,
espere a que la herramienta se enfríe antes de volver a
encender la herramienta.
Protección contra la sobredescarga
Cuando al capacidad de la batería sea reducida, la
herramienta se para automáticamente. Si el equipo no
opera incluso tras el accionamiento de los interruptores,
retire las baterías de la herramienta y recárguelas.
Indicación de la capacidad restante
de la batería
(Solo para cartuchos de batería con una "B" al nal del
número de modelo.)
1
2
► 1. Luces indicadoras 2. Botón de vericación
“CHECK”
Presione el botón de comprobación en el cartucho de la
batería para indicar la capacidad restante de la batería.
La luz indicadora se enciende por algunos segundos.
APAGADO IntermitenciaEncendido
Luces indicadoras
Recargue la
batería.
0 % a 25 %
25% a 50%
50 % a 75 %
75% a 100%
Capacidad
restante
Puede que haya
un defecto en el
funcionamiento
de la batería.
NOTA:
• Dependiendo de las condiciones de uso y de la
temperatura ambiental, puede que el nivel indi-
cado diera ligeramente de la capacidad real de
la batería.

13 ESPAÑOL
Indicador de la capacidad restante
de la batería
(Especíco del país)
121
► 1. Indicador de batería 2. Botón de vericación
“CHECK”
Presione el botón de revisión para que los indicadores
de la batería muestren la capacidad restante de las
baterías. Los indicadores de la batería corresponden a
cada batería.
Indicador de la capacidad restante de
la batería
Estado indicador de la batería Capacidad restante
de la batería
50 % - 100 %
20 % - 50 %
0 % - 20 %
Recargue la batería
Encendido
("ON")
APAGADO
Intermitencia
Accionamiento del interruptor
PRECAUCIÓN:
• Antes de insertar el cartucho de batería en
la herramienta, compruebe siempre y cerció-
rese de que el gatillo interruptor se acciona
debidamente y que vuelve a la posición
"OFF"(apagado) cuando lo suelta.
1
► 1. Gatillo interruptor
Para poner en marcha la herramienta, simplemente
apriete el gatillo interruptor. La velocidad de la herra-
mienta aumenta incrementando la presión en el gatillo.
Suelte el gatillo interruptor para parar.
1
1
► 1. Botón de bloqueo
Para una operación continua, jale el gatillo interruptor,
presione el botón de bloqueo y luego libere el gatillo
interruptor.
Para desbloquear la herramienta, jale el gatillo interrup-
tor por completo y luego suéltelo.
Cambio de velocidad
1
► 1. Control de ajuste de velocidad
El volumen de aire máximo puede ajustarse con tan
solo girar el control de ajuste. Esto puede hacerse aun
cuando la herramienta esté activa. El control tiene está
marcado de 1 (menor velocidad) a 6 (mayor velocidad).

14 ESPAÑOL
AVISO:
El control de ajuste de velocidad sólo se puede
subir hasta 6 y bajar hasta 1. No lo fuerce más allá
de estas marcas o de lo contrario la función de
ajuste de velocidad podría arruinarse.
Al estar trabajando bajo circunstancias de altas
temperaturas, puede que la herramienta se pare
debido al sistema de protección de sobrecalenta-
miento. En tal caso, permita que la herramienta
se enfríe. Evite ajustar la velocidad a 6 (velocidad
mayor) en circunstancias de altas temperaturas.
ENSAMBLE
PRECAUCIÓN:
• Asegúrese siempre de que la herramienta esté
apagada y el cartucho de batería extraído antes
de realizar cualquier trabajo en la misma.
Instalación de la boquilla larga
1
22
► 1. Boquilla larga 2. Marca triangular
Instalación de la boquilla larga:
1. Alinee la protuberancia pequeña en la carcasa
con la ranura de la boquilla larga.
2. Introduzca deslizando la boquilla larga y gire en
sentido de las agujas del reloj hasta que las mar-
cas triangulares en la boquilla larga y la carcasa
coincidan entre sí.
La longitud de la boquilla puede ajustarse al cambiar la
posición de jación.
Instalación de la boquilla plana o
boquilla de extensión
Accesorio opcional
La boquilla de extensión / boquilla plana puede insta-
larse sobre la punta de la boquilla larga de la misma
manera como se menciona anteriormente.
Instalación de la boquilla para
canaleta
Accesorio opcional
La boquilla para canaleta puede instalarse en la sopla-
dora. Se requiere el tubo adaptador - diseñado exclu-
sivamente para este modelo - para instalar la boquilla
para canaleta.
Para más detalles, consulte el manual de instrucciones
provisto con la boquilla para canaleta.
Acoplamiento de la correa para el
hombro
Accesorio opcional
PRECAUCIÓN: Cuando utilice la herramienta
en combinación con la fuente de alimentación
tipo mochila como la unidad portátil de alimen-
tación eléctrica, no use la correa para el hombro
incluida en el paquete de la herramienta.
Si coloca la correa para el hombro incluida en el
paquete de la herramienta y el arnés para hombros
de la fuente de alimentación tipo mochila al mismo
tiempo, se dicultará retirar la herramienta o la fuente
de alimentación tipo mochila en caso de emergencia,
y podría causar un accidente o lesión.
Enganche la correa para hombro en el colgador de la
herramienta.
Antes de usar, ajuste la longitud de la correa de tal
forma que resulte fácil la operación con ésta.

15 ESPAÑOL
OPERACIÓN
Soplado
PRECAUCIÓN:
• No coloque la sopladora sobre el suelo mientras
se encuentre encendida. Puede que la arena o
el polvo se introduzcan por la rejilla de succión,
pudiendo resultar en lesiones al usuario.
Sujete la sopladora con rmeza con una mano y rea-
lice la operación del soplado al moverla lentamente
alrededor.
Al soplar alrededor de algún edicio, roca grande o
vehículo, no apunte la boquilla directamente a estos
objetos.
Al soplar en una esquina, comience desde el interior de
la esquina desplazándose hacia afuera.
MANTENIMIENTO
PRECAUCIÓN:
• Asegúrese siempre de que la herramienta
esté apagada y el cartucho de batería extraído
antes de intentar realizar una inspección o
mantenimiento.
• Nunca use gasolina, bencina, diluyente (tíner),
alcohol o sustancias similares. Puede que esto
ocasione grietas o descoloramiento.
Limpieza
De vez en vez, limpie el exterior de la herramienta
usando un paño húmedo y agua enjabonada.
Para mantener la SEGURIDAD y FIABILIDAD del producto,
las reparaciones, y cualquier otra tarea de mantenimiento
o ajuste deberán ser realizadas en Centros de Servicio
Autorizados por Makita, empleando siempre repuestos Makita.
ACCESORIOS OPCIONALES
PRECAUCIÓN:
•
Estos accesorios o aditamentos (incluidos o no) están
recomendados para utilizar con su herramienta Makita
especicada en este manual. El empleo de cuales-
quiera otros accesorios o acoplamientos conllevará un
riesgo de sufrir heridas personales. Utilice los acceso-
rios o acoplamientos solamente para su n establecido.
Si necesita cualquier ayuda para más detalles en relación con
estos accesorios, pregunte a su centro de servicio Makita local.
• Batería y cargador originales de Makita
• Correa para el hombro
• Boquilla de extensión
• Boquilla plana
• Boquilla para canaleta
• Tubo adaptador
NOTA:
• Algunos de los artículos en la lista puede que
vengan junto con el paquete de la herramienta
como accesorios incluidos. Puede que estos
accesorios varíen de país a país.
GARANTÍA LIMITADA DE MAKITA
Ésta Garantía no aplica para México
Consulte la hoja de la garantía anexa para ver los términos
más vigentes de la garantía aplicable a este producto.
En caso de no disponer de esta hoja de garantía anexa,
consulte los detalles sobre la garantía descritos en el sitio
web de su país respectivo indicado a continuación.
Estados Unidos de América: www.makitatools.com
Canadá: www.makita.ca
Otros países: www.makita.com

Some dust created by power sanding, sawing, grinding, drilling, and other
construction activities contains chemicals known to the State of California
to cause cancer, birth defects or other reproductive harm. Some examples
of these chemicals are:
• lead from lead-based paints,
• crystalline silica from bricks and cement and other masonry products, and
• arsenic and chromium from chemically-treated lumber.
Your risk from these exposures varies, depending on how often you do this
type of work. To reduce your exposure to these ch emicals: work in a well
ventilated area, and work with approved safety equipment, such as those
dust masks that are specially designed to filter out microscopic particles.
WARNING
< USA only >
ADVERTENCIA
Algunos polvos creados por el lijado, aserrado, esmerilado, taladrado y
otras actividades de la construcción contienen sustancias químicas
reconocidas por el Estado de California como causantes de cáncer, defectos
de nacimiento y otros peligros de reproducción. Algunos ejemplos de estos
productos químicos son:
• plomo de pinturas a base de plomo,
• sílice cristalino de ladrillos y cemento y otros productos de albañilería, y
• arsénico y cromo de maderas tratadas químicamente.
El riesgo al que se expone varía, dependiendo de la frecuencia con la que
realice este tipo de trabajo. Para reducir la exposición a estos productos
químicos: trabaje en un área bien ventilada y póngase el equipo de seguridad
indicado, tal como las máscaras contra polvo que están especialmente
diseñadas para filtrar partículas microscópicas.
< Sólo en los Estados Unidos >
Makita Corporation
3-11-8, Sumiyoshi-cho,
Anjo, Aichi 446-8502 Japan
www.makita.com
885401H948
XBU02-4
EN, ESMX
20200825
Other manuals for XBU02
3
This manual suits for next models
2
Table of contents
Languages:
Other Makita Blower manuals

Makita
Makita UB001C User manual

Makita
Makita UB1100 User manual

Makita
Makita DUB362 User manual

Makita
Makita UB1100 User manual

Makita
Makita AS001G User manual

Makita
Makita 4014N User manual

Makita
Makita XBU04 User manual

Makita
Makita M4000 User manual

Makita
Makita M4000 User manual

Makita
Makita DUB362PT4X User manual

Makita
Makita BUB142 User manual

Makita
Makita DUB362 User manual

Makita
Makita UB003C User manual

Makita
Makita BBX7600 User guide

Makita
Makita DUB362 User manual

Makita
Makita EB7650TH User guide

Makita
Makita XBU03 User manual

Makita
Makita DUB184 User manual

Makita
Makita PM001G User manual

Makita
Makita DUB363 User manual