MAKS WDC mini User manual

For more information on setting up and operating
the device, please visit www.maks.systems
Security point magnetic contact radio channel detector (sensor) is
designed to monitor the status of structural elements (open/move)
in order to detect an attempt to enter the room. The device sends
an alarm notification to the alarm center MAKS PRO security alarm
system.
Mounted indoors and used to protect doors and windows.
Radio communication
The detector transceiver operates in several channels of
868.0 ... 868.6 MHz band for redundancy.
Secure two-way radio communication.
Distance - up to 2000 m in the open space.
Three grades of power, maximum - up to 20 mW.
WIRELESS MAGNETIC CONTACT SENSOR
• available in three colors
• secure two-way radio communication with MAKS PRO
• 868,0 ... 868.6MHz, several channels for
redundancy, range up to 2000 m
• power - lithium battery CR2, up to 5 years of operation
• easy and fast installation
• secure fastening
• efficient on metal doors
• miniature sensor
Characteristics
Maximum number of actuations
not less than 1,000,000
ISM wireless interface, up to 2000 m 868,0... 868,6 MHz
Power
(lithium battery included)
CR2 battery 3V
standby consumption
Case color
white, dark brown,
black
85 х 18,5 х 17,6 mm
Weight
56 grams
no more than 2 µA
transmission consumption
up to 45 mA
service life of battery
5 years
Operating temperature range
-20°C to +50°C
Detector dimensions
85 х 11 х 6 mm
Reed switch threshold
7-15 mm
Electromagnetic field immunity
8 V/m
Setting up
The detector operates only with the MAKS PRO wireless security
system center, connection to other systems is not provided.
The sensor is connected to the security center and
is configured using the MAKS Setup mobile application.
Batteries
The device uses an CR2 battery (included)
Magnet dimensions
Carefully select the installation location of the MAKS WDC mini
detector.
The device should not be placed:
1. Outdoors or in areas with unacceptable humidity and tempera-
ture
2. In places with a high level of radio interference
3. Near objects that can cause radio signal attenuation or shielding
(metal, mirrors, etc.)
4. At a distance of less than 1 m from the security center
Excellent connection - LED indicator flashes green
Satisfactory connection - LED indicator flashes yellow
Poor connection - LED indicator flashes red
No connection - LED indicator flashes red quickly
In test mode, the unit's radio transmitter operates at medium power.
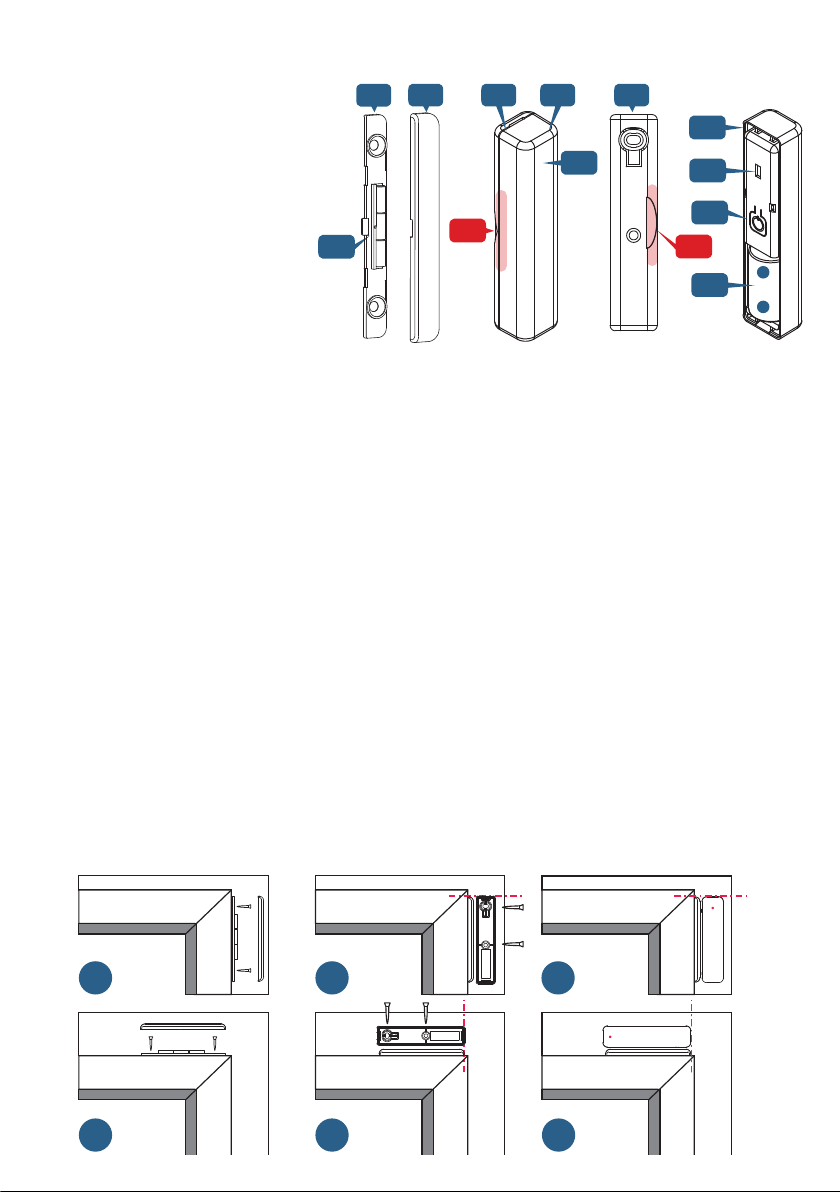
Functional parts of the device
Selecting the installation location
Installation and connection
Registration and setup Switching on and off
Press button 9to turn on the device - the indicator will be on. If the
device is registered in the MAKS PRO, it switches to standby mode.
If the sensor is not registered, it will switch to sleep mode after 30
seconds.
To turn off the device, press and hold button 9for 5 seconds.
2
1
3
1. Bottom plate of magnet case
2. Magnet case cover
3. Neodymium magnet
4. Bottom plate of the detector case
5. Detector case top cover and capsule with the device
6. Magnet position marks
7. LED indicator
8. Tamper contact
9. On/off button
10. Battery CR2
4
9
10
8
+
-
4 5 4
66
7
1 2 3
1 2 3
Indication in communication test mode
1. Place the detector at a distance of no more than 2 m from the
MAKS PRO security center. The registration runs at the lowest
possible power to avoid the influence of neighboring systems
which can be being set up nearby.
2. Start the MAKS Setup application
3. Follow the instructions of the application to connect to the
MAKS PRO and start the registration of MAKS wireless devices
4. Turn on the MAKS WDC mini, after 10-20 seconds it will be
registered
5. Set up a new device in your mobile application
The sensor can be placed vertically or horizontally. Install magnet
near mark 6on the detector case.
We recommend to install the device in the following order:
1. Selecting the installation location with the best signal using the
MAKS Setup application
2. Mounting the magnet (step 1)
3. Installation of the detector bottom plate (step 2),
4. Installation of the device (step 3)
When the capsule is inserted correctly, the tamper must be clamped
(locked).
Other MAKS Accessories manuals


