manuals.online logo
Brands
  1. Home
  2. •
  3. Brands
  4. •
  5. Meade
  6. •
  7. Accessories
  8. •
  9. Meade Equatorial Wedge User manual

Meade Equatorial Wedge User manual

INSTALLATION
The Meade 8" Equatorial Wedge is for use with the
Meade ETX-125EC Maksutov-Cassegrain telescope (in
conjunction with the #887 Advanced Field Tripod/#889
Tripod Adapter which includes the wedge); the 8" LX10
Schmidt-Cassegrain telescope (wedge included as
standard equipment). The 8" Equatorial Wedge is not
designed to support telescope models larger than those
listed.
The Equatorial Wedge attaches directly to the field
tripod and permits the telescope to be used in an
astronomical or “polar” mode.
NOTE: The Meade Equatorial Wedge is designed
solely for use in conjunction with a Meade field tripod.
CAUTION:The telescope, placed onto the Equatorial
Wedge alone without the field tripod attached to the
wedge may become seriously unbalanced, to the
point where it may actually tip over.
The Equatorial Wedge is of modern design, with several
important features incorporated to simplify and facilitate
telescope operation. After using the wedge, you will find
that the functional design features included are of very
significant value in routine telescope operations.
Included features:
• Attachment of the wedge to the field tripod by
means of only one manual knob.
• Quick azimuth adjustment by loosening the manual
knob as described above.
• Etched latitude scale for fast adjustment of the
latitude angle.
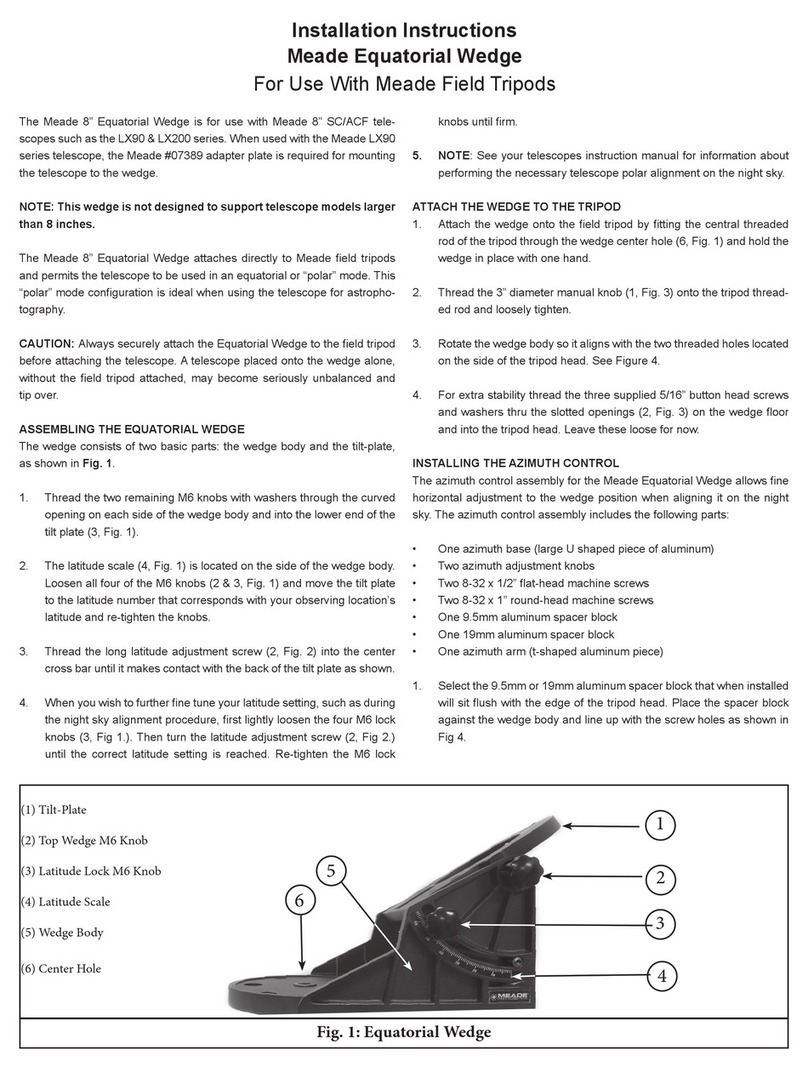
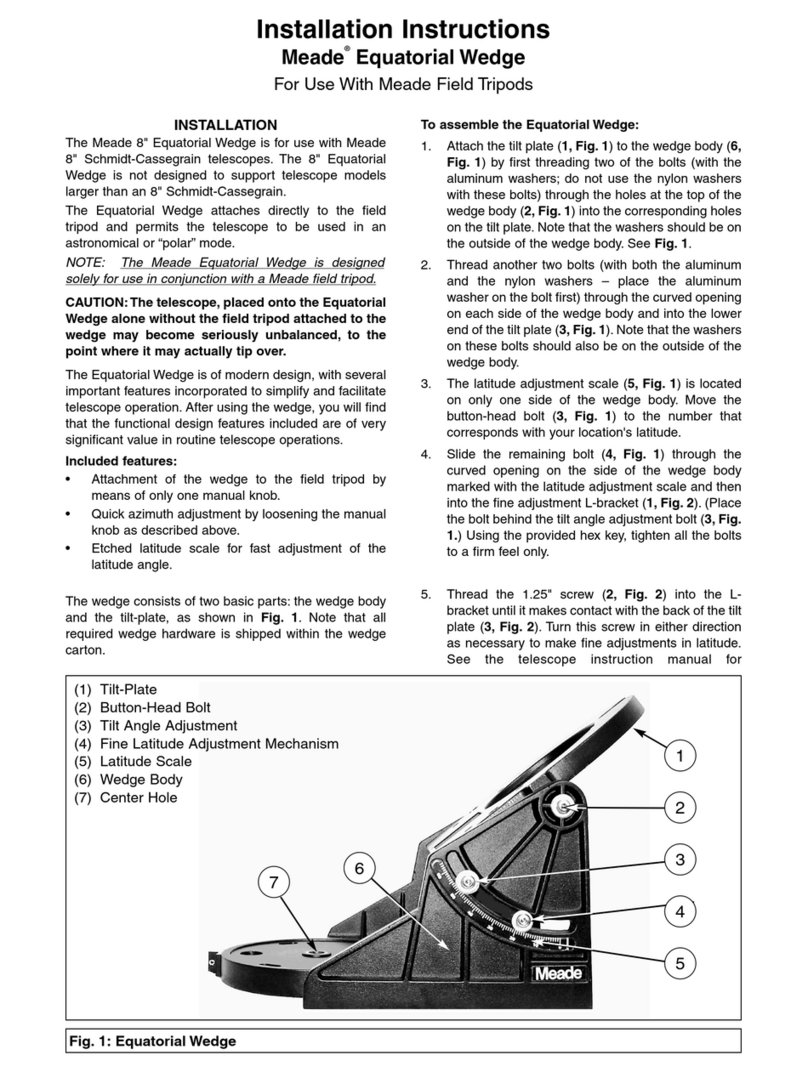
The wedge consists of two basic parts: the wedge body
and the tilt-plate, as shown in Fig. 1. Note that all
required wedge hardware is shipped within the wedge
carton.
To assemble the Equatorial Wedge:
1. Attach the tilt plate (1, Fig. 1) to the wedge body (6,
Fig. 1) by first threading two of the bolts (with the
aluminum washers; do not use the nylon washers
with these bolts) through the holes at the top of the
wedge body (2, Fig. 1) into the corresponding holes
on the tilt plate. Note that the washers should be on
the outside of the wedge body. See Fig. 1.
2. Thread another two bolts (with both the aluminum
and the nylon washers – place the aluminum
washer on the bolt first) through the curved opening
on each side of the wedge body and into the lower
end of the tilt plate (3, Fig. 1). Note that the washers
on these bolts should also be on the outside of the
wedge body.
3. The latitude adjustment scale (5, Fig. 1) is located
on only one side of the wedge body. Move the
button-head bolt (3, Fig. 1) to the number that
corresponds with your location's latitude.
4. Slide the remaining bolt (4, Fig. 1) through the
curved opening on the side of the wedge body
marked with the latitude adjustment scale and then
into the fine adjustment L-bracket (1, Fig. 2). (Place
the bolt behind the tilt angle adjustment bolt (3, Fig.
1.) Using the provided hex key, tighten all the bolts
to a firm feel only.
Fig. 1: Equatorial Wedge
1
2
3
4
5
6
(1) Tilt-Plate
(2) Button-Head Bolt
(3) Tilt Angle Adjustment
(4) Fine Latitude Adjustment Mechanism
(5) Latitude Scale
(6) Wedge Body
(7) Center Hole
Installation Instructions
Meade®Equatorial Wedge
For Use With Meade Field Tripods
7
5. Thread the 1.25" screw (2, Fig. 2) into the L-
bracket until it makes contact with the back of the tilt
plate (3, Fig. 2). Turn this screw in either direction
as necessary to make fine adjustments in latitude.
See the telescope instruction manual for
information about polar aligment.
6. Attach the wedge onto the field tripod by fitting the
central threaded rod of the tripod through the top of
the center hole of the wedge (7, Fig. 1). Thread the
3" diameter manual knob onto the threaded rod
underneath the tripod and tighten to a firm feel.
AZIMUTH CONTROL
The azimuth control for the Meade Equatorial Wedge
and field tripod is shipped in a plastic bag and includes
the following parts:
• Azimuth base (large U shaped piece of aluminum)
• Azimuth arm (small T shaped piece of aluminum)
• 2 - Azimuth knobs
• 2 - 8-32 x 1/2" flat-head machine screws
• 2 - 8-32 x 1" round-head machine screws
To attach the Azimuth Control to the wedge and
tripod:
1. If necessary, use a Phillips screwdriver to remove
the four set screws (which plug the attachment
holes) from the wedge (1, Fig. 3) and field tripod (2,
Fig. 3).
2. Attach the azimuth arm (5, Fig. 3) to the wedge
body using the two 8-32 x 1/2" flat-head machine
screws.
3. Attach the azimuth base (4, Fig. 3) to the tripod
using the two 8-32 x 1" round-head machine
screws.
4. Thread the two azimuth adjustment knobs (3, Fig.
3) into the azimuth base, until they just touch the
azimuth arm (5, Fig. 3).
The azimuth control is now ready to use. To adjust in
azimuth, loosen the 3" central wedge knob. Rotate the
wedge by using the two azimuth knobs in a push-pull
manner. After positioning the wedge, tighten the central
wedge knob.
If you have any questions regarding the use of the
Equatorial Wedge, please call Meade Customer Service
at 1-800-62-MEADE. Customer Service hours are from
8:30 am to 4:30 pm Pacific Time, Monday through
Friday.
Fig. 2: Latitude Adjustment Control
Fig. 3: Azimuth Control
3
2
1
5
4
Ver 0600 Part No. 14-0268-00
1
2
3
3
ADVANCED PRODUCTS DIVISION
Meade Instruments Corporation
World’s Leading Manufacturer of AstronomicalTelescopes for the Serious Amateur
6001 Oak Canyon, Irvine, California 92618 ■(949) 451-1450
FAX: (949) 451-1460 ■www.meade.com
© 2000

Other Meade Accessories manuals

Meade 07002 User manual

Meade

Meade 07002 User manual

Meade 5000 Series User manual

Meade

Meade 5000 Series User manual

Meade Zero Image-Shift Microfocuser User manual

Meade

Meade Zero Image-Shift Microfocuser User manual

Meade 1244 User manual

Meade

Meade 1244 User manual

Meade Ultrawedge User manual

Meade

Meade Ultrawedge User manual

Meade 6000 Series 50 mm User manual

Meade

Meade 6000 Series 50 mm User manual

Meade LXD 75 User manual

Meade

Meade LXD 75 User manual

Meade 494 Autostar User manual

Meade

Meade 494 Autostar User manual

Meade 608007 User manual

Meade

Meade 608007 User manual

Meade Zero Image-Shift Microfocuser User manual

Meade

Meade Zero Image-Shift Microfocuser User manual

Meade 608020 User manual

Meade

Meade 608020 User manual

Meade Equatorial Wedge User manual

Meade

Meade Equatorial Wedge User manual

Meade Zero Image-Shift User manual

Meade

Meade Zero Image-Shift User manual

Meade LX85 Series User manual

Meade

Meade LX85 Series User manual

Meade mySKY User manual

Meade

Meade mySKY User manual

Meade ETX-105AT User manual

Meade

Meade ETX-105AT User manual

Meade LX-90 User manual

Meade

Meade LX-90 User manual

Popular Accessories manuals by other brands

PAC uPAC-HY2 instructions

PAC

PAC uPAC-HY2 instructions

Hessaire MC92 Use & care guide

Hessaire

Hessaire MC92 Use & care guide

ON Semiconductor XGS 12000 manual

ON Semiconductor

ON Semiconductor XGS 12000 manual

Eichhorn Ladybug Rider instruction manual

Eichhorn

Eichhorn Ladybug Rider instruction manual

GARNI 045H instruction manual

GARNI

GARNI 045H instruction manual

Centralite 3-Series Product data sheet

Centralite

Centralite 3-Series Product data sheet

ATEN VS92A Specifications

ATEN

ATEN VS92A Specifications

Aura ZEN manual

Aura

Aura ZEN manual

SIKA VVX operating manual

SIKA

SIKA VVX operating manual

SkyWriter SL-300 instruction manual

SkyWriter

SkyWriter SL-300 instruction manual

Simply Automated UPB URD manual

Simply Automated

Simply Automated UPB URD manual

Honeywell RPW113A Mounting instruction

Honeywell

Honeywell RPW113A Mounting instruction

Cardin Elettronica CDR Series manual

Cardin Elettronica

Cardin Elettronica CDR Series manual

Vernier SMS-BTA Getting started and quick guide

Vernier

Vernier SMS-BTA Getting started and quick guide

Schwaiger ZHS19 manual

Schwaiger

Schwaiger ZHS19 manual

Hytronik HIM31 Installation and instruction manual

Hytronik

Hytronik HIM31 Installation and instruction manual

Manitowoc B-0320 installation instructions

Manitowoc

Manitowoc B-0320 installation instructions

Dometic PERFECTWALL PW1100 installation manual

Dometic

Dometic PERFECTWALL PW1100 installation manual

manuals.online logo
manuals.online logoBrands
  • About & Mission
  • Contact us
  • Privacy Policy
  • Terms and Conditions

Copyright 2025 Manuals.Online. All Rights Reserved.