Malloca MWC-46BG User manual

USER MANUAL
HƯỚNG DẪN SỬDỤNG
WINE COOLER
TỦRƯỢU
MODEL: MWC-46BG
MWC-180BG
Thanks for buying our Wine cooler, Hope our advanced product will give your Wine a
different joyful taste. Before use, please read and follow all safety rules and operating
instructions.
Cám ơn bạn đã sửdụng Tủrượu của chúng tôi, hy vọng sản phẩm của chúng tôi sẽđem lại
sựhài lòng cho quý khách hàng. Trước khi sửdụng, xin đọc và theo dõi tất cảhướng dẫn sử
dụng vềan toàn và vận hành.
0

WARNING
The information in this document is subject to modification without any prior notice. Some
models are available in dedicated countries only.
Offers no guarantee for our Wine cooler if it is being used for any purpose other than that for
which it was specifically designed. We cannot be held responsible for any error in this
manual. is not responsible or liable for any spoilage or damage to Wine or any other contents
incidental or consequential to possible defects of the Wine cooler. Warranty applies to the
Wine cooler only and not to the content of the Wine cooler
This appliance can be used by children aged from 8 years and above and persons with
reduced physical, sensory or mental capabilities or lack of experience and knowledge if they
have been given supervision or instruction concerning use of the appliance in a safe way and
understand the hazards involved. Children shall not play with the appliance. Cleaning and
user maintenance shall not be made by children without supervision.
Children should be supervised to ensure that they do not play with the appliance.
Do not store explosive substances such as aerosol cans with a flammable propellant in
this appliance.
This appliance is intended to be used in household and similar applications such as
–staff kitchen areas in shops, offices and other working environments;
–farm houses and by clients in hotels, motels and other residential type environments;
–bed and breakfast type environments;
–catering and similar non-retail applications.
DANGER: Risk of child entrapment. Before you throw away your old
Wine cooler:
- Take off the doors;
- Leave the humidor drawer in place so that children may not easily climb inside;
- When disposing of the appliance, do so only at an authorized waste disposal centre.
1

R600a WARNINGS:
For your safety observe the following recommendations.
•This appliance contains a small quantity of R600a refrigerant which is
environmentally friendly, but flammable. It does not damage the ozone layer, nor
does it increase the greenhouse effect.
•During transportation and installation, ensure that the tubing of the refrigerant circuit
is not damaged.
•Avoid using or manipulating sharp objects near by the appliances.
•Leaking refrigerant can ignite and may damage the eyes.
•In the event any damage does occur, avoid exposure to open fires and any device
which creates a spark. Disconnect the appliance from the mains power.
•Thoroughly ventilate the room in which the appliance is located for several minutes.
•Notify Customer Service for necessary action and advice.
•The room for installing the appliance must be at least 1 cubic metre per 8 grams of
refrigerant. The refrigerant quantity contained in this appliance is listed above in
grams; it is also noted on the Rating Plate of the appliance.
It is hazardous for anyone other than an Authorised Service Person to carry out
servicing or repairs to this appliance.
- WARNING: Keep ventilation openings in the appliance enclosure or in the built-in
structure clear of obstruction.
- WARNING: Do not use mechanical devices or other means to accelerate the defrosting
process, other than those recommended by the manufacturer.
- WARNING: Do not damage the refrigerant circuit.
- WARNING: Do not use electrical appliances inside the food storage compartments of
the appliance.
- WARNING: This appliance is not intended for use by persons (including children)
with reduced Physical, sensory or mental capabilities, or lack of experience and
knowledge, unless they have been given supervision or instruction concerning use
of the appliance by a person responsible for their safety;
- WARNING: Children should be supervised to ensure that they do not play with the
appliance;
- WARNING:Do not use extension cords or ungrounded (two prong) adapters;
- WARNING:If the supply cord is damaged, it must be replaced by the manufacturer,
Its service agent or similar qualified person in order to avoid hazard.
Attention:
When the Wine cooler is at “OFF” condition:
-Please take out all of goods from Wine cooler;
-Please keep Wine cooler clean
Allow 24 hours before switching on the Wine cooler. During this time we recommend
that you leave the door open to clear any residual odors.
2

BEFORE LOADING & PLUGGING IN THE WINE COOLER
Important: All models without front venting (air opening) are strictly for free standing
only. (See technical chart)
Recommendations:
The location you have selected for your Wine cooler should:
- be unencumbered and well ventilated;
- be well away from any heat source and direct sunlight;
- not be too damp (laundry, pantry, bathroom etc.);
- have a flat floor;
- have a standard and reliable electricity supply (standard socket to country standards,
linked to the ground), it is NOT recommended to use a multi-socket or extension lead;
- have a surge protector fitted to the electrical outlet;
- Away from the microwave oven. Certain microwave ovens do not have wave
interference shield. When placed within 1 meter vicinity of the Wine cooler, they may
affect the operation of the Wine cooler.
Notes:
These models are Both built-in and free-standing type as per the drawings thereafter.
Wine cooler should be install at suitable ambient temperature (please refer the end of User
Manual). If the temperature is higher or lower the ambient temperature range, it will affect
temperature fluctuation and can’t reach cooling performance.
Grounding instructions:
The Wine cooler must be grounded in case of wire leakage. Grounding reduces the risk of
electrical shock. The Wine cooler is equipped with a power cord having a grounding wire
and plug. The Wine cooler plug must be plugged into a properly affixed and grounded
electrical outlet.
Note: In locations where there is frequent lightning, it is advisable to use surge protectors.
Improper use of the grounding plug can result in the risk of electric shock. Consult a
qualified electrician or service person if the grounding instructions are not completely
understood.
If the supply cord is damaged, it must be replaced by a qualified person in order to avoid
electrical hazard.
INSTALLING YOUR WINE COOLER
Unpack and remove all of the protection and adhesive strips from the packaging around and
inside the Wine cooler.
The Wine cooler must be positioned such that the plug is accessible. Release the power cord.
Move your Wine cooler to its final location. The Wine cooler should be installed in a
suitable place where the compressor will not be subject to physical contact.
3

Leveling your Wine cooler: Wine cooler must be leveled BEFORE loading your Wine.
Your Wine cooler is equipped with 4 adjustable feet to facilitate easy leveling. recommends
that you tighten the back feet to the maximum and adjust the front feet to level the Wine
cooler.
INSTALLATION INSTRUCTIONS FOR BUILT IN WINE COOLER:
FRONT VENTING WINE COOLER ONLY.
1. “Built in” Wine cooler are front venting but are not designed to be fully integrated behind
a joinery door.
2. Please follow the installation diagram when installing built-in Wine cooler. No less than the
minimum installation dimension.
3. Built-in Wine cooler draw air from right of ventilation frame and expel through left of
ventilation frame under the front door.
4. “Built in” Wine cooler have a power switch located on the control panel so power point
location is not critical.
5. The Wine cooler requires a standard 240 volt/10 amp power point. (Or according to
different countries specifications).
6. The power cord is 2.0m in length and is fixed on the right side at the back when looking
from front of cabinet.
7. As with most appliances of today, the Wine cooler has sensitive electronic components
which are susceptible to damage through lightning and electricity supply faults. It is
therefore advised to use a power surge protector to avoid problems of this nature.
8. Air vent on door must be provided for built-in Wine cooler when a wood door installed.
In Hot climate zone, an air vent or grid, with a minimum ventilation size of 200mm x 40mm
MUST be cut out at the rear top of the back partitioning or at the top of either side of the
partitioning, allowing cool fresh air full access to flow into the 30mm gap located at the rear
of the cabinet.
This air vent or grid must not be opened on the same side as other appliances such as ovens
or an area that is sealed and without access to fresh cool air. Failing to comply with the
above specifications could result in WARRANTY void.
INSTALLATION DRAWINGS FOR BUILT IN Wine cooler: (UNDERBENCH OR IN
COLUMN) FRONT VENTING WINE COOLER ONLY.
4

Note: The appliance must be positioned so that the plug is accessible after installed.
DIMENSIONAL DRAWINGS:
For MWC-46BG
For MWC-180BG
5

OPEN ANGLE SIZE DRAWINGS:
For MWC-46BG
For MWC-180BG
6
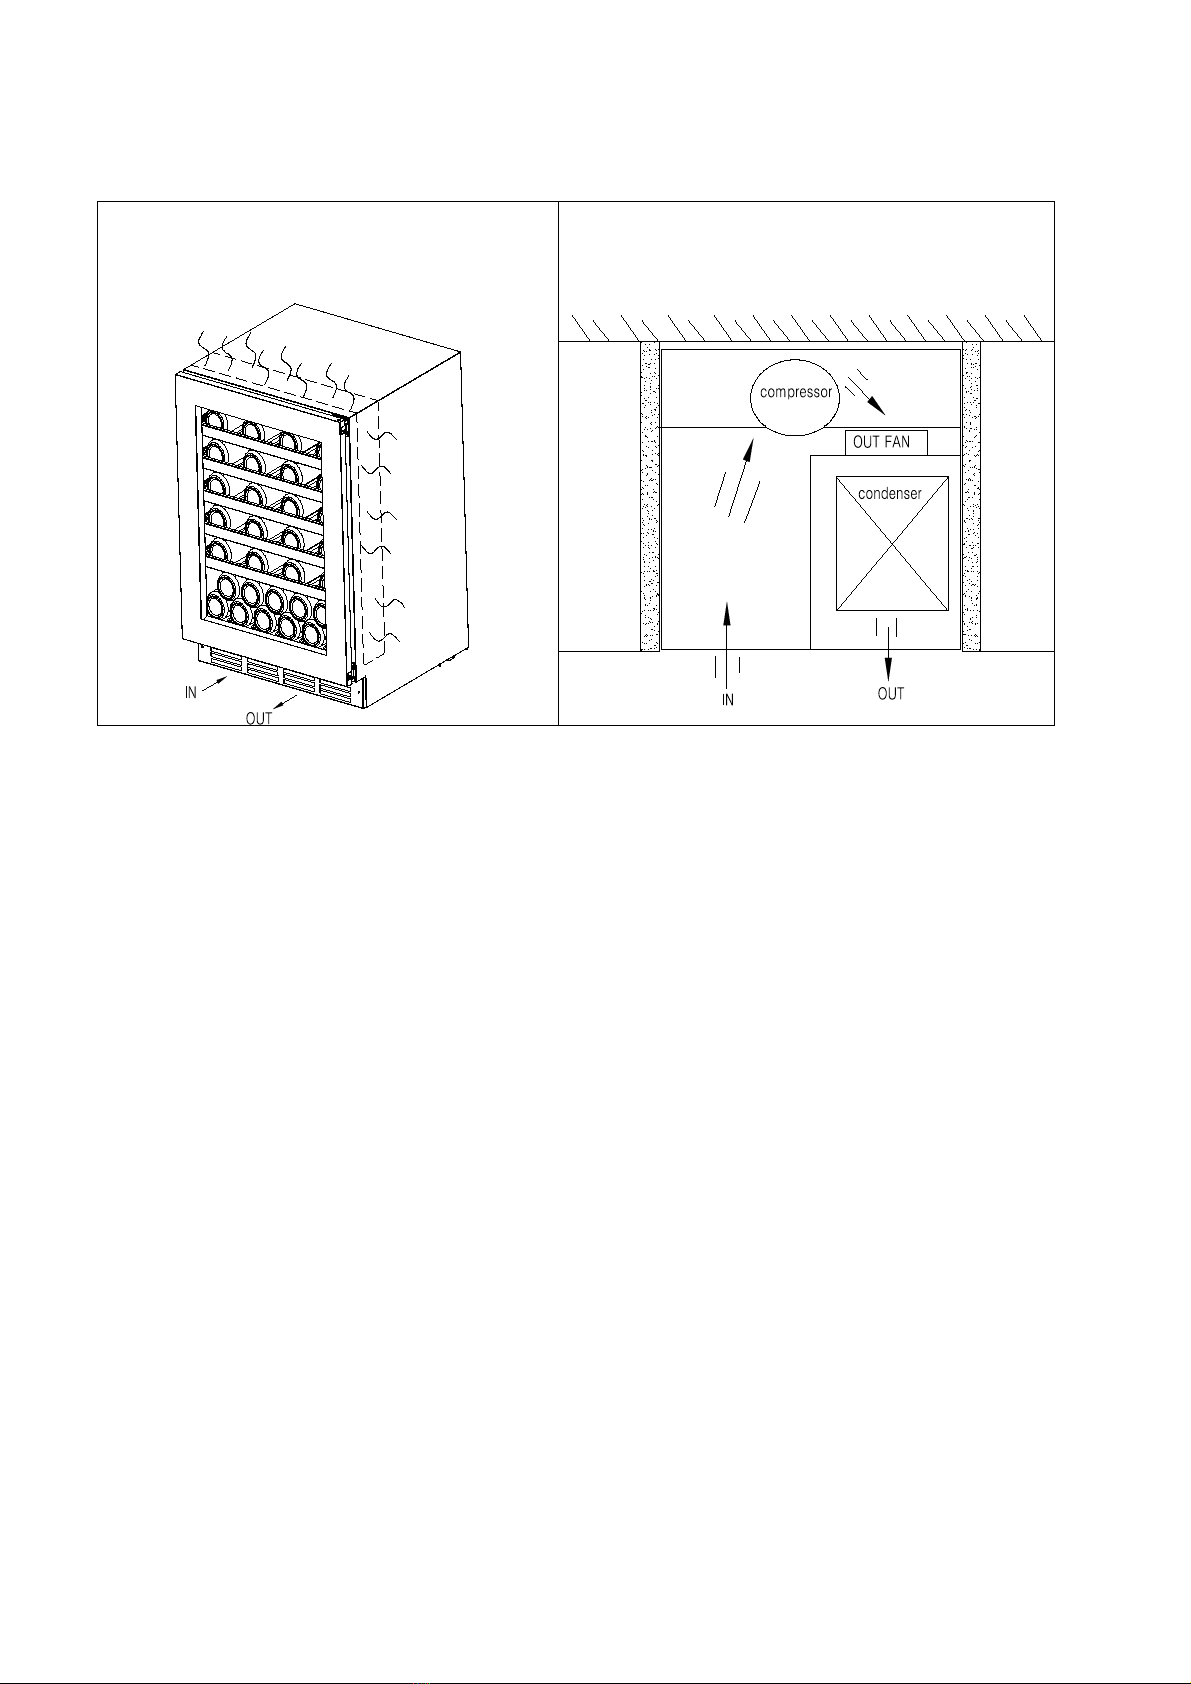
RADIATOR SYSTEM DESCRIPTION
These Models use side anti-dew tube and Independent cooling system:
TURNING ON YOUR WINE COOLER
Plug in and switch on the cellar by pressing on the power button for a few seconds.
When you use the Wine cooler for the first time (or restart the Wine cooler after having it
shut off for a long time), there will be a few degrees variance between the temperature you
have selected and the one indicated on the LED readout. This is normal and it is due to the
length of the activation time. Once the Wine cooler is running for a few hours everything
will stabilize.
Important: If the unit is unplugged, power is lost, or turned off, wait 3 to 5 minutes before
restarting the unit. The Wine cooler will not start if you attempt to restart before this time
delay.
Operating Noises
To reach the desired temperature settings, Our Wine cooler, like all Wine cooler operating
with compressors and fans, may produce the following types of noises. These noises are
normal and may occur as follows:
- Gurgling sound - caused by the refrigerant flowing through the appliance’s coils.
- Cracking/popping sounds - resulting from the contraction and expansion of the refrigerant
gas to produce cold.
- Fan operating sound - to circulate the air within the Wine cooler.
7
An individual’s perception of noise is directly linked to the environment in which the Wine
cooler is located, as well the specific type of models. Our Wine cooler are in line with
international standards for such appliance. We will always do its utmost to satisfy its
customers but will not retake possession of the goods due to complaints based on normal
operating noise occurrences.
LOADING YOUR WINE COOLER
You may load your wine bottles in single or double rows while taking note of the following:
if you do not have enough bottles to fill your Wine cooler, it is better to distribute the load
throughout the Wine cooler so as to avoid “all on top” or “all below” type loads.
- Do remove or relocate adjustable wooden shelves to accommodate larger type of bottles or
increase the capacity of the cellar by stacking the bottles up when necessary. (See
removing shelves)
- Keep smalls gap between the walls and the bottles to allow air circulation. Like an
underground cellar air circulation is important to prevent mould and for a better
homogeneous temperature within the cellar.
-Do not over load your Wine cooler to facilitate air circulation.
- Do not stack more than 1.5 rows of standard 0.75L bottles per shelves to facilitate air
circulation
-Avoid obstructing the internal fans (located inside on the back panel of the Wine cooler).
- Do not slide the shelves outwards beyond the fixed position to prevent the bottles from
falling.
- Do not pull out more than one loaded shelf at a time as this may cause the Wine cooler to
tilt forward.
- Do not cover the wooden shelves with alloy foil or other materials, as it will obstruct air
circulation.
- Do not move your Wine cooler while it is loaded with wines. This might distort the body of
the Wine cooler and cause back injury.
TYPES OF REGULATION
Please note that depending on the loading and settings chosen it takes about 24 hours for the
Wine cooler to see the temperature stabilizing.
During this time LED seems to move erratically in particular,It is normal and this process
occurs whenever the setting is modified and/or whenever a large amount of bottles are added
to the cellar.
Designed to store and mature all wines: red, white and sparkling. These Wine coolers
reproduce the ideal conditions for wine storage, at a constant recommended temperature of
12ºC. They can also be set to provide ideal serving temperature for full enjoyment of the
wine’s qualities. Unless stated by the wine maker on the bottle, We recommends 7ºC for
8

your champagne, 12ºC for whites and 18ºC for reds. (Refer to “Wine Service Temperature”
recommendation chart)
TEMPERATURE SETTINGS
Important: The LED displays by default the actual internal air temperature.
The temperature of the power, before all Settings will be resumed after the electricity to
power the preset temperature
The electrical board of all models comes with memory function.
It is important to understand that there is a difference between the air temperature inside the
Wine cooler and the actual temperature of the wine: You will need to wait approximately 12
hours before noticing the effects of temperature adjustment due to the critical mass within a
full Wine cooler.
Once the temperature is set, it is strongly advised not to toy with it or adjust frequently. The
thermostat will maintain the temperature inside the Wine cooler within a +/- 2.5ºC range. But
the thermal inertia of the wine and the glass is such that within this temperature range, the
actual temperature of the wine will only fluctuate 0.5ºC to 1ºC.
DISPLAY BOARD OPERATING INSTRUCTION:
For MWC-46BG
CF
+
-
ECO
3s 3s
1 2 3 4 5 6 7 8
①Energy Saving Mode
Press the button for 3 seconds into the energy-saving mode, press ⑥⑦ out of energy-saving
mode
②ON/OFF the power button:
In the standby mode: press 3 seconds, the power is turned on, the whole machine starts
In the power-on state: press the power button, window 4 shows the countdown 3 2 1, the
power is turned off, the machine is turned off (show 3 2 1 process, the hand cannot leave the
button)
9

③Lamp button:
Press the button, lights on / off switch
④Display Window:
Displays the setting temperature
⑤Window:
Displays the actual temperature
⑥Temperature setting up button :
Press one time, window ④the set value will increase 1 degree Celsius in the original setting
temperature, the setting range according to customer requirements.
⑦Temperature setting down button :
Press one time, window ④the set value will reduce 1 degree Celsius in the original setting
temperature, the setting range according to customer requirements
⑧C/F display conversion function keys:
Set the conversion degrees Celsius / Fahrenheit display, each press this button, the display
window will be into degrees Celsius or Fahrenheit.
For MWC-180BG
①
“ON/OFF” the power button :
Press the button 3 seconds to power off (Window ④digital countdown displays 3, 2, 1,).
Press again (without delay), the power turns on.
②
Upper zone temperature setting up button:
Press one time, window ④the set value will increase 1 degree Celsius in the original setting
temperature, the setting range according to customer requirements.
③
Upper zone temperature setting down button :
Press one time, window
④
the set value will reduce 1 degree Celsius in the original setting
temperature, the setting range according to customer requirements.
10
④
Window :
Display upper zone temperature.
⑤
Window:
Display lower zone temperature
⑥
Lower zone temperature setting up button:
press one time, window ⑤the set value will increase 1 degree Celsius in the original setting
temperature, the setting range accordingly to customer requirements.
⑦
Lower zone temperature setting down button:
press one time, window ⑤the set value will reduce 1 degree Celsius in the original setting
temperature, the setting range accordingly to customer requirements.
⑧
Lamp button:
Press the button and the lamp turns on, the lamp will turn off once press again.
⑧
C/F display conversion function keys:
Set the conversion degrees Celsius / Fahrenheit display, each press this button, the display
window will be into degrees Celsius or Fahrenheit
WINE SERVING TEMPERATURE CHART
All wines mature at the same temperature, which is a constant temperature set between 12ºC
to 14ºC. The below chart is an indicative temperature chart to indicate the best temperature
for drinking purposes.
Champagne NV, Sparkling, Spumante 6ºC
Dry White Semillon, Sauvignon Blanc 8ºC
Champagne Vintage, 10ºC
Dry White Chardonnay 10ºC
Dry White Gewürztraminer, Riesling, Pinot grigio 10ºC
Sweet White Sauternes, Barsac, Montbazillac, Ice Wine, Late Harvest 10ºC
Beaujolais 13ºC
Sweet White Vintage: Sauternes… 14ºC
White Vintage Chardonnay 14ºC
Red Pinot Noir, 16ºC
Red Grenache, Syrah 16ºC
Red Vintage Pinot Noir 18ºC
Cabernet & Merlot: French, Australian, New Zealand, 20ºC
Chilean, Italian, Spanish, Californian, Argentinean…
Vintage Bordeaux … Room temperature not exceeding 20ºC
11

IMPORTANT INFORMATION ABOUT TEMPERATURE
Your Wine cooler has been designed to guarantee optimum conditions for storing and/or
serving your wines.
Fine wines require long and gentle developments and need specific conditions in which to
reach their full potential.
All wines mature at the same temperature, which is a constant temperature set between 12ºC
to 14ºC. Only the temperature of “dégustation” (wine appreciation) varies according to the
type of wines (see “Wine Serving Temperature Chart” above). This being said and as it is
for natural cellars used by wine producers for long period of storage, it is not the exact
temperature that is important, but its consistency. In other words, as long as the temperature
of your Wine cooler is constant (between 12ºC to 14ºC) your wines will be stored in perfect
conditions.
Not all wines will improve over the years. Some should be consumed at an early stage (2 to 3
years) while others have tremendous ageing capability (50 and over). All wines have a peak
in maturity. Do check with your wine merchant to get the relevant information.
DEFROSTING/CONDENSATION/ HYGROMETRY/ VENTILATION
Your Wine cooler is designed with “Auto-cycle” defrost system. During “Off-cycle” the
refrigerated surfaces of the Wine cooler defrost automatically. Defrost water from the Wine
cooler storage compartment drains automatically and part of it goes into a drainage
container, which is located at the back of the Wine cooler next to the compressor. The heat is
transferred from the compressor and evaporates any condensation that has collected in the
pan. Part of the remaining water is collected within the Wine cooler for humidity purposes.
This system enables the creation of the correct humidity level inside your Wine cooler
required by the natural cork to maintain a long lasting seal.
Notes: The water collected by condensation, is therefore recycled. Under extremely dry
environmental conditions, you may have to add some water into the water container
provided with your Wine cooler.
All units are equipped with a double glazed glass door that has a third internal acrylic layer
to minimize condensation on the glass door.
The Wine cooler is not totally sealed; fresh air admission is permitted through the drainpipe.
Air is circulated through the cellar by means of a fan/fans and the hollow shelves.
Notes: During the refrigerating cycle, heat is given off and disperses through the external
surfaces of the Wine cooler. Avoid touching the surfaces during those cycles.
12

ADJUSTABLE WOODEN SHELVES
For easy access to the storage content, you must pull the shelves approximately 1/3 of its
depth out of the rail compartment. These wine cabinets, however, are designed with a notch
on each side of the shelf tracks to prevent bottles from falling.
When removing any of these shelves out of the rail compartment, tilt the shelf as per the
diagram and simply pull out, or push in the shelf until it sits on the support brackets securely.
Shelf installation and taking instruction:
Shelf taking: According to below instruction drawing to pull out the shelf to support bracket
①, press two sides of sliding roller buckles and pull out the shelf following the arrow mark
②.
Shelf installation: According to below instruction drawing to push in the shelf alignment
with two sides of sliding roller following the arrow mark ③.
REVERSIBILITY OF THE DOOR
Warning: To avoid accidents during the process of changing the door, we recommend that
you get assistance. The glass door is heavy and may cause injury if dropped.
- Depending on to the model and the type of handle your wine cabinet is equipped with, you
may have to rotate the door through 180 degrees.
- Depending on the type of handle your wine cabinet is equipped with, the door may not be
reversible or may require that a left or right opening door be ordered to change the opening
side.
13

1.Decorative nail
2. Knife
3. Drop-proof device
4. M5 six angle
5. M5 six angle screwdriver
6. Door spindle core
7. Upper door hinge
8. Lower door hinge
9. Cross screwdriver
10. Door block pieces
11. Screws
1. To put the cabinet on open operation place, the door opened to the maximum angle
2. Use small knife(2) to take off the decorative nail (1) on opposite side (Drawing 1);
3. Use the inner six angle screwdriver (Tool 5) to disassemble the screws(4) of drop-proof
device (3), then remove the drop-proof device .(Drawing 1)
4. Hold the door, use six angle screwdriver (Tool 5) to screw out the door shaft core(6) from
the two ends of the top of the door. Take out the door and set aside. (Drawing 2)
5. Discharge the upper and lower door hinge(7)(8) by M5 inner six angle screwdriver (Tool
5) , then to assemble the door hinge on the opposite side. (Drawing 3 and 4 )
6. Use a screwdriver to remove the Door block pieces (10) at the bottom of the door to the
top of the door. Install the top screws(11) at the bottom of the door.And rotate the door 180
degrees, then Install the door on the right side of the cabinet. (Drawing 5)
7. Finally, install the decorative nail and drop-proof device at the opposite side. (Drawing 6)
14
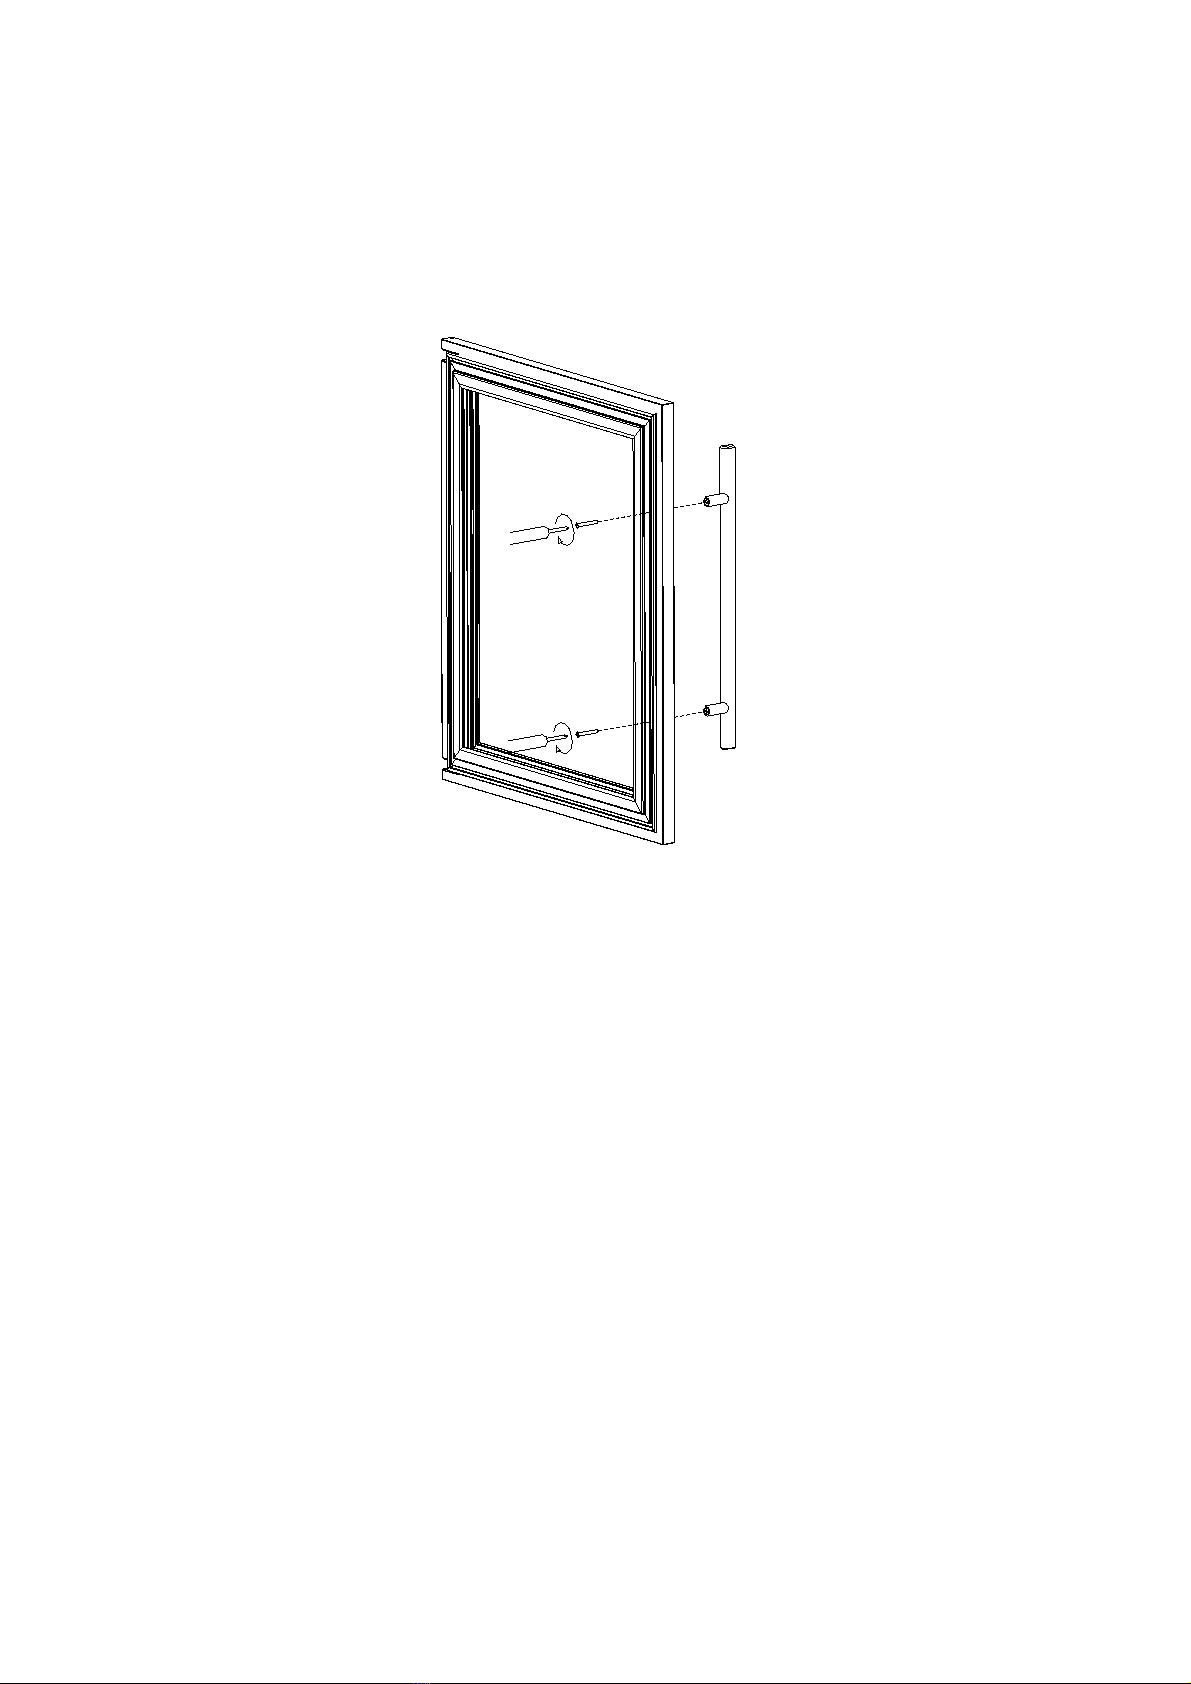
Handle Installation Method
1. Take out handle from cabinet.
2. Pull open door seal from the side of door, then insert screws into the 2 handle holes on
side of door, then put the screws alignment the hole of handle , tighten the screws by
Phillips screwdriver,then compress the door seal.
If the screws holes of the handle don't match perfectly with the holes of the door ,please us
e the electric drill to drill the holes of the door a bit big ( in surface side) ,
in order to install the handle perfectly.
OPERATION ANOMALIES
Ensure that there is power to the electrical supply plug by connecting another electrical
appliance to it. Check fuse, if any. Make sure that the door is closed properly.
If your Wine cooler appears to be malfunctioning, unplug it and contact your our after sales
service. Any intervention on the cold circuit should be performed by a refrigeration
technician who should carry out an inspection of the circuit sealing system. Similarly, any
intervention on the electrical circuit should be performed by a qualified electrician.
Notes: Any intervention performed by a non- authorized technician We will lead to the
warranty being considered as null and void.
POWER FAILURES
In the event of a power interruption, all previous temperature settings are automatically
preservation and it will revert to a preset temperature setting. (See preset chart)
15
Most power failures are corrected within a short period of time. An hour or two’s loss of
power will not affect Wine cooler’s temperatures. To avoid sudden change of temperature
while the power is off, you should avoid opening the door. For longer period of power
failure, do take steps to protect your wine.
Irrespective of the cause, if you notice either abnormal temperature or humidity levels
inside your Wine cooler, be reassured that only long and frequent exposure to these
abnormal conditions can cause a detrimental effect on your wine.
TROUBLESHOOTING GUIDE
Common problems may easily be solved, saving you the cost of a possible service call.
Please read carefully the instruction manual and revert to troubleshooting guide chart.
PROBLEM
POSSIBLE CAUSE
Wine cooler does
not operate.
Not plugged in.
The appliance is turned off.
The circuit breaker tripped or the fuse is broken.
Wine cooler is not
cold enough.
Check the temperature control setting.
External environment may require a higher setting.
The door is opened too often.
The door is not closed completely.
The door gasket does not seal properly.
Turns on and off
frequently.
The room temperature is hotter than normal.
The door is opened too often.
The door is not closed completely.
The temperature control is not set correctly.
The door gasket does not seal properly.
The light does not
work.
Not plugged in.
The circuit breaker tripped or a blown fuse.
The bulb is out of order.
The light button is “OFF”.
Vibrations.
Check to assure that the Wine cooler is level.
The Wine cooler
seems to make too
much noise.
The rattling noise may come from the flow of the refrigerant, which is
normal.
As each cycle ends, you may hear gurgling sounds caused by the flow
of refrigerant in your Wine cooler.
Contraction and expansion of the inside walls may cause popping and
crackling noises.
The Wine cooler is not level.
16
The door will not
close properly.
The Wine cooler is not level.
The door was reversed and not properly installed.
The gasket is faulty. ( magnet or rubber is spoiled)
The shelves are out of position.
Standard features:
Compressor operated: R600a
- Available in rated voltage/frequency (as per country' requirements):
220V/50/60Hz
- Automatic defrost
- Humidity : 65% RH +/-10% RH
- Black outer and inner finish
- Internal light
- Adjustable feet x 4
- Triple layers glass door
- Full black glass door
17

CẢNH BÁO
Thiết bịnày có thểđược sửdụng bởi trẻtrên 8 tuổi và đối với người sửdụng có
khảnăng vềthểchất, tinh thần hoặc thiếu kinh nghiệm nếu được giám sát hoặc
được hướng dẫn sửdụng một cách an toàn và hiểu các mối nguy hiểm có tính liên
quan. Trẻem không được chơi với thiết bị. Hướng dẫn sửdụng và vệsinh sẽ
không được thực hiện bởi trẻem nếu không có sựgiám sát của người lớn.
Trẻem nên được giám sát, chúng không được chơi với thiết bị.
Không đểcác chất nổnhư bình xịt khí có chất dễcháy trong tủrượu.
Thiết bịnày được sửdụng trong hộgia đình và các khu vực tương tựnhư:
–các khu vực nhân viên nhà bếp tại các cửa hàng, văn phòng.
–nhà ởnông trại và các khách trong khách sạn, nhà nghỉ
NGUY HIỂM: nguy hiểm cho trẻem. Trước khi bạn bỏtủrượu cũ.
- Gỡbỏcánh cửa;
- Để vật dụng hút ẩm ởnơi mà trẻkhông dễdàng leo trèo vào bên trong;
- Khi vứt bỏthiết bị, chỉthực hiện tại trung tâm xửlý chất thải có thẩm quyền.
R600a CẢNH BÁO:
Vì sựan toàn của bạn, hãy quan sát các đềxuất sau đây:
•Thiết bị này chứa một lượng nhỏ chất làm lạnh R600a thân thiện với môi trường,
nhưng dễ cháy. Nó không làm thủng tầng ozon và không gây hiệu ứng nhà kính.
•Trong quá trình vận chuyển và lắp đặt, đảm bảo rằng ống của mạch làm lạnh
không bị hư hỏng.
•Tránh sử dụng hoặc thao tác các vật sắc gần thiết bị.
•Rò rỉ chất làm lạnh có thể gây cháy hoặc làm hại cho mắt.
•Trong trường hợp có sự cố xảy ra, tránh tiếp xúc với nhiệt và thiết bị tạo ra tia lửa.
Ngắt thiết bị khỏi nguồn điện.
•Thiết bị được đặt ở nơi hoàn toàn thông thoáng trong khoảng vài phút.
•Thông báo cho trung tâm chăm sóc khách hàng để nhận những lời khuyên và các
bước thực hiện cần thiết.
•Số lượng chất làm lạnh của thiết bị này được nêu ở trên bằng đơn vị gam, nó cũng
được lưu ý trên bảng đánh giá thiết bị.
- CẢNH BÁO: giữ các lỗ thông hơi trong vách ngăn của thiết bị hoặc cấu trúc bên
trong không bị cản trở.
- CẢNH BÁO: không sử dụng thiết bị cơ khí hoặc thiết bị khác để đẩy nhanh quá
trình rã đông, khác với những gì nhà sản xuất đề nghị.
18

- CẢNH BÁO: không làm hỏng mạch làm lạnh.
- CẢNH BÁO: không sửdụng thiết bịđiện bên trong ngăn chứa của thiết bị.
- CẢNH BÁO: thiết bịkhông dành cho những người sửdụng (bao gồm trẻem)
giảm khảnăng vềthểchất, cảm giác, tinh thần hoặc thiếu kinh nghiệm vềkiến thức,
trừkhi họđược giám sát hoặc hướng dẫn sửdụng thiết bịbởi một người có trách
nhiệm với sựan toàn của họ.
- CẢNH BÁO: không sửdụng một ổcắm mởrộng cho nhiều thiết bịhoặc thiết bị
không được nối đất (2 chấu)
- CẢNH BÁO: nếu dây nguồn bịhỏng, nó phải được thay thếbởi nhân viên bảo trì,
đại lý hoặc người có tiêu chuẩn tương đương đểtránh nguy hiểm.
Chú ý:
Khi tủtượu ởtrạng thái “TẮT”:
-Hãy lấy ra tất cảvật dụng trong tủrượu;
-Giữcho tủrượu sạch sẽ
24 giờtrước khi bật công tắc tủrượu. Chúng tôi khuyến khích bạn đểcửa tủ
mởvì lý do làm sạch và đểtủrượu bay hết những mùi còn sót lại trong quá
trình sản xuất.
TRƯỚC KHI TẢI VÀ CẮM ĐIỆN CHO TỦRƯỢU
Quan trọng: tất cảcác mẫu mã không có lỗthông hơi phía trước (thoát khí)
chỉđứng độc lập. (xem biểu đồkỹthuật).
Khuyến nghị:
Vịtrí bạn nên đặt tủrượu:
- không bịcản trởvà thông gió tốt;
- tránh xa nhiệt và ánh sáng trực tiếp;
- nơi không ẩm ướt (giặt ủi, phòng chứa thức ăn, phòng tắm v.v.);
- trên nền phẳng;
- có nguồn cung cấp điện tiêu chuẩn và đáng tin cậy (ổcắm theo tiêu chuẩn quốc
gia, nối đất), KHÔNG nên sửdụng đầu cắm đa năng hoặc đầu nối mởrộng;
- có bộphận chống sét cắm vào ổcắm điện;
- tránh xa lò vi sóng. Một sốlò vi sóng không có tấm chắn sóng nếu đặt trong
phạm vi gần khoảng 1 mét nó có thểgây ảnh hưởng đến tủrượu.
Chú ý:
Tất cảcác mẫu mã âm tủhoặc đứng độc lập đều phải tuân theo bản vẽcủa nó.
Tủrượu nên được lắp đặt thích hợp với nhiệt độmôi trường xung quanh (xem
phần cuối hướng dẫn sửdụng). Nếu nhiệt độcao hơn hoặc thấp hơn nhiệt độmôi
trường, nó sẽảnh hưởng đến dao động nhiệt độvà không đạt được hiệu suất làm
mát.
Hướng dẫn nối đất:
19
This manual suits for next models
1
Table of contents
Languages:
Other Malloca Wine Cooler manuals


