MAM SQ16 User manual

Owners Manual
SQ16

Contents
1. Introduction.................................................................................................................... 4
1.1. Basic usage of the SQ16.................................................................................................................... 4
1.2. Basic principles................................................................................................................................... 5
1.3. Memory structure of the SQ16........................................................................................................... 7
1.4. Synchronizing the SQ16 to other sequencers.................................................................................... 8
1.5. First steps........................................................................................................................................... 9
2. Common functions...................................................................................................... 16
2.1. Tempo.............................................................................................................................................. 16
2.2. Start/Stop - Continue........................................................................................................................ 16
2.3. Loop.................................................................................................................................................. 17
2.4. Select/Edit........................................................................................................................................ 17
3. Global ........................................................................................................................... 18
3.1. Panic................................................................................................................................................. 18
3.2. MIDI Dump....................................................................................................................................... 18
3.3. Common Pattern.............................................................................................................................. 19
3.4. Clock Source, Clock out On/Off, Autostart On/Off............................................................................ 20
3.5. Load from Block - Write to Block...................................................................................................... 22
3.5.1. Loading/Writing Rotates, Songs, Chains, MIDI Sets, Step Sets, or Mute settings............... 22
3.5.2. Loading/Writing Patterns...................................................................................................... 23
3.5.3. Loading/Writing Global settings............................................................................................ 24
3.5.4. Loading/Writing a complete Block........................................................................................ 24
4. Pattern.......................................................................................................................... 25
4.1. Introduction....................................................................................................................................... 25
4.1.1. What is a Pattern and what is its purpose?.......................................................................... 25
4.1.2. Step data for a Pattern......................................................................................................... 25
4.1.3. Creating a Pattern - Playing back a Pattern......................................................................... 26
4.1.4. Pattern functions - Overview................................................................................................ 28
4.2. Instrument tracks.............................................................................................................................. 29
4.2.1. Structure and data of instrument tracks ............................................................................... 29
4.2.2. Editing the instrument tracks of a pattern............................................................................. 31
4.2.3. Copying the currently edited On/Off track or Accent Track.................................................. 32
4.3. Note Tracks...................................................................................................................................... 33
4.3.1. Structure and data of note tracks......................................................................................... 33
4.3.2. Editing the On/Off track, Accent track and Hold track of a Note Track ................................ 37
4.3.3. Editing/Inserting Notes......................................................................................................... 38
4.3.4. Copying the currently edited On/Off track, Hold track, Accent Track or notes..................... 41
4.4. Playing back Patterns....................................................................................................................... 42
4.5. Basic Pattern settings (Function pattern) ......................................................................................... 44
4.5.1. Length .................................................................................................................................. 44
4.5.2. Scale.................................................................................................................................... 44
4.5.3. Step Set................................................................................................................................ 44
4.5.4. MIDI Set............................................................................................................................... 45
4.5.5. Copying the currently edited Length setting, Scale setting, Step Set setting or MIDI Set setting ....... 45
5. MIDI Set ........................................................................................................................ 46
5.1. Which data does a MIDI Set contain?.............................................................................................. 46
5.2. Why and how to use MIDI Sets?...................................................................................................... 47
5.3. Editing a MIDI Set............................................................................................................................. 50
5.4. Copying MIDI Set data..................................................................................................................... 51
5.4.1. Selected MIDI Set setting: I Note # or I Channel.................................................................. 51
5.4.2. Selected MIDI Set setting: n Receive Channel or n Send Channel ..................................... 52

Contents
6. Step Set ........................................................................................................................ 53
6.1. Which data does a Step Set contain?.............................................................................................. 53
6.2. Why and how to use Step Sets?...................................................................................................... 54
6.3. Description of Step Set settings....................................................................................................... 55
6.3.1 ACC Mode, ACC Low, ACC High, Delay Repeat, Delay Time.............................................. 55
6.3.2 n Step Length........................................................................................................................ 57
6.4. Editing a Step Set............................................................................................................................. 58
6.5. Copying Step Set data...................................................................................................................... 59
6.5.1 Selected Step Set setting: ACC Mode/Low/High, Delay Repeat/Time.................................. 59
6.5.2 Selected Step Set setting: n Step Length.............................................................................. 60
7. Copy.............................................................................................................................. 61
7.1. Copying single settings..................................................................................................................... 61
7.2. Copying Patterns, Songs, Chains, MIDI Sets, Step Sets and Rotates............................................. 62
8. Mute settings ............................................................................................................... 65
9. Chain............................................................................................................................. 67
9.1. Chain Structure................................................................................................................................. 67
9.2. Chain playback................................................................................................................................. 67
10. Song............................................................................................................................ 69
10.1. Song structure................................................................................................................................ 69
10.2. Playing a Song............................................................................................................................... 69
10.3. Editing a Song................................................................................................................................ 70
10.4. Copying and inserting Song Steps................................................................................................. 73
10.4.1. Copying and inserting a single Song Step ......................................................................... 73
10.4.2. Copying and inserting several Song Steps ........................................................................ 74
10.4.3. Copying Song Steps without inserting................................................................................ 75
10.5. Deleting Song Steps....................................................................................................................... 76
11. Recording note tracks............................................................................................... 77
11.1. Recording in Play Mode - Pattern................................................................................................... 77
11.1.1. Selecting a Pattern and a note track within the Pattern ..................................................... 77
11.1.2. Setting the MIDI receive channel for the selected note track............................................. 77
11.1.3. Editing the Step recording track......................................................................................... 78
11.1.4. Selecting Recording Mode................................................................................................. 78
11.1.5. Recording (Modes: SGL STP, SGL LEG, and SGL ALL)................................................... 79
11.1.6. Recording (Mode: Arp - UP1/UP2/do1/do2/Ud1/Ud2/ST2/Co1/Co2/Co3)......................... 82
11.2. Recording in Play Mode - Chain/Play Mode - Song....................................................................... 85
12. Rotate ......................................................................................................................... 86
12.1. Introduction..................................................................................................................................... 86
12.2. How to activate Rotate:.................................................................................................................. 88
12.3. How to use Rotate.......................................................................................................................... 89
12.4. Rotate Data .................................................................................................................................... 89
12.5. Operation principles of the Rotate function.................................................................................... 89
12.5.1. Delay, Shift, Reset Mode.................................................................................................... 89
12.5.2. On/Off................................................................................................................................. 97
12.5.3. Destination......................................................................................................................... 98
12.5.4. Destination for instrument tracks........................................................................................ 99
12.5.5. Destination for note tracks................................................................................................ 101
12.6. Copying Rotate data..................................................................................................................... 103
12.6.1. Selected function: Delay, Shift or Reset........................................................................... 103
12.6.2. Selected function: On/Off................................................................................................. 103
12.7. Tips and tricks .............................................................................................................................. 104

4
1. Introduction
SQ16
1. Introduction
1.1. Basic usage of the SQ16
The SQ16 is predominantly used to create drum sequences. The SQ16 does not have a built-in sound source; instead it out-
puts MIDI data which control single drum instruments in an external drum expander or synthesizer. The SQ16 allows fast and
simple changes of the rhythm of a drum sequence. All changes can be made while the drum sequence is playing and are
immediately audible. That's why the SQ16 can also be used in a live setting.
With the exception of various synchronization commands (Sync, MIDI clock, Start/Stop/Continue) only Note commands are
sent by the SQ16. Other MIDI data types like Pitch bend or Controllers were consciously omitted to avoid complicated and
time consuming edit operations. For this purpose there are enough software sequencers in existence, which are often supe-
rior to a hardware sequencer. It would also defeat the purpose of the SQ16 - creating and editing drum sequences in a simple
manner.
The SQ16 offers a wealth of functions which go far beyond a step sequencer in the usual sense, like Delay (Echo), Arpeggio
or Rotate which helps create "irregular" rhythms.
Using the SQ16 as master:
•Example1:
The SQ16 controls the sounds and drumsets of a synthesizer. Simultaneously the synthesizer keyboard can be played;
the notes can be recorded into the SQ16 or transformed into an arpeggio. In addition the SQ16 synchronizes a drum
machine which has a sync input.
•Example2:
The SQ16 synchronizes an external sequencer. The drum sequence is transmitted via the synth's MIDI Thru to a drum
machine. The external sequencer itself controls the synthesizer.
Using the SQ16 as slave:
Here the SQ16 gets synchronized from an external sequencer. The SQ16 in turn controls the computer. If the external
sequencer must control the synthesizer too, this can be done via the MIDI Thru of the SQ16 in case the external sequencer
has just a single output.

5
1. Introduction
SQ16
1.2. Basic principles
• Pattern
So-called "patterns" form the nucleus of the SQ16. They are rhythmical patterns that consist of a limited amount of steps
(up to 16).
General architecture of a pattern:
Each pattern contains 16 tracks. Each track contains exactly one note per step. Within each instrument track all notes are the
same. If the SQ16 is triggering a drum expander each instrument track plays a single drum instrument (drum expanders
usually are built around drumsets in which each note is assigned to exactly one instrument).
Note tracks (track 14...16) can use different notes per step. If the SQ16 is triggering a synthesizer each note track plays back
a melody which can be assigned to certain sounds. If the synthesizer also contains drum sets you can simultaneously play
back Instrument tracks and note tracks. Each track has its own MIDI channel to allow an assignment to drumsets or sounds.

6
1. Introduction
SQ16
Creating a rhythm
The rhythm of a pattern depends on which step within each track are active or muted. Creating a rhythm with the SQ16
is fast and simple:
• Selecting a track
The LED's above each Step button 1-16 show the status of each single step (Step is active or muted)
• Editing a track
Each Step has its own button that toggles between the states of the Step.
Playing a pattern
When a pattern is playing all Steps are played back sequentially; e.g. Step 1, Step 2, Step 3... After the final step is rea-
ched the pattern starts again from the beginning. All tracks that have an active Step on the current Step Play Position
output a MIDI note. Consequently, the number of simultaneous MIDI notes can vary between 0 and 16.
Because all steps are played back sequentially you can easily display the rhythmical structure of a pattern by putting
one track above the other.
Display of current Step Play Position:
If a track is being edited and the pattern is played back each played step blinks. This sort of display is handy when
editing a track.
Editing note tracks
Since a note track can contain different notes different procedures are used to create a note track:
• Editing a note track (Insert/Delete/Transpose notes)
• Recording from an external keyboard
• Songs and Chains:
Playing back different patterns sequentially can create longer rhythmical structures. This is done with either so-called
Chains (pattern chains in fixed order) or Songs in which patterns can be grouped freely.
• MIDI Sets:
A MIDI set is used to assign a note number and a MIDI channel to each instrument track or a MIDI send channel and a
MIDI receive channel to each note track. Those data are not stored with a pattern! Each pattern can use one of 16 MIDI
Sets. All tracks are assigned to the various MIDI channels as defined by the MIDI Set.
• Step Sets:
The steps of each track don't have an own velocity setting. With a drum sequence it is often sufficient to use two diffe-
rent velocities to vary the volume of an instrument. For this purpose each track has its own accent track in which you
can activate an accent for each single step. However the velocity values used here are determined by the Step Set (indi-
vidually for each track). By assigning a Step Set to a pattern the velocity settings of this Step Set are used for each track
of the pattern.
• Rotate:
This function generates rhythmical variations by changing the Step Play Position; the original rhythm of the pattern
(instrument tracks and note tracks) however remains unchanged. The SQ16 contains 16 Rotate settings. Each Rotate
setting in turn contains different settings for each track.

7
1. Introduction
SQ16
1.3. Memory structure of the SQ16
• Block
The 8 Blocks are memory areas for permanent storage of data. Data is not lost after power-down. Each Block contains
the following data:
• Pattern 1...64
• Chain 1...16
• Song 1...8
• MIDI Set 1...16
• Step Set 1...16
• Rotate 1...16
• Mute Setting 1...15
• Global settings
• Edit Buffer
The Edit Buffer is the "working area" of the SQ16. Only data in the Edit Buffer can be edited or played back. Data of a
Block are edited or played back by loading this Block into the Edit Buffer and playing it/performing edit operations.
Anatomy of a SQ16-"session":
1.After powerup Block 1 is loaded automatically into the Edit Buffer. You can load a different block (but only one Block at a
time) into memory.
2.If you just play back the Edit Buffer data without performing edit operations the Edit Buffer plays back an exact copy of
the data of the loaded Block.
3.By performing edit operations only the data in the Edit Buffer is changed, not the data in the Block itself. If you want to
make those changes permanent you need to store the Edit Buffer into the Block again.
You can copy a Block (for example Block 1 to Block 3) by first loading Block 1 into the Edit Buffer and saving it into Block
3.
4.The Edit Buffer is volatile; all data are lost after powering down.

8
1. Introduction
SQ16
1.4. Synchronizing the SQ16 to other sequencers
• Synchronizing with MIDI sequencers
Synchronization is done by MIDI clock. The SQ16 can be used either as Master (SQ16 controls external sequencer) or
as Slave (SQ16 is controlled by external sequencer). This mode depends on the settings for Clock Source, Clock OUT
On/Off and Autostart On/Off in the global settings (see 3.4).
• Synchronizing drum machines with DIN sync
The SQ16 can control drum machines that have a DIN sync input. The SQ16 sends the commands Start, Stop ad Clock
(24 ppq).

9
1. Introduction
SQ16
1.5. First steps
This section helps you to become familiar with the basic operation of the SQ16. If you have never before worked with an
SQ16 you should follow these steps carefully.
1. Making connections
1.1. Connect the SQ16 to a MIDI expander that offers both drum instruments (as drumsets) and other sounds. Connect
the SQ16's MIDI Out to the expander's MIDI In.
1.2. Connect the included power supply to the SQ16.
2. Turning on the SQ16
• On powerup Block 1 data is loaded into the Edit Buffer. The SQ16 is in Play Mode - Pattern with Pattern 1 selected.
The tempo is set to 120 bpm.
• The 13 instrument tracks of Pattern 1 are set to send on MIDI channel 10 and are configured for a General MIDI
drumset.
• The 3 note tracks of Pattern 1 are set to the following MIDI channels:
note track n14: Channel 1
note track n15: Channel 2
note track n16: Channel 3
3. Starting the sequencer
Press the "Loop" button and start the SQ16 by pressing the "Start/Stop" button. You should hear a drum sequence with
all 13 instrument tracks activated and all note tracks muted.
If the connected expander isn't playing at all check for:
• Wrong connections
• Incorrect MIDI setup in the expander (for example disabled MIDI In)
• The expander possibly doesn't have any drumkits or they are not set to receive on channel 10
If the instrumentation is not musically useful the expander probably uses a drum mapping different from the General
MIDI standard. In this case you will have to change the instrument assignments in the SQ16 (see section 10).
4. Selecting a pattern for playback
4.1. Press step buttons 1...16 to play different patterns. The currently playing pattern is displayed in the right readout,
the next selected pattern in the left readout.
4.2. Before continuing with the next step select Pattern 1.
5. Activating and muting instrument tracks
5.1. Press the "Inst/Note" button. Mute setting Co001 is selected; all 13 instrument tracks are activated; all three note
tracks are muted.
5.2. Press the "arrow up" button in the left Select/Edit section several times to select different Mute settings.
5.3. Press the "arrow down" button in the left Select/Edit section until again Mute setting Co001 is active.
5.4. Press step button 1.13 to mute a single instrument track or mute all tracks with the "ALL OFF" button. You can turn
back on a muted track by again pressing its corresponding step button. Use step button 14...16 to mute the note
tracks n14, n15 and n16.

10
1. Introduction
SQ16
6. Editing an instrument track (On/Off track)
6.1. Mute all note tracks (n14...n16) and all instrument tracks except 3 and 12 (LED's 3 and 12 are lit). Instrument tracks
3 and 12 should trigger the following sounds:
instrument track 3:tambourine
instrument track 12: bass drum
We are going to edit track 12 now:
6.2. Activate the "Inst Step - On/Off" function.
6.3. Press the "arrow down" button in the left Select/Edit section several times until instrument track 12 is selected (left
display: I12). The current Step Play Position is blinking shortly. All steps that light permanently will trigger a bass
drum; all other steps are muted.
6.4. You can change the rhythm of the bass drum track by triggering the bass drum at different positions:
a.Press step button 1...16 to activate or mute single steps.
b.Mute all steps using the "ALL OFF" button.
c.Activate all steps using the "ALL ON" button.
Before continuing make the necessary edits to the On/Off track to activate Steps 1, 2, 3, 4 and 5.
7. Editing an instrument track (Accent track)
This section shows you how to edit the velocity (and hereby the volume) of single steps. This of course requires a
velocity sensitive bass drum in the connected expander.
7.1. Activate the "Inst Step - Accent" function.
With the help of the "light band" interface you can see which step is currently played. Additionally each active step
is blinking (1, 2, 3, 4 and 5).
7.2. Setting accents
You can set an accent for each step. This results in a higher velocity for this particular step. Accents are set with
the appropriate step buttons. All steps without an accent are output with a common "low" velocity; all steps with an
accent with a common "high" velocity.
Activate the accent for arbitrary steps. If you set an accent for a non-active step the step button will light perma-
nently but of course no audible result will follow.
Before continuing make the necessary edits that the only accent is set on Step 3. Make according to example 6 the
necessary edits that only Steps 1, 2 and 3 are active (and played).

11
1. Introduction
SQ16
8. Changing Accent settings for one track (requires velocity sensitive bass drum)
During steps 6 and 7 of your tour we have learnt how to edit the On/Off track and the Accent track for instrument track
12; both the On/Of track and the Accent track are pattern data. The accent track is responsible for the placement of
accents; and of course now we'd like to know how to set the common velocity values for low and high velocity for the
various tracks of a pattern. Those settings don't belong to the pattern data. Those individual velocity settings are edited
and stored in a Step Set. A pattern then gets assigned a Step Set (the SQ16 contains 16 Step Sets) and the settings of
this Step Set are used for the instrument tracks of the pattern.
Since Pattern 1 is currently using Step Set 1 you need to edit Step Set 1 to change the velocity settings for instrument
track 12 (bass drum).
8.1. Activate the "Step Set Edit" function. The left display reads "I12"; this means all subsequent actions affect the
velocity settings for instrument track 12.
8.2. Press "ACC Low" (step button 2). The right display shows the velocity value used for steps without accent (90). You
ca change this value by pressing the "Up" or "Down" button (step buttons 11 and 12).
8.3. Press "ACC High" (step button 3). The right display shows the velocity value used for steps with accent (115). You
ca change this value by pressing the "Up" or "Down" button (step buttons 11 and 12).
Make the necessary edits to achieve a difference in volume between ACC Low and ACC High.
Activating the Delay function
8.4. Press "ACC Mode" (step button 1). The right display reads "HL". This results in an accented output for Step 3 and
a non-accented output for Step 1.
8.5. Press the "Up" button (step button 11). This changes the mode to "dn". You'll here an echo that starts on Step 3
(accent set) and decreases in volume (from ACC High to ACC Low).
8.6. Press the "Up" button again. This switches to "dr" mode. You'll here an echo that starts on Step 3 (accent set) and
increases in volume (from ACC Low to ACC High).
8.7. Press the "Up" button again. This switches to "drn" mode. You'll here an echo that starts on Step 3 (accent set),
increases in volume (from ACC Low to ACC High) and then decreases in volume (from ACC High to ACC Low).
8.8. Press the "Down" button (step button 12) until mode "dn" is selected. Press "Delay Repeat" (step button 4). The
right display shows the number of repeats. You can change the value using the "Up" or "Down" buttons (step but-
tons 11 and 12). Before continuing with the next example set this value to 4.
8.9. Press "Delay Time" (step button 4). The right display shows the number of steps after which the echo starts. You
can change the value using the "Up" or "Down" buttons (step buttons 11 and 12). Before continuing with the next
example set this value to 4.
You can make individual assignments for Mode, Accent and Delay for each instrument track.
9. Assigning a specific instrument to an instrument track.
This section describes how to assign a different instrument to instrument track 12 (current setting: bass drum).
One instrument track - and hereby all steps of an instrument track - triggers exactly one MIDI note number; this results
in one single drum sound. MIDI note C1 was assigned to Track 12; this is the note number for a bass drum in the GM
drum set.
Assigning note numbers and MIDI channels is done via MIDI Sets. Each pattern gets assigned one of the 16 MIDI Sets
in the SQ16. A MIDI Set contains all the note numbers and MIDI channels for the instrument tracks; those settings are
edited directly in the MIDI Sets. The pattern contains just a pointer to a certain MIDI Set; the instrument tracks use the
MIDI channels and note numbers of the assigned MIDI Set.

12
1. Introduction
SQ16
9.1. Activate "MIDI Set Edit".
9.2. Press "I Note #" (step button 1). The right display shows the note number that is assigned to instrument track 12.
9.3. Change the value using the "Up" or "Down" buttons (step buttons 11 and 12). Depending on the note number
instrument track 12 will now play a different sound.
9.4. Leave "MIDI Set Edit" by pressing "Exit" (step button 13) and continue with example 11.
In examples 6 to 9 we have used instrument track 12 as ourexample; the process is similar for all other instrument tracks. You
simply need to select a different instrument track to edit it. This is done via the "Arrow Up" and "Arrow Down" buttons in the left
Select/Edit section. The left display shows the selected instrument track (I01...I13).
10.Assigning instruments and MIDI channels to the instrument tracks of a pattern
This section tells you how to assign an instrument and a MIDI channel to all instrument tracks. This is useful if you
couldn't achieve a suitable instrumentation in example 3 or if you want to change the MIDI channel altogether.
A short description of the SQ16's workings:
An instrument track is playing exactly one drum instrument of an external expander by assigning one note number to
this track (expanders usually group together drum sounds to drum sets). Of course also the MIDI channel must match.
Assigning note numbers and MIDI channels is done via MIDI Sets. Each pattern gets assigned one of the 16 MIDI Sets
in the SQ16. A MIDI Set contains all the note numbers and MIDI channels for the instrument tracks; those settings are
edited directly in the MIDI Sets. The pattern contains just a pointer to a certain MIDI Set; the instrument tracks use the
MIDI channels and note numbers of the assigned MIDI Set.
When assigning instruments to instrument tracks it is useful to hear just the instrument track you want to edit. The SQ16
is doing this automatically when using the Mute setting "SGL".
10.1.Activate "Inst/Note".
10.2.Press the "Arrow Up" button in the left Select/Edit section until the left display reads "SGL".
Editing a MIDI Set (Note numbers and instrument channels for instrument tracks)
10.3.Activate "MIDI Set Edit"
10.4.Select instrument track I1. Press the "Arrow Up" button in the left Select/Edit section until the left display reads
"I01".
10.5.Press "I Channel" (step button 2). The right display shows the MIDI channel for this instrument track. Change this
value using the "Up" or "Down" buttons (step buttons 11 and 12).
10.6.Press "I Note #" (step button 1). The right display shows the note number for the current instrument track. Change
this value using the "Up" or "Down" buttons (step buttons 11 and 12). Depending on the note number instrument
track 12 will now play a different sound. You may have to change the MIDI channel for a suitable result, too (see
10.5).
10.7.Repeat 10.4...10.6 for the remaining instrument tracks I02...I13.
10.8.If you've found a suitable instrumentation you should store it according to example 16 (storing changes into Block
1).
10.9.Turn off the SQ16 and start over with example 2.

13
1. Introduction
SQ16
11.Loading a Block
Imagine you have made several changes and edits but want to revert to the original settings. This can be achieved by
loading again Block 1 into the Edit Buffer.
11.1.Activate "Global".
11.2.Press "Load From Block" (step button 7) until the right display reads "ALL".
11.3.Press the "Enter" button (step button 14). When the left display reads "Yes" press the "Enter" button again to load
Block 1.
11.4.Press "Exit" (step button 13) to leave "Global".
12.Playing a Song
This section describes the general principle behind songs.
12.1.Activate "Play Mode - Song". Song 1 is selected. Each song is made out of 14 Song Steps that are played back in
a linear fashion. Each Song Step can play back one of 64 patterns and loop this pattern up to 32 times.
In Song 1 each Song Step plays Pattern 1. However, since each Song Step has different Mute settings various
instruments are played during the song. This allows the creation of a song with few patterns.
12.2.Press "Loop" and start the SQ16 by pressing the "Start/Stop" button. The song is playing. The left display shows
the currently playing Song Step, the right display shows the pattern loop.
Changing the Mute track for Song Steps:
12.3.Activate "Song Edit On/Off" while the song is playing. The song stops and the current Song Step is played back.
12.4.Press the "Arrow Up" or "Arrow Down" button in the left Select/Edit section to access Song Steps 1...14 (the num-
ber is shown in the left display). The LED's above the step buttons indicate which instrument tracks are active for
this Song Step (LED on) and which are muted. Keep in mind that this particular Song uses Pattern 1 for each Song
Step.
12.5.Change the Mute track for this Song Step using step buttons 1...16.
Before continuing with the next example stop the sequencer.
13.Playing back a Chain
This is an easy way to play several patterns after each other.
13.1.Activate "Play Mode - Chain". Chain 1 (C01) is selected. The LED's above the step buttons indicate which patterns
will be played in sequence.
13.2.Press "Loop" and start the SQ16 by pressing the "Start/Stop" button. The blinking LED shows that pattern is cur-
rently playing.
Editing a Chain:
This is simply done by pressing step buttons 1...16. Press a step button to add or remove a pattern from a Chain.

14
1. Introduction
SQ16
14.Activating Rotate
This section is a simple demonstration of Rotate's capabilities.
14.1.Activate "Play Mode - Pattern". Pattern 1 is selected.
14.2.Press "Loop" and start the SQ16 by pressing the "Start/Stop" button. All instruments of the pattern are playing; the
pattern repeats itself after 16 steps.
14.3.Activate "Rotate". Hold down the "Select" button in the left Select/Editsection and press simultaneously step button
1. This activates Rotate setting 1 as current Rotate setting; the left display reads "r01".
As you can hear Pattern 1 no longer repeats itself after 16 steps. By using Rotate you can vary the rhythm of Pat-
tern 1 without changing the actual pattern itself.
14.4.Disable "Rotate" to hear Pattern 1 again in its normal state. Hold down the "Select" button in the left Select/Edit
section and press simultaneously step button 1. The left display is empty (no Rotate setting active).
15.Changing basic pattern settings
15.1.Pattern length
This sets the final step for Pattern 1; e.g. the step after which Pattern 1 starts over.
• While Pattern 1 is playing activate "Pattern - Length".
• Change the pattern length using step buttons 1-16.
15.2.Pattern scale
This allows you to play back the pattern with double or half speed.
• While Pattern 1 is playing activate "Pattern - Scale". The current scale setting is 16 (step length 1/16).
• Press "Up" (step button 13). The speed has doubled (step length 1/32).
• Press "Down" (step button 12) until Scale 8 is displayed. The pattern plays now with half the speed compared to a
setting of 16 (step length 1/8).
15.3.Pattern Step Set
You can assign a Step Set to Pattern 1; Pattern 1 then is going to use its accent settings.
• While Pattern 1 is playing activate "Pattern - Step Set". Currently Step Set 1 is assigned.
• Press step button 2 to assign Step Set 2 instead. While the instrument tracks have not been changed Pattern 1
sounds different now. This is a result of the Delay setting being active for almost all instrument tracks in Step Set 2
while it was active for a couple of tracks only in Step Set 1.
15.4.Pattern MIDI Set
You can assign a MIDI Set to Pattern 1; its note number assignments are used by the instrument tracks of the pat-
tern.
• While Pattern 1 is playing activate "Pattern - MIDI Set". Currently MIDI Set 1 that contains GM drum set instrumen-
tation is assigned to Pattern 1.
• Press step button 2 to assign MIDI Set 2 instead. The instrumentation of Pattern 1 sounds different because the
instrument tracks are using different note numbers now.
You can set Pattern Length, MIDI Set and Step Set individually for each pattern.

15
1. Introduction
SQ16
16.Saving the Edit Buffer into a block.
All changes we have made so far took place in the Edit Buffer into which Block 1 was loaded at powerup. After switching
off the SQ16 the contents of the Edit Buffer are lost. If you want to keep those changes you need to write them into one
of the eight blocks before turning off the SQ16.
16.1.Activate "Global".
16.2.Press "Write To Block" (step button 8) until the right display reads "ALL".
16.3.Select the block you want to write into by pressing the "Up" or "Down" button (step buttons 11 and 12).
16.4.Press "Enter" (step button 14). When the left display reads "YES" press "Enter" again.
16.5.Press "Exit" (step button 13) to leave "Global".
17.Note tracks
Activating single steps and setting accents is the same as for instrument tracks. The same applies for Accent settings in
Step Sets. However there exist additional functions for recording a note track and for arpeggios. Those functions are
intended for a skilled user and are not explained at this point.
If you've followed the instructions up to this point you should be familiarwith the basic operating principles of the SQ16. Howe-
ver we could not explain all functions; that's why you should read the remaining parts of the manual carefully, too.

16
2. Common functions
SQ16
2. Common functions
2.1. Tempo
This determines the playback speed of the steps of a pattern. The Tempo setting is global for the pattern, chain and song play
modes. The tempo is displayed in quarter notes per minute (beats per minute = BPM). Keep in mind that each pattern can
have a different Scale setting. This can result in a different length for the pattern steps; you can have for example four steps
per quarter note, eight steps per quarter note, two steps per quarter note... (See also 4.5.2). The Tempo setting determines
the playback speed of the SQ16 as a whole while the Scale setting determines the playback speed for a single pattern.
The Tempo value can range between 20 and 255.
Setting a Tempo:
1.Activate "Tempo". The right display reads the current tempo in BPM.
2.Setting the tempo
a.With the up/down buttons (step buttons 11 and 12)
b.Entering the value directly with step buttons 1-9 and 0.
The Tempo value must always have three digits. For a tempo of 25 it is necessary to enter "025"; e.g. you must press
the buttons "0", "2" and "5".
If you press a button and the display doesn't change you have tried to enter an illegal value.
2.2. Start/Stop - Continue
• Start/Stop
This is used to start or stop the SQ16. Connected hardware and software sequencers receive a start or stop command.
After start MIDI clock is sent.
• Play Mode - Pattern:starting with step 1 in current pattern
• Play Mode - Chain:starting with step 1 and first Pattern in Chain
• Play Mode - Song:starting with step 1 at song start position
While the SQ16 is playing (either started with Start or Continue) you stop it by pressing the "Start/Stop" button a second
time.
• Continue
Continues playback at the previously stopped position. Connected hardware and software sequencers receive via Song
Position Pointer the exact position to continue as well.

17
2. Common functions
SQ16
2.3. Loop
Turns Loop alternating on and off.
• Loop not active:SQ 16 stops after pattern end, song end or chain end (depending on play mode)
• Loop active:patterns, songs and chains are repeated after arriving at their final step
2.4. Select/Edit
Many edit functions are used to change settings for patterns, songs, MIDI Sets and so on. Because most of those settings
exist several times it can be necessary to make double selections. For example, we have used the Inst Step Accent function.
The accent track is part of a pattern; consequently we needed to select a pattern; but we also needed to select an instrument
track I1..I13.
All this is done with the help of the Select/Edit section (the Copy function is without interest at the moment). The buttons in the
left section select - depending on the current function - either instrument/note tracks or Song Steps (only in Song Edit). If no
LED in the left section is active the currently selected function does not affect instrument or note tracks or Song Steps. The
buttons in the right section select - again depending on the current function - patterns, Songs, Step Sets, MIDI Sets, Chains or
Rotates. An LED shows which data type is affected.
The "Select" button and both "arrow" buttons have the same functionality in both sections.
• Select
Selecting an instrument track (left section) or for example a pattern (right section) is done by holding down the "Select"
button and pressing one of the step buttons. The LED's above the step buttons show the current selection. For example,
to select instrument track 5 hold down the "Select" button and press the step button 5. Then release the "Select" button.
• Arrow up
This button is used to select the next higher object; e.g. instrument tracks I1, I2, I3...I13. Holding the button down for lon-
ger than about a second will result in "scrolling" with increasing speed.
• Arrow down
This button is used to select the next lower object; e.g. instrument tracks I13, I12, I11...I1. Holding the button down for
longer than about a second will result in "scrolling" with increasing speed.
This method for selecting data is common for the whole SQ16. The next sections give detailed descriptions of each function
and the necessary steps. After short practice you will be familiar with data selection and no longer need the aid of this manual.

18
3. Global
SQ16
3. Global
3.1. Panic
In the case of so called "hanging notes" (the connected expander won't turn off certain notes anymore) you can force those
notes to stop with this function. "Panic" sends the following to the MIDI Out:
• All Notes Off (Channel 1...16)
• Reset All Controllers (Channel 1...16)
Selecting "Panic"
1.Activate "Global - Panic".
2.Press "Enter" button (step button 4) to send the Panic messages. If the SQ16 is in Start/Continue mode (currently play-
ing) it is stopped.
3.Leave "Global" by pressing "Exit" (step button 13) or repeat Panic.
3.2. MIDI Dump
You can externally (for example on a computer or MIDI file player) store SQ16 data to archive your settings or to extend your
storage capacity if the eight Blocks in the SQ16 isn't enough. Those data of course can be written back into the SQ16. A MIDI
dump for the SQ16 contains all data, e.g.:
• Rotate 1...16
• Chain 1...16
• MIDI Set 1...16
• Step Set 1...16
• Song 1...8
• Pattern 1...64
• Mute Setting 1...15
• Global data: Tempo + Common Pattern + Clock Source + Clock Out ON/OFF + Autostart ON/OFF, including Note rec
mode for Note Tracks 14, 15 and 16.
Sending a MIDI dump
All data residing in the Edit Buffer are sent as a MIDI dump. If you want to send one of the 8 blocks of the SQ16 you first need
to load it into the Edit Buffer (see 3.5.4).
1.If a Song, Chain or pattern is currently playing stop the SQ16 by pressing the "Start/Stop" button.
2.Activate "Global - Write Dump".
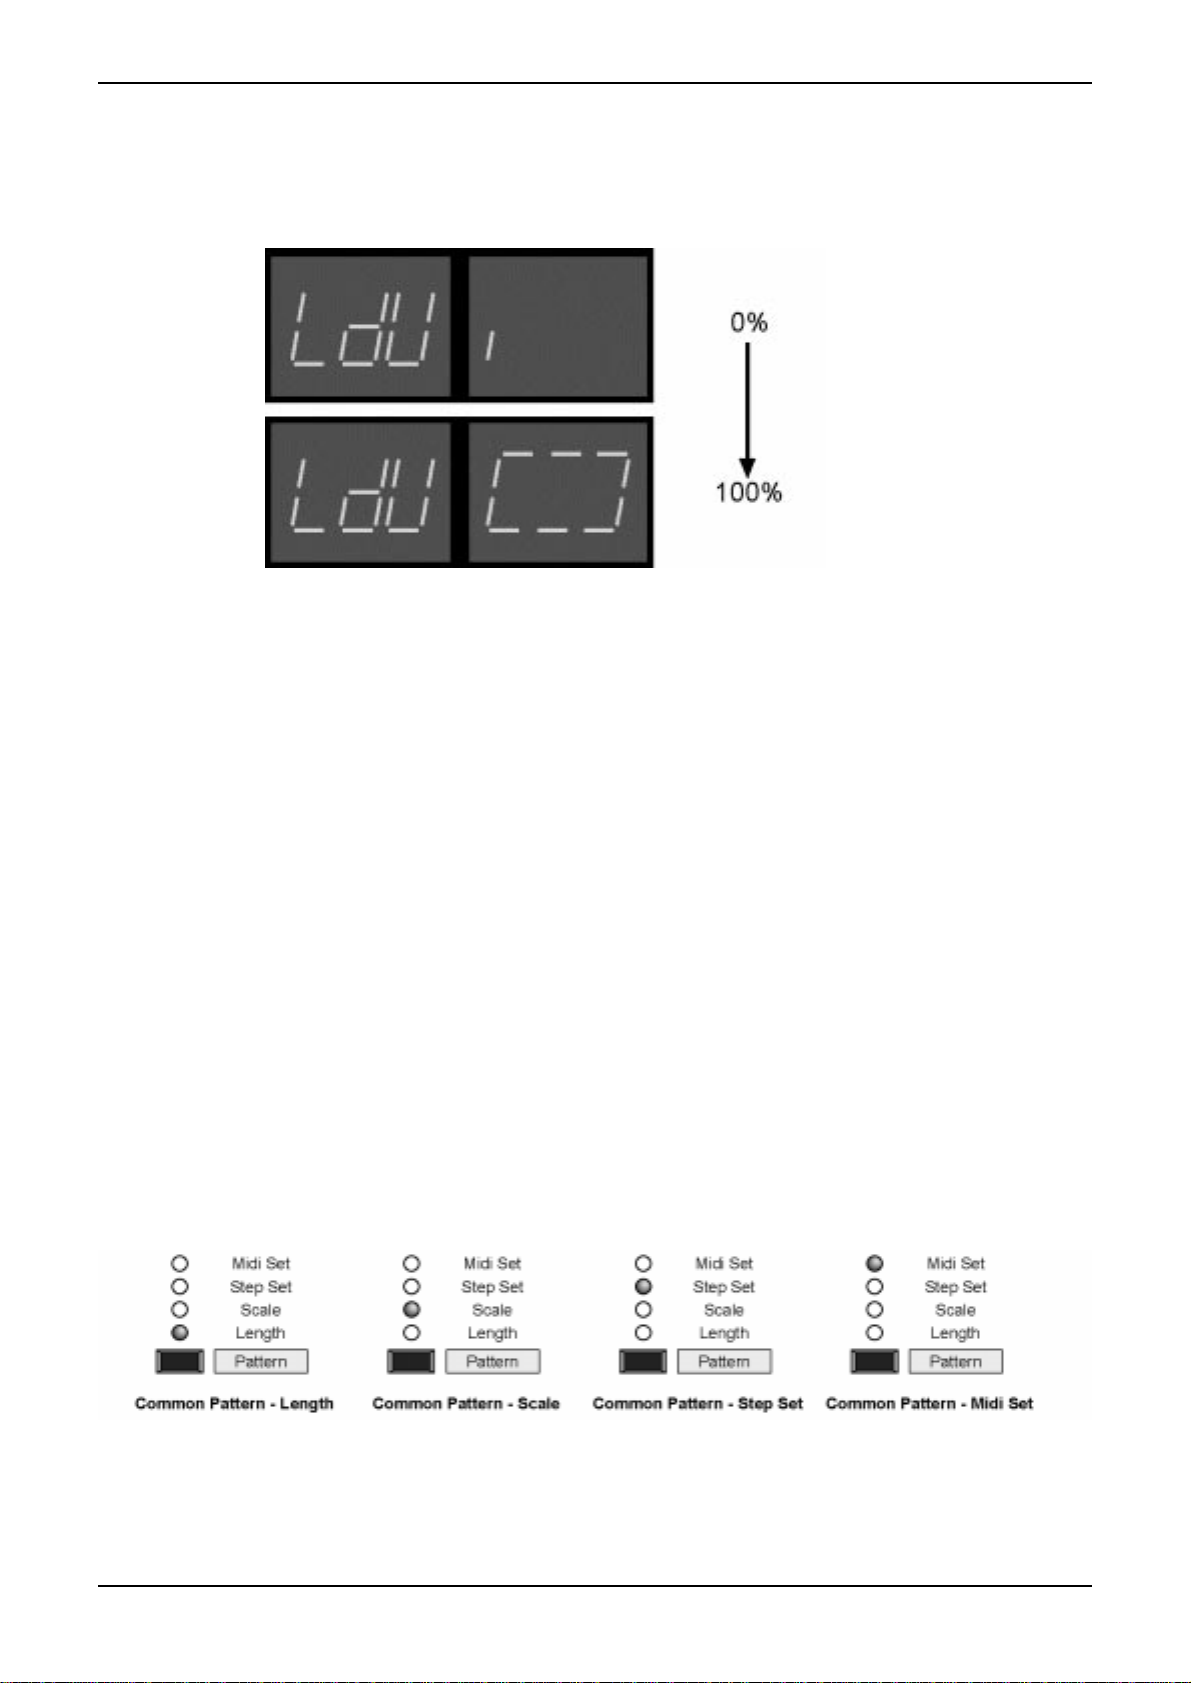
3.a.Press the "Enter" button (step button 14) to start the MIDI dump. While the MIDI dump is sent (for about 9 seconds)
the left display reads "SdU" while the right display shows the progress. After sending the MIDI dump "Global" is exited
automatically.
b.Do not start the MIDI dump and exit "Global" by pressing the "Exit" button (step button 13).
19
3. Global
SQ16
Loading a MIDI dump into the SQ16
You can send dumps to the SQ16 as long as it is in stop mode (not playing). If the SQ16 receives a dump it verifies the data
integrity (dumps must sent back unchanged). If it is a valid dump the left display reads "LdU" while the right display shows the
progress.
A MIDI dump is always sent into the Edit Buffer. If you want to keep it in the SQ16 you need to explicitly store it into one of the
8 Blocks (see 3.5.4).
3.3. Common Pattern
Each pattern uses individual MIDI Set and Step Set assignments and individual settings for Pattern Length and Pattern Scale
(see 4.5). The Common Pattern function is useful for assigning the same MIDI Set or Step Set to each Pattern or to make the
same settings for Pattern Length or Pattern Scale for all patterns.
Example: You have used different lengths for your patterns but now want all Patterns to have a length of 16 steps. Activate
Common Pattern and set as a common value for all Patterns the length to 16 steps (the individual length settings are still there
but no longer active; the Common Pattern setting overrides them). If you at a later point want to use the individual lengths
again you simply need to disable the Common Pattern length (in our case: 16 steps).
Editing Common Pattern settings:
Editing those settings means: Individually activating or deactivating Common Pattern settings for Length, Scale, MIDI Set and
Step Set and - if necessary - setting the desired values.
• Common Pattern not active; Patterns use individual pattern settings
• Common Pattern active; Patterns use Common Pattern settings
1.Activate Global - Common Pattern
2.Selecting the Pattern setting Length, Scale, MIDI Set or Step Set you want to make Common Pattern settings for. Press
Common Pattern button (step button 3) until the desired setting is active.
20
3. Global
SQ16
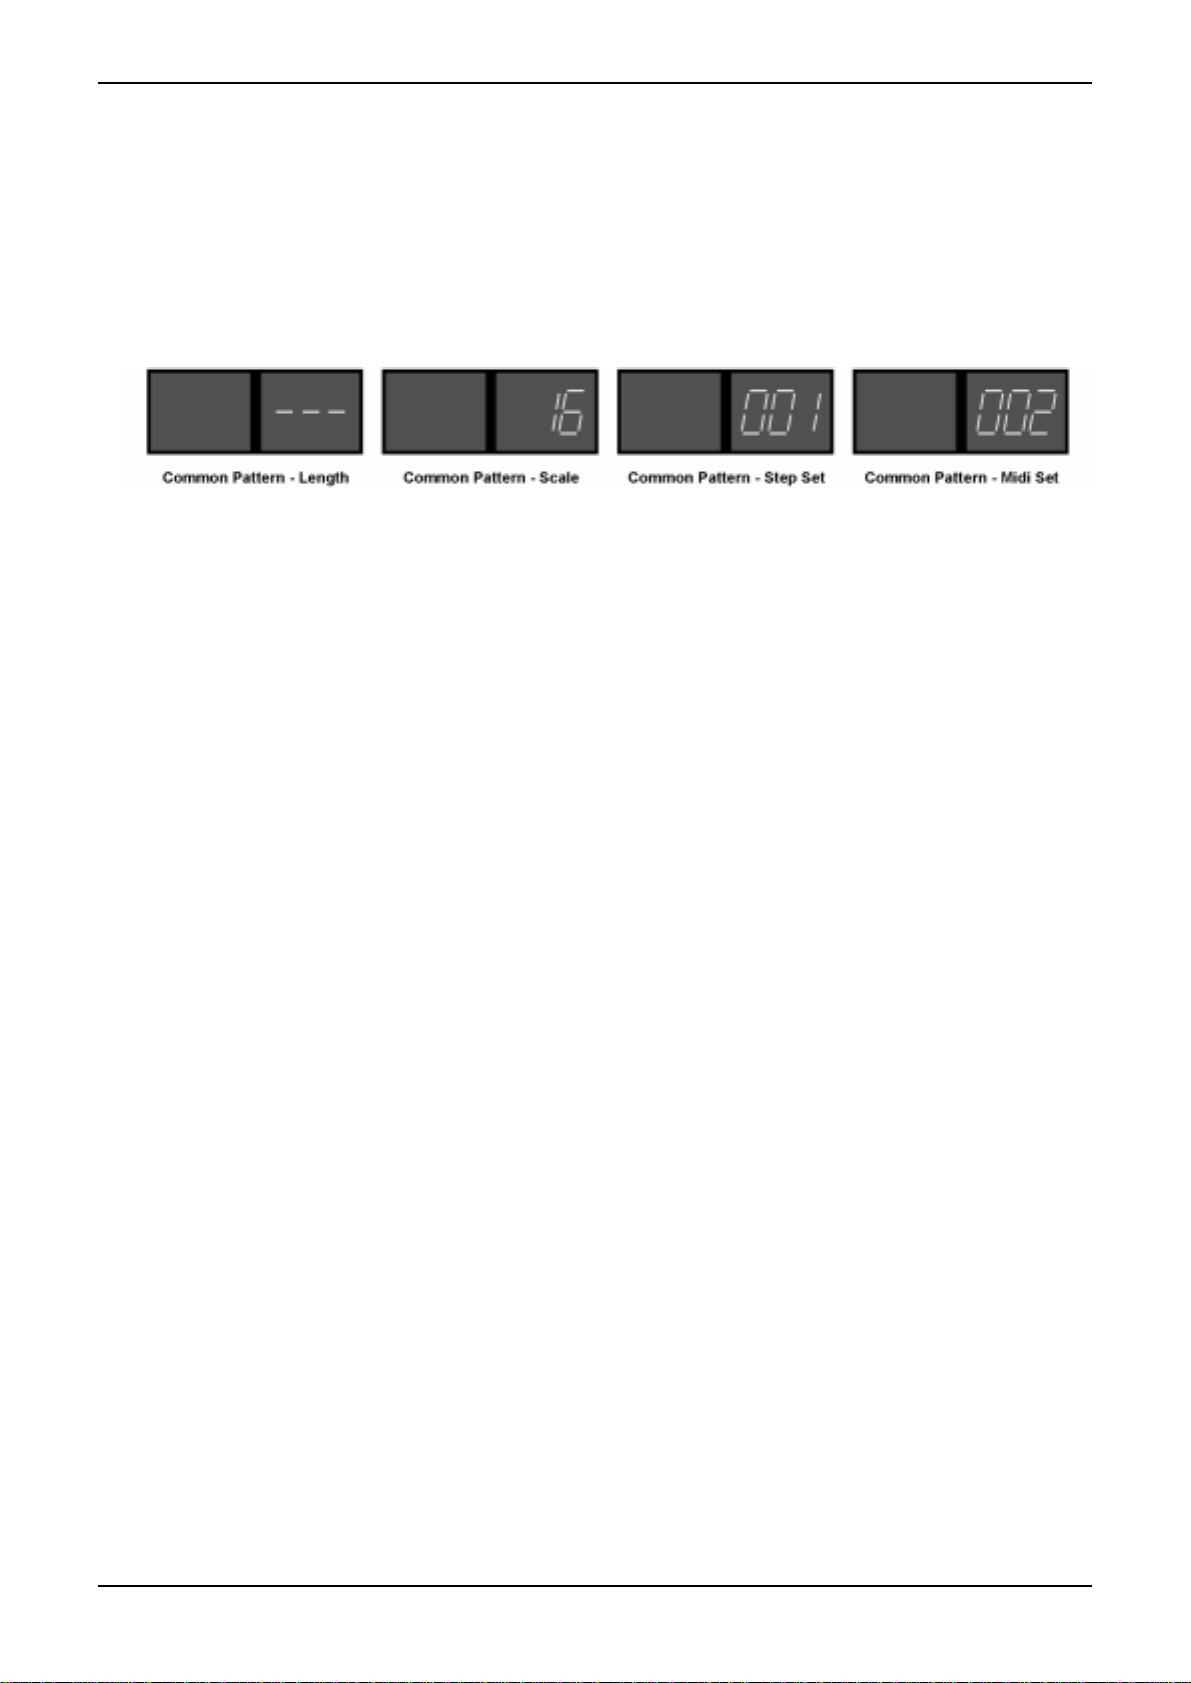
3.Edit with the up/down buttons (step buttons 11 and 12) the setting. Example: Pattern length - if the right display reads "-
--" Common Pattern is not active; the Patterns use their individual settings. If the display reads 001...016 Common Pat-
tern is active and all Patterns use the displayed Pattern Length. The following settings are possible:
• Length:001...016 (Common Pattern active) or "---" (Common Pattern not active)
• Scale:1, 2, 4, 8, 16, 32 (Common Pattern active) or "---" (Common Pattern not active)
• Step Set:001...016 (Common Pattern active) or "---" (Common Pattern not active)
• MIDI Set:001...016 (Common Pattern active) or "---" (Common Pattern not active)
4.Repeat step 2 and 3 to change other Common Pattern settings or press "Exit" (step button 13) to leave Global.
Example:
• patterns use individual length settings.
• All patterns use Scale value 16.
• All patterns use Step Set 1 and MIDI Set 2.
3.4. Clock Source, Clock out On/Off, Autostart On/Off
Those settings control the MIDI-synchronization to other sequencers/drum computers and are common to patterns, chains
and Songs.
• Clock Source - Autostart On/Off
Clock Source IC: The SQ16 always uses its internal clock regardless if it is started internally (via Start/Stop/Continue
buttons) or externally (via Start/Continue message). External start is only possible if Autostart is set to On (if Autostart is
set to off no external starting is possible).
Clock Source IEC: The SQ16 uses its internal clock if it is started internally (via Start/Stop/Continue buttons). When
started externally the external MIDI clock is used for synchronization. External start is always possible - regardless of
the Autostart setting.
• Clock OUT On/Off
This setting determines if after an internal start of the SQ16 (via Start/Stop/Continue buttons) MIDI clocks are being sent
(Clock out=On) or not (Clock OUT=Off). Regardless of this setting the SQ16 still sends the appropriate MIDI message
for each internal Start/Stop/Continue.
Table of contents


