Mamas & Papas horizons dresser User manual

instructions
horizons dresser
IMPORTANT: Please read instructions carefully
and keep for future reference
FR019DC: V1/06/05
Horizons Dresser V1 30/6/05 08:36 am Page 1
Before assembling your Horizons dresser...
Unpack all wooden components / fittings and identify them against the fittings and components lists.
Do not discard any packaging until you are certain you have all the correct panels and fittings.
If any items are damaged or missing, please contact your retailer or Mamas & Papas on 0870 8307700.
Allow plenty of time and space when beginning the construction of your dresser. The construction of this
piece of furniture requires two people.
HORIZONS DRESSER
THESE INSTRUCTIONS ARE IMPORTANT. PLEASE READ THEM CAREFULLY AND RETAIN FOR FUTURE REFERENCE.
- 2 -
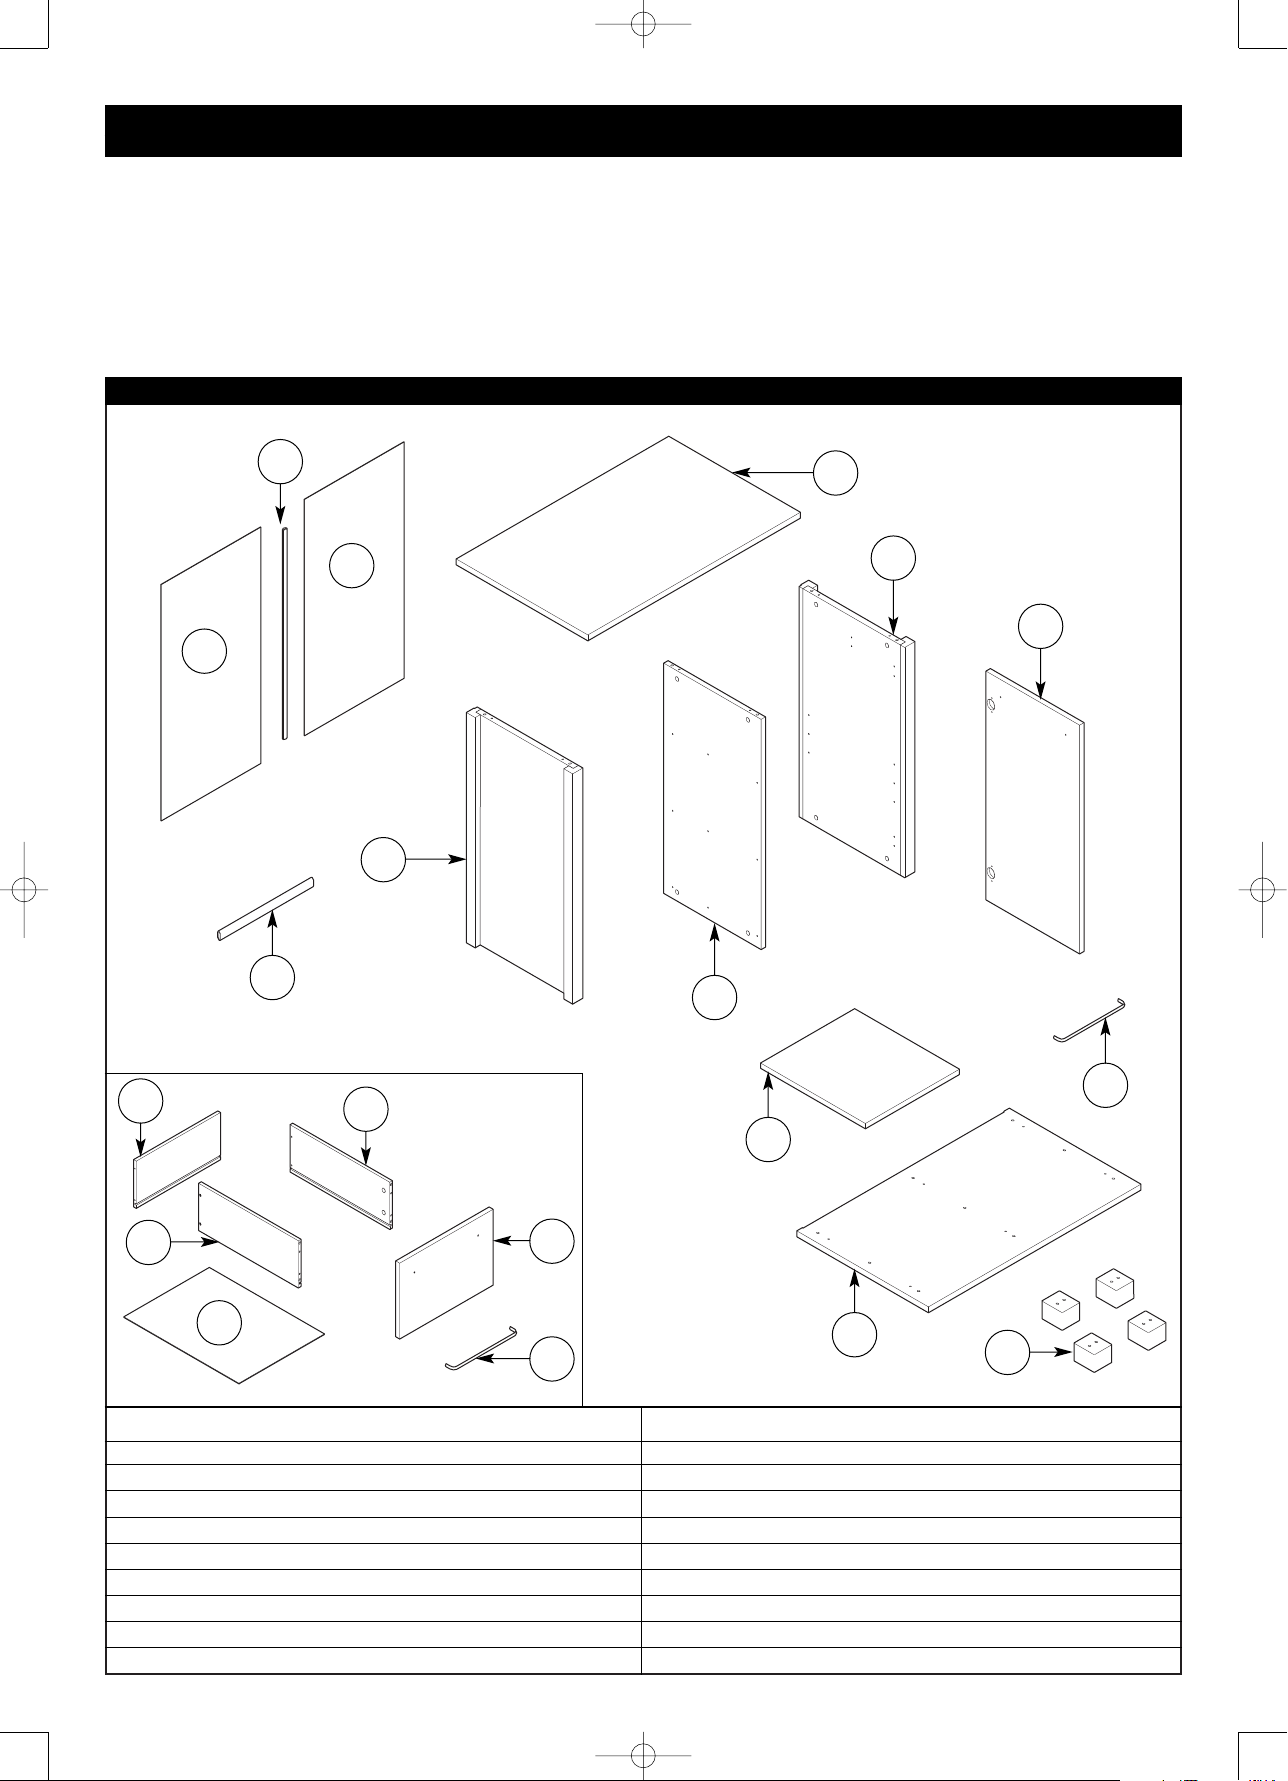
WOODEN COMPONENTS
7
9
10
Item Name Part no. Qty
1 Drawer left side --- 3
2 Drawer right side --- 3
3 Drawer back --- 3
4Drawer base --- 3
5Drawer front --- 3
6 Handle --- 4
7 Feet --- 4
8 Base --- 1
9 Left side panel --- 1
Item Name Part no. Qty
10 Right side panel --- 1
11 Middle panel --- 1
12 Top --- 1
13 Back panels --- 2
14 H-section --- 1
15 Shelf --- 1
16 Door --- 1
17 Hanger rail --- 1
12
11
8
6
16
5
2
4
1
33 x Drawers
14
6
13
13
15
17
Horizons Dresser V1 30/6/05 08:36 am Page 2

- 3 -
B x 34
Dowels
FITTINGS
Ox 2
Hinge plates
E x 24
Cam studs
C x 12
Drawer Cams
Gx 26
Assembly screws
Fx8
Handle screws
Kx 12
Carcass cams
Ix4
Feet bolts
M x 18
Carcass runner screws
Jx4
Plastic feet
Hx 6
Drawer runners (left and right hand versions)
Part no. 0000---00000
Lx 6
Carcass runners (left and right hand versions)
Part no. 0000---00000
Nx2
Hanger cups
Ax1
Glue
D x 12
Drawer screws
Fittings pack part no. 0000---00000
Sx1
Wall strap screw
Tx1
Washer
Q x 20
Nails
Rx1
Wall strap
Px 4
Shelf studs
Ux2
Hinge arms
Horizons Dresser V1 30/6/05 08:36 am Page 3

11mm
STEP 1
Assembling the four
dresser drawers:
Fit four dowels (B) into
the outside holes in the
left and right drawer
sides (1/2).
You may need to gently
tap the dowels in using a
small hammer.
Before fitting the the
drawer cams (C) ensure
that you have the correct
ones. The drawer cams
are shorter than the
carcass cams (K)
Slot four drawer cams
(C) into the large holes
on the inside faces of
the two drawer sides.
GLUING THE DOWELS
When fitting the dowels
(B) place a small amount
of glue (A) in the holes
before pushing them in.
Any excess glue should
be wiped away
immediately using a
damp cloth.
- 4 -
1
A
B
2
C
TOOLS
Cross-head Screwdrivers
To fit: D, E, F, G, M, O, & S. Hammer
To be used for: B, J & Q. Flat-head Screwdriver
To fit: C, I, & K.
B
Horizons Dresser V1 30/6/05 08:36 am Page 4

STEP 3
Slot the drawer base (4)
into the grooves in the
two drawer sides and
push it into the groove
in the drawer back.
Ensure the drawer base
is fully inserted into the
groove in the drawer
back.
STEP 2
Align the holes in the
backs of the drawer side
(1/2) align with the
holes in the ends of the
drawer back (3).
Check that the grooves
in the panels are aligned,
see diagram.
Fasten the panels
together with four
drawer screws (D) using
a cross-head screwdriver.
- 5 -
3
1
4
2
D
Horizons Dresser V1 30/6/05 08:36 am Page 5

STEP 5
Slot the drawer front
onto the two drawer
sides, ensuring that the
base slots into the
groove in the drawer
front.
Fasten the drawer cams
(C) in the drawer sides
by turning them
clockwise with a flat-
head screwdriver until
they are tight.
STEP 4
Screw four cam studs
(E) into the small holes
in the back of the
drawer front (5) using a
cross-head screwdriver,
see diagram.
Screw the handle (6) to
the drawer front using
two handle screws (F)
and a cross-head
screwdriver.
- 6 -
5
F
E
5
C
6
Horizons Dresser V1 30/6/05 08:36 am Page 6

- 7 -
STEP 7
Assembling the
dresser carcass:
Insert four dowels (B)
into the holes drilled half
way through the feet
(7). Do not fit the
dowels into the holes
that go all the way
through the feet.
Slot the dowels onto the
underside of the base
(8) and fasten into place
using the foot bolts (I)
and a flat-head
screwdriver.
Slot the plastic feet (J)
into the holes in the
feet. You may need to
gently tap them in with
a light hammer.
STEP 6
Attach the drawer
runners (H) to the sides
of the drawers using six
assembly screws (G).
Ensure the runners are
flush with the drawer
front before fixing them
in position and that the
wheel end of the runners
are facing the back of
the drawer, see diagram.
Repeats steps 1 to 6 for
the remaining drawers.
H
G
8
B
I
J
7
Horizons Dresser V1 30/6/05 08:36 am Page 7

STEP 9
Select the left side panel
(9).
Insert six dowels (B) into
the top and bottom
edges of right side
panel. You may need to
tap them in with a light
hammer.
Insert four carcass cams
(K) into the inside face
of the right side panel.
Ensure that the arrows
on the heads of the
cams face the
connecting holes.
STEP 8
Turn the base over so
that it rests on its feet.
Screw six cam studs (E)
into the top of the base
using a cross-head
screwdriver.
- 8 -
E
K
11
B
Horizons Dresser V1 30/6/05 08:36 am Page 8

STEP 10
Attach the top two
carcass runners (L) to
the left side panel (9)
using six carcass runner
screws (M) and a cross-
head screwdriver.
Check with the diagram
for the correct
orientation of the
carcass runners and
which screw holes to
use.
- 9 -
STEP 11
Attach the left side panel
(9) to the base (8).
Slot the dowels and
cams into the
appropriate holes in the
side panel and base.
Tighten the two cams in
the bottom of the left
side panel by turning
them clockwise using a
flat-head screwdriver.
M
9
L
9
8
Horizons Dresser V1 30/6/05 08:36 am Page 9

STEP 12
Attach the bottom
carcass runner (L) to the
assembled left side panel
and base three carcass
runner screws (M) and a
cross-head screwdriver.
- 10 -
M
STEP 13
Select the middle panel
(11).
Insert six dowels (B) into
the top and bottom
edges of middle panel.
You may need to tap
them in with a light
hammer.
Insert four carcass cams
(K) into the large holes
in the middle panel.
Ensure that the arrows
on the heads of the
cams face the
connecting holes.
11
B
K
L
Horizons Dresser V1 30/6/05 08:36 am Page 10

- 11 -
STEP 14
Attach the top two
carcass runners (L) to
the middle panel (11)
using six carcass runner
screws (M) and a cross-
head screwdriver.
Check with the diagram
for the correct
orientation of the
runners and which screw
holes to use.
STEP 15
Turn the middle panel
(11) over and attach one
of the hanger cups (N)
to the top middle set of
pilot holes using two
assembly screws (G) and
a cross-head screwdriver,
see diagram.
Select one of the three
height positions that you
want to fit the shelf at.
Fit two of the shelf
studs (P) into the
selected positions.
You may need to use a
light hammer to fully
insert the shelf studs.
The position of the shelf
can be altered after
completion.
M
G
L
11
N
P
11
Horizons Dresser V1 30/6/05 08:36 am Page 11

- 12 -
STEP 16
Attach the middle panel
(11) to the base (8).
Slot the dowels and
cams into the
appropriate holes in the
middle panel and base.
Tighten the cams by
turning them clockwise
using a flat-head
screwdriver.
STEP 17
Attach the bottom
carcass runner (L) to the
assembled middle panel
using three carcass
runner screws (M) and a
cross-head screwdriver.
11
M
L
Horizons Dresser V1 30/6/05 08:36 am Page 12

- 13 -
STEP 18
Select the right side
panel (10).
Insert six dowels (B) into
the top and bottom
edges of right side
panel. You may need to
tap them in with a light
hammer.
Insert four carcass cams
(K) into the inside face
of the right side panel.
Ensure that the arrows
on the heads of the
cams face the
connecting holes.
STEP 19
Attach the remaining
hanger cup (N) to the
top middle set of pilot
holes using two
assembly screws (G) and
a cross-head screwdriver,
see diagram.
Fit the remaining shelf
studs (P) into the same
height position as used
on the middle panel. You
may need to use a light
hammer to fully insert
the shelf studs.
Attach the two hinge
plates (O) to the front
edge of the right side
panel using a cross-head
screwdriver.
10
K
O
B
P
N
G
Horizons Dresser V1 30/6/05 08:36 am Page 13

STEP 21
Screw six cam studs (E)
into the underside of the
top (12) using a cross-
head screwdriver.
- 14 -
STEP 20
Attach the right side
panel (10) to the base
(8).
Slot the dowels and
cams into the
appropriate holes in the
side panel and base.
Tighten the cams by
turning them clockwise
using a flat-head
screwdriver
E
12
8
10
Horizons Dresser V1 30/6/05 08:36 am Page 14

Turn the top (12) over
and fit it onto the two
side and the middle
panels.
Slot the dowels and
cams into the
appropriate holes in the
side panel and base.
Tighten the cams by
turning them clockwise
using a flat-head
screwdriver.
STEP 22
- 15 -
STEP 23
Before attaching the
back panels you must
check that the dresser is
square. To do this, lay
the dresser down on its
front then measure from
the bottom corner of
one side panel to the top
corner of the opposite
side panel Ato A, see
diagram.
Now measure the
opposite diagonal Bto
B. If the measurements
are unequal then the
dresser is not square.
To square the dresser,
gently push the top
corner of the longest
diagonal towards the
shortest top corner and
re-measure, continue
until equal (a 2-3mm
difference is acceptable).
12
Horizons Dresser V1 30/6/05 08:36 am Page 15

Slot the two back panels
(13) into the H-section
(14) and place them into
the recesses in the side
panels, top and base.
STEP 24
- 16 -
STEP 25
Fasten the back panels
to the dresser using the
nails (Q) and a light
hammer.
13
13
14
Q
Horizons Dresser V1 30/6/05 08:36 am Page 16

Secure one end of the
wall strap to the wall.
See page 20 for more
information.
Thread the other end of
the wall strap (R)
through the gap
between the top of the
dresser and the back
panels.
Working from the front
of the dresser, fix the
wall strap to the
underside of the top
using the wall strap
screw (S) and washer (T)
supplied. Thread the
screw through the
washer and then through
the end of the wall strap
and into the pilot hole in
the underside of the top.
Do not fix the wall
strap to any other
component.
STEP 26
- 17 -
STEP 27
Attach the two hinge
arms (U) to the doors
(16) using four assembly
screws (G) and a cross-
head screwdriver.
Attach the handle (6) to
the door using the two
handle screws (F) and a
cross-head screwdriver.
R
T
S
F
G
U
16
6
Horizons Dresser V1 30/6/05 08:36 am Page 17

A
Slot the shelf (15) onto
the shelf studs, push the
shelf against the back
panel of the dresser.
Slot the hanger rail (17)
into the hanger rail cups.
Attach the hinge arms on
the door (16) to the
hinge plates on the right
side panel.
It is easiest to fit the top
hinge first then the
bottom.
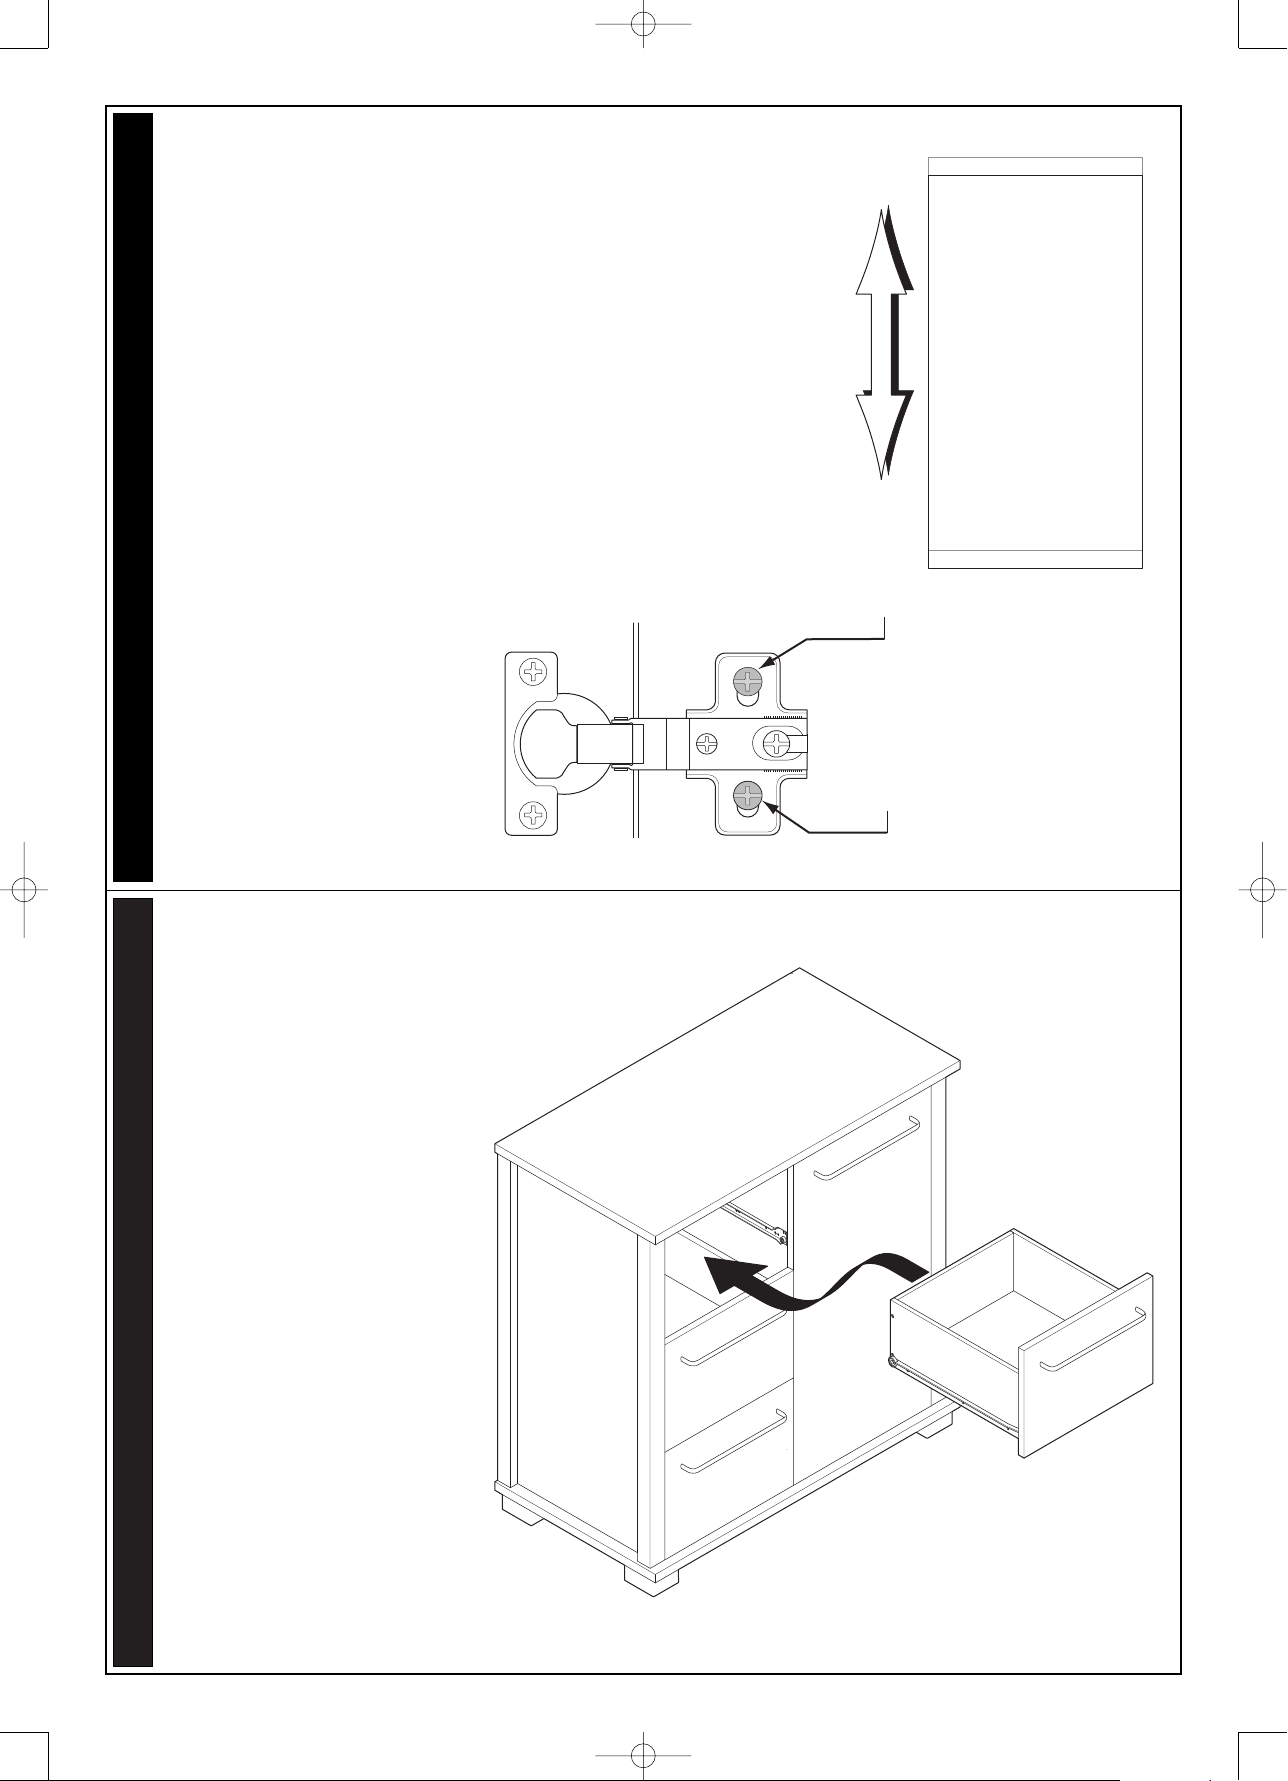
Loosen screw ‘A’ on the
hinge plate and slide it
into the hole in the end of
the hinge arm. Push the
hinge along the hinge
bracket until the head of
screw ‘A’ is clear of the
hole in the hinge arm.
After sliding both of the
hinge arms onto the hinge
plates, tighten both of
the ‘A’ screws. Now
gently close the door.
STEP 28
- 18 -
A
B
STEP 29
Adjusting the angle of
the door:
Turn screw ‘B’ either
clockwise or anti-
clockwise until the door
looks vertical.
You may need to loosen
screw ‘A’ before turning
screw ‘B’.
Always ensure screw ‘A’
is fully tightened before
using the dresser.
15
17
16
Horizons Dresser V1 30/6/05 08:36 am Page 18
C
C
Adjusting the height of
the door:
Loosen screws ‘C’ on
both of the hinge plates.
Lift or lower the door
into the desired position
and re-tighten all of the
screws.
STEP 30
- 19 -
STEP 31
Slot the runners on the
drawers onto the
runners inside the
dresser.
Push the drawers as far
into the dresser as they
will go.
The dresser is now fully
assembled, check that all
of the fittings are fully
tightened before use.
Horizons Dresser V1 30/6/05 08:36 am Page 19

1. WARNING: Never leave your child unattended. The safety of your child is your responsibility.
2. Before use, ensure the dresser is on a stable, level surface.
3. Do not allow children to climb on the dresser.
4. Never use the dresser if any parts are broken or missing.
5. Never pivot or drag the dresser on its feet, the dresser must always be lifted by at least two people when moved.
6. Do not place the dresser in the near vicinity of open fires or other sources of strong heat, such as electric or gas fires.
7. Always leave the dresser clean and dry. Wipe away any spillage straight away. The dresser can be cleaned with a
damp cloth. Never use abrasive, bleach or strong detergents.
8. Check regularly that all fittings and screws are correctly tightened and are not damaged.
INSTRUCTIONS FOR SAFE USE OF THE WALL STRAP
1THE WALL STRAP IS ONLY INTENDED TO BE USED WITH THE MAMAS & PAPAS PRODUCT THAT IT IS
SUPPLIED WITH.
2 Never attempt to modify or change the wall strap in any way. Never use any other fittings for attaching the
wall strap to your furniture than those supplied.
3 Never use the screw provided to attach the wall strap to the wall.
NO WALL ATTACHMENT FITTINGS ARE SUPPLIED. This is because the type of fittings required to attach the
wall strap to the chosen wall is determined by the walls composition.
If you are in any doubt about the correct type of fittings to use when attaching your wall strap, consult
a professional before attempting to fix it to the wall.
4The wall strap must not be used to replace any other fitting supplied with your piece of furniture.
5 Furniture falling over is generally due to the surface the furniture is placed on. A warped floor or wall-to-wall
carpeting will enable the furniture to rock, so greatly increasing the potential for the furniture to fall. If the
furniture is placed on a flat level wood or tiled floor the risk is reduced, but we still recommend the wall
strap is fitted.
INSTRUCTIONS FOR SAFE USE & MAINTENANCE
ALL OUR PRODUCTS ARE MADE FROM THE FINEST QUALITY MATERIALS
AND ARE MANUFACTURED UNDER THE STRICTEST QUALITY CONTROLS
We guarantee all our products or part thereof, for a period of six months from the date of delivery to the consumer
against faulty manufacture. This guarantee is not effective against damage caused as a result
of incorrect usage of the product or accidental damage. This in no way affects your statutory rights.
Due to constant updating and improvements, some components may occasionally differ slightly from the diagrams
shown in these instructions. Any spare components should be thrown away after you have fully constructed your
product. We reserve the right to change the specifications of any piece of furniture without prior notice.
- 20 -
AFTER SALES SERVICE: If you need assistance, spare parts or you are unhappy with any of the
goods please contact Customer Services on: 0870 8307700,
or e-mail us at: customer
Visit our website at www.mamasandpapas.com for the latest product information.
GUARANTEE
To validate this guarantee, fill in this coupon and return to: Mamas & Papas, Colne Bridge Rd, Huddersfield, HD5 0RH
Alternatively, call our Guarantee Registration Line on: 0870 8307700 or visit our website: www.mamasandpapas.com
Title (Mr/Mrs/Miss/Ms) ................ First name ....................................................................... Surname..............................................................
Address .............................................................................................................................................................................................................
............................................................................................................................................ Postcode ..............................................................
Daytime Tel. No. .................................................................. Email....................................................................................................................
Baby’s due date/date of birth ............................................................................................................................................................................
Product purchased Horizons Dresser Purchase date ...................................................... Price ..............................................................
If you would like to receive further information regarding new products, promotions and special offers from Mamas & Papas please tick the boxes indicating your
preferred method(s) of contact. Post ; Email .
If you would like to receive information from carefully selected 3rd parties please tick the boxes indicating your preferred method(s) of contact. Post ; Email .
Horizons Dresser V1 30/6/05 08:36 am Page 20
Other Mamas & Papas Indoor Furnishing manuals


Popular Indoor Furnishing manuals by other brands

Regency
Regency LWMS3015 Assembly instructions

Furniture of America
Furniture of America CM7751C Assembly instructions

Safavieh Furniture
Safavieh Furniture Estella CNS5731 manual

PLACES OF STYLE
PLACES OF STYLE Ovalfuss Assembly instruction

Trasman
Trasman 1138 Bo1 Assembly manual

Costway
Costway JV10856 manual


