Mamas & Papas Ocean tallboy User manual

instructions
ocean tallboy
FR38TB:V1/04/08
© Mamas & Papas (Holdings) Ltd. 2008
IMPORTANT: Please read instructions carefully
and keep for future reference
IMPORTANT: THE
ASSEMBLY OF THIS
PRODUCT REQUIRES
TWO PEOPLE.
IMPORTANT: PLEASE READ
THESE INSTRUCTIONS
CAREFULLY BEFORE
STARTING TO ASSEMBLE
YOUR PRODUCT.
Ocean Tallboy (print) V1.indd 1 30/7/08 10:40:26

Components
Item Name Part no. Qty
1 Left side panel 000000000000 1
2 Right side panel 000000000000 1
3 Bottom front rail 000000000000 1
4 Top front rail 000000000000 1
5 Rails 000000000000 3
6 Back panel 000000000000 1
7 Top 000000000000 1
Item Name Part no. Qty
8 Top drawer front 000000000000 1
9 Drawer fronts 000000000000 4
10 Handles 000000000000 5
11 Left drawer sides 000000000000 5
12 Right drawer side 000000000000 5
13 Drawer bases 000000000000 5
14 Drawer backs 000000000000 5
Before assembling your product...
Do not discard any packaging until you are certain you have all the correct components and fittings.
If any items are damaged or missing, please contact your retailer or Mamas & Papas on +44 (0)845 268
2000. Allow plenty of time and space when beginning the construction of your product.
oCean tallboy
F x 24
Cam stud
-2-
C x 10
Bolts
D x 10
Rail inserts
E x 1
Allen key
G x 24
Cams
H x 10
Handle screws
Fittings
I x 20
Long screws
J x 1
Wall strap
16
7
2
5
4
3
14
12
8
11
10
13
9
A x 10
Drawer runners (left & right hand versions)
B x 20
Runner screws
K x 1
Screwdriver
Ocean Tallboy (print) V1.indd 2 30/7/08 10:40:29

tools
-3-
X-head screwdriver
IMPORTANT: The use of powered screwdrivers is not recommended for assembling this product.
step 1step 2
Attach the ten runners (A)
to the left (1) and right
(2) side panels using the
twenty runner screws (B)
and a X-head screwdriver.
Note: There are five
left and five right hand
runners, see diagram for
the correct orientation.
Slot one of the bolts (C)
through the hole in the
middle of one of the rail
inserts (D).
Slot the bolt and insert
into the recess in the end
of the bottom front rail
(3) (this has the badge on
it).
Slot the rail onto the right
side panel (2).
Tighten the bolt into the
side panel using the allen
key (E).
C
a
D
1
e
3
2
b
2
Ocean Tallboy (print) V1.indd 3 30/7/08 10:40:32

-4-
step 3step 4
Attach one of the rails (5)
to the side panel using
a bolt (C) and rail insert
(D).
Fasten the bolt into the
side panel using the allen
key (E).
Attach the top front rail
(4) to the side panel using
a bolt (C) and rail insert
(D).
Fasten the bolt into the
side panel using the allen
key (E).
C
D
e
4
C
D
e
5
Ocean Tallboy (print) V1.indd 4 30/7/08 10:40:35

step 5step 6
Attach one of the rails (5)
to the side panel using
a bolt (C) and rail insert
(D).
Ensure that the groove in
the back panel is aligned
with the groove back leg
of the side panel.
Fasten the bolt into the
side panel using the allen
key (E).
Attach one of the rails (5)
to the side panel using
a bolt (C) and rail insert
(D).
Ensure that the groove in
the back panel is aligned
with the groove back leg
of the side panel.
Fasten the bolt into the
side panel using the allen
key (E).
-5-
5
5
C
D
e
C
D
e
Ocean Tallboy (print) V1.indd 5 30/7/08 10:40:37
step 7step 8
Slot the back panel (6)
into the grooves in the
top and bottom back rail.
Slide the back panel down
the rails into the groove in
the side panel.
With the help of another
person, slot the right
side panel (1) onto the
assembled section.
Fasten the rails to the
right side panel using five
bolts (C) and inserts (D).
Use the allen key (E) to
tighten the bolts into the
side panel.
-6-
1
D
C
e
6
Ocean Tallboy (print) V1.indd 6 30/7/08 10:40:39

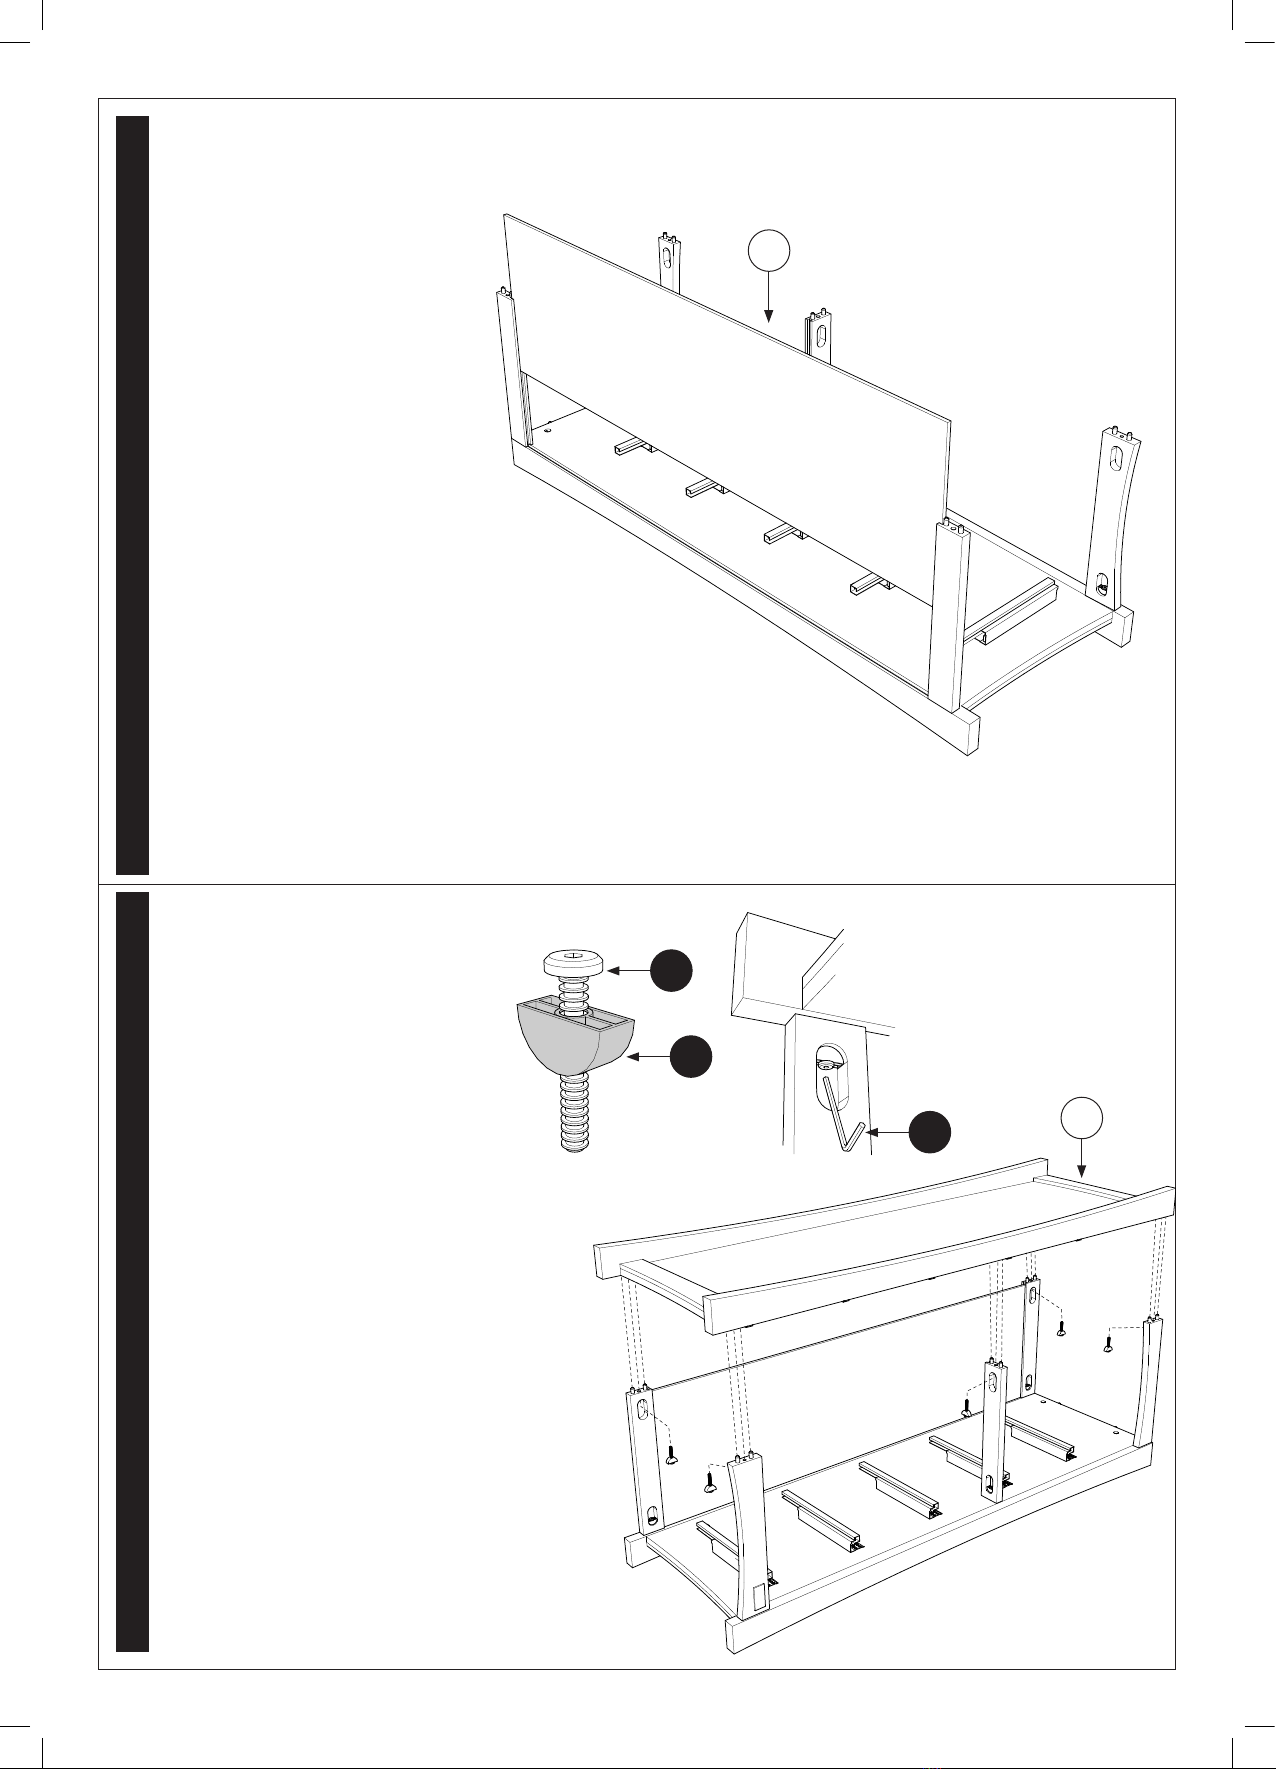
step 9step 10
With the help of another
person, lift the tallboy
upright.
Screw four cam studs (F)
into the top (7) using a
X-head screwdriver.
-7-
F
7
Ocean Tallboy (print) V1.indd 7 30/7/08 10:40:42

step 11step 12
Slot the top onto the
top of the assembled
sections.
Insert four cams (G)
into the holes in the side
panels.
Turn the cams clockwise
with the screwdriver (K).
Screw four cam studs
(F) into the top drawer
front (8) and sixteen
into the four drawer
fronts (9) using a X-head
screwdriver.
-8-
9
F
8
g
Ocean Tallboy (print) V1.indd 8 30/7/08 10:40:44

step 13step 14
Attach the handles (10)
to the drawer front using
ten handle screws (H) and
X-head screwdriver.
Slot the left (11) and
right (12) drawer sides
onto the drawer fronts as
shown in the diagram.
Insert twenty cams
(G) into the holes in
the drawer sides and
turn clockwise with the
screwdriver (K) to lock.
-9-
H
10
12
11
g
Ocean Tallboy (print) V1.indd 9 30/7/08 10:40:47

step 15step 16
Slot the five base panels
(13) into the grooves in
the drawer sides.
Push the base along the
grooves and into the
grooves in the drawer
front.
Slot the drawer backs
(14) onto the assembled
sections.
Insert twenty long screws
(I) into the holes in the
drawer sides.
Tighten the screws into
the drawer backs using a
X-head screwdriver.
All five drawers are now
fully assembled.
-10-
i
14
13
13
Ocean Tallboy (print) V1.indd 10 30/7/08 10:40:50

step 17step 18
Extend the drawer
runners from inside the
tallboy and lower the
drawers onto them.
Slide the drawers
backwards whilst holding
the runners in place so
that the hooks on the
back of the runner slot
into the holes in the back
of the drawers.
Slot the pins on the front
of the runners into the
holes in the undersides of
the drawers sides.
Slide the drawers into the
tallboy.
Attach the wall strap (J)
to the back of the top.
Slot the screw through
the washer and then
through one end of the
wall strap.
Tighten the screw into
back of the top using a X-
head screwdriver.
The tallboy is now fully
assembled.
-11-
J
Ocean Tallboy (print) V1.indd 11 30/7/08 10:40:52

-12-
After sales Service: If you need assistance, spare parts or you are unhappy with any aspect of the goods please
Visit our website at www.mamasandpapas.com for the latest product information.
instRUCtions FoR saFe Use & maintenanCe
WARNING: DO NOT LEAVE YOUR CHILD UNATTENDED. The safety of your child is your•
responsibility.
Before use, ensure the tallboy is on a stable, level surface.•
Do not allow children to climb on the tallboy.•
Never use the tallboy if any parts are broken or missing.•
Never pivot or drag the tallboy, the tallboy must always be lifted by at least two people•
when moved.
Do not place the tallboy in the near vicinity of open fires or other sources of strong heat,•
such as electric or gas fires.
Always leave the tallboy clean and dry. Wipe away any spillage straight away. The tallboy•
can be cleaned with a damp cloth. Never use abrasive, bleach or strong detergents.
Check regularly that all fittings and screws are correctly tightened and are not•
damaged. Loose screws can pinch parts of the body and clothing resulting in the risk of
strangulation.
Due to constant updating and improvements, some components may occasionally differ slightly from the diagrams shown in
these instructions. We reserve the right to change the specifications of any product without prior notice.
Wall stRap inFoRmation
The wall strap is only intended to be used with the Mamas and Papas product that it is
supplied with.
Never attempt to modify or change the wall attachment strap in any way. Never use any
other fittings for attaching the strap to your furniture than those supplied.
Never use the screw provided to attach the strap to the wall. No wall attachment fittings are
supplied. This is because the type of fittings required to attach the strap to the chosen wall
is determined by the walls composition. If you are in any doubt about the correct type of
fittings to use, consult a professional before attempting to attach the strap to the wall.
The wall strap must not be used to replace any other fitting supplied with your piece of
furniture.
Furniture falling over is generally due to the surface the furniture is placed on. A warped
floor or wall-to-wall carpeting will enable the furniture to rock, so greatly increasing the
potential for the furniture to fall. If the furniture is placed on a flat level wood or tiled floor
the risk is reduced, but we still recommend the wall strap is fitted.
Ocean Tallboy (print) V1.indd 12 30/7/08 10:40:52
Other Mamas & Papas Indoor Furnishing manuals


Popular Indoor Furnishing manuals by other brands

CLUB RATTAN
CLUB RATTAN Harmony manual

Walker Edison
Walker Edison OWF54CFP Assembly instructions

Homelegance
Homelegance 2042-16 Assembly instruction

IKEA
IKEA GREVBACK TV UNIT 35 7/8X18 1/2" instructions

Furniture of America
Furniture of America CM7134N Assembly instructions

Gilman Creek
Gilman Creek 1681431 Assembly instructions


Studymate
Studymate SMANTRMBBK Assembly instructions

MEKA-BLOCK
MEKA-BLOCK K-319 quick start guide

Whittier Wood Furniture
Whittier Wood Furniture Ellison 2136ASTa Assembly instructions

Conrad
Conrad 75 50 07 operating manual

Costway
Costway HW67594 user manual

Tecnos
Tecnos ONDA 21061001 Assembly instructions