mangOH Red User manual

mangOH™ Red
Getting Started—WPx5xx +
Linux Dev Machine + CLI
41110481
Rev 2
Contents subject to change

mangOH Red Getting Started
Rev 2 8/23/17 2 41110481
Important
Notice Due to the nature of wireless communications, transmission and reception of data can
never be guaranteed. Data may be delayed, corrupted (i.e., have errors) or be totally
lost. Although significant delays or losses of data are rare when wireless devices such
as the Sierra Wireless modem are used in a normal manner with a well-constructed
network, the Sierra Wireless modem should not be used in situations where failure to
transmit or receive data could result in damage of any kind to the user or any other
party, including but not limited to personal injury, death, or loss of property. Sierra
Wireless accepts no responsibility for damages of any kind resulting from delays or
errors in data transmitted or received using the Sierra Wireless modem, or for failure
of the Sierra Wireless modem to transmit or receive such data.
Limitation of
Liability The information in this manual is subject to change without notice and does not
represent a commitment on the part of Sierra Wireless. SIERRA WIRELESS AND ITS
AFFILIATES SPECIFICALLY DISCLAIM LIABILITY FOR ANY AND ALL DIRECT,
INDIRECT, SPECIAL, GENERAL, INCIDENTAL, CONSEQUENTIAL, PUNITIVE OR
EXEMPLARY DAMAGES INCLUDING, BUT NOT LIMITED TO, LOSS OF PROFITS
OR REVENUE OR ANTICIPATED PROFITS OR REVENUE ARISING OUT OF THE
USE OR INABILITY TO USE ANY SIERRA WIRELESS PRODUCT, EVEN IF
SIERRA WIRELESS AND/OR ITS AFFILIATES HAS BEEN ADVISED OF THE
POSSIBILITY OF SUCH DAMAGES OR THEY ARE FORESEEABLE OR FOR
CLAIMS BY ANY THIRD PARTY.
Notwithstanding the foregoing, in no event shall Sierra Wireless and/or its affiliates
aggregate liability arising under or in connection with the Sierra Wireless product,
regardless of the number of events, occurrences, or claims giving rise to liability, be in
excess of the price paid by the purchaser for the Sierra Wireless product.
Patents This product may contain technology developed by or for Sierra Wireless Inc.
This document contains information which is proprietary to Sierra Wireless Inc. and is
licensed pursuant to Creative Commons Attribution 4.0 International License.
Document
details Title: mangOH Red Getting Started—WPx5xx + Linux Dev Machine + CLI
Author: Sierra Wireless
Source: http://mangoh.io/
Copyright © August 23, 2017 Sierra Wireless. Licensed under the Creative Commons Attribution
4.0 license, http://creativecommons.org/licenses/by/4.0/
Disclaimer Indicate any modifications made to the original document.
Trademarks mangOH™ and the mangOH logo are trademarks of Sierra Wireless.
Other trademarks are the property of their respective owners.

Preface
Rev 2 8/23/17 3 41110481
Revision
History
Revision
number Release date Changes
1August 2017 Document created

Rev 2 8/23/17 4 41110481
Contents
Getting Started . . . . . . . . . . . . . . . . . . . . . . . . . . . . . . . . . . . . . . . . . . . . . . . . . . . . . . . . . . . . 6
Minimum System Requirements . . . . . . . . . . . . . . . . . . . . . . . . . . . . . . . . . . . . . . . . . . . . . 6
Quick Start Contents . . . . . . . . . . . . . . . . . . . . . . . . . . . . . . . . . . . . . . . . . . . . . . . . . . . . . . 6
Before You Begin . . . . . . . . . . . . . . . . . . . . . . . . . . . . . . . . . . . . . . . . . . . . . . . . . . . . . . . . . . 8
Set Up Your mangOH Red Hardware. . . . . . . . . . . . . . . . . . . . . . . . . . . . . . . . . . . . . . . . . . . 9
mangOH Layout. . . . . . . . . . . . . . . . . . . . . . . . . . . . . . . . . . . . . . . . . . . . . . . . . . . . . . . . . . 9
Hardware Setup. . . . . . . . . . . . . . . . . . . . . . . . . . . . . . . . . . . . . . . . . . . . . . . . . . . . . . . . . 10
Prepare Your Linux Dev Machine For Legato Development. . . . . . . . . . . . . . . . . . . . . . . 17
Prepare Dev Machine For Application Development. . . . . . . . . . . . . . . . . . . . . . . . . . . . . 17
Build and Install the Development Environment . . . . . . . . . . . . . . . . . . . . . . . . . . . . . . . . 17
Prepare Your mangOH Red For Development . . . . . . . . . . . . . . . . . . . . . . . . . . . . . . . . . . 23
Build and Install Legato Platform and mangOH Red Platform on Target . . . . . . . . . . . . . 23
How to Update Module Firmware . . . . . . . . . . . . . . . . . . . . . . . . . . . . . . . . . . . . . . . . . . . 26
Connect To Mobile Networks. . . . . . . . . . . . . . . . . . . . . . . . . . . . . . . . . . . . . . . . . . . . . . . . 29
Connect To a Mobile Network . . . . . . . . . . . . . . . . . . . . . . . . . . . . . . . . . . . . . . . . . . . . . . 29
Connect to the IoT Cloud . . . . . . . . . . . . . . . . . . . . . . . . . . . . . . . . . . . . . . . . . . . . . . . . . . . 34
Register and connect to AirVantage . . . . . . . . . . . . . . . . . . . . . . . . . . . . . . . . . . . . . . . . . 34
Register with AirVantage . . . . . . . . . . . . . . . . . . . . . . . . . . . . . . . . . . . . . . . . . . . . . . . .34
Connect to AirVantage . . . . . . . . . . . . . . . . . . . . . . . . . . . . . . . . . . . . . . . . . . . . . . . . .38

Contents
Rev 2 8/23/17 5 41110481
Develop and Test applications. . . . . . . . . . . . . . . . . . . . . . . . . . . . . . . . . . . . . . . . . . . . . . . 42
Develop using the CLI—Command Line Interpreter . . . . . . . . . . . . . . . . . . . . . . . . . . . . . 42
Configure the Dev Machine’s Terminal Windows for Development . . . . . . . . . . . . . . .42
Update an Installed Application . . . . . . . . . . . . . . . . . . . . . . . . . . . . . . . . . . . . . . . . . . .43
Update and Install a New Application . . . . . . . . . . . . . . . . . . . . . . . . . . . . . . . . . . . . . .47
Update Legato Application Framework. . . . . . . . . . . . . . . . . . . . . . . . . . . . . . . . . . . . . . . . 50
Update the Legato AF on Your Dev Machine . . . . . . . . . . . . . . . . . . . . . . . . . . . . . . . . . . 50
Tips. . . . . . . . . . . . . . . . . . . . . . . . . . . . . . . . . . . . . . . . . . . . . . . . . . . . . . . . . . . . . . . . . . . . . 53
Finding your SIM’s APN. . . . . . . . . . . . . . . . . . . . . . . . . . . . . . . . . . . . . . . . . . . . . . . . . . . 53
Using the Linux Terminal program. . . . . . . . . . . . . . . . . . . . . . . . . . . . . . . . . . . . . . . . . . . 53
Useful commands for this tutorial (and more) . . . . . . . . . . . . . . . . . . . . . . . . . . . . . . . . . . 54
Definitions . . . . . . . . . . . . . . . . . . . . . . . . . . . . . . . . . . . . . . . . . . . . . . . . . . . . . . . . . . . . . 55

Rev 2 8/23/17 6 41110481
1
1: Getting Started
Now that you have your mangOH™ Red, it’s time to start using it.
Important: Use this guide only if you are using a native Linux development system (Ubuntu
is recommended).
This guide includes instructions for native Linux® development machines using CLI (Command
Line Interpreter).
This Getting Started guide takes you from assembling your mangOH Red and setting
up your computer for mangOH development, through to installing and running
applications and sending data to the IoT Cloud via AirVantage, Sierra Wireless’ cloud-
based services platform for over-the-air (OTA) device management.
To get started with Windows systems, or for other mangOH Red resources (guides,
tutorials, etc.), visit mangoh.io/mangoh-red-resources.
1.1 Minimum System Requirements
Make sure your computer meets the minimum suggested requirements for application
development with the mangOH Red.
Note: The instructions in this guide have been tested on Ubuntu 16.04. If you choose to use a
different distribution (e.g. Debian, Fedora, etc.), you may need to adjust commands, set
permissions, etc. If you need assistance, please check out the forum at forum.mangoh.io.
1.2 Quick Start Contents
Important: Carefully follow the procedures as described—each section builds on earlier
procedures and results. If you skip steps or use alternate methods, you may have difficulty
completing the tutorial.
Table 1-1: Minimum System Requirements
Linux
O/S Ubuntu 16.04
CPU Dual core @ 2.6 GHz
RAM 4GB
HDD 10 GB free space

Rev 2 8/23/17 7 41110481
This quick start guide includes:
•Before You Begin on page 8
•Step-by-step tutorial:
·Set Up Your mangOH Red Hardware on page 9
·Prepare Your Linux Dev Machine For Legato Development on page 17
·Prepare Your mangOH Red For Development on page 23
·Develop and Test applications on page 42Connect To Mobile Networks on
page 29
·Connect to the IoT Cloud on page 34
•Things to do after the tutorial:
·Develop and Test applications on page 42
·Update Legato Application Framework on page 50
•Tips on page 53
Rev 2 8/23/17 8 41110481
2
2: Before You Begin
Before you begin, here are a few items that you might find helpful:
•Some terminology:
·"CF3"—The mangOH Red supports CF3 (Common Form Factor) embedded
modules, such as the WP8548 and HL8548.
Throughout this tutorial, "CF3" refers to the module that comes with your
mangOH Red kit.
·"Dev(elopment) machine"—Your Linux computer
·"Target"—The CF3 module in your mangOH Red.
•Some symbols:
·’$’, ’#’— Command prompts.
·’$’—Command prompt when you are logged in to a device as a regular
user.
·’#’—Command prompt when you are logged in as the ’root’ user.
Note: In the examples in this document, you will be logged in as a regular user on
your dev machine (command prompt will be ’$’), and logged in as the root user on
the target (command prompt will be ’#’).
·’~’, "$HOME"—Your ’home directory’ on your dev machine.
•Command examples—Many steps in this guide require you to enter commands in
a terminal window. These commands are shown like this:
$ ping 192.168.2.2
# cd ~
Note: You can copy commands from this guide and paste them in to your terminal
window to save time and avoid typing errors. Do not include the command prompt
when you copy/enter commands. (In the first example above, you would enter "ping
192.168.2.2", not "$ ping 192.168.2.2".)
•CF3 module default credentials and IP address (used to connect to the target
from the dev machine):
·USB ECM IP address—192.168.2.2
·User name—root
·Password—<none>
•Terminal window tips:
·Shortcut to open a terminal window (on the default Unity desktop used in
Ubuntu Linux)—Ctrl+Alt+T
·Cancel command to break out of a running process—Ctrl+C
·minicom exit command—Ctrl+A, then press X

Rev 2 8/23/17 9 41110481
3
3: Set Up Your mangOH Red Hardware
In this chapter, you will set up your mangOH Red to begin developing applications.
A typical mangOH Red kit includes:
•mangOH Red board
•CF3 (Common Form Factor) module, cover, and release tool
•micro-USB cables (2)
•Antenna (main)
•Antenna (diversity)—Included if the CF3 module supports LTE
•Sierra Wireless micro-SIM
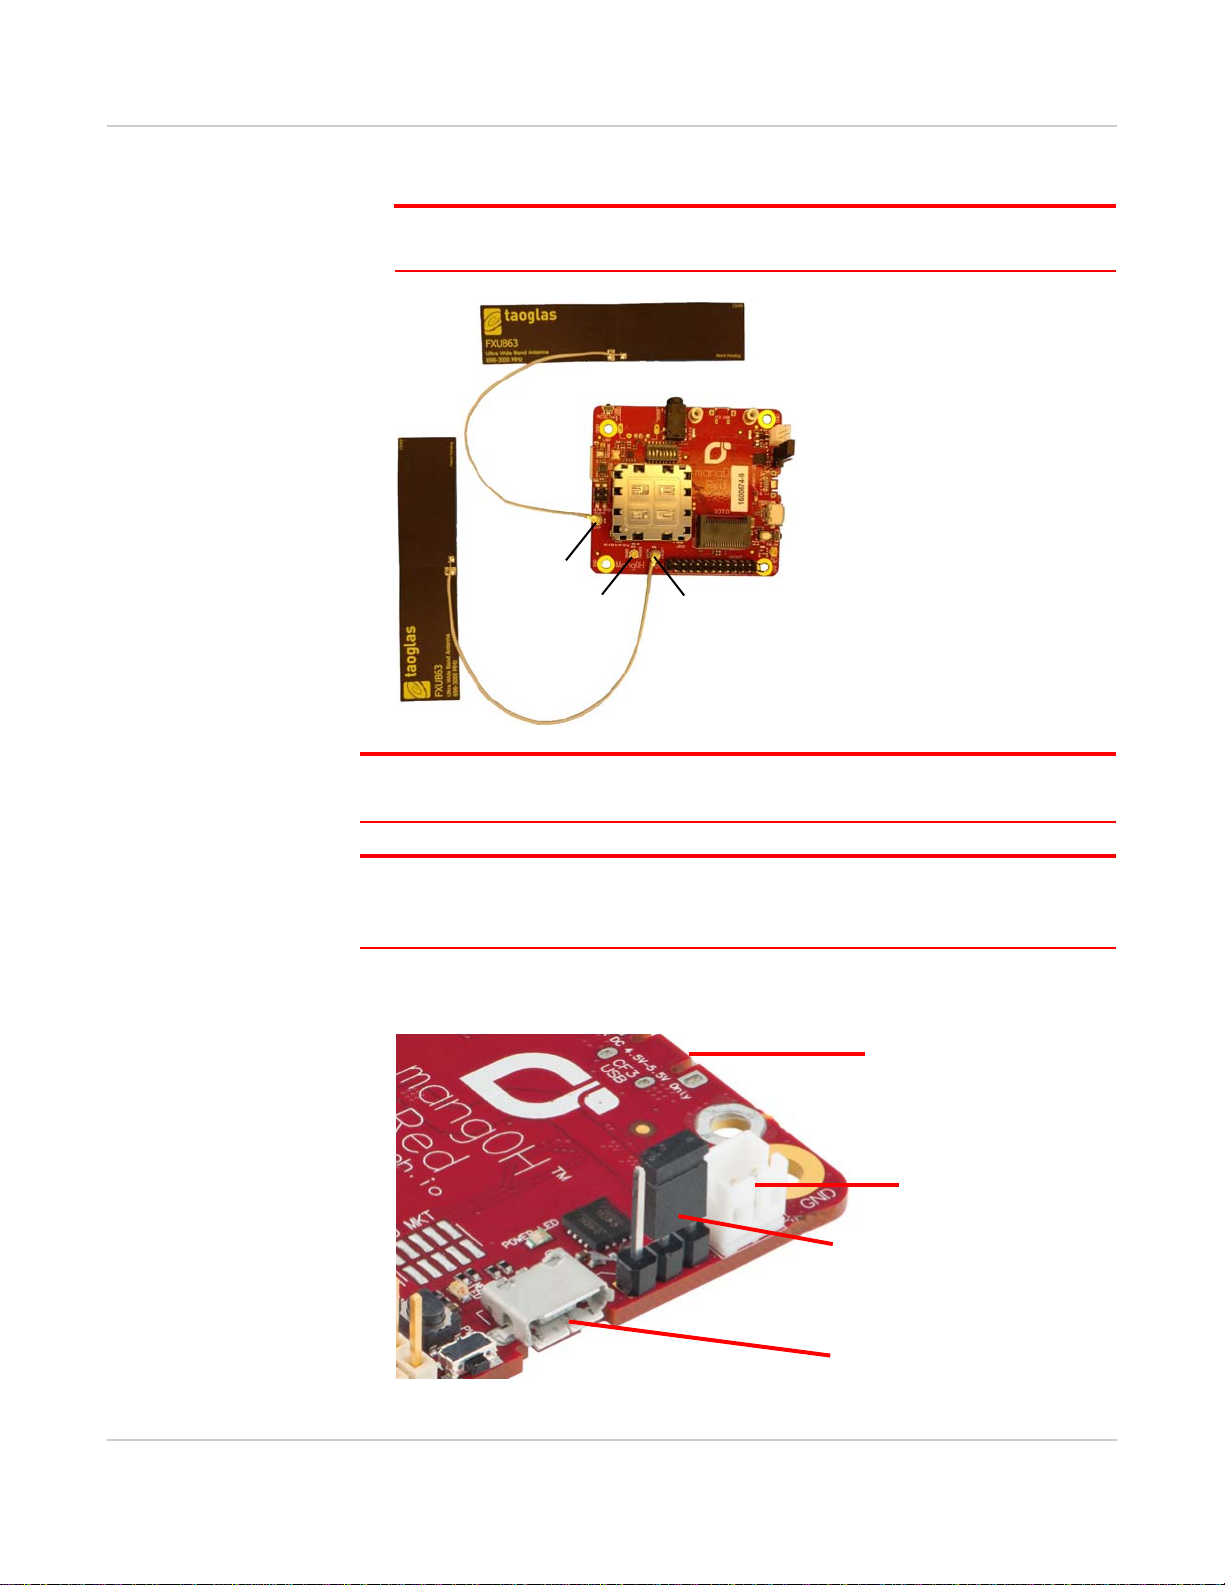
3.1 mangOH Layout
The following image indicates where you will connect typical kit components to the
mangOH Red— follow the instructions in Hardware Setup on page 10 for the proper
setup procedure.
CF3 USB connector
(bottom side of board)
CONSOLE USB connector
Power Header
and jumper
SIM card slot
(bottom side of board)
SW401 dipswitches
Module slot
Diversity antenna
connector
Main antenna
connector

mangOH Red Getting Started
Rev 2 8/23/17 10 41110481
3.2 Hardware Setup
To set up the mangOH Red board:
1. Insert the CF3 module—Hold the module above the socket and line up the
triangles on the module and socket. The module will drop straight into the socket.
(Position matters!)
2. Hold the module cover over the module and line up the circle on the cover with
the triangle on the label, then press the cover (on the edges) into place.
The triangle on the label
matches the position of the
triangle on the socket.
The triangle on the label
matches the position of the
circle on the cover.

Rev 2 8/23/17 11 41110481
3. Remove the protective film from the dipswitches:
4. Make sure the dipswitches are set as follows:
·ON—1,3,8
·OFF—2,4,5,6,7
5. Insert a micro-SIM in the slot on the bottom side of the mangOH Red. You can
use the Sierra Wireless micro-SIM that is included in the kit, or another micro-SIM
that has been activated by a mobile network provider.
Note: If you do not have an activated micro-SIM, you can still continue with the tutorial, but
will not be able to complete the following sections: Connect To Mobile Networks on
page 29 and Connect to the IoT Cloud on page 34.
Remove this film
Note the location of the notched corner. Inserted in bottom part of slot
mangOH Red Getting Started
Rev 2 8/23/17 12 41110481
6. Attach the main antenna and (for LTE CF3 modules) the diversity antenna.
Note: The main antenna is required if you want to connect the mangOH Red to a mobile
network in Connect To Mobile Networks on page 29.
Tip: If you have trouble connecting an antenna, make sure it is positioned directly on the
connector and push straight down. The antenna will not connect at an angle.
Note: The mangOH Red has two USB connectors. CF3 USB is used for SSH connections, AT
commands, and firmware downloads, and CONSOLE_USB is used for serial USB connections
for debugging and to access the module’s console.
7. Move the power select jumper to select the CF3 USB connector—in this guide,
power is supplied from the dev machine’s USB port to this connector.
Main
GNSS
Diversity
CF3 USB power (jumper on pins
closest to battery connector)
CF3 USB connector
(bottom side of board)
CONSOLE USB connector
Battery connector
Rev 2 8/23/17 13 41110481
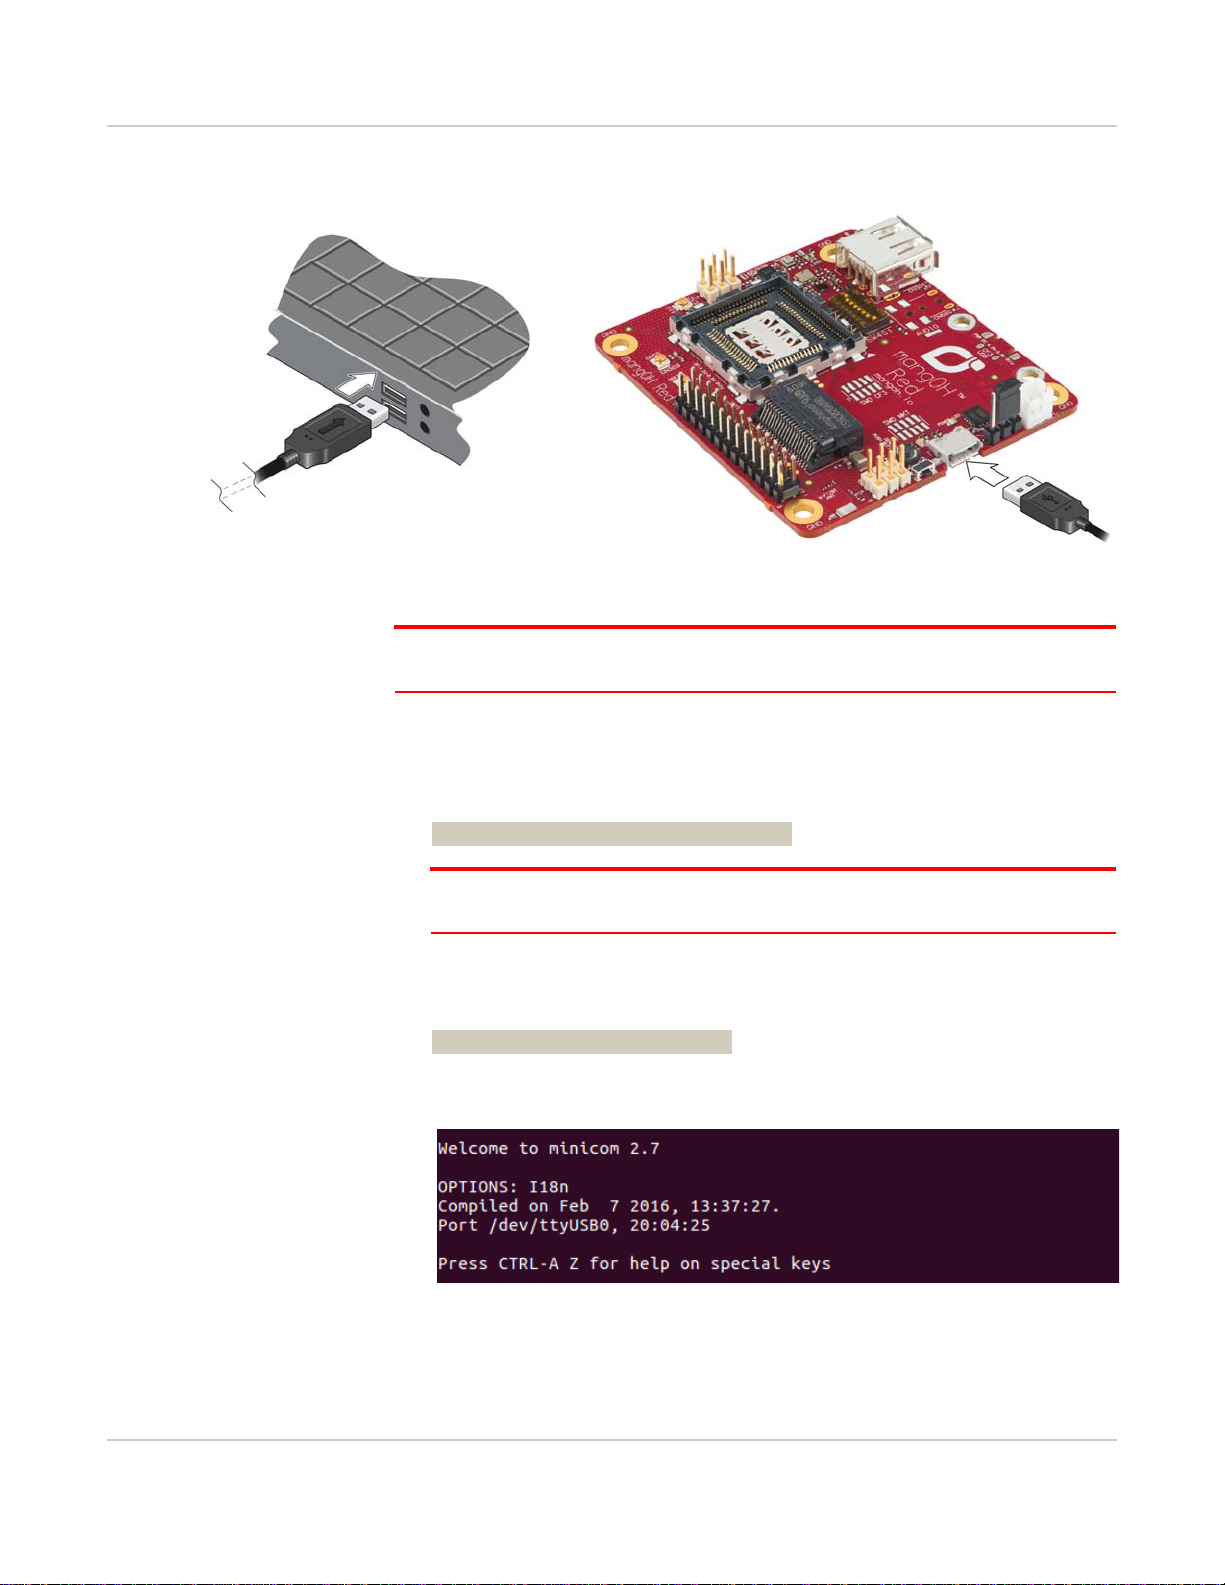
8. Use a micro-USB cable to connect the CONSOLE USB connector to a USB port
on your dev machine.
9. Open a terminal window on the dev machine—this window will be used to display
the target’s console messages (kernel messages, warnings, etc.).
Note: Depending on your desktop, a terminal window may be opened using a keyboard
shortcut (e.g. Ctrl+Alt+T for the Ubuntu Unity desktop), or an icon or menu item.
10. Connect to the target’s Linux console as follows:
a. In the terminal window, enter the following command to install the minicom
application on your dev machine (if it is not already there), and follow any
prompts that may appear:
$ sudo apt-get install minicom
Note: ’sudo’ tells the dev machine to run the command as the ’superuser’. Each time
you use sudo, you must enter your dev machine’s password to continue.
b. Connect to the target’s Linux console via the USB serial port (which
enumerated when you connected the CONSOLE USB connector to the dev
machine):
$ minicom -D /dev/ttyUSB0
A welcome message appears, and the window will show console messages
when the mangOH Red powers on in the next step.

mangOH Red Getting Started
Rev 2 8/23/17 14 41110481
Note: The USB serial port enumerates as ttyUSB0 because you connected
CONSOLE USB to the host before connecting CF3 USB to the host (which you will do
later). However, if you connected CF3 USB first, it would enumerate ttyUSB0,
ttyUSB1, and ttyUSB2. Then when CONSOLE USB is connected, it will enumerate as
ttyUSB3.
Note: You can exit minicom at any time—the purpose of showing it here is to demon-
strate how to display console messages for debugging purposes. To exit minicom,
press Ctrl+A, then press X. When prompted, select Yes to leave minicom.
Note: Through the rest of this guide, examples use terminal windows connected via ssh,
but a console connection could also be used. However, only one console connection can
be opened at any time since it locks the USB serial port.
11. Power up the mangOH Red:
a. Use a micro-USB cable to connect the CF3 USB connector to a USB port on
the dev machine.
CF3 USB connector
(bottom side of board)

Rev 2 8/23/17 15 41110481
When the mangOH Red is powered, the Power LED turns solid green and
startup messages will appear in the terminal window that you connected to
the target’s console in Step 10.
Note: For future reference, the mangOH Red’s power supply (USB port on your dev
machine, or an AC adapter) connects to the board via either USB connector—
CF3 USB or CONSOLE USB (depending on the jumper position on the power
header). If an AC adapter is connected to CF3 USB, SSH/AT connections are not
possible; if it is connected to CONSOLE USB, serial USB connections are not
possible.
12. On the dev machine, open another terminal window.
13. Make sure the modemmanager package is removed from your system (this
package causes problems with mangOH Red if it is not removed):
$ sudo apt-get remove modemmanager
14. Wait 10-15 seconds for the mangOH Red to enumerate.
15. Test the CF3_USB connection:
$ ping 192.168.2.2
Power LED
Console messages describing
module boot-up process

mangOH Red Getting Started
Rev 2 8/23/17 16 41110481
You should receive ping responses. Press Ctrl+C to cancel the ping request and
return to the command prompt.
Now you are ready to Prepare Your Linux Dev Machine For Legato Development on
page 17.
Ctrl+C pressed to cancel ping
Replies received, connection working

Rev 2 8/23/17 17 41110481
4
4: Prepare Your Linux Dev Machine For Legato
Development
In this chapter, you will prepare your dev machine for Legato application development
by setting up the development environment with required applications and packages.
Important: To install and use the development environment, your dev machine must meet
the requirements in Table 1-1 on page 6.
4.1 Prepare Dev Machine For Application
Development
After preparing your mangOH Red hardware in Set Up Your mangOH Red Hardware
on page 9, you can prepare your dev machine for application development:
Important: Download, installation and use of Legato Application Framework and Platform
Services is subject to the Legato License and Open Source Licenses. (Note: These links
automatically download the licenses as PDF files.)
4.2 Build and Install the Development
Environment
In this section you will build and install the environment to develop applications for the
CF3 module used in your mangOH Red. The environment includes:
•Legato toolchain—Tools and libraries used to build the Legato Platform for your
CF3 module. The Legato toolchain is module-specific; you must make sure you
install the toolchain designed for your module.
•mangOH Red platform—Drivers for on-board components, and a basic
device-to-cloud application.
To build and install the development environment on your dev machine:
1. Open a terminal window.
2. Install packages required for the development environment:
a. Display your Ubuntu version:
$ lsb_release -d
Note: If the version is less than 16.04, upgrade your operating system to 16.04 or
higher, then continue with these instructions.

mangOH Red Getting Started
Rev 2 8/23/17 18 41110481
3. Check whether your dev machine is 32-bit or 64-bit:
$ uname -m
The dev machine’s hardware type appears —e.g. "x86_64" is a 64-bit system.
4. Install several packages that are required for the Legato Platform and the
mangOH Red platform—enter the following command and follow any prompts
that appear:
$ sudo apt-get install build-essential openjdk-8-jre \
libwebkitgtk-1.0-0 python python-jinja2 cmake \
git subversion libsdl-dev diffstat texinfo gawk \
chrpath wget cpio vim zsh bash ninja-build screen \
sshpass bc python-git unzip libxml2-utils gcovr \
libcurl4-gnutls-dev zlib1g-dev libbz2-dev \
bsdiff libssl-dev zip autoconf automake
Note: The ’\’ at the ends of the lines tells the system that the command continues on
the next line. When you run this command (and any others in this guide that use the
’\’), you can copy and paste the full command (including ’\’ characters) in your terminal
window. If you type the command manually all on one line, do not type the ’\’
characters.
5. As shown in the previous step, the output you see when you run some commands
may be different from the examples shown. To check if a command succeeded or
failed, enter the following command:
$ echo $?
When prompted to continue,
type Y and press Enter.
Installation messages
Actual messages displayed will vary
depending on which packages are
already installed
The command worked (value = 0).
Any other value (2, 100, etc.) would
mean the command failed.

Rev 2 8/23/17 19 41110481
If the value returned is ’0’, the command succeeded. If it is any other value, the
command failed.
6. If your dev machine is 64-bit, install additional dependencies:
$ sudo apt-get install lib32z1 lib32ncurses5
7. Build the Legato toolchain (SDK):
a. If you have previously installed Legato toolchains, make sure you do not have
any old toolchain files ("poky*.sh") in your Downloads directory
(e.g. ~/Downloads), and remove any changes that may have been made to
your .bashrc file:
i. Go to your Downloads directory:
$ cd ~/Downloads
ii. Either move or delete any old toolchain files:
Delete files:
$ rm poky*
Move files:
$ mkdir old_toolchains
$ mv poky* old_toolchains
iii. Edit your ~/.bashrc file, comment out any items at the bottom of the file
that begin with "LEGATO", and save and close the file.
b. Go to http://source.sierrawireless.com/resources/legato/downloads and click
the latest Legato (32-bit or 64-bit) toolchain download link (the link is to a .sh
file).
Note: You must register on the Source for an account before you can download files.
c. Click Download.
d. If prompted, save the file to your Downloads folder. (e.g. ~/Downloads)
Click Download on the latest (newest)
32-bit or 64-bit toolchain link

mangOH Red Getting Started
Rev 2 8/23/17 20 41110481
e. In the terminal window, open the folder and run the file.
(In the command below, replace <file_name> with the actual file name.
e.g. If the file name is "poky-swi-ext-sample-1.7.3.sh", the command would be
"bash poky-swi-ext-sample-1.7.3.sh"):
$ cd ~/Downloads
$ bash <file_name>
f. When prompted to enter a target directory for the SDK, press Enter to accept
the default (/opt/swi/y17-ext).
g. When prompted to install or (possibly) replace the SDK, type ’Y’ and press
Enter.
When finished, installing, the message "SDK has been successfully set up
and is ready to be used." will appear.
h. Configure the toolchain to make it available for use in generating the
mangOH Red platform and the kernel modules that it references:
$ export PATH=$PATH:/opt/swi/y17-ext/sysroots/\
x86_64-pokysdk-linux/usr/bin/\
arm-poky-linux-gnueabi
$ cd /opt/swi/y17-ext/sysroots/\
armv7a-vfp-neon-poky-linux-gnueabi/usr/\
src/kernel
$ sudo chown -R $USER .
$ ARCH=arm CROSS_COMPILE=arm-poky-linux-gnueabi- \
make scripts
$ sudo chown -R root .
Other manuals for Red
4
Table of contents
Other mangOH Motherboard manuals


