Mantion SLIDSOFT NM V323 Assembly instructions

NM V323 A 09-2014 MANTION SAS - 25000 Besançon - Tel +33 3 81 50 56 77 - Fax +33 3 81 85 38 79 - www.mantion.com 1/20
NM V323
INSTRUCTIONS DE MONTAGE
MONTAGEANLEITUNG
INSTRUCTIONS FOR ASSEMBLY
INSTRUCCIONES DE MONTAJE
Poids maximal des panneaux
Maximales Gewicht
Maximum weight
Peso máximo por hoja
80 Kg
Epaisseur des panneaux
Ladendicke
Shutter thickness
Espesor de las hojas
27 - 40 mm
calcule instantanément le détail des
composants (quantitatif, dimensionnement ...)
listet sofort die benötigten Artikel auf
list instantaneoulsy the required items
Calcula al momento el despiece completo
del sistema
www.mantion.com
SLIDSOFT®
VOLETS COULISSANTS MOTORISÉS : 3 PANNEAUX
MOTORISERTE SCHIEBEFENSTERLÄDEN : 3 FLÜGEL
MOTORIZED SLIDING SHUTTERS – 3 PANELS
MALLORQUINAS CORREDERAS MOTORIZADAS : 3 HOJAS
10180E
COMPOSITION - ZUSAMMENSETZUNG - COMPOSICIÓN
NM V323 A 09-2014 MANTION SAS - 25000 Besançon - Tel +33 3 81 50 56 77 - Fax +33 3 81 85 38 79 - www.mantion.com 2/20
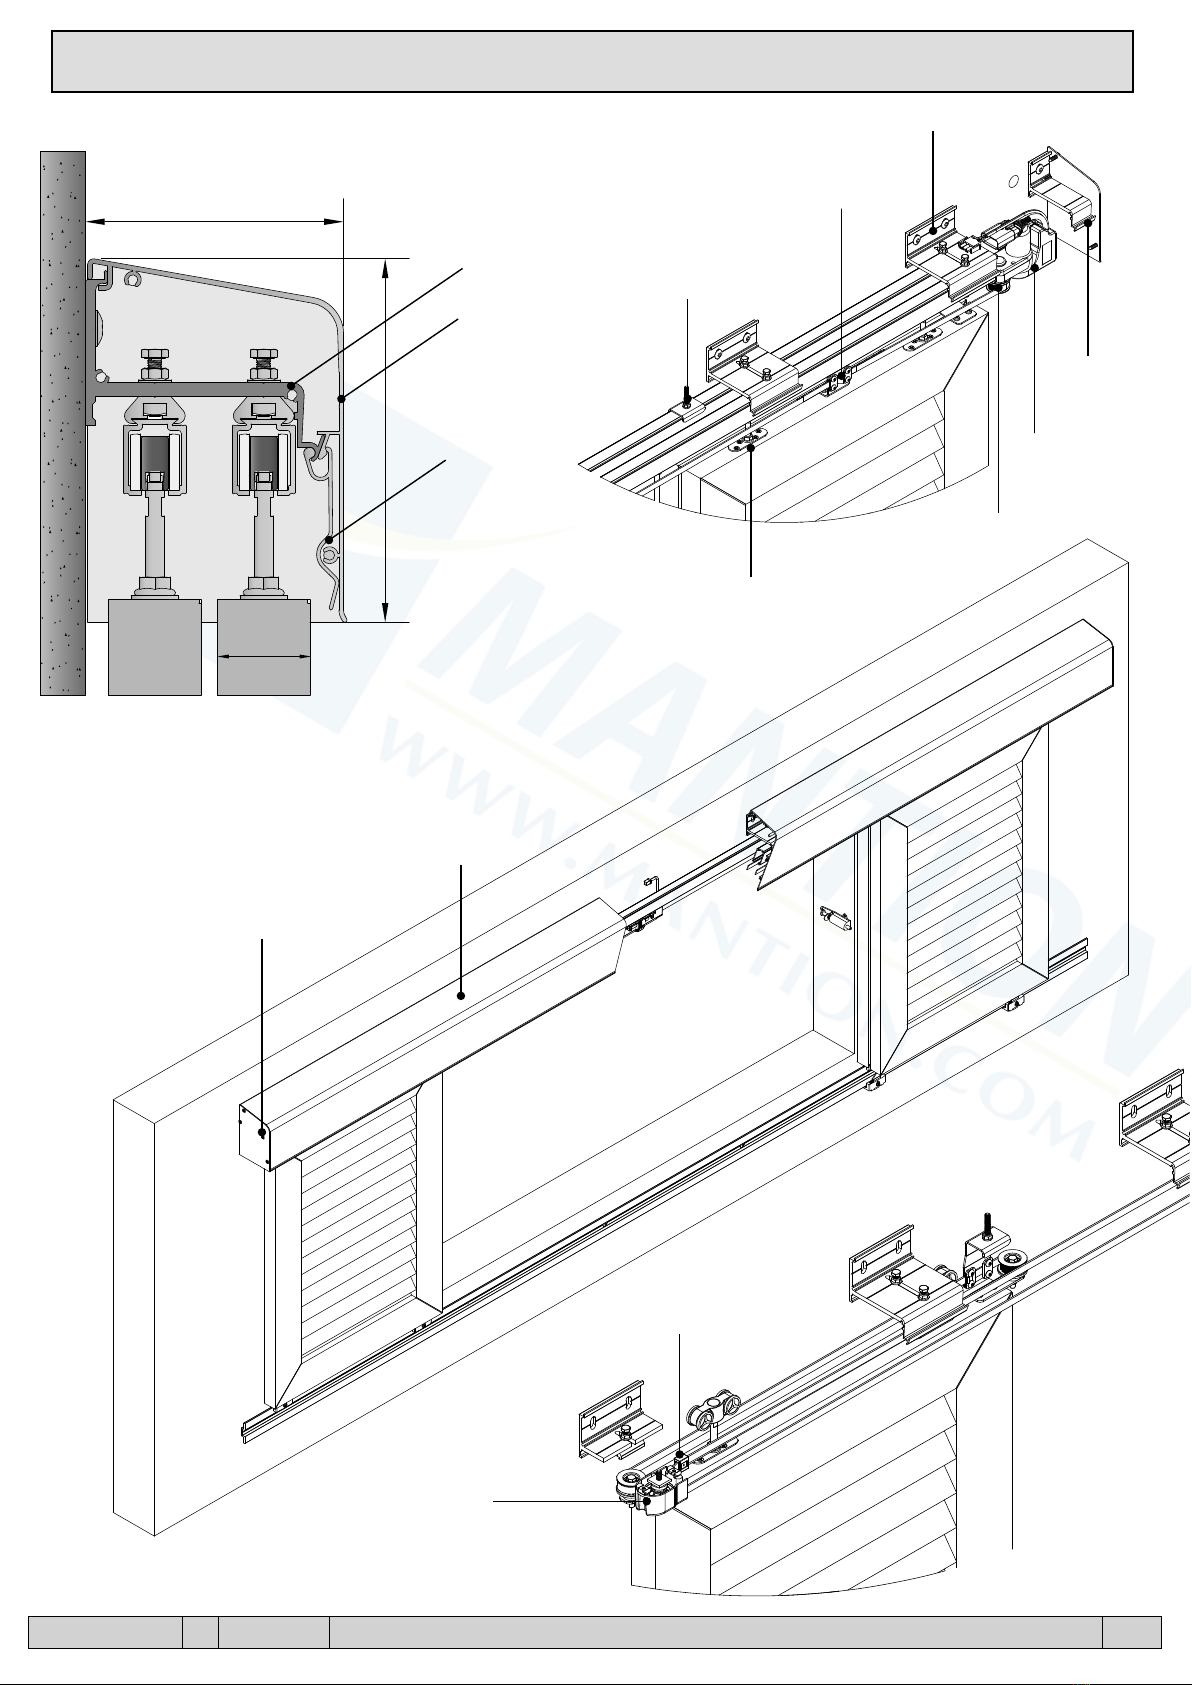
10189
11164
11167 M
157
112
27- 40
11113M
11164
11167M
11174
11167 M
10191
10180 F24
26 XA2
10192
11113 M
11170
NM V323 A 09-2014 MANTION SAS - 25000 Besançon - Tel +33 3 81 50 56 77 - Fax +33 3 81 85 38 79 - www.mantion.com 3/20
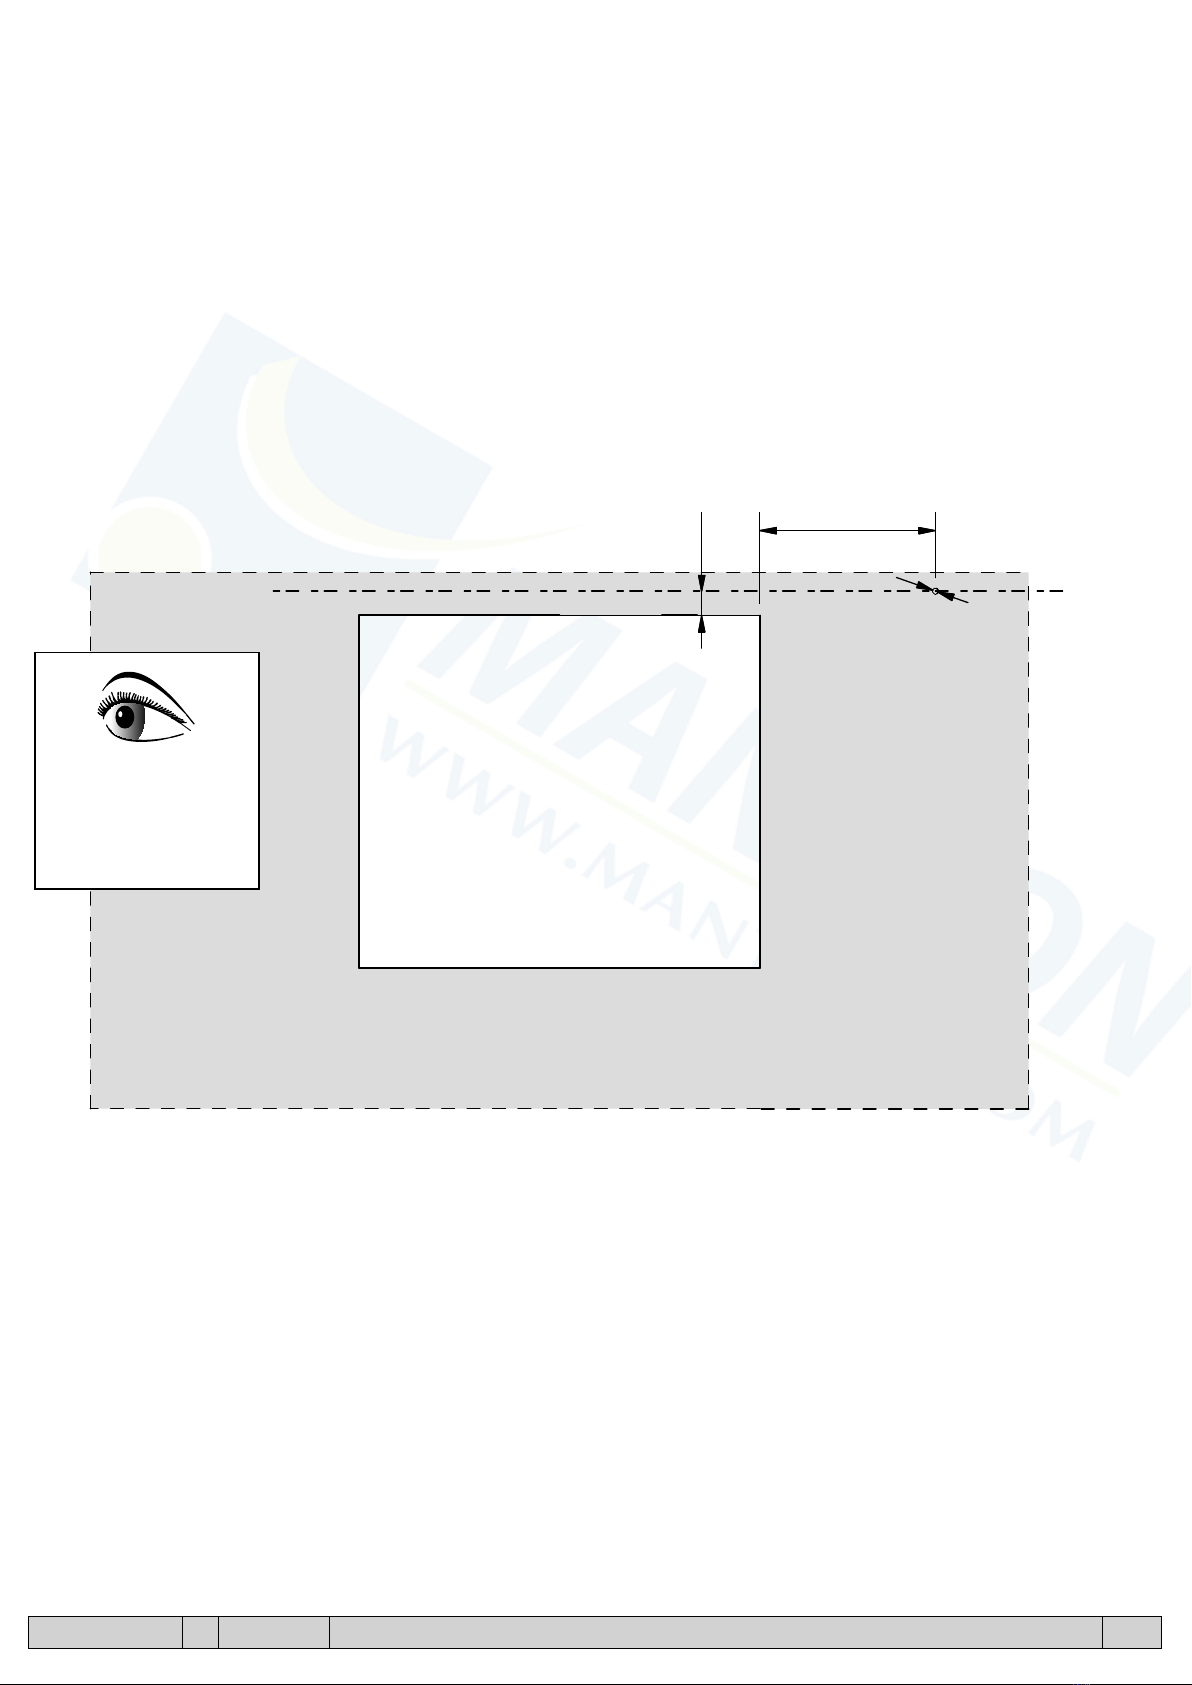
SORTIE DE CABLE
KABELAUSLAUF
CABLE OUTLET
SALIDA DEL CABLE
P* + 150
Ø20
125
*P = Largeur des panneaux
= Flügelsbreite
= Panels width
= Ancho hojas
Vue de l’extérieur
Aussenansicht
Outside view
Visto desde el exterior
NM V323 A 09-2014 MANTION SAS - 25000 Besançon - Tel +33 3 81 50 56 77 - Fax +33 3 81 85 38 79 - www.mantion.com 4/20
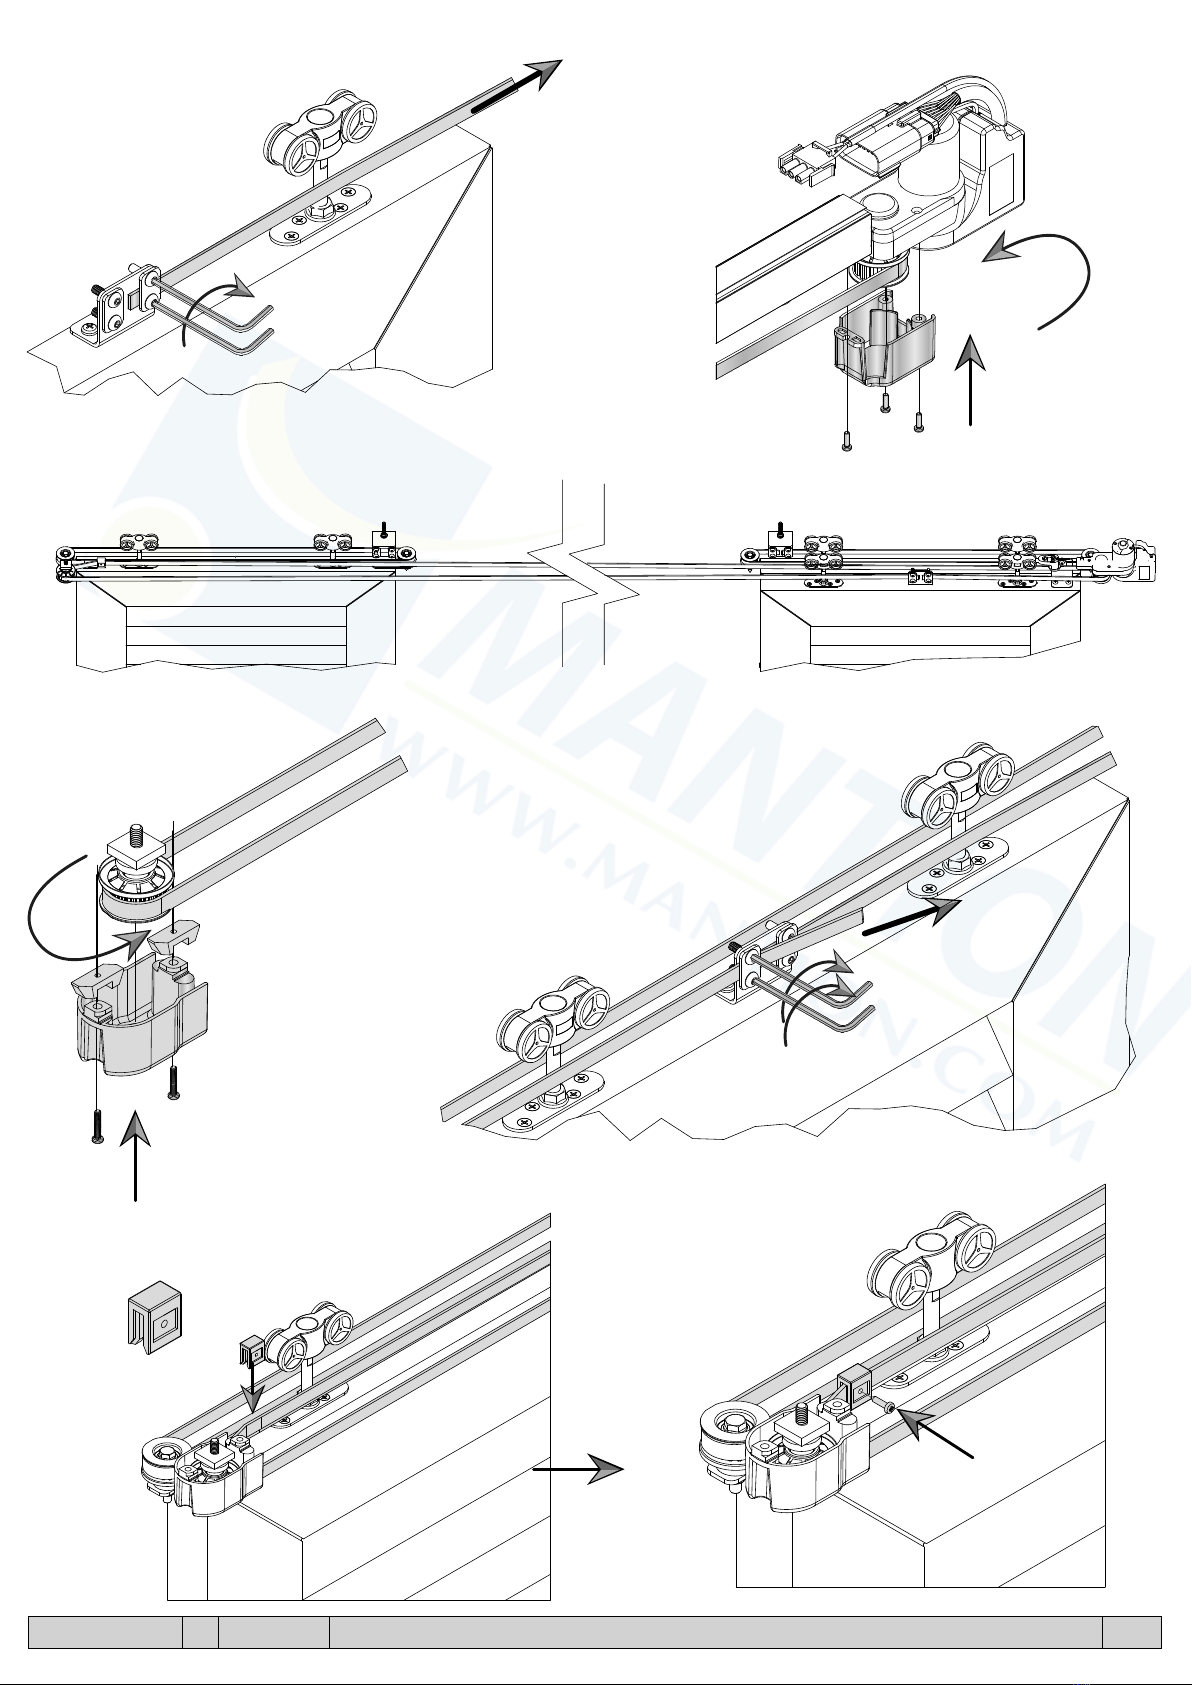
1.
70
120
15
Ø9 x 30 mm
45
45
1.1
1.2
45 45
NM V323 A 09-2014 MANTION SAS - 25000 Besançon - Tel +33 3 81 50 56 77 - Fax +33 3 81 85 38 79 - www.mantion.com 5/20
160
2.
= =
MAX = 500 mm
a
b
c
P +80
125
85

4.
4.1
4.2
4mm mini
5.
38
38
3.
Ø7
x2
x2
NM V323 A 09-2014 MANTION SAS - 25000 Besançon - Tel +33 3 81 50 56 77 - Fax +33 3 81 85 38 79 - www.mantion.com 6/20

6. 7.
60
8.
8.1 8.2
NM V323 A 09-2014 MANTION SAS - 25000 Besançon - Tel +33 3 81 50 56 77 - Fax +33 3 81 85 38 79 - www.mantion.com 7/20

9.
a.
c.
b./d.
a./c.
b.
d.
Ne pas serrez
Do not tighten
Nicht anziehen
No apriete
NM V323 A 09-2014 MANTION SAS - 25000 Besançon - Tel +33 3 81 50 56 77 - Fax +33 3 81 85 38 79 - www.mantion.com 8/20

NM V323 A 09-2014 MANTION SAS - 25000 Besançon - Tel +33 3 81 50 56 77 - Fax +33 3 81 85 38 79 - www.mantion.com 9/20
10.
a.
c.
b.
b.
a./c.
NM V323 A 09-2014 MANTION SAS - 25000 Besançon - Tel +33 3 81 50 56 77 - Fax +33 3 81 85 38 79 - www.mantion.com 10/20
11.
e.
g.
h./e. f.
g. / i.
h.
i.
f.

12.
13.
=
=
270
a.
b. c.
NM V323 A 09-2014 MANTION SAS - 25000 Besançon - Tel +33 3 81 50 56 77 - Fax +33 3 81 85 38 79 - www.mantion.com 11/20
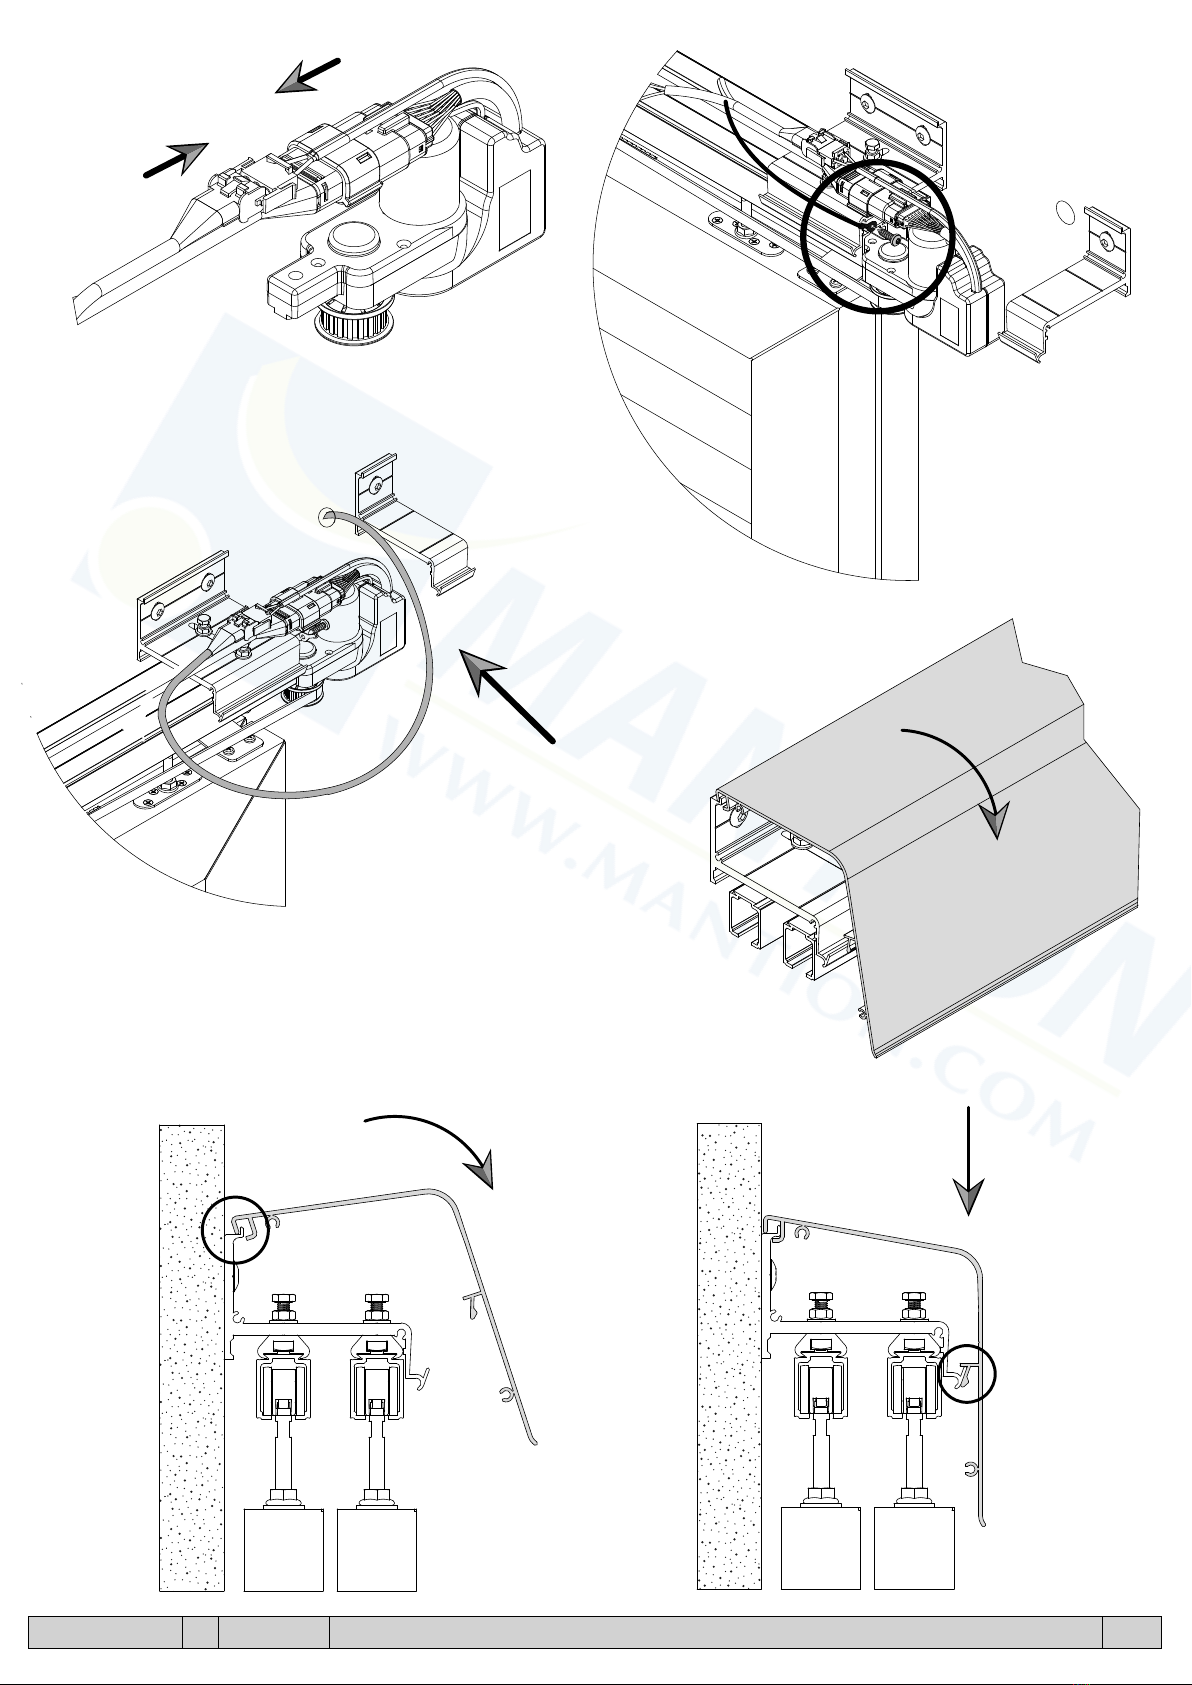
14.
a. b.
a.
b.
c.
15.
NM V323 A 09-2014 MANTION SAS - 25000 Besançon - Tel +33 3 81 50 56 77 - Fax +33 3 81 85 38 79 - www.mantion.com 12/20
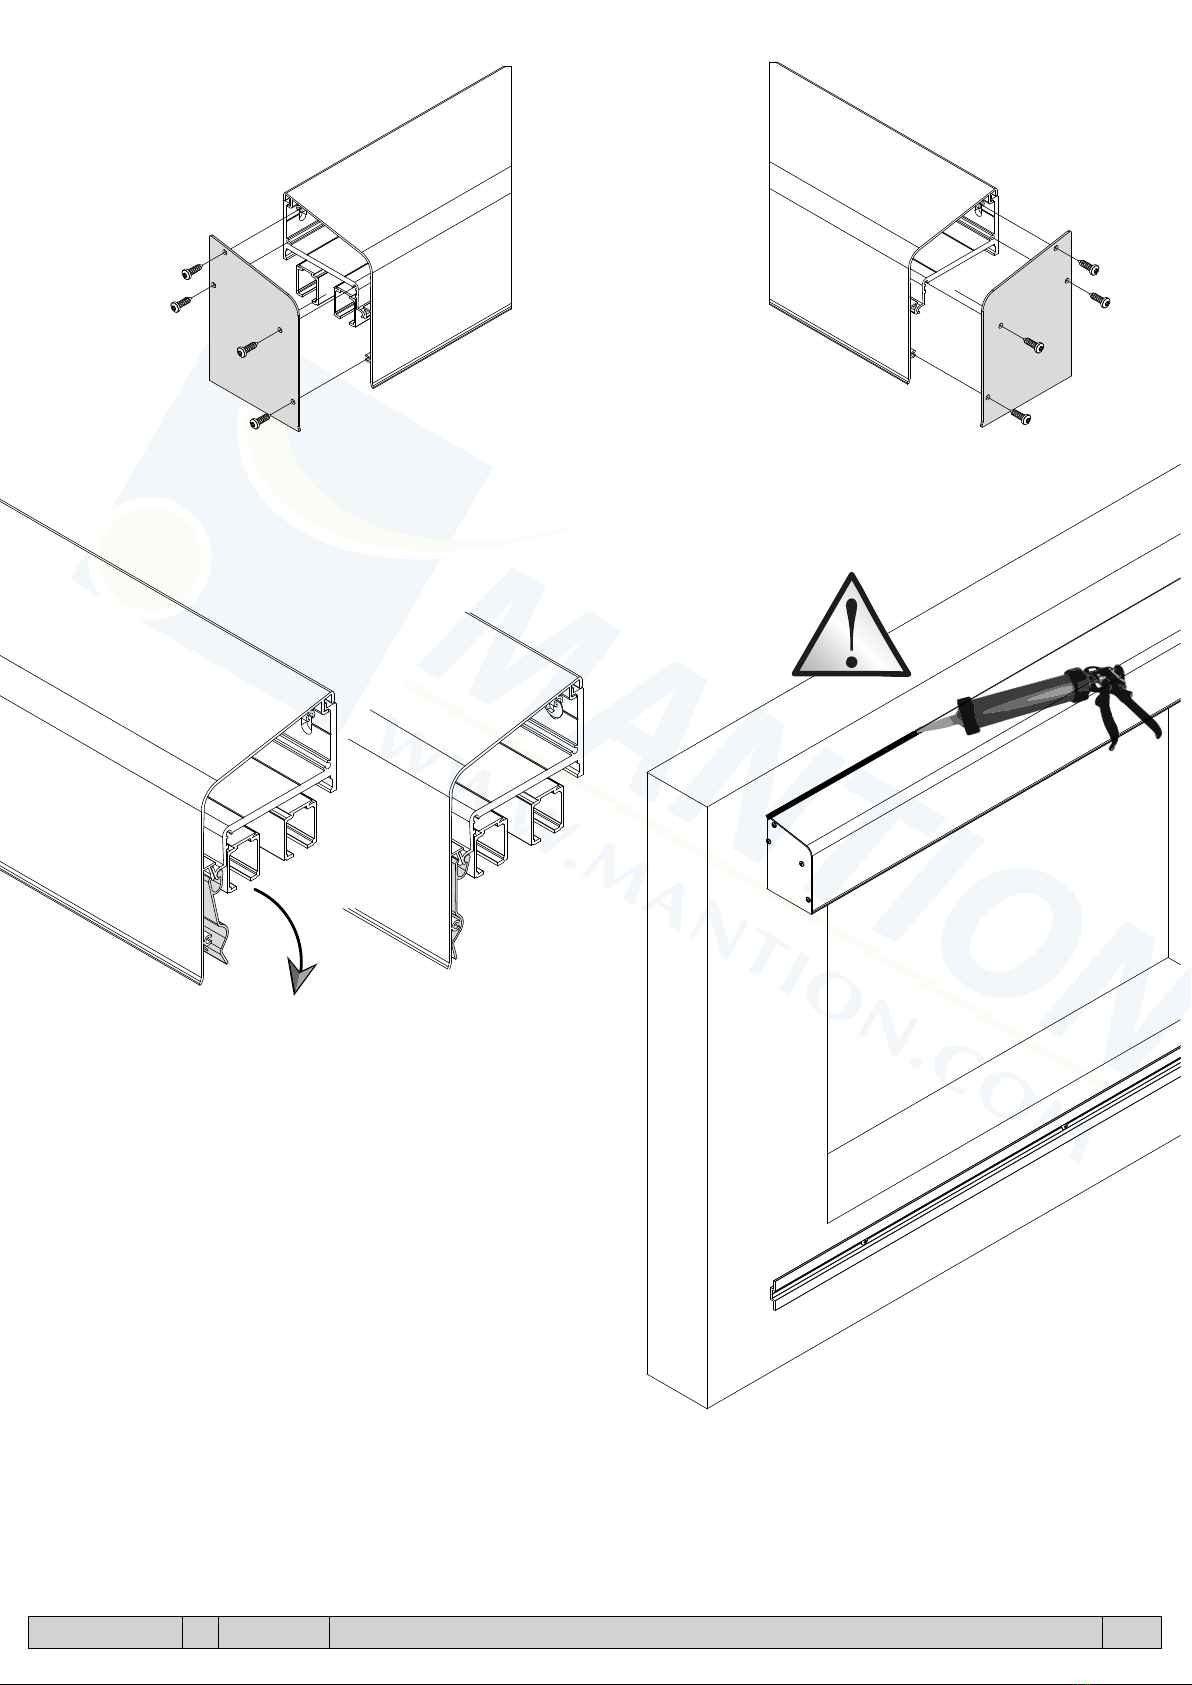
16.
17. 18.
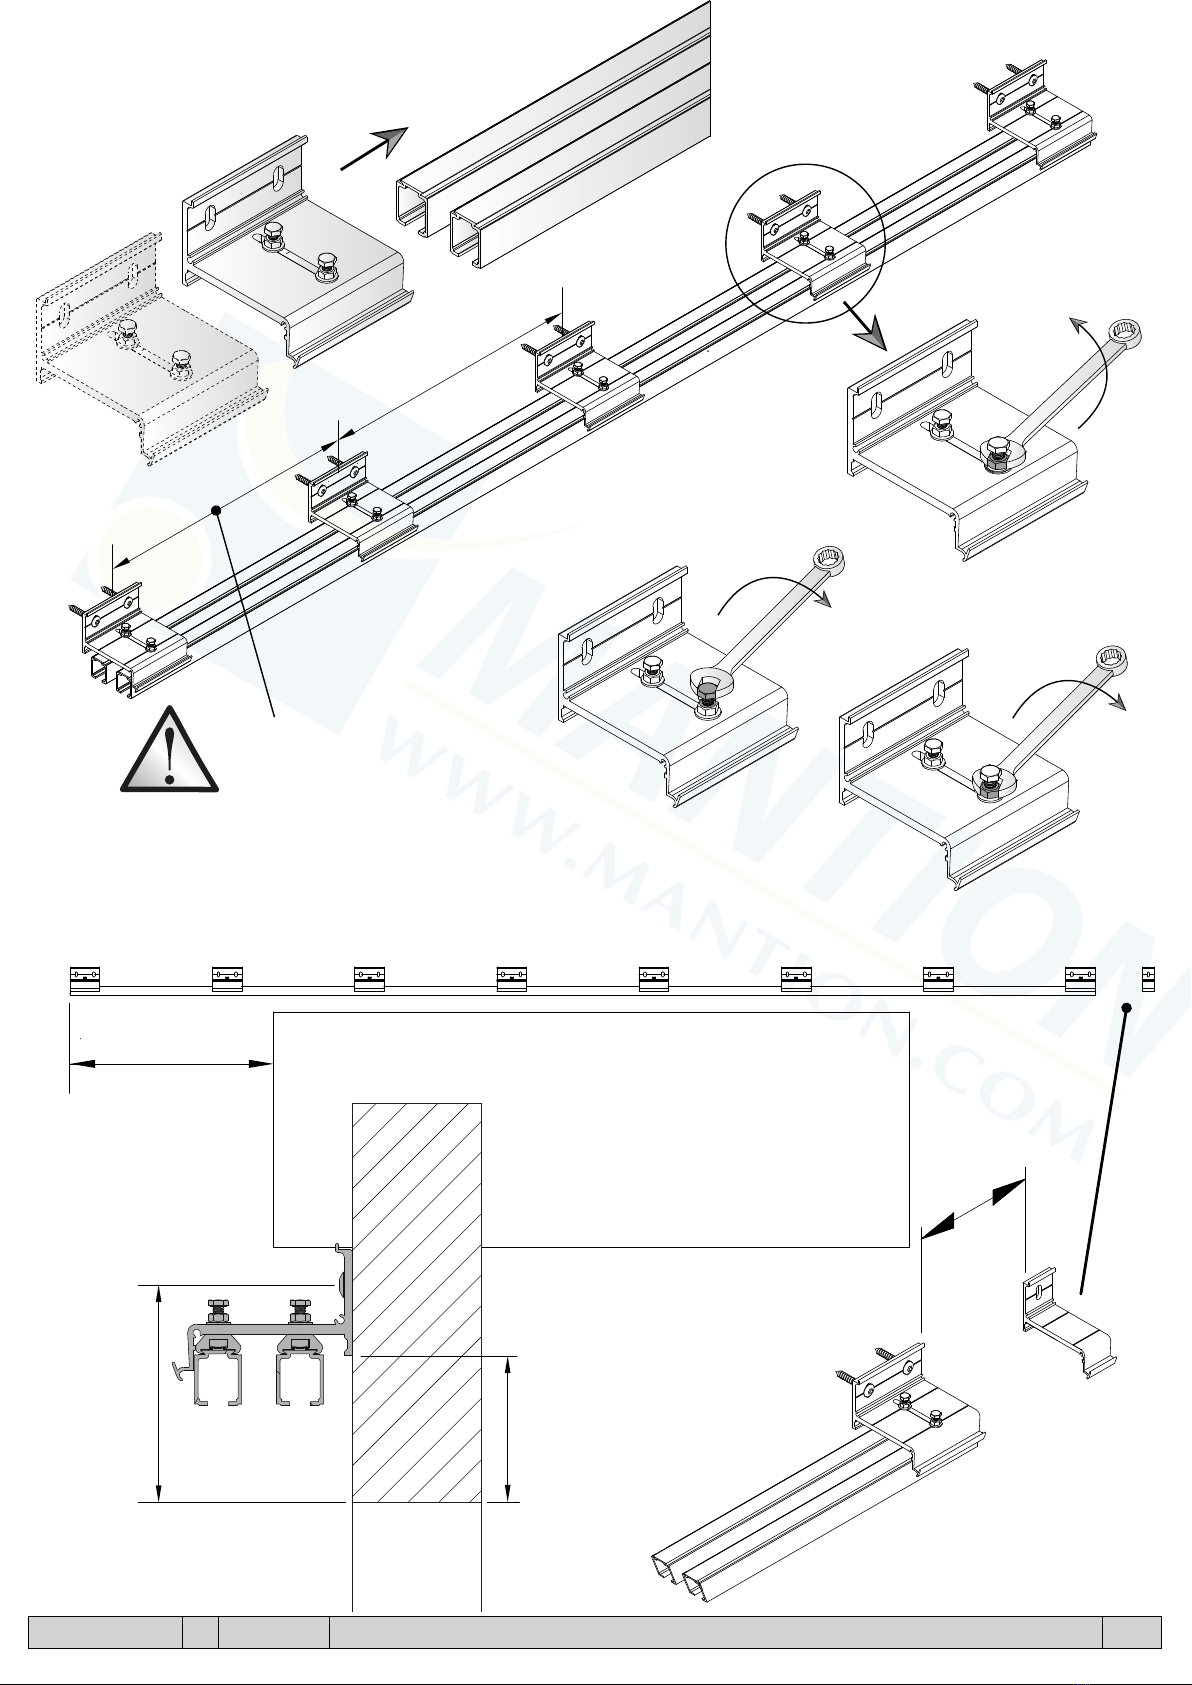
Clipser une pince tous les 1 m environ
Aufclipsen jeder 1 m (cerca)
Clip the clamps approximately every 1 m.
Engatillar los clips cada metro mas o menos
NM V323 A 09-2014 MANTION SAS - 25000 Besançon - Tel +33 3 81 50 56 77 - Fax +33 3 81 85 38 79 - www.mantion.com 13/20
NM V323 A 09-2014 MANTION SAS - 25000 Besançon - Tel +33 3 81 50 56 77 - Fax +33 3 81 85 38 79 - www.mantion.com 14/20
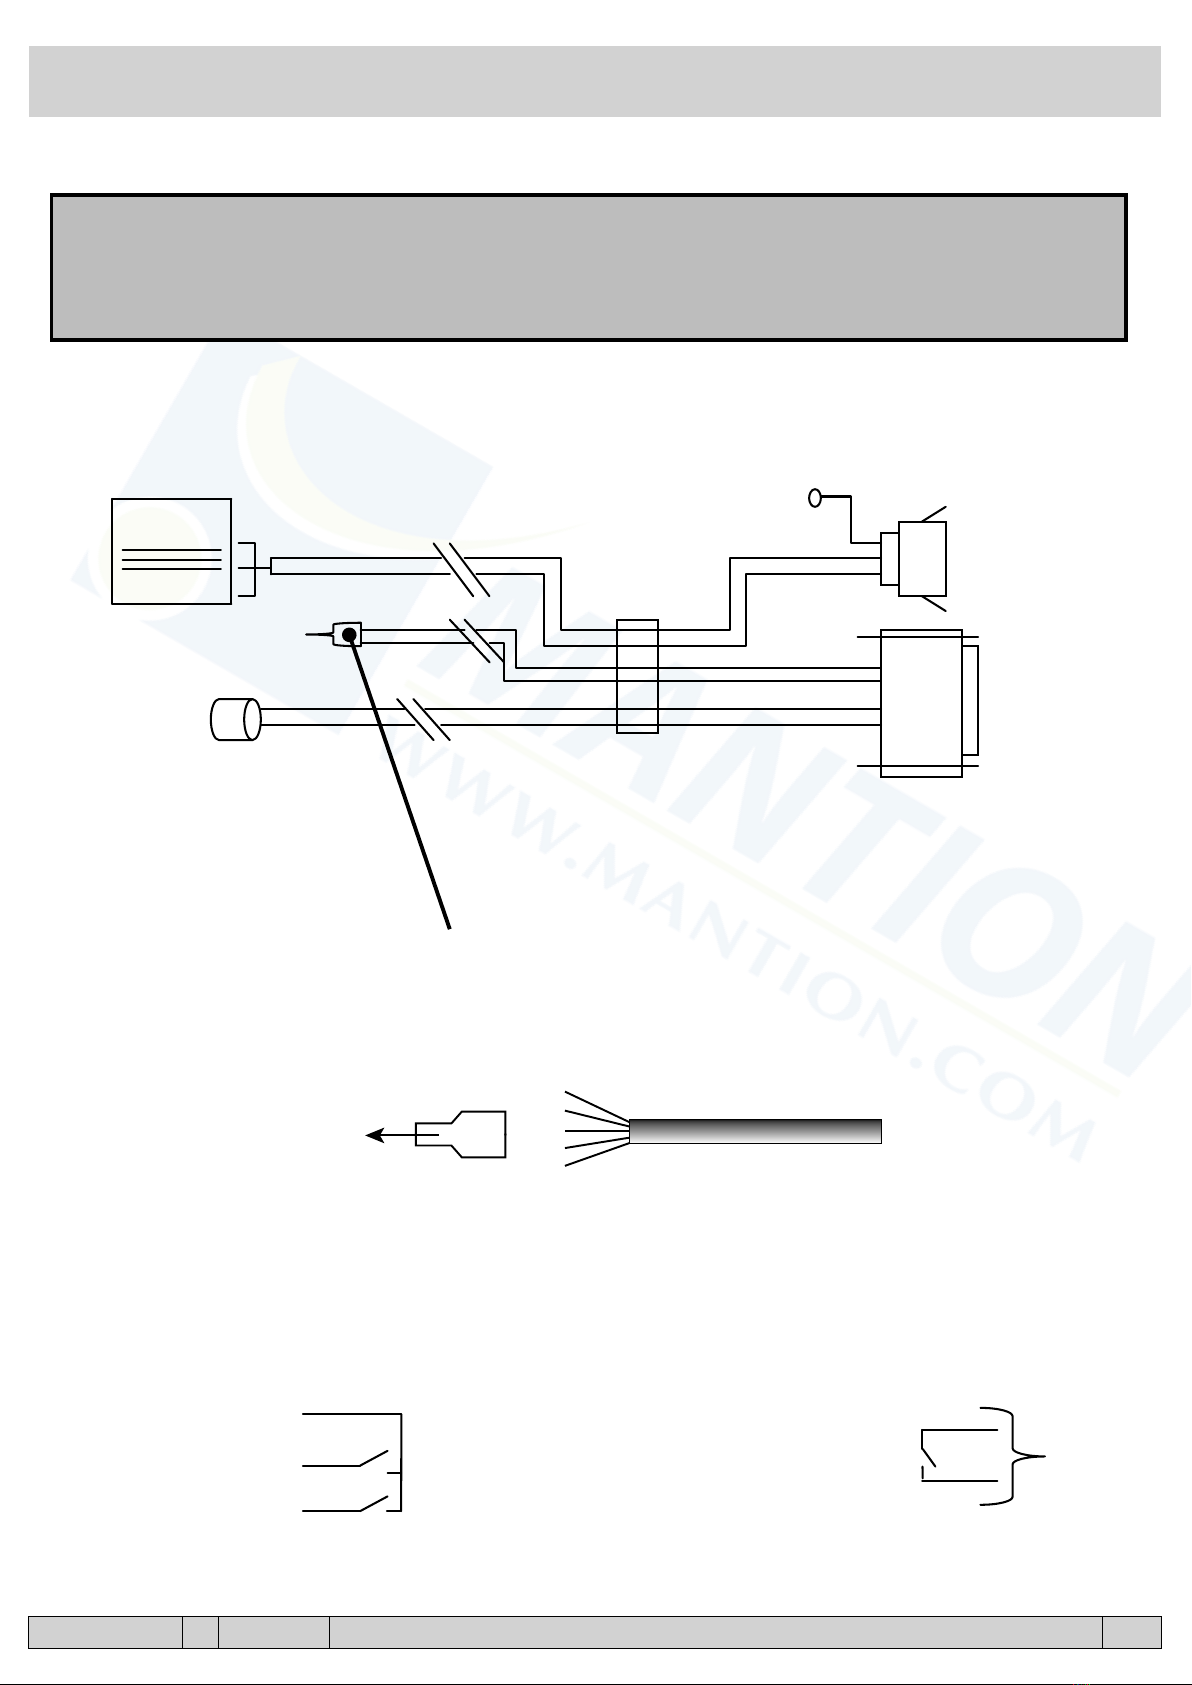
SCHEMA POUR CABLAGE ELECTRIQUE / SCHEMA FÜR LEITUNGSFHÜRUNG / WIRING SHEMA
ESQUEMA PARA CABLEADO ELECTRICO
Alimentation vers le moteur
Antriebselektrov ersorgung
Power supply to the Motor
Alimentación al haz Motor
Alimentation secteur
Wechselstrom
Power supply
Alimentación
230V AC
1A Max
3
4
5
6
7
Connexion vers le moteur
Anschluss auf der Antriebse-
lektrostrahlung
Connection to the Motor
Conexión al haz Motor
Connexion sur pack batterie
Anschluss auf
die Batterie
Connection on tha battery
Conexión al pack batería
Raccordement des options
Optionen Anschluss
Options connection
OPCIONES
Options / Optionen / Opción
Interrupteur laire
Kabelsteuerung
Wired control
Conexión de un mando por cable
5Gris / Gemeinsam / Grey
4Vert / Grün / Green / Verde
3Rouge / Rot / Red / Rojo
Commun / Gemeinsam
Common / Común
Fermeture / Erschluss
close / Cierre
Ouverture / Offnung
open / Apertura
6Marron/ Braun / Marrón
7Rose/ Pink / Rosado
Alarme
Alarm
Alarma
Couper l’alimentation de la motorisation avant de procéder au branchement d’un dispositif optionnel
Die Motorisierung unbedingt abschalten vor den Anschluss eines optionalen Betätigungsgeräts an das Netz
Disconnect power before connecting any optional device
Cortar la alimentación de la motorización antes de hacer la conexión de un dispositivo opcional

NM V323 A 09-2014 MANTION SAS - 25000 Besançon - Tel +33 3 81 50 56 77 - Fax +33 3 81 85 38 79 - www.mantion.com 15/20
PROGRAMMATION
Préambule :
Nous utilisons la technologie radio pour la commande des mouvements. Le produit standard est livré avec un émetteur 2 boutons
à poser sur le mur. En option vous pouvez disposer d’une télécommande mono ou multi boutons.
Les fonctions disponibles sont :
� Enregistrement d’un code simple
� Enregistrement en mode centralisé
� Effacement d’un code
� Effacement de tous les codes
PROGRAMMATION
La programmation de ou des émetteurs s’effectue à l’aide du Bouton Poussoir situé sur le pack batterie. Avant de démarrer le
mode apprentissage, il faut positionner les volets proches de la position ‘ouvert’- environ 10 à 15 cm. L’état de programmation est
visualisé par le clignotement de la LED. Attention ! Lorsque le pack batterie est positionné entre les courroies utiliser impérativement
un stylo ou un petit tournis pour actionner le Bouton Poussoir.
Mode apprentissage et mise en mémoire d’un émetteur
-Effectuer 1 pression >2 secondes sur le Bouton Poussoir.
La LED clignote lentement ( ����….����…), démarrage du mode apprentissage
-Appuyer 1 fois simultanément sur les 2 touches de l’émetteur. Pression >1 sec.
L’enregistrement de l’émetteur est confirmé par le clignotement rapide de la LED ( �.�.�. )
Nota: Si l’émetteur est déjà en mémoire la LED clignotera lentement selon le mode apprentissage
Les volets se déplacent en butées ouverture puis en butées fermeture pour mémoriser la distance de déplacement : Ces mouvements
s’effectuent en vitesse lente. Un deuxième cycle d’ouverture/fermeture s’effectue à la vitesse normale d’utilisation.
Le mode apprentissage est terminé. La LED s’éteint, les volets sont en position fermée.
Programmation d’un émetteur supplémentaire
-Effectuer une pression courte <1 seconde sur le Bouton Poussoir.
La LED s’allume en continu
-Appuyer 1 fois simultanément sur les 2 touches de l’émetteur. Pression >1 seconde
L’enregistrement de l’émetteur est confirmé par le clignotement rapide de la LED ( �.�.�. )
Programmation en Mode Centralisé
-Effectuer une pression courte <2 secondes sur le Bouton Poussoir.
La LED s’allume en continu
-Effectuer une pression longue >2 secondes sur le Bouton Poussoir.
La LED clignote lentement ( ����..����..����.. )
-Appuyer 2 fois simultanément sur les 2 touches de l’émetteur. Pression >1 sec
L’enregistrement de l’émetteur est confirmé par le clignotement rapide de la LED ( �.�.�. )
La LED s’éteint, l’enregistrement est pris en compte.
Effacement d’un code
-Effectuer 2 pressions courtes <2 secondes sur le Bouton Poussoir.
La LED clignote rapidement ( �.�.�. )
-Appuyer 2 fois simultanément sur les 2 touches de l’émetteur. Pression >1 sec.
L’effacement de l’émetteur est confirmé par le clignotement rapide de la LED ( �.�.�. )
Effacement de toute la mémoire
-Effectuer 2 pressions courtes <2 secondes sur le Bouton Poussoir.
La LED clignote rapidement ( �.�.�. )
-Effectuer 1 pression > 10 secondes sur le Bouton Poussoir.
L’effacement total de la mémoire est confirmé par le clignotement rapide de la LED ( �.�.�. )
Motoreducteur Pack batterie Emetteur
LED
bouton
poussoir

NM V323 A 09-2014 MANTION SAS - 25000 Besançon - Tel +33 3 81 50 56 77 - Fax +33 3 81 85 38 79 - www.mantion.com 16/20
Symptômes Causes probables Solutions
Le cycle d’apprentissage ne démarre
pas La led clignote 4 fois Le pack batterie est déchargé Attendre 6 à 8 heures avant
d’actionner le volet
Le cycle d’apprentissage ne démarre
pas La led est allumé La commande est défectueuse Vérifier le branchement moteur-boîtier
de commande (voir notice de montage)
Le cycle d’apprentissage est terminé
mais l’émetteur n’actionne pas le volet
La led rouge clignote rapidement 5 fois
Aucun dispositif de commande n’est
relié au boîtier de commande
Vérifier que la languette de protection
de la pile soit enlevée. Vérifier que les
piles ne soient pas défectueuses (Led
allumée sur un appui)
Le cycle d’apprentissage ne démarre
pas La led est éteinte
La commande est défectueuse
Vérifier que la languette de protection
de la pile soit enlevée. Vérifier que les
piles ne soient pas défectueuses (Led
allumée sur un appui)
Le moteur n’est pas alimenté
Vérifier le branchement du boîtier de
commande à l’alimentation. Vérifier le
branchement de l’alimentation au
secteur
La commande d’ouverture déclenche la
fermeture du volet La commande est inversée Procéder à l’inversion de commande
des boutons de l’émetteur (voir notice)
La commande de fermeture déclenche
l’ouverture du volet La commande est inversée Procéder à l’inversion de commande
des boutons de l’émetteur (voir notice)
Le volet ne s’ouvre pas sur une
demande d’ouverture ou de fermeture
La commande est défectueuse Supprimer l’obstacle ou/et refaire un
apprentissage
Le pack batterie est déchargé Attendre 6 à 8 heures avant
d’actionner le volet
L’entraînement est bruyant (bruit de
claquement) Courroie détendue Vérifier la tension de la courroie. Elle ne
doit être ni détendue, ni trop tendue.
Le volet ne se ferme pas complètement
Présence d’un obstacle ou mauvais
apprentissage
Supprimer l’obstacle ou/et refaire un
apprentissage
Le pack batterie est déchargé Attendre 6 à 8 heures avant
d’actionner le volet
Le volet ne s’ouvre pas complètement
Présence d’un obstacle ou mauvais
apprentissage
Supprimer l’obstacle ou/et refaire un
apprentissage
Le pack batterie est déchargé Attendre 6 à 8 heures avant
d’actionner le volet
Le volet se ferme violemment Mauvais apprentissage Refaire un apprentissage
Le volet s’ouvre violemment Mauvais apprentissage Refaire un apprentissage
L’entraînement est bruyant
(bruit de claquement) Courroie détendue Retendre la courroie
AIDE AU DIAGNOSTIC
Inversion de la commande des boutons de l’émetteur
Ceci dans le cas ou une pression sur le bouton repéré (><) de l’émetteur commande l’ouverture des volets.
Positionner le volet proche de la position ‘fermée’ environ 10 à 15 c.
Dans cette nouvelle position, relancer une programmation selon instructions du paragraphe Mode apprentissage et mise en
mémoire d’un émetteur.

NM V323 A 09-2014 MANTION SAS - 25000 Besançon - Tel +33 3 81 50 56 77 - Fax +33 3 81 85 38 79 - www.mantion.com 17/20
FUNKTIONSBESCHREIBUNG
FUNKSTEUERUNG
Folgende Funktionen sind vorrätig:
Programmierung eines Codes
Programmierung der Coden bei der Zentralsteuerung
Löschen eines Coden
Löschen allen Coden
PROGRAMMIERUNG :
Die Programmierung (der) des Sender(s) erfolgt mittels des Batterieknopfes.
Bevor Sie den Einlernvorgang (Learning mode) anfangen, soll der Schiebeladen in eine fast „offene Position“ gebracht werden
(10 bis 15 cm vom Stopper entfernt).
ACHTUNG: Ein Schraubenzieher oder eine Stiftspitze werden benötigt, um auf den Batterieknopf zu drucken.
EINLERNVORGANG (LEARNING MODE) UND SPEICHERUNG DES ERSTEN SENDERS
- Mehr als 2 Sekunden auf den Batterietaste drücken
Die LED-Diode blinkt dann langsam ( ����….����…)
- 1 Mal für mehr als 1 Sekunde gleichzeitig auf sender Tasten drücken.
Die Speicherung vom Sender wird durch ein schnelles Blinken der LED bestätigt.
- Das langsame Blinken der LED bedeutet „Einlernvorgang“.
N.B.: Falls der Code des Senders, den Sie eingeben, vorher im Empfänger gespeichert worden ist, wird die LED nicht schnell
sondern langsam blinken.
Der Schiebeladen geht langsam in Anschlag „Öffnung“ und in Anschlag „Schliessen“, um die Fahrtlänge zu speichern.
Eine zusätzliche „Auf und Zu“ Fahrt erfolgt dann zu einer normalen Geschwindigkeit.
Der „Einlernvorgang“ beendet sich dann in geschlossener Position des Schiebeladens und die LED leuchtet aus.
PROGRAMMIERUNG EINES ZUSÄTZLICHEN SENDERS
Auf den Batterieknopf kurz (für weniger als 1 Sekunde) drücken.
Die LED leuchtet dann.
Gleichtzeitig auf beiden Sendertasten, für mehr als 1 Sekunde drücken.
Die Speicherung wird durch ein schnellen Blinken der LED bestätigt ( �.�.�. )
PROGRAMMIERUNG DER ZENTRALSTEUERUNG
Auf den Batterieknopf kurz (weniger als 2 Sekunden) drücken.
Die LED leuchtet dann.
Dann für mehr als 2 Sekunden auf diesen Knopf drücken.
Die LED blinkt dann langsam laut folgender Frequenz : ( ����….����…)
2 Mal gleichzeitig auf beiden Sendertasten für länger als 1 Sekunde drücken
Die Speicherung wird durch ein schnelles Blinken der LED bestätigt. ( �.�.�. )
Die LED-Diode leuchtet aus, die Programmierung ist jetzt gespeichert.
LÖSCHVORGANG DES CODES :
2 Mal kurz (weniger als 2 Sekunden) auf den Batterieknopf drücken
Die LED blinkt schnell laut folgender Frequenz ( �.�.�. )
2 Mal gleichzeitig auf beiden Sendertasten für länger als 1 Sekunde drücken.
Das Löschen des Sendercodes wird durch ein schnelles Blinken der LED bestätigt ( �.�.�. )
LÖSCHEN DER GANZEN SPEICHERUNG :
2 Mal kurz (weniger als 2 Sekunden) auf den Batterieknopf drücken
Die LED blinkt schnell laut folgender Frequenz ( �.�.�. )
Dann für länger als 10 Sekunden auf diesen Knopf drücken.
Das gesamte Löschen der Speicherung wird durch ein schnelles Blinken der LED bestätigt (�.�.�.)
Motor Batterie Sender
LED
Knopf

NM V323 A 09-2014 MANTION SAS - 25000 Besançon - Tel +33 3 81 50 56 77 - Fax +33 3 81 85 38 79 - www.mantion.com 18/20
Fehlerbeschreibung Mögliche Ursachen Lösungen
Lernzyklus startet nicht.
LED blinkt 4 Mal auf Batteriepack ist entladen 6 bis 8 Stunden warten, bevor der
Fensterladen betätigt wird.
Lernzyklus startet nicht. LED leuchtet
auf Steuerung defect
Prüfen, ob der Schutzstreifen von der
Batterie abgezogen ist Zustand der
Batterien überprüfen (LED leuchtet auf
Knopfdruck auf)
Lernzyklus startet nicht. LED leuchtet
nicht
Steuerung defect
Prüfen, ob der Schutzstreifen von der
Batterie abgezogen ist Zustand der
Batterien überprüfen (LED leuchtet auf
Knopfdruck auf)
Der Motor bekommt keinen Strom
Anschluss des Steuergeräts an
die Stromversorgung überprüfen
Netzanschluss der Stromversorgung
überprüfen
Der Öffnungsbefehl löst das Schließen
des Fensterladens aus Steuerung vertauscht Die Steuerung der Senderbedienknöpfe
umkehren (s.Bedienungsanleitung)
Der Schließbefehl löst das Öffnen des
Fensterladens auf Steuerung vertauscht Die Steuerung der Senderbedienknöpfe
umkehren (s.Bedienungsanleitung)
Der Fensterladen wird auf Öffnungs-
bzw. Schließanforderung nicht
geöffnet
Steuerung defect Batteriezustand überprüfen (LED
leuchtet auf Knopfdruck auf)
Batteriepack ist entladen
Kabelbaumanschluss überprüfen:
6 bis 8 Stunden warten, bevor der
Fensterladen betätigt wird.
Der Fensterladen schließt nicht
vollständig
Hindernis im Weg oder falsches
Anlernen
Hindernis entfernen und/oder Anlernen
wiederholen.
Batteriepack ist entladen 6 bis 8 Stunden warten, bevor der
Fensterladen betätigt wird.
Der Fensterladen wird nicht
vollständig geöffnet
Hindernis im Weg oder falsches
Anlernen
Hindernis entfernen und/oder Anlernen
wiederholen.
Batteriepack ist entladen 6 bis 8 Stunden warten, bevor der
Fensterladen betätigt wird.
Der Fensterladen schlägt zu Falsches Anlernen Anlernen wiederholen.
Der Fensterladen geht schlagartig auf Falsches Anlernen Anlernen wiederholen.
Der Antrieb ist laut (Schlaggeräusch) Riemen locker Riemen nachspannen
DIAGNOSE EBENE
FUNKTIONSUMTAUSCH DER SENDERTASTEN
Der Funktionsumtausch ist notwendig, falls sich die Fensterläden beim Drücken auf der > < Sendertaste öffnen.
Bevor das Sie eine Einlernvorgang wieder durchführen, soll der Laden In eine fast «zu Position» gebracht werden (10 bis 15 cm)
Dann eine Einlernvorgang (learning mode)wieder durchführen wie in Notiz beschrieben.

PROGRAMMING INSTRUCTIONS
In our system, the sliding movements are ensured via radio control technology.
The standard version includes a 2 button transmitter which is to be placed on the wall. As an option, we offer a mono or multi-
button remote control.
The available functions are the following ones:
- setting of code
- setting in central mode
- resetting a code
- resetting all code
PROGRAMMING
The programming of the transmitter(s) is made via the push button on the battery-pack.
Before starting learn mode, the shutters must be positioned close to the “open” position (approx. 10 to 15 cm).
The programming status is confirmed by the blinking of the LED
CAUTION! : a screwdriver must be used to activate the push button on the battery.
Learning mode and saving
Push once for more than 2 seconds on the Push button on the battery.
The LED will blink slowly ( ����….����…), the learning mode has now started.
Push on the 2 switches on the transmitter simultaneously for more than 1 second.
The transmitter setting will be confirmed by a rapid blinking of the LED ( �.�.�. )
Nota : if the transmitter has previously been saved, the LED will blink slowly like in learning mode.
The shutters slide up to the opening stop positions and then to the closing stop position in order to save the travel distance. This
occurs at slow speed. A second opening/closing cycle occurs at normal speed.
The learning mode has been completed. The LED goes out.
Programming of an additional transmitter
Press briefly (less than 1 second) on the push button of the battery.
The LED will light up.
Press on both transmitter buttons once simultaneously for more than 1 second.
The setting of the transmitter will be confirmed by a rapid blinking of the LED ( �.�.�. )
Programming in centralised mode
Press on the push button for less than 2 seconds.
The LED will light up.
Press on the push button once for more than 2 seconds
The LED will blink slowly ( ����….����…)
Press on both transmitter buttons simultaneously for more than 1 second. Repeat.
The setting of the transmitter will be confirmed by a rapid blinking of the LED ( �.�.�. )
The LED shuts off, the setting has been saved.
Deleting a code
Quickly press the push button twice for less than 2 seconds.
The LED will blink quickly ( �.�.�. ) .
Press on both transmitter buttons simultaneously and for more than 1 second. Repeat
The deletion of the code will be confirmed by a rapid blinking of the LED. ( �.�.�. )
Deleting of the entire memory
Quickly press the push button twice for less than 2 seconds.
The LED will blink quickly ( �.�.�. )
Then press again on this button and hold for more than 10 seconds till the LED goes out.
The entire memory has been deleted.
Motor Battery Transmitter
LED
Button
NM V323 A 09-2014 MANTION SAS - 25000 Besançon - Tel +33 3 81 50 56 77 - Fax +33 3 81 85 38 79 - www.mantion.com 19/20

symptoms Possible causes Solutions
The learning cycle does not start.
The LED blink 4 times The battery pack is empty Wait 6 to 8 hours before using the
shutter.
The learning cycle does not start.
The LED is ON The order is defective
Verify that protective cover of the
battery is removedVerify that the
battery is not defective (the LED is ON
while pushing)
The learning cycle does not start
The LED is OFF
The order is defective
Verify that protective cover of the
battery is removedVerify that the
battery is not defective (the LED is ON
while pushing)
The motor is not powered
Verify the plug between the control
box and the power supply Verify the
power supply connection
The opening button make the
shutter closing The order is inverted
Proceed to the reversal of the functions
of the transmitter buttons
(see programming instructions)
The closing button make the
shutter opening The order is inverted
Proceed to the reversal of the functions
of the transmitter buttons
(see programming instructions)
The shutter does not start when there
is an opening or closing order
The order is defective Verify that the battery is not defective
(the LED is ON while pushing)
The battery pack is empty Verify the electrical wire plug : Wait 6
to 8 hours before using the shutter.
The shutter does not close completely
There is an obstacle or bad learning Remove the obstacle and/or do a
learning cycle again
The battery pack is empty Verify the electrical wire plug : Wait 6
to 8 hours before using the shutter.
The shutter does not close completely
There is an obstacle or bad learning Remove the obstacle and/or do a
learning cycle again
The battery pack is empty Verify the electrical wire plug : Wait 6
to 8 hours before using the shutter.
The shutter is hardly closing Bad learning Do a learning cycle again
The shutter is hardly opening Bad learning Do a learning cycle again
The drive is noisy (popping noise) Belt relaxed Tighten the belt
DIAGNOSTIC HELP
Reversal of the functions of the transmitter buttons
This operation is necessary in case where the shutters open by pressing the (>< ) button of the transmitter.
Position the shutters near the ‘close’ position (approx. 10 to 15 cm). In this new position, start again the operation Learning mode
and saving.
NM V323 A 09-2014 MANTION SAS - 25000 Besançon - Tel +33 3 81 50 56 77 - Fax +33 3 81 85 38 79 - www.mantion.com 20/20
Table of contents
Languages:
Other Mantion Indoor Furnishing manuals


Popular Indoor Furnishing manuals by other brands

Costway
Costway AD10018 user manual

Riverside Furniture
Riverside Furniture Verona Assembly instructions

VonHaus
VonHaus 3000319 quick start guide

El Corte Inglés
El Corte Inglés GABO 510-06847 quick start guide

BetaLife
BetaLife GARRETT 21995 Assembly instructions

NOA & NANI
NOA & NANI OTTO DISPLAY CABINET Assembly instructions


