Connections to the Water Source:
We recommend that a wye-strainer and valve be installed on the supply piping serving the hydrant. This valve should be
in a convenient and easily accessible location. Because the drain port operates as an auto-drain, a second drain-down
valve is not required between this port and the termination point of the discharge piping. The drain-down piping should
discharge open-site to a sanitary receptacle such as a mop sink. Local, governing plumbing codes should be followed
when installing this hydrant and making piping connections to the building water system. Optimal water pressure at the
hydrant supply should be 60 PSI (typical city
water pressure), however it will still operate
properly at a minimum of 20 PSI.
MAPA PRODUCTS MPH-24D PEDESTAL HYDRANT
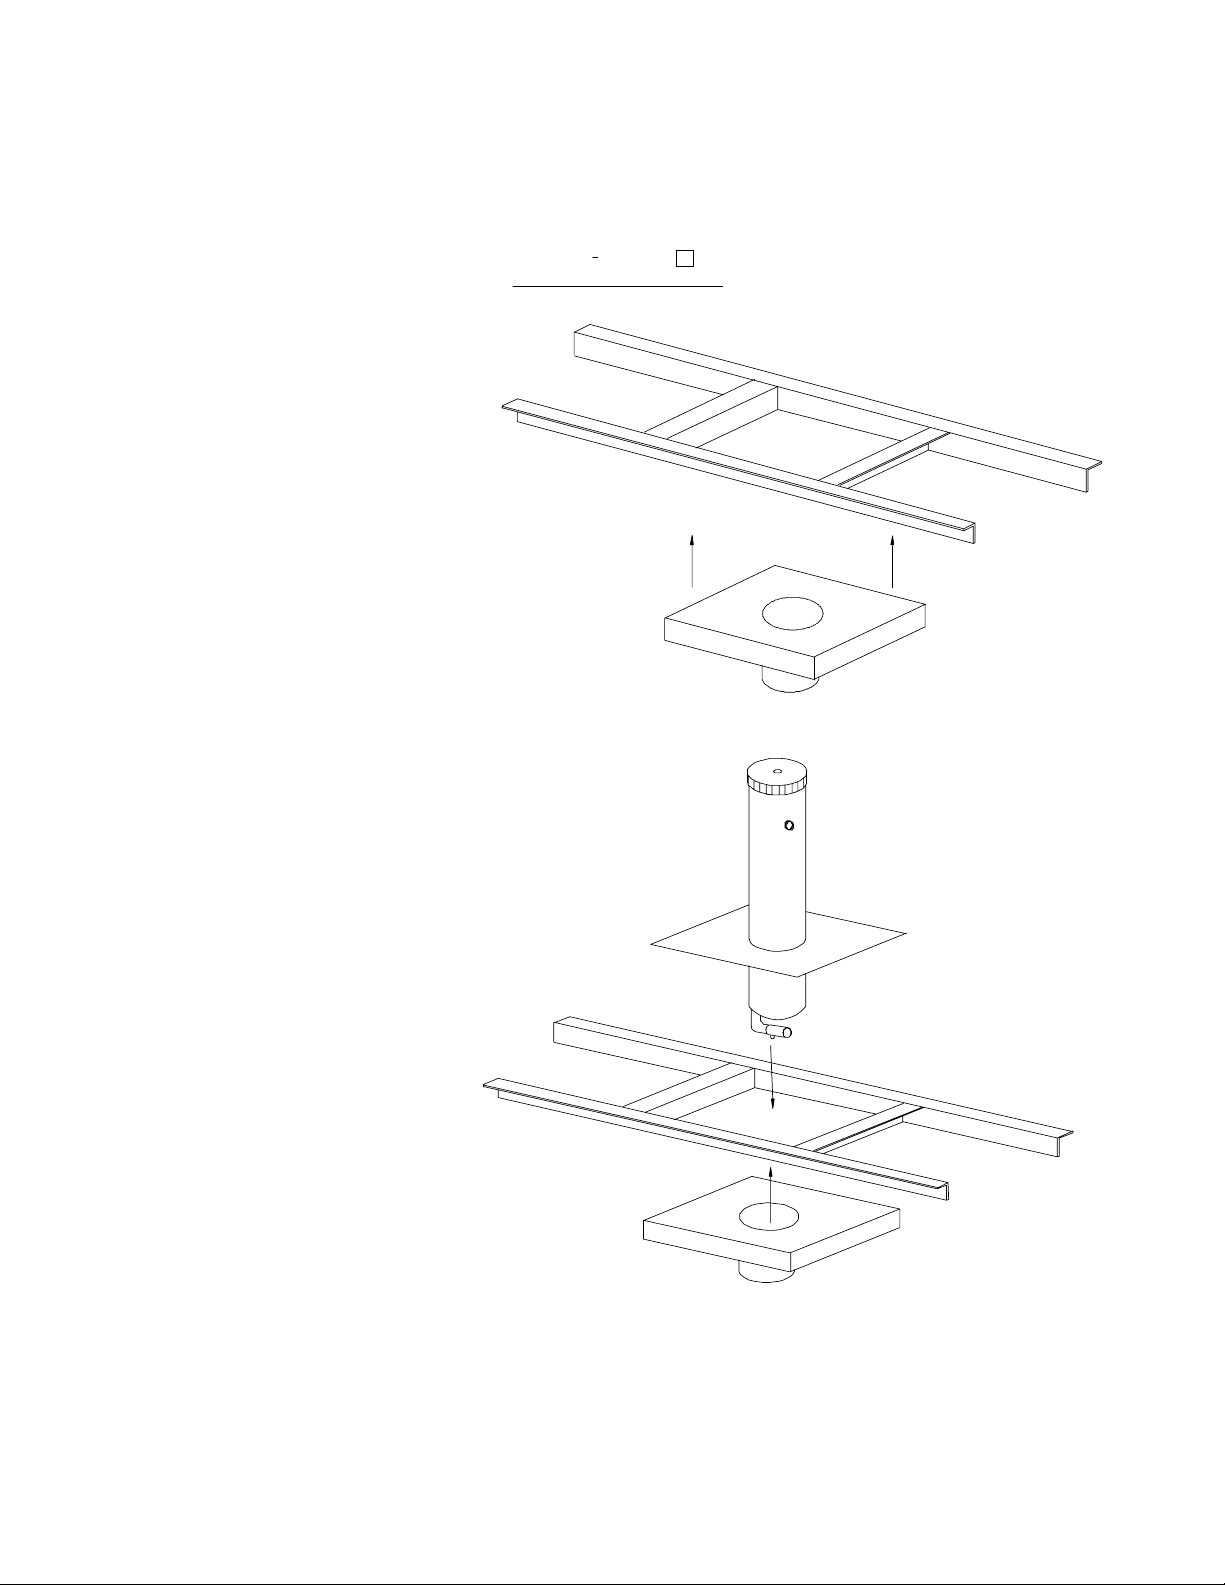
Welded AngleFrame Detail
ID Dimension 12- 1
2inches square
Secure Angle Framing To Support Structure
Figure 1
Under-deck flange should
freely slide upward into
angle frame opening.
Installation of the Hydrant: A hole
approximately six inches (6”) in diameter
should be cut in the roof decking. The hole
should be centered on an angle frame
welded to the roof structure below the
decking. Once roof insulation is in place, cut
through the insulation and place the Hydrant
base squarely onto the roof surface. Square
the Hydrant, pointing the nozzle in the
desired direction.
Refer to Figure 2.
Caution should be taken to assure that the
Hydrant is vertically level above the roof. We
do not recommend installing the Hydrant
within four feet of the edge of the roof or
within three feet of other roof top equipment
or on any sloping surfaces of the roof.
Installation of the Under-deck Flange:
Once roofing work at the Hydrant has been
completed, the under-deck flange should
be installed. Slide the under-deck flange
from below, over the lower portion of the
hydrant’s shroud. Snug the flange securely
to the deck and angle framing. Using the
four (4) ¼” X 1 ½” bolts, secure the flange
to the angle framing. Care should be taken
to insure that the under-deck flange is firm
against the bottom of the roof deck while
tightening these set screws. See Figure 3
Figure 2
Insert Hydrantthrough roof
insulation at center of angle
framing.
Slide Under-Deck flange over stainless
shroud snug to roof decking.
Attach with hardware. See Figure 3
Next, using the four (4) ¼” X 1” set screws,
securely fasten the under-deck flange to
the stainless tubing.
Refer to Figure 3 of the Instructions.
Water Supply Test: It is recommended
that the water supply be thoroughly tested
prior to activating the Hydrant. To avoid
damage to the valve ball, stem or seat, the
water supply system should also be purged
of all foreign materials before the supply
valve to the Hydrant is opened.
Winterizing - Severe Weather Drain-down: If the drain-down port on the ball valve of the hydrant discharges in a
downward sloping manner and is terminated open-site at a sanitary receptacle then there is no concern that the
assembly or stand-pipe will be subject to freezing. Caution: To insure positive discharge of the water remaining in the
stand-pipe after the valve is closed, any hose or fitting connected to the outlet of the hydrant should be removed.
MAPA Products, LLC Box 129 Naples, Texas 75568 Phone (903) 897-2371 Watts (877) 897-2371 Fax (903) 897-2781
Page 2 of 4


