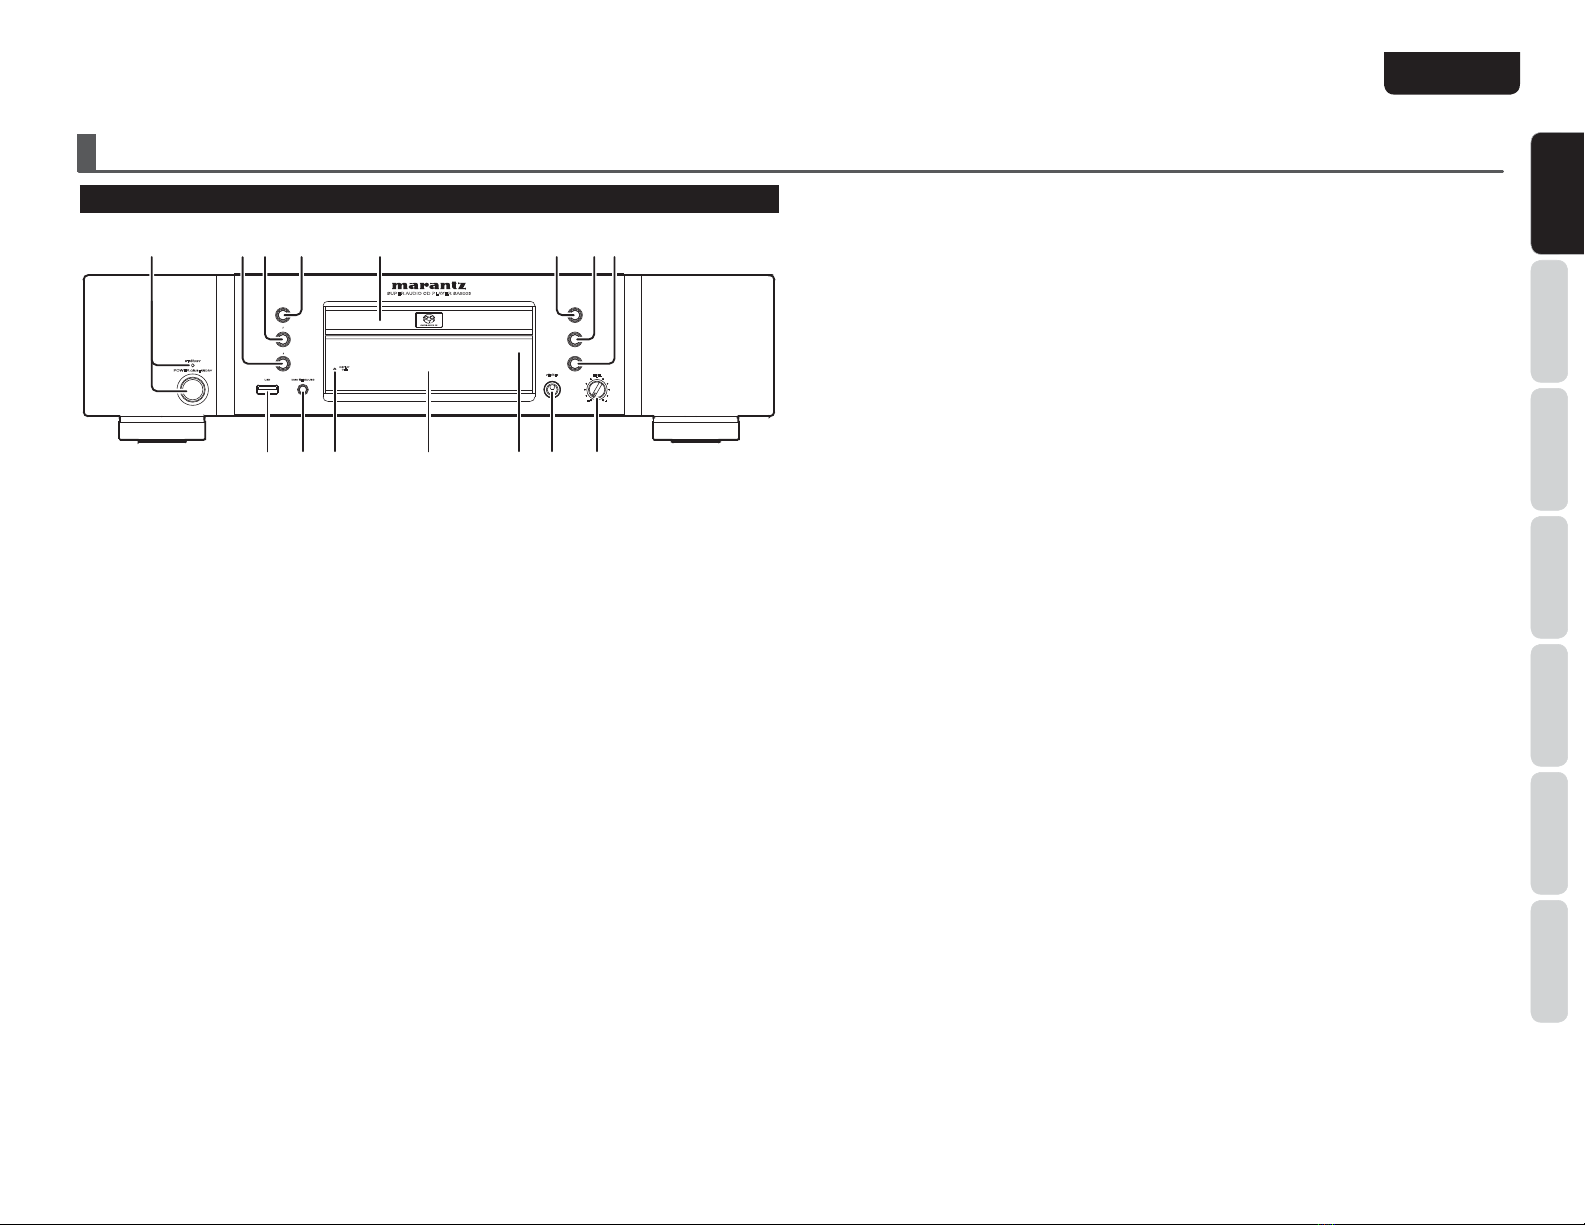
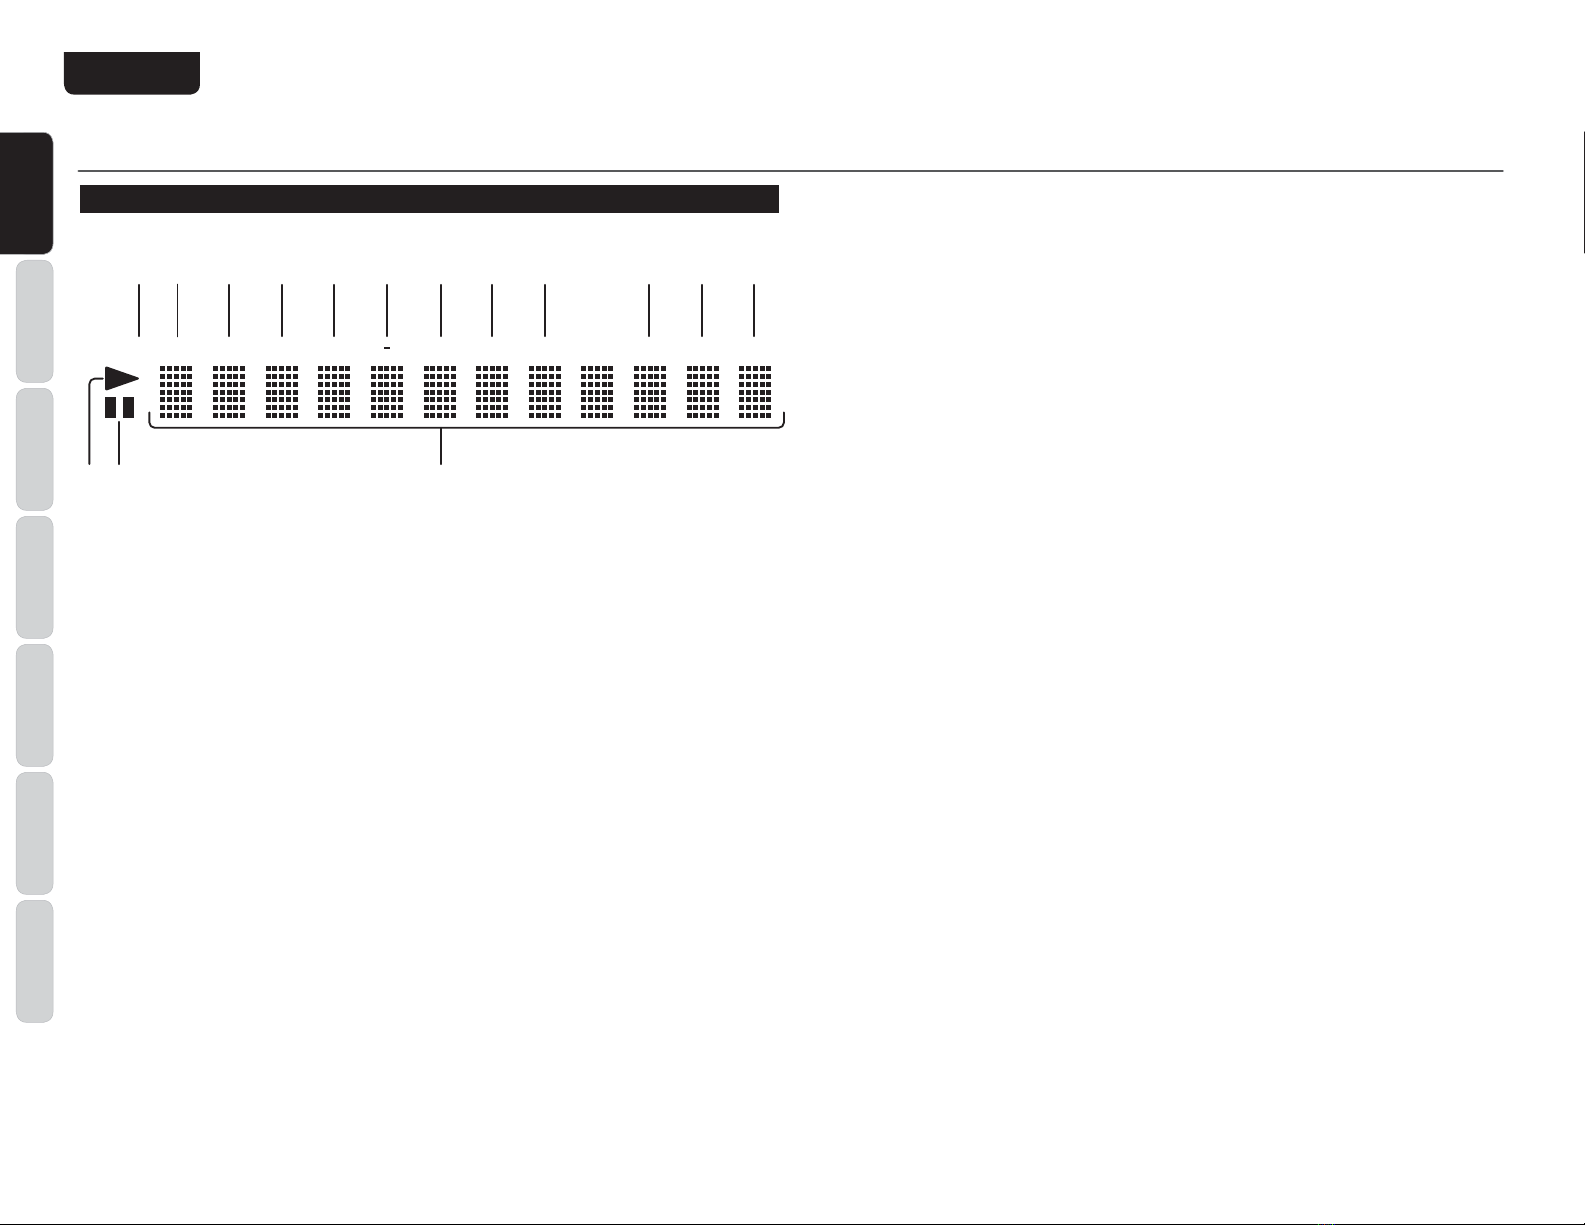
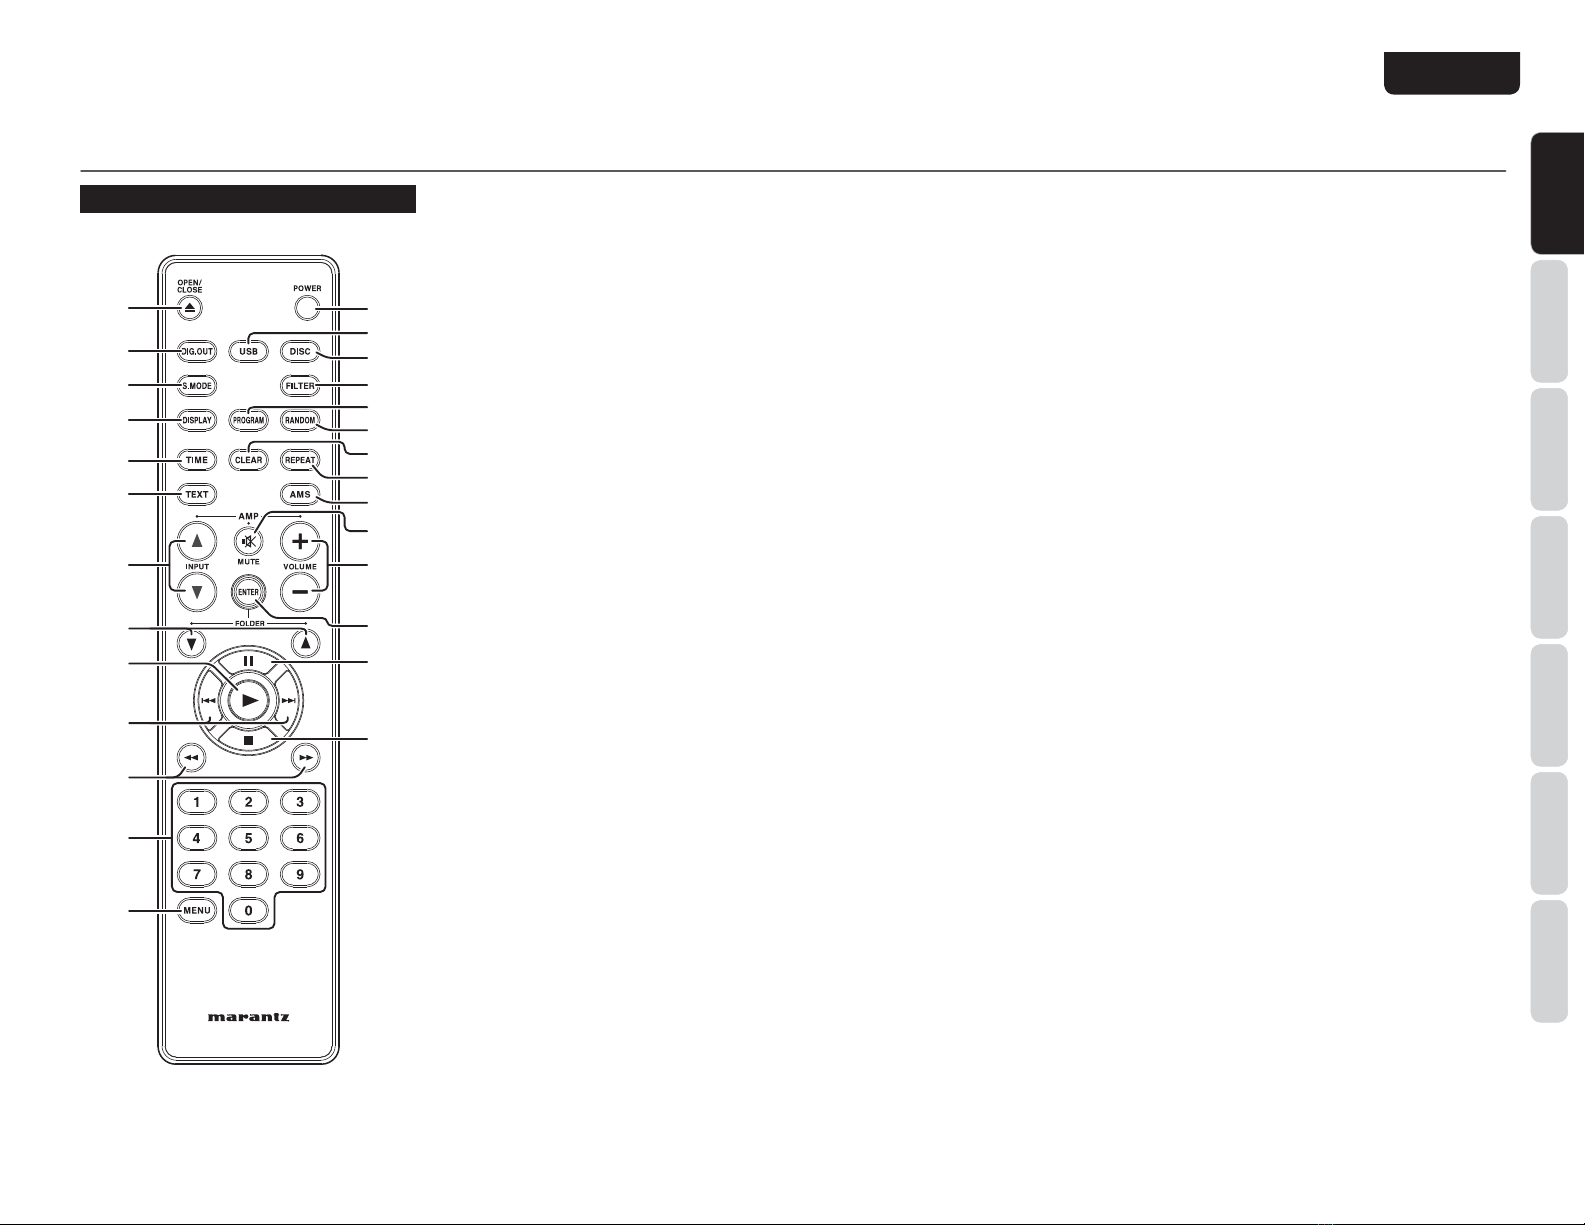
Marantz SA8003 User manual

Super Audio CD player
SA8003
ENGLISHFRANÇAISESPAÑOL

CAUTION
RISK OF ELECTRIC SHOCK
DO NOT OPEN
CAUTION:TO REDUCETHE RISK OF ELECTRIC SHOCK,
DO NOT REMOVE COVER (OR BACK) NO USER-SERVICEABLE
PARTS INSIDE REFER SERVICINGTO QUALIFIED
SERVICE PERSONNEL
The lightning flash with arrowhead symbol within an equilateral triangle is
intended to alert the user to the presence of uninsulated “dangerous voltage”
within the product’s enclosure that may be of sufficient magnitude to constitute
a risk of electric shock to persons.
The exclamation point within an equilateral triangle is intended to alert the
user to the presence of important operating and maintenance (servicing)
instructions in the literature accompanying the product.
WARNING
TO REDUCE THE RISK OF FIRE OR ELECTRIC SHOCK, DO NOT EXPOSE THIS APPLIANCE
TO RAIN OR MOISTURE.
CAUTION: TO PREVENT ELECTRIC SHOCK, MATCH WIDE BLADE OF
PLUG TO WIDE SLOT, FULLY INSERT.
ATTENTION: POUR EVITER LES CHOCS ELECTRIQUES, INTRODUIRE
LA LAME LA PLUS LARGE DE LA FICHE DANS LA BORNE CORRESPON-
DANTE DE LA PRISE ET POUSSER JUSQU’AU FOND.
LASER SAFETY
This unit employs a laser. Only a qualified service person should remove the cover or attempt to service
this device, due to possible eye injury.
CAUTION : USE OF CONTROLS OR ADJUSTMENTS OR PERFORMANCE
OF PROCEDURE OTHER THAN THOSE SPECIFIED HEREIN MAY
RESULT IN HAZARDOUS RADIATION EXPOSURE.
IMPORTANT SAFETY
INSTRUCTIONS
READ BEFORE OPERATING EQUIPMENT
This product was designed and manufactured to meet strict quality and safety standards.
There are, however, some installation and operation precautions which you should be particularly aware of.
1. Read these instructions.
2. Keep these instructions.
3. Heed all warnings.
4. Follow all instructions.
5. Do not use this apparatus near water.
6. Clean only with dry cloth.
7. Do not block any ventilation openings. Install in accordance with the manufacture's instructions.
8. Do not install near any heat sources such as radiators, heat registers, stoves, or other apparatus
(including amplifiers) that produce heat.
9. Do not defeat the safety purpose of the polarized or grounding-type plug. A polarized plug has two
blades with one wider than the other. A grounding type plug has two blades and a third grounding
prong. The wide blade or the third prong are provided for your safety. If the provided plug does not fit
into your outlet, consult an electrician for replacement of the obsolete outlet.
10. Protect the power cord from being walked on or pinched particularly at plugs, convenience
receptacles, and the point where they exit from the apparatus.
11. Only use attachments/accessories specified by the manufacturer.
12. Use only with the cart, stand, tripod, bracket, or table specified by the manufacturer, or sold with the
apparatus. When a cart is used, use caution when moving the cart/apparatus combination to avoid
injury from tip-over.
13. Unplug this apparatus during lightning storms or when unused for long periods of time.
14. Refer all servicing to qualified service personnel. Servicing is required when the apparatus has been
damaged in any way, such as power-supply cord or plug is damaged, liquid has been spilled or
objects have fallen into the apparatus, the apparatus has been exposed to rain or moisture, does not
operate normally, or has been dropped.
Additional Safety Information!
s
This product should not be placed in a built-in installation such as a bookcase or rack unless proper
ventilation is provided or the manufacturer’s instructions have been adhered to.
s !PPARATUSSHALLNOTBEEXPOSEDTODRIPPINGORSPLASHINGANDTHATNOOBJECTSlLLEDWITHLIQUIDSSUCHAS
vases, shall be placed on the apparatus.
s 7HENTHESWITCHISINTHE/&&POSITIONTHEAPPARATUSISNTCOMPLETELYSWITCHEDOFFFROMTHE-!).3
s 4HEEQUIPMENTSHALLBEINSTALLEDNEARTHEPOWERSUPPLYSOTHATTHEPOWERSUPPLYISEASILYACCESSIBLE
s $ONOTEXPOSETHEUNITANDBATTERIESTOEXCESSIVEHEATSUCHASDIRECTSUNLIGHTlREORTHELIKE
s -AKEASPACEOFABOUTINCHSMAROUNDTHEUNIT

OPT_080602U2
NOTE:
This equipment has been tested and found to comply
with the limits for a Class B digital device, pursuant
to Part 15 of the FCC Rules. These limits are
designed to provide reasonable protection against
harmful interference in a residential installation. This
equipment generates, uses and can radiate radio
frequency energy and, if not installed and used in
accordance with the instructions, may cause harmful
interference to radio communications. However, there
is no guarantee that interference will not occur in a
particular installation. If this equipment does cause
harmful interference to radio or television reception,
which can be determined by turning the equipment off
and on, the user is encouraged to try to correct the
interference by one or more of the following measures:
- Reorient or relocate the receiving antenna.
- Increase the separation between the equipment and
receiver.
- Connect the equipment into an outlet on a circuit
different from that to which the receiver is connected.
- Consult the dealer or an experienced radio/TV
technician for help.
NOTE:
Changes or modifications may cause this unit to fail to
comply with Part 15 of the FCC Rules and may void
the user's authority to operate the equipment.
This Class B digital apparatus complies with Canadian
ICES-003.
Cet appareil numerique de la Classe B est conforme a
la norme NMB-003 du Canada.
DECLARATION OF CONFORMITY
U.S. Responsible Party: Marantz America, Inc.
100 Corporate Drive,
Mahwah, NJ, 07430, U.S.A.
TEL: 201-762-6500
Type of Product:
Model:
Super Audio CD player
SA8003
This device complies with Part 15 of the FCC rules. Operation is subject to the
following conditions: (1) This device may not cause harmful interference, and (2) this
device must accept any interference received, including interference that may cause
undesired operation.

1
NAMES AND
FUNCTIONS
BASIC
CONNECTION
BASIC
OPERATION
ADVANCED
CONNECTIONS
APPLICATION
OPERATION
TROUBLESHOOTING
OTHERS
ENGLISH
sAudio connecting cord
sRemote control connecting cord
sUser Guide
INTRODUCTION
Thank you for selecting the Marantz Super Audio CD Player for your Audio system.
This Player incorporates a number of features designed to enhance the listening of your favorite audio
sources.
Please read these operating instructions carefully. We recommend that you read the entire user guide before
you attempt to connect or operate the player.
After you have reviewed the contents of this manual, we suggest that you make all system connections
before you attempt to operate the unit.
CHECKING THE ACCESSORIES
After opening the cover of the packing box, check
that the following accessories are included.
sRemote controller
sSize
“AAA”batteries x 2
sAC Power cord
CONTENTS
FEATURES ........................................................2
FEATURES....................................................................... 2
APPLICABLE DISCS TO THE UNIT ............................ 2
BEFORE USING ............................................... 3
USAGE OF REMOTE CONTROLLER ........................... 4
NAMES AND FUNCTIONS............................ 5
FRONT PANEL................................................................ 5
DISPLAY .......................................................................... 6
REMOTE CONTROLLER................................................ 7
REAR PANEL .................................................................. 8
BASIC CONNECTIONS .................................. 9
CONNECTING TO AN AMPLIFIER ............................. 9
USB MEDIA/iPod CONNECTION ............................... 9
CONNECTING THE POWER SUPPLY......................... 9
BASIC OPERATION ...................................... 10
NORMAL PLAYBACK.................................................. 10
PLAYING YOUR FAVORITE TRACKS OF A DISC .... 10
PLAYING YOUR FAVORITE PARTS OF A DISC
(SEARCH)...................................................................... 10
ADVANCED CONNECTIONS....................... 11
CONNECTING TO A DIGITAL AUDIO
COMPONENT............................................................... 11
REMOTE CONTROL CONNECTION.......................... 12
TIMER PLAY ................................................................. 12
APPLICATION OPERATION (CD OPERATION)
.....14
TO CHANGE TIME DISPLAY...................................... 14
REPEATED DISC PLAY (REPEATPLAY) .................... 14
PLAYING TRACKS IN A RANDOM SEQUENCE
(RANDOM PLAY) ......................................................... 14
PLAYING TRACKS IN A SPECIFIC SEQUENCE
(PROGRAM PLAY)....................................................... 14
TO CHECK THE PROGRAMMED TRACKS .............. 15
SEARCHING YOUR FAVORITE TRACKS
(AMS (AUTOMATIC MUSIC SCAN) PLAY)............. 15
SWITCHING SOUND MODE
(SUPER AUDIO CD)..................................................... 15
SETTING THE DIGITAL OUTPUT .............................. 16
APPLICATION OPERATION
(USB/iPod OPERATION)..............................17
NORMAL PLAYBACK.................................................. 17
PLAYING YOUR FAVORITE TRACKS ........................ 18
PLAYING YOUR FAVORITE PARTS OF A
TRACK (SEARCH) ........................................................ 18
USB MEDIUM OPERATION....................................... 19
iPod OPERATION......................................................... 21
TROUBLESHOOTING....................................23
OTHERS ..........................................................25
SPECIFICATIONS & DIMENSIONAL
DRAWINGS .................................................................. 27
NOTES ABOUT THE DISCS ....................................... 28
ABOUT USB MEDIA ................................................... 28

2
NAMES AND
FUNCTIONS
BASIC
CONNECTION
BASIC
OPERATION
ADVANCED
CONNECTIONS
APPLICATION
OPERATION
TROUBLESHOOTING
OTHERS
ENGLISH
FEATURES
FEATURES
This unit can play back the outstanding sound
performance of Super Audio CDs. This unit has the
following major features.
sLow-noise low-distortion filter circuit and
high-speed HDAMSA2-type output amplifier
with the differential input type HDAM
sPlayback of CD-R/CD-RW discs
sPlayback of CD-R/CD-RW/CD-ROM discs
containing WMA and MP3 files
sToroidal transformer
The SA8003 features a toroidal transformer that
produces less vibration and magnetic leakage flux
compared to conventional power transformers.
The materials and manufacturing process of the
ring-shaped core are strictly controlled to reduce
vibration, while the short-ring attached to the
perimeter of the transformer reduce magnetic
leakage flux.
sLarge-capacitance block capacitor
A large capacitance 3300 μF capacitor carefully
selected for its acoustic characteristics is
incorporated into the power supply circuit.
sAudiophile-grade film capacitors and
electrolytic capacitors
The SA8003 features the same audiophile-
grade film capacitors and electrolytic capacitors
specifically used in top-range models.
sDouble-layered chassis
sHigh-grade machined analog audio output
connectors
sPlayback of USB audio (MP3/WMA/WAV)/
iPod
This unit can play back MP3, WMA, WAV, and
AAC files by connecting an USB device or iPod to
its USB connector.
APPLICABLE DISCS TO THE UNIT
1. HjeZg6jY^d89
The Super Audio standard is based on Direct Stream
Digital (DSD) technology. This new direct-stream
digital format comprises a 1-bit system that has a
digital sampling frequency that is 64 times higher
than that of conventional audio CD. The results are
spectacular: a frequency response of over 100k Hz
and a 120 dB dynamic range over the entire audible
spectrum. Mixed with as many of the original
frequencies as possible, the audio information
audible for human ears sounds much more natural.
All audible frequencies are, after all, embedded
in the frequency range as emitted by the sound
source. A better reproduction does not exist! For
the first time your ears will relive reality.
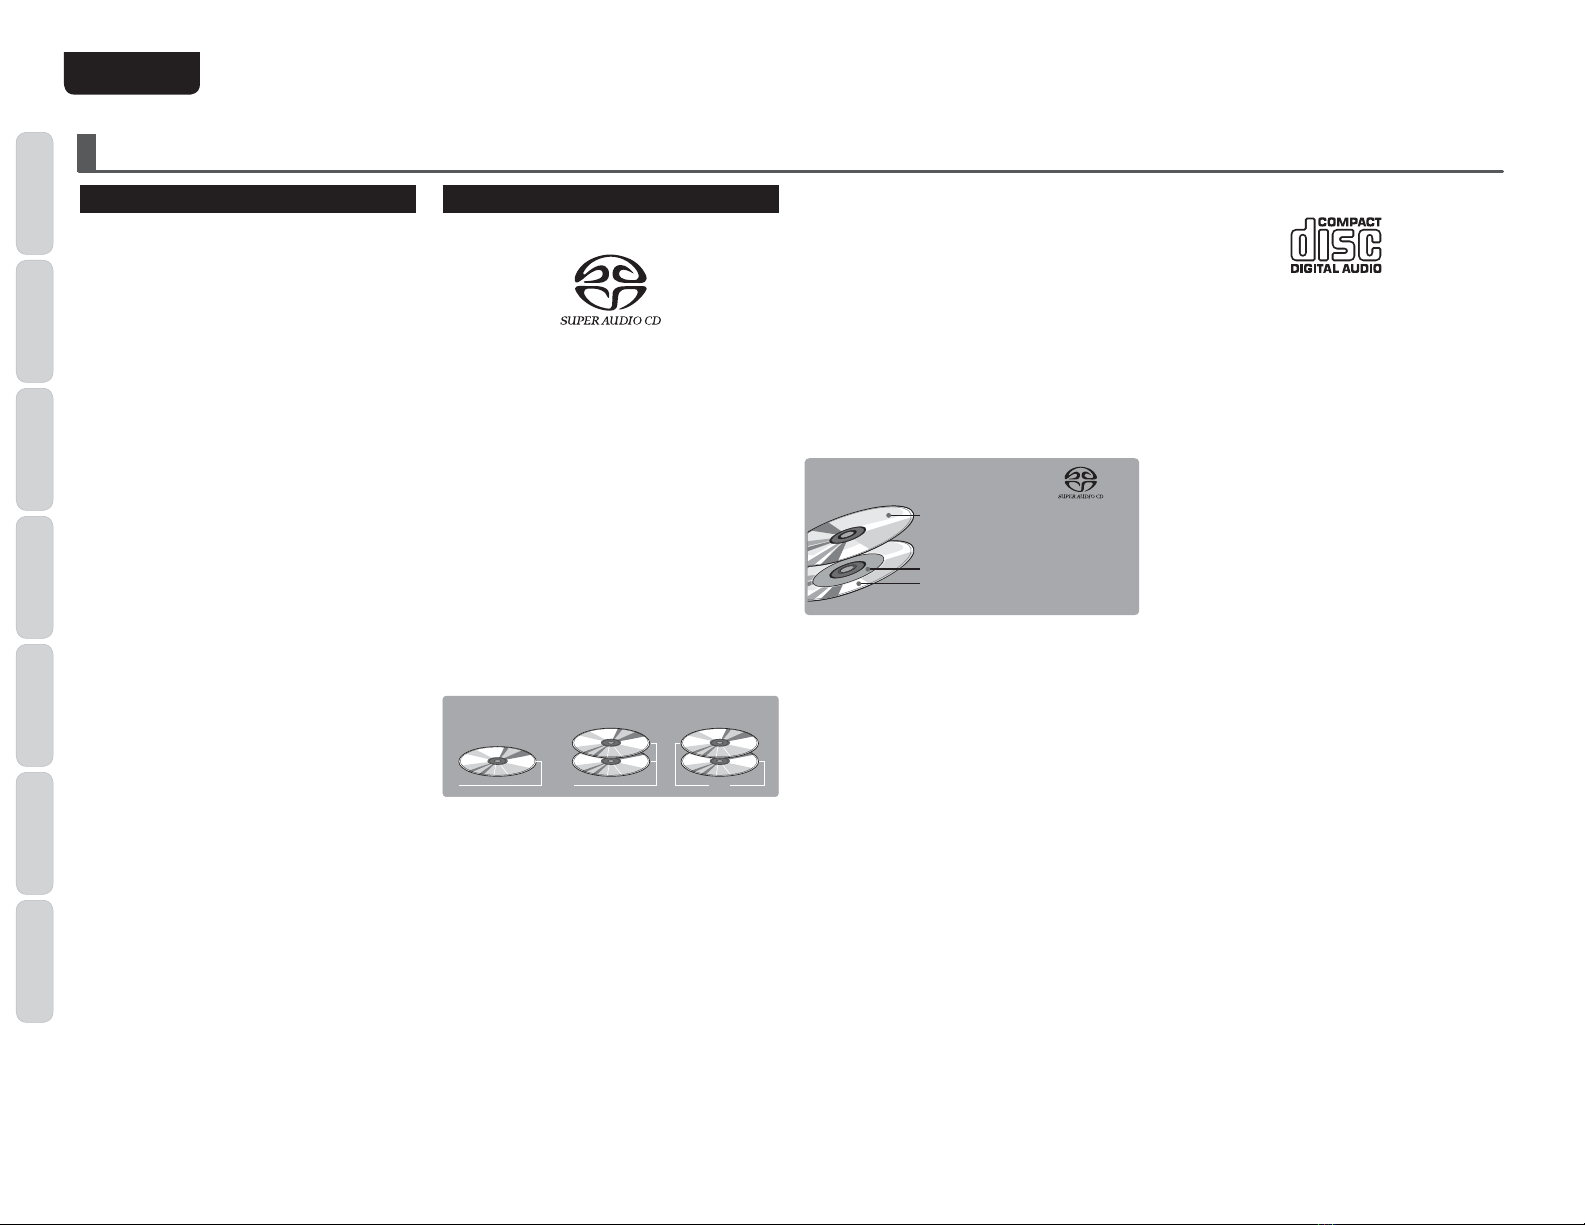
There are three types of Super Audio CDs.
sSingle-layer Disc
sDual-layer Disc
sHybrid-layer Disc
Disc Types
Single-layer Disc
Dual-layer Disc Hybrid-layer Disc
HD layer HD layer CD layer HD layer
And each type may contain two areas of recorded
information.
sHigh quality stereo area
sHigh quality multi-channel area**
sSingle Layer Disc
It can contain both high quality stereo area and
high quality multi-channel area** information.
sDual Layer Disc
It can contain both high quality stereo area and
high quality multi-channel area** information.
And a double amount of information can be
stored on the disc thanks to the second layer.
sHybrid Layer Disc
Not only does this disc contain both high sound
quality stereo area and high sound quality multi-
channel area** information, it also has a CD layer
in the second layer, so it can be played on a CD
player.
Hybrid Super Audio CD Disc
1CD layer that plays on any of your
existing CD players
High-Density layer containing:
2- High sound quality stereo
3- High sound quality multi-channel**
The number of tracks recorded may vary per layer. It
will be shown on the display window of the unit.
**This unit is a stereo-only player, and so it
cannot play high-quality multi-channel audio
areas. (It does not recognize multi-channel
areas.)
2. 6jY^d898996
Audio CDs contain music tracks only.
3. 89"G$89"GL
This unit can play back the CD-RW (ReWritable)
discs as well as ordinary Audio CD and CD-R
(Recordable) discs.
sThe CD-R and CD-RW discs should contain
properly-recorded TOC* information so that they
can be played back. In CD recorders, the task of
writing TOC information is referred to as finalizing
the disc. Discs that are not finalized cannot be
properly recognized as an Audio CD and played
back by regular CD players and Super Audio CD
players. For details, please read the instruction
manual provided with a CD recorder.
* TOC stands for Table Of Contents and contains
information such as the total number of tracks
and total playing time of the disc.
sAs the playback of a CD-RW disc necessitates
partial change of the player setup, it may take
longer time for reading the TOC information than
when an Audio CD or CD-R disc is played.

3
NAMES AND
FUNCTIONS
BASIC
CONNECTION
BASIC
OPERATION
ADVANCED
CONNECTIONS
APPLICATION
OPERATION
TROUBLESHOOTING
OTHERS
ENGLISH
This section must be read before any connection is
made to the mains supply.
EQUIPMENT MAINS WORKING SETTING
Your Marantz product complies with the household
power and safety requirements in your area.
This product can be powered by 120 V AC only.
COPYRIGHT
Recording and playback of any material may
require consent. For further information refer to the
following:
—Copyright Act 1956
—Dramatic and Musical Performers Act 1958
—Performers Protection Acts 1963 and 1972
—any subsequent statutory enactments and
orders
INAPPROPRIATE PLACES FOR
INSTALLATION
To keep your player in perfect working order for the
longest possible time, avoid installing the player in
the following locations.
sWherever it will be exposed to direct sunlight
sWherever it will be close to a heater or other heat-
radiating appliance
sWherever the humidity is high or ventilation is
poor
sWherever it is very dusty
sWherever it will be subject to vibration
sOn top of a rickety stand or in an unstable location
which is tilted at an angle
sOn top of an amplifier or other component which
dissipates a great deal of heat
sIn an audio rack with little space at the top
and bottom or other location where the heat
dissipation will be obstructed
To ensure proper heat dissipation, install the
player while leaving clearances between the
player and wall or other components, as shown
in the figure below.
)^cX]Zh%#&b
dgbdgZ
)^cX]Zh%#&b
dgbdgZ
)^cX]Zh%#&b
dgbdgZ
)^cX]Zh%#&b
dgbdgZ
BEFORE USING
DO NOT PLACE OBJECTS ON TOP
sRefrain from placing any objects on top of the
player.
CAUTIONS ON HANDLING MAINS CORD
sDo not touch the mains cord with wet hands.
sWhen disconnecting the mains cord, always
make sure that you take hold of the plug. Yanking
out or bending the cord can damage it and/or
cause electric shocks or a fire.
sGet into the habit of disconnecting the power
plug before leaving home.
DO NOT ATTEMPT REPAIRS YOURSELF
sRefrain from lubricating the player: doing so can
cause malfunctioning.
sOnly qualified engineers with specialized
expertise are authorized to repair the pick-up and
parts inside the player.
PRECAUTIONS
sIn winter, droplets of water form on the insides
of the windows of a heated room: this is called
condensation. This CD player uses an optical
lens, so the condensation may form in the
following cases.
- In a room immediately after the heating has
been turned on
- In a room where the humidity level is high
- When the player has been suddenly brought
from a cold location into a warm room
S
ince, in cases like this, the track numbers may
not be read and the player is prevented from
operating properly, wait about 30 minutes, and
then operate the player.
sThis player may cause interference on a tuner or
TV set. If this is the case, place it further away
from the tuner or TV set.
sCompact discs have much less noise than analog
records and hardly any noise is heard before play
starts. Bear in mind, therefore, that if the volume
control on the amplifier is set too high, you will
risk damaging other audio components.
sThis audio player is for the exclusive playing of
Audio CDs (Compact Discs) and MP3/WMA
compressed data files.
It cannot play CD-ROMs used with personal
computers, game CDs, video CDs, DVDs (video/
audio) or DTS-CDs.
sWe do not recommend the use of lens cleaners.

4
NAMES AND
FUNCTIONS
BASIC
CONNECTION
BASIC
OPERATION
ADVANCED
CONNECTIONS
APPLICATION
OPERATION
TROUBLESHOOTING
OTHERS
ENGLISH
BEFORE USING
USAGE OF REMOTE CONTROLLER
LOADING BATTERIES
Before using the remote controller for the first time,
load the batteries in the remote controller. The
batteries provided are used to verify the operations
of the remote controller only.
1. GZbdkZi]ZWViiZgnXdkZg#
2. >chZgi i]Z WViiZg^Zh l^i] XdggZXi V$s
dg^ZciVi^dc#
3. 8adhZi]ZWViiZgnXdkZgjci^a^iXa^X`hh]ji#
CAUTIONS ON HANDLING BATTERIES
Misuse of the batteries can result in electrolyte
leakage, rupturing, corrosion, etc.
Bear in mind the following points when using
batteries.
sRemove the batteries from the remote control
unit if the unit is not going to be used for a
prolonged period (a month or more).
sDo not use an old battery together with a new
one.
sInsert the batteries while ensuring that their
Vand spoles are properly aligned with the
corresponding markings on the remote control
unit.
sBatteries with the same shape may have different
voltages. Do not use different types of batteries
together.
sIf electrolyte has leaked, thoroughly wipe the
inside of the battery compartment, and then
insert new batteries.
sWhen batteries which are no longer required are
to be discarded, follow the directions (regulations)
laid down by the local authorities in the area
concerned for their disposal.
OPERATIONAL RANGE
Operate the unit with the remote controller within
the range of the illustration below.
6eegdm#
&+#)[i*b
+%°
Precautions
sDonot allow direct sunlight,an inverter fluorescent
light or other strong source of light to shine onto
the player’s infrared signal reception window
(remote sensor). Otherwise, the operation of the
remote control unit may be disabled.
sBear in mind that operating the remote control
unit may cause other devices operated by infrared
rays to be operated by mistake.
sThe remote control unit cannot be operated if
the space between the controller and the player’s
remote sensor is obstructed.
sDo not place any objects on top of the remote
control unit. Doing so may cause one or more
buttons to be held down which will cause the
batteries to run down.

5
NAMES AND
FUNCTIONS
BASIC
CONNECTION
BASIC
OPERATION
ADVANCED
CONNECTIONS
TROUBLESHOOTING
OTHERS NAMES AND
FUNCTIONS
ENGLISH
APPLICATION
OPERATION
NAMES AND FUNCTIONS
:POWER ON/STANDBY switch
STANDBY indicator
This switch is used to turn the power ON and OFF
(see page 10).
@/(Track Skip/Search)
button
See page 10.
.Z/E(Search/Track Skip)
button
See page 10.
;(Open/Close) button
See page 10.
=Disc tray
The disk to be played is placed on the tray (see
page 10).
B2(Play) button
See page 10.
>(Stop) button
See page 10.
2(Pause) button
See page 10.
8LEVEL (headphones level) control
This is used to adjust the headphones volume level.
The level increases when turned clockwise.
PHONES (headphones) jack
The headphones are connected to this jack. Use
headphones that come with a standard plug.
Remote sensor
This sensor senses the infrared control signals sent
from the remote control unit.
FL display
See page 6.
DISPLAY OFF indicator
See page 7.
DISC MEDIA / USB button
See page 17.
USB connector
See page 17.
FRONT PANEL
DISPLAY
OFF
SUPER AUDIO CD PLAYER SA8003
DISC MEDIA/USBUSB
PHONES LEVEL
– +
STANDBY
ON/STANDBY
POWER
0
2
7
8
¡¢
41
!5
qwert yui
!4 !0 o!3 !2 !1

6
NAMES AND
FUNCTIONS
BASIC
CONNECTION
BASIC
OPERATION
ADVANCED
CONNECTIONS
TROUBLESHOOTING
OTHERS
NAMES AND
FUNCTIONS
ENGLISH
APPLICATION
OPERATION
NAMES AND FUNCTIONS
*1 (repeat) indicator
This indicator lights up during repeat play of one
track.
<RPT (repeat) indicator
This indicator lights up during repeat play.
-RNDM (random) indicator
This indicator lights up during random play.
/PROG (program) indicator
This indicator lights up during program play.
0TRK (track) indicator
This indicator lights up above the display of the track
number currently being played.
1SA-CD indicator
This indicator indicates the type of disc on the disc
tray (Super Audio CD).
3CD indicator
This indicator indicates the type of disc on the disc
tray (CD).
4M FILE indicator
This indicator indicates the type of disc on the disc
tray (WMA/MP3).
5USB indicator
This indicator lights up during operation in the USB/
iPod mode.
N D OFF (digital output OFF)
indicator
This indicator lights up when the digital output
setting of the audio CD signal is set to OFF (see
page 16).
N REMAIN (remaining time) indicator
This indicator lights up above the remaining playback
time of a track, when it is displayed.
N TTL (total time) indicator
This indicator lights up above the total remaining time
or the total program time, when it is displayed.
N Main display area
This area displays the time display and text
information of the disc to be played, as well as the
setting menu items, etc.
N (pause) indicator
This indicator lights up when play is paused.
N (play) indicator
This indicator lights up during disc play.
DISPLAY
1
RPT RNDM PROG TRK CD CD FILE USB DOFF REMAIN TTLM
SA
a s d f g h j
¡
3
¡
4
¡
5
k l ¡0 ¡1 ¡2

7
NAMES AND
FUNCTIONS
BASIC
CONNECTION
BASIC
OPERATION
ADVANCED
CONNECTIONS
TROUBLESHOOTING
OTHERS NAMES AND
FUNCTIONS
ENGLISH
APPLICATION
OPERATION
NAMES AND FUNCTIONS
CPOWER button
Switches the power of the unit ON and OFF (see
page 10).
AUSB button
Press this button when using a USB connection
(see page 17).
,DISC button
Press this button when using a disc media.
?FILTER button
This button cannot be used on this unit.
+PROGRAM button
See page 14.
7RANDOM button
See page 14.
6CLEAR button
See page 15.
REPEAT button
See page 14.
AMS (Automatic Music Scan)
button
See page 15.
O MUTE button
This button can activate the mute function of devices
compatible with Marantz pre-main amplifiers.
O VOLUME button
This button can be used to adjust the volume of
devices compatible with Marantz amplifiers that
come with a remote controller.
O ENTER button
This button is used to enter settings done via MENU
or decide files for USB file search.
O (pause) button
See page 10.
O (stop) button
See page 10.
O MENU (menu setting) button
Press this button when conducting Timer Play, SA-
CD, USB setup or iPod setup.
O 0-9 (numeric) buttons
See page 10.
O , Z(search) buttons
See page 10.
O , E(track skip) buttons
See page 10.
O (play) button
See page 10.
P FOLDER /Pbuttons
These buttons are used for USB folder search and
iPod album selection.
P INPUT /Pbuttons
These buttons are used to switch the input when
using one of the supported Marantz amplifiers.
However, this function may not work with some of
the older models.
P TEXT button
Press this button when switching the main display
area from time display to text display when using a
data disc containing MP3, WMA files, etc., or during
USB/iPod use (see page 20).
However, this feature does not support the display
of Super Audio CD or Audio CD TEXT.
P TIME button
Press this button when switching the main display
area from text display to time display (see page
14).
P DISPLAY button
Press this button when switching the display ON
and OFF.
The display becomes dimmer each time the button
is pressed. When the button is pressed for the third
time, the display turns off and the DISPLAY OFF
indicator lights up. The last setting is retained even
if the power is turned off.
P S.MODE (sound mode) button
See page 15.
P DIG.OUT (digital out on/off) button
Press this button when switching the digital output
of an audio CD signal on/off (see page 16).
P (OPEN/CLOSE) button
See page 10.
REMOTE CONTROLLER
z
v
⁄3
⁄4
⁄5
⁄6
⁄7
⁄9
⁄8
¤0
⁄1
c
n
.
⁄2
,
x
b
m
⁄0
¤1
¤2
¤3
¤4
¤5
¤6
¤7

8
NAMES AND
FUNCTIONS
BASIC
CONNECTION
BASIC
OPERATION
ADVANCED
CONNECTIONS
TROUBLESHOOTING
OTHERS
NAMES AND
FUNCTIONS
ENGLISH
APPLICATION
OPERATION
NAMES AND FUNCTIONS
/Power cord connector socket
Use the supplied power cord to connect the unit to
a standard household power supply outlet.
Connect the player so that the power cord
can be removed easily as a precaution against
possible accidents.
4DIGITAL AUDIO OUT OPTICAL
(optical digital output) connector
This optical output connector performs digital
output of the music signal of the audio CD during
playback (see page 11).
)DIGITAL AUDIO OUT COAXIAL
(coaxial digital output) connector
This coaxial digital output connector performs digital
output of the music CD of the audio CD during
playback (see page 11).
0REMOTE CONTROL IN / OUT
(remote control IN and OUT)
connectors
These connectors are used to connect the player to
a Marantz audio component equipped with remote
control connectors using the supplied remote
control connecting cable (see page 12).
1EXTERNAL / INTERNAL
(external/internal) switch
The switch is set to INTERNAL at factory shipping,
enabling use of the player’s built-in remote sensor.
When connecting the remote control connector
of this player to a Marantz unit using the supplied
connecting cable, set this switch to EXTERNAL
(see page 12).
6ANALOG OUT (analog output)
connector
This connector outputs the music signal during
playback (see page 9).
REAR PANEL
AC IN
DIGITALAUDIO OUT
IN
OUT
REMOTE CONTROL
ANALOG OUTPUT
R L
OPTICALCOAXIAL
INTERNAL
EXTERNAL
qwety r

9
NAMES AND
FUNCTIONS
BASIC
CONNECTION
BASIC
OPERATION
ADVANCED
CONNECTIONS
TROUBLESHOOTING
OTHERS BASIC
CONNECTION
ENGLISH
APPLICATION
OPERATION
BASIC CONNECTIONS
This CD player is connected to an amplifier, CD recorder and other components for use. To ensure that the
components are connected properly, refer to the instruction manuals that come with the components to be
connected.
Before connecting the components, be absolutely sure to turn off their power.
CONNECTING TO AN AMPLIFIER
Use the audio connecting cord to connect the player with a stereo amplifier or AV amplifier.
When making the connections, insert the plugs securely into the connectors. Failure to insert the plugs
securely may result in noise.
L
R
GND
CD AUX
/
DVD
TUNER
OUTIN
RECORDER 1
OUTIN
RECORDER 2
R
L
L
R
PHONO
AC IN
AC OUTLET
UNSWITCHED
100W 1A MAX
100V 50/60Hz
OUT
IN
REMOTE
CONTROL
R
L
POWER AMP
DIRECT IN
PRE OUT
R
L
R
SPEAKERS
SYSTEM A
L
R L
AC IN
DIGITALAUDIO OUT
IN
OUT
REMOTE CONTROL
ANALOG OUTPUT
R L
OPTICALCOAXIAL
INTERNAL
EXTERNAL
L]^iZ
L]^iZ
6bea^ÄZg
GZY
/H^\cVaÅdl
GZY
6jY^dXdccZXi^c\XdgYhjeea^ZY
Caution:
Do not connect the player to the PHONO input connectors on the amplifier.
USB MEDIA/iPod CONNECTION
Connect the SA8003 to USB media/iPod.
DISPLAY
OFF
SUPER AUDIO CD PLAY
E
DISC MEDIA/USBUSB
Y
0
¡¢
41
Hjeea^ZY^EdYXVWaZ
Caution:
sConnect the USB media/iPod while in power off
or when the input source is something other than
USB. Connecting/disconnecting USB memory
when the input source is USB and the power is on
may damage the USB memory.
sWhen using an USB device, do not use an USB
extension cable.
CONNECTING THE POWER
SUPPLY
1. Eaj\i]ZedlZgXVWaZ^cid68>C_VX`dci]Z
WVX`eVcZa#
AC IN
A
UDIO OUT
OPTICAL
2. Eaj\i]ZedlZgXVWaZ^cidVc68djiaZi#
3. Ijgcdci]ZedlZghl^iX]d[i]ZVjY^djc^i
Vbea^ÄZg!ZiX#i]Vi^h XdccZXiZYl^i]i]^h
jc^i#HZii]ZhZaZXidgdci]ZXdccZXiZYjc^i
idi]^hjc^i#

10
NAMES AND
FUNCTIONS
BASIC
CONNECTION
BASIC
OPERATION
ADVANCED
CONNECTIONS
TROUBLESHOOTING
OTHERS
BASIC
OPERATION
ENGLISH
APPLICATION
OPERATION
BASIC OPERATION
NORMAL PLAYBACK
SUPER AUDIO CD PLAYER PLAYBACK
0
2
7
8
1. 4.2. 3.
1. @ZZeegZhh^c\i]ZPOWERHl^iX][dgVWdji
VhZXdcYidijgcdci]ZhnhiZb#
Display
I]Z Y^heaVn XnXaZh [gdb TOC Reading→
No Discl]ZccdY^hX^hadVYZY→Super
Audio CD l]Zc i]Z hiVgi hdjcY bdYZ
hZii^c\^hHjeZg6jY^d89#
2. EgZhhi]ZWjiidc#
I]ZY^hXigVnXdbZhdji#EaVXZi]ZY^hXl^i]
aVWZah^YZjedci]ZigVn#
Id eaVn V h^c\aZ -Xb 89! eaVXZ i]Z Y^hX
l^i] i]Z ^cYZciVi^dc Vi i]Z XZciZg d[ i]Z
igVn#
3. EgZhhWjiidc#
Caution:
Do not close the disc tray by pressing it in with your
hand, as this will damage it.
4. EgZhh2Wjiidc#
9^hX ineZ ^h VjidbVi^XVaan YZiZXiZY VcY
eaVnWVX`^hhiVgiZY#IgVX`cjbWZgVcYigVX`
ZaVehZY i^bZ b^cjiZ! hZXdcY VeeZVg dc
i]ZY^heaVn#
;dg HjeZg 6jY^d 89$89 ]nWg^Y"aVnZg
Y^hXh hZZ eV\Z '! i]Z aVnZg i]Vi ^h hZi
^c i]Z hiVgi hdjcY bdYZ hZZ eV\Z &+
^h eaVnZY# Id X]Vc\Z i]ZaVnZg! jhZ i]Z
S.MODEWjiidchZZeV\Z&*#
(Exp.:Track 6, Elapsed time 2 min 8 sec)
CjbWZgd[XjggZciigVX` B^cjiZh HZXdcYh
Playback automatically stops at the end of the final
track.
TO STOP PLAYBACK
Press button.
TO EJECT DISC
Press button to open the disc tray and take the
disc off. Press the button again to close the tray.
Disc tray must be closed when the unit is not be
used.
TO PAUSE PLAYBACK
Press button.
PAUSE indicator will light and playback is paused
at the point that the button is pressed. To restart
playback, press button again or press 2button.
PLAYING YOUR FAVORITE
TRACKS OF A DISC
0-9
0
2
7
8
¡¢ 41
SPECIFY TRACK NUMBER TO PLAY
(DIRECT SEARCH)
Specify track number with numerical buttons (0-9)
on the remote controller.
(example)
3rd track : Press 3.
12th track : Press 1and then press 2(within
approximately 1.5 seconds).
IF A WRONG NUMBER IS PRESSED
If a track number that is not in the disc is specified,
“No Track”will be shown on the main display.
Press correct number again.
SKIPPING TO THE PREVIOUS OR NEXT
TRACK (TRACK SKIP)
TO LISTEN TO A TRACK POSTERIOR TO THE
CURRENT TRACK
Press the Ebutton on the remote controller or
the unit the same number of times as the number
of tracks you want to advance.
TO LISTEN TO A TRACK PRIOR TO THE CURRENT
TRACK
If the button is pressed on the unit or the
remote controller while playing a track, playback
starts again from the start of the current track.
Continue to press the button for the same
number of times as the number of tracks you want
to return.
PLAYING YOUR FAVORITE
PARTS OF A DISC (SEARCH)
0
2
7
8
¡¢ 41
The search is started by holding down the , E
buttons on the player or the , Zbuttons on the
remote control unit during playback.
The search speed can be changed by pressing the
, Ebuttons on the player or the , Z
buttons on the remote control unit.
The search speed changes in 4 steps: 1 →2 →3
→4 →1.
4 is the fastest search speed.
When the specific part you wish to hear is near,
press the 2button.
Note:
No sound is output during the search operation.

11
NAMES AND
FUNCTIONS
BASIC
CONNECTION
BASIC
OPERATION
ADVANCED
CONNECTIONS
TROUBLESHOOTING
OTHERS ADVANCED
CONNECTIONS
ENGLISH
APPLICATION
OPERATION
ADVANCED CONNECTIONS
CONNECTING THE OPTICAL OUTPUT CONNECTOR
Use an optical digital connecting cable available on the market. Insert the plug firmly in until it clicks into
place. Do not bend or bundle the optical digital connecting cable.
CONNECTING TO A DIGITAL AUDIO COMPONENT
The player has one digital optical output connector and one digital coaxial output connector.
You can enjoy digital recording when the player is connected to a CD recorder or other digital recording component.
Caution:
Signals come of the Digital Audio Output (Optical and Coaxial) terminals only at the time of audio CD playback. There are no signals when other media are being played back.
CONNECTING THE COAXIAL OUTPUT CONNECTOR
Use a coaxial digital connecting cable available on the market.
INPUT OUTPUT
MD/CDMD
DIGITAL IN/OUT
INPUT
ANALOG IN/OUT
OUTPUT
MD MD COMMON
L
R
OPTICAL
CD
AC IN
DIGITALAUDIO OUT
IN
OUT
REMOTE CONTROL
ANALOG OUTPUT
R L
OPTICALCOAXIAL
INTERNAL
EXTERNAL
Dei^XVaY^\^iVaXdccZXi^c\XVWaZVkV^aVWaZdcbVg`Zi
/H^\cVaÅdl
89gZXdgYZg!B9YZX`!6KVbea^ÄZg!ZiX#
INTERNAL
EXTERNAL
INPUT
ANALOG IN/OUT
OUTPUT OUTPUT
R
L
DIGITAL IN/OUT
INPUT
OPTICALCOAXIAL CONTROL
REMOTE
INPUT OUTPUT
IN
OUT
AC IN
DIGITALAUDIO OUT
IN
OUT
REMOTE CONTROL
ANALOG OUTPUT
R L
OPTICALCOAXIAL
INTERNAL
EXTERNAL
8dVm^VaY^\^iVaXdccZXi^c\XVWaZVkV^aVWaZdcbVg`Zi
/H^\cVaÅdl
89gZXdgYZg!B9YZX`!6KVbea^ÄZg!ZiX#

12
NAMES AND
FUNCTIONS
BASIC
CONNECTION
BASIC
OPERATION
ADVANCED
CONNECTIONS
TROUBLESHOOTING
OTHERS
ADVANCED
CONNECTIONS
ENGLISH
APPLICATION
OPERATION
ADVANCED CONNECTIONS
REMOTE CONTROL CONNECTION
Connecting this player to additional Marantz audio equipment using the supplied remote control cable
enables remote control of the connected equipment as a single audio system.
sWhen connecting equipment incorporating a remote sensor, connect the “remote control out”connector
of the equipment to the “remote control in”jack of the CD player.
When doing this, set this player’s switch to “EXTERNAL.”This will stop its remote control IR receiver
from operating and the player can now be controlled via the remote control IR receiver of the attached
equipment.
L
R
GND
CD AUX
/
DVD
TUNER
OUTIN
RECORDER 1
OUTIN
RECORDER 2
R
L
L
R
PHONO
AC IN
AC OUTLET
UNSWITCHED
100W 1A MAX
100V 50/60Hz
OUT
IN
REMOTE
CONTROL
R
L
POWER AMP
DIRECT IN
PRE OUT
R
L
R
SPEAKERS
SYSTEM A
L
R L
AC IN
DIGITALAUDIO OUT
IN
OUT
REMOTE CONTROL
ANALOG OUTPUT
R L
OPTICALCOAXIAL
INTERNAL
EXTERNAL
HZiid¹:MI:GC6A#º
GZbdiZXdccZXidgXVWaZhjeea^ZY
/H^\cVaÅdl
6bea^ÄZg
TIMER PLAY
This unit can perform timer play by cooperating with your audio timer.
Connect this unit’s power cord to the audio timer’s power socket and the timer’s power cord to power
outlet.
sFor connection to audio timer and it’s operation, please refer to the instruction manual of your audio
timer.
AC IN
DIGITALA UDIO OUT
OPTICALCOAXIAL
6jY^dI^bZg

13
NAMES AND
FUNCTIONS
BASIC
CONNECTION
BASIC
OPERATION
ADVANCED
CONNECTIONS
TROUBLESHOOTING
OTHERS ADVANCED
CONNECTIONS
ENGLISH
APPLICATION
OPERATION
TIMER PLAY SETTING
Time Play is set in the following hierarchical logic.
Timer Play
CD/SA-CD
USB
Off
On
File Sel
1.
3.
4.
5.
6.
4.
5.
6.
2.
7.
1. @ZZeegZhh^c\i]ZPOWERHl^iX][dgVWdji
VhZXdcYidijgcdci]ZhnhiZb#
2. EgZhh i]Z MENU Wjiidc dc i]Z gZbdiZ
Xdcigdajc^i#
3. 9^heaVn ¹TIMER PLAY=>º ^c i]Z Y^heaVn
VgZVVcYi]ZcegZhh ENTERWjiidcdci]Z
gZbdiZXdcigdajc^i#
4. 9^heaVn¹2 ONºl^i]i]Z!EWjiidch!
VcYi]ZcegZhhENTERWjiidcdci]ZgZbdiZ
Xdcigdajc^i#
5. Id eaVn V 89$H6"89 Y^hX l^i] i^bZg eaVn!
Y^heaVn ¹1 CD/SACDº l^i] i]Z ! E
Wjiidch VcY i]Zc egZhh ENTER Wjiidc dc
i]ZgZbdiZXdcigdajc^i#
6. ;dgJH7eaVnWVX`l^i]i^bZg eaVn!Y^heaVn
¹2 USBº l^i] i]Z ! E Wjiidch! VcY
i]Zc egZhh ENTER Wjiidc dc i]Z gZbdiZ
Xdcigdajc^i#
>[ JH7 ^h hZaZXiZY! i]Z igVX` id WZ eaVnZY
Yjg^c\i^bZgeaVnXVcWZhZaZXiZY# ;dgi]Z
hZaZXi^dc bZi]dY! gZ[Zg id JH7 hZaZXi^dc
bZi]dY#
7. EgZhh i]Z MENU Wjiidc dc i]Z gZbdiZ
Xdcigdajc^iidXdbeaZiZi]ZhZii^c\#
8. >[89$H6"89^hhZaZXiZY!^chZgii]ZY^hXidWZ
eaVnZY#
9. HZii]ZVjY^di^bZg#
Caution:
Insert a USB medium in advance when selecting
USB for Timer Play.
ADVANCED CONNECTIONS

14
NAMES AND
FUNCTIONS
BASIC
CONNECTION
BASIC
OPERATION
ADVANCED
CONNECTIONS
REMOTE CONTROLLER
OPERATION
TROUBLESHOOTING
OTHERS
APPLICATION
OPERATION
ENGLISH
TO CHANGE TIME DISPLAY
TIME
Press the TIME button on the remote control.
Each time TIME button is pressed, display will
change in the following order.
Track elapsed
time
Track remaining
time
Total remaining
time
sTrack remaining time
(The remaining playing time from the playing
point to the end of the current track)
¹G:B6>Cº^hY^heaVnZY
sTotal remaining time
(The remaining playing time from the playing
point to the end of the last track)
¹G:B6>CIIAº^hY^heaVnZY
Track information does not appear when “Total
remaining time”is displayed.
APPLICATION OPERATION (CD OPERATION)
REPEATED DISC PLAY
(REPEATPLAY)
REPEAT
Each time the REPEAT button on the remote control
is pressed, the repeat mode cycles in the following
order.
OFF 1
ALL
ONE TRACK REPEAT
Press REPEAT button on the remote two times.
“1”, “RPT”indicators will light and the track will be
played repeatedly.
TO EXIT FROM ONE TRACK REPEAT
Press the REPEAT button on the remote control
twice. “1”“RPT”indicator will disappear, repeat
mode will be off and it returns to normal play
mode.
ALL TRACK REPEAT
When “Repeat”mode is off, press the REPEAT
button on the remote control twice. The “RPT”
indicator will light up and all track repeat play
begins.
TO RETURN TO NORMAL PLAY
Press the REPEAT button on the remote control
once. “RPT”indicator will disappear, repeat mode
will be off and it returns to normal play mode.
Note:
Random Play and AMS Play cannot be conducted
when the unit is in Repeat Mode.
PLAYING TRACKS IN A RANDOM
SEQUENCE (RANDOM PLAY)
RANDOM
When the RANDOM button on the remote
control is pressed in stop mode, and then the 2
button is pressed, the unit shuffles the track order
automatically and plays all tracks randomly in the
shuffled order.
The display’s “RNDM”(random) indicator will
light-up.
Note:
Repeat Play and AMS Play cannot be conducted
when the unit is in Random Mode.
sIf the Ebutton on the main unit, or the E
button on the remote control are pressed during
Random Play, the player jumps to the next track
of the shuffled order.
sTo search through the current track during random
play, press and continue holding the /,
Z/Ebuttons on the main unit or press the
, Zbuttons on the remote control.
TO EXIT FROM RANDOM PLAY AND RETURN TO
NORMAL PLAY
Press the button, and then press the RANDOM
button while playback is stopped.
The RNDM (random) indicator goes off, and random
play is released.
PLAYING TRACKS IN A SPECIFIC
SEQUENCE (PROGRAM PLAY)
1.
2.
4.
You can arrange and play tracks in a specific
sequence. Up to 24 tracks to be played can be
programmed.
1. EgZhh PROGRAMWjiidc dc i]Z gZbdiZ ^c
hidebdYZ#¹PROGº^cY^XVidgl^aaWa^c`VcY
^i\dZhidegd\gVbbdYZ#
A^\]ihje
2. 8]ddhZ V igVX` id WZ egd\gVbbZY l^i]
cjbZg^XWjiidchdci]ZgZbdiZ#
(Example: The 15th track is chosen and it’s
length is 4min30sec)
A^\]ihje
&hiigVX`egd\gVbbZY

15
NAMES AND
FUNCTIONS
BASIC
CONNECTION
BASIC
OPERATION
ADVANCED
CONNECTIONS
REMOTE CONTROLLER
OPERATION
TROUBLESHOOTING
OTHERS APPLICATION
OPERATION
ENGLISH
APPLICATION OPERATION (CD OPERATION)
3. L^i] i]Z hZfjZcXZ YZhXg^WZY ^c hiZe 2
VWdkZ!egd\gVbVcdi]ZgigVX`#GZeZVii]Vi
hZfjZcXZ id egd\gVb Vaa i]Z igVX`h ndj
lVci#NdjXVcegd\gVbjeid(%igVX`h#
(Example: The 7th track is chosen and total
length of 7th and 15th is 7min50sec)
IdiVaegd\gVbbZY
cjbWZg
IdiVaeaVn^c\i^bZd[
egd\gVbbZYigVX`h
4. EgZhh 2 Wjiidc id hiVgih eaVnWVX` ^c
egd\gVbbZYdgYZg#
Note:
Repeat Play, Random Play, and AMS Play cannot
be conducted while the unit is in PROGRAM mode
(i.e. when the PROG indicator is lit).
TO CHECK THE PROGRAMMED
TRACKS
CLEAR
TO DELETE A PROGRAMMED TRACK
1. EgZhh CLEAR Wjiidc ^c hide bdYZ l]Zc
egd\gVb ]Vh WZZc bVYZ L]Zc ¹PROGº
^cY^XVidg^ha^\]i^c\je#
2. :kZgn i^bZ egZhh CLEAR Wjiidc! i]Z
egd\gVbbZY igVX`h VgZ YZaZiZY ^c dgYZg
[gdbi]ZaVhiigVX`egd\gVbbZY#
TO CLEAR WHOLE PROGRAM
Press STOP button two times while in program
play. In the stop mode, press STOP button once.
Program can also be cleared by pressing OPEN/
CLOSE button to open the disc tray.
TO ADD TRACKS TO PROGRAM
Tracks can be added to the end of program when
program is remaining (“PROG”indicator is lighting
up) and in stop mode.
PLEASE BE CAREFUL ABOUT THE FOLLOWING
MATTERS
sWhen programming 1st through 9th tracks in a
disc that has over 10 tracks by using numeric
buttons. For instance, programming the 3rd track
after programming the 1st track, press 3button
more than approximately 1.5 seconds after 1
button is pressed. When a program is finalized,
the time is updated.
sLikewise, when programming a track at 10th or
after. For example, to program 13th track, press 3
button within approximately 1.5 seconds after 1
button is pressed.
sWhen programming a track in a disc that has less
than 9 tracks. For instance, to program the 5th
track after 4th track has been programmed, press
5button more than approximately 0.5 second
after 4button is pressed.
SEARCHING YOUR FAVORITE
TRACKS (AMS (AUTOMATIC
MUSIC SCAN) PLAY)
AMS
This feature is convenient for searching where your
favorite track is.
If the AMS button is pressed while a track is
stopped, the PLAY indicator “2”flashes, and the
first ten seconds of each track on the disk will be
played starting from the first track.
Also, if the AMS button is pressed during playback,
the PLAY indicator “2”flashes, and the program
jumps to the next track after approximately
10 seconds elapses on the display time.
Once you find a song that you want to listen to,
press the AMS button again or press the 2button.
The PLAY indicator lights up and normal playback
resumes from the current track.
Note:
AMS Play cannot be conducted while the unit is in
PROGRAM mode.
SWITCHING SOUND MODE
(SUPER AUDIO CD)
Please set Start Sound Mode to “SA-CD”(see
page 16).
S.MODE
1. EgZhh S.MODE Wjiidc ^c hide bdYZ cdi
eaVn^c\#
I]Z XjggZcian hZaZXiZY aVnZg dg VgZV ^h
h]dlcdci]ZY^heaVn#89dgHjeZg6jY^d
89
>[ S.MODE Wjiidc ^h egZhhZY V\V^c! V
eaVnVWaZ aVnZg dg VgZV l^aa WZ h]dlc! VcY
i]Z aVnZg dg VgZV l^aa WZ hl^iX]ZY id cZl
dcZ#
L]ZcaVnZgdgVgZV^hhl^iX]ZY!ID8l^aa
WZgZVYV\V^c#
I]ZhdjcYbdYZXVccdiWZX]Vc\ZY[dg
6jY^d89h VcY Y^hXh l^i]dcanV HjeZg
6jY^d89VgZV#
I]Z hdjcY bdYZ dc ]nWg^Y aVnZg Y^hXh
l^aaWZX]Vc\ZY^ci]Z[daadl^c\dgYZg#
Super Audio CD stereo area
CD layer
2. EgZhhi]ZS.MODEWjiidcYjg^c\eaVnWVX`#
I]Z XjggZcian hZaZXiZY aVnZg dg VgZV ^h
h]dlcdci]ZY^heaVn#89dgHjeZg6jY^d
89
>[ S.MODE Wjiidc ^h egZhhZY V\V^c! i]Z
eaVnWVX`^hhideeZY!VcYi]ZaVnZgdgVgZV
l^aaWZhl^iX]ZYidcZldcZ#
L]Zc ndj lVci id a^hiZc Vi i]Vi VgZV!
egZhh2WjiidcV\V^c#I]ZeaVnWVX`l^aaWZ
hiVgiZY#

16
NAMES AND
FUNCTIONS
BASIC
CONNECTION
BASIC
OPERATION
ADVANCED
CONNECTIONS
REMOTE CONTROLLER
OPERATION
TROUBLESHOOTING
OTHERS
APPLICATION
OPERATION
ENGLISH
APPLICATION OPERATION (CD OPERATION)
SWITCHING “START SOUND MODE”
The Start Sound Mode can be switched over in the
following hierarchical scheme.
SA-CD Mode SA-CD*
CD
2.
3.
4.
2.
3.
4.
1.
5.
1. EgZhh i]Z MENU Wjiidc dc i]Z gZbdiZ
Xdcigda#
2. JhZi]Z!EWjiidchidY^heaVn¹SA-CD
Mode=>ºVcYegZhhENTER Wjiidcdc i]Z
gZbdiZXdcigda#
3. Id adVYi]Z H6"89aVnZg!jhZ i]Z!E
Wjiidch id Y^heaVn ¹1 SA-CDº VcY egZhh
ENTERWjiidcdci]ZgZbdiZXdcigda#
4. Id adVY i]Z 89 aVnZg! jhZ i]Z ! E
WjiidcidY^heaVn¹2 CDºVcYegZhhENTER
Wjiidcdci]ZgZbdiZXdcigda#
5. EgZhh i]Z MENU Wjiidc dc i]Z gZbdiZ
Xdcigdajc^iidXdbeaZiZi]ZhZii^c\#
WHEN START SOUND MODE IS SWITCHED TO
CD
sAt this time, if a Super Audio CD hybrid layer disk
is inserted, the CD layer is read.
sSound Mode cannot be switched even if the
S.MODE button on the remote control is
pressed.
sIf a disk with only a Super Audio CD area is
inserted, the Super Audio CD layer is read.
WHEN START SOUND MODE IS SWITCHED TO
SA-CD (DEFAULT MODE)
sAt this time, if a Super Audio CD hybrid layer disk
is inserted, the Super Audio CD layer is read.
sSwitch to the CD layer by pressing the S.MODE
button on the remote control.
sSwitch back to the Super Audio CD layer by
pressing the S.MODE button on the remote
control once again.
SETTING THE DIGITAL OUTPUT
The settings can be made using the remote
control.
The settings are retained even if the power is turned
off so that you can always hear tracks played the
way you want.
Use the same procedures to change the settings
again.
The settings can be changed when the track is
stopped.
DURING THE PLAYBACK OF THE CD LAYER
OF AN AUDIO CD OR SUPER AUDIO CD
DIG.OUT
“DIGITAL OUTPUT OFF”OPERATION
The digital output function is turned ON and OFF
by pressing the DIG.OUT button while the track
is stopped. When digital output is turned off, the
“D OFF”indicator lights up on the display.
sWhen digital output is not used, turn off the digital
output to enjoy better sound quality.
Note:
Digital signals are only output when playing Audio
CDs.
They are not output when playing other media.
The “digital output off”has a memory retention
function where the settings remain stored and
unchanged even when the disk is changed or the
power is turned off.
9Z[VjaihZii^c\

17
NAMES AND
FUNCTIONS
BASIC
CONNECTION
BASIC
OPERATION
ADVANCED
CONNECTIONS
REMOTE CONTROLLER
OPERATION
TROUBLESHOOTING
OTHERS APPLICATION
OPERATION
ENGLISH
NORMAL PLAYBACK
0
2
7
8
1. 3. 2. 4.
1.
2.
4.
1. 8dccZXii]ZJH7bZY^jbidi]ZJH7edgi
dci]Z[gdcieVcZa#
2. @ZZeegZhh^c\i]ZPOWERHl^iX][dgVWdji
VhZXdcYidijgcdci]ZhnhiZb#
I]Z Y^heaVn XnXaZh [gdb ¹TOC Readingº
→¹No Diskº l]Zc cd Y^h` ^h adVYZY →
¹SuperAudioCDº l]Zc i]Z HiVgi HdjcY
BdYZhZii^c\^hHjeZg6jY^d89#
3. EgZhh i]Z DISC MEDIA/USB Wjiidc dc
i]Z[gdci eVcZa! dg i]ZUSB Wjiidc dci]Z
gZbdiZXdcigda#
APPLICATION OPERATION (USB/iPod OPERATION)
4. L]^aZi]Zjc^ihZVgX]Zh[dgJH7bZY^V!i]Z
Y^heaVnl^aagZVYVh[daadlh#
L]Zc i]Z jc^i [^c^h]Zh \Zii^c\ i]Z JH7
bZY^jb [^aZ ^c[dgbVi^dc! i]Z Y^heaVn
X]Vc\Zhidi]Z[daadl^c\#
;daYZgCd# ;^aZCd# ;^aZCVbZ
Note:
When no USB medium is connected, the display
cycles from “USB Reading”→“USB”.
5. EgZhhi]Z2Wjiidc#
HZaZXiZY ÄaZ ^c[dgbVi^dc l^i]^c i]Z bZcj
VcYi^bZ^c[dgbVi^dcVgZY^heaVnZY#
;daYZgCd# ;^aZCd# I^bZ>c[dgbVi^dc
L]Zci]ZgZVgZbdgZi]Vc&%%%hdc\h!i]Z
Y^heaVnX]Vc\ZhidVeeZVgVh[daadlh#
;^aZKdajbZ I^bZ>c[dgbVi^dc
TO STOP PLAYBACK
Press the button.
TO PAUSE PLAYBACK
Press the button.
Pause indicator will light and playback is paused at
the point that the button is pressed.
To resume playback, press the button again or
press the 2button.
Tip
sWhen playing USB media/iPod files, the unit
can play up to 65,535 files, 700 folders, and a
maximum of 8 levels.
sThe iPod’s equalizer cannot be operated from
the Marantz player. We recommend that you turn
“off”the iPod’s equalizer before connecting the
iPod to the main unit.
sSome operations may differ depending on the
iPod model.
USING “REPEAT PLAY”MODE
You can repeatedly play a single song or all songs.
REPEAT
Each time the REPEAT button on the remote
control is pressed, Repeat Play mode cycles in the
following order.
OFF
ALL
1
Press the 2button to begin playback in the selected
repeat mode (see page 14).
PLAYING TRACKS IN A RANDOM
SEQUENCE (RANDOM PLAY)
You can randomly play songs.
RANDOM
Press the RANDOM button on the remote control
while the player is stopped to turn random mode
ON or OFF.
Press the 2button when random mode is turned
ON to start Random Play (see page 14).
SEARCHING YOUR FAVORITE TRACKS
(AMS (AUTOMATED MUSIC SCAN) PLAY)
You can play the first 10 seconds of each track
starting from the first track.
Press the AMS button on the remote control to
automatically begin AMS play (see page 15).
AMS
Other manuals for SA8003
5
Table of contents
Other Marantz CD Player manuals

Marantz
Marantz SA8001 User manual

Marantz
Marantz SA8004 User manual

Marantz
Marantz CC3000 User manual

Marantz
Marantz SA7001KI User manual

Marantz
Marantz CDR510 User manual

Marantz
Marantz SA-1 User manual

Marantz
Marantz CD-57 User manual

Marantz
Marantz VC4400 User manual

Marantz
Marantz VC6001 User manual

Marantz
Marantz CD6003 User manual

Marantz
Marantz CD-54 User manual

Marantz
Marantz CC3000 User manual

Marantz
Marantz CD-43 User manual

Marantz
Marantz SA-15S2B Limited User manual

Marantz
Marantz VC5200 User manual

Marantz
Marantz SA8260/F1N User manual

Marantz
Marantz CD6005 User manual

Marantz
Marantz CD5004 User manual

Marantz
Marantz VC-8100 User manual

Marantz
Marantz SA8004 User manual