Marimba One One Vibe User manual

707.822.9570 // marimbaone.com
One Vibe
OWNER’S MANUAL

1
Harp
Treble
Bass
Accidental
Resonators
Natural Bars
Accidental Bars
Natural
Resonators
Center Support
CAREFULLY UNPACK YOUR CRATE
Compare the seven components as shown on this page.
Pedal
FOR ASSEMBLY,
YOU WILL NEED:
A large open space with carpet (or a blanket to cover the oor)
An assistant to help you with assembly
KEEP THESE INSTRUCTIONS FOR FUTURE REFERENCE
2 Rev. 102923
ASSEMBLY INSTRUCTIONS
& OWNER'S MANUAL

2
4
6
CENTER SUPPORT
3
8
7
5
UNFOLD LEGS
Position yourself with the bass end on
your left and treble end on your right, with
legs facing you. Pull legs toward you.
IDENTIFY BASS END OF CENTER
SUPPORT
Bass end is engraved with the letter
B on bottom of the center support.
Align bass end of center support
with bass end of harp.
UNFOLD ARMS
Unfold arms by swinging them
over to the opposite side.
POSITION CENTER SUPPORT
Insert center support through legs of
both endframes.
Treble
Bass
Bass
Treble
Bass
ATTACH BASS END
Slide notch onto bolt.
TIGHTEN
KNOB
REPEAT FOR
TREBLE END
Treble
Bass
End
Rev. 102923 3

910
13
11
PEDAL
12
14 15
TIGHTEN
KNOB
REPEAT FOR
OTHER ARM
ATTACH ARMS
Rotate arm and slide notch onto bolt.
REMOVE PARTS
Remove knob, threaded
wheel, metal washer, and
one black plastic washer.
INSERT PEDAL BOLT
Slide bolt through center hole on center support.
Retain
SECURE PEDAL
Place black plastic washer, metal washer,
threaded wheel, and knob onto bolt in the
following order:
TIGHTEN KNOBS
Adjust tension using both wheel and
threaded knob
4 Rev. 102923

16 17
19 20
RESONATORS
Treble
18
ATTACH STRAP TO PEDAL
Insert strap clip into slot on pedal.
PLACE HARP
IN UPRIGHT
POSITION
INSERT RESONATORS
Insert resonators into the
treble headboard.
POSITION TREBLE END OF
NATURAL RESONATORS
First, position treble end of natural resonators
into treble endframe. Natural resonators have
plugs in every tube.
IDENTIFY NATURAL RESONATOR BANK
The natural resonator bank has a plug inside every tube. The accidental resonators are
missing a plug in every 3rd or 4th tube.
Treble
Bass
Rev. 102923 5

21
24
23
22
Treble
Bass
Bass
LIFT BASS END
Lift bass end of resonators above top
edge of bass headboard.
MAGNETIC DRIVE SYSTEM
Once the resonators are placed
into the frame, the resonators fans
are ready to rotate.
Our patented Magnetic Drive
System eliminates the need for
hooking up belts and cables.
IDENTIFY ACCIDENTAL RESONATOR BANK
Repeat steps 19 through 22.
CHECK FIT
Push down on the resonators on the treble end to make sure they are fully in place.
INSERT RESONATORS
Insert resonators into slots on
bass headboard.
DO NOT
TOUCH
THE BELT
Bass
6 Rev. 102923

25
27
28
29
KEYBOARDS
26
Bass
Treble
Treble
bass end close-up
Tuning Arch
Corner Jacks
Rail Jacks
treble end close-up
POSITION NATURAL KEYBOARD
Hold cords, push pedal down with foot,
lay keyboard onto rails 1 and 2.
POSITION BARS ON RAILS
Place bars between rail jacks.
Set cord into slots on rail jacks.
SECURE BARS TO RAILS
At bass end, pull cord evenly taut and
then hook springs together and then
slip over corner jacks to secure cord.
FOLLOW SIMILAR PROCEDURE FOR ACCIDENTAL BARS
NOTE: For accidental bars, bars are only placed over resonators with a plug.
SECURE TREBLE END
Slide cord around corner jacks on
treble end.
Rev. 102923 7

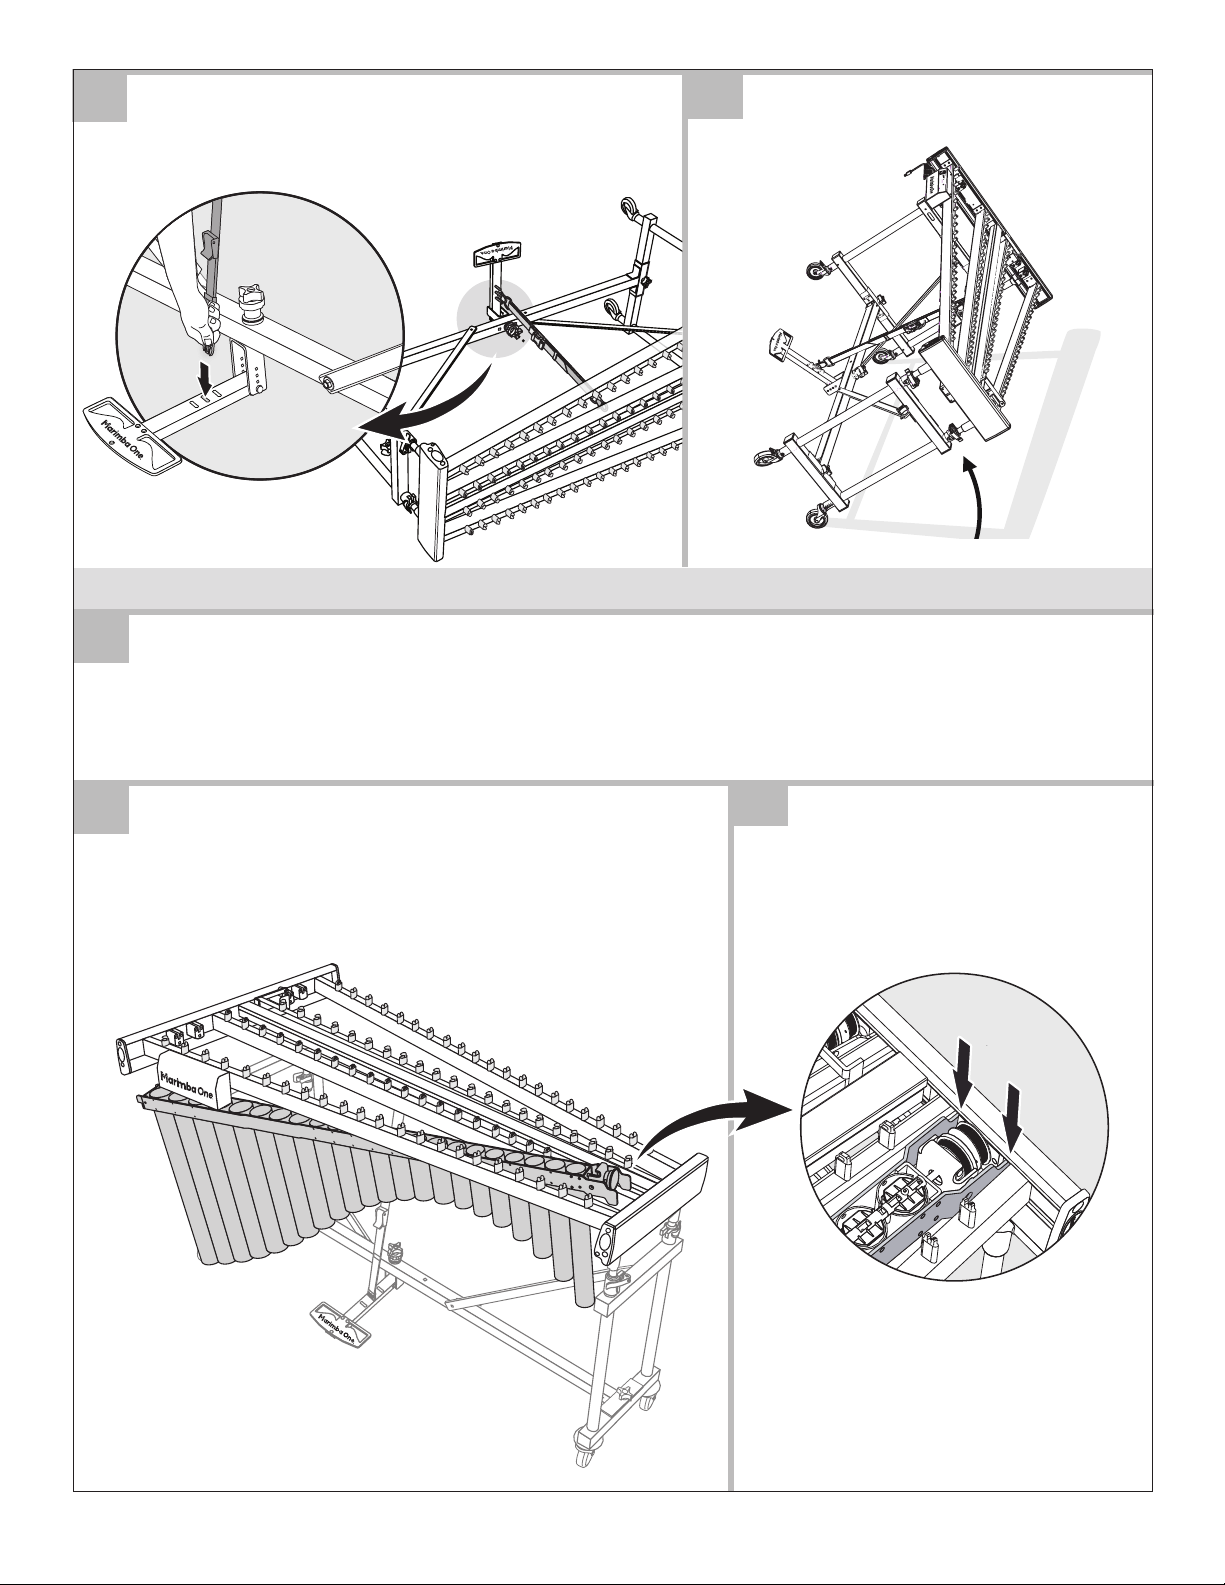
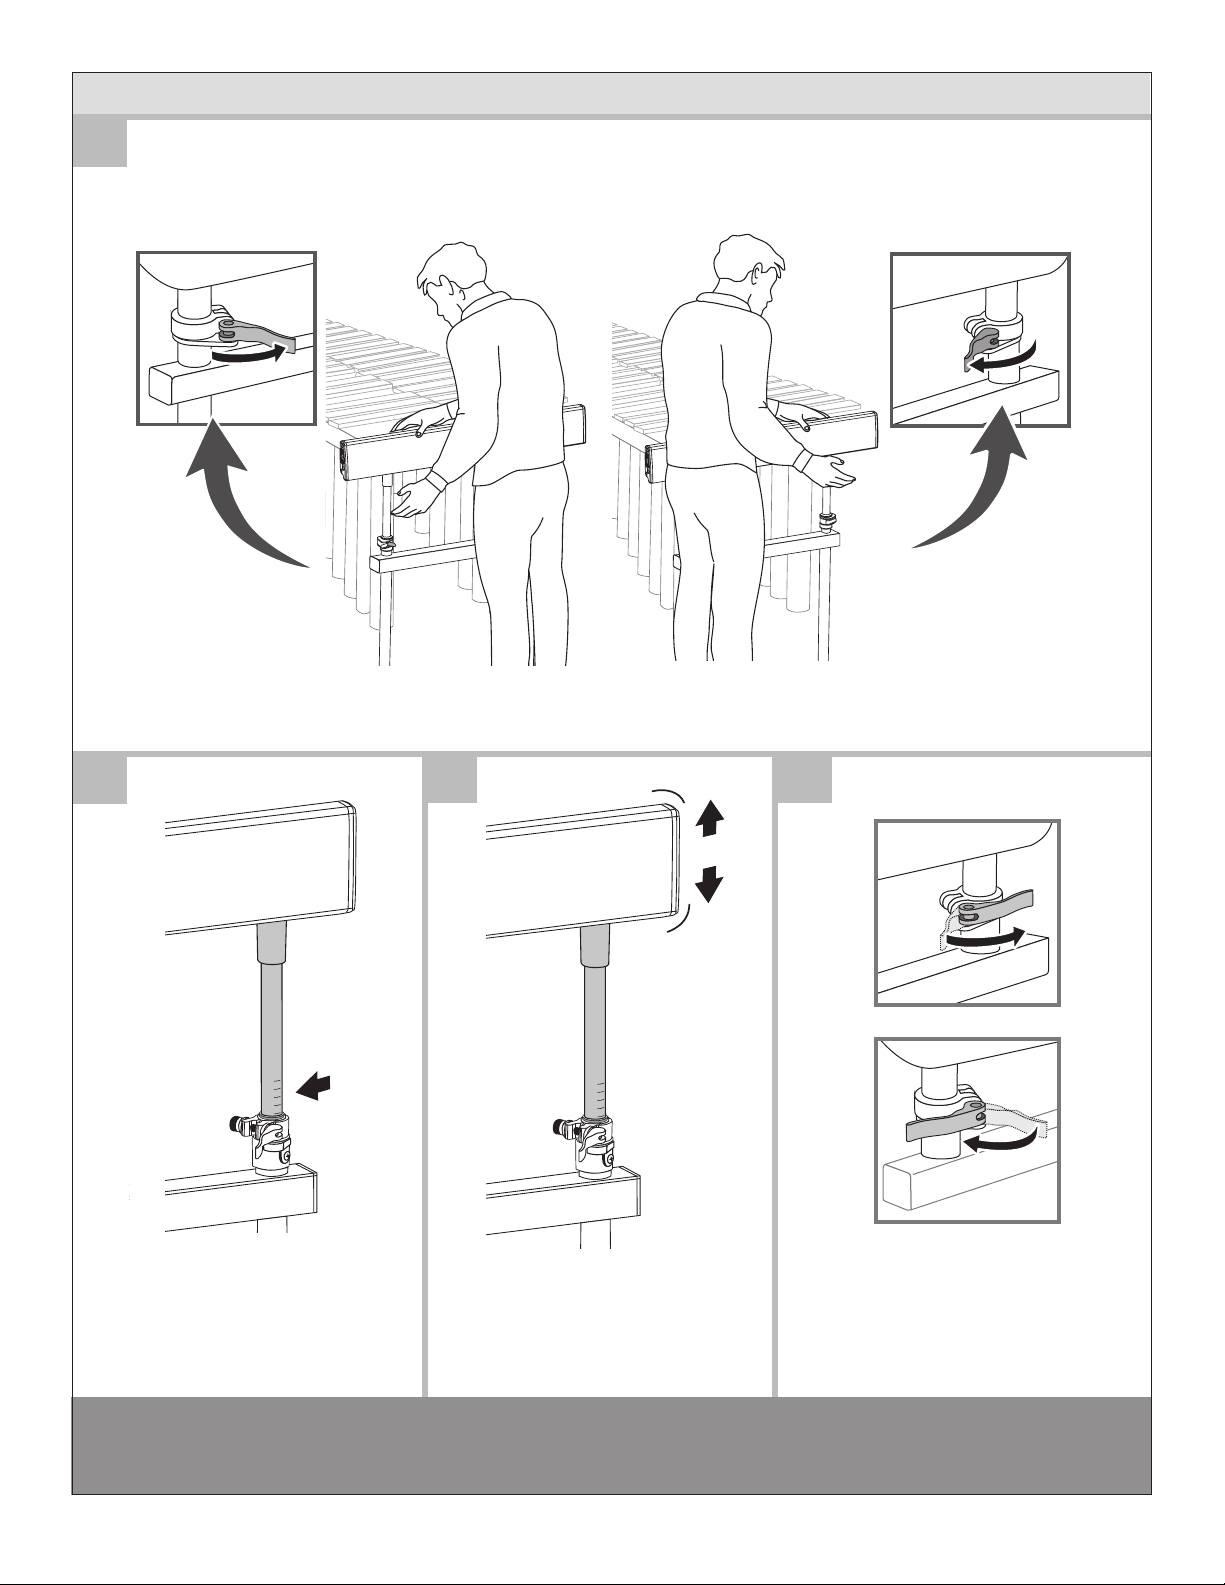
DAMPING PRESSURE TENSION KNOB
30
31
Bass
TENSION KNOB
The tension knob is set at the factory
for full damping pressure.
Turn clockwise for less damping
pressure and counter-clockwise for
more dampening pressure.
ADJUSTING THE SUSTAIN AT THE BASS OR TREBLE ENDS OF INSTRUMENT
The damper bar is set at the factory for
even damping across the keyboard.
Adjust balance of sustain by turning the
adjustment screw located at bass end.
Lower the adjustment knob
for more bass sustain and less
treble sustain.
Raise the adjustment knob
for less bass sustain and more
treble sustain.
8 Rev. 102923

a
32
cb
HEIGHT ADJUSTMENT
86
87
88
89
90
86
87
88
89
90
86
87
88
89
90
86
87
88
89
90
Locate the Izzy Height
Adjustment™ clamp on
the frame.
Gently lift or push down
to raise or lower.
Close levers when desired
height is achieved.
Always adjust the height of the marimba with rails, resonators and bars installed.
RAISING/LOWERING YOUR VIBRAPHONE
Rev. 102923 9

USING THE MOTOR CONTROL BOX
32
33
Speed
Run
Stop
On
O
Speed
Run
Stop
On
O
Speed
Run
Stop
On
O
TO TURN POWER ON
Push On/O Switch to ON position.
TO MAKE FANS ROTATE
Turn Run/Stop Switch to RUN and use the slider to control fan
speed. The One Vibe fans always stop in the 12 o’clock/vertical
position when you turn the Run/Stop Switch to STOP.
NOTE: To avoid the fans stopping in random
positions, do not turn the On/O Switch to
the OFF position when playing the OneVibe.
ON/OFF SWITCH
Power On/O
ON/OFF SWITCH
SPEED CONTROL SLIDER
Fan Rotation Speed FAN RUN/STOP SWITCH
Run/Stop
FAN RUN/STOP SWITCH
10 Rev. 102923

bar cord tension
AFTER ASSEMBLY CARE & MAINTENANCE
1
2
4
3
vibraphone cleaning
moving the vibraphone
Over time, as you play your instrument, the cord that suspends the bars may loosen
and need to be adjusted. To increase tension in the bar cord, use the cleats behind the
springs to take up slack in the cord.
bar cord tension
cleaning
moving the vibraphone
Cleat CleatHooks
Spring
(Bar Cord)
UNHOOK SPRINGS
Spring
RE-HOOK SPRINGS
FORM LOOP IN CORD
At cleat, pull cord to make enough
slack to form a loop.
SLIP LOOP OVER CLEAT
Slip the loop down around the cleat.
Pull the cord taut.
USE A SOFT COTTON CLOTH OR TOWEL DAMPENED WITH WATER ONLY.
Do not use commercial cleaners on your vibraphone!
When the vibraphone is moved, pass S LOWLY through doorways, over doorjambs,
electrical cords, and uneven surfaces.
THE VIBRAPHONE SHOULD ONLY BE LIFTED BY THE END FRAMES.
Rev. 102923 11

WARRANTY
YOU ARE THE OWNER OF ONE OF THE FINEST VIBRAPHONES IN THE WORLD
THE FOLLOWING WARRANTY PROTECTS YOUR INVESTMENT
PLEASE READ IT CAREFULLY
Manufacturer of the world’s nest percussion keyboards and mallets
MARIMBA ONE WARRANTS ONLY TO THE ORIGINAL PURCHASER
THAT THIS INSTRUMENT IS FREE FROM DEFECTS IN MATERIALS
AND/OR WORKMANSHIP AS FOLLOWS:
1. During a period of twelve (12) months from the date of receiving your instrument, Marimba One® will
pay all labor and materials necessary to repair any defective instrument or part thereof. We will repair
a defective instrument or part at the location of our factory. The purchaser must pay all shipping
charges to and from our factory in advance.
2. During a period of twelve (12) months from the date of receiving your instrument, Marimba One®
will replace at no charge any bar that fails to perform according to acceptable musical standards.
Marimba One® will replace any defective bar upon request by the purchaser. The purchaser must
return the defective bar to the location of our factory upon receipt of the replacement bar. The
purchaser must pay all shipping charges to and from our factory in advance.
3. Natural variation occurring in materials which do not aect the musical performance of the instrument
shall not be considered defects, Marimba One® reserves the right to inspect any instrument claimed
to be defective to determine if the cause is a manufacturing defect. Excluded from this warranty are
all defects other than manufacturing defects. Specically excluded are defects occurring as a result
of use other than normal use, any unauthorized alteration or repair of the instrument, defects occurring
in the course of shipping, and other similar defects not related to the manufacture of the instrument.
REPAIR OR REPLACEMENT AS PROVIDED UNDER THIS WARRANTY IS THE EXCLUSIVE
REMEDY OF THE PURCHASER, MARIMBA ONE SHALL NOT BE LIABLE FOR ANY INCIDENTAL
OR CONSEQUENTIAL DAMAGES FOR BREACH OF ANY EXPRESS OR IMPLIED WARRANTY.
EXCEPT TO THE EXTENT PROHIBITED BY APPLICABLE LAW, ANY IMPLIED WARRANTY OF
MERCHANTABILITY OR FITNESS FOR A PARTICULAR PURPOSE IS LIMITED IN DURATION
AND SCOPE TO THE DURATION AND SCOPE OF THIS WARRANTY. THIS WARRANTY IS
NONTRANSFERABLE AND VALID ONLY TO THE ORIGINAL PURCHASER.
Telephone: (707) 822-9570
Email: percussion@marimbaone.com
LOC ATI O N
901 O Street, Arcata, CA 95521 - U.S.A.
MAILING ADDRESS
Post Oce Box 786, Arcata, CA 95518 - U.S.A.
INSTRUMENT SERIAL NO.:
Warranty • Jan. 2023
Other manuals for One Vibe
3
Table of contents
Other Marimba One Music Equipment manuals