Marina S390 User manual
S390
S500
EN

S390
S390
S390

S390
S390 S390
S390

CHOKE SYSTEM
S390
S390
S500
S500

S500
S500
S500 S500
S500

S500
S500
S500
S390
We wish to thank you for choosing our aeration. We are condent that the high quality of our machine will meet
with your satisfaction and appreciation and that your lawn mower will give you long-lasting service.Before starting
to use your machine, make sure to read with care this manual, which has been purposely drawn up to provide you
with all the necessary information for proper use, in compliance with basic safety requirements.
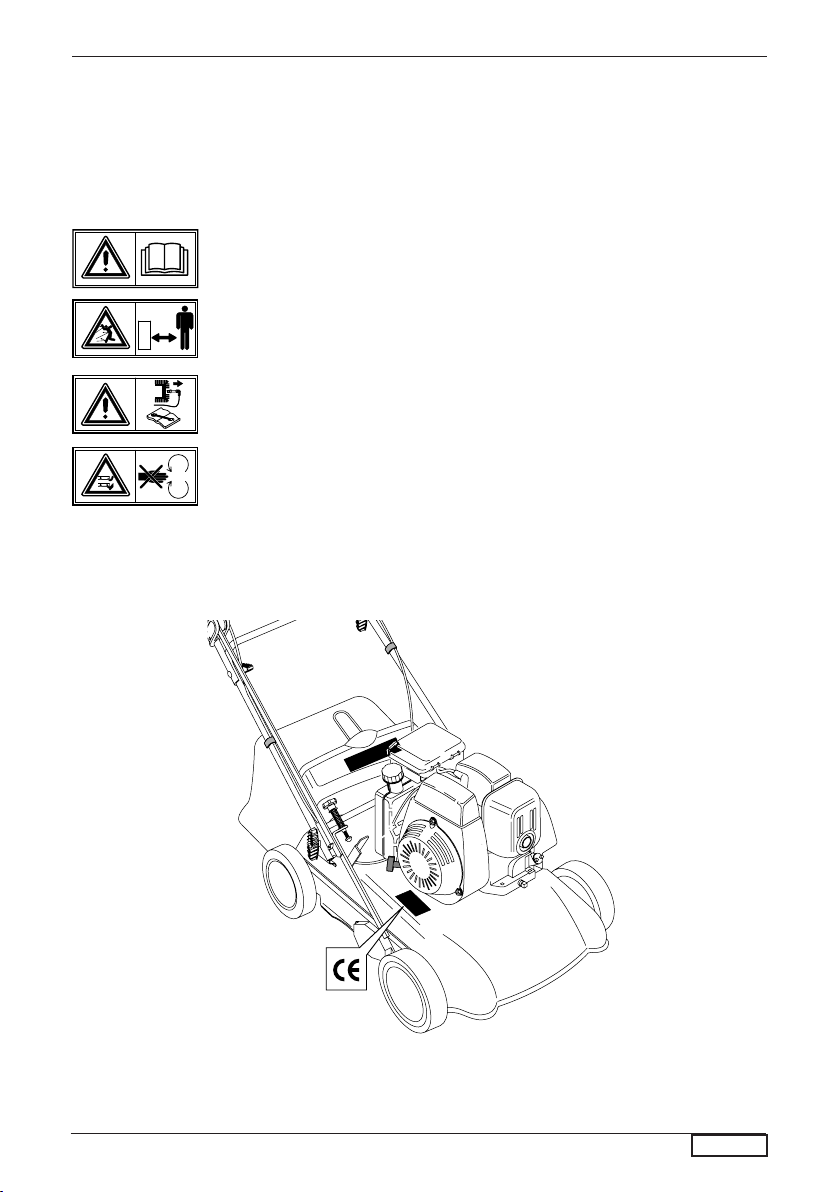
Caution! Read the instruction manual before use.
Keep other people well away from the danger area!
Caution! Switch off the engine and disconnect the spark plug before undertaking
any maintenance work.
Warning: Risk of hand and feet injury.
EN - 1
english
Translation of the original instructions

Training
a)Anyone who is not aware of the instructions for use
shall not use the scarier. Do not allow children or
anyone who has not understood these instructions
to use the scarier. A minimum age for using the
machine can be xed by local regulations.
b)The operator is responsible for the safety of other
people in the working area. Keep children and
domestic animals at a safe distance when the lawn
mower is in use.
c)This machine is to be used exclusively for scari-
fyinging natural grass. Never use the mower for
other purposes (e.g., for attening out bumps in the
ground, such as mole-hills or ant- hills).
d)Work only when there is sufcient light.
e)Before mowing, remove all foreign objects from the
lawn which may be thrown by the machine. While
mowing, stay alert for any foreign objects which
may have been missed.
Setting up and operating
a)When mowing, wear strong footwear (boots or
heavy shoes) and long trousers.
b)Before you start mowing, make sure that the blade
and blade xing screw are securely fastened.
If the blades are severely damaged, they must
be replaced.
c)Turn off the engine, wait until the blade has stopped
and remove the spark plug cap before:
transporting, lifting or moving the machine away
from the working area;
carrying out maintenance or cleaning, or when
carrying out any operation on the blade;
eaving the machine unattended.
Caution! The blades rotate for a few seconds also
after turning off the engine.
d)Caution! The fuel is highly inammable:
Store fuel in containers specically designed for
this purpose.
Refuel outdoors only and do not smoke while
refuelling.
Fill up the fuel tank before starting the engine.
Under no circumstances open the fuel tank cap
or add petrol when the engine is running or when
it is still hot.
If the petrol has overowed, do not under any cir-
cumstances start up the engine.Move the mower
away from the area where fuel has bean spilt and
avoid any source of possible ignition until the petrol
fumes have dissipated.
Replace the fuel tank cap and tighten it down
rmly.
e)Do not operate the engine in a conned space
where dangerous carbon monoxide fumes can
collect.
f) When mowing, never run; you must always walk.
g)Exercise extreme caution when turning or when
pulling the lawn mower towards you.
h)Particular precautions must be taken when mowing
on slopes or downhill stretches:
Use appropriate antislip footwear.
Always be sure of your footing.
Mow across the face of slopes, never up or down.
Take great care when changing direction.
Do not mow on excessively steep slopes.
i)Never use the lawn mower unless the guards and
safety devices (e.g. deector or collection bag) are
securely in position and in good condition.
j)Any improper use of the collection device may
be dangerous due to rotating blades and foreing
objects thrown around.
k)For reasons of safety, the engine must never exce-
ed the speed. (r.p.m.) indicated on the label.
l) Take care when starting the engine and be sure
to follow the user instructions. Never place your
hands or feet undern11eath the deck or into the rear
discharge chute while the engine is running.
m) During the engine start-up, the operator shall not
lift the scaricator; should this be necessary, the
equipment shall be tilted so that the blades are on
the opposite side of the operator.
n) If the blades happen to hit any obstacle, stop the
engine at once and remove the spark plug cap.
Then get an expert to examine it.
Maintenance and storage
a)Make sure that all nuts, bolts, and screws are
kept well tightened to keep the mower in a safe
operating condition.
b)Never leave the machine with fuel in the tank within
an enclosed area where the fuel vapours could
reach naked ames or sparks.
c)Allow the engine to cool before storing in any
enclosure.
d)Keep the engine, silencer, battery compartment
and petrol tank free from grass, leaves and excess
lubricant, in order to reduce the danger of re.
e)Frequently check the collection bag for wear or
deterioration
f)For safety reasons, be sure to replace worn-out or
damaged parts in due time.
g)If the fuel tank has to be drained, it is essential that
this be done outdoor.
h)Assemble the blades following the corresponding
instructions and use only blades bearing the ma-
ker’s name or the trademark of the manufacturer or
supplier and marked with the reference number.
i)To protect hands during disassembly or assembly of
the blades, it is absolutely essential to wear suitable
protective gloves.
SAFETY RULES
EN - 2
english

Always operate with the deector or collection bag in the correct position.
Always stop the engine before removing the collection bag and adjusting the blade height.
Never place your hands or feet underneath the deck or into the grass discharge chute
while the engine is running.
SAFETY PRECAUTIONS
Before scarifying the lawn, remove all foreign objects.
While mowing, stay alert for any foreign objects which
may have been missed.
During the engine start-up or operation, the operator
shall not lift the scaricator; should this be necessary,
the equipment shall be tilted so that the blades are
on the opposite side of the operator.
Never place your hands or feet underneath the deck
or into the rear discharge chute while the engine is
running.
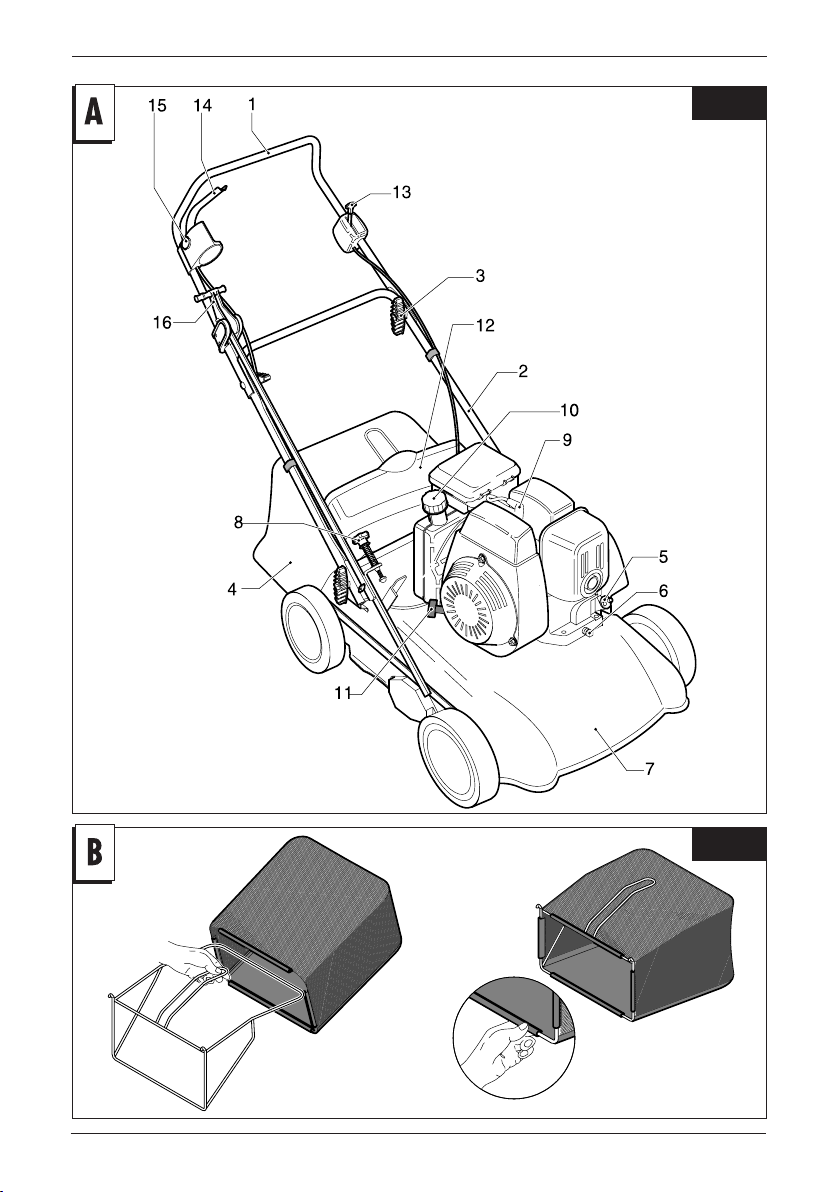
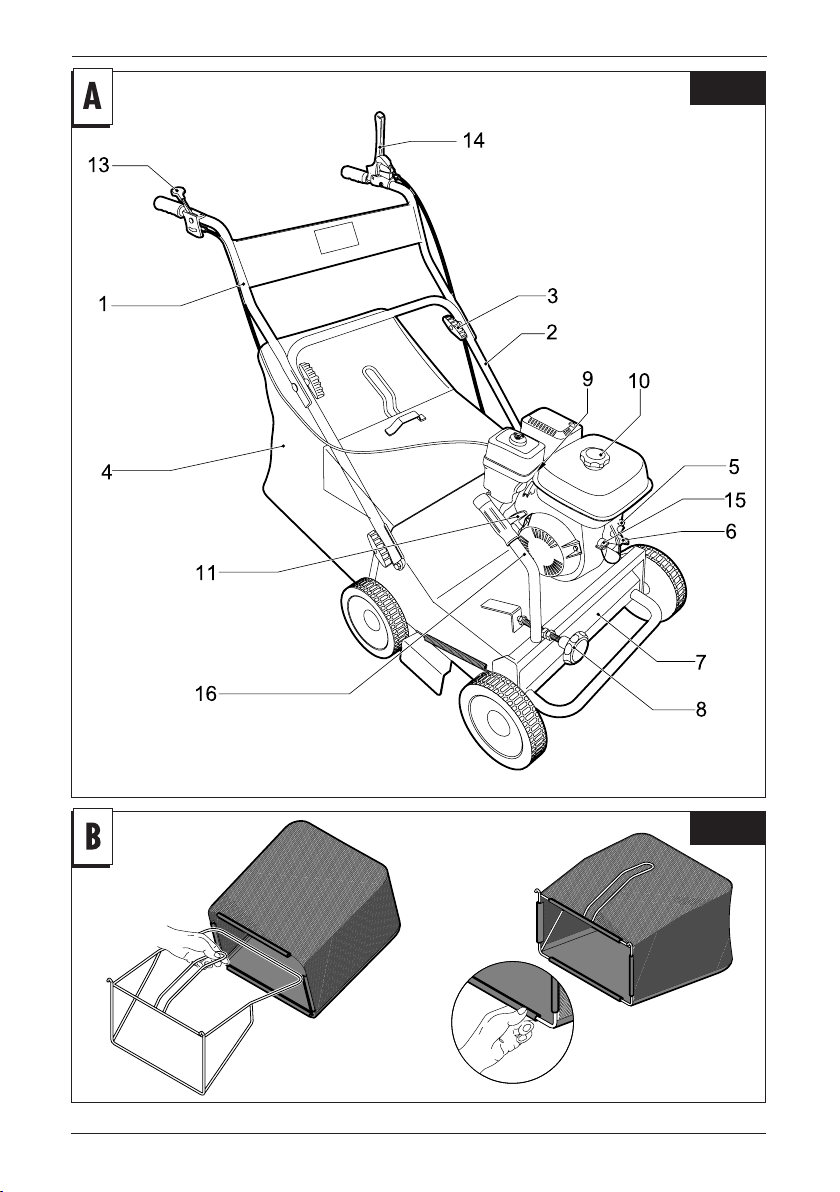
DESCRIPTION
COLLECTION BAG ASSEMBLY
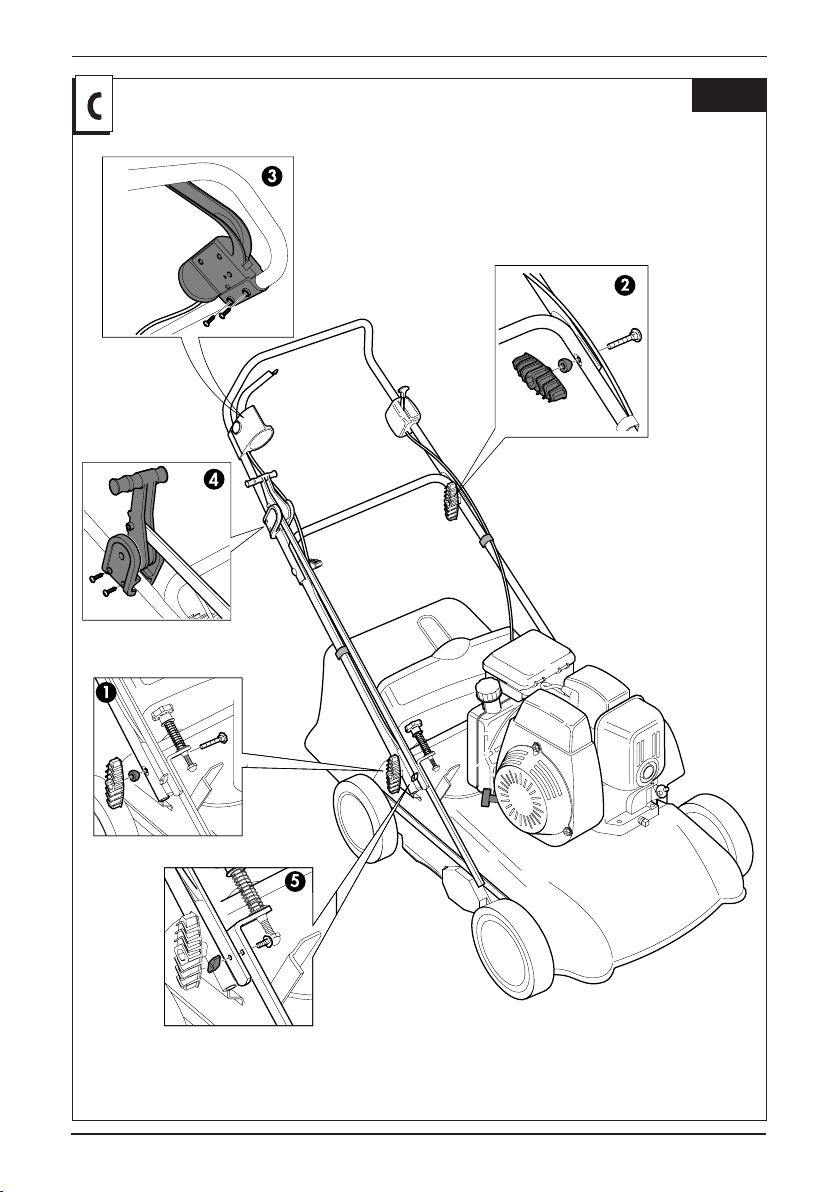
ASSEMBLY
REGOLAZIONE ALTEZZA LAME
1 Upper handles
2 Lower handles
3 Fastening knobs for upper handles
4 Collection bag
5 Oil ller cap
6 Oil drain plug
7 Deck
8 Blade height adjusting knob
9 Spark plug
10 Fuel cap
11 Engine start-grip
12 Rear deector
13 Throttle lever
14 Engine stop lever
15 Switch button
16 Blade operation lever
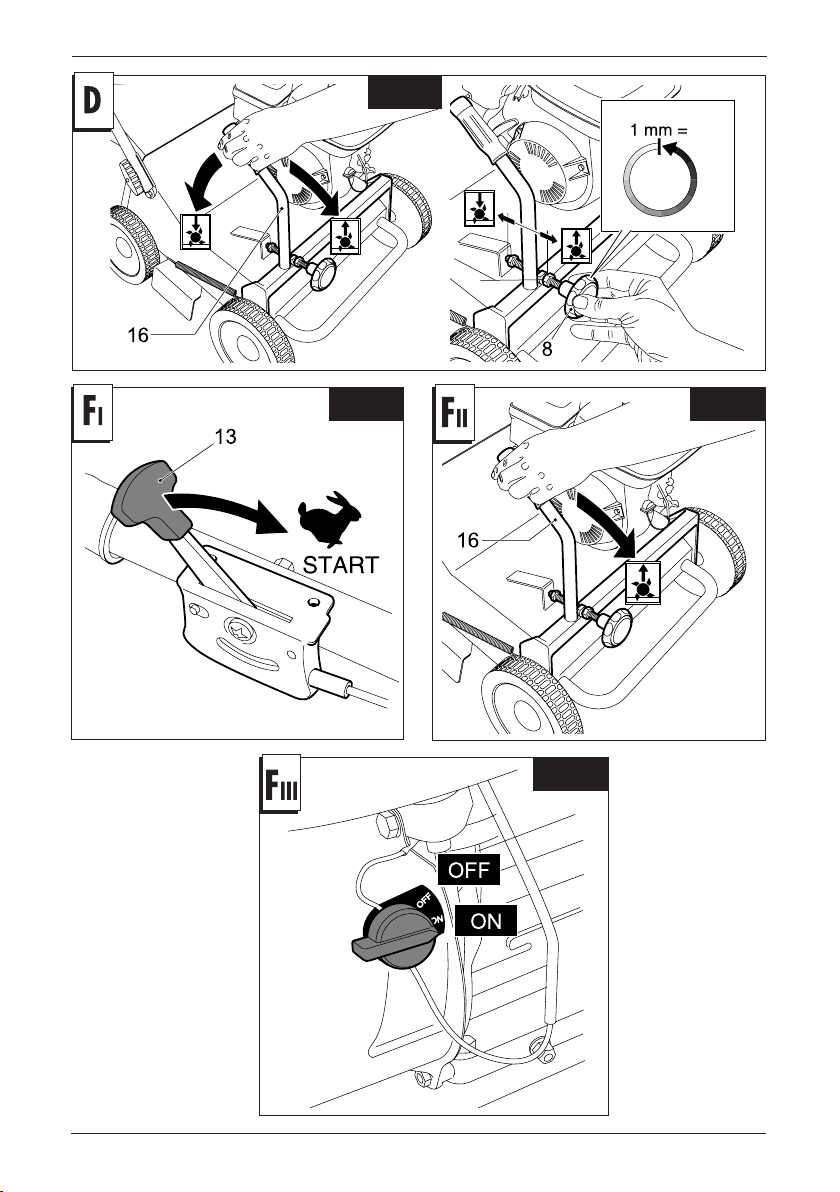
Move the lever (16) forwards.
Adjust the height of the blades by turning the knob (8) to the left to increase the working depth or to the
right to reduce it. (1 turn = 1 mm).
N.B.= make tha blades cut into the earth by about 3 mm.
Setting the working depth
Select the working depth depending upon the wear of blades and the state of the lawn. If the motor does not pull
through or even stops in scarifying, the wrong working depth has been selected.
In this case, reduce the working depth.
The motor must turn evenly.
Adjustment level per Step: 1 mm.
Adjustment level max: 10 mm
Adjustment level advised: 3 mm
EN - 3
english
OPERATION
ENGINE ADJUSTMENTS
Refer to the engine manufacturer’s mainte-
nance manual.
CAUTION:- 0.6l Oil must be added to the
engine before use
SCARIFICATION
Each year and on every lawn, moss and weeds take
hold, which cause the ground to become matted.
By scarifying, the hard surface is cut, allowing the
grass to breathe and take up nutritional substances,
oxygen and water.
Before scarifying, mow the lawn to a height of about
40 mm (an inch).
Only use the aerator when the lawn is dry.
March, April, and September are the best months
for scarifying.
Do this work at least once a year.
To get a nice green effect, we recommend using
a fertiliser immediately after having used the sca-
rication.
Empty the grass box in good time.
Only with the engine switched off and the cutting
gear at a standstill.
1. Lift the grass box.
2. Lift the discarge ap.
3. Remove the grass box by pulling it backwards.
If the grass box is over-lled, the discharge channel
in the housing of the aerator becomes blocked and
grass is left lying on the lawn.
Put the grass box back into place and start the
engine.
STARTING THE ENGINE
Once the machine has been set up properly, start the
engine as follows:
Engines with primer system:
Press the fuel-enrichment pump located on the
carburettor 3 or 4 times position the accelerator
lever (13) on MAX.
For further information and explanations, read care-
fully the user instruction manual of the engine.
Manual start of the engine
The exhaust fumes contain carbon monoxide,
a non-odorous and lethal gas!
For this reason, never start the engine in
enclosed or badly ventilated rooms.
Do not start the motor when the blade unit
is in the operating position.
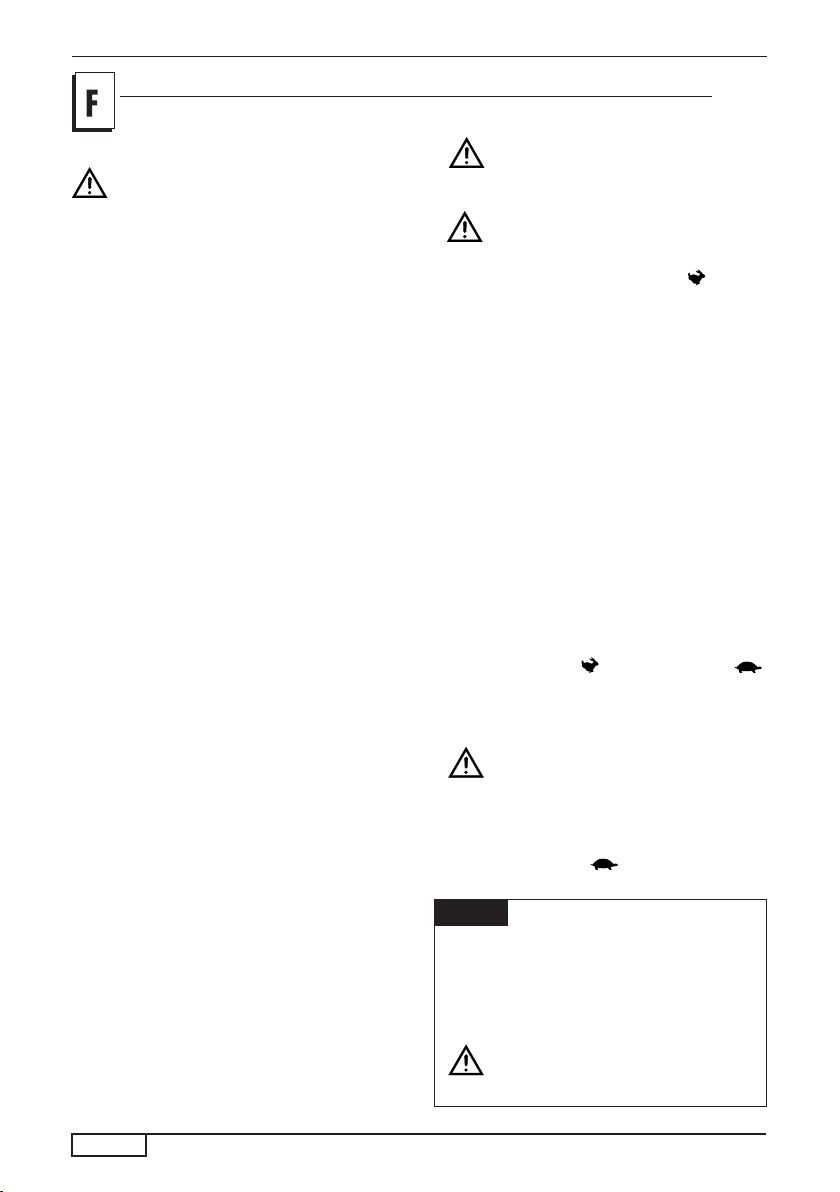
Pull the lever (16) up to lift the blade unit.
Push the gas lever (13) to the position ”START”.
Press the injection pump 2 to 3 times. There should
be a 2 second gap in between each pressing.
Attention!
At temperatures below +10°C, press the rubber bel-
lows 5 times. Never use the bellows when the engine
has reached operating temperature.
Press push button (15) and pull STOP switch lever
(14) towards the handle and hold it in this position.
If the engine brake bracket is not pulled, the starter
cord cannot be pulled out as a result of the engine
brake.
Pull out the starter cord until a compression resistan-
ce can be felt. Allow the cord to return slowly and then
pull it out again quickly a full arm’s length for the start.
Keep the starter handle in your hand and allow the
rope to return slowly. Set the gas lever to match the
work you are doing.
After the start
As soon as the engine is running, put the gas lever
to position between (“START, MAX”) and
(“STOP, MIN”) at a speed which you think matches
the work you are doing.
Stopping the engine
Please remember that the blade continues to
run for a few seconds after switching off.
Therefore, do not put your hands under the
scarier immediately after switching it off.
Release the lever of switch (14) to turn off the
engine.
Put the gas lever to or MIN. (Stop).
EN - 4
english
The S500 has the possibility to start and stop the
blades keeping the engine working.
In order to make the blades working you have to
push lever Aand push down lever B.
To stop it you have to release lever B.
Attention!
The blade needs some seconds to stop
completely.
S500

MAINTENANCE
Check engine oil level
Change engine oil
Clean the air lter
Check spark plug
Replace air lter
Clean air intake cover
Check silencer
Sharpen or replace of blade
Check for loose parts
Clean the scarier
For a four stroke engine, check the oil level and
change the oil when dirty. For further explanation,
see ENGINE INSTRUCTION BOOK.
Frequently check the mower and ensure that all
deposits are removed from beneath the deck.
Take care, the exhaust mufer may be very hot.
Caution! Switch off the motor and disconnect
the spark plug before undertaking any mainte-
nance work.
Frequently remove the wheel screws clean whith
petroleum and oil before replacing. Ball bearings must
be greased before remounting.
Frequently check the blades for damage.
The lawn mower must be checked by a SERVICE
DEALER.
BEFORE EVERY USE
AFTER FIRST 2 HOURS
EVERY 5 HOURS OF OPERATION
OFTEN
EVERY 25 HOURS OF OPERATION
AT THE BEGINNING OF EVERY
SEASON
PRIOR TO STORING
EVERY 50 HOURS OF OPERATION
EVERY 100 HOURS OF OPERATION
EN - 5
english
AERATOR S390 - S500 WITH SPRING SHAFT
The spring shaft is designed to remove moss
and dry grass from the turf.
mm above the ground, on any type of ground.
For transport, the shaft must be lifted from the ground
by operating the appropriate lever.
Before using the aerator, mow the lawn with a mower.
Unlike the shaft with oating or xed knives, the spring
tips do not have to impact the ground.
Recommended working depth for shaft with xed or
oating blades is 3 mm under the ground, maximum
depth 5 mm on hard ground and 10 mm on soft ground.
Recommended working depth for the spring shaft is 2

EC DECLARATION OF CONFORMITY
MA.RI.NA. Systems srl - via F.Baracca 3, 24034 Cisano Bergamasco (Bg) – Italy
Declare that the machine scarier with internal combustion engine
• Model (a)
• Power (b)
• Working width (c)
• Weight (d)
• Serial number (e)
n compliance with the requirements of the following EC directives
1) 2006/42/EC
2) 2000/14/EC + 2005/88/EC
3) 2014/30/EU
4) 2011/ 65/ EC
5) 2012/46/EU
In accordance with the following norms:
1) EN ISO 12100:2010
2) EN ISO 5395-1:2013; EN ISO 5395-2:2013
3) EN ISO 3744:2010
Also declares that the technical manual is kept at:
MA.RI.NA. Systems srl - via F.Baracca 3, 24034 Cisano Bergamasco (Bg) – Italy
Tested by: (m)
Directive 2000/14/EEC : conformity valuation procedure followed (Annex VI) tested by : (n)
• Measuring conditions (f)
• Grip vibrations (g)
• Measured sound power (h)
• Guaranteed sound power (k)
• Sound pressure at operator’s ear (measuring uncertainty 2dB) (y)
Cisano Bergamasco, 18/01/2017
english
Consult the levels measured and shown on the label on the last page
EN - 6
Christian Rivolta
C.E.O.
This manual suits for next models
1
Table of contents
Popular Tiller manuals by other brands

Scheppach
Scheppach MTE460 SE Translation of original instruction manual

Craftsman
Craftsman 917.296020 owner's manual

Pilote 88
Pilote 88 S2 Operating and maintenance instructions

Stafor
Stafor M2BR4 Operating and maintenance instructions

Agrimate
Agrimate AM-RTP-7P CHAMPION user manual

Poulan Pro
Poulan Pro 176843 owner's manual


