Maro D'Italia DI600 Instruction Manual


Content
Package content
Safety precautions
Before installation
List of installation parts
Side control buttons overview
Remote control overview
Rear / Front wash operation
Move and pulsating Rear wash mode
Installation
Auto mode
Seat heating setting
Dryer operaton and night light
Nozzle cleaning
Cleaning
Disassembly
Troubleshooting
Service record & Notes
Warranty card
Troubleshooting & Significant indicatiors and warnings
T-adapter cleaning and filter replacement
Users Memory Settings
Technical specifications
Technical drawing & Recommended power and water supply connections

(remote control)
(main unit)
Screws and anchors
T-adapter&Filter
Bidet inlet hose Expansion screws
Bidet seat main unit

250W-300W
385x510x136mm
≥4m/s
30°C~55°C
50W-60W
29°C~41°C
1250W
30°C~41°C
IPX4
3°C~35°C
0.07MPa~0.75MPa
3°C~40°C
911W~1084W
1300W
AC 220V-240V, 50Hz
PRODUCT DIMENSIONS
MAXIMUM SPEED OF AIR
AIR TEMPERATURE
HEATER POWER
SURFACE TEMPERATURE
HEATER POWER
WATER TEMPERATURE
WATERPROOF RATING
WATER SUPPLY TEMPERATURE
WATER SUPPLY PRESSURE
BEST ROOM TEMPERATURE
RATED POWER
MAX POWER
RATED VOLTAGE
SEAT
HYGIENE
HEATED WATER
HEATED SEAT
DRYER
ENERGY
SAVING
REAR
5 Settings
5 Settings
3 Settings
5 Settings
3 Settings
AIR
DI600
ELECTRONIC TOILET SEAT
MODEL
NAME
Technical Specifications
REAR
FRONT
MOVE/OSCILLATING NOZZLE
PULSATING
WATER PRESSURE CONTROL
WATER TEMPERATURE CONTROL
NOZZLE POSITION ADJUSTMENT
AIR DRYER
AIR TEMPERATURE CONTROL
SEAT HEATING TEMPERATURE CONTROL
SOFT CLOSING SEAT AND COVER
ANTIBACTERIAL NOZZLE CAP
ANTIBACTERIAL SEAT
NOZZLE MANUAL CLEAN MODE
ENERGY-SAVINGS/ECO
NIGHT LIGHT
SEAT SENSOR
DRYER POWER
OTHER

>
5
0
0
m
m
2
0
0
m
m
25
0
m
m
1
0
0
m
m
293mm
Technical Drawings
Recommended Power and Water Supply Connection
140~180mm
Power socket can be positioned either on the left or right side of the water outlet.
377mm
205mm
136mm
385mm
510mm
500mm
545mm

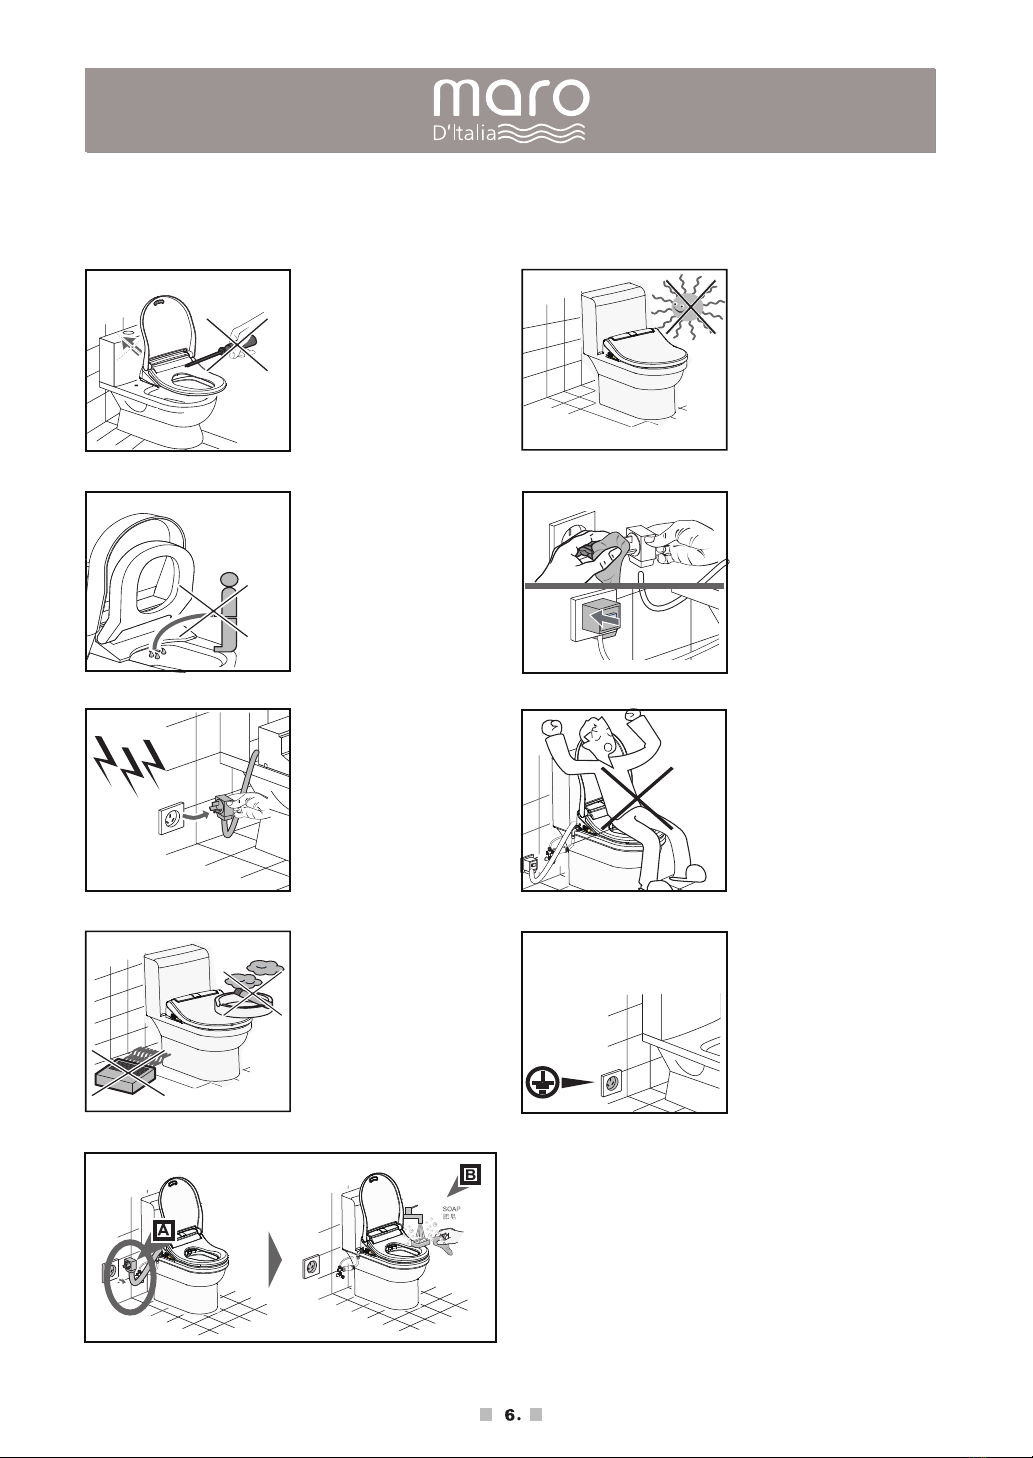
Make sure no splash of water,
detergents or urine comes in
touch with the power plug. This
might cause an electric shock.
Do not touch the power plug with
wet hands. This might cause a fire
or an electrical shock.
Do not turn the product upside
down. Do not lift the front of the
base part of product by more than
45°. This might cause product
damage.
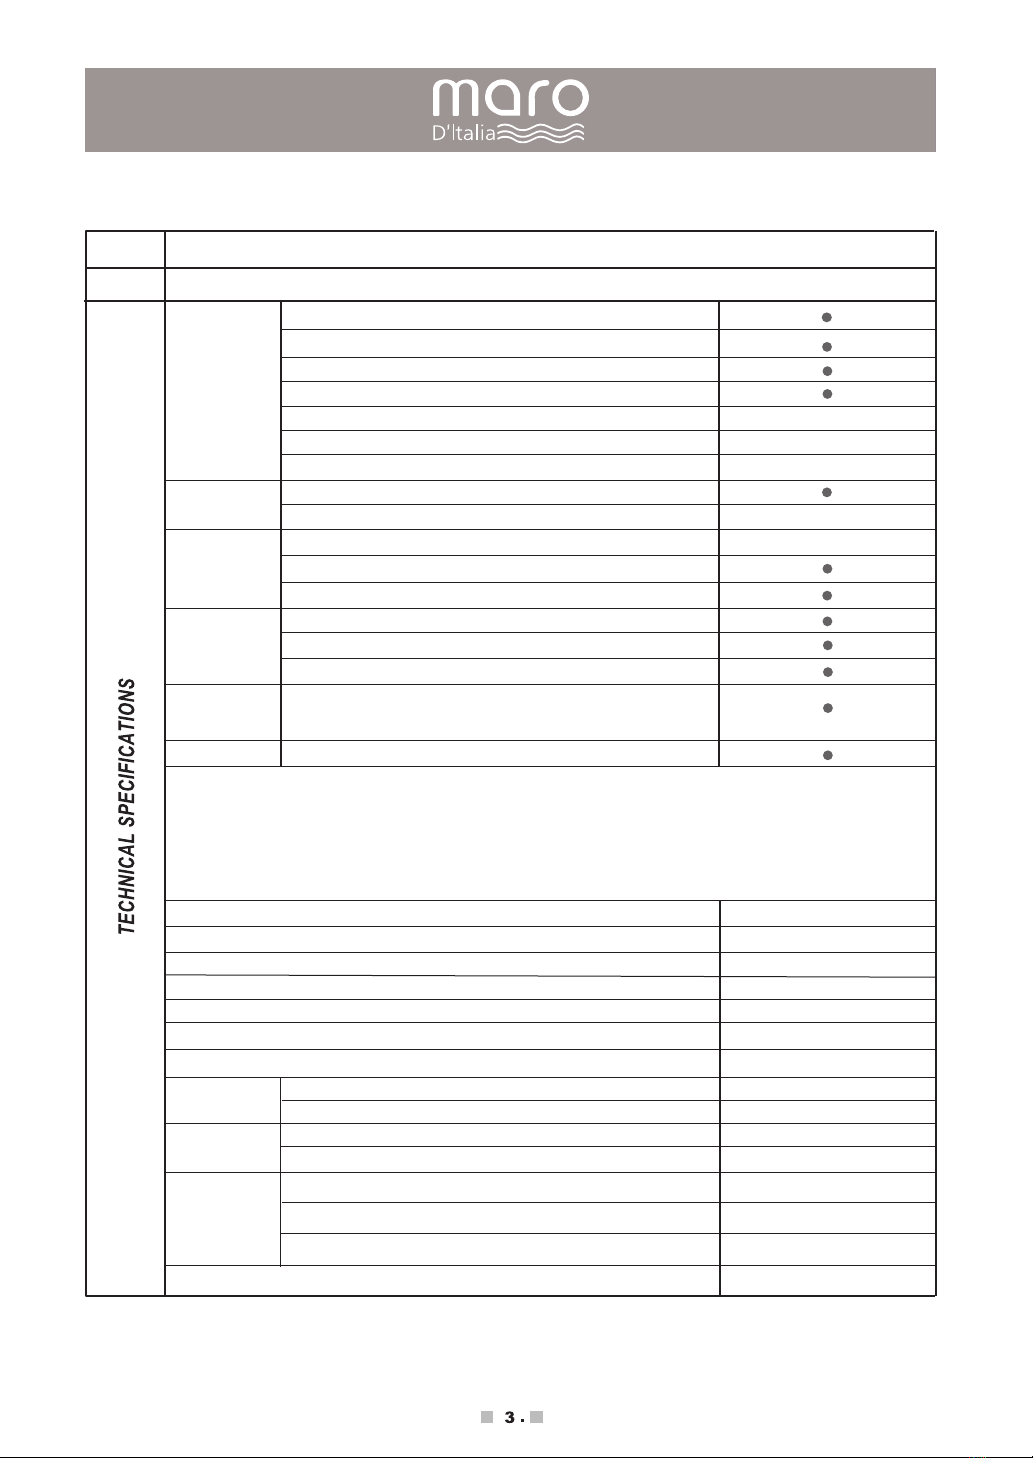
Use the specified power supply
AC 220V-240V/50Hz only. Never
put too much pressure on the
electrical outlet. This may cause a
fire or overheating. If the power
cord does not suffice, please buy
a professional power extension
cord.
Do not loose outlets. This might
cause a fire or an electrical shock.
Safety precautions
Do not bend or distort the nozzle.
This might cause product damage
or performance failure.
Make sure you operate the plug
and wire correctly, otherwise this
may lead to fire or electrical
shock. To avoid the risk, make
sure that onlyprofessional staff
is entitled to perform the
replacement in case of power cord
failure.
Make sure not to use industrial
water, waste water, polluted water
or sea water as the supply. This
might cause inflammation skin
injury.
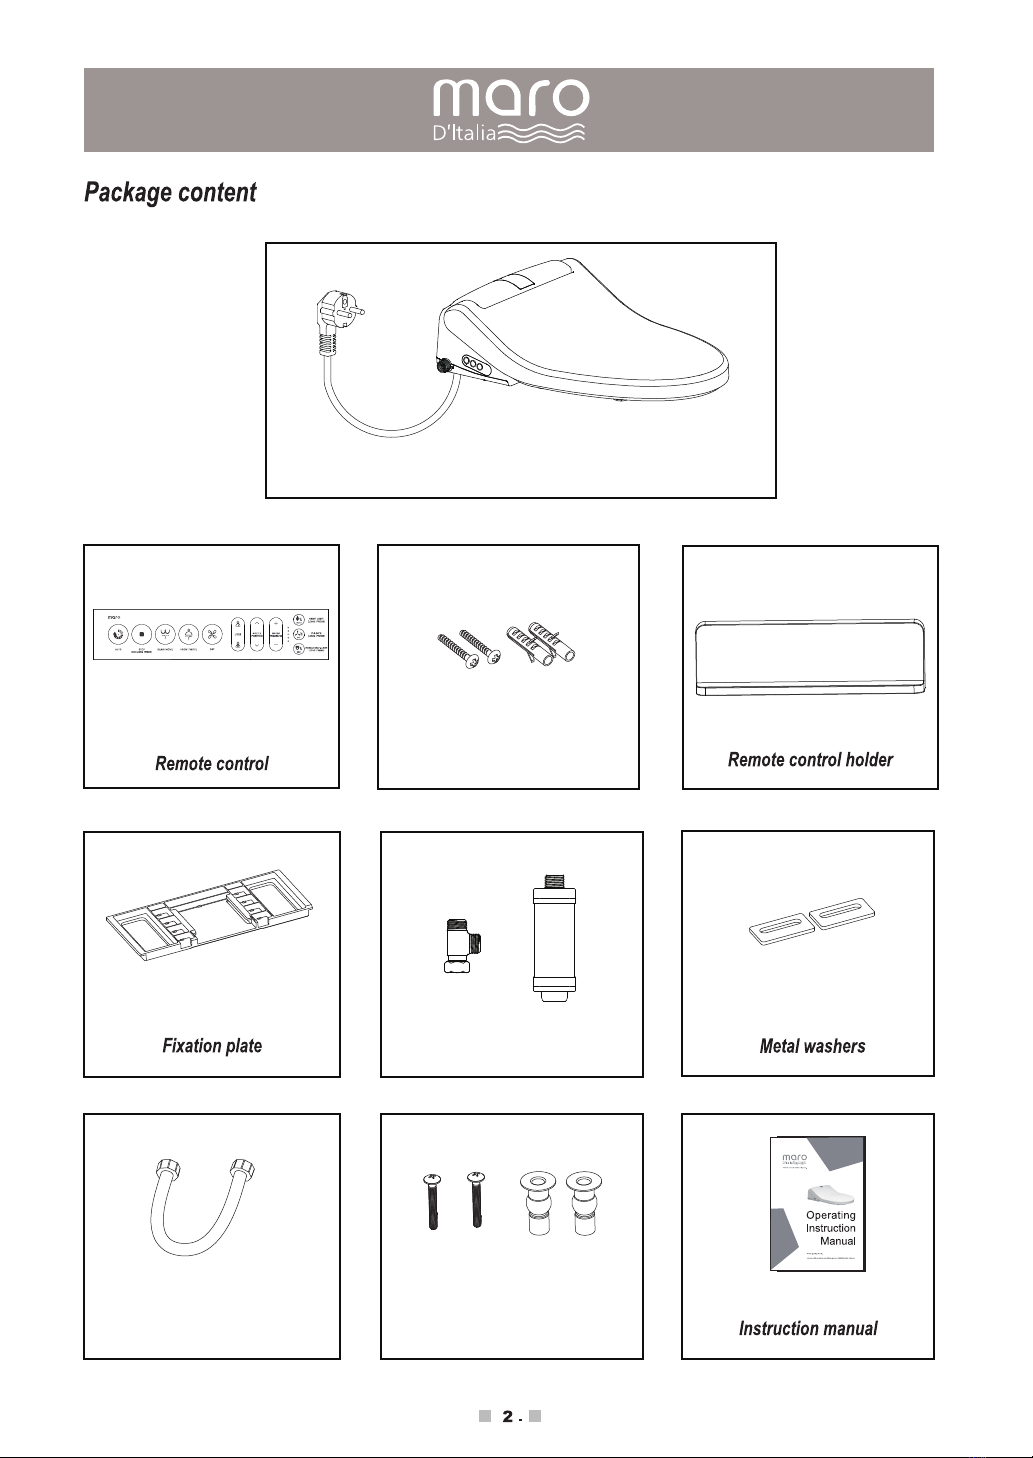
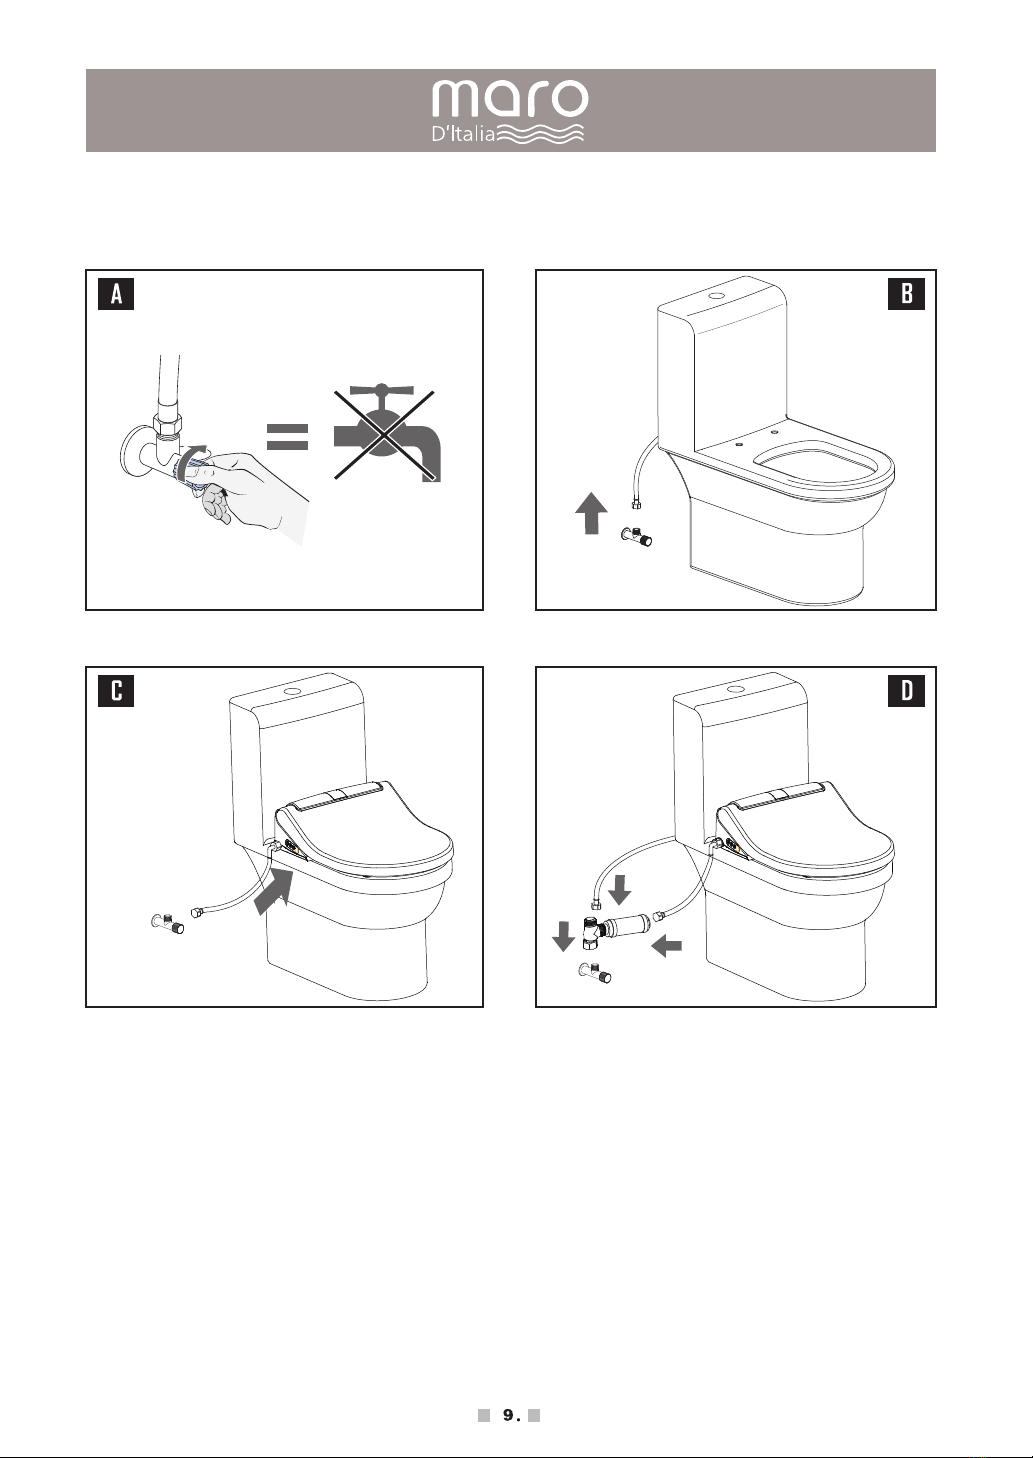
Use the attached new hose
assembly during the installation.
The old hose should not be
reused. Do not bend or distort the
inlet hose. This might cause water
leakage orperformance failure.
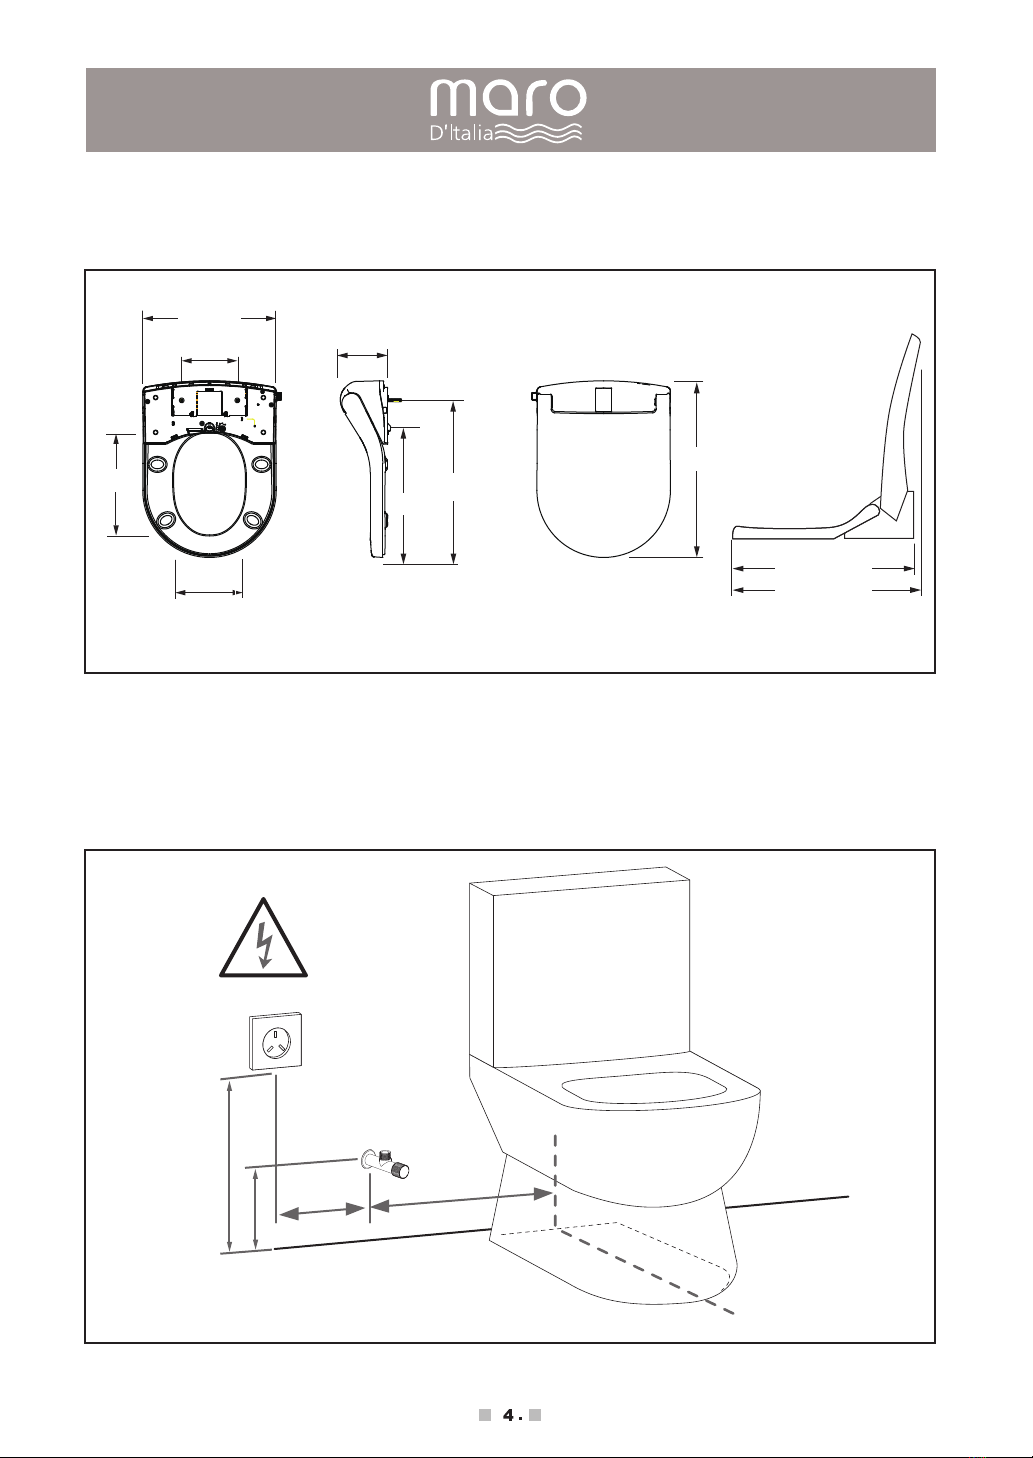
The room temperature where the
product is placed should be
above the freezing point. Make
sure you set up the right room
temperature, otherwise the
product might freeze.

Safety precautions
Make sure replacement, repair or
removal of the product is carried
out by a qualified service person
only. Failing to do so might cause
a fire or electrical shock.
Do not urinate on the nozzle.
This might cause product failure.
Unplug the power plug when
thunder occurs. Wrong use can
result in product failure or
damage of the product.
Do not place an electric heater
near the product or dispose of
any burning materials such as
a lit cigarette in the toilet. This
may result in fire or product
deformation.
Do not expose the product to
direct sunlight. This might cause
discoloration or skin injury due to
unstable temperature.
Check if the type C electrical plug
is connected to the ground line.
Make sure the electrical plug is
plugged into an outlet that is
properly installed and grounded.
Electrical power supply should
be implemented by a qualified
electrician or service technician.
Improper use of the grounding
plug can resultin electric shock.
Before inserting the power plug
into the electrical outlet, use a soft
dry cloth to remove dust and
other particles from the plug.
Insert itinto the outlet.
Do not lean on the seat cover.
This might cause cover damage.
Pull the power plug out of the electric al outlet before cleaning the unit.
Do not splash water directly onto the bidet. Failing to do so might cause
an electrical shock.

Before installation
1. Do notput the product in a roomwhere humidity can exceed 90% RH (relative humidity).
2. Onlyuse specified power supply (AC 220V–240V). Other power supply may cause product failure orproduct damage.
3. Do not applypower or supplywater to the unituntil the installation process is complete.
4. The power voltage amounts to 220V–240V. The Max power is 1300W. Use wiring and electrical outlet appropriate for th is level of
power.
5. Use water supplywith static pressure of 0.7kgf/cm²–7.5 kgf/cm² (0.07 MPa–0.75 MPa).
6. The temperature of the main water supply should bedefined from 3°C–35°C (37.4°F–95°F).
When using electrical products, especially when children are present, basic safety precautions should always be followed, including the
following:
TO REDUCE THE RISKOF ELECTROCUTION:
1. Do notplace or store this appliance anywhere where it can fall orbepulled into abath or sink.
2. If the product fallsinto the water, please unplug the power supplyimmediately and do not touch itdirectly with yourhands.
3. Do not reach for the product that has fallen into water. Unplug itimmediately.
4. Do notuse the product while taking a shower.
WARNING: To reduce the risk oflow-temperature burns, electric shocks, fire orpersonal injuries:
1. Close supervision isnecessary when thisproduct isused by children orpersons requiring general assistance.
2. Do notleave children unattended in the roomwhen the product ispositioned. Kids should notplay with the product.
3. Adjust the temperature of the toilet seat for the elderly, handicapped and peoplewith sensitive skin.
WARNING
Please clean any residual mud, sand and other debris in the bathroom before installation; otherwise you may risk product damage.

Installation
Installation tips for fixation plate: First, do not screw the plate
too tightly, leaving space. Second, install the product and adjust
its position, then press the button on the right side to uninstall
the product so as to make a tight screw to the plate. And at last
install the main unit by sliding it onto the fixation plate until it
locks in place.
4.5

Installation

Installation
Slide down to put the remote control back to
the initial position.
Slide up to remove the remote control.
4.5

Installation

Installation
Functionality test
In order to test if the wash functions work properly, press on the “Seat sensor” position with your hand.
Seat sensor
12

Fixation Plate
Power
Seat
Display
ECO
bider Inlet Hose
T-adapter Filter
Filter
Power
Rear Wash
Night Light
Front wash Nozzle Cap
Plug
Rear Wash Button
Front wash Button
Bidet Seat unit
IR Receiver
Cover
List of installaton parts
Dryer
13

Side Buttons Overview
Power
Rear Wash Button
Front Wash Button
Front Wash
Power
Rear Wash
IR Receiver
Front / Rear Wash Settings
Press the “Rear” or “Front” button to initiate the Rear or Front Wash function. Press again to initiate the Move oscillating nozzle washing
mode. Remarks:For perfect cleanliness we suggest, while using Front cleansing or Rear cleansing to press the Move button (Front or Rear
button one more time), this way you will be clean to perfection.
Press the “Power” button to stop all functions, it will stop automatically 3 minutes later or when you leave the seat.
14

Remote control overview
Forward Button
Backward Button
Pressure Button“-”
Pressure Button“+”
Auto Button
Front/Move Button
Rear /Move Button
Stop Button/ECO
Air Temperature Button/
Pulsate Button
Seat Temperature Button/
Nozzle Clean Button
User 1
User 2
Dryer Button
Light Button
Water Temperature Button/
15

Water temperature settings
Rear / Front Wash Settings
Water Pressure settings
Nozzle position settings
Press the “Stop”button to stop Washing and Drying Functions; Thewashing procedure will stop automatically after 3 minutes or
when you leave the seat.
Normal temperature
Medium temperature
High temperature
Low temperature
16

Move - Oscillating Nozzle Washing
Pulsating Washing ( in Rear/Front Mode)
Energy saving - ECO mode
Press the button to STOP.
Long press the button to enable/disable the ECO.
(After the ECO mode start, the seat
will maintain lower temperature when
leaving the seat; and temperature will
be slowly rise to the set temperature
after seated.)
Press the button to start Move.
Press again to stop.
Enabled Rear /Front Mode
Long press the button to start Pulsate. Press again to stop.
17

Step 4: Dryer Mode
Auto mode
Press the button to start the “Auto mode”, it will complete Rear Wash with Move
function enabled and lastly Drying in sequential order automatically
Step 1: Rear Wash Mode
Step 3: Rear Wash Mode
Step 2: Move Mode
30s
18

Normal temperature
Seat temperature control
Anti-scalding protection
180 seconds after the user is seated, the control system reduces the seat temperature automatically, to prevent being scolded.
5th grade
4th grade
3rd grade
2nd grade
1st grade
19
Table of contents
Popular Bathroom Fixture manuals by other brands

Hans Grohe
Hans Grohe Logis 71630000 Instructions for use/assembly instructions

daewon
daewon DIB-N800 Series user manual

Lefroy Brooks
Lefroy Brooks M1-4308 Installation, operating, & maintenance instructions

GME
GME AKORD installation manual

American Standard
American Standard Aspirations TU06150 Series manual

DUSBAD
DUSBAD Vital 1 Series Assembly instructions