MARSAL MB42 User manual

OVEN SERVICE MANUAL
MarsalDeckOvens:MB42,MB60,MB236,MB866,SD236,SD248,SD260,SD448,SD660,
SD1048,SD1060,SD866,SD10866,WF42,WF60
RETAIN THIS MANUAL FOR FUTURE REFERENCE
©2016MarsalPizzaOvens.175E.HoffmanAve.Lindenhurst,NY11757(631)226‐6688www.marsalsons.com

1
TESTINGOFCOMPONENTS
AUTOMATICSAFETYPILOTVALVE(TSII)#55127
Pilotgasissuppliedfromthemainvalveinletthroughadrilledpassagewaytothepilotburner.Pushingthe
redresetbuttontemporarilyallowsgastoflowtothepilotburnerforignitionofthepilotburnerflame.When
thebulbheatsup,themainvalveopenstoallowgastoflowtothemainburner.Theredresetbuttonisthen
released.
Ifthepilotburnerflamefailsandcannotbereactivatedthe
followingtestcanbeperformed:
Pilotburneradjustment:RefertosectiononPage3
CleanPilotburner’slimitingorificeasfollows:
1.
Disconnectgastubingatthepilotburnerbody
2.
Removecupshapedorificefrompilotburnerbody
3.
Cleanorificebyblowinganyforeignmatteroutthe
orificehole.Takecarenottoenlargeorificehole.
4.
Replacecomponentsinreverseorder.Ifthepilot
burnerstilldoesnotoperateorthemainburner
comeswithalowflame,orwillnotcomeatall,
replacetheAutomaticSafetyPilotValve(TSII)
MAINMANUALCONTROLVALVE#70380
Themainmanualcontrolvalveisasimpleballvalve.Duetoits
simplicity,failuresofthistypeofvalvearepracticallynon‐existent.
Fordifficultiesassociatedwiththiscontrol,itwouldbebestto
replacethevalve.
THERMOSTATFDTH#71880
Foranysuspectedthermostatproblemsthefollowingproceduresshouldbereviewedinthismanual:
Thermostatadjustment
Bypass(MinimumBurnerFlame)adjustment.
Thermostatcalibration.Mostthermostatfailureswillgenerallyfallintooneofthefollowingthree
categories:
Figure 1

2
1.
Ifthermostatisinarunawayconditionandwillnotshutoffatsettemperature,replace
thethermostat.
2.
Ifthermostatwillnotmaintaincalibrationafteradjustment,replacethermostat.
3.
Ifthermostatbulborcapillaryarecut,bent,orunnecessarilyflattened,replace
thermostat.
(ThisisNOTcoveredunderthewarranty!)
MAINTENANCEINSTRUCTIONS
ADJUSTMENTS
Manymalfunctionsattributedtodefectivematerialorfaultyworkmanshipmayberectifiedbythe
adjustmentofpilotburners,mainburners,orthermostats.Itisthereforewisetoattempttocorrect
operationaldifficultiesthroughadjustmentratherthantheimmediatereplacementofparts.
PILOTBURNERADJUSTMENT#70101
A commonly diagnosed malfunction of the safety pilot valve is the pilot burner/flame sensing bulb
relationshipresultingfrom:
Improperdraft
Lowgaspressure.
(NaturalGas4.5”WC–PropaneGas11”WC)
Cloggedpilotburnerorificefromdirtanddebrisfromunpurgedgaslines.
Incorrectadjustmentofpilotburnerflame.
Whenworkingcorrectly,theflamemustengulfthesafetypilotprobetip
Figure 2

3
MAINBURNERADJUSTMENTS
Satisfactoryovenperformanceandburnerlifearedependentoncorrectburneradjustment.Before
shipment,burnershavebeenadjustedforproperoperationwiththetypespecifiedontheratingplate
locatedinsidethecontrolcompartmentabovethelightswitch.Iffurtheradjustmentisnecessaryproceed
asfollows:
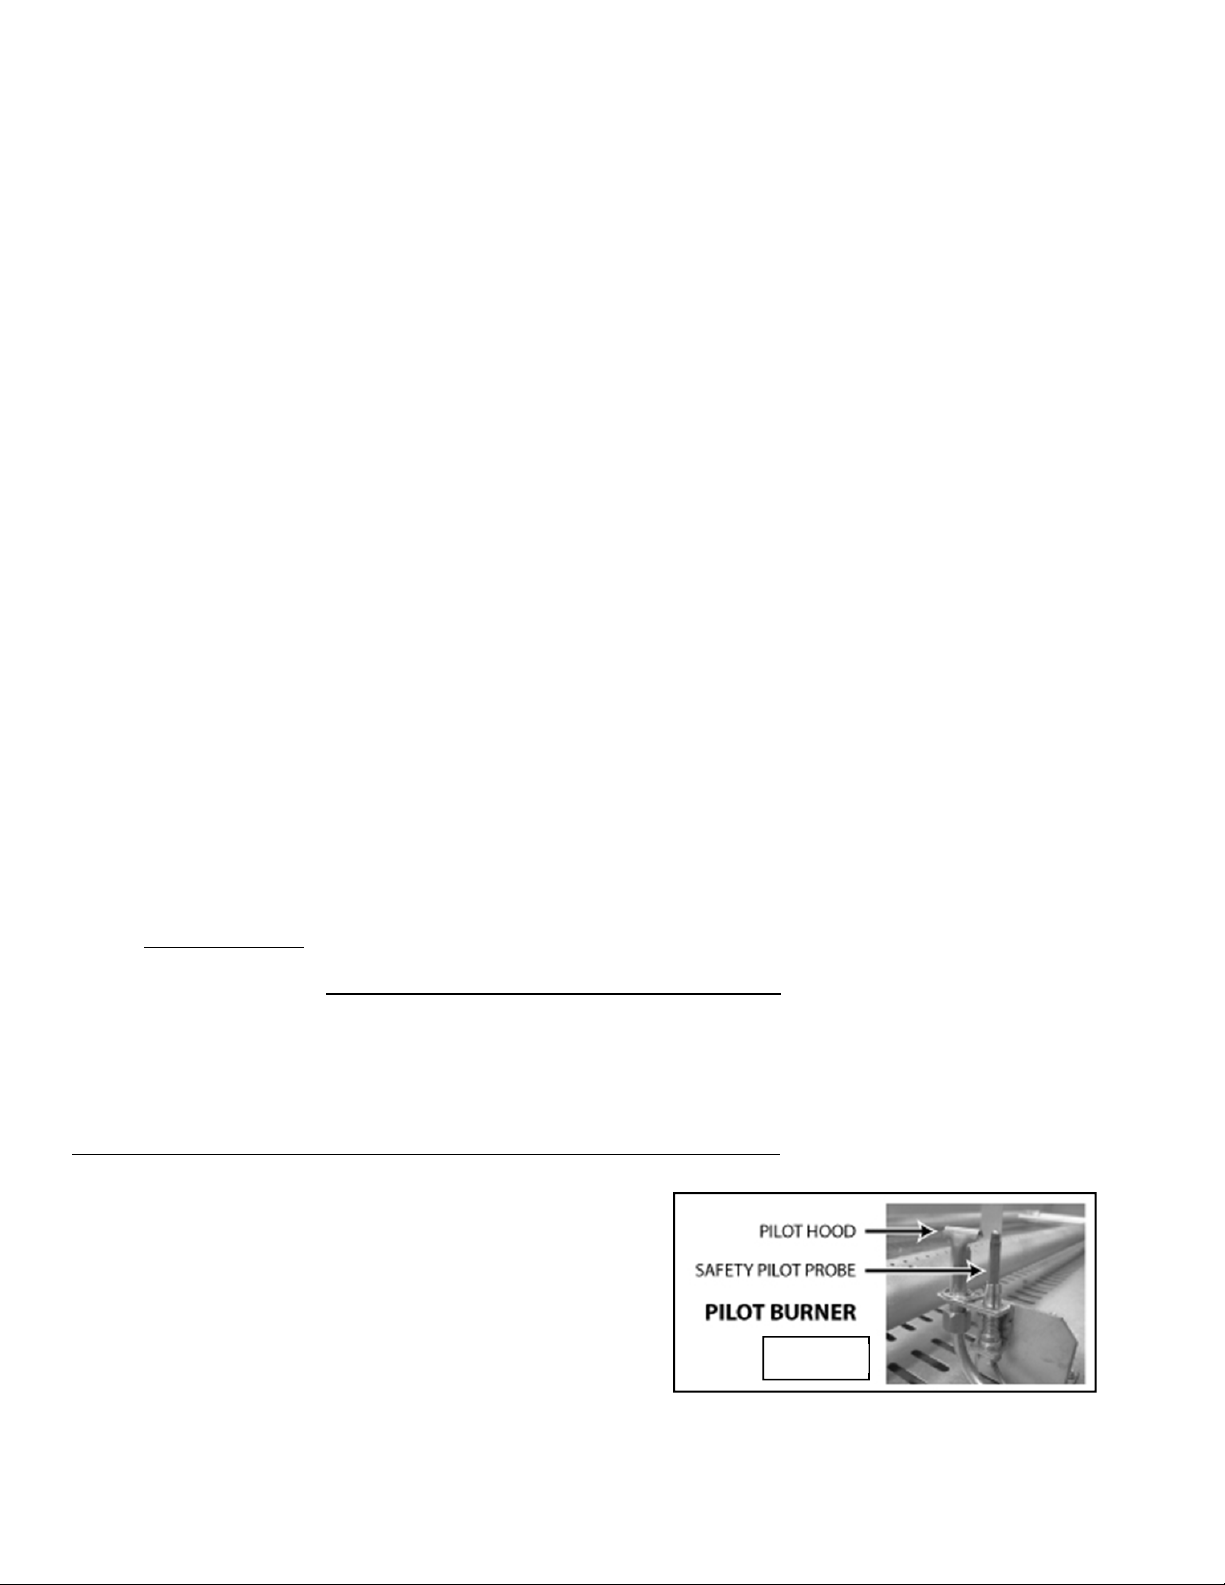
Adjustprimaryairshutteratthefrontoftheburnercompartmenttoobtainastableandquiet
flame.
Iftoomuchprimaryairispresent,flameswillliftfromtheburnerparts.Areductionin
primaryairwillcorrectthiscondition.
Toolittleprimaryairwillcauseyellowtippingoranentireyellowflametoappear.This
conditionindicatesincompletecombustionandmaycausecarbonsootingtoappearonmetal
partsneartheflame.
Whenaflameraisesofftheburneritisimportanttodetermineifitisa“liftingflame”ora
“floatingflame”:
o“Liftingflames”risefromtheportstoburnsomedistanceabovetheports.Insome
casestheseflameswilldropbacktotheportandliftagainintermittently.Theyare
causedbytoomuchprimaryair.Decreasingtheshutteropeningwillstoplifting
flames.
o“Floatingflames”arelongandlazyinappearance,poorlydefined,quietflames
whichrollaroundthecombustionchambersometimescompletelyofftheports.
Floatingflamesresultfromtoolittlesecondaryair.Lackofsecondaryairiscaused
byincorrectventing,cloggedflueways,blockedsecondaryairinletopenings,orlack
ofnaturalroommakeupairtotheoven.
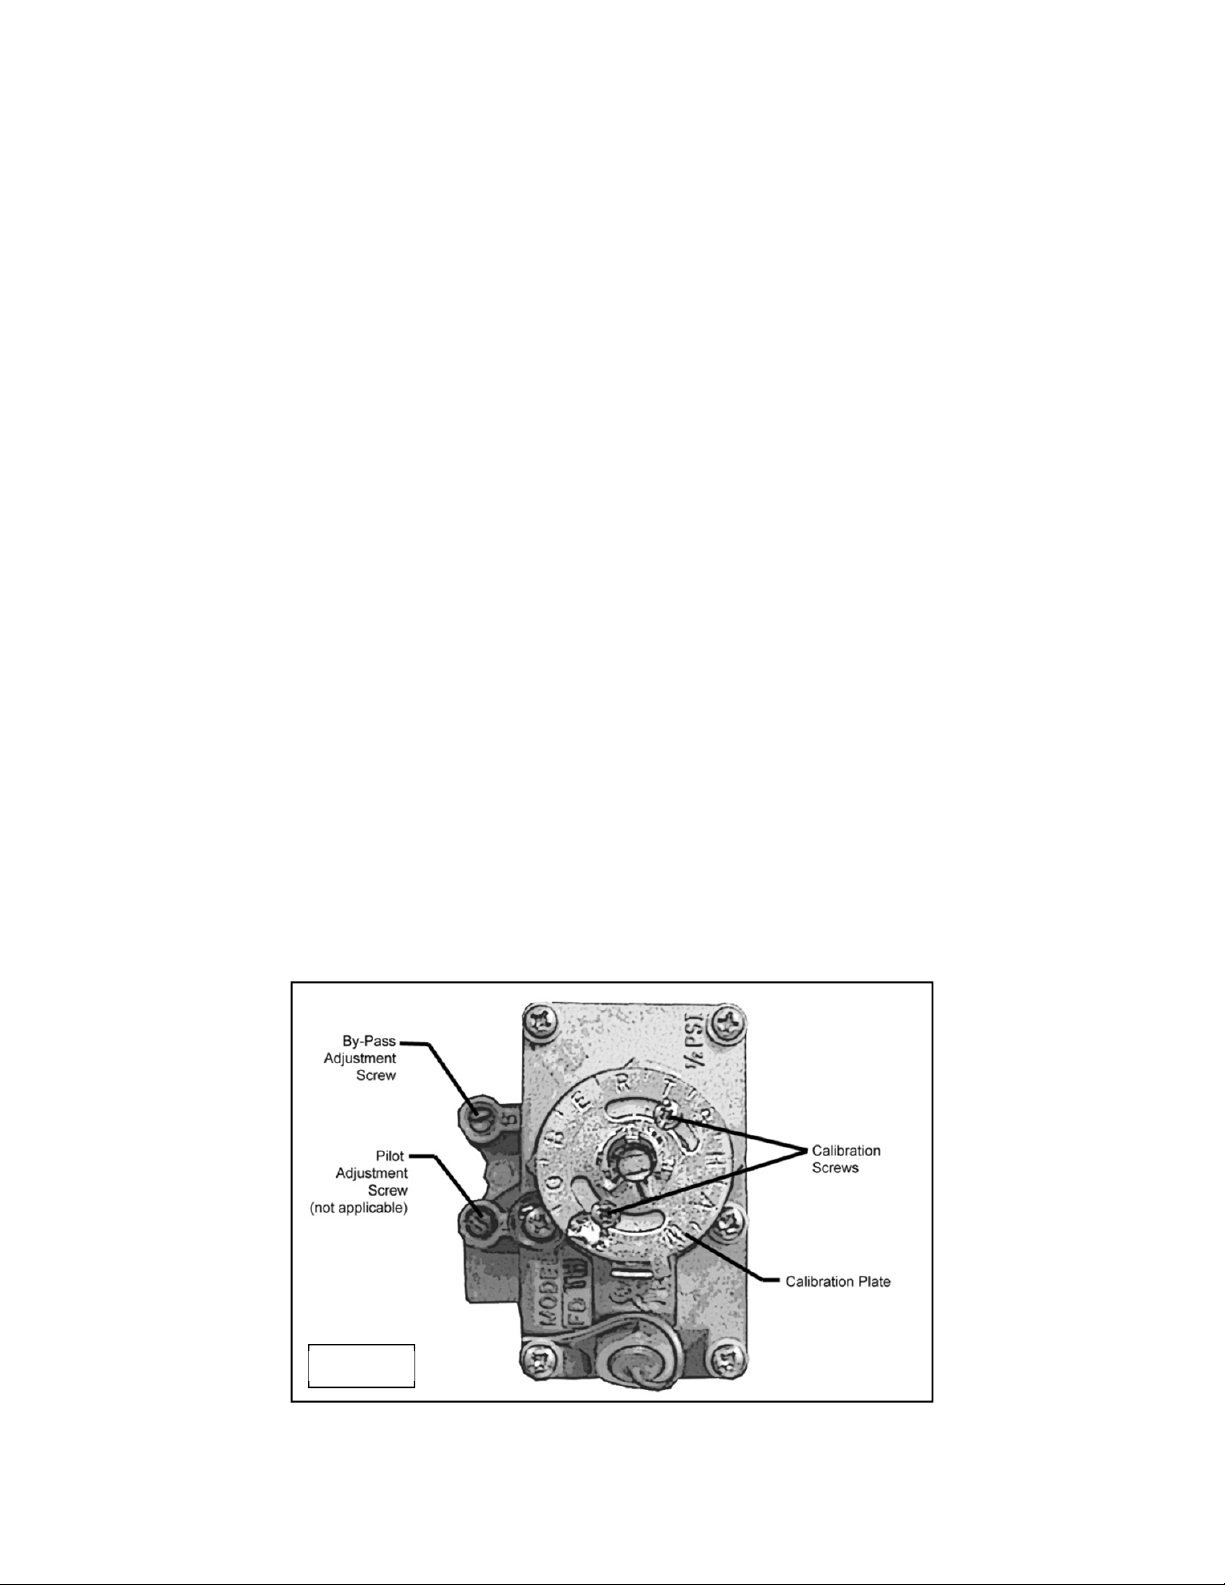
BYPASS(MINIMUMBURNERFLAME)ADJUSTMENTS
ARobertshawFDTH300°‐650°F(149°‐343°C)typethermostatisused.Thisisathrottlingtypegas
thermostatwithbypassflameadjustmentcontrol.Forbypassadjustmentproceedasfollows:
1. Preheatovento500°F(260°C).Whenthermostathasthrottledtobypasstheglameonthe
mainburnershouldhavedecreasedtoaflamenolargerthan1/8”(6mm)
2. Ifflameistoohigh,removedial,insertscrewdriverinscrewmarked“B”onthethermostatand
turnscrewclockwisetolowerflame.
3. Ifflameistoolow,removedial,insertscrewdriverinscrewmarked“B”onthethermostatand
turnscrewcounterclockwisetoincreaseflame.

4
THERMOSTATCALIBRATION
1. Attachpyrometerleadtothermostatbulbinthebakingcompartment.Ifapyrometerisnot
available,placeareliablemercurytypeoventhermometerinthecenterofthebakingdeck
(Approximately1”abovethesurface).
2. Preheattheoventoatleast400°F(204°C).
3. Whentheburnerreachesbypassorminimumflame,takethetemperaturereading.
4. Ifthetemperatureiswithin10°F(6°C)ofthethermostatsetting,donotchangethe
thermostatsettings.
5. Ifthetemperaturediffersmorethan10°F(6°C)fromthethermostatsetting,adjustthe
thermostatasfollows:
A. Pullthermostatdialstraightoffwithoutturning.
B. Holdcalibrationplateonthermostatandloosenthetwocalibrationlockscrews
untiltheplatecanbemovedwithoutmovingthecontrol.
C. Turncalibrationplatesothatpyrometerreadingissetinlinewiththeindicator
markatthe12o’clocktemperaturevariationwillbe50°F(28°C)betweenletters.
Adjustthecalibrationplateasfollows:
1. Turncalibrationplatecounterclockwiseifpyrometerorthermometer
readingishigherthanthedialreadingORclockwiseifthepyrometeror
thermometerreadingislowerthanthedialreading.
2. Holdcalibrationplateandtightentwoscrewsfirmly.
3. Replacedial.
Figure 3

5
MAINTENANCEINSTRUCTIONS
MAINBURNERREMOVAL
1. Opencombustioncompartmentdoor.
2. Removetheburnerdoorbyremovingitshinges.
3. Removetheheatshieldsbyremovingthethreescrewsthatholdittogether.
4. Removethetwoscrewsthatholdthepilotburnertothebracket.
5. Movetheentirepilotburnerassemblywithcapillaryandpilotgastubingforwardoutof
workarea.
6. Disconnectunionatmanifold.
7. Removethree(3)boltswhichholdtheburnerassemblytotheflooroftheburner
compartmentandremovetheteesupportfortheflamedeflectors.
8. Replaceburnersinreplaceorderfromremoval.
PILOTBURNERREMOVAL:#70101
1. Opencombustioncompartmentdoor.
2. Removetheburnerdoorbyremovingitshinges.
3. Removetheheatshieldsbyremovingthethreescrewsthatholdittogether.
4. Removethescrewthatholdsthepilotburnertothebracket.
5. Removethecapillarybulb.
6. Disconnectgassupplytubingfrompilotburner.
7. Replacepilotburnerinreverseorderfromremoval.
OVENLIGHTBULBREMOVAL(MBSERIESONLY)CAUTION!!Partswillbehot!
GLASS#70019–LIGHTBULB#70071–BULBHOLDER#71893
1. Openthecontroldoorandremovethescrewlocatedatthebackofthelightbox(Figure4on
nextpage).
2. Removethelightboxoutthroughthecontroldoor(Figure5onnextpage).
3. Removethelightbulbandreplacewithnewbulb.(ONLYUSE100W120VACor500W240
VACBULBS!)
MARSALOFFERSA500W240VOLTBULBTHATISALMOSTTHESAMEILLUMINATIONASA
100WBUTMOREDURABLE.

6
GASCONTROLANDPIPINGCONTROLSTACKASSEMBLYREMOVAL
1. Openbakingcompartmentdoorandremovethermostatbulbfromthetopofthechamber.
Slidethecapillarytubetotheleftandintothecontroldoorarea.
2. Disconnectpilottubingatsafetyvalveoncontrolstack.
3. Disconnectthethermocouplefromthesafetyvalve.
4. Disconnectupperandlowerunionsoncontrolstack.
5. Pullcontrolstackassemblyforward.
6. Replacecontrolstackinreverseorderfromremoval.
AUTOMATICSAFETYPILOTVALVE,MAINMANUALCONTROLVALVE,AND
THERMOSTATREMOVAL
1. RemoveControlStackAssembly(seeabove).
2. RemoverespectivecontrolfromControlStackAssembly.
3. ReplacenewcontrolandothercomponentsinControlStackAssemblyinreverseorder.
ATTENTION:THETSIISAFETYVALVECANBEREPLACEDBYREPLACINGTHEHEADONLY,
LEAVINGTHEBODYSTILLATTACHEDTOTHECONTROLSTACKASSEMBLY.
PRESSUREREGULATORREPLACEMENT#71881(N)OR#71882(P)
Thepressureregulatorislocatedjustabovethecontrolstackinthecontrolcompartment.Before
replacement,gasservicetothispointmustbeshutoffbeforedisconnecting.
Figure 4 Figure 5

7
OPERATIONALDIFFICULTIES&POSSIBLECAUSES
TROUBLESHOOTING
FIRST THING’S FIRST!
Checkthediameterofyourgasconnections.FlexlinesorhardplumbingMUSTBE
¾”orbigger.
AstainlesssteelfluepipeMUSTBEinstalledonallovensthatareventingintoa
hood.
AdraftdiverterMUSTBEinstalledonallovensbeingdirectlyventedintothe
ceiling.
PROBLEM
POSSIBLECAUSES
PILOTBURNERGOES
OUT
1. Pilotthermocouplenotincenterofflame.
2. Poordraftconditionssnuffoutflame(nofluepipe).
3. Toomuchdraftpullstheflameawayfromthermocouple.
4. Airfromfansorregisterblowingatfrontofoven.
5. Pilotflametoolow.
6. Pilotorificeisdirty.
7. Thermocoupleisdefective.
8. Safetypilotvalvedefective.
9. Gasleakatpilotorificefitting.
BURNERFAILSTOCOME
ONWHENPILOTISON
1. Burnervalveofflocatedjustabovethethermostat.
2. Safetyvalvedefective.
3. Thermostatoutofcalibration.
4. Thermostatisdefective.
5. Burnerorificeisplugged.

8
OVENBURNERWILLNOT
THROTTLEDOWNORGETS
TOOHOT
1. Brokencapillarytubeonthermostat.
2. Oventhermostatoutofcalibration.
3. Minimumbypassflametoohigh(lowerto1/8”)
4. Dirtunderthermostatvalveseat.
5. Thermostatdefective.
TOOMUCHBOTTOMHEAT1. Underdraftingoroverdrafting(pullingheatoutofthe
oven).
2. Temperaturetoolow.
3. Impropercalibrationorgaspressure.
NOTENOUGHTOPHEAT1. Overdrafting(pullingheatoutoftheoven).
2. Oventemperaturetoolow.
OVENWILLNOTKEEPUP
ATBUSYTIMESORTHERE
ISUNEVENCOOKING
1. Gaspressuretoolow.
2. Insufficientgasvolumeduetotoosmallgassupplylines.
3. Additionalgasregulatorsinstalled.
4. Poordraftconditions.
5. Toomuchdraftpullingheatoutoftheovens.
6. Airfromfansorregisterblowingatfrontofoven.
SOOTINGINBAKINGOR
BURNERCHAMBER
1. Airshutterspaceistoosmall.Theremustbea1/8”–
3/16”space.
2. Airshutteriscloggedwithflourdust.Cleantheair
shutteropeningwithaknifeorbrush.
©2016MarsalPizzaOvens.175E.HoffmanAve.Lindenhurst,NY11757(631)226‐6688www.marsalsons.com
Other manuals for MB42
1
This manual suits for next models
14
Table of contents