The
Master Plumber
products shown here are protected by one or more of the following U.S. Patents:
4,043,359, 3,786,995, 4,562,960, 4,593,430, 4,089,347, 4,218,785, 4,696,322, 4,765,365. Los productos
Master Plumber
mostrados aquí están protegidos por una o más de las siguientes Patentes
de U.S.A.: 4,043,359, 3,786,995, 4,562,960, 4,593,430, 4,089,347, 4,218,785, 4,696,322, 4,765,365.
32336 32336 32336 32336 32336 32336
32336 32336 32336 32336 32336 32336
RP694 877
Button
Botón
RP5416
Screw
Tornillo
RP694 869
Handle w/Button & Screw
Manija con Botón y Tornillo
RP5435
Adjusting Ring
Anillo de Ajuste
RP5437
RP9428 (Polished Brass/Bronce Pulido)
Cap w/Adjusting Ring
Casquete con Anillo de Ajuste
RP5436
Knob Handle Cam and Packing
Leva y Empaque para Perilla
RP12619
Lever Handle Cam and Packing
Leva y Empaque para Palanca
RP452 771
Knob Handle Ball Assembly
Ensamble de la Bola para Perilla
RP345 454
Lever Handle Ball Assembly
Ensamble de la Bola para Palanca
RP5354
RP9448 (Polished Brass/Bronce Pulido)
Sleeve
Casquillo
RP452 763
Seats & Springs
Asientos y Resortes
RP5421
Pipe Plug
Tapón de Tubería
RP30358
Set Screw
Tornillo de Presión
RP5417
RP9442 (Polished Brass/Bronce Pulido)
Screws
Tornillos
RP5383
RP9445 (Polished Brass/Bronce Pulido)
Escutcheon
Chapetón
RP13708◆
Wrench
Llave
RP7629
Showerhead
Ducha
RP7628
RP9439 (Polished Brass/Bronce Pulido)
Shower Arm & Flange
Brazo de Regadera y Brida
RP7626 (Chrome/Cromo)
RP7626PB (Polished Brass/Bronce Pulido)
Tub Spout–Diverter
Salida para Bañera–Con Desviador
RP30370
Handle w/Set Screw
Manija con Tornillo de Presión
◆Accessory Order Only
◆Solo Pedido de Accesorio
11/24/99 Rev.-
Single Handle WasherlessTub & Shower Valve
STEP BY STEP ILLUSTRATED INSTRUCTIONS
You have selected a product that will give you years of trouble-free service!
Each
Master Plumber
faucet is built using only the very best materials and
the latest manufacturing technology available. And, to insure dependability,
we test every faucet.Engineered for durability, we are confident you will enjoy
your new
Master Plumber
faucet for years to come.
The
Master Plumber
SATISFACTION GUARANTEE covers all the parts of
your
Master Plumber
faucet and the brilliant, protective finish too.
The SATISFACTION GUARANTEE proves that we are so sure about
Master Plumber
faucet craftsmanship, materials and quality, that we're ready
to stand behind them for as long as you own your home!
Your new faucet is also easy to install. Just read and carefully follow these
illustrated instructions, and you'll be enjoying your
Master Plumber
faucet in
no time.
Models / Modelos: 183 944, 183 985, 184 025, 452 664, 452 755
Llave (Mezcladora, Grifo) Monocontrol sin
Empaque Para Bañera y Ducha
INSTRUCCIONES ILUSTRADAS, PASO A PASO
¡Usted a escogido un producto que le dará muchos años de servicio sin
problemas! Cada llave
Master Plumber
es fabricada utilizando solamente los
mejores materiales y la última palabra de la tecnología disponible. Y, para
asegurar su confiabilidad, nosotros probamos cada llave. Diseñada para ser
resistente, tenemos la confianza que usted disfrutará de su nueva llave
Master Plumber
por muchos años.
La GARANTÍA de SATISFACCIÓN de
Master Plumber
cubre todas las
piezas de su llave
Master Plumber
y también su brillante y protector acabado.
La GARANTÍA de SATISFACCIÓN es la prueba que nosotros estamos
tan seguros acerca de la mano de obra, materiales y calidad de la llave
Master Plumber
, que estamos listos a respaldarla por todo el tiempo que
usted sea el propietario de su casa.
La instalación de su nueva llave es fácil. Simplemente, lea y siga con
cuidado estas instrucciones ilustradas y usted estará disfrutando de su
llave
Master Plumber
sin pérdida de tiempo.
Installation & Maintenance
4
IF LEAK PERSISTS–Replace ball assembly,
Repair Kit RP452 771 for Knob handle faucets.
Use RP345 454 for Lever handle faucets.
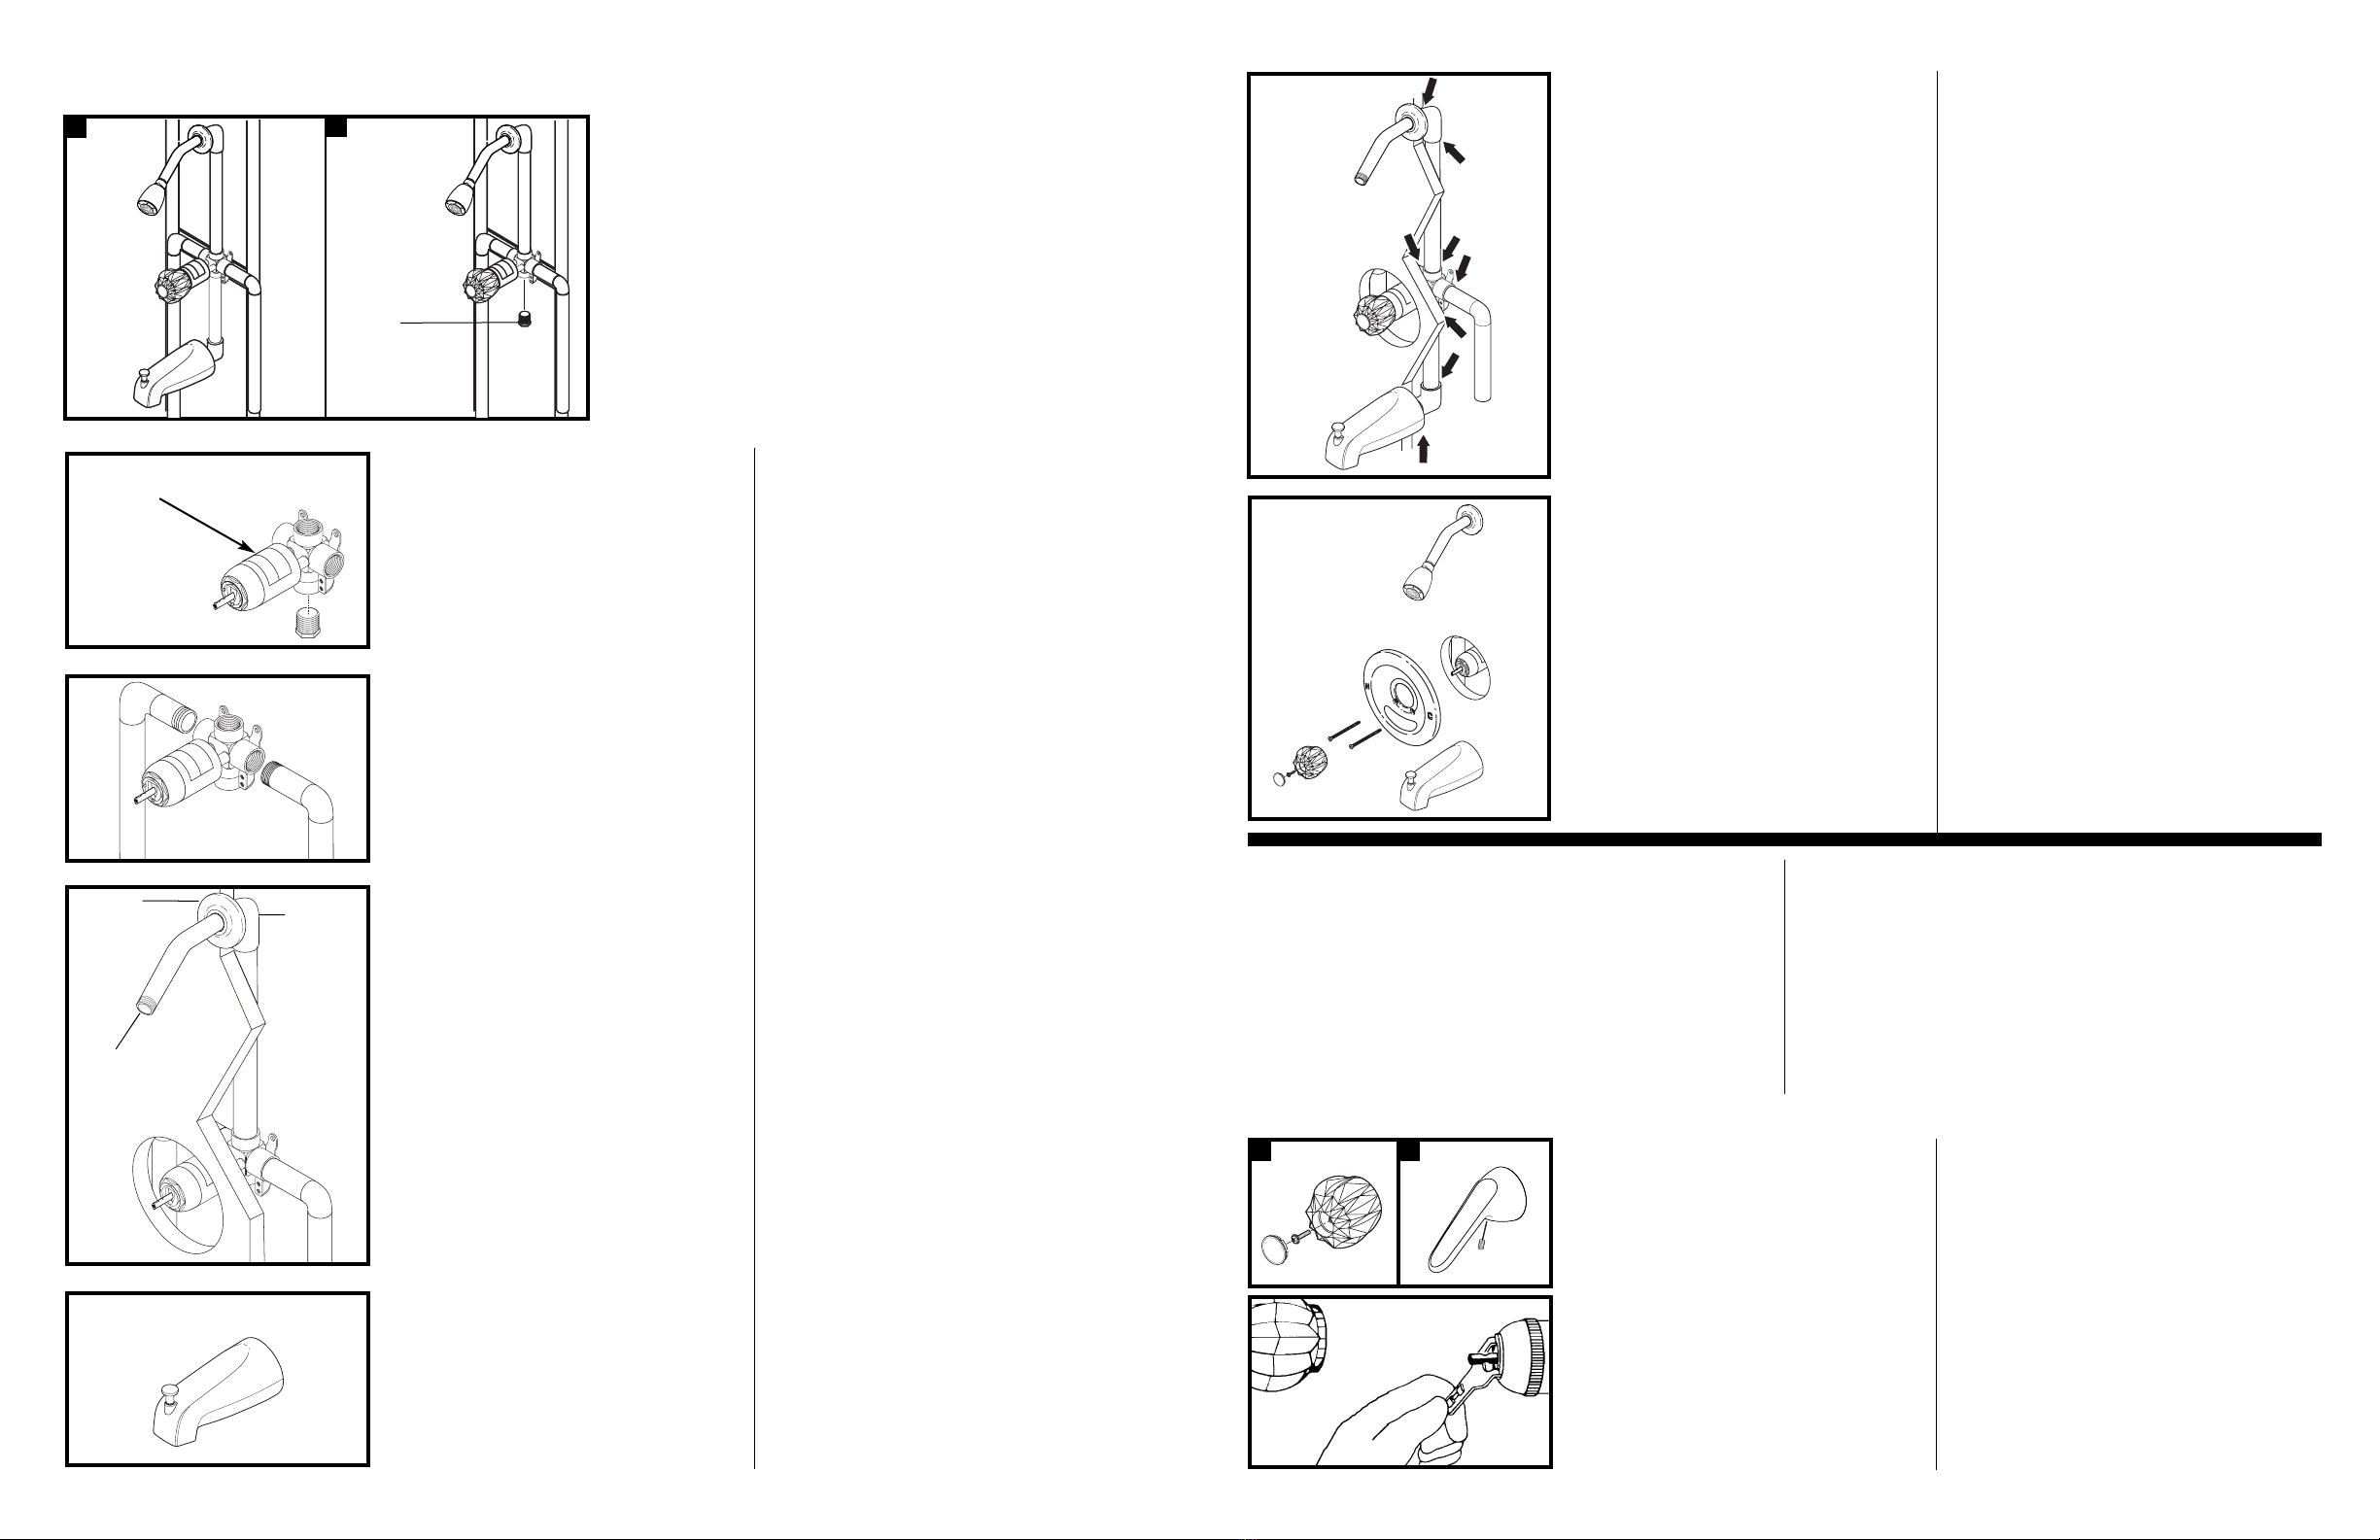
1. SHUT OFF WATER SUPPLIES. Remove handle.
Refer to Illustration A or B on page 3.
2. Unscrew cap assembly and lift out ball and cam
assembly by pulling up on stem.
2
3. Slip packing then cam on new ball and insert into
socket. Reinstall cap and handle.
SI LA FUGA PERSISTE–Reemplace el ensamble de
la bola con el Equipo para Reparaciones RP452 771
para manerales redondos y de anillo cocina. Usa
RP345 454 para manijas de palanca.
1. CIERRE LOS SUMINISTROS DE AGUA. Quite la
manija.Vea ilustración A o B en la página 3.
2. Desenrosque el ensamble del casquete y saque hacia
afuera al ensamble de bola y leva halando hacia arriba
al vástago.
2
3. Deslice el empaque y entonces la leva sobre la bola
nueva e inserte dentro del encaje. Reinstale el casquete
y la manija.
Helpful Hints:
2. Using wrench (accessory order only), partially unscrew
adjusting ring before attempting to remove cap assembly.
Always install cap assembly HAND TIGHT, then tighten
adjusting ring.
Sugerencias Utiles:
2. Usando la llave (sólo pedido de accesorio), desenrosque
parcialmente el anillo de ajuste antes de tratar de sacar el
ensamble del casquete.Siempre instale al ensamble del
casquete APRETANDOLO A MANO, entonces apriete el
anillo de ajuste
.
1.
3.
2.
32336 Rev.-
Care Instructions
Your
Master Plumber
faucet is designed and engineered in accordance with the
highest quality and performance standards. With proper care, it will give you
years of trouble free service. Care should be given to the cleaning of this
product. Although its finish is extremely durable, it can be damaged by harsh
abrasives or polish. To clean, simply wipe gently with a damp cloth and blot dry
with a soft towel.
WARNING: SCRUBBING BUBBLES
®
BATHROOM CLEANER AND LYSOL
®
BASIN
TUB ANDTILE CLEANER MUST NOT BE USED ON CLEAR KNOB HANDLES AND
LEVERS. USE OF THESE CLEANERS CAN RESULT IN CRACKED OR SEVERELY
DAMAGED HANDLES. IF OVERSPRAY GETS ONTO THE HANDLES, IMMEDIATELY
WIPE THEM DRY WITH A SOFT COTTON CLOTH.
Instrucciones Sobre el Cuidado
Su llave
Master Plumber
está diseñada y fabricada de acuerdo con las normas
de calidad y rendimiento más altas. Con un cuidado apropiado, le dará años de
servicio sin dificultades. Se debe tener cuidado con la limpieza de este producto.
Aunque su acabado es extremadamente resistente, puede ser dañado por
abrasivos o pulimentos ásperos. Para limpiarla, simplemente frote con un paño
húmedo y séquela con una toalla suave.
ADVERTENCIA: NO SE PUEDE USAR SCRUBBING BUBBLES
®
BATHROOM
CLEANER O LYSOL
®
BASIN TUB AND TILE CLEANER EN LAS MANIJAS
TRANSPARENTES REDONDOS Y DE PALANCA. EL USO DE ESTOS PRODUCTOS
PUEDE RESULTAR EN MANGOS RAJADOS O SEVERAMENTE DAÑADOS. SI
ESTOS PRODUCTOS CAEN SOBRE LA MANIJA, SEQUELO INMEDIATAMENTE
CON UNA TOALLA DE ALGODON SUAVE.
Manufactured for TruServ, Chicago, IL 60631-3505, 100% Retailer Owned.
Sold under license from Peerless Faucet Company, © 1999.
Made in the U.S.A.
Fabricado para TruServ, Chicago, IL 60631-3505, 100% propiedad de comerciantes individuales.
Vendido bajo la licencia de Peerless Faucet Company, © 1999.
Hecho en los Estados Unidos.
Write Purchased Model Number Here For Future Reference. Anote Aquí el Número del Modelo Comprado, Para Referencia Futura.
IF FAUCET LEAKS FROM TUB SPOUT/
SHOWERHEAD–Replace Seats and Springs,
Repair Kit RP452 763.
1. SHUT OFF WATER SUPPLIES. Remove handle.
Refer to Illustration A or B on page 3.
2. Unscrew cap assembly and lift out ball and cam
assembly by pulling up on stem.
2
3. Remove old seats and springs. NOTE: Refer to insert
for proper seat and spring installation. Reassemble
faucet in reverse order.
SI LA LLAVE TIENE FUGAS DE AGUA EN LA SALIDA
DE LA BAÑERA/DUCHA–Reemplace los asientos y
resortes con el Equipo para Reparaciones RP452 763.
1. CIERRE LOS SUMINISTROS DE AGUA.Quite la
manija.Vea ilustración A o B en la página 3.
2. Desenrosque el ensamble del casquete y saque hacia
afuera al ensamble de bola y leva halando hacia arriba
al vástago.
2
3. Saque los asientos y resortes viejos. NOTA: Vea la
figura apropiada para la instalación de asientos y
resortes.Vuelva a armar la llave en orden inverso.
1.
3.
2.
Master Plumber
®
Lifetime Faucet
and Finish Limited Warranty
All parts and finishes of the Master Plumber
®
faucet are warranted to the original
consumer purchaser to be free from defects in material and workmanship for as long as
the consumer owns their home.
Master Plumber
will replace, FREE OF CHARGE, during the warranty period, any
part or finish which proves defective in material and/or workmanship under normal
installation, use, and service. Replacement parts can be obtained from your local
dealer or from our factory. THIS WARRANTY IS LIMITED TO DEFECTIVE PARTS OR
FINISH REPLACEMENT ONLY. LABOR CHARGES AND/OR DAMAGE INCURRED IN
INSTALLATION, REPAIR, OR REPLACEMENT AS WELL AS INCIDENTAL AND CON-
SEQUENTIAL DAMAGES CONNECTED THEREWITH ARE EXCLUDED. PROOF OF
PURCHASE (original sales receipt) MUST ACCOMPANY ALL WARRANTY CLAIMS.IF
YOUR ORIGINAL RECEIPT IS USEDTO OBTAIN A PROMOTIONAL REBATE ON THE
PRODUCT, A COPY OF THE RECEIPT ALONG WITH A COPY OF THE REBATE
FORM MUST BE SUBMITTED WHEN REQUESTING WARRANTY SERVICE. THIS
WARRANTY IS THE ONLY EXPRESS WARRANTY MADE BY
Master Plumber
.
Some states do not allow the exclusion or limitation of incidental or consequential
damages, so the above limitation or exclusion may not apply to you.
Any damage to this faucet as a result of misuse, abuse, neglect, accident, improper
installation, or any use violative of instructions furnished by us, WILL VOID THE
WARRANTY.
This warranty gives you specific legal rights, and you may also have other rights which
vary from state to state.
Garantia Limitada de por Vida Para Su Llave
y Acabado de Master Plumber®
Todas las piezas y el acabado de la llave Master Plumber
®
están garantizadas al dueño
original de estar libres de defectos en la mano de obra y los materiales por todo el
tiempo que el usuario dueño original sea el propietario de su casa.
Master Plumber
reemplazará, LIBRE DE CARGO, durante el período de la garantía,
cualquier pieza o acabado que resulte defectuosa por defecto de fábrica bajo
instalación, uso y servicio normal. Las piezas de repuesto pueden ser obtenidas de su
distribuidor local o de nuestra fábrica. ESTA GARANTIA ESTA LIMITADA SOLAMENTE
AL REEMPLAZO DE LA PIEZA O SU ACABADO. ESTAN EXCLUIDOS LOS CARGOS
Y/O DAÑOS INCURRIDOS EN LA INSTALACION, REPARACION O REEMPLAZO,
ASI COMO LOS DAÑOS INCIDENTALES O CONSEQUENTES CONECTADOS CON
ELLOS. UNA PRUEBA DE LA COMPRA (el comprobante de la venta original)
DEBE ACOMPAÑAR A TODOS LOS RECLAMOS BAJO ESTA GARANTIA. SI SU
RECIBO ORIGINAL ES USADO PARA OBTANER UN REEMBOLSO PROMOCIONAL
EN EL PRODUCTO, UNA COPIA DE ESTE RECIBO CON UNA COPIA DEL
FORMULARIO PARA EL REEMBOLSO DEBE DE SER ENTREGADA CUANDO
SOLICITE SERVICIO DE GARANTÍA. LESTA GARANTIA ES LA UNICA GARANTIA
EXPRESA DE
Master Plumber
.
Algunos estados no permiten la exclusión o limitación de los daños incidentales
o consequentes, así que la limitación o exclusión expresada arriba puede no ser
aplicable a usted.
Cualquier daño a esta llave que sea el resultado del mal uso, abuso, negligencia,
accidente, instalación impropia, o cualquier uso en violación de las instrucciones
suministradas por nosotros ANULARA LA GARANTIA.
Esta garantía le da a usted derechos legales específicos y usted puede también tener
otros derechos que varían de estado a estado.
RP29547PB
Showerhead
Ducha