MasterPower Home EV Wallbox P1 User manual
Version: V1.2
Home EV Wallbox
P1/P2/P3
S1/S2/S3
User Manual

03
Content
1. Warranty
2. Safety and Warning
3. Introduction
3.1 Product Technical Specifications
3.2 External Structure
3.3 Package Contents
4 Operation Instruction
4.1 Installation Preparation
4.2 Installation Process
5. Configuration and Operation
5.1 Power-on Checking
5.2 Start and stop charging station P1/P2/P3 - S1/S2/S3 by your charge card
5.3 Start and stop charging station P1/P2/P3 - S1/S2/S3 by APP (Bluetooth)
6. Set up and update
6.1 Mode setting for maximum charging current
6.2 External enabling/disabling of the Wallbox
6.3 Firmware version upgrade
7. Troubleshooting
7.1 Indicator Status
7.2 Fault Code and Resolution (LCD display)
Home EV Wallbox P1/P2/P3-S1/S2/S3 - User Manual
04
05
06
07
07
08
09
13
13
14
21
21
21
22
23

04
1. Warranty
Master Battery, S.L. (Hereinafter “Master”) warrants that Products supplied to Customer pursuant to this
Agreement/Contract shall be of merchantable quality and shall meet all applicable safety standards and free from any
defect of design, material and workmanship within the warranty period. The warranty period is Twenty-four (24)
months since from the delivery date. Master warranty does not cover damages resulting from inappropriate storage,
incorrect installation, improper operation or bad environment beyond environmental requirement.
Customer gives notice in writing within a period of ten (10) days after Customer has discovered that some or all
Products do not comply with the warranty as set out in this warranty. Customer shall provide necessary assistance to
Master for failure detection. Master gives response within a reasonable time of 48 hours. Master shall analyze the
fault reason and provide technical instruction for Customer to repair Products.
Customer repairs Products and applies for free spare parts from Master in case replacements are required. A written
claim report about fault description, serial number of Products, photos of Products and applied spare parts must be
sent to Master for verification. Master shall not accept the claim if modifications or reworking have been performed
to Products without Master’s consent. Spare parts are offered for free within the warranty period. Beyond warranty
period, spare parts are offered at Customer’s cost.
Faulted parts replaced by Customer shall be well stored and packaged with markings of fault description for further
disposal by Master. The faulted parts after repair and test can be treated as spare part to Customer.
No local service is provided for free and Master charges service fee for local service according the following
standards: per person per day plus the actual travel costs and material costs. A mutual agreement should be reached
before offering local service.
Except as set forth herein, Master provides no other warranty, whether express or implied. The warranty applies only
to Products which are supplied by Master.
Home EV Wallbox P1/P2/P3-S1/S2/S3 - User Manual

05
2. Safety and Warning
Save these instructions. Read all instruction before installing or using the charger.
1) Keep the charger away from explosive or flammable materials, chemicals, vapors and other hazard objects.
2) Keep the charger socket clean and dry. If it gets dirty, please wipe it with clean dry cloth.
3) Touching the socket core is strictly forbidden when power on.
4) Do not use the charger in case of any device defects, crack, abrasion, bare leakage and so on. Please contact the
professional personnel if any of these conditions occurs.
5) Do not attempt to dissemble, repair, refit the charger. If necessary, please contact the professional personnel.
Improper operation will result in device damage, electric leakage, etc.
6) In case any abnormal condition happens, please cut off all input and output power supplies immediately.
7) Please protect charging carefully from rain and lightening.
8) Keep children away from the charger.
9) During charging, do not drive the EV. Charge only when the EV is stationary, for hybrid cars, charge only when the
engine is switched off.
10) Our packaging materials are environmentally friendly and can be recycled. Please put the packaging in applicable
containers to recycle it. Do not dispose of this device with the household waste. It should be taken to a suitable
facility for recycling of electrical and electronic devices. For more detailed information about recycling of this
device, please contact your local city/town council office or your household waste disposal service.
Warning
The input and output voltages of this device are high voltage, which threaten human life safety.
Please strictly observe all warnings on the device and user manual. Unauthorized and
non-professional service personnel are forbidden to remove the cover of this device.
Home EV Wallbox P1/P2/P3-S1/S2/S3 - User Manual

06
3. Introduction
3.1 Product Technical Specifications
Model
Technical Features
Charging Capacity
Input / Output Power
RCD
Standby Power
Measuring Accuracy
Communication
User Interface
Certificate
Charging Interface
Special Protection
Physical Properties
Warranty
Protection
Enclosure
Front Panel
Special Protection
Installation
Cooling
Operating Temperature
Humidity
Product Dimensions
Package Dimension
Net Weight
Gross Weight
MF - EV 7.2kW - P1 / S1
Up to 7kW
230VAC ± 20% - 50 / 60Hz -
32A - 1 phase
30Ma RCD Type A and DC 6Ma RCD function
< 3W
1%
Bluetooth / WIFI (Optional) APP
LED / LCD (3.5’) / RFID (Mifare ISO&IEC 14443A)
CE / EN / IEC 61851-1:2017, EN / IEC 61851-21-2:2018
Type 2 cable 5M / SAE J1772
Over Current Protection, Residual Current Protection, Ground Protection, Surge Protection,
Over / Under Voltage Protection, Over / Under Temperature Protection
2 years
IP54, IK10
Plastic PC940 / Galvanized steel
Temper glass
Over Current Protection, Residual Current Protection, Ground Protection, Surge Protection,
Over / Under Voltage Protection, Over / Under Temperature Protection
Wall-mount / Pole-mount
Natural cooling
-30°C to +55°C
Max. 95% (non-regulating)
320*230*100 (L*W*H) mm
462*302*248 (L*W*H) mm
4.5Kg
5.5Kg
MF - EV 11kW - P2 / S2
Up to 11kW
400VAC ± 20% - 50 / 60Hz -
16A - 3 phase
Type 2 cable 5M
5.1Kg
6.1Kg
MF - EV 22kW - P3 / S3
Up to 22kW
400VAC ± 20% - 50 / 60Hz -
32A - 3 phase
Type 2 cable 5M
5.5Kg
6.5Kg
Home EV Wallbox P1/P2/P3-S1/S2/S3 - User Manual

07
3.2 External Structure
3.3 Package Contents
Unpack the product. Please check and verify following items after receiving the charger:
• Visual inspection on charger’s external appearance. If there is any breakage or other damage,please notify the
seller immediately.
• Check type and quantity of all accessories as follows. If there is a shortage in the quantity of any item or if any
items are missing, please contact the seller at once.
228 mm 100 mm
28
368 mm
Version:V1.2
Home EV Wallbox
P1 / P2 / P3
User Manual
User Manual
(x1)
M4*40 Screw
(x6)
Installation
Cardboard
(x1)
φ6 Expansion
Pipe
(x6)
Wallbox
(x1)
The holder
(x1)
Key
(x2)
RFID Card
(x2)
Home EV Wallbox P1/P2/P3-S1/S2/S3 - User Manual
08
4. Operation Instruction
4.1 Installation Preparation
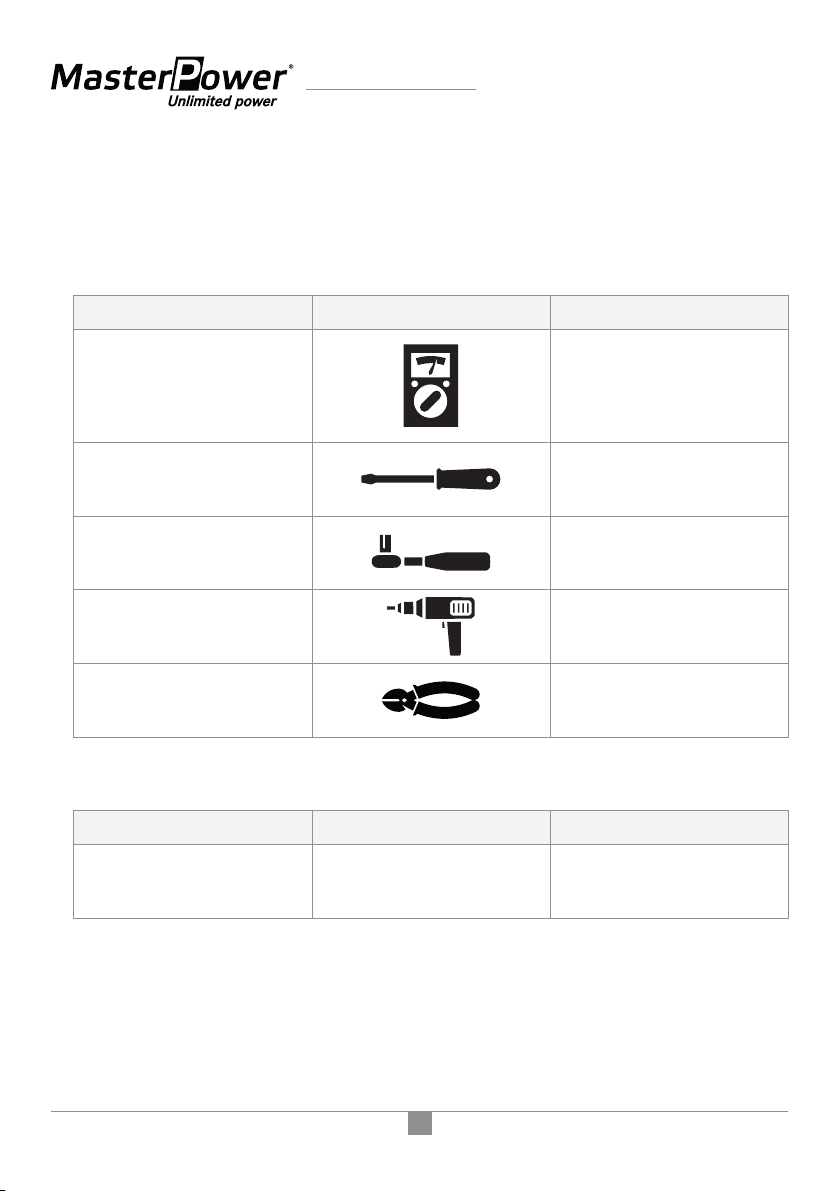
1) Tools required
2) Cables & Materials
FunctionPhotoTool Name
Multimeter Check electrical connection
and electrical parameter
Cross Screwdriver
(PH2 x 150mm, PH3 x 250mm) Tighten the screws
Insulated Torque Wrench Tighten the bolts
Electric drill Hole on the wall
Diagonal Pliers Cut cables
QuantitySpecificationName
Power supply cable Depend on actual requirement
Single-phase or three-phase
power supply cable
Home EV Wallbox P1/P2/P3-S1/S2/S3 - User Manual
09
4.2 Installation Process
1) Installation Notice
• Electrical devices should only be installed, operated, and maintained by qualified personnel. No responsibility is
assumed by the manufacturer for any consequences arising out of the use of this device. A qualified person is
one who has certified skills and knowledge related to the construction, installation and operation of this type of
electrical device and who has received safety training to recognize and avoid the hazards involved.
• All applicable local, regional, and national regulations must be applied when installing, repairing and maintaining
this device.
• RCD of the charger is intergrated 6mA DC, please install a Type A breaker outside.
2) Checks before starting the Installation Process
• Ensure the charger’s location allows good operational access for normal use and repair & maintenance.
• The AC input components within the premise’s power supply are correctly fitted with required protection items
prior to installation of the charger.
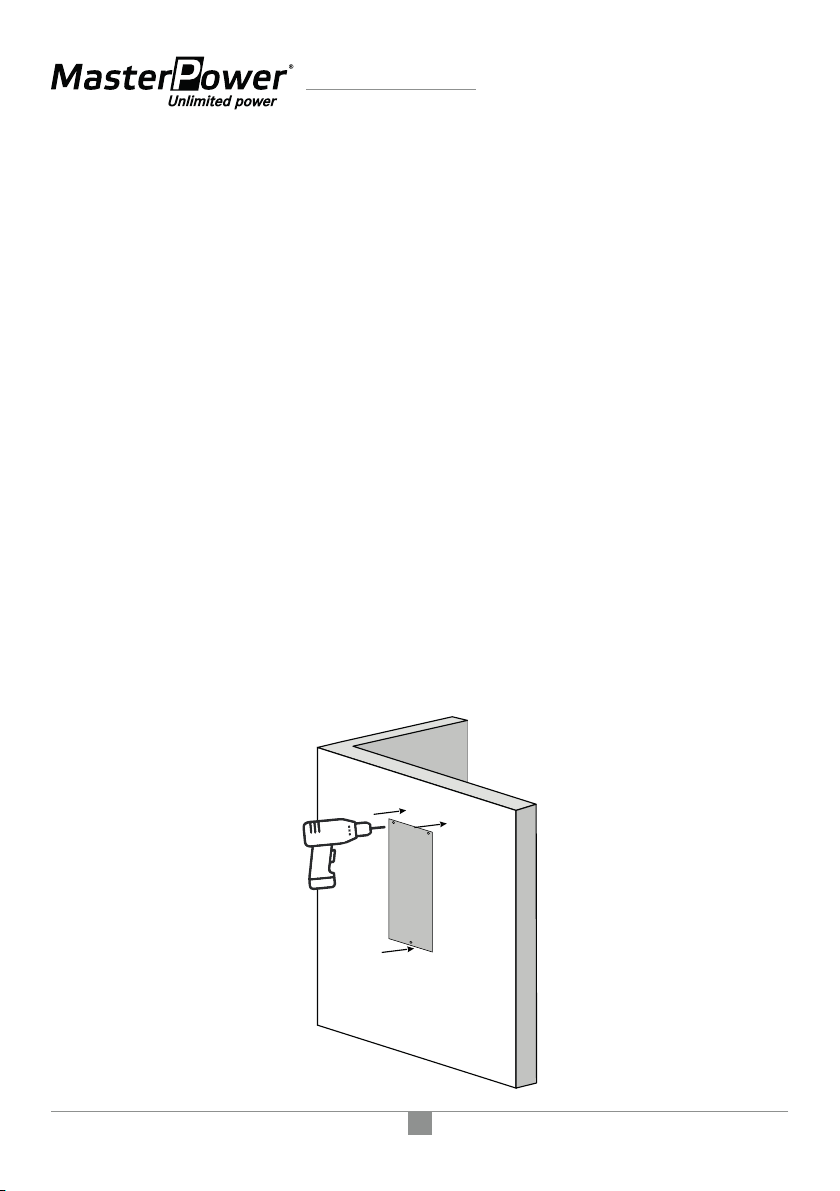
3) Installation Procedure
1. Please use a percussion drill to drill holes according to the cardboard positioning.
Home EV Wallbox P1/P2/P3-S1/S2/S3 - User Manual
10
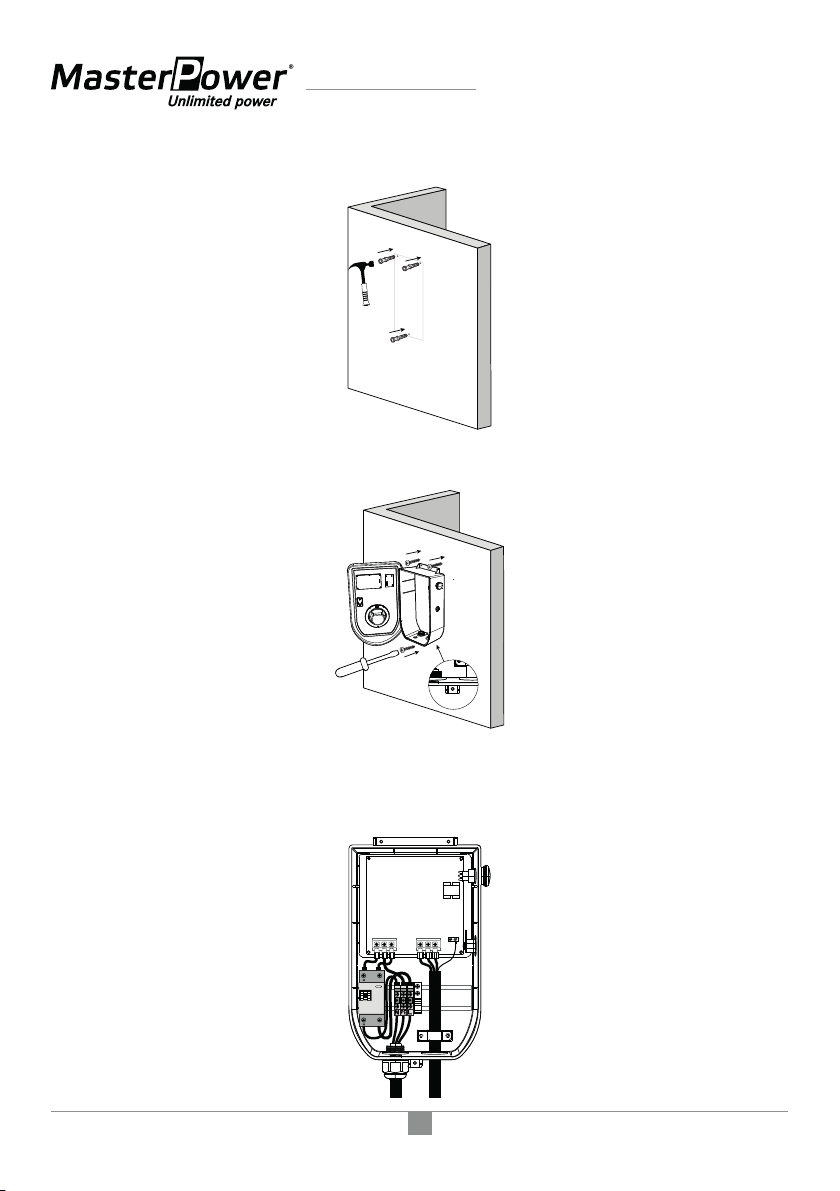
2. Install expansion bolts (3*M6*60mm).
3. Open the cover with the key, fix the charging station with self = tapping screws (3*M5*50mm).
4. Use a cable with a size of 3*6mm2 (7kW) to connect to the input terminal of the charging station, from left to
right, RSTN and GND wire, and then tighten the screw with a screwdriver.
Home EV Wallbox P1/P2/P3-S1/S2/S3 - User Manual

11
5. Use a cable with a size of 5*4mm2 (11kW) or 5*6mm2 (22kW) to connect to the input terminal of the charging
station, from left to right, RSTN and GND wire, and then tighten the screw with a screwdriver.
6. Fix the hook on the wall with screws (3*M5*50mm).
Home EV Wallbox P1/P2/P3-S1/S2/S3 - User Manual
Other manuals for Home EV Wallbox P1
1
This manual suits for next models
8
Table of contents


