Matrix Orbital LK202-24-USB User manual

LK202-24-USB
Technical Manual
Revision: 2.0

Contents
Contents ii
1 Introduction 1
1.1 What to Expect From the LK202-24-USB . . . . . . . . . . . . . . . . . . . . . . . . . . . 1
1.2 What Not to Expect From the LK202-24-USB . . . . . . . . . . . . . . . . . . . . . . . . . 1
1.3 KeypadInterface ........................................ 1
1.4 SetupforTesting ........................................ 2
1.5 TryingouttheLK202-24-USB................................. 2
1.6 TryingoutaKeypad ...................................... 3
1.6.1 Here’swhattodo: ................................... 3
2 Connections 4
2.1 ConnectorPinout ........................................ 4
2.1.1 Power.......................................... 5
2.1.2 USBCommunications ................................. 6
2.1.3 Alternate USB Communications . . . . . . . . . . . . . . . . . . . . . . . . . . . . 7
2.1.4 Serial TTL Communications . . . . . . . . . . . . . . . . . . . . . . . . . . . . . . 8
2.1.5 LEDHeaders...................................... 8
2.2 GeneralPurposeOutputs .................................... 8
2.2.1 Advanced General Purpose Outputs & GPO’s 1 to 3 . . . . . . . . . . . . . . . . . 9
2.2.2 Advanced GPO Power Select . . . . . . . . . . . . . . . . . . . . . . . . . . . . . 10
2.2.3 GPO4,GPO5,andGPO6............................... 11
2.2.4 Dallas1-WireBridge.................................. 11
2.3 General ............................................. 11
2.4 TheBuiltInCharacterFont................................... 12
2.5 WritingTexttotheDisplay................................... 13
2.6 TextCommands......................................... 13
2.6.1 Auto Line Wrap On (254 67)(R) . . . . . . . . . . . . . . . . . . . . . . . . . . . . 13
2.6.2 Auto Line Wrap Off (254 68)(R) . . . . . . . . . . . . . . . . . . . . . . . . . . . . 13
2.6.3 Auto Scroll On (254 81)(R) . . . . . . . . . . . . . . . . . . . . . . . . . . . . . . 13
2.6.4 Auto Scroll Off (254 82)(R) . . . . . . . . . . . . . . . . . . . . . . . . . . . . . . 13
2.6.5 Set Cursor Position (254 71 [column][row]) . . . . . . . . . . . . . . . . . . . . . 14
2.6.6 Send Cursor Home (254 72) . . . . . . . . . . . . . . . . . . . . . . . . . . . . . . 14
2.6.7 Turn On Underline Cursor (254 74)(R) . . . . . . . . . . . . . . . . . . . . . . . . 14
2.6.8 Turn Off Underline Cursor (254 75)(R) . . . . . . . . . . . . . . . . . . . . . . . . 14
2.6.9 Turn On Block (blinking) Cursor (254 83)(R) . . . . . . . . . . . . . . . . . . . . . 14
2.6.10 Turn Off Block (blinking) Cursor (254 84)(R) . . . . . . . . . . . . . . . . . . . . . 14
2.6.11 CursorLeft(25476) .................................. 14
2.6.12 CursorRight(25477) ................................. 15
Matrix Orbital LK202-24-USB ii

3 Keypad Interface 15
3.1 General ............................................. 15
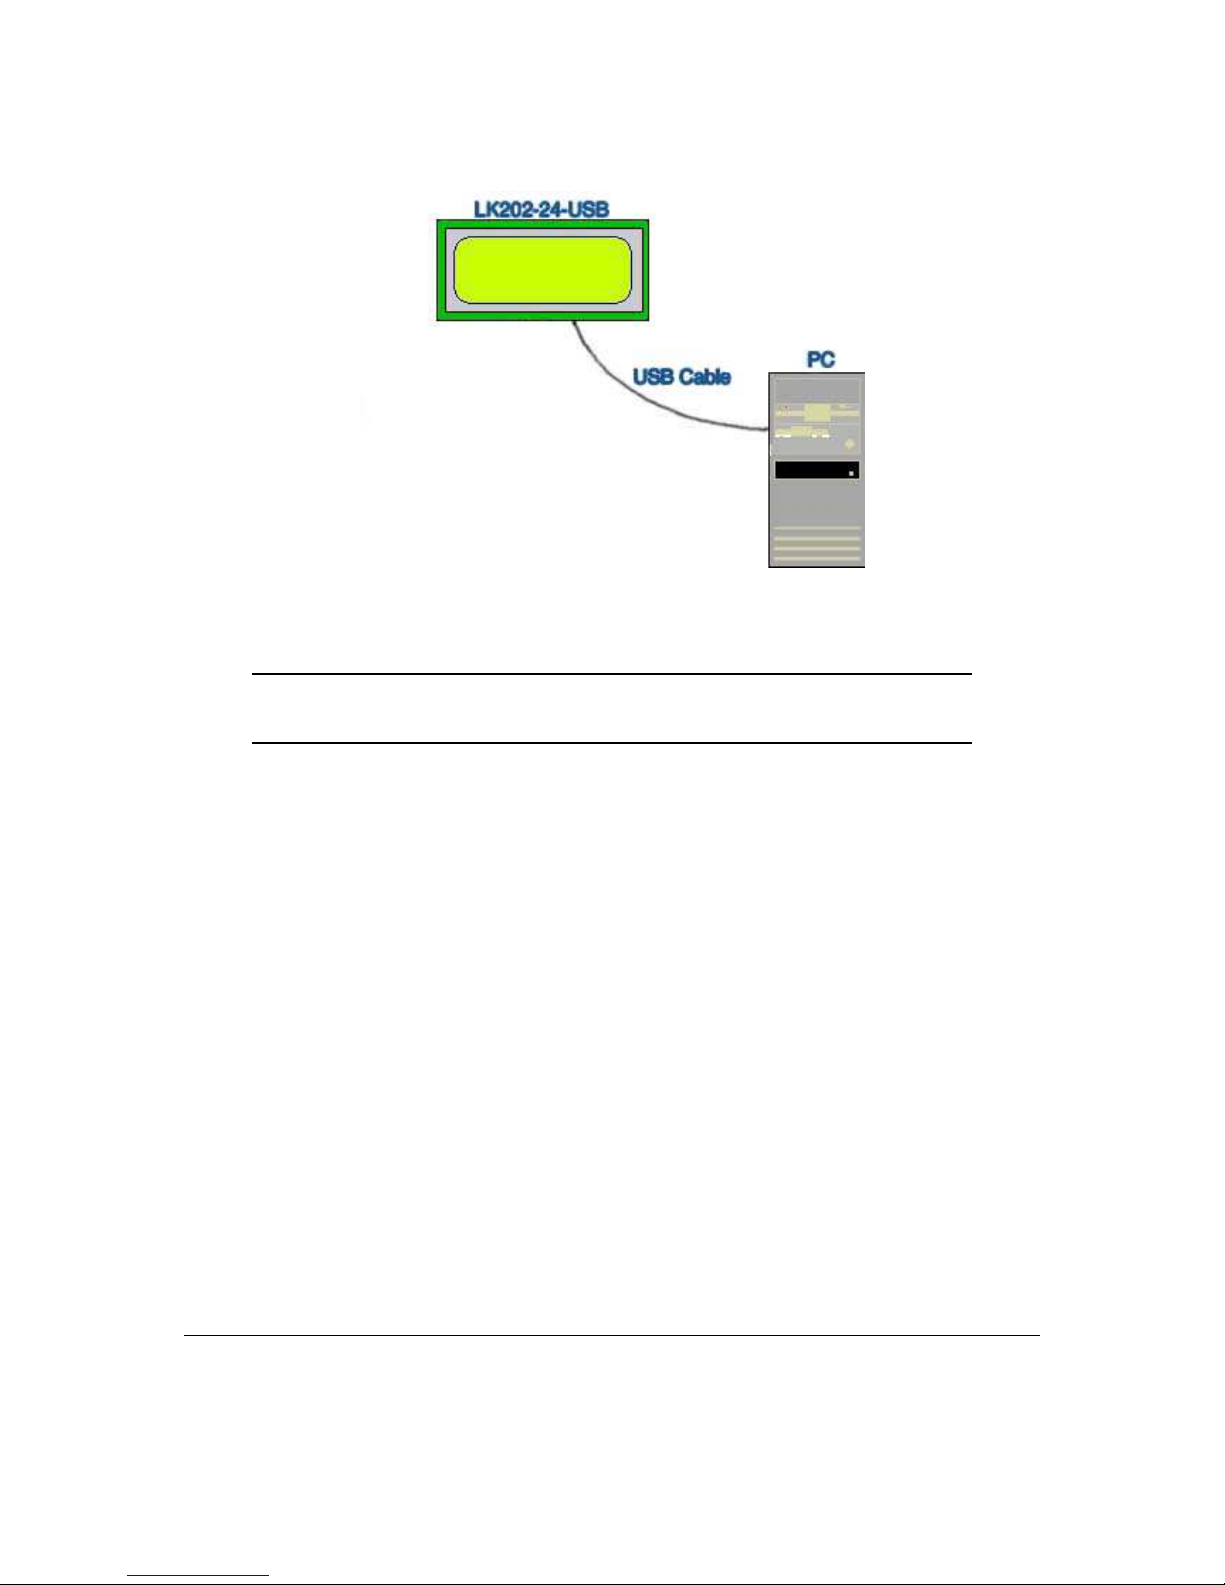
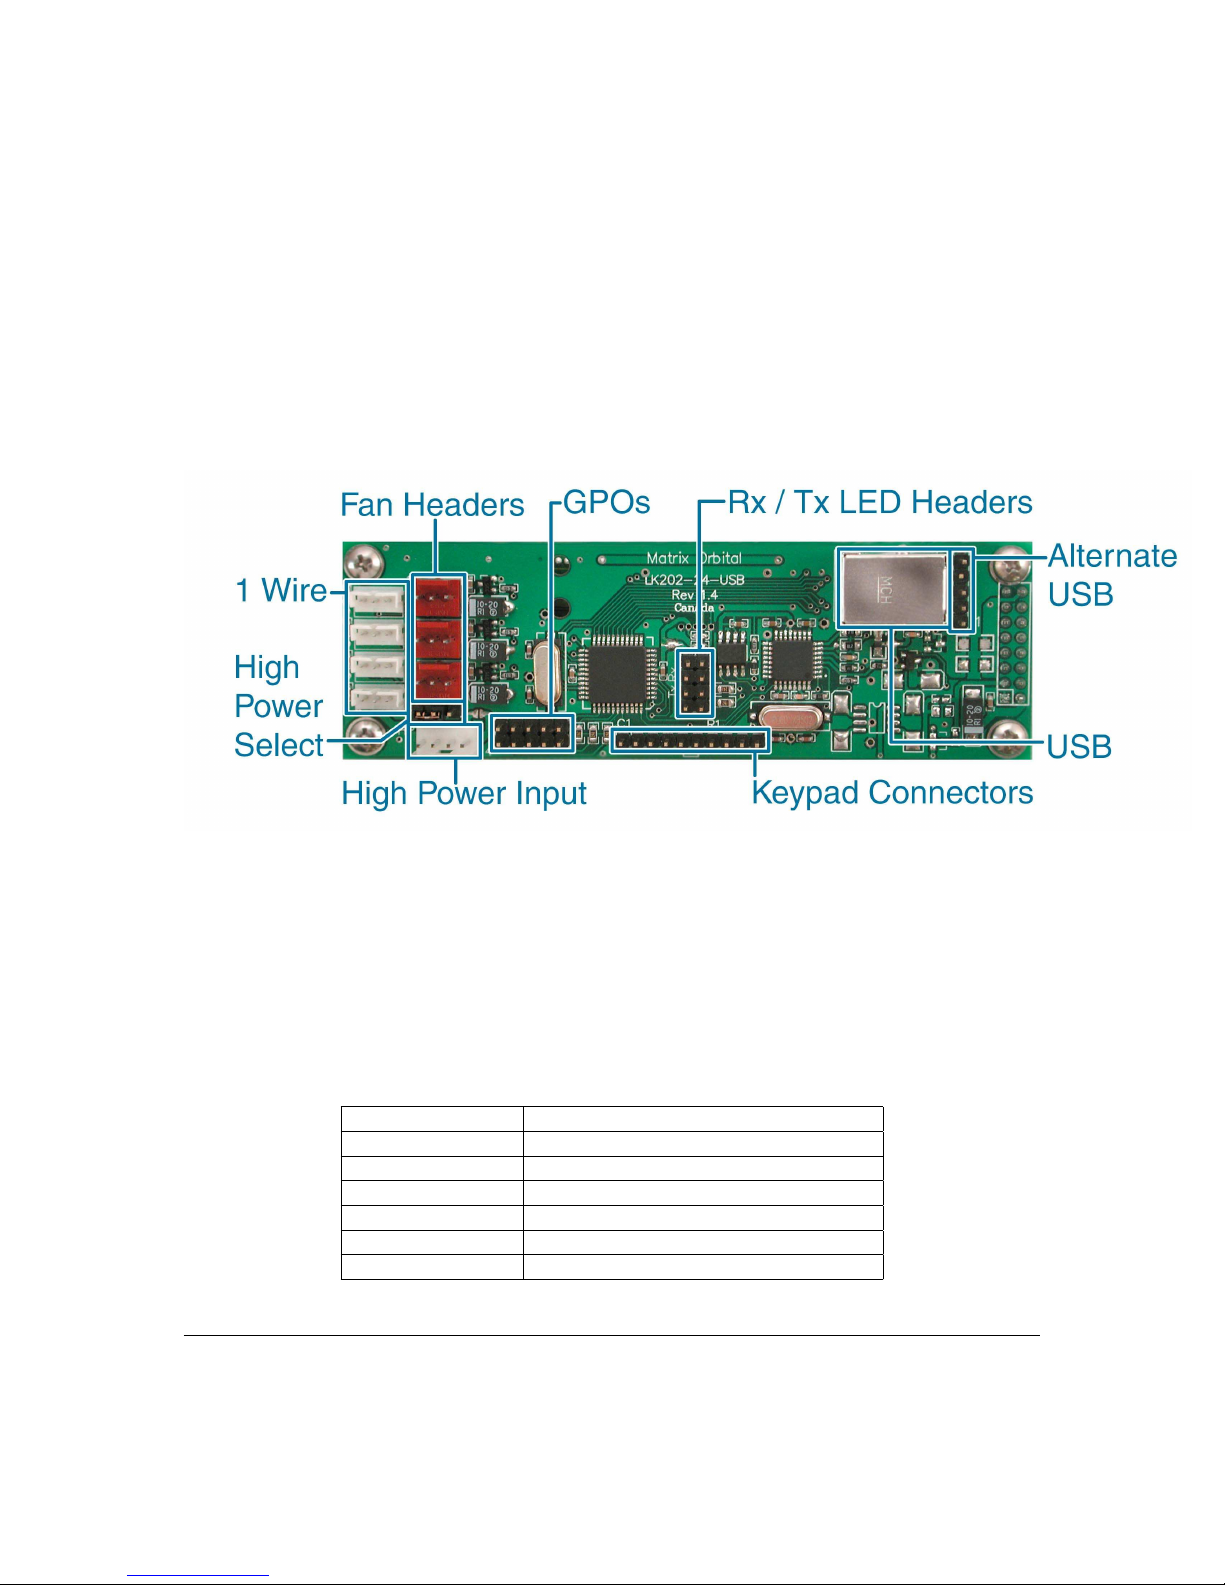
3.2 Connections........................................... 15
3.3 KeypadCommands....................................... 16
3.3.1 Auto Repeat Mode On (254 126[mode])(R) . . . . . . . . . . . . . . . . . . . . . . 16
3.3.2 Auto Repeat Mode Off (254 96)(R) . . . . . . . . . . . . . . . . . . . . . . . . . . 17
3.3.3 Auto Transmit Keypresses On (254 65)(R) . . . . . . . . . . . . . . . . . . . . . . 17
3.3.4 Auto Transmit Keypresses Off (254 79)(R) . . . . . . . . . . . . . . . . . . . . . . 17
3.3.5 Clear Key Buffer (254 69) . . . . . . . . . . . . . . . . . . . . . . . . . . . . . . . 17
3.3.6 PollKeypad(25438).................................. 17
3.3.7 Set Debounce Time (254 85 [time])(R) . . . . . . . . . . . . . . . . . . . . . . . . 18
4 Bar Graphs and Special Characters 18
4.1 CommandList ......................................... 18
4.1.1 Initialize Wide Vertical Bar Graph (254 118) . . . . . . . . . . . . . . . . . . . . . 18
4.1.2 Initialize Narrow Vertical Bar Graph (254 115) . . . . . . . . . . . . . . . . . . . . 18
4.1.3 Draw Vertical Bar Graph (254 61 [column][height]) . . . . . . . . . . . . . . . . . 18
4.1.4 Initialize Horizontal Bar Graph (254 104) . . . . . . . . . . . . . . . . . . . . . . . 19
4.1.5 Draw Horizontal Bar Graph (254 124 [column][row][dir][length]) . . . . . . . . . . 19
4.1.6 Define Custom Character (254 78 [c][8 bytes]) . . . . . . . . . . . . . . . . . . . . 19
4.1.7 Remember Custom Character (254 194 [c][8 bytes]) . . . . . . . . . . . . . . . . . 20
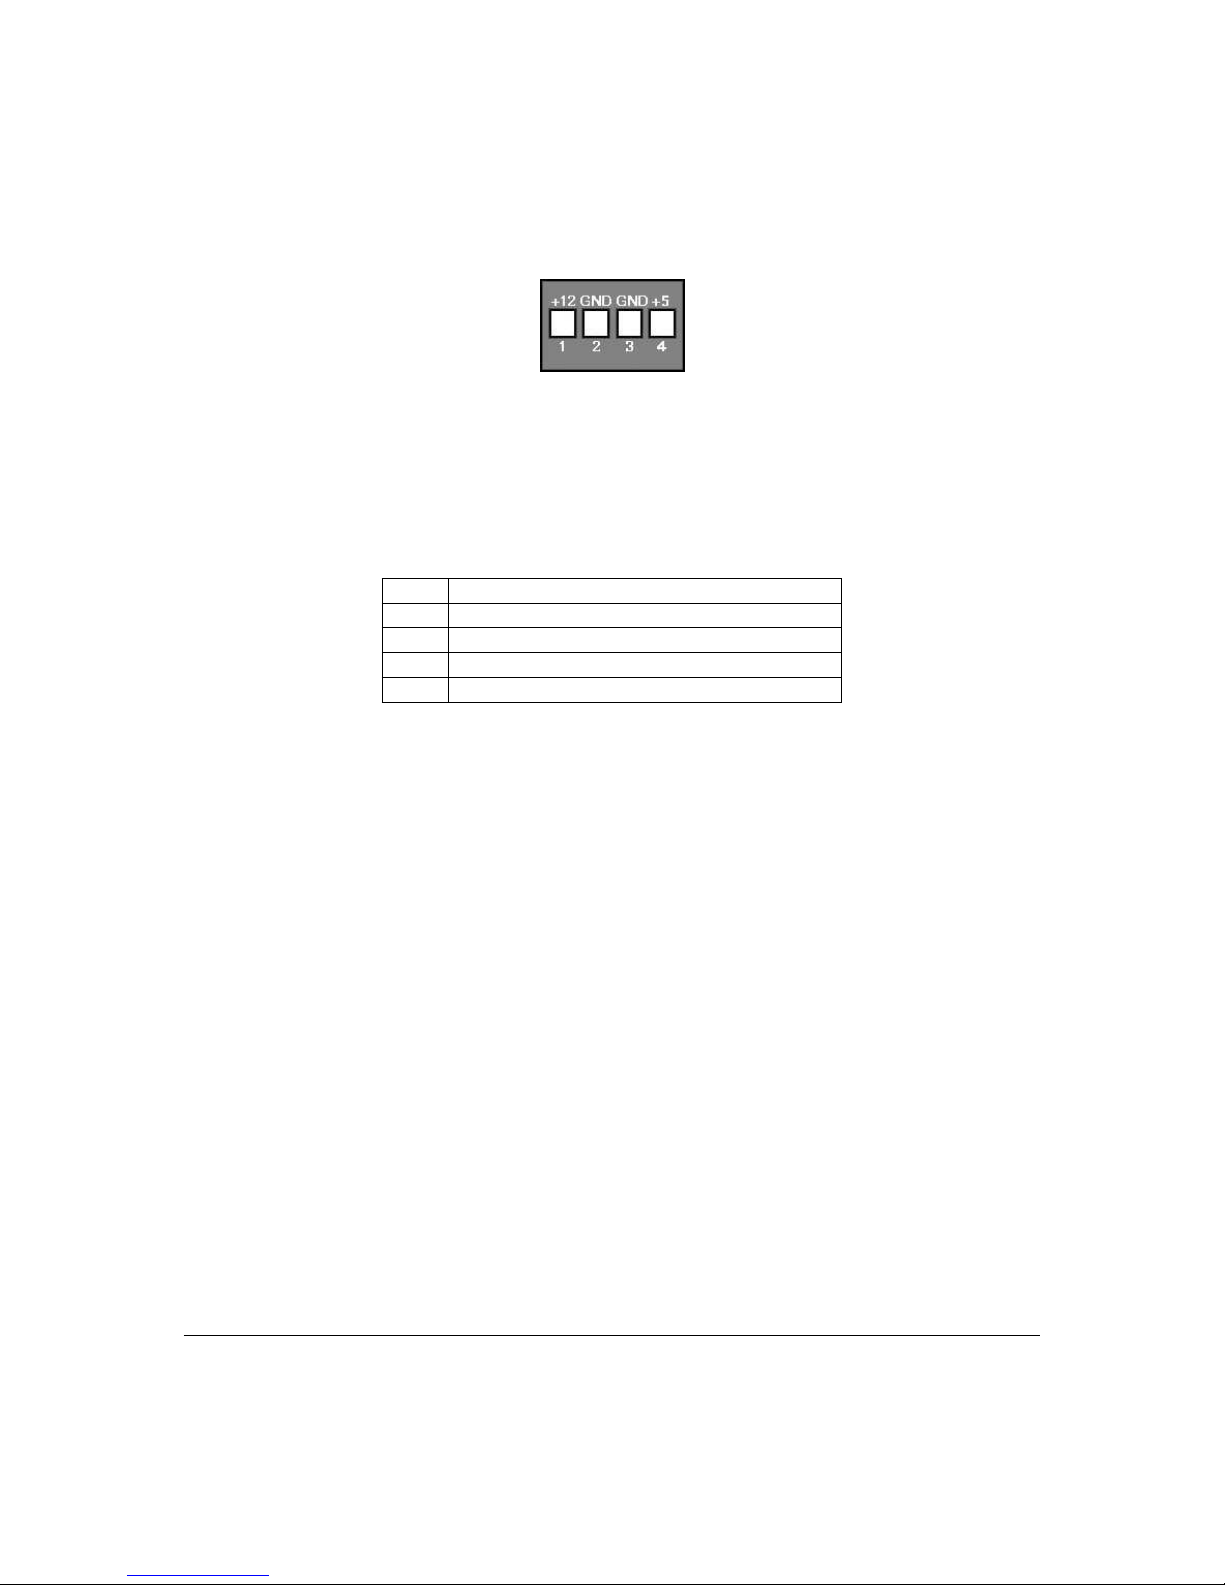
5 Fan and GPO Commands 20
5.1 DisplayReturnProtocol .................................... 20
5.2 FanandGPOCommands.................................... 22
5.2.1 General Purpose Output Off (254 86 [gpo #]) . . . . . . . . . . . . . . . . . . . . . 22
5.2.2 General Purpose Output On (254 87 [gpo #]) . . . . . . . . . . . . . . . . . . . . . 22
5.2.3 PWM Value (254 192 [fan #] [PWM value]) . . . . . . . . . . . . . . . . . . . . . . 22
5.2.4 Return Fan RPM (254 193 [fan #]) . . . . . . . . . . . . . . . . . . . . . . . . . . . 22
5.2.5 Remember GPO / PWM State (254 195 [fan #] [PWM value]) . . . . . . . . . . . . 23
5.2.6 Set PWM Base Frequency (254 196 [index]) . . . . . . . . . . . . . . . . . . . . . 23
5.2.7 Remember PWM Base Frequency (254 197 [index]) . . . . . . . . . . . . . . . . . 24
6 1-Wire Commands 24
6.1 DeviceIdentification ...................................... 24
6.2 Protocol............................................. 24
6.3 ROMCommands ........................................ 25
6.4 Display1-Wirefunctions.................................... 25
6.4.1 Transaction command (254 C8 1 [flags] [Send Bits] [Recieve bits] [Send data]) . . . 26
6.4.2 Search command (254 C8 2) . . . . . . . . . . . . . . . . . . . . . . . . . . . . . . 27
7 Miscellaneous Commands 27
7.1 CommandList ......................................... 27
7.1.1 Remember (254 147 [0|1]) . . . . . . . . . . . . . . . . . . . . . . . . . . . . . . . 28
7.1.2 Cleardisplay(25488) ................................. 28
7.1.3 Set Contrast (254 80 [contrast]) . . . . . . . . . . . . . . . . . . . . . . . . . . . . 28
7.1.4 Set Contrast and save (254 145[contrast]) . . . . . . . . . . . . . . . . . . . . . . . 29
Matrix Orbital LK202-24-USB iii

7.1.5 Backlight on (254 66[minutes]) (R) . . . . . . . . . . . . . . . . . . . . . . . . . . 29
7.1.6 Backlight off (254 70) (R) . . . . . . . . . . . . . . . . . . . . . . . . . . . . . . . 29
7.1.7 Set Backlight Brightness (254 153[brightness]) . . . . . . . . . . . . . . . . . . . . 29
7.1.8 Set and Save Backlight Brightness (254 152[brightness]) . . . . . . . . . . . . . . . 29
7.1.9 Load Startup Screen (254 64 [40 characters]) . . . . . . . . . . . . . . . . . . . . . 29
7.1.10 Read Module Type (254 55) . . . . . . . . . . . . . . . . . . . . . . . . . . . . . . 30
7.1.11 Set Serial Number (254 52 [byte1][byte2]) . . . . . . . . . . . . . . . . . . . . . . 30
7.1.12 Read Serial Number (254 53) . . . . . . . . . . . . . . . . . . . . . . . . . . . . . 30
7.1.13 Read Version Number (254 54) . . . . . . . . . . . . . . . . . . . . . . . . . . . . 30
8 Appendix: Command Summary 31
8.1 General ............................................. 31
8.2 IssuingCommands ....................................... 31
8.3 OnNumbers........................................... 31
8.3.1 ASCIICharacters.................................... 32
8.4 TextCommands......................................... 32
8.5 KeypadInterfaceCommands.................................. 34
8.6 Bar Graphs and Special Characters . . . . . . . . . . . . . . . . . . . . . . . . . . . . . . . 35
8.7 FanandGPOCommands.................................... 36
8.8 MiscellaneousCommands ................................... 37
9 Appendix: Specifications and Options 40
9.1 Specifications.......................................... 40
9.2 Options ............................................. 42
10 Appendix: Glossary 42
Matrix Orbital LK202-24-USB iv

1 Introduction
The LK202-24-USB is equipped with the following features;
•20 column by 2 line text display
•Built in font with provision for up to 8 user defined characters
•USB communication, or Serial TTL communication
•Use of up to 100 modules on the same USB host
•Fully buffered so that no delays in transmission should ever be necessary
•Ability to add a customized splash / start up screen
•Use of "Remember" functions to save settings
•Software controlled contrast
•Software controlled backlight brightness
•Backlight with configurable time-out setting up to 180 minutes
•Use of up to a 24 key keypad with a 10 key buffer
•Three low power general purpose outputs for a variety of applications
•Four high power general purpose outputs with RPM sensing and PWM control
•Horizontal or vertical bar graphs
•Power and data from one USB cable
•A perfect fit to Matrix Orbital’s PC Bay inserts without any2.1.2 Power by 3.5" floppy cable
•Dallas 1-wire Bridge
1.1 What to Expect From the LK202-24-USB
The LK202-24-USB is designed as the display unit for an associated controller. The controller may be
anything from a single board, special purpose micro-controller to a PC, depending on the application. The
controller is responsible for what is displayed on the screen of the display.
The display provides a simple command structure which allows text and bar graphs to be displayed on
the screen. Text fonts are built in and use standard ASCII mapping. Provision is made for up to 8 user
defined characters.
The screen is backlit for low light situations. Backlighting may be turned on or off under program
control. Contrast is adjustable to compensate for differing lighting conditions and viewing angles.
General purpose outputs allow the controller to switch up to six electronic or electro-mechanical devices
by issuing commands to the display unit. These can be used for controlling LEDs, relays, etc.
1.2 What Not to Expect From the LK202-24-USB
The display does not include bitmap graphics capability, except that permitted by defining special char-
acters.
1.3 Keypad Interface
The keypad interface takes row / column input and converts it into ASCII characters, which are delivered
out the USB port to the associated controller.
Matrix Orbital LK202-24-USB 1

Figure 1: Connections for Testing
NOTE The keypad is not used to directly control any aspect of the operation of the
display. The display acts simply as a matrix to serial converter.
1.4 Setup for Testing
Before setting up the application, it is best to test out the display. This is easily done with a PC.
The following is a list of requirements for testing;
•An available powered USB source
•USB Drivers which can be located on Matrix Orbital’s website and eCD
•Test software such as Alpha Demo or Display Tuner
Once the above test requirements have been met, the user may proceed with the following steps;
1. Refer to the diagram above for the following steps.
2. Download or copy the USB drivers into a directory.
3. Uncompress the files. They will be a self extracting ZIP file.
4. Connect the USB cable to the display and the computer.
5. Windows will give a prompt for drivers for a USB ⇔Serial Device.
6. Select “Specify location”, and navigate to the directory the file was uncompressed to.
7. Test the display.
1.5 Trying out the LK202-24-USB
The unit should be plugged into the USB and the backlight and custom start up screen should come on.
Matrix Orbital LK202-24-USB 2

•Run a PC program such as Hyperterm to experiment with typing text. Make certain it’s configured to
use the correct port. Set the baud rate to 19,200 and turn flow control off.
Once this is complete, try typing some characters on the keyboard. The characters should now appear on the
display screen.
Alpha Demo, Display Tuner or MOGD are excellent for basic display tests.
1.6 Trying out a Keypad
Since a number of different keypad types can be connected to the display, the results may be a little
unpredictable. At this point the user should make certain the keypad and interface work, and possibly
generate an ASCII map for any programming needs.
The keypad interface on the display converts a row / column connection to an ASCII character. By
default, a keypress is transmitted as serial data immediately. Keypad buffering can be selected using the
appropriate commands.
The keypad should be a matrix style or momentary switches. It is possible to simulate key strokes by
shorting out a row and a column pin.
1.6.1 Here’s what to do:
1. The PC should be running a terminal program, such as Hyperterm.
2. With the display connected to the PC, plug in the keypad. If the connector has fewer pins than the one
on the display, centre it as well as possible.
NOTES
•The keypad connector must be wired with columns on one side and rows on the other
side of the center of the connector. If the keypad isn’t wired this way the user will
need to make an adapter or rewire the connector to meet this requirement.
•The connector is reversible. Reversing the connector will not damage the keypad or
the display, but will however, change the ASCII character map
3. Press a key on the keypad. An upper case ASCII character (A-X) should appear on the PC screen.
Different keys should generate different characters.
To experiment, reverse the connector to see if it generates a more logical set of characters. Ultimately the
program in the controller will have to ’map’ these characters to the ones marked on the keypad, which will
likely be different.
Matrix Orbital LK202-24-USB 3

2 Connections
2.1 Connector Pinout
Refer to the Figure below for this chapter.
Figure 2: Electrical Connections
Table 1: Connectors & Functions
Connector Function
14 Pin dual header General Purpose Outputs and +5V Output
Rx / Tx Receive and Transmit LED outputs
10 Pin header Keypad
USB Communication / Power
Alt. USB Alternate USB / Power Header
4 Pin White Header Optional High Power GPO Power Input
Matrix Orbital LK202-24-USB 4

Table 2: Mating Connectors
Connector Part # Mate Part #
3 Pin White Header AMP 173979 AMP 173977
3 Pin Red Header MOLEX 43009 MOLEX 7879
10 Pin Dual Header MOLEX 42375 Many, ex. MOLEX 70058
Rx/Tx MOLEX 42375 Many, ex. MOLEX 70058
10 Pin Header MOLEX 42375 Many, ex. MOLEX 70058
USB MOLEX 67068 Standard USB cable
Alt. USB MOLEX 42375 Many, ex. MOLEX 70058
4 Pin White Header AMP 171825-4 AMP 170205-1
2.1.1 Power
USB High power ports can supply 500mA of power. Low power devices, such as un-powered hubs,
can only supply 150mA of power. Please be sure to observe the total power usage on the display when
connected to the USB port. The display will require between 125mA to 220mA depending on the model and
the number of GPOs being used.
Table 3: GPO Power Levels
GPO Maximum Power
+5V Low Power 20mA, current limited
+5V High Power 1000mA. Please note; an unmod-
ified USB host can only supply
a maximum of 500mA on a high
power output and only 150mA on
low power.
+12V High Power 1000mA
Power is applied via the USB cable or the alternate USB header. Power requirement is +5 VDC ±0.25V.
WARNINGS
•When using the alternate USB header, verify all the cable pin outs
before applying power. Incorrect power application may damage
the display and host.
•Make sure the host is capable of supplying all the necessary power.
Add the display power requirement and the GPO power if used for
a total power requirement.
Matrix Orbital LK202-24-USB 5

The display has a secondary power connector used for High Power GPOs. Only if the user is planning on
using GPO 1, GPO 2 and GPO 3 as +12V, should the user plug in a unmodified 3.5” floppy power cable.
Figure 3: Header
Figure 4: Connector Pinout
Pin Description
Pin 4 +5.0 VDC (normally from PC power supply)
Pin 3 Ground
Pin 2 Ground
Pin 1 +12.0 VDC (normally from PC power supply)
Make certain to have sufficient current capacity to handle the desired load. Each High Power GPO can
source over 1000mA.
2.1.2 USB Communications
A standard B type USB header is provided on the display for USB communication. The USB cable pro-
vides power and data to the display. There are two ways of communicating to the display. Under Windows,
the user will have direct access to the display drivers or create a virtual COM Port (VCP). With the VCP,
a new COM Port is created in Windows. Under the control panel the user can set all the options for the
USB device, including speed. Windows 98, Windows ME, Windows 2000, and Windows XP drivers have
been tested and work. VCP drivers are also available for Apple OS-X, OS-8, and OS-9. Linux drivers are
available as well, but have not been tested by us, nor will Matrix Orbital be able to provide any support for
them.
For more driver information please visit www.FTDIchip.com.
8bit, no parity, one stop bit.
Speed: 19.2 Kb/s
Matrix Orbital LK202-24-USB 6

Table 4: USB ID
VID 0403
PID Description
FA00 USB 2 Serial Communication
FA01 MX2 / MX3
FA02 MX4 / MX5
FA03 LK / VK202-24-USB
FA04 LK / VK204-24-USB
2.1.3 Alternate USB Communications
Figure 5: USB & Alternate USB
Table 5: Connector Pinout
Pin Number Description
5 Ground
4 Not Used
3 D+
2 D-
1 +5V
NOTE Please verify pinout with motherboard manuals.
Matrix Orbital LK202-24-USB 7

2.1.4 Serial TTL Communications
Figure 6: Rx / Tx and LED Headers
The display can be communicated to by Serial at TTL levels. Communication will bypass the USB
section and requires power and ground to be provided by the header. Do not use this header in conjunction
with USB communication.
8bit, no parity, one stop bit.
Speed: 19.2 Kb/s
2.1.5 LED Headers
The LED headers provide a visual indication of communication over the Rx and Tx line if a LED is
connected. The LED’s blink frequency will increase as the amount of data increases. The headers are
current limited to 20mA at +5V. This feature only works with USB communication and will not work with
serial TTL.
2.2 General Purpose Outputs
The display has a variety of general purpose outputs for a variety of applications.
Matrix Orbital LK202-24-USB 8

Figure 7: Connections
2.2.1 Advanced General Purpose Outputs & GPO’s 1 to 3
These outputs are capable of controlling high current draw devices, saving power up state, switching to
PWM mode and repeat back RPM via Hall effect sensor.
Figure 8: Fan Headers
Matrix Orbital LK202-24-USB 9

WARNINGS
•RPM Reading should not be used at 5V.
•There are no current limiting resistors.
•Maximum current draw is 1000mA.
•Default voltage setting is 12V.
•As of Firmware Revision 2.1, the default PWM frequency is
19.1Hz.
2.2.2 Advanced GPO Power Select
12 Volt 5 Volt
Figure 9: High / Low Power Select
When the jumper is placed in the high power position, the unit supplies +12V to the advanced GPOs. If
the jumper is placed in the low power position, +5V is supplied to the GPOs. For 12V, external power by a
3.5” floppy connector will be required.
Matrix Orbital LK202-24-USB 10

2.2.3 GPO 4, GPO 5, and GPO 6
Figure 10: General Purpose Outputs
GPO’s 4, 5, and 6 are low power ouputs providing +5V at 20mA, enforced by current limiting resistors.
They are ideal for driving LEDs and relays directly.
2.2.4 Dallas 1-Wire Bridge
The display offers one Dallas 1-wire bridge. All three headers are connected to one communication line.
A maximum of 32 1-wire devices can be connected to the display at a time.
Figure 11: 1-Wire Pinout
2.3 General
Text is displayed on the LK202-24-USB using the built in 5x8 dot matrix font, in addition to up to 8 user
defined characters.
Matrix Orbital LK202-24-USB 11

2.4 The Built In Character Font
The display includes a built in 5x8 dot matrix font with the full range of ASCII characters, plus a variety
of extended characters, as shown in the Figure below.
Figure 12: Character Set
In addition to the built in characters, users may define up to 8 special characters. Once defined, these
characters occupy positions 0x00 to 0x07 in the above chart. The display does not have provision to down-
Matrix Orbital LK202-24-USB 12

load other fonts.
2.5 Writing Text to the Display
When the display receives a character, it displays that character at the position currently defined. The
next character sent to the module then advances to the following position on the display. Characters are
drawn using the built in font, and only characters defined in the font are actually displayed. Characters
which are not defined by the built in font print as a space.
The position where text is to be inserted is a character location stored in the display’s volatile memory
and maintained internally by the display’s firmware. This position is manipulated by the commands shown
in the following section.
2.6 Text Commands
In this section commands are identified by their names and decimal values.
Some commands marked with an “R”, may be “Remembered” to set new defaults that will be in effect
each time the unit is powered on.
2.6.1 Auto Line Wrap On (254 67)(R)
Enables automatic line wrapping. Note that this word is not ’word wrapping’, and wraps may occur in
the middle of a word.
2.6.2 Auto Line Wrap Off (254 68)(R)
Disables automatic line wrapping. Characters beyond the end of a line may be lost.
2.6.3 Auto Scroll On (254 81)(R)
When auto scrolling is on, it causes the display to shift the entire display’s contents up to make room for
a new line of text when the text reaches the scroll position, which is the bottom right character position.
2.6.4 Auto Scroll Off (254 82)(R)
When auto scrolling is disabled, text will wrap to the top left corner of the display area. Existing text
in the display area is not erased before the new text is placed. A series of ’spaces’, followed by a “Cursor
home” command, may be used to erase the top line of text.
Matrix Orbital LK202-24-USB 13

2.6.5 Set Cursor Position (254 71 [column][row])
This command sets the cursor position (text insertion point) to the [column] and [row] specified. Columns
have values from 1 to 20 (0x01 to 0x14) and rows have values of 1 and 2 (0x01 and 0x02).
2.6.6 Send Cursor Home (254 72)
This command moves the cursor position (text insertion point) to the top left of the display area.
2.6.7 Turn On Underline Cursor (254 74)(R)
Turns on the underline cursor. The cursor shows the current text insertion point. Both underline and
blinking cursors may be turned on or off independently. The cursor if off by default.
2.6.8 Turn Off Underline Cursor (254 75)(R)
Turns off the underline cursor. Does not affect the blinking block cursor.
2.6.9 Turn On Block (blinking) Cursor (254 83)(R)
Turns on the blinking block cursor. The cursor shows the current text insertion point. Both blinking and
underline cursors may be turned on or off independently. The cursor is off by default.
2.6.10 Turn Off Block (blinking) Cursor (254 84)(R)
Turns off the blinking block cursor. Does not affect the underline cursor.
2.6.11 Cursor Left (254 76)
Moves the cursor one position to the left but does not erase any character that may be in that position.
Note that this command moves the text insertion point even if the cursor is turned off.
NOTE A ’destructive backspace’, which erases the character to the left of the original
position, may be done by issuing the following sequence: cursor left, space, cursor left.
Matrix Orbital LK202-24-USB 14

2.6.12 Cursor Right (254 77)
Moves the cursor one position to the right but does not erase any character that may be in that position.
Note that this command moves the text insertion point even if the cursor is turned off.
3 Keypad Interface
This chapter describes the keypad interface and associated commands in detail.
3.1 General
The display keypad interface processes the keypad row / column matrix into a serial data byte stream.
Aside from this processing, the keypad has no effect on the display. To send keystrokes to the display, they
must be routed through the controller.
3.2 Connections
COLUMN 1
COLUMN 2
COLUMN 3
COLUMN 4
COLUMN 5
COLUMN 6
ROW 1
ROW 2
ROW 3
ROW 4
Figure 13: Keypad Connector
The connector is not ’keyed’, so the keypad will probably plug in either of two ways. The display will
not be damaged by reversing the connector. However, the keypad will generate a different ASCII character
mapping for each position. If the connector has fewer than 10 pins it should be centered on pins 6 and 7 of
the connector.
Pins 1 through 6 are columns and Pins 7 through 10 are rows. The keypad is scanned wherever a key is
passed; there is no continuous key scan. This means that keypresses are dealt with immediately without any
appreciable latency. This also prevents electrical noise which is often caused by continuous key scans.
NOTE Please note that keypads may be laid out in a different pattern. If this is the case,
the user will need to interpret the key codes differently.
Matrix Orbital LK202-24-USB 15

Table 6: Keypad Layout
Columns
1 2 3 4 5 6
1 A B C D E F
Rows 2 G H I J K L
3 M N O P Q R
4 S T U V W X
NOTE The keypad connector must be wired with columns on one side and rows on the
other side of the centre of the connector. If the keypad isn’t wired this way the user will
need to make an adapter or rewire the connector to meet this requirement.
3.3 Keypad Commands
Some commands, marked with an “R”, may be “Remembered” to set new defaults that will be in effect
each time the unit is powered on.
3.3.1 Auto Repeat Mode On (254 126[mode])(R)
[mode]=0x00 gives Resend Key Code mode
[mode]=0x01 gives Key Down / Key Up Code mode
Two modes of auto repeat are available and are set via the same command.
1. Resend Key Mode: This mode is similar to the action of a keyboard on a PC. In this mode, when a
key is held down, the key code is transmitted, immediately followed by a 1/2 second delay.
2. Key down / Key up codes: This code may be used when the typematic parameters of the “Resend
Key Code” mode are unacceptable or if the unit is being operated in polled mode. The host system
detects the press of a key and stimulates an auto repeat inside the host system until the key release is
detected.
In this mode, when a key is held down, the key code is transmitted immediately and no other codes will be
sent until the key is released. On the release of the key, the key release code transmitted will be a value equal
to the key down code plus 20 hex. For example, if the key code associated with key “P”(0x50) is pressed,
the release code is “p”(0x70).
Matrix Orbital LK202-24-USB 16
Other manuals for LK202-24-USB
1
Table of contents
Other Matrix Orbital Control Unit manuals
Popular Control Unit manuals by other brands

Samson
Samson 3351 Mounting and operating instructions

Congatec
Congatec conga-QMX8X quick start guide

Automationdirect.com
Automationdirect.com Productivity 2000 P2-16TA manual

Leviton
Leviton 73A00-3ZB Installation instructions and user guide

Yoshitake
Yoshitake AF-5 product manual

power automation
power automation PA 8000 LW Series installation instructions