Matsui MBCONW10N Parts list manual

GB
NO
FI
SE
DK
BUILT-IN OVEN
INSTRUCTION / INSTALLATION MANUAL
INNEBYGGET OVN
INSTRUKSJONS / INSTALLASJONSHÅNDBOK
KALUSTEISIIN SIJOITETTAVA UUNI
KÄYTTÖ/ASENNUSOHJE
INDBYGGET OVN
INSTRUKTION / INSTALLERINGSMANUAL
INBYGGD UGN
INSTRUKTIONER / INSTALLATIONSMANUAL
INSTRUCTION MANUAL
MBCONW10N
INSTRUCTION MANUAL
MBCONX10N
MBCONW_X10N_IB_101013_Zell.indb 1 13/10/2010 2:45 PM

Contents GB
Unpacking......................................................................................................... 4
Product Overview.............................................................................................. 5
FrontView................................................................................................... 5
Control Panel .............................................................................................. 5
Operation.......................................................................................................... 6
FirstTime Use of the Oven........................................................................... 6
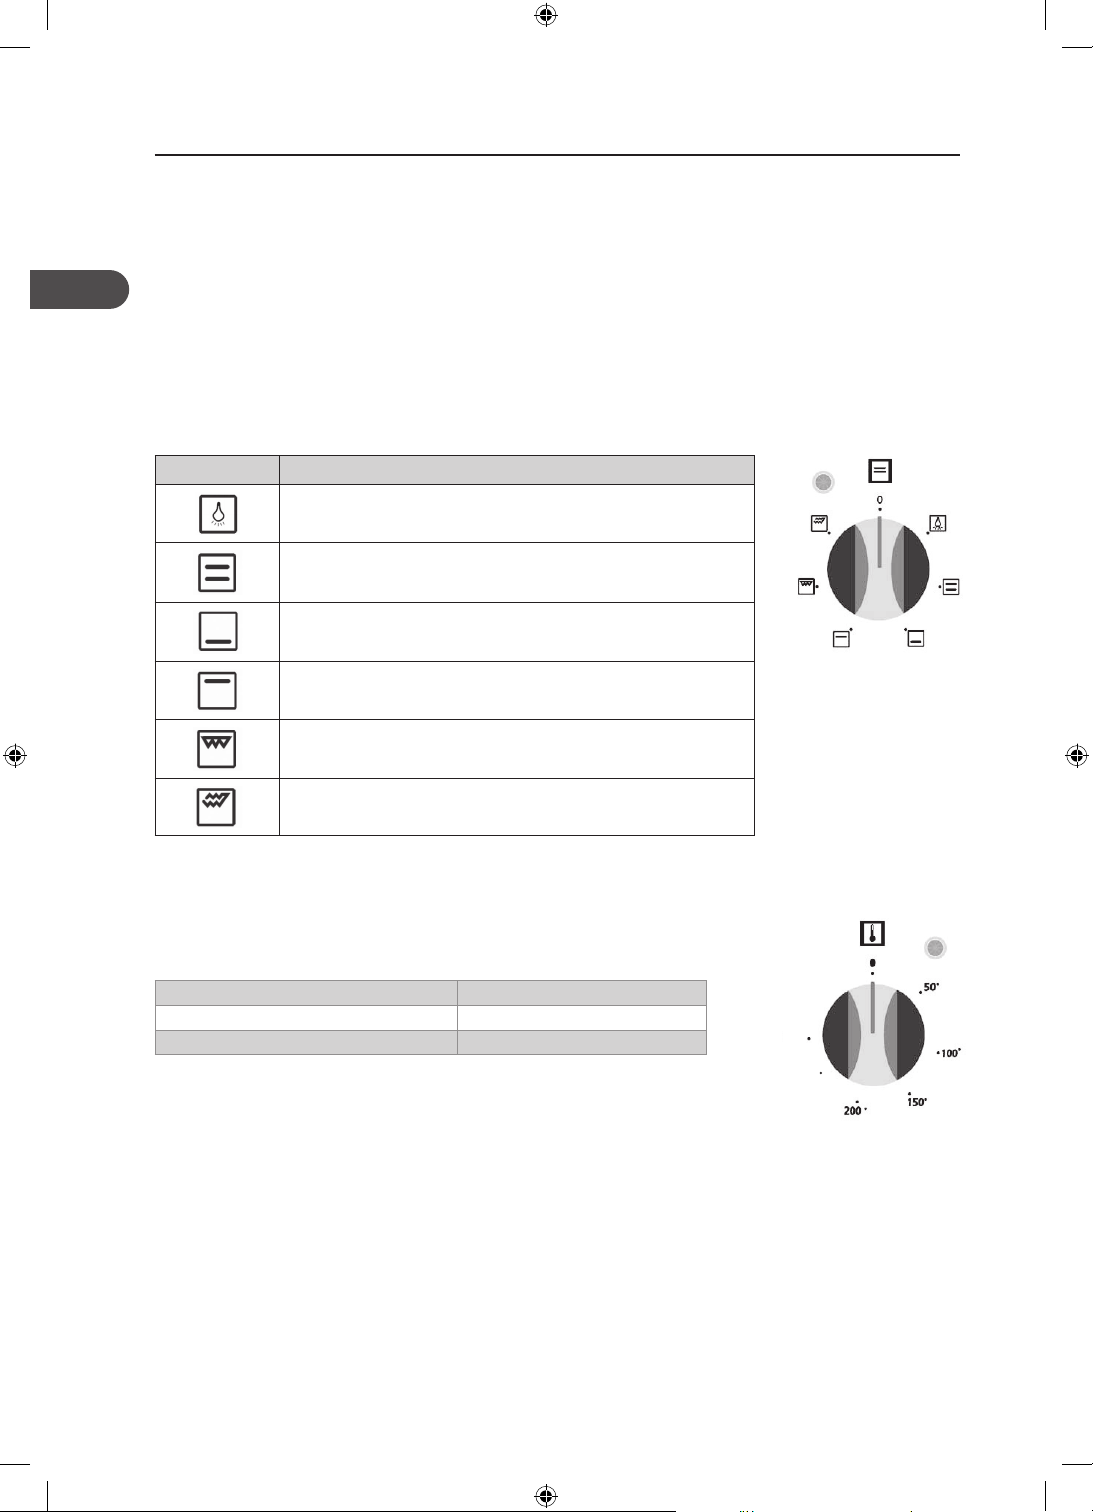
Function Selector Control............................................................................ 6
Thermostat Control ..................................................................................... 6
Using the Oven............................................................................................ 7
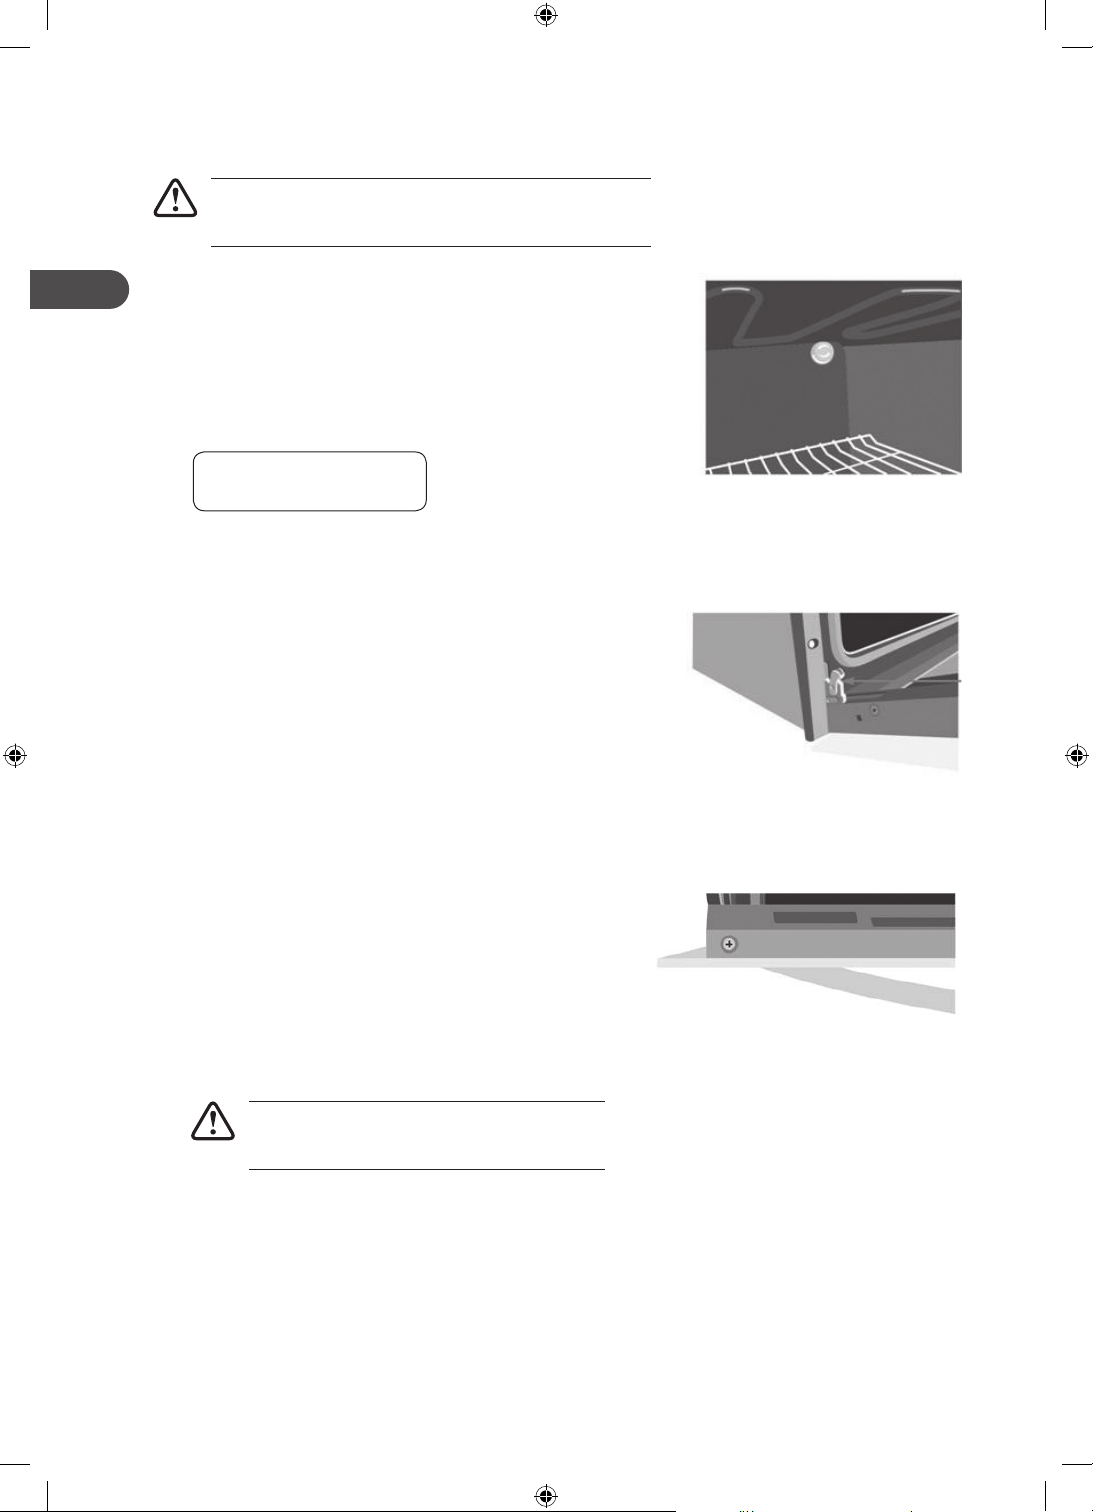
Replacing the Anti-tilting Oven Shelf.......................................................... 7
Using the Functions ....................................................................................8
Baking Tips.................................................................................................. 8
Energy Saving ............................................................................................. 8
Cleaning and Maintenance................................................................................9
Cleaning Tips............................................................................................... 9
Cleaning the Outside of the Oven................................................................ 9
Cleaning the Oven Door Glass ..................................................................... 9
Replacing the Oven Light.......................................................................... 10
Removing the Door for Easier Cleaning..................................................... 10
Taking out the Glass from the Oven Door for Cleaning .............................. 10
Specications.................................................................................................. 11
Installation...................................................................................................... 12
Use a Competent Person or Qualied Electrician....................................... 12
Installing the Built-in Oven....................................................................... 13
Making an Electrical Connection............................................................... 14
Power Connection Box ..............................................................................14
Safety Warnings.............................................................................................. 59
Innhold NO
Utpakking ....................................................................................................... 15
Produktoversikt............................................................................................... 16
Sett forfra ................................................................................................. 16
Kontrollpanel............................................................................................ 16
Bruk ................................................................................................................ 17
Førstegangs bruk av stekeovn................................................................... 17
Funksjon Selector-kontroll ....................................................................... 17
Termostatkontroll ..................................................................................... 17
Bruk av stekeovn....................................................................................... 18
Skifte anti-vippe hylle............................................................................... 18
Funksjoner................................................................................................ 19
Baketips.................................................................................................... 19
Energisparing............................................................................................ 19
Rengjøring og vedlikehold.............................................................................. 20
Rengjøringstips......................................................................................... 20
Rengjøring av utsiden av stekeovnen........................................................ 20
Rengjøring av glasset i ovnsdøren.............................................................20
Skifte ovnslampe ...................................................................................... 21
Fjerning av dør for lettere rengjøring........................................................ 21
Fjerning av glasset fra ovnsdøren for rengjøring....................................... 21
Spesikasjon................................................................................................... 22
Installasjon ..................................................................................................... 23
Bruk en kompetent person eller en kvalisert elektriker .......................... 23
Installere innbyggingsovn ........................................................................ 24
Strømtilkobling......................................................................................... 25
Strømtilkoblingsboks................................................................................ 25
Sikkerhetsadvarsler......................................................................................... 59
Innehåll SE
Uppackning..................................................................................................... 26
Produktöversikt............................................................................................... 27
Frontsikte.................................................................................................. 27
Kontrollpanel............................................................................................ 27
Användning .................................................................................................... 28
Användning av ugnen för första gången................................................... 28
Kontroll för funktionsprogramväljare........................................................ 28
Kontroll för termostaten ........................................................................... 28
Användning av ugnen............................................................................... 29
Byt ut den icke vippbara ugnshyllan ......................................................... 29
Användning av funktionerna.................................................................... 30
Tips vid bakning........................................................................................ 30
Energibesparing........................................................................................ 30
Rengöring och underhåll................................................................................. 31
Tips vid rengöring..................................................................................... 31
Rengöring av ugnens utsida ..................................................................... 31
Rengöring av glaset på ugnsdörren ..........................................................31
Byte av ugnsljuset..................................................................................... 32
Avlägsna dörren för en lättare rengöring.................................................. 32
Plocka ut glaset från ugnsdörren för att rengöra....................................... 32
Specikationer................................................................................................ 33
Installation...................................................................................................... 34
Ta hjälp av en kompetent person eller en kvalicerad elektriker............... 34
Installation av den inbyggda ugnen.......................................................... 35
Skapa en elektrisk anslutning................................................................... 36
Strömanslutningslåda............................................................................... 36
Säkerhetsföreskrifter....................................................................................... 60
Sisältö FI
Pakkausmateriaalin poistaminen.................................................................... 37
Tuotteen yleiskatsaus ..................................................................................... 38
Näkymä edestä ......................................................................................... 38
Ohjauspaneeli........................................................................................... 38
Käyttö ............................................................................................................. 39
Ensimmäinen käyttökerta......................................................................... 39
Toiminnon valitsin .................................................................................... 39
Termostaatin säädin.................................................................................. 39
Uunin käyttö............................................................................................. 40
Kallistumattoman pellin/ritilän asentaminen........................................... 40
Toimintojen käyttö.................................................................................... 41
Leivontavinkkejä....................................................................................... 41
Energiansäästö ......................................................................................... 41
Puhdistus ja huolto:........................................................................................ 42
Puhdistusvinkkejä..................................................................................... 42
Uunin ulko-osien puhdistus...................................................................... 42
Uuniluukun lasin puhdistus ...................................................................... 42
Uunivalon vaihto....................................................................................... 43
Uuniluukun irrottaminen puhdistamisen helpottamiseksi........................ 43
Uuniluukun lasin irrottaminen puhdistamista varten............................... 43
Tekniset tiedot ................................................................................................ 44
Asennus .......................................................................................................... 45
Käänny pätevän henkilön tai ammattiasentajan puoleen......................... 45
Kalusteisiin sijoitettavan uunin asennus................................................... 46
Sähköliitännän tekeminen........................................................................ 47
Virtarasia .................................................................................................. 47
Turvavaroitukset ............................................................................................. 60
MBCONW_X10N_IB_101013_Zell.indb 2 13/10/2010 2:45 PM

Indholdsfortegnelse DK
Udpakning ...................................................................................................... 48
Produktoversigt............................................................................................... 49
Forside...................................................................................................... 49
Kontrolpanel............................................................................................. 49
Betjening ........................................................................................................ 50
Brug af Ovnen Første Gang........................................................................50
Funktionsknap.......................................................................................... 50
Termostat.................................................................................................. 50
Betjening.................................................................................................. 51
Placering af Anti-vippe Risten................................................................... 51
Brug af Funktioner.................................................................................... 52
Bagetips.................................................................................................... 52
Energibesparelse....................................................................................... 52
Rengøring og Vedligeholdelse......................................................................... 53
Rengøringstips.......................................................................................... 53
Rengøring af Ovnens Yderside................................................................... 53
Rengøring af Ovnens Glasdør.................................................................... 53
Skift af Ovnens Lyspære............................................................................ 54
Fjern Døren for Lettere Rengøring............................................................. 54
Fjern Glasset fra Ovndøren ved Rengøring................................................ 54
Specikationer................................................................................................ 55
Installering...................................................................................................... 56
Brug en Kompetent Person eller Autoriseret Elektriker ............................. 56
Installering af Indbygget Ovn ................................................................... 57
Elektriske Forbindelser.............................................................................. 58
Strømforbindelser..................................................................................... 58
Sikkerhedsforanstaltninger............................................................................. 61
MBCONW_X10N_IB_101013_Zell.indb 3 13/10/2010 2:45 PM

4
GB
Congratulations on the purchase of your new Matsui built-in oven.
You must read this manual in order to fully understand how to install and operate it correctly.
Read all the safety warnings carefully before use and keep this manual for future reference.
Unpacking
Remove all packaging from the unit. Retain the packaging. If you dispose of it please do so
according to local regulations.
The following items are included:
Deep Tray x 1
(P.N. 20612977)
Shallow Tray x 2
(P.N. 20612976)
The Main Unit
Wire Shelf x 1
(P.N. 37010933)
Instruction / Installation Manual
(P.N. 52036913-v2)
250°
290°
TBA
MBCONW_X10N_IB_101013_Zell.indb 4 13/10/2010 2:45 PM

5
GB
250°
290°
250°
290°
Product Overview
Front View
1. Control Panel 2. Shelf guide slots
Control Panel
1 2
34
1. Function Selector Control 2. Thermostat Control
3. Oven Indicator Lamp 4. Thermostat Lamp
1
2
250°
290°
240°
MBCONW_X10N_IB_101013_Zell.indb 5 13/10/2010 2:45 PM

6
GB
Function Selector Control
• This control is used to select the cooking functions available, which are:
Symbol Function description
The oven light will be turned on.
The oven’s thermostat and warning lights and the lower and
upper heating elements will be switched on.
The oven’s thermostat and warning lights and the lower
heating element will be switched on.
The oven’s thermostat and warning lights and the upper
heating element will be switched on.
The oven’s thermostat and warning lights and grill heating
element will be switched on.
The oven’s thermostat, warning lights, upper and grill
heating elements will be switched on.
Thermostat Control
The temperature can be set from 50°C - 290°C. Select the desired
temperature, as follows:
To keep food warm 50 - 100°C position
For traditional oven cooking 50 - 290°C position
For all types of grilling 190°C position
250°
290°
Operation
First Time Use of the Oven
Unpack the oven. Remove any insert cards or plastic bags. Use a damp cloth to carefully wipe the inner
cavity wall and housing. Clean all the detachable parts in hot, soapy water before using.
Heat the oven on maximum for 45 minutes. There may be a little smoke and odour upon initial start up
(for about 15 mins). This is normal. It is due to the protective substance on the heating elements which
protects them from the effects of corrosion during shipping from the factory.
250°
290°
MBCONW_X10N_IB_101013_Zell.indb 6 13/10/2010 2:45 PM

7
GB
Using the Oven
• Under no circumstances should the oven be lined with aluminium foil as
overheating may occur. Do not place dishes or baking trays directly onto the base
of the oven as it becomes very hot and damage may occur.
• Bread may catch re if the toasting time is too long. Close supervision is necessary
during toasting.
• During use the appliance becomes hot. Care should be taken to avoid touching the
heating elements inside the oven.
• Accessible parts may become hot during use. Young children should be kept away.
Guide 6
Guide 5
Guide 4
Guide 3
Guide 2
Guide 1
1. To get the best results, the smallest distance
allowed between the food and the upper
heating element is 30 mm.
2. On the wall of inner cavity there are 6 different
shelf/tray guide slots. You can place the shelf/
tray at different heights to achieve the best
cooking performance depending on the heat
of the heating elements and the size of food.
If only the upper heating element is on, we
suggest that you place the shelf/tray on guide 6
(make sure that there is a minimum distance of
30mm between the food and the upper heating
element).
3. Always monitor the food during cooking to
ensure that you are not overcooking it.
4. For heavy food, use a baking pan rather than
the wire shelf.
5. Select the oven function you require. Select the temperature you require.
6. Before placing food in the oven you may need to pre-heat the oven for 10 minutes.
7. The temperature light will go out when the chosen temperature has been reached.
8. To switch the oven off turn the function control dial to the off position ‘0’.
Replacing the Anti-tilting Oven Shelf
• Insert the shelf at an angle with the vertical section to the rear to clear
the stops at either side of the guide slot. Once past this stop the shelf
can be placed level again.
• To remove, completely angle the shelf upward so the shelf stop is
cleared from the guide stop.
MBCONW_X10N_IB_101013_Zell.indb 7 13/10/2010 2:45 PM

8
GB
Using the Functions
Function Description
Static Cooking Function
The static cooking function emits heat, ensuring even cooking of the lower and upper
food, this is an excellent function for making pastries, cakes, baked pasta, lasagne and
pizza.
Lower Heating Function
The lower heating function is ideal for baking pizza, as the heat rises from the bottom
of the oven and warms food up, rather than cooking the foods.
Upper Heating Function
In this type of cooking, the heat emanating from upper heating element cooks the
upper side of the food. Upper heating function is appropriate for frying the upper side
of already cooked food and heating the food.
Grilling Function
This function is used for grilling and toasting foods, use the highest shelf guide slot
(keep food 30 mm from the elements). Lightly brush the shelf with oil to stop foods
sticking and place foods in the centre of the shelf. Always place a tray beneath to catch
any drips of oil or fat.
Faster Grilling Function
This function is used for faster grilling and for covering a larger surface area, such as
grilling meats, which tend to take up more room.
Baking Tips
1. Always place baking tins in the centre of the wire shelf.
2. Make sure you use bakeware that is oven proof.
3. Do not place bakeware too close to the rear of the oven wall.
4. You can influence the degree of browning by changing the temperature setting.
5. If a cake collapses after removing it from the oven:
• Use less liquid on your next attempt.
• Consider using a longer baking time or use a slightly lower temperature setting.
Energy Saving
To save energy and to help protect the environment, we recommend these hints:
• Preheat the oven only if expressly required by the recipe or guidelines.
• Dark baking tins have a higher degree of heat absorption.
• In the case of longer baking times, you can switch off the oven 5–10 minutes before the full
baking time and use the residual heat. This will reduce energy usage.
• Use the oven efficiently, by cooking many trays of food at the same time.
• Cook 2 trays of scones, small cakes or sausage rolls at the same time.
• Select the correct shelf location for food being cooked.
• Do not open the oven door more than necessary.
MBCONW_X10N_IB_101013_Zell.indb 8 13/10/2010 2:45 PM

9
GB
Cleaning and Maintenance
Cleaning Tips
1. Allow the oven to fully cool before cleaning. Remove the wire shelves, wash them separately in hot
soapy water and dry thoroughly.
2. Wash the interior of the oven with hot soapy water and wipe down with a damp cloth.
3. Leave the door open until the interior has dried, before replacing the wire shelves.
4. Clean the oven after each use, especially after roasting or grilling, this will prevent spilt or splattered
food debris burning and becoming difficult to remove.
5. Do not use abrasive pads to clean the interior of the oven as this may remove the enamel, which will
affect the efficiency of your oven.
6. Steam cleaners must never be used to clean this oven.
Cleaning the Outside of the Oven
1. You should regularly wipe over the control panel and oven door using a soft cloth and liquid
detergent as spilt liquids may damage the finish.
2. Wash enameled or chrome plated parts of the oven with hot soapy water or with non-abrasive
detergents.
3. Never use abrasive pads to clean enameled, chromed or stainless steel surfaces.
4. When using commercially available stainless steel cleaning products, avoid cleaning any lettering or
symbols, as they can become damaged.
Cleaning the Oven Door Glass
Do not use harsh abrasive cleaners or sharp metal scrapers to clean the oven door glass since they scratch
the surface, which may result in shattering of the glass.
Ensure that the appliance is switched off and isolated before
cleaning the oven to avoid the possibility of electric shock.
MBCONW_X10N_IB_101013_Zell.indb 9 13/10/2010 2:45 PM

10
GB
Removing the Door for Easier Cleaning
1. We recommend you have someone to assist you during removal
of the door.
2. Open the door completely.
3. The door hinge has a small latch. Lift the latch on both hinges.
4. Lift the door slightly as if closing, and then with both hands
supporting the door, pull it away from the oven.
5. To replace the door, perform the above in reverse order. Open
and close the door to make sure that it has been fitted correctly.
Taking out the Glass from the Oven Door for Cleaning
1. Remove the oven door.
2. Undo the screws from the metal panel that holds the glass
in place.
3. Lift the glass out of the frame. Clean it using appropriate
glass cleaning products.
4. To replace the glass, place it back in, placing the securing
caps
over the top of the glass and screw it back into place.
5. Ensure the glass is not damaged in any way.
Replacing the Oven Light
1. Turn off the oven and make sure that it is cold. Switch off its
isolation switch.
2. After removing the cover in front of the light, take out the bulb.
3. Insert the new bulb, which should be resistant to 300°C. For
replacement bulbs contact your local service centre.
4. Re-fit the cover.
5. If in any doubt, consult a qualified electrician for help.
It may require a little force due to the adhesive
pads under glass.
Ensure that the appliance is switched off before replacing
the light to avoid the possibility of electric shock.
Bulb specifications
230V~ 50 Hz, 25W, E14
MBCONW_X10N_IB_101013_Zell.indb 10 13/10/2010 2:45 PM

11
GB
Specification
Model MBCONW10N / MBCONX10N
Rated Voltage 230-240V
Rated Frequency 50 Hz
Power 3200-3500 W
Current 13 – 15 A
Top Element 1200 W
Bottom Element 1100 W
Grill 2000/3200 W
Net Weight 30.2 kg
Product Dimensions 59.5 x 59 x 57 cm
Usable Oven Capacity 61 Litres
Energy Efficiency Class A
Features and specifications are subject to change without prior notice.
MBCONW_X10N_IB_101013_Zell.indb 11 13/10/2010 2:45 PM

12
GB
Installation
Use a Competent Person or Qualified Electrician
• This oven must be installed in compliance with local safety standards.
• Wiring connections must be in accordance with Local Wiring Rules and any particular conditions of the
local authority.
• Refer to data plate for rating information. The data plate is positioned behind the bottom of the oven
door. The circuit diagram is positioned on the rear panel of the appliance.
• A means of disconnection with a contact separation of at least 3mm must be supplied in the fixed
wiring.
• This appliance must be properly earthed.
• Do not lift the appliance by the door handles.
• Prepare the cupboard opening to match your appliance measurements. (See diagrams)
• Slide appliance into the cupboard, ensuring that the supply cable (where fitted) does not kink.
• To prevent tipping, secure your oven into the cupboard by fastening with the 4 screws supplied.
• The cabinet must be suitable for use with built in ovens. Installation into low temperature tolerant
cabinetry (e.g. Vinyl coated) may result in deterioration of the low temperature coating by discolouring
or bubbling.
• We cannot accept responsibility for damage caused by installation into low temperature tolerant
cabinets.
• After installation, test and ensure that the appliance operates correctly.
The oven is intended for housedhold use only.
The manufacturer reserves the right to introduce changes which do not aect the operation of the
appliance.
The electrical connection of this oven should be carried out by a competent person, if in doubt
consult a qualified electrician, according to the instructions in this installation section and in
compliance with the current regulations.
To avoid any potential hazard, you must follow our instructions when you install your appliance.
Failure to install the appliance correctly could invalidate any warranty or liability claims.
MBCONW_X10N_IB_101013_Zell.indb 12 13/10/2010 2:45 PM

13
GB
Installing the Built-in Oven
1. The space where the oven will be placed needs to be at least 60cm wide, 58cm deep and 59.5cm high.
A minimum gap of 2.5cm between the work surface and the control panel, and a distance of 5cm
between the work surface and top of the oven is needed, in order to be able to get to the back of the
oven if necessary and for easy access when sliding the oven out.
2. Once the oven has been positioned into the gap, the front frame of the oven can be fixed to the
surrounding kitchen unit using the mounting screws and secured into place with the spacers and
screws.
Cabinet cut - out sizes
59.5cm
58cm
56cm
60cm
Countertop
Built-in oven
Min.2.5cm
Control
panel
Distance between
countertop and
control panel
Built-in hob
Distance between
countertop and
top panel of built-in
oven
Min. 5cm
55.5cm
55.5cm 57cm
Mounting screws
57cm
59cm
59.5cm
B
240°
Front
frame
Spacer
Mounting
screw
Wooden
part
Cabinet cut - out sizes
59.5cm
58cm
56cm
60cm
Countertop
Built-in oven
Min.2.5cm
Control
panel
Distance between
countertop and
control panel
Built-in hob
Distance between
countertop and
top panel of built-in
oven
Min. 5cm
MBCONW_X10N_IB_101013_Zell.indb 13 13/10/2010 2:45 PM

14
GB
Making an Electrical Connection
An approved suitable cable must be connected from the Consumer Unit (main fuse box)and be protected
by its own fuse or Micro Circuit Breaker (MCB) of the appropriate value. If in doubt consult a qualified
electrician..
The electrician must provide a fused double-pole isolation switch, which disconnects both the line (live)
and neutral conductors, with a contact separation of at least 3 mm incorporated into the fixed wiring.
The fused switch should be fitted to the kitchen wall, and must be placed in an easy accessible position
in accordance with IEE regulations. The fused switch should be connected to a socket on the wall behind
the oven. If no switch or socket are available contact a qualified electrician to install one. The oven’s power
supply cable can then be connected. Ensure the socket is switched off and plug the oven into the socket.
The power supply cable must be positioned away from direct heat sources. It should not be subjected to a
temperature rise of more than 50°C above room temperature.
Green & Yellow = Earth
Blue = Neutral
Brown = Live
1. The wire which is coloured green
and yellow must be connected to the
terminal marked E ( ) Earth.
2. The wire which is coloured blue must
be connected to the terminal marked
N (Neutral).
3. The wire which is coloured brown
must be connected to the terminal
marked L (Live).
The plug and socket must be accessible
after installation, or an all-pole
disconnection switch provided in the fixed
wiring in accordance with the local wiring
regulations.
Power Connection Box
Should the mains lead of the appliance ever require replacing, we recommend that this be carried out by a
qualified electrician who will replace it with a lead of the same size and temperature rating.
THIS APPLIANCE MUST BE EARTHED.
The flexible mains lead is supplied connected to an IEC 60083 C4 (Schuko type) plug, having a 16 Amp
capacity. If this plug does not fit the socket in your home, it should be replaced with a suitable plug as
outlined below.
The wires in the mains lead are coloured in accordance with the following code:
L
N
Live (Brown)
Earth
(Green/Yellow)
Neutral (Blue)
Cord Clamp
3X1,5 mm2, H05V V-F
Type power supply cord must be used.
Grounding lead must be connected
to screw with symbol
MBCONW_X10N_IB_101013_Zell.indb 14 13/10/2010 2:45 PM

15
NO
Gratulerer med kjøpet av din nye Matsui innbyggingsovn.
Du må lese manualen for å forstå hvordan å installere og bruke den riktig.
Les alle advarslene nøye før bruk og oppbevar denne manualen for fremtidig referanse.
Utpakking
Fjern all emballasje fra enheten. Ta vare på emballasjen. Hvis du kaster det kan du gjøre det i
henhold til lokale bestemmelser.
Følgende elementer er inkludert:
Dyp langpanne x 1
(PN 20612977)
Langpanne x 2
(PN 20612976)
Hovedenheten
Rist x 1
(PN 37010933)
Instruksjons- / Installasjonshåndbok
(PN 52036913-v2)
250°
290°
TBA
MBCONW_X10N_IB_101013_Zell.indb 15 13/10/2010 2:45 PM

16
NO
250°
290°
250°
290°
Produktoversikt
Sett forfra
1. Kontrollpanel 2. Spor for langpanne
Kontrollpanel
1 2
34
1. Funksjon Selector-kontroll 2. Termostatkontroll
3. Stekeovn indikatorlampe 4. Termostatlys
1
2
250°
290°
240°
MBCONW_X10N_IB_101013_Zell.indb 16 13/10/2010 2:45 PM

17
NO
Funksjon Selector-kontroll
• Denne kontrollen blir brukt til å velge tilgjengelige matlagingsfunksjoner, som er:
Symbol funksjonsbeskrivelse
Ovnslampen slås på.
Stekeovnens termostat og varsellys og de nedre og øvre
varmeelementene slås på.
Stekeovnens termostat og varsellys og det nedre
varmeelementet slås på.
Stekeovnens termostat og varsellys og det øvre
varmeelementet slås på.
Stekeovnens termostat og varsellys og grill varmeelementet
slås på.
Stekeovnens termostat, varsellys, grill og det øvre
varmeelementet slås på.
Termostatkontroll
Temperaturen kan stilles fra 50 °C - 290 °C. Velg ønsket temperatur, som
følger:
For å holde maten varm 50-100 °C posisjon
For tradisjonell ovn matlaging 50-290 °C posisjon
For alle typer grilling 190 °C posisjon
250°
290°
Bruk
Førstegangsbruk av stekeovnen
Pakk ut stekeovnen. Fjern eventuelle innsatser og all plast. Bruk en fuktig klut til å tørke forsiktig inne i
stekeovnen. Rengjør alle de løse delene i varmt såpevann før bruk.
Slå stekeovnen på maks varme i 45 minutter. Det kan være litt røyk og lukt ved første oppstart (i ca 15 min).
Dette er normalt. Det er på grunn av det beskyttende stoffet på varmeelementene som beskytter dem fra
effektene av korrosjon under transport fra fabrikken.
250°
290°
MBCONW_X10N_IB_101013_Zell.indb 17 13/10/2010 2:45 PM

18
NO
Bruk av stekeovnen
• Under ingen omstendigheter bør stekeovnen være foret med aluminiumsfolie
slik at overoppheting kan oppstå. Plasser ikke retter eller stekebrettet direkte på
bunnen av stekeovnen som blir veldig varm slik at skader kan oppstå.
• Brød kan ta fyr hvis den ristes for lenge. Nøye overvåking er nødvendig under
ristingen.
• Apparatet blir varmt under bruk. Unngå å berøre varmeelementene inne i
stekeovnen.
• Tilgjengelige deler kan bli varme under bruk. Små barn bør holdes unna.
Spor 6
Spor 5
Spor 4
Spor 3
Spor 2
Spor 1
1. For å få det beste resultatet er minsteavstanden
mellom maten og det øvre varmeelementet
30 mm.
2. På veggene inne i stekeovnen det 6 forskjellige
spor for rist / langpanne. Du kan plassere rist
/ langpanner i forskjellige høyder for å oppnå
best stekeresultat avhengig av varmen fra
varmeelementene og størrelsen på maten. Hvis
bare det øvre varmeelementet er på, foreslår vi
at du plasserer langpannen på spor 6 (sørg for
at det er en avstand på minst 30 mm mellom
maten og det øvre varmeelementet).
3. Overvåk alltid maten under tilberedningen for å
sikre at du ikke er kokt det.
4. For tung mat, bruk langpanne i stedet for rist.
5. Velg ovnsfunksjonen du ønsker. Velg ønsket temperatur.
6. Før du plasserer maten i stekeovnen kan det være nødvendig å forvarme stekeovnen i 10 minutter.
7. Temperaturlyset vil slukke når den valgte temperaturen er nådd.
8. For å slå av stekeovnen sett funksjonshjulet i av-stilling“0”.
Skifte anti-vippe hylle
• Sett hyllen i en vinkel til den vertikale delen bak i stekeovnen for å
fjerne stoppere på hver side av sporet. Når hyllen er forbi stopperne
kan den plasseres i plan igjen.
• Hvis du vil ta ut hyllen, vinkler du den oppover slik at den er helt fri
fra hyllestopperne og stopperne i sporet.
MBCONW_X10N_IB_101013_Zell.indb 18 13/10/2010 2:45 PM

19
NO
Funksjoner
Beskrivelse av funksjoner
Statisk stekefunksjon
Den statiske tilberedningsfunksjon avgir varme, noe som sikrer jevn steking i både
øvre og nedre del. Dette en utmerket funksjon for å lage bakverk, kaker, bakt pasta,
lasagne og pizza.
Undervarmefunksjon
Undervarmefunksjonen er ideell for oppvarming av pizza, da varmen stiger fra bunnen
av stekeovnen og varmer opp maten i stedet for å steke den.
Overvarmefunksjon
I denne typen matlaging, steker varmen som kommer fra det øvre varmeelementet
oversiden av maten. Den øvre oppvarmingsfunksjonen er egnet til steking av
oversiden av ferdigmat mat og oppvarming av mat.
Grillfunksjon
Denne funksjonen brukes til grilling og ristet mat, bruk det høyeste hyllesporet (hold
maten 30 mm fra elementene). Hyllen kan børstes lett med olje for å unngå at maten
setter seg fast. Plasser maten i midten av hyllen. Plasser alltid en langpanne under for å
fange olje eller fett.
Rask grillfunksjon
Denne funksjonen brukes for raskere grilling og dekker en større overflate, for
eksempel grilling av kjøtt som har en tendens til å ta opp mer plass.
Baketips
1. Plasser alltid kakeformer i midten av hylleristen.
2. Kontroller at du bare bruker bakeformer som er ovnssikre.
3. Plasser ikke bakeformer for nær baksiden av ovnsveggen.
4. Du kan påvirke graden av bruning ved å endre temperaturinnstillingen.
5. Hvis en kake kollapser etter at den tas ut av stekeovnen:
• Bruk mindre væske på neste forsøk.
• Vurder å bruke en lengre steketid, eller bruke en litt lavere temperatur.
Energisparing
For å spare energi og for å beskytte miljøet, anbefaler vi disse tipsene:
• Forvarm stekeovnen bare hvis det uttrykkelig kreves av oppskriften eller retningslinjene.
• Mørke kakeformer har en høyere grad av varmeabsorpsjon.
• Ved lengre steketid, kan du slå av stekeovnen 5-10 minutter før full baking tid og bruk restvarmen.
Dette vil redusere energiforbruket.
• Bruk stekeovnen effektivt, med flere brett med mat på samme tid.
• Bak to brett med scones, småkaker eller pølseruller på samme tid.
• Velg riktig plassering av hylle / langpanne for maten som skal stekes.
• Ikke åpne ovnsdøren mer enn nødvendig.
MBCONW_X10N_IB_101013_Zell.indb 19 13/10/2010 2:45 PM

20
NO
Rengjøring og vedlikehold
Rengjøringstips
1. La stekeovnen bli fullt avkjølt før rengjøring. Fjern rister, vask dem separat i varmt såpevann og tørk
grundig.
2. Vask innsiden av stekeovnen med varmt såpevann og tørk over med en fuktig klut.
3. La døren stå åpen til interiøret har tørket, før du setter hyllene tilbake.
4. Rengjør stekeovnen etter hver bruk, spesielt etter steking eller grilling. Dette vil hindre søl eller sprutet
matrester brenner og bli vanskelig å fjerne.
5. Ikke bruk skrubber for å rengjøre innsiden av stekeovnen, da dette kan fjerne emaljen, noe som vil
påvirke effektiviteten av stekeovnen.
6. Damprengjøringsmidler må aldri brukes til å rengjøre denne stekeovnen.
Rengjøring av utsiden av stekeovnen
1. Du bør regelmessig tørke over kontrollpanelet og døren med en myk klut og flytende vaskemiddel
siden sølte væsker kan skade overflaten.
2. Vask emaljerte eller forkrommede deler av stekeovnen med varmt såpevann eller med ikke-slitende
rengjøringsmidler.
3. Bruk aldri skrubber for å rengjøre emaljerte, forkrommet eller rustfritt stål.
4. Ved bruk av kommersielt tilgjengelige rengjøringsmidler for rustfritt stål, unngå rengjøring av
bokstaver eller symboler da de kan bli skadet.
Rengjøring av glasset i ovnsdøren
Ikke bruk sterke skuremidler eller metalliske skraper for å rengjøre glasset i ovnsdøren siden de vil ripe
overflaten, noe som kan føre til glasset knuses. Kontroller at apparatet er slått av og isolert før rengjøring
av stekeovnen for å unngå fare for elektrisk sjokk.
Sørg for at apparatet er slått av og isolert før stekeovnen
rengjøres for å unngå muligheten for elektrisk støt.
MBCONW_X10N_IB_101013_Zell.indb 20 13/10/2010 2:45 PM
This manual suits for next models
1
Table of contents
Languages:
Other Matsui Oven manuals