manuals.online logo
Brands
  1. Home
  2. •
  3. Brands
  4. •
  5. Matsushima
  6. •
  7. Monitor
  8. •
  9. Matsushima PFM-KCU01 User manual

Matsushima PFM-KCU01 User manual

This manual suits for next models

3

Other Matsushima Monitor manuals

Matsushima PFM-AD12 User manual

Matsushima

Matsushima PFM-AD12 User manual

Matsushima PFM-KCU14 User manual

Matsushima

Matsushima PFM-KCU14 User manual

Matsushima PFM-M01E User manual

Matsushima

Matsushima PFM-M01E User manual

Matsushima PFM-AP01 User manual

Matsushima

Matsushima PFM-AP01 User manual

Matsushima PFM-AD12S User manual

Matsushima

Matsushima PFM-AD12S User manual

Popular Monitor manuals by other brands

Samsung ME32C user manual

Samsung

Samsung ME32C user manual

ViewSonic VA926-LED user guide

ViewSonic

ViewSonic VA926-LED user guide

Furuno Mu 120c Operator's manual

Furuno

Furuno Mu 120c Operator's manual

Asus VB171D - 17" LCD Monitor Service manual

Asus

Asus VB171D - 17" LCD Monitor Service manual

AOC 9GLR Technical specifications

AOC

AOC 9GLR Technical specifications

DMG RAFFAELLO manual

DMG

DMG RAFFAELLO manual

AOC LM720 - 17" Technical specifications

AOC

AOC LM720 - 17" Technical specifications

Sony Trinitron GDM-F500 Service manual

Sony

Sony Trinitron GDM-F500 Service manual

Memorex MT1701 user guide

Memorex

Memorex MT1701 user guide

ViewSonic VE510s-4 Service manual

ViewSonic

ViewSonic VE510s-4 Service manual

Farenheit T-1503CM instruction manual

Farenheit

Farenheit T-1503CM instruction manual

Ditel DINOS DN129/AT Quick installation guide

Ditel

Ditel DINOS DN129/AT Quick installation guide

Sony SDM-S51 Specifications

Sony

Sony SDM-S51 Specifications

Kenwood DMX1025BT quick start guide

Kenwood

Kenwood DMX1025BT quick start guide

Dell S2409WFP user guide

Dell

Dell S2409WFP user guide

EverFocus EN-7517E instruction manual

EverFocus

EverFocus EN-7517E instruction manual

Dell P3222QE user guide

Dell

Dell P3222QE user guide

Panasonic TH152UX1 - 152" PLASMA TV Service manual

Panasonic

Panasonic TH152UX1 - 152" PLASMA TV Service manual

manuals.online logo
manuals.online logoBrands
  • About & Mission
  • Contact us
  • Privacy Policy
  • Terms and Conditions

Copyright 2025 Manuals.Online. All Rights Reserved.

TPFM-008E
Rev1:Feb.3,2016
Contents
SafetyPrecautions・・・・・・・・・・・・・・1
1.Outline・・・・・・・・・・・・・・・・・2
             2.Specification・・・・・・・・・・・・・・3,4
             3.Systemconfigurationchart・・・・・・・・5
             4.Shape(roughdrawing)・・・・・・・・・・・5
5.Mountingmethod・・・・・・・・・・・・・6
             6.Howtoconnect・・・・・・・・・・・・・・7,8
             7.Partnamesandfunctions・・・・・・・・・9
             8.Startup・・・・・・・・・・・・・・・・・10,11
9.SetupexampleofParameter・・・・・・・・12
             10.Maintenance・・・・・・・・・・・・・・・13
11.Troubleshooting・・・・・・・・・・・・13
INSTRUCTION MANUAL
FOR
Dust Monitor
TYPE
PFM-KCU01(Transducer)
PFM-M01PEX(Sensor)
Z961/Z964(Zenerbarrier)
※
You, an excellent operator, please read the manual for Model thoroughly and
operate Model effectively for your factory and for yourself and thank you!!
1-8-18Norimatsu-Higashi,Yahatanishi-ku,Kitakyushu807-0837Japan
PhoneNo.(8193)691-3731FaxNo.(8193)691-3735
http://www.matsushima-m-tech.com
E-mailsales@matsushima-m-tech.com
-
1
-
Safety Precautions
Be sure to thoroughly read the instruction manual before using the products.
Keep the instruction manual in a safe, convenient location for future reference.
All or part of the contents described in this manual may be changed without any notice.
Due to our constant striving for further improvement of products, parts or products that differ from those
described in this manual may be substituted.
WARNING
(Failure to observe this WARNING may cause a fatal or serious injury.)
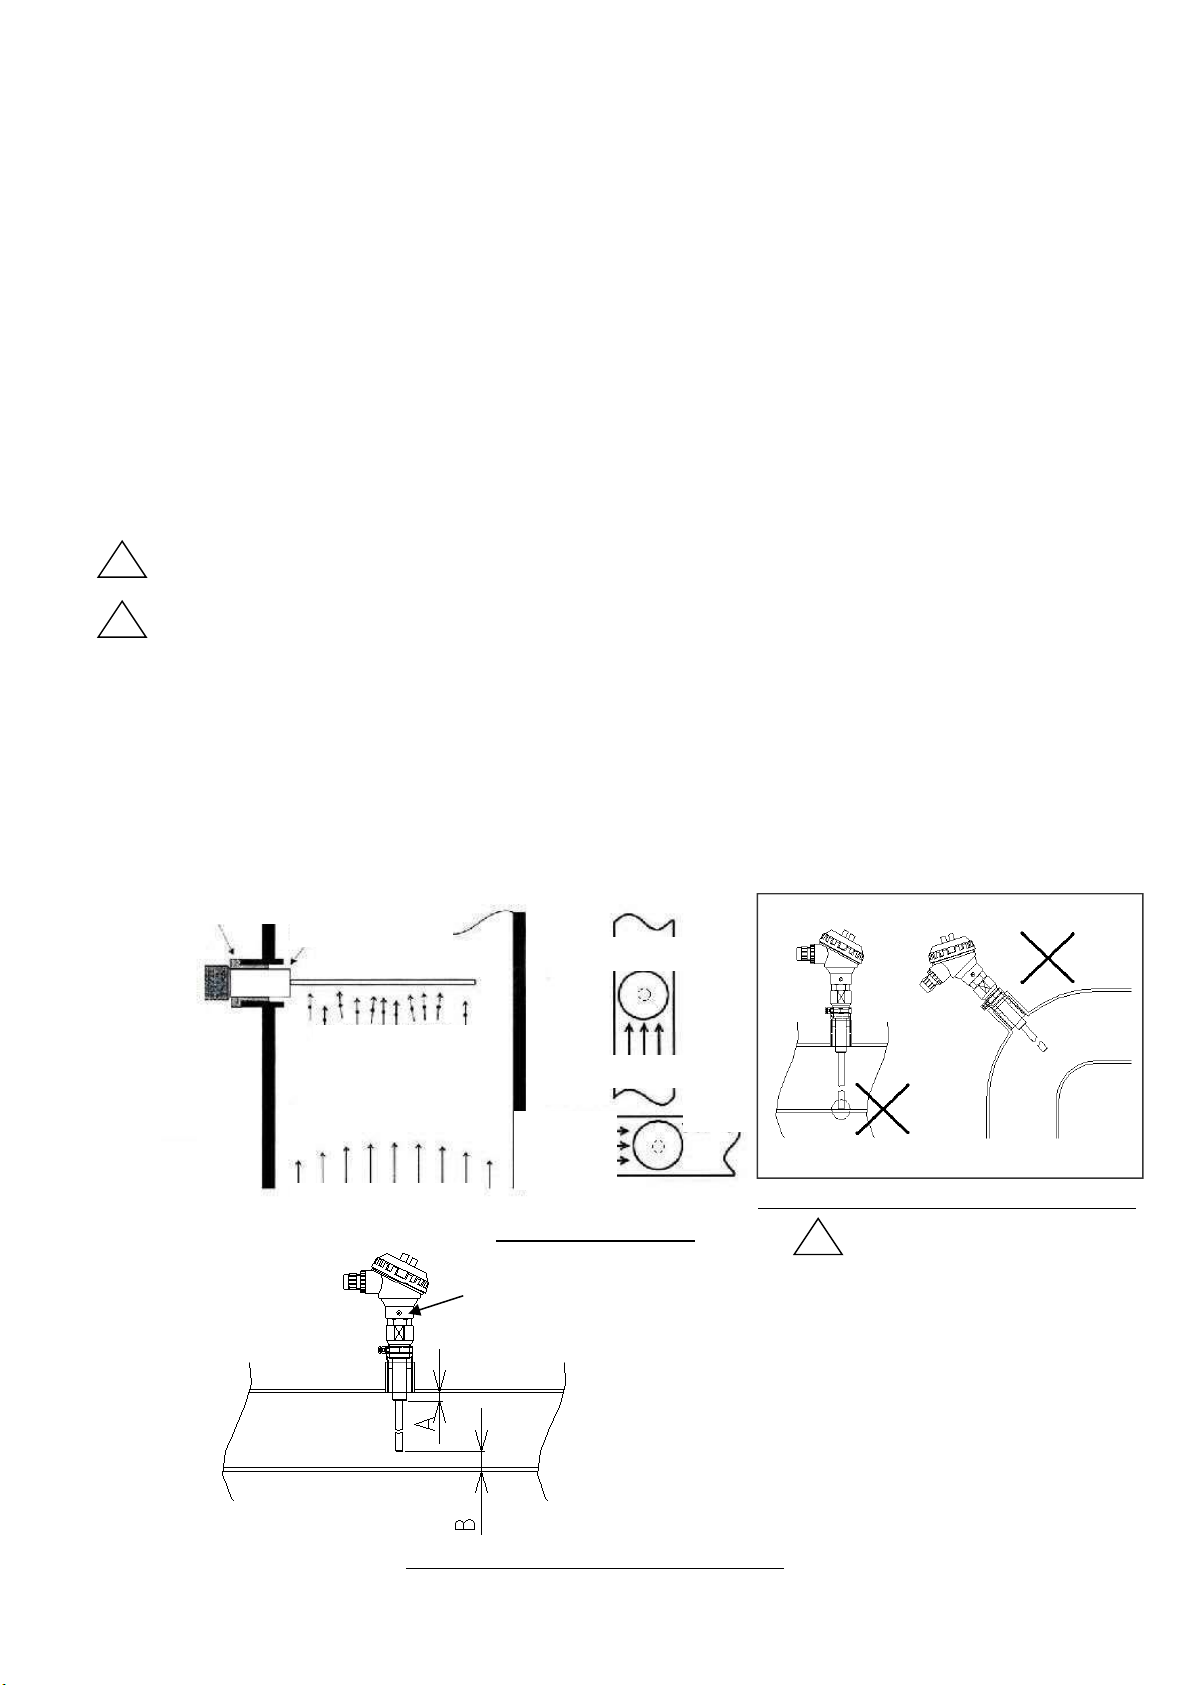
Be sure to confirm that any peripheral equipment does not move before installation work.
In addition, observe safety requirements for installation work where high-place work is expected.
Be sure to turn off the power source before wiring, mounting and transportation work. (Failure to observe
this WARNING may result in an electric shock/ injury or equipment damage due to short-circuit.)
Carry out wiring work correctly with reference to a proper drawing.
Never disassemble the equipment. (Failure to observe this WARNING may result in an electric shock.)
Do not open the cover under an explosive environmental condition when power is entered. (Failure to
observe this WARNING may result in an injury or equipment damage.)
Do not place or store the equipment in any hostile environmental place where it will be subjected to direct
sunlight, rain, water droplet, hazardous gas/water, etc..
CAUTION
(Failure to observe this CAUTION may cause a moderate injury or equipment damage.)
Do not use the equipment for any purpose other than the original purpose of use.
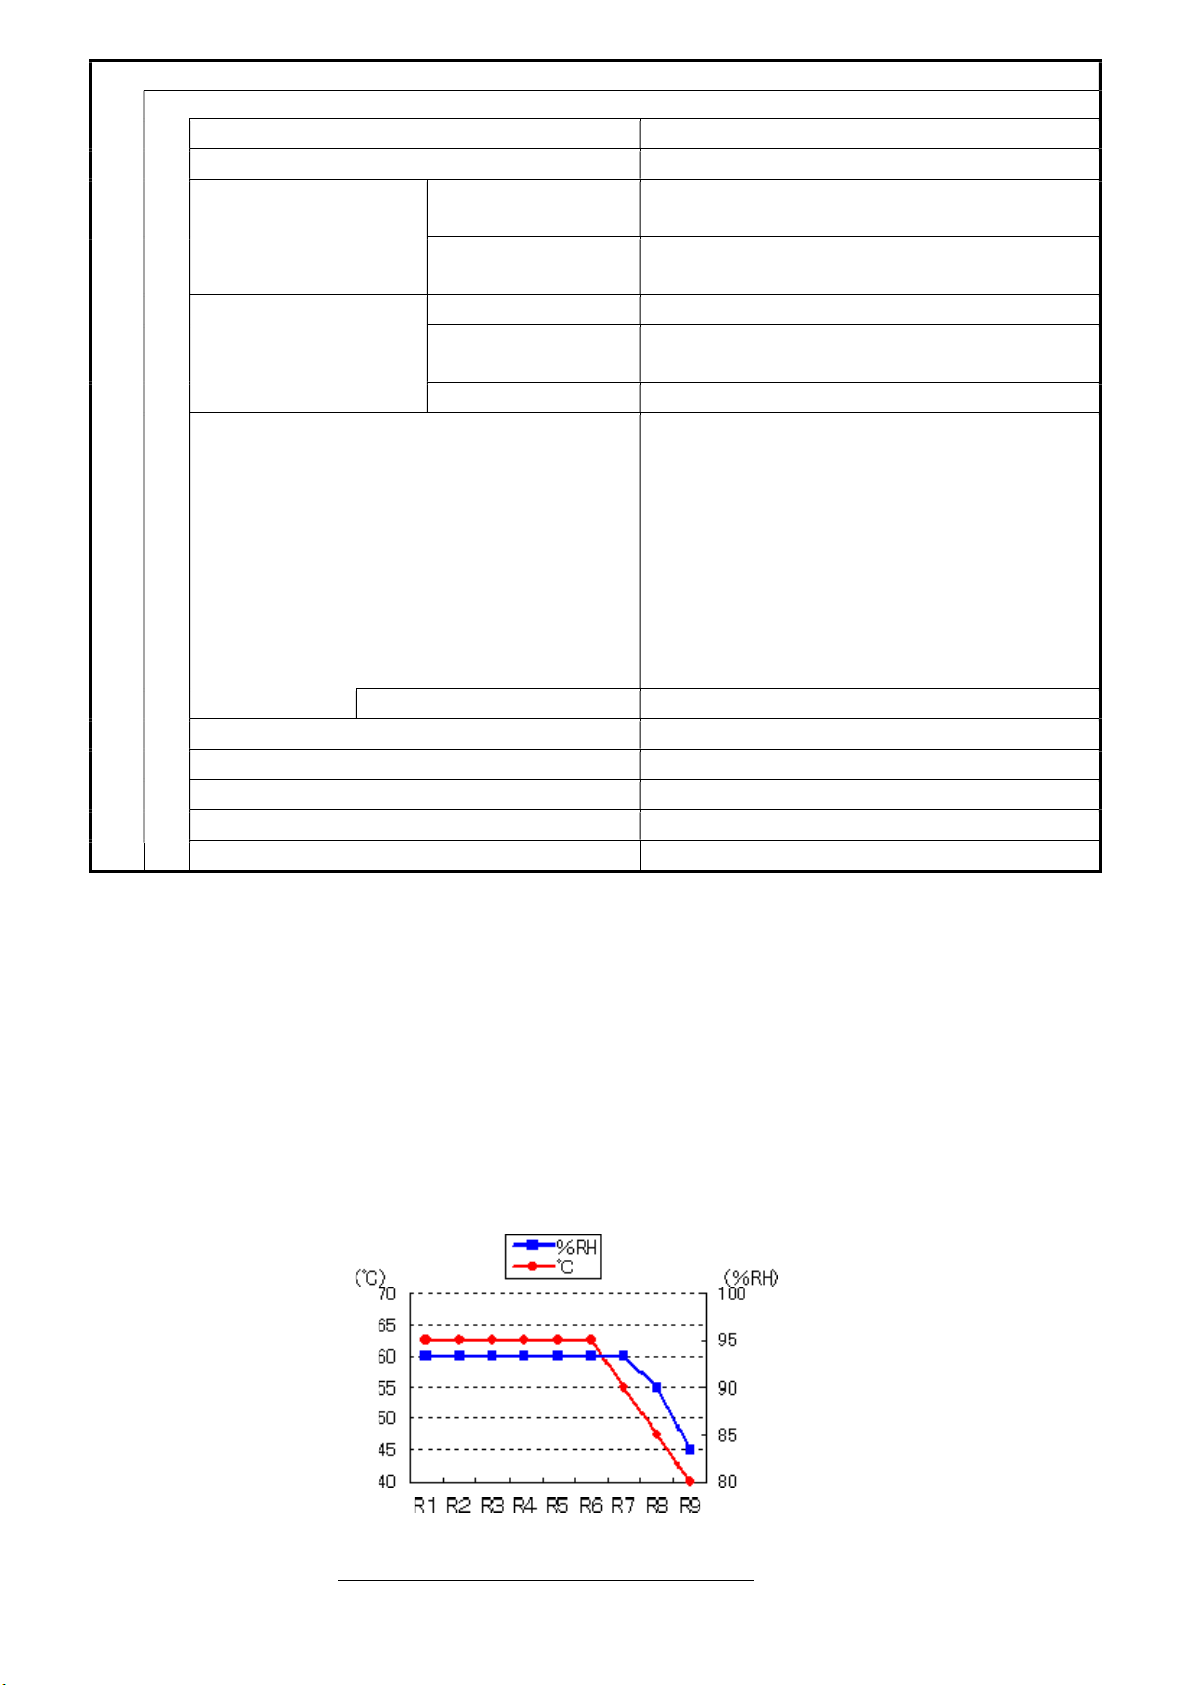
Be sure to confirm the specification of equipment and use the equipment within the range of specification.
(Mounting conditions such as temperature, power source, frequency, etc.)
Make sure a correct wiring before applying power source.
Do not have a shock or strong impact to the equipment.
(Failure to observe this CAUTION may result in equipment damage.)
Be sure to connect necessary terminals (grounding, etc.).
Remove all wiring to the equipment before doing electrical welding work near the equipment.
Do not forcedly bend or pull the lead wire also do not use unnecessarily long wire.
Tighten the cover, lead outlet, etc. properly so that dust, rainwater, etc. do not enter inside the equipment.
Do not use the equipment under a corrosive condition (NH
3
, SO
2
, CI
2
, etc.).
Be sure to tighten the cable grand so that outer air does not enter inside the equipment.
When applying piping connection such as conduit, etc. instead of cable grand, apply putty or equivalents
on the cable entry so that outer air does not enter inside the equipment.
IMPORTANT
(indicates notes or information to help customers.)
Limitations of Warranty:
Warranty period shall be one year from the date of delivery (ex-factory).
Any damage of any other products that have occurred for use of the equipment is not covered by
this warranty. Also any loss induced by failure or malfunction of the equipment is not covered by
this warranty.
Failure or malfunction caused by following are not covered by this warranty:
a. Modification or repair by a party other than MATSUSHIMA’s authorized personnel,
or replacement of parts not recommended by MATSUSHIMA.
b. Inadequate storage, installation, use, inspection or maintenance that does not comply
with specifications.
c. Cause for any peripheral equipment or device.
d. Accident beyond control and force majeure (fire, earthquake, flood, riots, etc.).
Lack of instructions to MATSUSHIMA for information or safety requirements that can be predicted only
by customers’ side.
This warranty conditions do not limit customers’ legal right.
Price for the equipment does not include any charge for services such as commissioning,
supervising, etc..
!
!
!
-
2
-
1.Outline
   Electricchargewillgeneratewhenanumberofcorpusclecontainedingaspassthroughand/or
getintouchwithprobeofdustmonitorequippedwithduct,plumbingpipe,etc.
Thedustmonitoramplifiesthis"Displacementofthecharge"withthesensor,andsendsthe
amplifiedslightsignaltotheoutputunit.
Thiselectricsignal"Displacementofthecharge"isbothfilteredandamplifiedandthenoutput
instrumentationsignalof4〜20mAinproportiontodustamountandcontactsignalaswell.
Important:ViewfordensityofdustmonitorperFrictionElectrificationMechanism
OutputvalueofFrictionElectricChargeMechanicdustmonitorwillbevariabledueto
variousenvironmentalfactorssuchas「kindofparticle」「particlediameter」「specificgravity
「currentspeed」throughmeasureprinciple.
   Underaregularenvironment,however,linearcharacteristicwillnotofcoursevaryunderthat
environment.
AstoconsideringdensityregardingtoDustMonitorofFrictionElectricChargeMechanism,
itrequiresyoutoconsiderinfluenceduetovariationofparticlecharacteristicsasafore
mentionedanditdoesnotalwaysmeetdensityspecified.
   Densityindicatedonspecificationisfordesigndevelopmentofmachineryandispublicized
foryoucustomerstouseasaguidelineindecidingtherange.
   Whenyoucustomersdecidetherange,youpleasefindtherangeandsetitinwhichalarmlevel
iseasytosetstrictlyfrom0−100%signalandbecomespulsesignal.
   Bydoingso,youcanrealizeyourmanagementofexhaustdrift.
   Ifthereisaneedherebytoexecutedensitymanagement,youarerecommendedtodecidedensity
equivalentto0-100%.
   Ondecidingabove,youpleaseinvestigatedensityofpulseandyoucanreadsignalasdensity
fromcurrentsignalofmachinerybyjointlyutilizingintegralfunction,etctogettherange
acquiringsignalnearesttoactualdensityof0−100%.
(Thevalueyoucangetiscompensatedandisarelativeconversionvaluebutnotabsolute.)
   Theexplosion-proofconstructionofthisproductisExibⅡBT4(TIIS).
ItiscomposedofSensor,Zenerbarriers,andTransducer.
PleasesetupSensorinhazardousarea,andsetupZenerbarriersandTransducerinSafety
area.
TherangeofHazardousareaisZone1orZone2.
ThisSensorcannotbeinstalledontheplaceofZone0.
   PleasewireforSensorandZenerbarrierwithaexclusivelineshildedcable.
   PleasewirebetweenZenerbarriersandtheOutputunitbysimilarexclusivelineshilded
cable.
!
-
3
-
2.Specification
1.Type
Sensor PFM-M01PEX
Outputunit PFM-KCU01
Zenerbarrier Z961
Zenerbarrier Z964
2.Structural Sensor+Zenerbarrier+Outputunit(Separate)
3.Necessaryconditionsformeasuring
1)Gasemissions
terms
Temperature ≦60℃
Pressure ≦200kPa
Humidity ≦40vol%
Flowrate ≧4m/s
2)Dustterms Size ≧0.3μm
Concentration 0.1〜1000mg/m3
4.Equipmentspecification
Sensor
1)Approval ExibⅡBT4(TIIS)
2)Protection Dust-proofandSplash-proofconstruction
3)Rating Uo=17.4V,Io=190.3mA,Po=430mW
4)Temperature(※1) -20℃〜+60℃
※Noncondensing
5)Humidity(※2) ≦95%RH
※Condition:Stateofcasesealingup
6)Mounting R1Screw(1Socketbelonging)
7)Wiringdistance
(max.100m)(※3)
BetweenSensorand
Zenerbarrier
5m(Exclusiveusecable)
BetweenSensorand
Zenerbarrier
0.4m(Exclusiveusecable)
8)Length  (※4) Probe L1 300mm
Isolation L2 58mm(Permissiblelength:50〜550mm)
9)Mass. Approx.1.3kg
Zenerbarrier(Z961)
1)Approval 〔Exib〕ⅡB
2)InternationalProtection IP20
3)Rating Uo=17.4V,Io=190.3mA,Po=430mW
Um=AC250V50/60Hz,DC250V
4)Temperature -20℃〜+60℃
※Noncondensing
5)Humidity Max.75%
6)Mass. Approx.150g
Zenerbarrier(Z964)
1)Approval 〔Exib〕ⅡB
2)InternationalProtection IP20
3)Rating Uo=17.4V,Io=190.3mA,Po=430mW
Um=AC250V50/60Hz,DC250V
4)Temperature -20℃〜+60℃
※Noncondensing
5)Humidity Max.75%
6)Mass. Approx.150g
-
4
-
※1)Themaximumtemperatureisdifferentaccordingtotherange.(Refertoafigure1.)
※2)Thepermissiblehumidityisdifferentaccordingtothecookingstove.(Refertoafigure1.)
※3)WiringdistanceisadditionbetweenSennsor,Barrier,andOutputunit.
Thecableisaspecialcable.
※4)Themaximumlengthis1000mm.
Pleasecalculate"Maximumlength"bythecalculatingformulaofL1+L2.
※5)Thereferencedensitywhenstandardfineparticle"Talc"ismeasuredatflowvelocity
10m/sisshown.
Thedifferenceisinthisdensitybecauseofanactualmeasurementfineparticleand
theenvironment.
 ※Theprobeshouldnotbetoucheddirectlybyhand.
 ※Asafecircuitisgrounded.
  Therefore,pleaseavoidtheexecutionofthewithstandvoltagetest.
4.Equipmentspecification
Outputunit
1)Powersupply(Pleasespecifyit) AC110V/220V-15%/+10% 50/60Hz
2)Powerconsumption 7VA
3)Outputsignal
Analogsignal DC4〜20mA×1(max.23.3mA)
Load:Max.500Ω(Isolated)
Relayoutput
signal
1-Alarm:1C(AC250V,2A/DC30V,2A)
2-Upperlimit:2C(AC250V,2A/DC30V,2A)
4)Display
Power Green(ON=点灯)
Alarm 1-Alarm:Red(ON=点灯)
2-Upperlimit:Yellow(ON=点灯)
Concentration Digital4segmentdisplay(0.0〜118.5%)
5)Measuringrange
 (※5)
9changes
Range1:0.1〜1000mg/m3
Range2:0.1〜500mg/m3
Range3:0.1〜200mg/m3
Range4:0.1〜100mg/m3
Range5:0.1〜 50mg/m3
Range6:0.1〜 20mg/m3
Range7:0.1〜 10mg/m3
Range8:0.1〜 5mg/m3
Range9:0.1〜 2mg/m3
 Setvaluewhenshipping Range4
6)Integrationtime 0〜30s
7)Temperature -20℃〜+50℃ ※Noncondensing
8)InternationalProtection IP20
9)Mounting WalltapestryorDIN-Rail
10)Mass. Approx.0.7kg
Fig.1.Graphoftemperatureandhumidity
Range
-
5
-
3.Systemconfigurationchart
4.Shape(roughdrawing)
Fig.2.Systemconfigurationchart
・Itbecomesthesystemconfigurationoftheexplosion-proofwithSensor×1setand
Zenerbarrier×2sets.
・
Rating:
「Uo=17.4V,Io=190.3mA,Po=430mW」
AC110V
AC220V
Hazardousareathatcanbeinstalled(※
ThisSensorcannotbeinstalledontheplaceofZone0.)
Zone1/Zone2
Hazardousarea Safetyarea
Sensor
PFM-M01PEX
Zenerbarrier
Z961
Zenerbarrier
Z964
Outputunit
Power
Pleaseconnectearthterminalseparately
.
A-classgrounding(withtheground
 resistanceof10Ω orless.)
5P
5N
OUT
GND
1
2or3
4
1
2or3
4
8
6or7
5
8
6or7
5
Exclusiveline
Shieldedcable
※1)
PleasedetachAbetweensocketandinsulator10mmormore.
※2)
RefertothespecificationsforlengthL1,L2.
※3)
Theprobeshouldbetoucheddirectlybyhandwithoutgroundingwhilebeingenergized.
※4)
Pleasebesuretoconnectearthterminal.
※5)
PleasetightentheBoltandNutwhenyouinstallit.
※6)
Pleasemakesurethattheleadoutletisfirmlyclosedsothattheoutsideairdoesnot
invadeinsidetheunit.
Whereitisconnectedbypipingconstructionsuchasconduitsystem,
pleaseapplyputtyandsoontotheleadcableentrysothattheoutsideairdoesnot
invadeinsidetheunit.
※7)
PleasecomplytoA-classgrounding(Withthegroundresistanceof10Ωorless)alone.
Fig.3.Shape(roughdrawing)
Safetyarea Hazardousarea
Outputunit Zenerbarriers Sensor
80
66
60
68
1
4
6
4-φ5Mtg.Holes
35mmDIN-Rail
12.5
115
(115.7)
35mmDIN-Rail
(90)(57)L2(※2)L1(※2)
(30) (85)
LeadoutletG1/2
Housing
Earthterminal
M4screw(※4)
Mtg.BossR1
1-socketL=43mm
Insulator:PTFE(※1)
Probe:SUS316L(※3)
M5Bolt,Nut
(※5)
EarthterminalM3screw(※7)
Exclusiveline
Shieldedcable
Exclusiveline
Shieldedcable
-
6
-
D
ustmonitor
Insulation
Probe
Directionofflow
Probe
Direction
of
flow
Directionofflow
Probe
Exhaustgas
R1Attachmentscrew
5.Mountingmethod
    TomountDustMonitor,1-socketisprovidedwith.
    Weldthesocketontothepipe.Installthedustmonitorsoitishorizontalorvertical.
Weldingshouldexecuteallaroundthepipetoshutoffgas.
  5-1.Precautionformounting
    DustMonitormaymal-functioninanenvironmentaslistedhereunder.
MountingMonitorinsuchenvironmentshouldberefrainedfrom,please.
(1) Plumbingpipetobeextremelysqueezedorclosetoaplacebending.
(2) Mountingpositionwithindiameterofductor1.5ofverticaldimension.
(3) Nearafan
(4) Fittingplumbingpipe・shortpipe・ductarenonconductive.
(5) Measureenvironmentandconditionsareoutofspecification.
(6) Incaseraisingbulkupwithshortpipeinaplacewheredustsaccumulatebetweenshort
pipeandprobe.
(7) Placewheretipofprobeiswithin20mmfromplumbingpipe.
Important:Wiringofpowerandsignalshouldbeindependent,please.
 Capisfortransportprotectionandisnotaraincoat.
Attention:・Exclusivecableistransmittingveryweaksignal.
Cableshouldbeprotectedwith,byallmeans,steelmadeelectricwirepipe
independentlysothatinductivenoiseformambientareadoesnotbothersignal.
・Securelyclosetheleadoutlettopreventoutsideairfromenteringinthemain
unit.
DonotremovetheaccessorySilicagel.(fordehumidification)
・Whereusingconduitpipingandsooninsteadofcablegrand,besuretoapply
puttyorlikeatcableentrysothatambientairdoesnotcomeintotheunit.
・IsolatetheOutputunitfromtheouternoisesourcesandtakeanymeasureagainst
noiseiftheremaybeanynoisefrompowersupply/signallines.
Fig.4.Installation
Fig.6.Installationreferencefigure
!
!
※ClearanceA≧10mm
※
Clearance
B
≧
2
0mm
Important:
ForinstallationofProbe,
PlaceR1Attachmentscrew,
theninsertProbeandtighten
M5boltandnutonthesideof
R1Attachmentscrew.
Formaintenance, byloosening
boltandnut,youcanpullout
Probe.
!
Fig.5.Example)Installationnotgood
-
7
-
6.Howtoconnect
①
②
② AttachingScrewCover
AttachingScrewCover
Upper:Mainblockpart
Lower:Terminalblockpart
ThereareAttachingScrewCoversatupperandlower
portionsofasurfaceofaTransducer.
Pleaseremovethecoverswithanegativedriverorthe
like.
Pleasekeepthecoverswhichyouremoved.
Pleaseattachthecoverwhichyoukeptafterwiring.
Fig.7.Removingcover
Aterminalblockpartisjoinedtoamainblockpart
withfourpointsofscrewsandconnectors.
Youcanseeascrewjoiningtotheterminalblockpart
underholesforTransducerattachingwhenyouremove
theattachingscrewcovers.
Pleaseloosenthesejoiningscrewsofthe
terminalblockpartwithaPhillipsdriver.
YoucanseetheterminalblockoftheTransducerwhen
youremovethemainblockpartfromtheterminalblock
partafterhavingloosenedtheseJoiningScrews.
Joining
Screws
Mtg.Hole
Mtg.Hole
Mtg.Hole
Mtg.Hole
Fig.8.Joiningscrewsofterminalandmainblockpart
Fig.9.Terminalpart
Board(Terminal)
Powerterminal
DC4-20mterminal
Sensorterminal
Connector
(mainblockpart)
Relayterminal
Whenyouwiretheterminalblockoftheconverter,you
mustnotmakeanyfalsewiring.
Afterwiring,pleaseattachthemainblockpartwith
theprocedurethereverseofhowtoremovethemain
blockpart.
-
8
-
Fig.4.Connection
※Aboutthe
grounding
constructionofZenerbarriers.
PleasecomplytoA-classgrounding(Withthegroundresistanceof10Ωorless)alone.
Important:EMC-cableglandisusedforSensor.
Again,whenwiring. Figure.11.becomespointsofwiring. 
White
Electronicsubstrate
ofSensor
HousingofSensor
ExclusivelineShieldedcable
Pleaseconnectearthterminalseparately
.
A-classgrounding.
EMCcable
gland
Sensor
PFM-M01PEX
Zenerbarrier
Z961/Z964
Outputunit
PFM-KCU
Black
Brown Brown Brown Brown
Yellow Yellow Yellow Yellow
White White White
Green
Green
Green Green
Black
Black
Hazardousarea Safetyarea
Powersupply
AC110V/220V
(
-
15
〜
+10
%
)
Alarmcontact
(SPDT)
Ac250V,2ADC30V,2A
Upperlimit1
(SPDT)
Ac250V,2ADC30V,2A
Upperlimit2
(SPDT)
Ac250V,2ADC30V,2A
Analogoutputsignal
DC4〜20mA
LoadMax.500Ω
Line-connectingterminal:
Max.1.5mm2(Outputunit)
!
Fig.10.Connectiondiagram
(Componentpart)
Packing Body
Shield-ring
Rubberbush
Clampingmember
Cap
(
2
)
Completiondrawing
(1)
85
(
3
)
5
(
4
)
Packing
(1)
PleasepassCap,Clampingmember,andRubber
bushthroughthecable.
Pleasepeeloffthecablecoveringfrom
thevergebythelengthof85mm.
(2)
Pleasemaketheshieldlineasunder.
Pleasewrapanasundershieldline
asshowninleftfigure.
(3)
PleasepassShield-ringthroughthecable.
Pleasepeeloffthecoverofthecorewireby5mm.
Please use solderless terminal with insulating
coatingofStick-typebythree(brown,yellow,and
white)corewires.
Agreencorewiremustusethepressureterminalof
Rtype(R1.25-4).
(4)
PleasepassBodyandPackingthroughthecable,and
installitsothattheshieldlinemaysurelycome
incontactwiththeShield-ring.
Fig.11.becomespointsofwiring.
-
9
-
7.Partnamesandfunctions
     (1) RANGE: measurerange(1、2、3、4、5、6、7、8、9)set
     (2) L1ON: setONpointoflimit1(setrange:0〜100%)
     (3) L1OFF: setOFFpointoflimit1(setrange:0〜100%)
     (4) L2ON: setONpointoflimit2(setrange:0〜100%)
     (5) L2OFF: setOFFpointoflimit2(setrange:0〜100%)
            MinimumrangeofHysteresisisstill1%.
     (6) INTEGRATIONTIME: Integraltimeset(setrange:0〜30s)
【forindication】
POWER LED:Lightonaspoweron
FAULT LED:CPUonwhenabnormal
L1ONLED:Lightonoverlimit1set
L2ONLED:Lightonoverlimit1set
4beamsindicateLED:detectiondensity
willindicateper0-100%complyingwith
setup.
【forbutton】
→:  use when changing beam of
number/value.
↑: usewhenincreasingnumber/value.
MOD
: usewhenswitchingparameterset
modeandmeasuremode.
     Pushingaftersetchangewill
memorizeparameterandreturntomeasure
mode.
SELECT
:
     Usewhenswitchingsetitems.
F−RESET
:
     Usewhensettingmeasureagain.
%
Fig.12.FrontpanelofOutputunit
MatsushimaMeasureTechCo.,Ltd.
MADEINJAPAN