manuals.online logo
Brands
  1. Home
  2. •
  3. Brands
  4. •
  5. maxill
  6. •
  7. Accessories
  8. •
  9. maxill u-test User manual

maxill u-test User manual

Popular Accessories manuals by other brands

Quincy lab 140AE-1 operating manual

Quincy lab

Quincy lab 140AE-1 operating manual

HomePro ZIR000 user manual

HomePro

HomePro ZIR000 user manual

DOL 20SCR Technical user guide

DOL

DOL 20SCR Technical user guide

RAB Smart Task installation manual

RAB

RAB Smart Task installation manual

Kemppi KMS 300 quick guide

Kemppi

Kemppi KMS 300 quick guide

Stearns 57,500 Series Installation and service instructions

Stearns

Stearns 57,500 Series Installation and service instructions

iGuzzini TWILIGHT COPENAGHEN manual

iGuzzini

iGuzzini TWILIGHT COPENAGHEN manual

Adelaide Annexe & Canvas Avan Deluxe installation guide

Adelaide Annexe & Canvas

Adelaide Annexe & Canvas Avan Deluxe installation guide

OHAUS 5000 instruction manual

OHAUS

OHAUS 5000 instruction manual

HOME8 WLS1300 quick start guide

HOME8

HOME8 WLS1300 quick start guide

MAXBOTIX MaxSonar quick start guide

MAXBOTIX

MAXBOTIX MaxSonar quick start guide

ioSmart iSmart56 Installation and user guide

ioSmart

ioSmart iSmart56 Installation and user guide

Focusrite Scarlett 18i8 user guide

Focusrite

Focusrite Scarlett 18i8 user guide

Velleman ED38105 user manual

Velleman

Velleman ED38105 user manual

JumpSport SkyBounce user manual

JumpSport

JumpSport SkyBounce user manual

Prima-Temp PRIYA Instructions for use

Prima-Temp

Prima-Temp PRIYA Instructions for use

Tefcold BC85I-BC85I W user manual

Tefcold

Tefcold BC85I-BC85I W user manual

Vaisala WMS302 user guide

Vaisala

Vaisala WMS302 user guide

manuals.online logo
manuals.online logoBrands
  • About & Mission
  • Contact us
  • Privacy Policy
  • Terms and Conditions

Copyright 2025 Manuals.Online. All Rights Reserved.

(1) Description
(1.2) Installing The Device
(1.2.1) Place the incubator on a level and horizontal surface.
(1.2.2) Insert the column connector of the adapter into the
device, then plug the adapter into a wall outlet.
(1.2.3) Power ON the main switch. The incubator is ready to
operate when the display becomes visible.
(1.3) Crushing a SCBI
(1.3.1) Insert one third of the way into crusher and push side-
ways to break the vile.
(2) Technical Data
Model u-test
Power supply DC, 24 V
Power 35 W
Temperature range 20°C ~ 80°C
Accuracy of the temperature ≤ ± 0.5°C
Display accuracy 0.1°C
Heating time (from 20°C to 80°C) ≤ 10min
Ambient temperature 5°C ~ 35°C
Dimensions (W×D×H) 110 mm x 150 mm x 85 mm
Weight 0.65 kg
Incubator - Manual
Manual Continues on Reverse
Display
Panel
Block
Power Switch
Power Connector
Crusher
DC 24 V
110 V
The power connector is on the rear of the device,
DC, 24 V input, inside is “+”, Outside is “-”.
(3) Safety Precautions
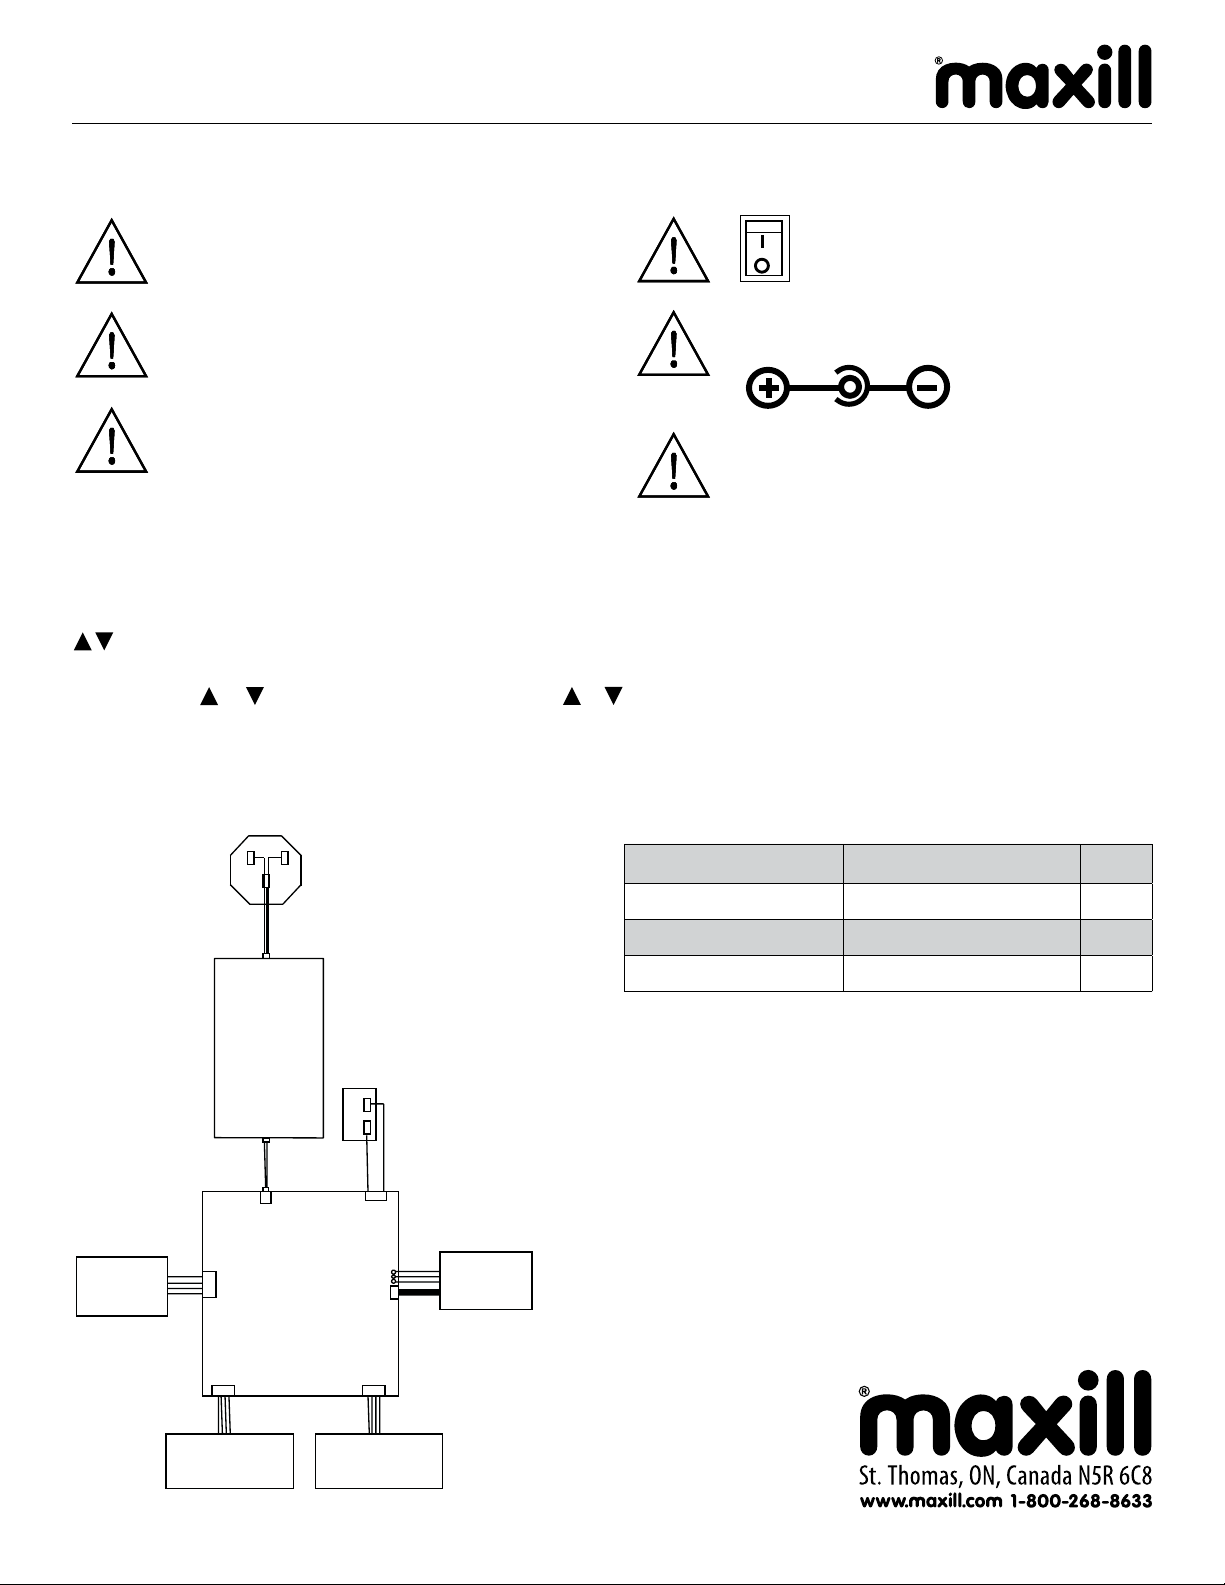
Wiring Diagram for Incubator Packing List
Read this manual completely before operating.
Opening or tampering with the unit will void
the manufacturer’s warranty and may cause
electrocution.
The unit should be stored and operated in a
clean, dry place at ambient room temperature.
The unit should be shielded from exposure to
direct sunlight, strong lamps, corrosive materials,
magnetic fields and heat sources.
The main power switch is located on the
rear of the unit. Push“I” to power on the
unit and push “O” to power off the unit.
Turn the power off when the unit is not in use. If
the unit will not be used for an extended period
of time, remove the power cord/adapter and
cover the unit to shield it from contaminants.
(4) Operation Guide
(4.1) Control elements
for setting the temperature.
(4.2) Setting temperature
Press and hold or until the cursor appears, then press or to adjust the temperature.
Item Type QTY
Incubator u-test 1
Adapter 24 V, 2 A 1
Manual 1
Revision 0: 22 November 2012
110 V
Main Switch
Adapter
24 V, 2 A
Heater
J8 J10
J4
J2
J1
Sensor Main
Board
PanelDisplay
J3