MAXTOOLS JSL280 User manual

Manuale d’uso / User manual / Mode d’emploi / Bedienungsanleitung / Manual del usuario
JSL280 | JSL350
Jump Starter Lithium 12V

2
JSL280 | JSL350

3
Italiano 4
English 12
Français 20
Deutsch 28
Español 36
JSL280 | JSL350

4
1. PERICOLO: LEGGERE ATTENTAMENTE TUTTE LE INFORMAZIONI DI
SICUREZZA DEL PRODOTTO PRIMA DELL’USO. Il mancato rispetto delle
istruzioni può causare ESPLOSIONI E INCENDI con grave rischio per la
salute dell’operatore, morte, danneggiamento del prodotto e di cose.
2. Il prodotto è un avviatore di emergenza per veicoli con batteria 12V,
l’avviamento di altri tipi di veicoli può essere pericoloso.
3. NON usare l’avviatore al posto della batteria del veicolo
4. Il prodotto NON è un giocattolo, tenere al di fuori della portata dei bambini,
non utilizzare con bambini nelle vicinanze.
5. Utilizzare per l’avviamento SOLO con i cavi forniti nella confezione.
6. Indossare occhiali e guanti protettivi quando si utilizza il prodotto. Le
batterie possono esplodere e scagliare frammenti a distanza. L’acido in esse
contenuto è altamente corrosivo e può causare gravi danni agli occhi e alla
pelle. In caso di contatto con l’acido sciacquare con acqua abbondante e
rivolgersi ad un medico.
7. L’avviatore deve essere ricaricato per mezzo del cavo in dotazione, da
connettere esclusivamente ad una presa USB 5V.
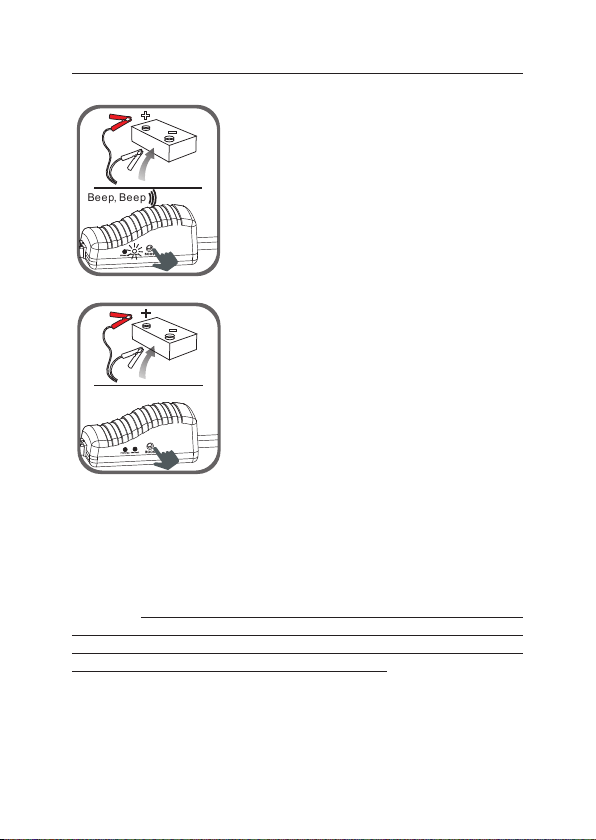
8. Identificare attentamente la corretta polarità della batteria prima di effettuare
il collegamento delle pinze.
9. La pinza negativa NON deve essere collegata a carburatori, tubi del
carburante, parti metalliche sottili.
10. Se il veicolo non si avvia al primo tentativo, attendere due minuti prima di
riprovare. Dopo cinque avviamenti senza esito attendere almeno 10 minuti
prima di riprovare per lasciar smaltire il calore generato.
11. Scollegare le pinze dalla batteria subito dopo l’avviamento ed al massimo
entro 30 secondi.
12. NON conservare in ambienti oltre i 60°C, ricaricare esclusivamente a
temperature tra 0°C e 45°C ed in ambienti ben aerati, a idonea distanza da
materiali infiammabili.
13. NON esporre alla pioggia, non immergere in acqua.
Italiano
ATTENZIONE

5
Italiano
14. NON avvicinare il prodotto al fuoco o a oggetti molto caldi, rischio grave di
incendio ed esplosione.
15. NON utilizzare il prodotto in atmosfera potenzialmente esplosiva o in presenza
di liquidi o materiali infiammabili.
16. È consigliabile rimuovere braccialetti, collane o anelli durante l’uso
dell’avviatore.
17. NON usare l’avviatore se presenta segni di caduta, rotture, danneggiamenti,
se i cavi non sono integri.
18. Lasciar riposare l’avviatore qualche minuto prima di ricaricarlo dopo un
avviamento
19. Non utilizzare l’avviatore se l’avviatore stesso è sotto carica.
20. In caso di uso estremo e al di fuori dal consentito la batteria dell’avviatore
può perdere del liquido. Questo liquido è corrosivo e pericoloso, evitare
accuratamente ogni contatto con la pelle e gli occhi. In caso di contatto lavare
con abbondante acqua e contattare un medico.
21. L’avviatore contiene una batteria al litio che a fine vita deve essere smaltita
secondo le Norme in uso.

6
Grazie per aver scelto un prodotto MaxTools.
Seguire accuratamente le istruzioni contenute nel presente manuale.
La non osservanza delle disposizioni di sicurezza può causare danni a cose e
persone, e danneggiare irreparabilmente il dispositivo.
Conservare il Manuale per future consultazioni.
DESCRIZIONE PRODOTTO
1. Ingresso cavi con pinze
2. Porta USB 5V 2.1A
3. Porta USB per ricarica ultrarapida
4. Lampada LED
5. Pulsante
6. Indicatore
7. Presa di ricarica Micro-USB
8. Uscita 15V 10A
Ingresso cavi con pinze Porta USB per ricarica veloce
Cavo di avviamento intelligente
Italiano
1
6
5
3
247
5
6
1
2
3478
Presa di ricarica Micro-USB JSL350 - Uscita 15V 10A
Caricatore
ultrarapido QC3.0 Alimentazione di
dispositivi a 12V
JLS280
JLS350

7
ISTRUZIONI PER L’USO
Indicatore
Premere il pulsante per controllare lo stato di carica del dispositivo.
Indicatore Spento 1 Led 2 Led 3 Led 4 Led
Livello carica 0% 25% 50% 75% 100%
L’indicatore lampeggerà un led alla volta durante la ricarica. Le luci fisse indicano
il livello di carica. L’indicatore si spegne a carica completa.
Istruzioni per la ricarica
1. Connettere il cavo USB al caricatore e collegarlo ad una presa di corrente.
2. Collegare il cavo Micro-USB alla presa di ricarica ultrarapida del dispositivo.
In alternativa, collegare il cavo Micro-USB alla presa di ricarica del dispositivo
quindi connetterlo ad un porta USB attiva.
Italiano

8
Bee p, Bee p
Beep, Beep
Bee p, Bee p
Beep, Beep
LED VERDE fisso:
Indica la connessione corretta e avviatore
attivo. Si può procedere all’avviamento.
LED ROSSO
lampeggiante e “beep”:
Indica l’inversione di polarità. Invertire la
connessione immediatamente.
1. Il dispositivo deve essere ben carico, con i quattro
LED blu dell’indicatore accesi.
2. Inserire il connettore blu del cavo con pinze
nell’ingresso 12V (1) assicurandosi che non ci
siano indicatori LED accesi.
3. Connettere la pinza rossa al terminale positivo
(+) della batteria oppure al polo positivo remoto.
Connettere la pinza nera al polo negativo (-) della
batteria oppure al polo negativo remoto.
4. È importante che la connessione venga fatta con
entrambi i lati della pinza saldamente ancorati sul
metallo. In caso di depositi solforosi sul polo, questi
devono essere preventivamente rimossi.
Avviamento di emergenza
Italiano

9
Bee p, Bee p
Beep, Beep
Bee p, Bee p
Beep, Beep
LED VERDE
lampeggiante e “beep”:
Batteria del veicolo molto scarica. Premere
il pulsante BOOST per due secondi e quindi
procedere all’avviamento.
LED spenti e nessun “beep”:
Indica batteria veicolo assente o interrotta.
Premere per due secondi il pulsante BOOST e
quindi procedere all’avviamento.
5. Avviare il veicolo per un massimo di 3 secondi e far riposare almeno tre
minuti tra un tentativo ed il successivo.
6. Quando il veicolo è in moto rimuovere una pinza alla volta, riporre i cavi
avviamento nella custodia e ricaricare il dispositivo appena possibile.
Attenzione: quando viene premuto il pulsante BOOST per più di due secondi, viene
inibita per 30 secondi la funzione di sicurezza del dispositivo. È importante che, ad
avviamento effettuato, i cavi vengano rapidamente disconnessi dalla batteria, per
non sottoporre il dispositivo ad un pericoloso sovraccarico.
Italiano

10
SPECIFICHE TECNICHE
JSL280 JSL350
Capacità batteria litio (LiPo)* 13.000 mAh (48.1 Wh) 17.000 mAh (62.9 Wh)
Uscite
5V-2.1A; Ricarica
veloce (5V-2.4A; 9V-2A;
12V-1.5A),12V per avviamento
5V-2.1A; Ricarica veloce
(5V-2.4A; 9V-2A; 12V-1.5A),
15V 10A; 12V per avviamento
Ingresso Ricarica veloce 5V / 9V Ricarica veloce 5V / 9V
Tempo di ricarica Max 3 ore Max 4 ore
Ampere di Avviamento 500A 700A
Ampere di picco 1500A 2100A
Temperature di utilizzo -20°C / 60°C -20°C / 60°C
Dimensioni 151x81x32 mm 231.5x90.5x29.5 mm
Peso 440 gr 605 gr
(*) Batteria al Litio-Polimero
Ricarica di telefoni e tablet
1. Connettere il dispositivo elettronico alla porta USB per la ricarica veloce (3).
2. Premere il pulsante dell’avviatore per avviare la ricarica, il caricatore
riconoscerà automaticamente l’amperaggio di cui necessita il dispositivo
da ricaricare.
Alimentazione di dispositivi a 12V
1. Collegare il cavo di ricarica (non incluso) alla porta di uscita 15V 10A (8).
2. Collegare l’altro capo del cavo al dispositivo 12V.
3. Premere il pulsante (5) per avviare la carica.
Utilizzo della lampada LED
Premere per 3 secondi il pulsante per accendere la lampada. La luce può essere:
Fissa, Lampeggiante, SOS.
Italiano

11
PROBLEMI / SOLUZIONI
Problema Causa Rimedio
L’avviatore non è
completamente carico
anche se i LED sono
accesi
In caso di lungo
inutilizzo il dispositivo
potrebbe non essere
completamente carico
anche se i led sono
accesi
Ricaricare l’apparecchio
connettendolo al suo
caricatore per qualche ora
Premendo l’interruttore i
LED non si accendono
È entrata in funzione
la protezione di basso
voltaggio
Connettere subito
il dispositivo al suo
caricabatteria
D: Come si spegne il dispositivo?
R: Il dispositivo si spegne da solo automaticamente quando non c’è carico o
quando la ricarica è completa.
D: Quante volte posso ricaricare il mio telefono?
R: Con questo dispositivo potete in media ricaricare fino a 5-8 volte il vostro
smartphone.
D: Quanto tempo impiega l’avviatore a caricarsi completamente?
R: Se il dispositivo è completamente scarico possono essere necessarie max 4 ore.
D: Per quante volte il dispositivo carico al 100% è in grado di avviare un veicolo a
benzina di media cilindrata?
R: 20-30 volte, dipende da altri fattori quali la temperatura e lo stato della batteria
del veicolo.
D: Ogni quanto tempo devo caricarlo?
R: Consigliamo vivamente di caricarlo almeno una volta ogni tre mesi o dopo ogni
utilizzo.
DOMANDE PIÙ FREQUENTI
Italiano

12
1. PRIOR TO USE,READ AND UNDERSTAND PRODUCT SAFETY INFORMATION.
Failure to follow the instructions may result in EXPLOSION OR FIRE
which may result in serious injury, death and damage to device or
property.
2. The product is a jump starter for vehicles with 12V battery, other jumping
would be dangerous.
3. DO NOT use in place of vehicle battery.
4. The product is not a toy, keep out of reach of children, do not use it if children
are close to the vehicle.
5. Only the use of Original Equipment cable set is admitted to jumpstarting.
6. Wear eye protection and gloves when operating product. Batteries can
explode and cause flying debris. Battery acid is very dangerous for eyes and
skin. In the case of contamination flush affected area with running clean
water and contact poison control immediately.
7. Charge using the cable provided, to be connected only to a 5V USB socket.
8. Carefully check the battery polarity before to connect the clamps, DO NOT
short circuit the clamps
9. Black clamp must be connected to a proper vehicle mass, DO NOT connect to
carburetor, gasoline hoses or thin metal parts.
10. Wait at least two minutes before following jumpstart if the first one has not
been successful. After 5 attempts in a row you must stop for at least 10
minutes to allow the internal heat dissipate.
11. After successfully starting the vehicle remove the clamps from the battery
before 30 seconds.
12. DO NOT store in locations where the temperature may exceed 60°C, charge
the product only between 0°C and 45°C in well ventilated areas and at proper
distance from flammable materials.
13. DO NOT expose the product to rain or water.
WARNING
English

13
14. DO NOT expose the product to fire or to very hot objects, high risk of explosion
or fire.
15. DO NOT operate the product in explosive atmospheres or in presence of
flammable liquids or materials.
16. Remove personal metal items like rings, bracelets or necklaces when
jumpstarting a vehicle.
17. Carefully check the product before use in search of cracks, damages, shock
marks.
18. After jump start a vehicle, don’t charge the unit immediately.
19. DO NOT use the unit to jumpstart a vehicle while charging the internal battery
20. Under extreme conditions the internal battery may leak. If a liquid is noticed
coming from the product do not handle with bare hands and avoid any
contact with eyes or skin. In case of contact wash with cold running water for
at least 10 minutes and get medical attention immediately.
21. The product contains lithium batteries, at the end of his life dispose in
accordance with local regulations.
English

14
Thank you for choosing a MaxTools product.
We advise you to carefully follow the instructions contained in this manual.
Non-compliance with the safety regulations can lead to damage to persons or
goods and cause irreparable damage to the device.
Keep this instruction Manual for future consultations.
PRODUCT DESCRIPTION
English
1. Jump start socket
2. 5V 2.1A output port
3. Quick Charge output port
4. LED Flash Light
5. Switch
6. Indicator
7. 5V 2A input port
8. 15V 10A output port
Jump start socket Quick Charge output port
Intelligent jumper cable
Quick Charge input port JSL350 - 15V 10A output port
Home ultra charger
QC3.0 For 12V vehicle
products
1
6
5
3
247
5
6
1
2
3478
JLS280
JLS350

15
INSTRUCTIONS FOR USE
Indicator
Press the push button in order to check the charge state of the device.
Indicator Switched off 1 Led 2 Led 3 Led 4 Led
Charge level 0% 25% 50% 75% 100%
The indicator will flash one by one during the period of charging. Different number
of solid indicators show different storage level of Jump Starter. All indicators light
off when the charging is paused or completed.
Recharge instructions
1. Connect the USB cable to the charger and plug it into a power outlet.
2. Connect the Micro-USB cable to the ultra-fast charging socket of the device.
Alternatively, connect the Micro-USB cable to the charging socket of the device
then connect it to an active USB port.
English

16
English
Bee p, Bee p
Beep, Beep
Bee p, Bee p
Beep, Beep
GREEN LIGHT on:
Telling the connection is correct and the circuit
is working, you can turn on the engine to jump-
start directly.
RED LIGHT on with buzzing:
Indicates reversed polarity. Invert the connection
immediately.
1. Connect the blue plug fully seated into the host,
and make sure the Cable Indicator is off.
2. Connect Red Clamp to the positive (+) battery
terminal, Black Clamp to the negative (-)
battery terminal.
3. Operate following the instruction of the Cable
Indicator:
Jump start 12V vehicle Instruction

17
Bee p, Bee p
Beep, Beep
Bee p, Bee p
Beep, Beep
GREEN LIGHT blinking with
buzzing:
Indicates very low battery. Press the BOOST
button for two seconds and then jump start the
engine.
No Lights on, No buzzing:
Indicates absent or interrupted vehicle battery.
Press the BOOST button for two seconds and
then jump start the engine.
English
4. Turn the ignition key for a maximum of 3 seconds and then wait for a further
3 minutes before attempting to jump start again.
5. When the engine is running, remove one clamp at a time, return the clamps
to their housing and recharge the starter as soon as possible.
Note: when the BOOST button is pressed for over two seconds, the security function
of the device is inhibited for 30 seconds. Once the engine has been jump started,
the cables must be quickly disconnected from the battery in order not to overload it.

18
English
TECHNICAL SPECIFICATIONS
Charging of cell phones and tablets
1. Plug the switch cable to Quick Charge output port.
2. Select appropriate connector and connect it to your mobile phones or tablet.
3. Touch the switch button, it can recognise electronic products’s suitable
parameters, start to charge for mobile phone/tablets etc.
For power supply to 12V vehicle products or 12V electronics
1. Connect the charging cable (not included) to the 15V 10A output port (8).
2. Connect the other end of the cable to the 12V device.
3. Press the button (5) to start charging.
Use of the LED lamp
Press the switch 3 seconds to start the LED flash light.
There are 4 modes of LED light appear in order (normal, strobe. SOS, off) if you
press slightly.
JSL280 JSL350
Lithium Battery Capacity (LiPo)* 13.000 mAh (48.1 Wh) 17.000 mAh (62.9 Wh)
Outputs
5V-2.1A; Quick Charge
(5V-2.4A; 9V-2A;
12V-1.5A),12V jump start
5V-2.1A; Quick Charge
(5V-2.4A; 9V-2A; 12V-1.5A),
15V 10A; 12V jump start
Input socket Quick Charge 5V / 9V Quick Charge 5V / 9V
Recharge time Max 3 hours Max 4 hours
Cranking Ampere 500A 700A
Peak Ampere 1500A 2100A
Operating temperatures -20°C / 60°C -20°C / 60°C
Sizes 151x81x32 mm 231.5x90.5x29.5 mm
Weight 440 gr 605 gr
(*) Lithium polymer Battery

19
PROBLEMS / SOLUTIONS
Problem Cause Solution
The jump starter is not
fully charged despite the
LEDs being switched on
If not used for a long
period of time, the
device could not be fully
charged despite the
LEDs being on
Recharge the device by
connecting it to its charger
for a few hours
By pressing the push
button, the LEDs do not
switch on
Low-voltage protection
has been activated
Connect the device to its
charger immediately
Q: How do I switch off the device?
A: The device shuts down automatically when it is not on charge or when the
recharge process is over.
Q How many times can I recharge my cell phone?
A:This device allows you to recharge your smartphone up to 5-8 times on average.
Q: How long does the charger provided take to recharge the jump starter?
A: If the device is completely dead, it may take up to max 4 hours.
Q: How many times is a 100% charged device able to start a mid-size petrol
vehicle?
A: 20-30 times. It depends on other factors such as temperature and the state of
the vehicle battery.
Q: How often shall I recharge it?
A: We warmly recommend you to charge it at least once every three months or
after each use.
MOST FREQUENTLY ASKED QUESTIONS
English

20
1. Avant l’utilisation, veuillez lire attentivement et comprendre les
informations de sécurité du produit. Le non-respect des instructions
peut causer des dommages matériels ou entraîner des blessures
graves voire mortelles à cause d’une explosion ou un incendie résultant
d’endommagement de produit.
2. Ce produit sert au démarrage d’automobile 12V, il sera probablement
dangereux pour d’autres démarrages.
3. C’est interdit d’utiliser ce produit en remplaçant le bac d’élément
d’automobile.
4. Ne pas le jouer en tant qu’un jouet.
5. Veuillez utiliser les pinces à bac d’élément attachées au produit, en cas de
détérioration de pinces à bac d’élément ou fils, il faut immédiatement arrêter
l’utilisation, pour éviter des blessures corporelles résultant d’incendie ou
choc électrique.
6. Il faut porter des lunettes et des gants de protection lorsque vous utilisez
ce produit. La batterie peut provoquer des débris volants à cause d’une
explosion. Le fluide de batterie est nocif pour les yeux et la peau. Dans
ce cas-là, veuillez laver la zone blessée avec de l’eau propre et contactez
immédiatement le service de contrôle des substances toxiques..
7. Veuillez utiliser le chargeur fourni avec l’appareil ou celui de même
spécification que le port d’entrée de l’unité centrale pour recharge
8. Ne pas connecter les pôles positif et négatif aux sens inverses.
9. Ne pas utiliser les pinces à bac d’élément pour recharger d’autres appareils.
10. Veuillez ne pas démarrer pour plus de 3 fois consécutives, pour éviter de
détériorer le produit à cause de surchauffe de produit. En cas de démarrage
pour plusieurs fois, le laps de temps entre deux démarrages doit être de
2min.
11. Après avoir démarré l’automobile, veuillez retirer le produit du bac d’élément
d’automobile dans 30s, sinon cela engendrera des endommagements.
Français
AVERTISSEMENT
This manual suits for next models
1
Table of contents
Languages:
Other MAXTOOLS Remote Starter manuals
Popular Remote Starter manuals by other brands

Black Widow Security
Black Widow Security BW 752 installation manual

ADS
ADS TR1150AT owner's manual

Schumacher Electric
Schumacher Electric BE01255 owner's manual

Schumacher
Schumacher FR01240 owner's manual

ENDEAVOUR
ENDEAVOUR ET6795 instruction manual

Young Shin Electronics
Young Shin Electronics R1800-900FM user guide