GYS GYSpack AUTO User manual

N° 141215 _V6_07/07/2017
FR
EN
DE
ES
RU
2-8 / 55-60
9-15 / 55-60
16-22 / 55-60
23-29 / 55-60
30-35 / 55-60
GYSPACK AUTO
GYSPACK 400
www.gys.fr
NL 36-42 / 55-60
IT 43-49 / 55-60
CN 50-54 / 55-60

2
GYSPACK AUTO / GYSPACK 400 FR
Notice originale
INSTRUCTIONS DE SÉCURITÉ
Ce manuel d’utilisation comprend des indications
sur le fonctionnement de votre appareil et les
précautions à suivre pour votre sécurité. Merci de
le lire attentivement avant la première utilisation
et de le conserver soigneusement pour toute
relecture future. Ces instructions doivent être lues
et bien comprises avant toute opération. Toute
modification ou maintenance non indiquée
dans le manuel ne doit pas être entreprise. Tout
dommage corporel ou matériel dû à une utilisation
non conforme aux instructions de ce manuel ne
pourra être retenu à la charge du fabricant. En cas
de problème ou d’incertitude, veuillez consulter
une personne qualifiée pour manier correctement
l’appareil. Cet appareil doit être utilisé uniquement
pour faire du démarrage dans les limites indiquées
sur l’appareil et le manuel. Il faut respecter les
instructionsrelativesàla sécurité.Encas d’utilisation
inadéquate ou dangereuse, le fabricant ne pourra
être tenu responsable.
Appareil destiné à un usage à l’intérieur. Il ne
doit pas être exposé à la pluie (chargeur).
Cet appareil peut être utilisé par des enfants
âgés d’au moins 8 ans et par des personnes
ayant des capacités physiques, sensorielles ou
mentales réduites ou dénuées d’expérience ou
de connaissance, s’ils (si elles) sont correctement
surveillé(e)s ou si des instructions relatives à
l’utilisation de l’appareil en toute sécurité leur
ont été données et si les risques encourus ont été
appréhendés. Les enfants ne doivent pas jouer

3
GYSPACK AUTO / GYSPACK 400 FR
Notice originale
avec l’appareil. Le nettoyage et l’entretien par
l’usager ne doivent pas être effectués par des
enfants sans surveillance.
À n’utiliser en aucun cas pour charger des piles
ou des batteries non rechargeables.
Utiliser exclusivement le chargeur fourni avec
l’appareil pour la recharge des batteries.
Ne pas utiliser l’appareil, si le cordon
d’alimentation ou la fiche de secteur sont
endommagés.
Ne jamais charger une batterie gelée ou
endommagée.
Ne pas couvrir l’appareil.
Nepasplacerl’appareilàproximitéd’unesource
de chaleur et à des températures durablement
élevées (supérieures à 50°C).
Ne pas obstruer les ouvertures de ventilation.
Se référer à la partie installation avant d’utiliser
l’appareil.
Risque d’explosion et d’incendie!
Une batterie en charge peut émettre des gaz
explosifs.
• Pendant la charge, la batterie doit être placée
dans un emplacement bien aéré.
• Éviter les flammes et les étincelles. Ne pas
fumer.
• Protéger les surfaces de contacts électriques
de la batterie à l’encontre des courts-circuits.
Risque de projection d’acide !
• Porter des lunettes et des gants de protection.

4
GYSPACK AUTO / GYSPACK 400 FR
Notice originale
• En cas de contact avec les yeux ou la peau,
rincer immédiatement à l’eau et consulter un
médecin sans tarder.
Connexion / déconnexion :
• Déconnecter l’alimentation avant de brancher
oudedébrancherlesconnexionssurlabatterie.
• La borne de la batterie non reliée au châssis
doit être connectée la première. L’autre
connexion doit être effectuée sur le châssis
loin de la batterie et de la canalisation de
combustible. Le chargeur de batterie doit
alors être raccordé au réseau.
• Après l’opération de charge, débrancher le
chargeur de batterie du réseau puis retirer la
connexion du châssis et enfin la connexion
de la batterie, dans l’ordre indiqué.
Raccordement :
• Appareil de classe II (chargeur du booster).
• Appareil de classe III (booster).
Le raccordement au réseau d’alimentation doit
être effectué conformément aux règles d’instal-
lation nationales.
Entretien :
• Le câble d’alimentation ne peut pas être
remplacé. Si le câble est endommagé, il
convient de mettre l’appareil au rebut.
• L’entretien ne doit être effectué que par une
personne qualifiée.

5
GYSPACK AUTO / GYSPACK 400 FR
Notice originale
• Avertissement ! Débrancher toujours la fiche
de la prise secteur avant d’effectuer des
travaux sur l’appareil (chargeur & booster).
• Régulièrement, enlever le capot du booster
et dépoussiérer à la soufflette. En profiter
pour faire vérifier la tenue des connexions
électriques avec un outil isolé par un personnel
qualifié.
• N’utiliser en aucun cas des solvants ou autres
produits nettoyants agressifs
• Nettoyer les surfaces de l’appareil à l’aide
d’un chiffon sec.
Réglementation :
• Appareilconformeauxdirectiveseuropéennes.
• La déclaration de conformité est disponible
sur notre site internet.
• Marque de conformité EAC (Communauté
économique eurasienne).
Mise au rebut :
• Ce matériel fait l’objet d’une collecte sélective.
Ne pas jeter dans une poubelle domestique.
• L’accumulateur présent dans cet appareil
est recyclable. Prière de procéder confor-
mément aux prescriptions de recyclage en
vigueur.
• La batterie doit être retirée de l’appareil
avant que celui-ci ne soit mis au rebut.
• L’appareil doit impérativement être décon-
necté du réseau d’alimentation avant de reti-
rer la batterie.

6
GYSPACK AUTO / GYSPACK 400 FR
Notice originale
DESCRIPTION GÉNÉRALE
Ce démarreur autonome (7 kg) est destiné au démarrage des véhicules équipés d’une batterie de 12 V (6 élements de
2V) au plomb. Le GYSPACK AUTO fonctionne grâce à une batterie haute performance. Pour le bon fonctionnement de
l’appareil et pour préserver la durée de vie de sa batterie interne, il est impératif de le recharger après chaque utilisa-
tion et de le laisser brancher jusqu’à la prochaine utilisation.
Mise en garde : Pour éviter tout dommage ou explosion, bien respecter les polarités lors du branchement des pinces.
TEST DE LA BATTERIE INTERNE
Avant chaque démarrage, tester la batterie. Appuyer sur le bouton test, le résultat s’afche :
- Voyant vert : La batterie est chargée. Démarrage possible.
- Voyant orange : Il est fortement conseillé de recharger avant utilisation.
- Voyant rouge : A recharger obligatoirement. Attention ne jamais utiliser l’appareil lorsque le voyant
rouge s’allume.
DÉMARRAGE D’UN VÉHICULE
Ne pas déconnecter la batterie du véhicule. Le débranchement de la batterie peut entraîner la perte
d’information et une éventuelle impossibilité de redémarrage.
Le booster doit être stocké en position verticale. Toute autre position ne doit être maintenue que de manière
temporaire.
1. Couper le contact avant de connecter les câbles et pinces.
ATTENTION : Ne pas mettre en contact la pince rouge avec la pince noire.
2. Connecter la pince rouge à la borne + de la batterie, et la pince noire à la borne – de la batterie ou sur le châssis
du véhicule.
Les câbles ne doivent pas être pincés ou en contact avec des surfaces chauffantes ou coupantes.
3. Se rendre au poste de contrôle du véhicule et tourner la clef de contact. Si le moteur ne démarre pas, attendre 3
minutes entre chaque tentative de démarrage (6 sec max).
- En cas de non-respect du temps préconisé entre chaque essai (3 min) ou si la durée d’essai est trop
longue (>6 secondes) les chances de démarrage sont réduites (risque de perte de puissance).
- Risque de fuite d’acide et de destruction de la batterie interne en cas de non-respect des durées pré-
conisées.
- Si le véhicule ne démarre pas, il peut y avoir un autre problème qu’une batterie en mauvais état : alter-
nateur, bougie de préchauffage...
ANOMALIES, CAUSES, REMÈDES
Anomalies Causes Remèdes
Des étincelles apparaissent au mo-
ment du contact des pinces sur la bat-
terie.
Inversion de polarité des pinces de
l'appareil sur la batterie véhicule. Vérier la polarité de la batterie.
L’appareil n’arrive pas à démarrer le
véhicule. L'une des LED rouge ou or-
ange de l'appareil s'allume en mode
"Test".
La batterie de l’appareil est déchargée. Mettre en charge l’appareil, attendre
la n de charge et réessayer.
Plusieurs essais de démarrage sans
pause. Attendre 3 minutes entre 2 tentatives.
Un démarrage ne doit pas durer plus
de 6 secondes.
La tension de la batterie est inappro-
priée. Vérier que la tension de la batterie
du véhicule est bien de 12V.

7
GYSPACK AUTO / GYSPACK 400 FR
Notice originale
L’appareil n’arrive plus à démarrer le
véhicule et aucune LED de l'appareil
ne s'allume en mode "Test".
La tension des batteries internes est
très basse. Il se peut qu’elles soient
endommagées.
Remettre l’appareil en charge pour
tenter une restauration de la batterie.
La batterie interne est endommagée
et ne peut être rechargée. Contacter le service après-vente GYS
pour procéder à un remplacement de
la batterie.
La recharge de la batterie interne ne
démarre pas (aucune des LED de
l'état de charge de l'appareil ne s'al-
lume).
La prise du chargeur externe n’est pas
correctement enchée dans la prise
de l’appareil.
Vérier la connexion de la prise du
chargeur sur l'appareil.
Après une journée de charge, le
voyant de n de charge ne s'allume
pas.
Les batteries internes sont endomma-
gées et ne peuvent être rechargées. Contacter le service après-vente GYS
pour procéder à un remplacement des
batteries.
En mode source d’alimentation ex-
terne 12V, le booster ne délivre plus
de courant.
Le disjoncteur thermique interne a
coupé le circuit. Débrancher l’appareil extérieur
connecté au booster et attendre que
le disjoncteur se réarme automatique-
ment.
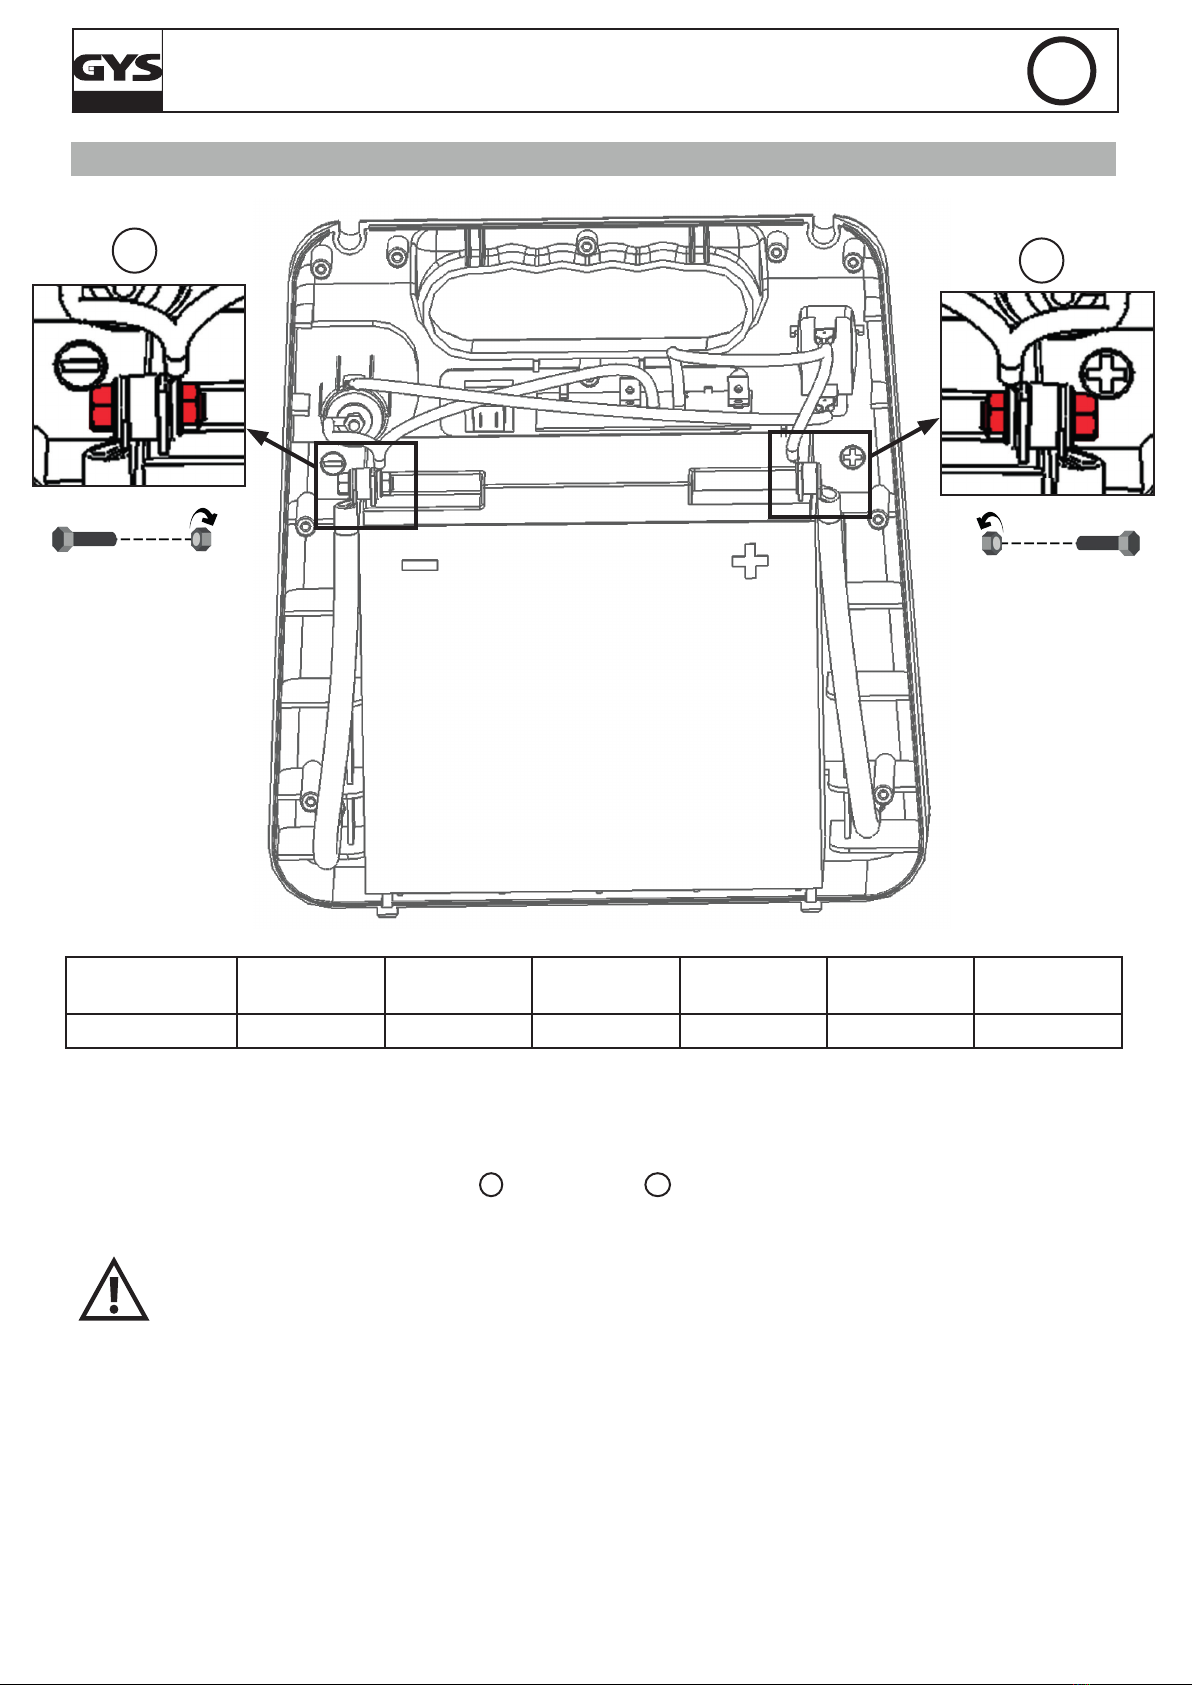
RECHARGE DE LA BATTERIE INTERNE
Brancher le chargeur au secteur 230V et l’autre extrémité sur l’avant du GYSPACK.
En n de charge l’arrêt est automatique et le voyant indicateur de charge s’allume.
Nb : Le Gyspack doit toujours être posé verticalement pendant la recharge, sinon il y a risque de fuite d’acide et de
destruction.
NON GARANTIE DE LA BATTERIE
Les batteries sont des éléments actifs, leur durée de vie dépend de leur entretien. Après chaque utilisation de ce
démarreur, il est impératif de recharger les batteries internes. Le stockage dans des lieux aux températures élevées
réduit considérablement la charge des batteries. Dans le cas d’une non-utilisation prolongée, il est fortement conseillé
de recharger les batteries avant utilisation. De manière générale, nous conseillons de laisser le produit branché en
permanence pour maintenir les batteries à leur meilleur niveau de performance.
Ce produit est équipé d’une batterie haute performance qui dans le cas du non respect des règles d’entretien peuvent
se détériorer dans le temps et de manière irréversible.
Sa conservation dépendant de son utilisation, la batterie du GYSPACK AUTO est exclue de la garantie.
CONDITIONS DE GARANTIE
La garantie couvre tous défauts ou vices de fabrication pendant 1 an, à compter de la date d’achat (pièces et main
d’oeuvre). La garantie ne couvre pas :
• Toutes autres avaries dues au transport.
• L’usure normale des pièces (Ex. : câbles, pinces, etc.).
• Les incidents dus à un mauvais usage (erreur d’alimentation, chute, démontage).
• Les pannes liées à l’environnement (pollution, rouille, poussière).
En cas de panne, retourner l’appareil à votre distributeur, en y joignant :
- un justicatif d’achat daté (ticket de sortie de caisse, facture….)
- une note explicative de la panne.

8
GYSPACK AUTO / GYSPACK 400 FR
Notice originale
REMPLACEMENT DE LA BATTERIE
2
1
Produit Batterie Type Tension (V) Capacité (Ah) Dimensions
(cm) Réf. batterie
GYSPACK 400 6FM - 18 Batterie au plomb 12 18 33 x 14 x 35 53139
Pour remplacer la batterie :
• Le produit doit être préalablement déconnecté du réseau d’alimentation.
• Il faut dans un premier temps dévisser la coque arrière (9 vis) et la retirer.
• Une fois la coque arrière enlevée, la batterie se trouve de face (cf illustration). La batterie est reliée à la connectique du GYS-
PACK en deux points : au niveau de la borne - 1et de la borne + 2. Pour la retirer, enlever la vis qui permet la liaison entre
la batterie et le reste de la connectique du GYSPACK.
A la remise d’une nouvelle batterie, veiller à bien associer les polarités de la batterie et du GYS-
PACK AUTO/400. Borne - à gauche, borne + à droite (cf illustration).
Repositionner les 2 vis et rondelles, serrer les écrous (couple de serrage recommandé de 4 N.m).
• Revisser la coque arrière

9
GYSPACK AUTO / GYSPACK 400 EN
Translation of the original instructions
SAFETY INSTRUCTIONS
This manual includes guidelines on the operation
of your device and the precautions to follow for
your own safety. Ensure it is read carefully before
first use and keep it handy for future reference.
These instructions should be read and understood
before anyone operates the product. Any modifi-
cations or maintenance that are not specified in
the manual should not be undertaken. The manu-
facturer is not liable for any injury or damage due
to non-compliance with the instruction manual. In
case of problems or uncertainties, please consult
a qualified person that is able to handle the de-
vice correctly. This device should only be used for
charging and / or start-up and / or power supply
within the limits indicated on the device and in the
manual. The safety instructions must be followed.
In case of improper or unsafe use, the manufactu-
rer cannot be held responsible.
Device suitable for indoor use only. Do not ex-
pose to rain or excessive moisture (charger).
This device may be used by children from age 8
and by persons with reduced physical, sensory
or mental capabilities or lack of experience and
knowledge, provided that they are under supervi-
sion or have been told how to use the device safely
and are aware of the potential risks. Children must
not use the device as a plaything. Cleaning and
servicing tasks may not be carried out by children
unless they are supervised.
Do not use for charging non-rechargeable batteries.

10
GYSPACK AUTO / GYSPACK 400 EN
Translation of the original instructions
Do not use any charger other than the one
supplied with the machine to charge the
batteries.
Do not operate the device with a damaged
power supply cord or a damaged mains plug.
Never charge a frozen or damaged battery.
Do not cover the device.
Do not place the device near a fire or subject it
to heat or to longterm temperatures exceeding
50°C.
Do not obstruct the cooling vents. Refer to the ins-
tallation section before operating the machine.
The automatic mode of operation and usage
restrictions are explained below in these opera-
ting instructions.
The booster must be stored in a vertical position.
Any other storage position should only be
temporary.
Risk of explosion and re!
A battery being charged can emit explosive
gas.
• During the charge, the battery must be placed
in a well ventilated area.
• Avoid flames and sparks. Do not smoke.
• Protect the electrical contacts of the battery
against short-circuiting.
Connection / disconnection:
• Disconnect the power supply before connec-
ting/disconnecting the device to/from the
battery.

11
GYSPACK AUTO / GYSPACK 400 EN
Translation of the original instructions
• The terminal of the battery that is not connec-
ted to the car frame must be connected first.
The other connection must be made on the
car frame, far from the battery and the fuel
line. The battery charger must be connected
to the power supply network.
• After the charging process, disconnect the bat-
tery charger from the power supply network
and remove the connector from the car frame
and then the connector from the battery, in
this order.
Acid projection hazard!
• Wear safety goggles and protective gloves
• If your eyes or skin come into contact with bat-
tery acid, rinse the affected part of the body
with plenty of water and seek immediate me-
dical assistance.
Connection:
• Class II device (charger booster)
• Class III device (booster)
Connection to the mains must be made accor-
ding to the national installation regulations.
Maintenance:
• The power supply cable cannot be replaced.
If the cable is damaged,the device should not
be used.
• Service should be performed by a qualified
person

12
GYSPACK AUTO / GYSPACK 400 EN
Translation of the original instructions
• Warning! Always disconnect from the mains
before performing maintenance on the device
(charger & booster).
• If the internal fuse is blown, it must be replaced
by the manufacturer, its after-sales service or
an equally qualified person.
• Under no circumstances should solvents or
other aggressive cleaning agents be used.
• Clean the device’s surfaces with a soft, dry
cloth.
Regulations:
• The device complies with European Directive.
• The certificate of compliance is available on
our website.
•EAC conformity mark (Eurasian Economic
Commission)
Disposal:
• This product should be disposed of at an ap-
propriate recycling facility. Do not dispose of
in domestic waste.
• The battery fitted in this device is recyclable.
Please proceed according to the applicable
recycling regulations.
• The battery must be removed from the de-
vice before the latter is discarded.
• The device must absolutely be disconnected
from the power supply network before remo-
ving the battery.

13
GYSPACK AUTO / GYSPACK 400 EN
Translation of the original instructions
GENERAL DESCRIPTION
This autonomous starter is intended for the starting of vehicles equipped with a 12 V battery. GYSPACK functions thanks
to a high performance battery. For an appropriate use of the machine and a longer lifetime of its internal battery, it is
essential to connect to the sector the GYSPACK after each use and keep it connected until the next use.
Warning: To avoid any damage or explosion, respect the polarity during the clamp connection.
TESTING OF THE INTERNAL BATTERY
Test the battery before each use: press on the test button, the result is displayed as follow:
- Green indicator: The battery is charged. Can be used for starting vehicles
- Orange indicator: It is strongly advised to recharge the GYSPACK before use.
- Red indicator: obligation to recharge.
Warning: never use the Machine when the red indicator is on.
STARTING OF A VEHICLE
Do not disconnect the battery from the vehicle. Disconnecting the battery may result in loss of information
and a possible inability to restart.
1. Turn ignition off before connecting the GYSPACK to the car’s battery.
Do not touch the red clamp with the black clamp.
2. Connect the red clamp to the positive pillar (+) of the battery, then the black clamp to negative pillar (-).
The cables must not be pinched or in contact with hot or sharp surfaces.
3. Go to the driver’s seat and turn the ignition key. If your engine does not start, wait 3 minutes until next attempt. ( 6 sec max)
- If the cooling period between each attempt (3 minutes) is not observed or if the duration of the
attempt is too long (> 6 seconds), the chances of a successful jumpstart are signicantly reduced
(risk of power loss).
- Risk of battery acid leaks or damage if the recommended periods are not observed.
- If the vehicle does not start, it may be a problem other than a faulty battery: alternator, glowplug…
CHARGING OF THE INTERNAL BATTERY
Connect the main plug to the 220V power supply and the minor plug to the charging socket in the front panel of the
GYSPACK.
The charge stops automatically and the green indicator lights when the battery is charged.
Note: the Gyspack must always be placed in vertical position when in charge. If not, there is a risk of acid leak and
destruction.

14
GYSPACK AUTO / GYSPACK 400 EN
Translation of the original instructions
TROUBLESHOOTING
Troubleshooting Causes Solutions
Sparks appear when the clampsmake
contact with the battery terminals. The position of the negative and pos-
itive clamps on the battery terminals
is incorrect (polarity reversal).
Check the battery polarity.
The unit can not start the vehicle. One
of the red or orange LED on the unit
switches on in "test" mode.
The internal battery is discharged. Charge the unit, and try again after
the charge is complete.
Several jump start attempts without
pause between each. Wait 3 minutes between 2 starts. A
start must not last more than 6 sec-
onds.
The battery voltage is incorrect.. Check that the battery voltage of the
vehicle is 12V.
The device can not start the vehicle
anymore and no one LED of the de-
vice switches on in "Test" mode.
The voltage of the internal batteries is
very low. It may be that the internal
batteries are damaged.
Put the device on charge in order to
attempt to recover the battery.
The internal batterie is damaged and
it cannot be recharged. Contact the GYS after sale service to
replace the batterie.
The charge of the internal battery
does not start (none of the charging
LEDs activate).
The external charger plug is not
connected correctly to the socket of
the machine.
Check that the plug is connected cor-
rectly to the machine.
After a day of charge, the end of
charge indicator does not activate. The internal batteries are damaged
and cannot be recharged. Contact the GYS after sale service to
organise a replacement of the batte-
ries.
In external 12V power source mode,
the booster no longer delivers power. The internal thermal protection cir-
cuit-breaker has cut the circuit. Disconnect the external device
connected to the machine and wait
for the circuit-breaker to reset itself
automatically.

15
GYSPACK AUTO / GYSPACK 400 EN
Translation of the original instructions
NO WARRANTY FOR THE BATTERY
Gyspack contains a high performance battery, which imperatively needs to be recharged after each use. If this condition
is not respected, within 24 hours the battery gets sulphated. This causes an irreversible deterioration of the battery.
For this reason, the battery of the Gyspack, which is expensive, is not under warranty, because its conservation depends
on its use.
BATTERY REPLACEMENT
2
1
Product Battery Type Voltage (V) Capacity (Ah) Dimensions
(cm) Battery ref
GYSPACK 400 6FM - 18 Lead- acid battery 12 18 33 x 14 x 35 53139
To replace the battery :
• First the booster must be disconnected form the power supply.
• The back panel must be unscrewed (9 screws) and removed.
• Once the back panel is removed, the battery front appears (cf illustration). The battery is connected to the GYSPACK at two
points : at the - terminal 1and at the + terminal 2. To remove the battery, remove the screw that enables the connection
between the battery and the GYSPACK.
When putting a new battery, make sure to observe the polarities of both the battery and the
GYSPACK AUTO/400. Terminal - on the left, terminal + on the right (cf illustration). Put the 2
screws and washers back, tighten the nuts (recommended torque wrench 4 N.m).
• Place the booster’s backpanel screws back on.

16
GYSPACK AUTO / GYSPACK 400 DE
Übersetzung der Originalbetriebsanleitung
SICHERHEITSANWEISUNGEN
Diese Betriebsanleitung enthält Sicherheits- und
Betriebshinweise. Bitte lesen Sie diese Anleitung
aufmerksam durch, bevor Sie das Gerät zum
ersten Mal benutzen und bewahren Sie diese
sorgfältig auf. Die Nichteinhaltung dieser Anwei-
sungen und Hinweise kann mitunter zu schweren
Personen- und Sachschäden führen. Nehmen Sie
keine Wartungarbeiten oder Veränderungen am
Gerät vor, wenn diese nicht explizit in der Anlei-
tung genannt werden. Der Hersteller haftet nicht
für Verletzungen oder Schäden, die durch unsach-
gemäße Handhabung dieses Gerätes enstanden
sind. Bei Problemen oder Fragen zum korrekten
Gebrauch dieses Gerätes, wenden Sie sich bitte
an entsprechend qualifiziertes und geschultes Fa-
chpersonal. Dieses Gerät darf ausschließlich zum
Laden/Starten und/oder zur Spannungsversor-
gung für die in der Anleitung oder auf dem Gerät
genannten Anforderungen genutzt werden. Die
Sicherheitshinweise müssen in jedem Fall beachtet
werden. Im Fall einer unangemessenen oder ge-
fährlichen Verwendung kann der Hersteller nicht
haftbar gemacht werden.
Schützen Sie das Gerät vor Feuchtigkeit und
Nässe (Ladegerät).
Schützen Sie das Gerät vor unbefugtem Ge-
brauch. Kinder unter 8 Jahren düfen nicht mit
diesem Gerät spielen. Befinden sich Kinder oder
Personen mit eingeschränkten körperlichen oder
geistigen Fähigkeiten sowie Personen ohne ex
plizite Erfahrung im Umgang mit dem Produkt in

17
GYSPACK AUTO / GYSPACK 400 DE
Übersetzung der Originalbetriebsanleitung
der Nähe des Gerätes, sorgen Sie bitte für
ausreichend Schutz und Kontrolle bei Benutzung
des Gerätes.
Laden Sie nie defekte oder nicht aufladbare Bat-
terien.
Benutzen Sie ausschließlich das beiliegende
Ladegerät zum Aufladen der Batterien.
Benutzen Sie das Gerät nicht, wenn der Stecker,
die Klemmen oder das Zubehör defekt ist.
Laden Sie niemals eine beschädigte oder ge-
frorene Batterie.
Decken Sie das Gerät während der Nutzung
nicht ab.
Lagern Sie das Gerät nicht in der Nähe einer
Wärmequelle oder bei dauerhaft hohen Tem-
peraturen (über 50°C).
Blockieren Sie nicht die Belüftungsöffnungen
des Gerätes. Bitte beachten Sie den Punkt «Ins-
tallation» der Betriebsanleitung vor Gebrauch
des Gerätes.
Der Automatik-Modus sowie die Einschränkun-
gen bei der Benutzung werden nachfolgend in
der Betriebsanleitung erklärt.
Explosions- und Brandgefahr!
Während des Ladevorgangs können explosive
Gase entstehen.
• Während des Ladevorgangs muss die Bat-
terie in einem gut belüfteten Bereich plaziert
werden.
• Vermeiden Sie Funken und Flammen. Rauchen
Sie nicht!

18
GYSPACK AUTO / GYSPACK 400 DE
Übersetzung der Originalbetriebsanleitung
• Schützen Sie die Pole der Batterie vor
Kurzschlüssen.
Es besteht die Gefahr von Säurespritzern!
• Tragen Sie eine Schutzbrille und Handschuhe.
• Bei Kontakt der Batteriesäure mit den
Augen oder der Haut gründlich mit Wasser
nachspülen und sofort einen Arzt aufsuchen.
Verbinden/Trennen
• Trennen Sie das Gerät vom Spannungsnetz
bevor Sie Kabel und Zangen anschließen
oder trennen.
• Versichern Sie sich immer, dass die rote
Klemme zuerst mit dem «+» Pol der Batterie
verbunden wird. Falls es nötig ist die schwarze
Klemme mit der Fahrzeugkarosserie zu
verbinden, versichern Sie sich, dass es einen
Sicherheitsabstand von der Batterie zum
Benzintank/Aufspuffgibt.AchtenSiewährend
der Ladung auf einen frei zugänglichen
Netzanschluss.
• Beachten Sie am Ende des Ladevorgangs
folgendes: Trennen Sie erst das Gerät vom
Stromnetz und entfernen Sie dann erst die
Klemmen von der Batterie.
Anschluss
• Klasse II-Gerät (charger booster).
• Klasse III-Gerät (booster).
Der Anschluss an die Stromversorgung muss
den nationalen Vorschriften entsprechen.

19
GYSPACK AUTO / GYSPACK 400 DE
Übersetzung der Originalbetriebsanleitung
Wartung:
• Ist das Kabel nicht zu reparieren oder auszu-
tauschen, dann ist das Gerät fachgerecht zu
entsorgen.
• Die Wartung und Reparatur darf nur von
entsprechend geschultem und qualifiziertem
Fachpersonal durchgeführt werden.
• Avertissement ! Débrancher toujours la fiche
de la prise secteur avant d’effectuer des
travaux sur l’appareil.
• Öffnen Sie regelmäßig das Gehäuse
und entfernen Sie Staub und andere
Ablagerungen. Beachten Sie hierbei die
geltenden Sicherheitsvorschriften.
• Benutzen Sie niemals Lösungsmittel oder an-
deren aggressiven Reinigungsprodukte.
• Reinigen Sie die Oberfläche des Gerätes mi-
thilfe eines trockenen Lappen.
Richtlinien:
•Das Gerät entspricht den europäischen
Richtlinien und Normen.
• Die Konformitätserklärung finden Sie auf
unsere Webseite.
•EAC-Konformitätszeichen (Eurasische
Wirtschaftsgemeinschaft)
Entsorgung:
• Die interne Batterie des Gerätes ist recy-
clingsfähig. Bitte beachten Sie die geltenden
Recycling-Vorschriften.

20
GYSPACK AUTO / GYSPACK 400 DE
Übersetzung der Originalbetriebsanleitung
• Die Batterie muss erst von dem Gerät
getrennt werden, bevor Sie dieses entsorgen.
• Das Gerät muss von dem Stromnetz getrennt
werden, bevor Sie es von der Batterie trennen.
GERÄTEBESCHREIBUNG
Das GYSPACK ist für den Start von Fahrzeugen, die mit einer 12 V Bleibatterie mit üssigem Elektrolyt ausgerüstet sind,
bestimmt. Die Funktion dieses Startgeräts wird durch eine integrierte Hochleistungsbatterie bewirkt.
Für einen optimalen Gebrauch des Geräts und eine längere Lebenszeit seiner internen Batterie, muss das GYSPACK nach
jedem Gebrauch ans Stromnetz angeschlossen werden und bis zur nächsten Benutzung angeschlossen bleiben.
HINWEIS: Um Beschädigungen am Gerät zu vermeiden, beachten Sie bitte die Polung der Startklemmen.
BATTERIE TEST (FÜR DIE INTERNE BATTERIE)
Vor jedem Start muss die Batterie getestet werden. Drücken Sie dazu auf die Testtaste:
- Grüne Leuchte: Die Batterie ist aufgeladen. Start ist möglich.
- Orange Leuchte: Es wird empfohlen, die Batterie vor der Anwendung wieder aufzuladen.
- Rote Leuchte: Die Batterie muss unbedingt aufgeladen werden! Achten Sie darauf, das Gerät nie
anzuwenden, wenn die rote Leuchte aueuchtet
START EINES FAHRZEUGS
Klemmen Sie unter keinen Umständen die Batterie vom Fahrzeug ab! Das Abklemmen kann
Informationsverlust verursachen und allenfalls einen weiteren Startversuch verhindern.
Booster immer senkrecht stellen. Alle andere Positionen dürfen nur temporär sein.
1. Batterieschalter steht in Position „OFF“
2. Verbinden Sie die rote Klemme mit dem „+“ Pol, die schwarze Klemme mit dem „-“ Pol.
Die Kabel unter keinen Umständen abknicken oder direktem Kontakt mit heißen oder scharfkantigen
Oberächen aussetzen.
3. Versuchen Sie das Fahrzeug zu starten ( begrenzen Sie die Startzeit auf 5 bis 6 Sekunden). Startet das Fahrzeug nicht, warten
Sie bitte mindestens 3 Minuten bevor Sie einen neuen Startversuch durchführen.
- Die Nichteinhaltung der empfohlenen Wartezeit zwischen jedem Test (3 Min.) oder bei zu langer
Testdauer (> 6 Sek.) mindern die Chancen eines erfolgreichen Startes (Leistungsverlustsrisiko).
- Bei Missachtung dieser Hinweise, besteht die Gefahr auslaufender Batteriesäure und Beschädigung
der internen Batterie. Für eine optimale Lebensdauer des Gerätes ist die Einhaltung dieser Vorga-
ben unbedingt notwendig.
- Ein Fahrzeug das nicht startet, kann ein anderes Problem als eine Batterie im schlechten Zustand
haben: Lichtmaschine, Anlasser, Zündkerze….
LADEN DER INTEGRIERTEN BATTERIE
Das Ladegerät des GYSPACK an eine 220 V Steckdose und den Adapter auf der Vorderseite des GYSPACK anschließen.
Die Ladung wird automatisch beendet und durch die grüne Kontrollleuchte angezeigt.
ACHTUNG: GYSPACK während der Ladung stets senkrecht stehen lassen! Sonst besteht die Gefahr, dass Batteriesäure
austritt oder das Gerät kaputt geht.
Other manuals for GYSpack AUTO
2
This manual suits for next models
1
Table of contents
Languages:
Other GYS Remote Starter manuals

GYS
GYS STARTIUM 330E User manual

GYS
GYS GYSpack 400 User manual

GYS
GYS GYSPACK PRO 800 User manual

GYS
GYS GYSPack 650 User manual

GYS
GYS GYSPACK AIR User manual

GYS
GYS STARTPACK 12.24 User manual

GYS
GYS NOMAD POWER PRO TRUCK User manual

GYS
GYS Start UP 80 User manual

GYS
GYS NEOSTART 320 User manual

GYS
GYS Start UP 80 User manual