MB QUART WM1-BB Specification sheet

Operation
and Installation
Manual
CD/DVD PLAYER
COMMANDER
SIRIUS
USB
WM1-BB
Central Unit
Processing Center

Please carefully read all of the information in this manual. Familiarity with operation and installation proce-
dures will help you obtain the best possible performance from your new Central Unit Processing Center.
Introduction
2
Index
Button Locations and Functions . . . . . . . . . . . . . . . . . . . . . . . . . . . . . . . . . . . . . . . . . . . . . . . . . . . . . 3-4
Remote Control Button Locations and Functions. . . . . . . . . . . . . . . . . . . . . . . . . . . . . . . . . . . . . . . . . 4-5
General Operation . . . . . . . . . . . . . . . . . . . . . . . . . . . . . . . . . . . . . . . . . . . . . . . . . . . . . . . . . . . . . . . . 6
AM/FM Radio Operations. . . . . . . . . . . . . . . . . . . . . . . . . . . . . . . . . . . . . . . . . . . . . . . . . . . . . . . . . . . 6-8
Sound Controls . . . . . . . . . . . . . . . . . . . . . . . . . . . . . . . . . . . . . . . . . . . . . . . . . . . . . . . . . . . . . . . . . . 8-10
Disc Warnings . . . . . . . . . . . . . . . . . . . . . . . . . . . . . . . . . . . . . . . . . . . . . . . . . . . . . . . . . . . . . . . . . . . 11
Model: MBB-CD Operation (CD Player)
CD Operation (Compact Disc). . . . . . . . . . . . . . . . . . . . . . . . . . . . . . . . . . . . . . . . . . . . . . . . . . . . . . 11-12
MP3 Disc Operation . . . . . . . . . . . . . . . . . . . . . . . . . . . . . . . . . . . . . . . . . . . . . . . . . . . . . . . . . . . . . 12
USB Operation . . . . . . . . . . . . . . . . . . . . . . . . . . . . . . . . . . . . . . . . . . . . . . . . . . . . . . . . . . . . . . . . . 13
Auxiliary Audio Input Operation . . . . . . . . . . . . . . . . . . . . . . . . . . . . . . . . . . . . . . . . . . . . . . . . . . . . 13
Model: MBB-DVD Operation (DVD/CD Player)
CD Operation (Compact Disc). . . . . . . . . . . . . . . . . . . . . . . . . . . . . . . . . . . . . . . . . . . . . . . . . . . . . . 14
MP3 Disc Operation . . . . . . . . . . . . . . . . . . . . . . . . . . . . . . . . . . . . . . . . . . . . . . . . . . . . . . . . . . . . . 15
USB Operation . . . . . . . . . . . . . . . . . . . . . . . . . . . . . . . . . . . . . . . . . . . . . . . . . . . . . . . . . . . . . . . . . 15-16
Auxiliary Audio/Video Input Operation . . . . . . . . . . . . . . . . . . . . . . . . . . . . . . . . . . . . . . . . . . . . . . . 16
DVD Operation . . . . . . . . . . . . . . . . . . . . . . . . . . . . . . . . . . . . . . . . . . . . . . . . . . . . . . . . . . . . . . . . . 16-18
DVD Setup Menu . . . . . . . . . . . . . . . . . . . . . . . . . . . . . . . . . . . . . . . . . . . . . . . . . . . . . . . . . . . . . . . 18
CD Changer Operation . . . . . . . . . . . . . . . . . . . . . . . . . . . . . . . . . . . . . . . . . . . . . . . . . . . . . . . . . . . . . 19-20
Sirius Satellite Radio
Sirius Satellite Radio Setup . . . . . . . . . . . . . . . . . . . . . . . . . . . . . . . . . . . . . . . . . . . . . . . . . . . . . . . 20
Sirius Satellite Radio Operation . . . . . . . . . . . . . . . . . . . . . . . . . . . . . . . . . . . . . . . . . . . . . . . . . . . . 21-23
IPOD Operation . . . . . . . . . . . . . . . . . . . . . . . . . . . . . . . . . . . . . . . . . . . . . . . . . . . . . . . . . . . . . . . . . . 23-25
USB Operation . . . . . . . . . . . . . . . . . . . . . . . . . . . . . . . . . . . . . . . . . . . . . . . . . . . . . . . . . . . . . . . . . . . 25
Auxiliary Audio Input Operation . . . . . . . . . . . . . . . . . . . . . . . . . . . . . . . . . . . . . . . . . . . . . . . . . . . . . . 26
Setup Features . . . . . . . . . . . . . . . . . . . . . . . . . . . . . . . . . . . . . . . . . . . . . . . . . . . . . . . . . . . . . . . . . . . 27
WM1-BB Installation . . . . . . . . . . . . . . . . . . . . . . . . . . . . . . . . . . . . . . . . . . . . . . . . . . . . . . . . . . . . . . 28
WBB-CD and WBB-DVD Installation . . . . . . . . . . . . . . . . . . . . . . . . . . . . . . . . . . . . . . . . . . . . . . . . . . 29
Radio Commander Installation. . . . . . . . . . . . . . . . . . . . . . . . . . . . . . . . . . . . . . . . . . . . . . . . . . . . . . . 30
Speaker Connections . . . . . . . . . . . . . . . . . . . . . . . . . . . . . . . . . . . . . . . . . . . . . . . . . . . . . . . . . . . . . . 31
Auxiliary Connections . . . . . . . . . . . . . . . . . . . . . . . . . . . . . . . . . . . . . . . . . . . . . . . . . . . . . . . . . . . . . 32
Input Connections . . . . . . . . . . . . . . . . . . . . . . . . . . . . . . . . . . . . . . . . . . . . . . . . . . . . . . . . . . . . . . . . 33-35
Replaceable Fuse . . . . . . . . . . . . . . . . . . . . . . . . . . . . . . . . . . . . . . . . . . . . . . . . . . . . . . . . . . . . . . . . . 35
Warranty . . . . . . . . . . . . . . . . . . . . . . . . . . . . . . . . . . . . . . . . . . . . . . . . . . . . . . . . . . . . . . . . . . . . . . . 36
Safety Information
DO NOT OPEN COVERS AND DO NOT REPAIR
YOURSELF. PLEASE REFER SERVICING TO A
QUALIFIED TECHNICIAN.
CHANGES OR MODIFICATIONS TO THIS PRODUCT
NOT APPROVED BY THE MANUFACTURER WILL
VOID THE WARRANTY AND WILL VIOLATE FCC
APPROVAL.

Button Locations and Functions
3
1. Power On/Off and Display Dimmer: Press to turn the unit on or off. Press and hold to dim the dis-
play. Press and hold again to restore display’s illumination.
2. Volume Control: Press the button to increase the volume and press the button to decrease
the volume.
3. Play/Pause and Mute Button:
DVD/CD and CD Changer Mode: Press to pause disc play, press again to resume play.
Radio, Sirius Satellite Radio and AUX Input Modes: Press to mute volume level. Press again to restore.
4. Enter/Band and Loud Button:
Radio: Press to select AM1, AM2, FM1, FM2 and FM3 radio bands.
Loudness: Press and hold button until “LOUD ON” appears in the display to boost high and low tones
at low volume levels. To deactivate press and hold again until “LOUD OFF” appears in the display.
IPOD Mode: See IPOD Operation Section for more information.
5. Display Area: This area displays all function information for the radio, DVD/CD player, auxiliary input,
USB, Sirius and IPOD modes.
6. Equalizer Button: Press to choose between preset sound equalization settings.
7. Display Button (DISP): Press to display information if available.
DVD/CD and CD Changer Mode: Press to display track information.
8. ASM Button (Automatic Station Memory):
Radio Mode: Press and hold for automatic station memory storing. Press and release for scanning
memorized stations.
9. Setup Button: Press to access Bass, Treble, Balance, Fader and Subwoofer controls. Press and hold
for 10 seconds to access Beep Confirmation, Default Volume and AM/FM Tuning System.
10. Multi-Function Button #6:
Radio Mode: Press and hold until a beep is heard to store a radio station into memory #6 (CH6).
Press and release when recalling preset radio station #6
11. Multi-Function Button #5:
Radio Mode: Press and hold until a beep is heard to store a radio station into memory #5 (CH5).
Press and release when recalling preset radio station #5.
CD Mode: See “Repeating a CD Track” for more information (page 12 or page14).
CD Changer Mode: Press to preview each track on the CD for 10 seconds. Press and hold to preview
each track on every CD for 10 seconds. Press again to cancel.
12. Multi-Function Button #4:
Radio Mode: Press and hold until a beep is heard to store a radio station into memory #4 (CH4).
Press and release when recalling preset radio station #4.
CD Mode: See “Random CD Track Play Order” for more information (page 12 or page14).
CD Changer Mode: Press to play all the tracks on the CD in random order. Press and hold to play all
the CDs in random order. Press again to cancel.
VOL
VOL
DIR/CAT RPT SHF SCN
DIM
S-MOD
DVD SETUP
iPOD MENU
MENU
ENT
BND
MUTE
MODE
123456
EQ
DISP
ASM
SETUP
LOUD
ST
12
2
34567
98
10
11
12131415
16
17
16
18
VOL
VOL
WR1-P Commander (Sold Separately)

4
Button Locations and Functions (Continued)
13. Multi-Function Button #3:
Radio Mode: Press and hold until a beep is heard to store a radio station into memory #3 (CH3).
Press and release when recalling preset radio station #3.
CD Mode: See “Preview CD Tracks” for more information (page 12).
CD Changer Mode: Press to repeat a CD track. Press and hold to repeat the entire disc. Press again
to cancel.
14. Multi-Function Button #2:
Radio Mode: Press and hold until a beep is heard to store a radio station into memory #2 (CH2).
Press and release when recalling preset radio station #2.
CD Changer Mode: Push to change to a higher number disc in the CD changer.
15. Multi-Function Button #1:
Radio Mode: Press and hold until a beep is heard to store a radio station into memory #1 (CH1).
Press and release when recalling preset radio station #1.
CD Changer Mode: Push to change to a lower number disc in the CD changer.
16. Tune/Track Buttons:
Radio Mode: Press either button and the tuner will scan to the next strong station and stop. Then
press and hold either button until “MANUAL” appears in the display then release. Again press either
button until the desired radio station appears in the display.
CD and CD Changer Mode: Press to change the track to a lower or higher track.
17. Mode Button:
Press to change the play source: Radio and AUX. Depending on what other input sources are con-
nected (IPOD, Sirius, DVD/CD and CD Changer) these play sources will also appear in the display.
18. Menu Button:
Sirius Mode: See Sirius Satellite Radio Operation section for more information.
IPOD Mode: See IPOD Operation section for more information.
Remote Control Button Locations and Functions (Option)
3. CD Play/Pause and Mute Button:
DVD/CD and CD Changer Mode: Press to pause
disc play, press again to resume play.
Radio, Sirius Satellite Radio and AUX Input
Modes: Press to mute volume level.
4. Enter/Band and Loud Button:
Radio: Press to select AM1, AM2, FM1, FM2
and FM3 radio bands.
Loudness: Press and hold button until “LOUD
ON” appears in the display. To deactivate,
press
and hold again until “LOUD OFF” appears.
12. Multi-Function Button #6:
Radio Mode: Press and hold until a beep is
heard to memorize a radio station. Press and
release when recalling preset radio station #6.
13. Multi-Function Button #5:
Radio Mode: Press and hold until a beep is
heard to memorize a radio station. Press and
release when recalling preset radio station #5.
CD Mode: See “Preview CD Track” for more
information (page 12).
CD Changer Mode: Press to preview each
track on the CD for 10 seconds. Press and
hold to preview the first track on every loaded
CD for 10 seconds. Press again to cancel.
DIM
ENT
BND
LOUD
MUTE
VOLUME
RPT SHF SCN
DIR / CAT
S-MOD
IPOD MENU
135
6
2
7
4
9
80
MODE
MENU
OK
DVD
SETUP
SUB-T
TITLE
AUDIO
DVD
MENU
1
19
3
2
2
18
17
20
4
12
16
13
14
15
18
1. Power On/Off and Display Dimmer: Press to
turn the unit On or Off. Press and hold to dim
the display. Press and hold again to restore.
2. Volume Control: Press the and buttons
to increase and decrease the volume level.

5
Remote Control Button Locations and Functions (Option) (Continued)
14. Multi-Function Button #4:
Radio Mode: Press and hold until a beep is
heard to memorize a radio station. Press and
release when recalling preset radio station #4.
CD Mode: See “Random CD Track Play Order”
for more information (page 12 or page14).
CD Changer Mode: Press to play all the tracks
on the CD in random order. Press and hold to
play every loaded CD in random order. Press
again to cancel.
15. Multi-Function Button #3:
Radio Mode: Press and hold until a beep is
heard to memorize a radio station. Press and
release when recalling preset radio station #3.
CD Mode: See “Repeating a CD Track” for
more information (page 12 or page14).
CD Changer Mode: Press to repeat a CD track.
Press and hold to repeat the entire disc. Press
again to cancel.
16. Multi-Function Button #2:
Radio Mode: Press and hold until a beep is
heard to memorize a radio station. Press and
release when recalling preset radio station #2.
CD Changer Mode: Push to change to a higher
number disc in the CD changer.
7. Multi-Function Button #1:
Radio Mode: Press and hold until a beep is
heard to memorize a radio station. Press and
release when recalling preset radio station #1.
CD Changer Mode: Push to change to a lower
number disc in the CD changer.
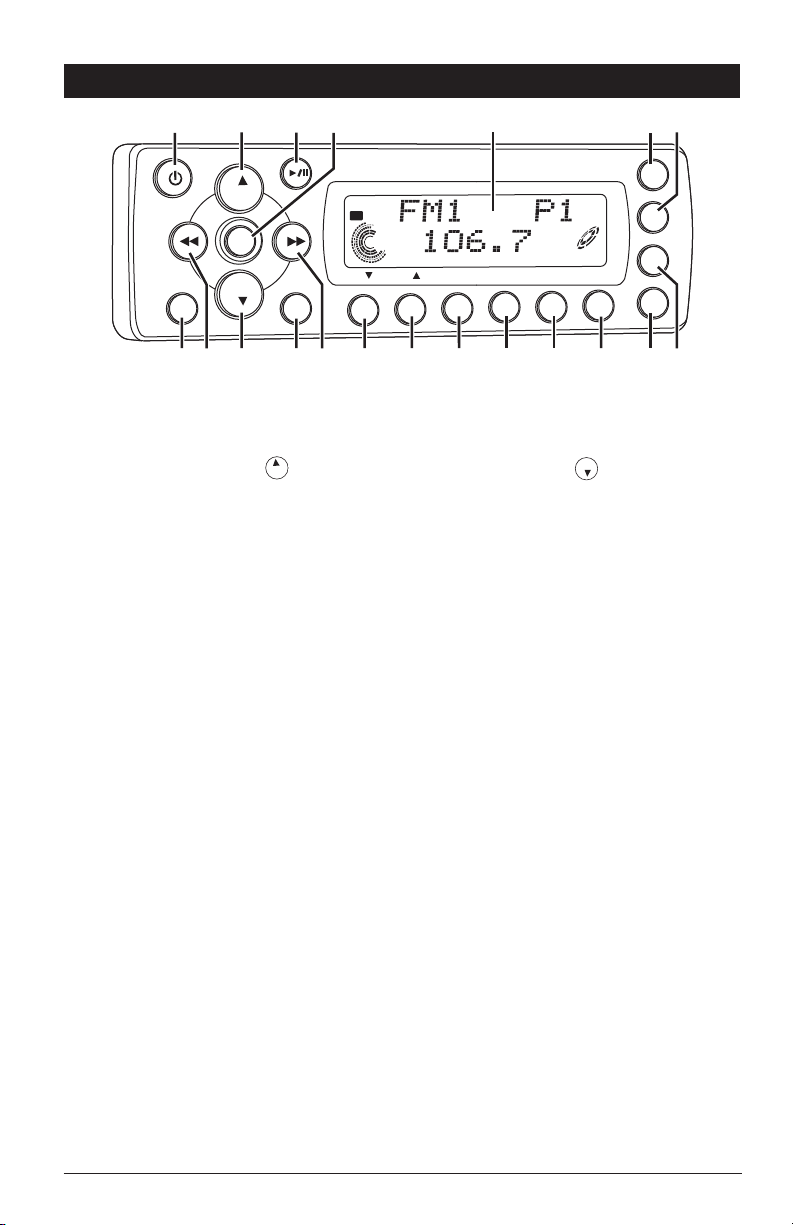
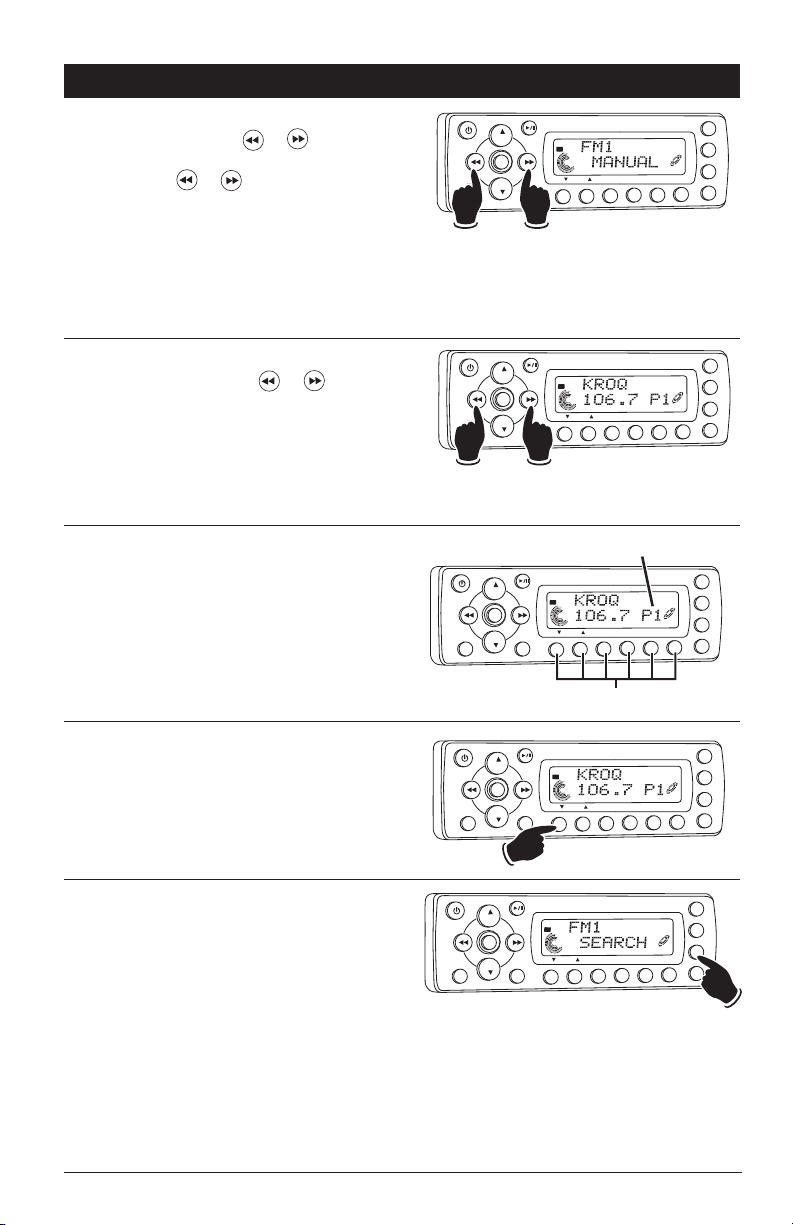
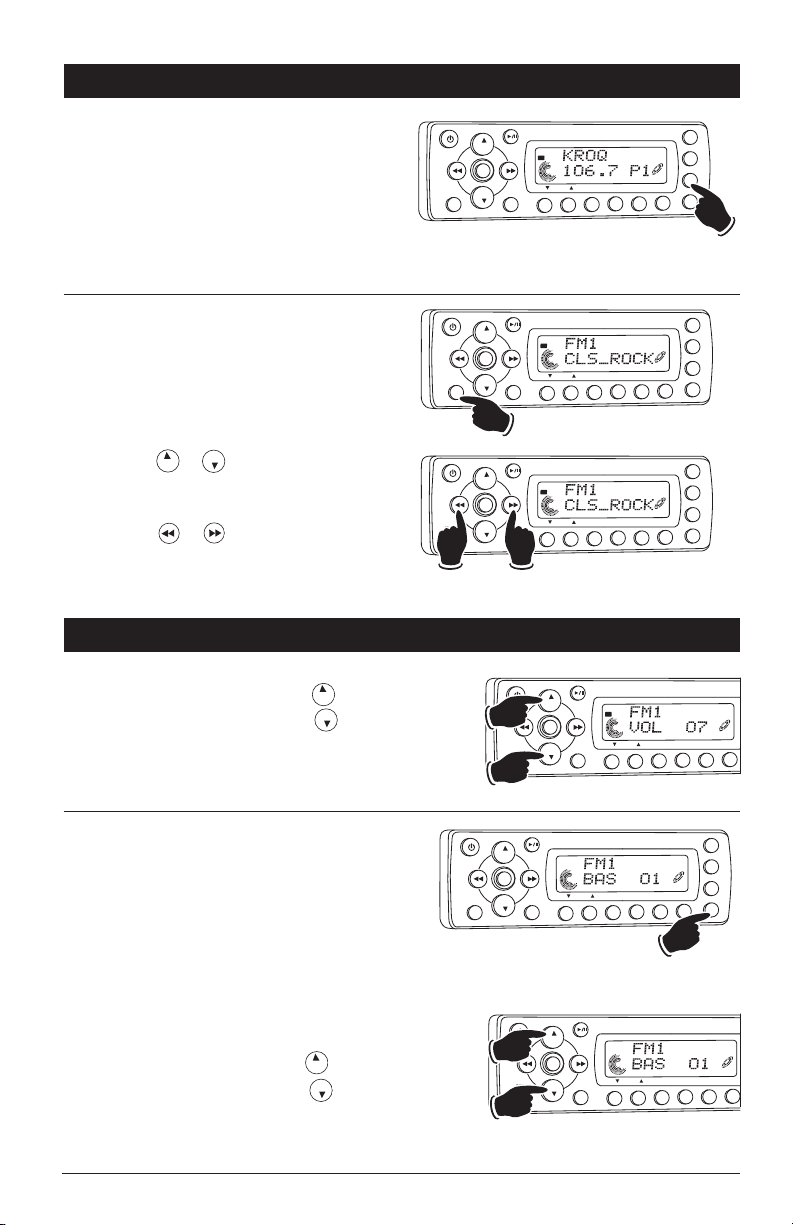
18. Tune/Track Buttons:
Radio Mode: Press and the tuner will scan to
the next strong station and stop. Press and
hold until “MANUAL” appears in the display
then release. Then press or until the
desired radio station is tuned-in.
CD and CD Changer Mode: Press to change
the track to a lower or higher track
19. Mode Button:
Press to change the play source: Radio and
AUX. Depending on what other input sources
are connected (IPOD, Sirius, USB, DVD/CD and
CD Changer) these play sources will also
appear in the display.
20. Menu Button:
Sirius Mode: See Sirius Satellite Radio
Operation section for more information.
IPOD Mode: See "IPOD Operation" for more
information.
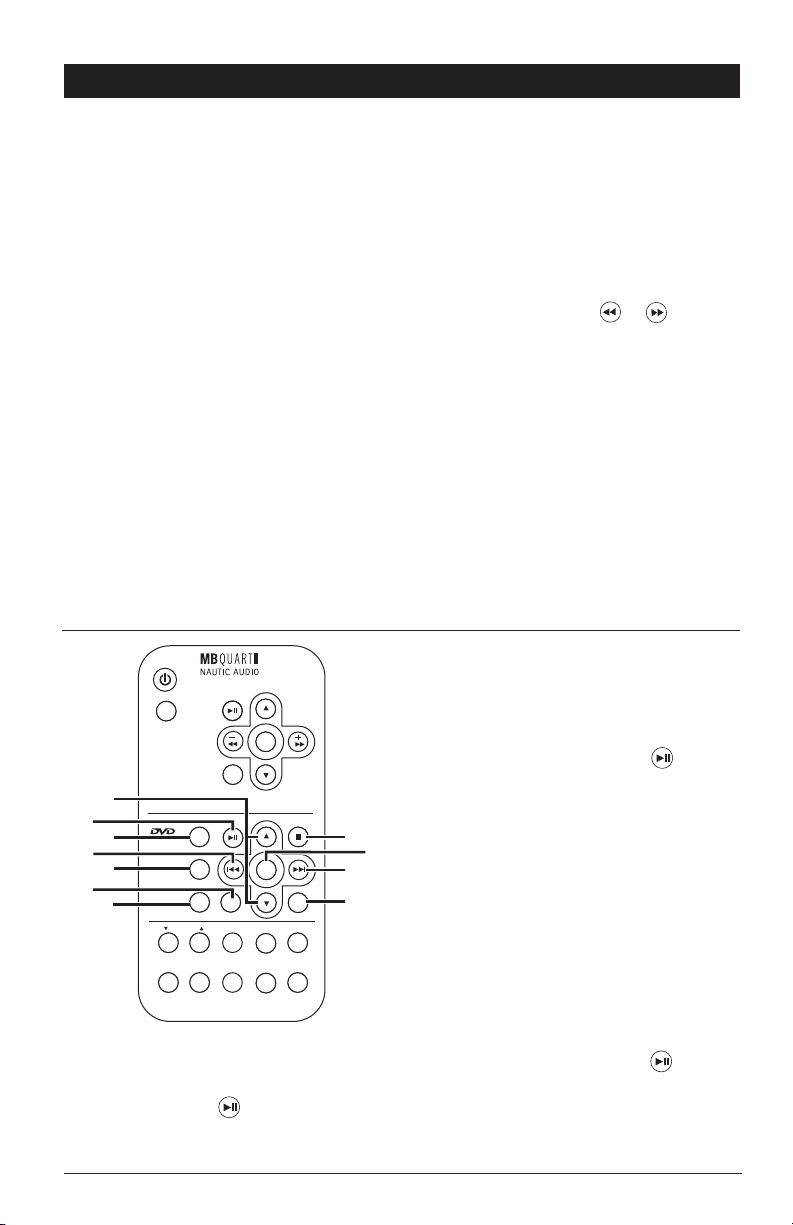
DVD Operation Section
21. Navigation Buttons:
These buttons serve as cursor button to select
items up and down.
22. Play/Pause Button:
Press to pause disc play, press again to
resume play.
DIM
ENT
BND
LOUD
MUTE
VOLUME
RPT SHF SCN
DIR / CAT
S-MOD
IPOD MENU
135
6
2
7
4
9
80
MODE
MENU
OK
DVD
SETUP
SUB-T
TITLE
AUDIO
DVD
MENU
21
22
23
24
25
26
27
28
29
30
31
23. DVD Setup Button:
Press to display onscreen Setup menu.
24. Fast Reverse Disc Play/Navigation Button:
Press this button to fast reverse disc play. Each
time the button is pressed, the speed changes.
To resume normal play, press the button.
25. Title Button:
Press this button to display the disc title.
26. Subtitle Button:
Press to access DVD’s subtitle languages.
27. Audio Button:
Press to access DVD’s audio settings.
28. Stop Button:
Press to stop play of picture or audio.
29. OK Button:
Executes the selected item.
30. Fast Forward Disc Play/Navigation Button:
Press this button to fast reverse disc play. Each
time the button is pressed, the speed changes.
To resume normal play, press the button.
31. Menu Button:
Press to display the root menu that is stored
on the DVD disc.

6
Selecting the AM or FM Band:
Press the ENT BND button repeatedly and select
from FM1, FM2, FM3, AM1 or AM2.
Note: Radio station call letters may be displayed
instead of the radio band.
General Operations
Power On/Off:
Press the button to turn the unit on and off.
VOL
VOL
DIR/CAT RPT SHF SCN
DIM
S-MOD
DVD SETUP
iPOD MENU
MENU
ENT
BND
MUTE
MODE
123456
EQ
DISP
ASM
SETUP
LOUD
LOUD
ST
D-DIR
Selecting a Play Source:
To select a play source, press the MODE button
until the desired source appears in the display:
AM1, AM2, FM1, FM2 or FM3
(AM and FM Radio),
SIRIUS (Satellite Radio, if connected),
CDP-PLAY (CD Player, if connected),
DVD PLAY (DVD Player, if connected),
USB (MP3 Player, if connected),
IPOD (IPOD, if connected) and
CD-CH (CD Changer, if connected.
Note: For auxiliary input sources see auxiliary
input operations for more information.
Dimming the Display:
Press and hold the button to dim the bright-
ness of the display. Press and hold again to
restore the brightness of display.
VOL
VOL
DIR/CAT RPT SHF SCN
DIM
S-MOD
DVD SETUP
iPOD MENU
MENU
ENT
BND
MUTE
MODE
123456
EQ
DISP
ASM
SETUP
LOUD
LOUD
ST
D-DIR
Hold
VOL
VOL
DIR/CAT RPT SHF SCN
DIM
S-MOD
DVD SETUP
iPOD MENU
MENU
ENT
BND
MUTE
MODE
123456
EQ
DISP
ASM
SETUP
LOUD
LOUD
ST
D-DIR
Display Selection:
Press the DISP button to display the information
according to the mode selected.
Example: Press the DISP button in the Sirius
radio mode to display SONG-TITLE _
> ARTIST _
>
CATEGORY.
VOL
VOL
DIR/CAT RPT SHF SCN
DIM
S-MOD
DVD SETUP
iPOD MENU
MENU
ENT
BND
MUTE
MODE
123456
EQ
DISP
ASM
SETUP
LOUD
CATEGORY
SAT
VOL
VOL
DIR/CAT RPT SHF SCN
DIM
S-MOD
DVD SETUP
iPOD MENU
MENU
ENT
BND
MUTE
MODE
123456
EQ
DISP
ASM
SETUP
LOUD
LOUD
ST
D-DIR
AM/FM Radio Operations
Power On/Off:
Press the button to turn the unit on.
Selecting the Play Source:
Press the MODE button until “AM1, AM2, FM1,
FM2 or FM3 or radio station call letters” appear
in the display.
VOL
VOL
DIR/CAT RPT SHF SCN
DIM
S-MOD
DVD SETUP
iPOD MENU
MENU
ENT
BND
MUTE
MODE
123456
EQ
DISP
ASM
SETUP
LOUD
LOUD
ST
D-DIR

7
AM/FM Radio Operation (Continued)
Manually Tuning in a Radio Station:
Press and hold either the or button until
“MANUAL” appears in the display then release.
Then press the or until the desired radio
station appears in the display.
VOL
VOL
DIR/CAT RPT SHF SCN
DIM
S-MOD
DVD SETUP
iPOD MENU
MENU
ENT
BND
MUTE
MODE
123456
EQ
DISP
ASM
SETUP
LOUD
ST
Lower
Frequency
Higher
Frequency
Tuning in a Radio Station Using Seek:
Press and release either the or button
and the tuner will scan up to the next strong sta-
tion, stop seeking and start playing.
VOL
VOL
DIR/CAT RPT SHF SCN
DIM
S-MOD
DVD SETUP
iPOD MENU
MENU
ENT
BND
MUTE
MODE
123456
EQ
DISP
ASM
SETUP
LOUD
LOUD
ST
D-DIR
Lower
Frequency
Higher
Frequency
Memorizing Radio Stations:
1. Press the ENT BND button to select either the
FM1, FM2, FM3, AM1 or AM2 radio band.
2. Tune in the desired radio station.
3. To store the station press and hold anyone of
the six radio station recall buttons until you
hear a beep.
VOL
VOL
DIR/CAT RPT SHF SCN
DIM
S-MOD
DVD SETUP
iPOD MENU
MENU
ENT
BND
MUTE
MODE
123456
EQ
DISP
ASM
SETUP
LOUD
LOUD
ST
D-DIR
Radio Station Recall Buttons
Memorized Radio Station Indicator
Recalling Memorized Radio Stations:
1. Press the ENT BND button to select either the
FM1, FM2, FM3, AM1 or AM2 radio band.
2. Press and release one of the six radio station
recall buttons to select the memorized radio
station.
VOL
VOL
DIR/CAT RPT SHF SCN
DIM
S-MOD
DVD SETUP
iPOD MENU
MENU
ENT
BND
MUTE
MODE
123456
EQ
DISP
ASM
SETUP
LOUD
LOUD
ST
D-DIR
VOL
VOL
DIR/CAT RPT SHF SCN
DIM
S-MOD
DVD SETUP
iPOD MENU
MENU
ENT
BND
MUTE
MODE
123456
EQ
DISP
ASM
SETUP
LOUD
ST
D-DIR
Automatically Store Radio Stations:
1. Press the ENT BND button to select either the
FM1, FM2, FM3, AM1 or AM2 radio band.
2.
Press and hold the ASM button and “SEARCH”
will appear in the display. The tuner will search
for the strongest stations and store them into
memory. The new stations will replace stations
that were previously stored in the current band.
Note: After the new stations are stored into
memory the tuner will start scanning the
newly memorized stations.
3. When a desired station is reached, press the
ASM button to stop scanning.
Hold
Note: The unit will automatically switch from FM
Mono to FM Stereo when the signal strength
increases to a stereo level. If the stereo signal
should become weak, the unit will switch back to
Mono. FM Stereo reception is indicated when the
“ST” appears in the display.

8
Sound Controls
Bass:
1. Select the Bass mode (BAS) by pressing the
SETUP button.
2. Increase the Bass by pressing the button.
Decrease the Bass by pressing the button.
3. Control reverts back to volume control after 5
seconds.
Volume:
Increase the volume by pressing the button.
Decrease the volume by pressing the button.
Bass, Treble, Balance, Fader and
Subwoofer Controls
Select the desired sound mode by pressing the
SETUP button. The modes will be displayed in
the following order: Bass, Treble, Balance, Fader,
Subwoofer Line Level Output and Subwoofer
Cutoff Frequency.
AM/FM Radio Operation (Continued)
Scanning Stored Radio Stations:
1. Press the ENT BND button to select either the
FM1, FM2, FM3, AM1 or AM2 radio band.
2. Press the ASM button and the tuner scans for
preset stations stored in the current band and
pauses for 5 seconds at each station. When a
desired station is reached, press the ASM but-
ton again to stop scanning.
VOL
VOL
DIR/CAT RPT SHF SCN
DIM
S-MOD
DVD SETUP
iPOD MENU
MENU
ENT
BND
MUTE
MODE
123456
EQ
DISP
ASM
SETUP
LOUD
LOUD
ST
D-DIR
VOL
VOL
DIR/CAT RPT SHF SCN
DIM
S-MOD
DVD SETUP
iPOD MENU
MENU
ENT
BND
MUTE
MODE
123456
LOUD
LOUD
ST
D-DIR
Increase
Decrease
VOL
VOL
VOL
VOL
VOL
VOL
DIR/CAT RPT SHF SCN
DIM
S-MOD
DVD SETUP
iPOD MENU
MENU
ENT
BND
MUTE
MODE
123456
LOUD
Increase
Decrease
VOL
VOL
DIR/CAT RPT SHF SCN
DIM
S-MOD
DVD SETUP
iPOD MENU
MENU
ENT
BND
MUTE
MODE
123456
EQ
DISP
ASM
SETUP
LOUD
Scanning for FM Radio Stations According
to Program Type (PTY):
1. Press the ENT BND button to select either the
FM1, FM2 or FM3 radio band.
2. Press the MENU button to display the pro-
gram type.
3. Press the or to select the desired pro-
gram type (PTY). (Example: News,
Information, Sports, etc.)
4. Press the or button to search a station
with the selected program type (PTY).
VOL
VOL
DIR/CAT RPT SHF SCN
DIM
S-MOD
DVD SETUP
iPOD MENU
MENU
ENT
BND
MUTE
MODE
123456
EQ
DISP
ASM
SETUP
LOUD
LOUD
ST
D-DIR
VOL
VOL
DIR/CAT RPT SHF SCN
DIM
S-MOD
DVD SETUP
iPOD MENU
MENU
ENT
BND
MUTE
MODE
123456
EQ
DISP
ASM
SETUP
LOUD
LOUD
ST
D-DIR
Lower Higher
VOL
VOL

9
Treble:
1. Select the Treble mode (TRB) by pressing the
SETUP button.
2. Increase the Treble by pressing the button.
Decrease the Treble by pressing the button.
3. Control reverts back to volume control after 5
seconds.
VOL
VOL
VOL
VOL
DIR/CAT RPT SHF SCN
DIM
S-MOD
DVD SETUP
iPOD MENU
MENU
ENT
BND
MUTE
MODE
123456
LOUD
Increase
Decrease
Balance:
1. Select the Balance mode (BAL) by pressing the
SETUP button.
2. To adjust the amount of sound output to the
Right speakers press the button.
To adjust the amount of sound output to the
Left speakers press the button.
BAL L=R = Equal sound right and left speakers.
BAL 10R = Right speakers only.
BAL 10L = Left speakers only.
3. Control reverts back to volume control after 5
seconds.
VOL
VOL
VOL
VOL
DIR/CAT RPT SHF SCN
DIM
S-MOD
DVD SETUP
iPOD MENU
MENU
ENT
BND
MUTE
MODE
123456
LOUD
Right
Left
Sound Controls (Continued)
Fader:
1. Select the Fader mode (FAD) by pressing the
SETUP button.
2. To adjust the amount of sound output to the
Rear speakers press the button.
To adjust the amount of sound output to the
Front speakers press the button.
FAD F=R = Equal sound front and rear speakers.
FAD R10 = Rear speakers only.
FAD F10 = Front speaker only.
3. Control reverts back to volume control after 5
seconds.
VOL
VOL
VOL
VOL
DIR/CAT RPT SHF SCN
DIM
S-MOD
DVD SETUP
iPOD MENU
MENU
ENT
BND
MUTE
MODE
123456
LOUD
Rear
Front
Subwoofer Line Level Output (SWG):
1. Select the Subwoofer Line Level Output mode
(SWG) by pressing the SETUP button.
2. To adjust the subwoofer line level output higher
press the button.
To adjust the subwoofer line level output higher
press the button.
SWG 00 = No gain.
SWG -12 = Minimum level.
SWG 12 = Maximum level.
3. After 5 seconds control reverts back to volume
control.
Note: If subwoofer output is turned Off, Subwoofer
Line Level Output mode is not accessi
ble. See
Subwoofer Output (page 10) for more informa
tion.
VOL
VOL
VOL
VOL
DIR/CAT RPT SHF SCN
DIM
S-MOD
DVD SETUP
iPOD MENU
MENU
ENT
BND
MUTE
MODE
123456
LOUD
Higher
Lower

10
Sound Controls (Continued)
Subwoofer Output:
Press and hold the EQ button to turn subwoofer
output On and Off. “SW” appears in the display
when the subwoofer is On and “SW” does not
appear when the subwoofer output is Off.
VOL
VOL
DIR/CAT RPT SHF SCN
DIM
S-MOD
DVD SETUP
iPOD MENU
MENU
ENT
BND
MUTE
MODE
123456
EQ
DISP
ASM
SETUP
LOUD
Hold
SW
“SW” Subwoofer on Indicator
Loudness:
To boost high and low tones at low volume lev-
els, press and hold the ENT BND button until
“LOUD ON” appears in the display. To deselect,
press and hold the ENT BND button again until
“LOUD OFF” appears in the display.
VOL
VOL
DIR/CAT RPT SHF SCN
DIM
S-MOD
DVD SETUP
iPOD MENU
MENU
ENT
BND
MUTE
MODE
123456
EQ
DISP
ASM
SETUP
LOUD
Hold
Mute:
Press and release the MUTE button to mute the
volume level. If a disc is playing the MUTE but-
ton will pause the disc. Press the MUTE button
again to restore the volume or resume playing
the disc.
VOL
VOL
DIR/CAT RPT SHF SCN
DIM
S-MOD
DVD SETUP
iPOD MENU
MENU
ENT
BND
MUTE
MODE
123456
EQ
DISP
ASM
SETUP
LOUD
Equalizer (EQ):
Press the EQ button to choose between the pre-
set equalizer settings: FLAT, CLASSICS, POP M,
ROCK M, JAZZ and DSP OFF as indicated in the
display area.
VOL
VOL
DIR/CAT RPT SHF SCN
DIM
S-MOD
DVD SETUP
iPOD MENU
MENU
ENT
BND
MUTE
MODE
123456
EQ
DISP
ASM
SETUP
LOUD
Subwoofer Cutoff Frequency (SWF):
1. Select the Subwoofer Cutoff Frequency mode
(SWF) by pressing the SETUP button.
2. To adjust the subwoofer cutoff frequency press
the or button.
SWF 160 = Low Pass 160Hz
SWF 120 = Low Pass 120Hz
SWF 80 = Low Pass 80Hz
3. After 5 seconds control reverts back to volume
control.
Note: If subwoofer output is turned Off, Subwoofer
Cutoff Frequency mode is not accessi
ble. See
Subwoofer Output (page 10) for more informa
tion.
VOL
VOL
DIR/CAT RPT SHF SCN
DIM
S-MOD
DVD SETUP
iPOD MENU
MENU
ENT
BND
MUTE
MODE
123456
LOUD
Higher
Lower
VOL
VOL

11
Disc Warnings
Disc Formats Supported by this Player:
Label side up
Do not touch
the underside
of the disc
Do not bend
Wipe the disc from
the center toward
the outside edge
Disc Cleaning:
Use a dry soft cloth to wipe disc the surface. If the
disc is quite dirty, use a soft cloth slightly moist with
isopropyl (rubbing) alcohol. Never use solvents
such as benzine, thinner or conventional record
cleaners as they may mar the surface of the disc.
Note: A disc may become somewhat scratched
(although not enough to make it unusable) depend-
ing on handling and conditions in the usage envi-
ronment.
DVD
12cm disc
(Single-sided disc only)
CD
12cm disc
MP3
12cm disc
Handling:
• Dirt, dust, scratches and warping disc will cause
non operation.
• Do not place stickers on disc or scratch disc.
• Do not place discs in the following places: Direct
sunlight, Dirty, dusty and damp areas, Near car
heaters, Car seats or dashboard.
CD Operation (Option)
General Operations:
1. Press the button to turn the unit On.
2.
Gently insert the disc into the slot with the label
side up. The unit will automatically load the disc.
Note: If a CD does not auto-load, DO NOT FORCE
it into the slot, as you may already have a CD
loaded as indicated by the inserted disc icon.
Label Side Up
CD Track Selection:
Press the button to select a lower track.
Press the button to select a higher track.
The track number will appear in the display.
VOL
VOL
DIR/CAT RPT SHF SCN
DIM
S-MOD
DVD SETUP
iPOD MENU
MENU
ENT
BND
MUTE
MODE
123456
EQ
DISP
ASM
SETUP
LOUD
Lower
Track
Higher
Track
Track
Number
Model: MBB-CD
VOL
VOL
DIR/CAT RPT SHF SCN
DIM
S-MOD
DVD SETUP
iPOD MENU
MENU
ENT
BND
MUTE
MODE
123456
EQ
DISP
ASM
SETUP
LOUD
LOUD
ST
D-DIR
Inserted Disc Icon
MBB-CD CD Player (Optional Accessory)

12
VOL
VOL
DIR/CAT RPT SHF SCN
DIM
S-MOD
DVD SETUP
iPOD MENU
MENU
ENT
BND
MUTE
MODE
123456
EQ
DISP
ASM
SETUP
LOUD
Pausing a CD:
Press the button to pause the disc, press it
again to resume play.
VOL
VOL
DIR/CAT RPT SHF SCN
DIM
S-MOD
DVD SETUP
iPOD MENU
MENU
ENT
BND
MUTE
MODE
123456
EQ
DISP
ASM
SETUP
LOUD
Preview CD Tracks:
Press the SCN button until “SCN” appears in the
display. Each track on the disc will play for 10
seconds. To cancel this feature press the SCN
button until “SCN” disappears from the display.
VOL
VOL
DIR/CAT RPT SHF SCN
DIM
S-MOD
DVD SETUP
iPOD MENU
MENU
ENT
BND
MUTE
MODE
123456
EQ
DISP
ASM
SETUP
LOUD
Random CD Track Play Order:
Press the SHF button until “SHF” appears in the
display. The tracks on the disc will play in a ran-
dom order. To cancel this feature press the SHF
button again.
VOL
VOL
DIR/CAT RPT SHF SCN
DIM
S-MOD
DVD SETUP
iPOD MENU
MENU
ENT
BND
MUTE
MODE
123456
EQ
DISP
ASM
SETUP
LOUD
Ejecting a CD:
Press the button to eject a disc.
Repeating a CD Track:
The WBB-CD’s default setting is to play the entire
disc and then continually repeat the disc.
To repeat a CD track press the RPT button and
“RPT” appear in the display. The CD track will
now play repeatedly. Press the RPT button one
more time to cancel track repeat.
Disc Track Selection:
Press the button to select a lower track.
Press the button to select a higher track.
The track number will appear in the display.
(See CD Operation for more details)
VOL
VOL
DIR/CAT RPT SHF SCN
DIM
S-MOD
DVD SETUP
iPOD MENU
MENU
ENT
BND
MUTE
MODE
123456
EQ
DISP
ASM
SETUP
LOUD
Lower
Track
Higher
Track
Track
Number
CD Operation (Option) (Continued)
Model: MBB-CD
MP3 Disc Operation (Option)
Model: MBB-CD

13
General Operations:
1. Press the button to turn the unit On.
2. Open the door on the MBB-CD and insert the
USB connector into the slot.
3. The unit will automatically switch to the USB2
mode and start playing.
Note: The controls on the MP3 player will
become inoperable, and the WM1-BB will now
control the MP3 player.
Track Selection:
Press the button to select a lower track.
Press the button to select a higher track.
The track number will appear in the display.
Pausing a Track:
Press the button to pause the track, press it
again to resume play.
Display Selection:
Press the DISP button to display the following
MP3 disc information: track and elapse time.
Repeating a Track:
Random Track Play Order:
Preview Tracks:
(See CD Operation for details)
VOL
VOL
DIR/CAT RPT SHF SCN
DIM
S-MOD
DVD SETUP
iPOD MENU
MENU
ENT
BND
MUTE
MODE
123456
EQ
DISP
ASM
SETUP
LOUD
SW
Lower
Track
Higher
Track
Track
Number
VOL
VOL
DIR/CAT RPT SHF SCN
DIM
S-MOD
DVD SETUP
iPOD MENU
MENU
ENT
BND
MUTE
MODE
123456
EQ
DISP
ASM
SETUP
LOUD
VOL
VOL
DIR/CAT RPT SHF SCN
DIM
S-MOD
DVD SETUP
iPOD MENU
MENU
ENT
BND
MUTE
MODE
123456
EQ
DISP
ASM
SETUP
LOUD
General Operations:
1. Press the button to turn the unit On.
2. Press the MODE button until “AUX2 IN”
appears in the display.
3. Refer to the audio device’s owners manual for
proper operation.
Note: The WM1-BB will not control the auxiliary
source, but can adjust the sound controls.
USB Operation (Option)
Model: MBB-CD
Auxiliary Audio Input Operation (Option)
Model: MBB-CD

14
General Operations:
1. Press the button to turn the unit On.
2.
Gently insert the disc into the slot with the label
side up. The unit will automatically load the disc.
Note: If a CD does not auto-load, DO NOT
FORCE it into the slot, as you may already have a
CD loaded as indicated by the inserted disc icon.
Label Side Up
CD Track Selection:
Press the button to select a lower track.
Press the button to select a higher track.
The track number will appear in the display.
VOL
VOL
DIR/CAT RPT SHF SCN
DIM
S-MOD
DVD SETUP
iPOD MENU
MENU
ENT
BND
MUTE
MODE
123456
EQ
DISP
ASM
SETUP
LOUD
Lower
Track
Higher
Track
Track
Number
VOL
VOL
DIR/CAT RPT SHF SCN
DIM
S-MOD
DVD SETUP
iPOD MENU
MENU
ENT
BND
MUTE
MODE
123456
EQ
DISP
ASM
SETUP
LOUD
Pausing a CD:
Press the button to pause the disc, press it
again to resume play.
VOL
VOL
DIR/CAT RPT SHF SCN
DIM
S-MOD
DVD SETUP
iPOD MENU
MENU
ENT
BND
MUTE
MODE
123456
EQ
DISP
ASM
SETUP
LOUD
Repeating a CD Track:
The WM1-DVD’s default setting is to repeat the
disc. So when the CD mode is selected, “RPT”
appears in the display, the disc will play the
entire disc and then continually repeat the disc.
To repeat a CD track press and hold the RPT but-
ton two times. “RPT” on the first press and hold
will disappear then on the second press and hold
“RPT” will reappear. The CD track will now play
repeatedly. Press and hold the RPT button one
more time to cancel track repeat.
The repeat feature operates in the following
sequence: Disc Repeat _
> Repeat Off _
> Track
Repeat _
> Disc Repeat . . .
CD Operation (Option)
Model: MBB-DVD
VOL
VOL
DIR/CAT RPT SHF SCN
DIM
S-MOD
DVD SETUP
iPOD MENU
MENU
ENT
BND
MUTE
MODE
123456
EQ
DISP
ASM
SETUP
LOUD
LOUD
ST
D-DIR
Inserted Disc Icon
MBB-DVD DVD Player (Optional Accessory)
Hold

15
Random CD Track Play Order:
Press and hold the SHF button until “SHF”
appears in the display. The tracks on the disc will
play in a random order. To cancel this feature
press and hold the SHF button again.
VOL
VOL
DIR/CAT RPT SHF SCN
DIM
S-MOD
DVD SETUP
iPOD MENU
MENU
ENT
BND
MUTE
MODE
123456
EQ
DISP
ASM
SETUP
LOUD
General Operations:
1. Press the button to turn the unit On.
2. Open the door on the MBB-CD and insert the
USB connector into the slot.
3. The unit will automatically switch to the USB2
mode and start playing.
Note: The controls on the MP3 player will
become inoperable, and the WM1-BB will now
control the MP3 player.
Track Selection:
Press the button to select a lower track.
Press the button to select a higher track.
The track number will appear in the display.
Display Selection:
Press the DISP button to display the following
MP3 disc information: track and elapse time.
VOL
VOL
DIR/CAT RPT SHF SCN
DIM
S-MOD
DVD SETUP
iPOD MENU
MENU
ENT
BND
MUTE
MODE
123456
EQ
DISP
ASM
SETUP
LOUD
SW
Lower
Track
Higher
Track
Track
Number
VOL
VOL
DIR/CAT RPT SHF SCN
DIM
S-MOD
DVD SETUP
iPOD MENU
MENU
ENT
BND
MUTE
MODE
123456
EQ
DISP
ASM
SETUP
LOUD
USB Operation (Option)
Model: MBB-DVD
Disc Track Selection:
Press the button to select a lower track.
Press the button to select a higher track.
The track number will appear in the display.
(See CD Operation for more details)
VOL
VOL
DIR/CAT RPT SHF SCN
DIM
S-MOD
DVD SETUP
iPOD MENU
MENU
ENT
BND
MUTE
MODE
123456
EQ
DISP
ASM
SETUP
LOUD
Lower
Track
Higher
Track
Track
Number
MP3 Disc Operation (Option)
Model: MBB-DVD
Hold

16
General Operations:
1. Press the button to turn the unit On.
2. Press the MODE button until “AV IN” appears
in the display.
3. Refer to the audio/video device’s owners man-
ual for proper operation.
Note: The WM1-BB will not control the auxiliary
source, but can adjust the sound controls.
Pausing a DVD:
Press the button to pause the disc, press it
again to resume play.
General Operations:
1. Press the button to turn the unit On.
2.
Gently insert the disc into the slot with the label
side up. The unit will automatically load the disc.
Note:
If a DVD does not auto-load, DO NOT FORCE
it into the slot, as you may already have a DVD
loaded as indicated by the inserted disc icon.
Playing a DVD:
Press the button to play the disc.
VOL
VOL
DIR/CAT RPT SHF SCN
DIM
S-MOD
DVD SETUP
iPOD MENU
MENU
ENT
BND
MUTE
MODE
123456
EQ
DISP
ASM
SETUP
LOUD
LOUD
ST
D-DIR
Inserted Disc Icon
VOL
VOL
DIR/CAT RPT SHF SCN
DIM
S-MOD
DVD SETUP
iPOD MENU
MENU
ENT
BND
MUTE
MODE
123456
EQ
DISP
ASM
SETUP
LOUD
VOL
VOL
DIR/CAT RPT SHF SCN
DIM
S-MOD
DVD SETUP
iPOD MENU
MENU
ENT
BND
MUTE
MODE
123456
EQ
DISP
ASM
SETUP
LOUD
Label Side Up
Auxiliary Audio/Video Input Operation (Option)
Model: MBB-DVD
DVD Operation (Option)
Model: MBB-DVD
USB Operation (Option) (Continued)
Model: MBB-DVD
Pausing a Track:
Press the button to pause the track, press it
again to resume play.
VOL
VOL
DIR/CAT RPT SHF SCN
DIM
S-MOD
DVD SETUP
iPOD MENU
MENU
ENT
BND
MUTE
MODE
123456
EQ
DISP
ASM
SETUP
LOUD
Repeating a Track and Random Track Play
Order:
(See CD Operation for details)
VOL
VOL
DIR/CAT RPT SHF SCN
DIM
S-MOD
DVD SETUP
iPOD MENU
MENU
ENT
BND
MUTE
MODE
123456
EQ
DISP
ASM
SETUP
LOUD
LOUD
ST
D-DIR
Inserted Disc Icon

17
Stopping a DVD:
Press the button to stop the disc. To resume
play, press the button.
Pressing the button 2 times. Then pressing
the button and the disc will start playing
from the beginning.
VOL
VOL
DIR/CAT RPT SHF SCN
DIM
S-MOD
DVD SETUP
iPOD MENU
MENU
ENT
BND
MUTE
MODE
123456
EQ
DISP
ASM
SETUP
LOUD
Ejecting a DVD:
Press the button to eject a disc.
Fast Forward / Fast Reverse Disc Play:
Press and hold the (fast forward) or
(fast reverse) button during play. Each time the
button is pressed and held, the speed of fast for-
ward/fast reverse changes in the following order:
2X, 4X, 8X, 20X
To resume normal play, press the button.
DVD Chapter Selection:
Press the button to select a lower chapter.
Press the button to select a higher chapter.
The chapter number will appear in the display.
Chapter selection can also be selected by using
the remote control. Press the chapter selection
number button that corresponds to the chapter
you want to play.
For example: If you want to play chapter 8, press
button 8button.
If you want to play chapter 28, press the 2 but-
ton followed immediately by the 8 button.
Chapter 28 will start playing and “28” will appear
in the display.
VOL
VOL
DIR/CAT RPT SHF SCN
DIM
S-MOD
DVD SETUP
iPOD MENU
MENU
ENT
BND
MUTE
MODE
123456
EQ
DISP
ASM
SETUP
LOUD
Lower
Chapter
Higher
Chapter
Chapter
Number
RPT SHF SCN
DIR / CAT
135
6
2
7
4
9
80
SUB-TAUDIO
DVD
MENU
VOL
VOL
DIR/CAT RPT SHF SCN
DIM
S-MOD
DVD SETUP
iPOD MENU
MENU
ENT
BND
MUTE
MODE
123456
EQ
DISP
ASM
SETUP
LOUD
Fast
Rewind
Fast
Forward
Audio Language Menu:
Press the AUDIO button during playback to select
the desired audio/language setup.
Menu Function:
Press the DVD MENU button during disc play
and the main menu will be displayed. Scroll
through the menu with the NAVIGATION BUT-
TONS. Select a feature by pressing the OK but-
ton.
VOLUME
OK
DVD
SETUP
SUB-T
TITLE
AUDIO
DVD
MENU
Navigation
Buttons
RPT SHF SCN
DIR / CAT
135
24
OK
SUB-T
TITLE
AUDIO
DVD
MENU
DVD Operation (Option) (Continued)
Model: MBB-DVD

18
Subtitle Language Menu:
Press the SUB-T button during playback. Each
time the button is pressed, the subtitle language
changes in sequential order.
• Some discs may only contain one subtitle lan-
guage.
• Depending on the disc, the number of subtitle
languages may be different.
RPT SHF SCN
DIR / CAT
135
6
2
7
4
9
80
OK
SUB-T
TITLE
AUDIO
DVD
MENU
System Setup Language Setup Audio Setup
SYSTEM SETUP
TV SYSTEM
SCREEN SAVER
TV TYPE
PASSWORD
RATING
DEFAULT
EXIT SETUP
Press the DVD SETUP button on the remote con-
trol to display the Setup Menu:
System Setup Page:
Use the navigation buttons to scroll between the
menu items. Make a selection by pressing the
OK button.
• TV System: NTSC, PAL, Auto
• Screen Saver: On, Off.
• TV Type: 4:3PS, 4:3LB, 16:9
• Password: _ _ _ _
• Rating: 1 Kid Safe
2 G
3 PG
4 PG13
5 PG-R
6 R
7 NC-17
8 Adult
• Default: Restore
• Exit Setup
Language Setup Page:
Use the navigation buttons to scroll between the
menu items. Make a selection by pressing the OK
button. Language Setup Options:
• OSD Language: English, German, Spanish,
French, Portuguese, Italian, Russian
• Audio Lang: English, German, Spanish,
French, Portuguese, Italian, Russian
• Subtitle Lang: English, German, Spanish,
French, Portuguese, Italian, Russian, Off
• Menu Lang: English, German, Spanish,
French, Portuguese, Italian, Russian, Off
• Exit Setup
Audio Setup Page:
Use the navigation buttons to scroll between the
menu items. Make a selection by pressing the OK
button. Audio Setup Options:
• Key: #, +3, +2, 0, -2, -4, b
• Exit Setup
DVD Operation (Option) (Continued)
Model: MBB-DVD
DVD Setup Menu (Option)
Model: MBB-DVD
Note: To access the DVD Setup Menu a DVD disc has to be inserted.

19
CD Changer Operation (Option)
Load CDs into Changer:
Insert the CD magazine into the external CD
changer.
Power On/Off:
Press the button to turn the unit On.
Selecting the Play Source:
Press the MODE button until “CD-CH” appears in
the display.
VOL
VOL
DIR/CAT RPT SHF SCN
DIM
S-MOD
DVD SETUP
iPOD MENU
MENU
ENT
BND
MUTE
MODE
123456
EQ
DISP
ASM
SETUP
LOUD
CD Track Selection:
Press the button to select a lower track.
Press the button to select a higher track.
The track number will appear in the display.
VOL
VOL
DIR/CAT RPT SHF SCN
DIM
S-MOD
DVD SETUP
iPOD MENU
MENU
ENT
BND
MUTE
MODE
123456
EQ
DISP
ASM
SETUP
LOUD
Lower
Track
Higher
Track
Track
Number
CD Disc Selection:
Press the 1button to select a lower disc in the
CD changer. Press the 2button to select a higher
disc in the CD changer. The disc number will
appear in the display.
Disc Number
VOL
VOL
DIR/CAT RPT SHF SCN
DIM
S-MOD
DVD SETUP
iPOD MENU
MENU
ENT
BND
MUTE
MODE
123456
EQ
DISP
ASM
SETUP
LOUD
Lower
Disc
Higher
Disc
VOL
VOL
DIR/CAT RPT SHF SCN
DIM
S-MOD
DVD SETUP
iPOD MENU
MENU
ENT
BND
MUTE
MODE
123456
EQ
DISP
ASM
SETUP
LOUD
Pausing a CD:
Press the button to pause the disc. Press it
again to resume play.
Repeating a CD Track or Disc:
Select the desired track to be repeated. Then press
the RPT button and “RPT” will appear in the dis-
play. This track will play repeatedly.
Press and hold the RPT button and “DRPT” will
appear in the display. The disc will play repeat-
edly.
To cancel either function, press the RPT button
again.
VOL
VOL
DIR/CAT RPT SHF SCN
DIM
S-MOD
DVD SETUP
iPOD MENU
MENU
ENT
BND
MUTE
MODE
123456
EQ
DISP
ASM
SETUP
LOUD

20
CD Changer Operation (Option) (Continued)
VOL
VOL
DIR/CAT RPT SHF SCN
DIM
S-MOD
DVD SETUP
iPOD MENU
MENU
ENT
BND
MUTE
MODE
123456
EQ
DISP
ASM
SETUP
LOUD
Preview CD Tracks or Disc:
Press the SCN button and “SCN” will appear in
the display. Each track on the current disc will
play for 10 seconds.
Press and hold the SCN button and “DSCN” will
appear in the display. The first track on every
disc will play for 10 seconds.
To cancel either function, press the SCN button
again.
VOL
VOL
DIR/CAT RPT SHF SCN
DIM
S-MOD
DVD SETUP
iPOD MENU
MENU
ENT
BND
MUTE
MODE
123456
EQ
DISP
ASM
SETUP
LOUD
Random CD Track or Disc Play Order:
Press the SHF button and “SHF” will appear in
the display. The tracks on this disc will play in
random order.
Press and hold the SHF button and “DSHF” will
appear in the display. The tracks on all the discs
will play in random order.
To cancel either function, press the SHF button
again.
Sirius Satellite Radio Setup (Option)
Note: If your Sirius tuner is not activated, call 1-888-539-7474 to activate. The Sirius Tuner ID Number
(ESN) is required during the activation process. Following the instructions below to access the Sirius
Tuner ID Number (ESN):
Accessing your Sirius Tuner ID Number (ESN):
1. Press the MODE button until “SIRIUS”
appears in the display area.
2. Press the MENU button until “Direct-T”
appears in the display area.
3. Press the ENT BND button 4 times “SR
CH000..” appears in the display area. The
ESN number will appear in the display in two
different screens.
4. Press the ENT BND button again to exit.
VOL
VOL
DIR/CAT RPT SHF SCN
DIM
S-MOD
DVD SETUP
iPOD MENU
MENU
ENT
BND
MUTE
MODE
123456
EQ
DISP
ASM
SETUP
LOUD
SAT
SW
VOL
VOL
DIR/CAT RPT SHF SCN
DIM
S-MOD
DVD SETUP
iPOD MENU
MENU
ENT
BND
MUTE
MODE
123456
EQ
DISP
ASM
SETUP
LOUD
SAT
VOL
VOL
DIR/CAT RPT SHF SCN
DIM
S-MOD
DVD SETUP
iPOD MENU
MENU
ENT
BND
MUTE
MODE
123456
EQ
DISP
ASM
SETUP
LOUD
SAT
SW
4 Times
Table of contents
Other MB QUART DVD Player manuals