MBCI EXEPTIONAL Metals EM SuperLok User manual

EM SuperLok
Field Seaming Tool Manual
®
CRIMPING ARM
(UP POSITION)
LOCKING ARM
(UP POSITION)
EQUIPMENT CHECKLIST
HAND CRIMPER
(Shipped Separately)
ELECTRIC SEAMER
DO NOT PULL
DO NOT LIFT
When handling seamer tool, always use
the handles to lift or pull it.
NEVER PICK IT UP BY THE LOCKING
ARM OR PULL IT BY THE ELECTRIC
CORD
FORMING
ARM
HANDLE
PHASE 1/PHASE 2
HAND TOOL
ERECTOR RESPONSIBILITY
This Seaming Equipment Kit was checked before shipment and found to be complete and in proper working condition. Upon
receipt of this kit, inspect for any damage that may occurred during shipment. If any damage is discovered, call MBCI immedi-
ately for instructions.
It is the erector’s responsibility to become familiar with, and operate the seaming equipment in accordance with the instructions
provided in this manual using safe construction practices. Failure to adhere to these instructions could result in damage to the
seaming equipment and/or roof panels, or injury to erection personnel.
EM SuperLok® Seaming Information
The seamer and the hand crimper are shipped in individual specially designed boxes accompanied by a field manual. Read the field manu-
al thoroughly before starting the seaming operation. Failure to adhere to these instructions will result in damage to the seamer
and/or panels. The erector will be held liable for any costs incurred for replacement or repair.
Pre-Seaming Information
1. Locate field manual in the hand crimper or seamer box and review operational procedures.
2. Locate power source and check against power requirements in field manual.
3. Check seams for proper engagement.
4. Clean dirt, debris and excess sealant from seams and panel surfaces to avoid interfering with the seaming operation.
5. Panels must be hand crimped at each clip and endlap as they are installed to prevent their separation by a strong wind. Panels
should be seamed with electric seaming tool as soon as possible after installation.

BEGINNING
PHASE 2 ACTION
FINISHED
PHASE 2 ACTION
BEGINNING
PHASE 1 ACTION
FINISHED
PHASE 1 ACTION
FORMING
ARM
FORMING
ARM
GREASE
ZERK
FITTINGS
HANDLE HANDLE
FORMING
ARM
FORMING
ARM
GREASE
ZERK
FITTINGS
HANDLE HANDLE
SEAMER MANUAL
2 SUBJECT TO CHANGE WITHOUT NOTICE SEE www.mbci.com FOR CURRENT INFORMATION EFFECTIVE JANUARY 23, 2015
EM SuperLok®
SEAMING OPERATION
To begin seaming with hand tool, set the hand tool on the seam making sure seam is in the PHASE 1 Action slot. Align the edge
of the hand tool with the end of the panel. Rotate the forming arm under the handle to produce 6” of PHASE 1 seam. This should
be done three times along the seam for a total of 18”.
Return to the end of the panel to begin PHASE 2 Action. Set hand tool onto seam making sure seam is in the PHASE 2 Action
slot. Align the edge of the hand tool with the edge of the panel. Rotate the forming arm under the handle to produce 6” of fin-
ished PHASE 2 seam. This should be done once per rib. The relationship of this 6” of finished seam to the 18” of crimped
seam is critical to the proper alignment of the rolls in the electric seamer.
The seam is now ready to accept the electric seamer.
CAUTION
It is critical that the panel seams are crimped and folded as shown before using the electric seamer. Failure to follow these
guidlines will result in damaged seams.
NOTE
All grease zerk fittings on the hand tool should be greased with lithium based grease daily.
12"
6"
HAND CRIMPED
STAGE 1
HAND TOOL
STAGE 2
As Panels are installed, hand seam at each clip with hand crimper. Panels should be completely seamed with electric seamer
as soon as possible.
Push locking arm down to lock hand crimper onto seam. If difficulty is encountered, check to make sure that hand crimper is
properly aligned on seam. Do not force locking arm.
Push crimping arm down to crimp panel. Return both the crimping arm and locking arm to the up position and remove tool from seam.
Houston, TX 877/713-6224
Adel, GA 888/446-6224
Atlanta, GA 877/512-6224
Atwater, CA 800/829-9324
Dallas, TX 800/653-6224
Indianapolis, IN 800/735-6224
Lubbock, TX 800/758-6224
Memphis, TN 800/206-6224
Oklahoma City, OK 800/597-6224
Omaha, NE 800/458-6224
Phoenix, AZ 888/533-6224
Richmond, VA 800/729-6224
Rome, NY 800/559-6224
Salt Lake City, UT 800/874-2404
San Antonio, TX 800/598-6224
Tampa, FL Sales Office 800/359-6224

SUBJECT TO CHANGE WITHOUT NOTICE SEE www.mbci.com FOR CURRENT INFORMATION EFFECTIVE JANUARY 23, 2014 3
SEAMER MANUAL
SEAMING OPERATION
CONTINUED
The electric seamer will run in one direction
only. To determine the direction of the seamer,
stand at the eave and look upslope. If the roof is
being installed left to right, the seamer will run
upslope. If the roof is being installed right to left,
the seamer will run downslope. An orientation
plate is on the seamer to assist you in placing
the seamer onto the seam properly. When roof
has endlaps, panels will always run right to left.
To begin seaming set seamer on seam with the
locking bar up, and to the open side of the seam.
The rear wheels should be even with the edge of
the roof panel. Push the locking bar down to
engage the rolls and turn the seamer on.
Stop seamer about one foot from end of panels.
Disengage locking bar and remove the electric
seamer. Finish seam with hand tool.
CAUTION
Seamer operation should be closely supervised
at all times. A safety line should be attached to the
seamer.
Houston, TX 877/713-6224
Adel, GA 888/446-6224
Atlanta, GA 877/512-6224
Atwater, CA 800/829-9324
Dallas, TX 800/653-6224
Indianapolis, IN 800/735-6224
Lubbock, TX 800/758-6224
Memphis, TN 800/206-6224
Oklahoma City, OK 800/597-6224
Omaha, NE 800/458-6224
Phoenix, AZ 888/533-6224
Richmond, VA 800/729-6224
Rome, NY 800/559-6224
Salt Lake City, UT 800/874-2404
San Antonio, TX 800/598-6224
Tampa, FL Sales Office 800/359-6224
EM SuperLok®
DIRECTION
OF ROOF
INSTALLATION
DIRECTION
OF ROOF
INSTALLATION
PANEL PROFILE
UNSEAMED
PANEL PROFILE
PHASE 1
PANEL PROFILE
PHASE 2

LOCKING
ARM
LIFTING
HANDLE
Litho in U.S.A. 1-2015
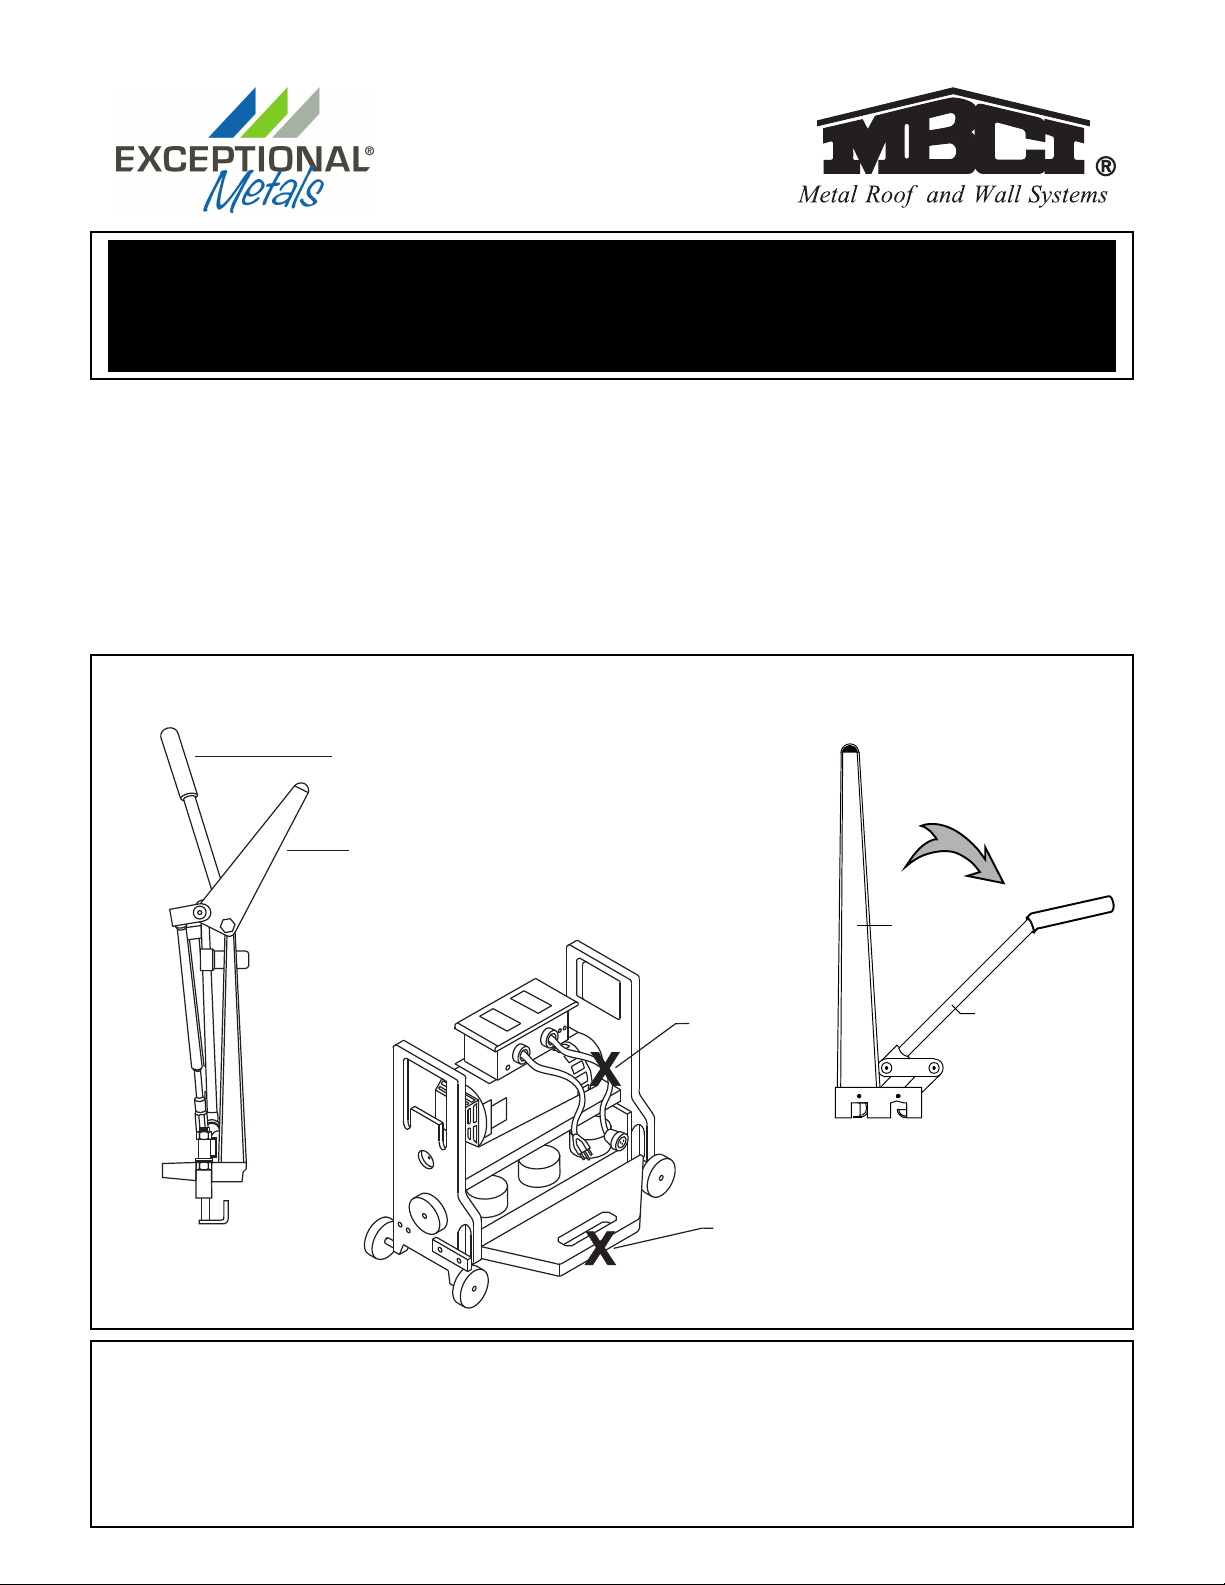
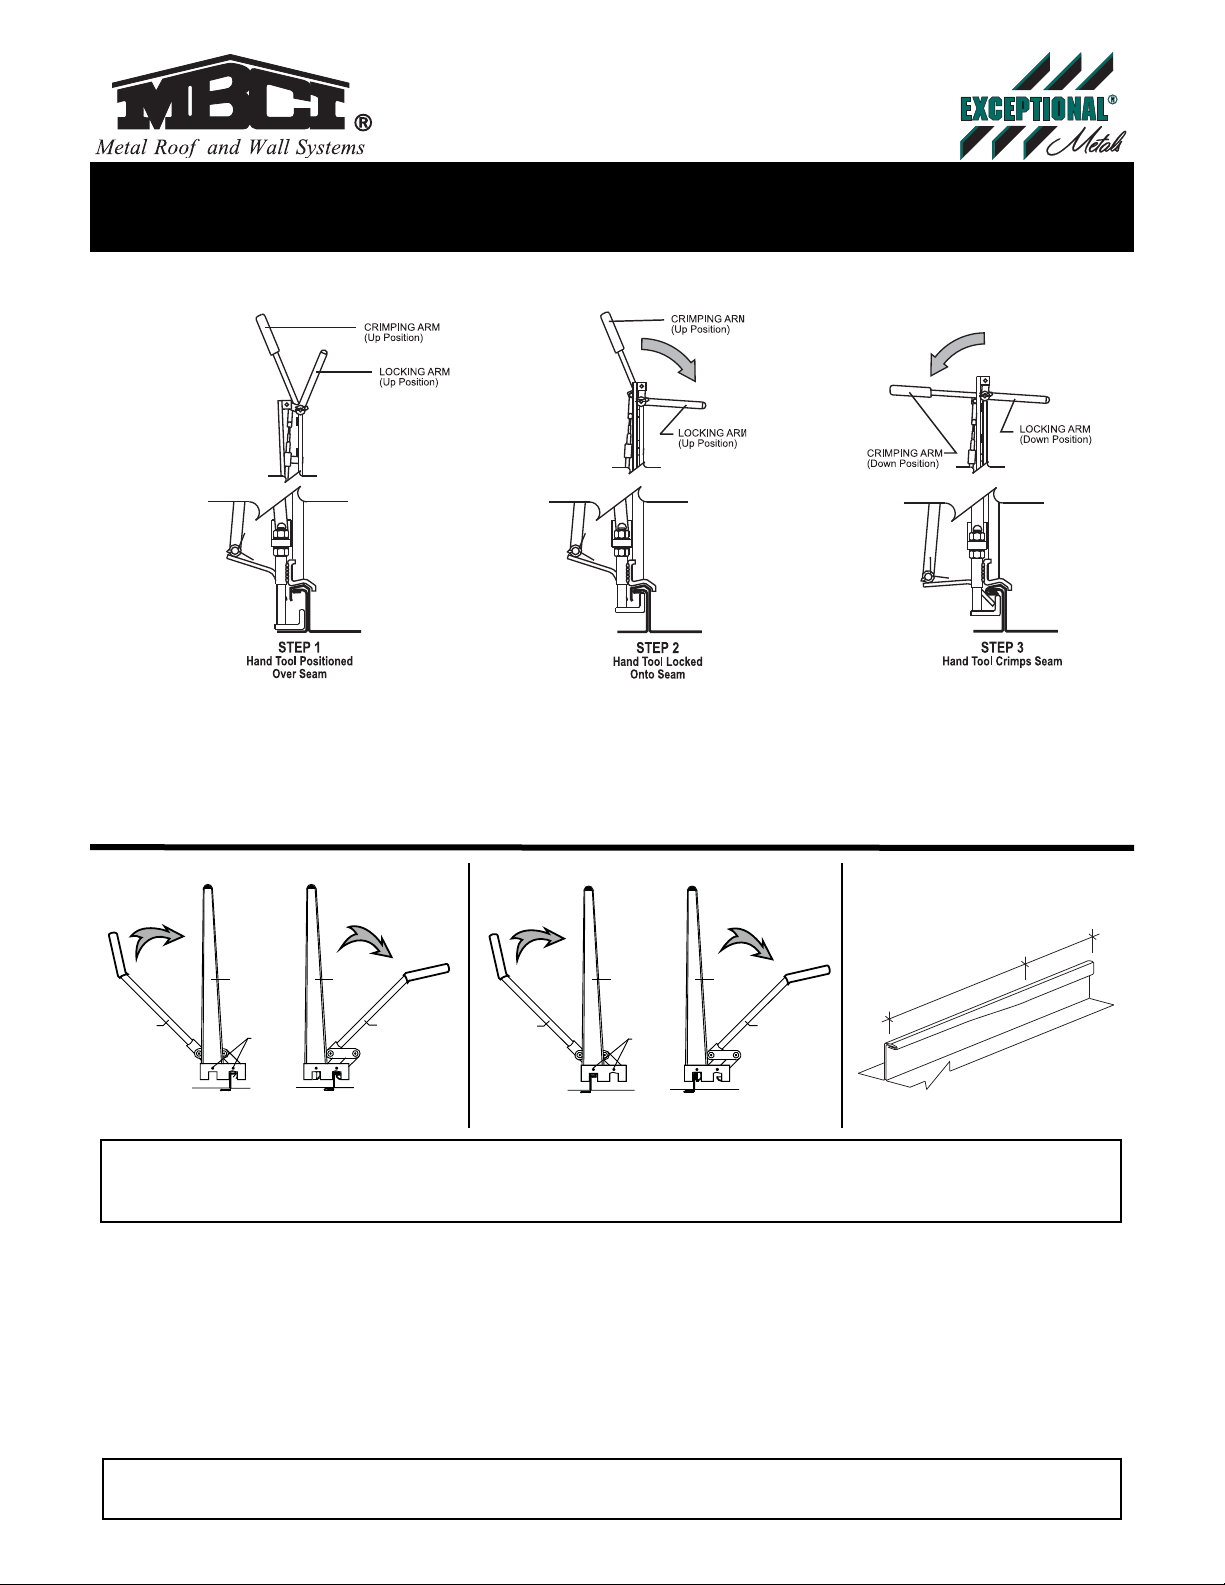
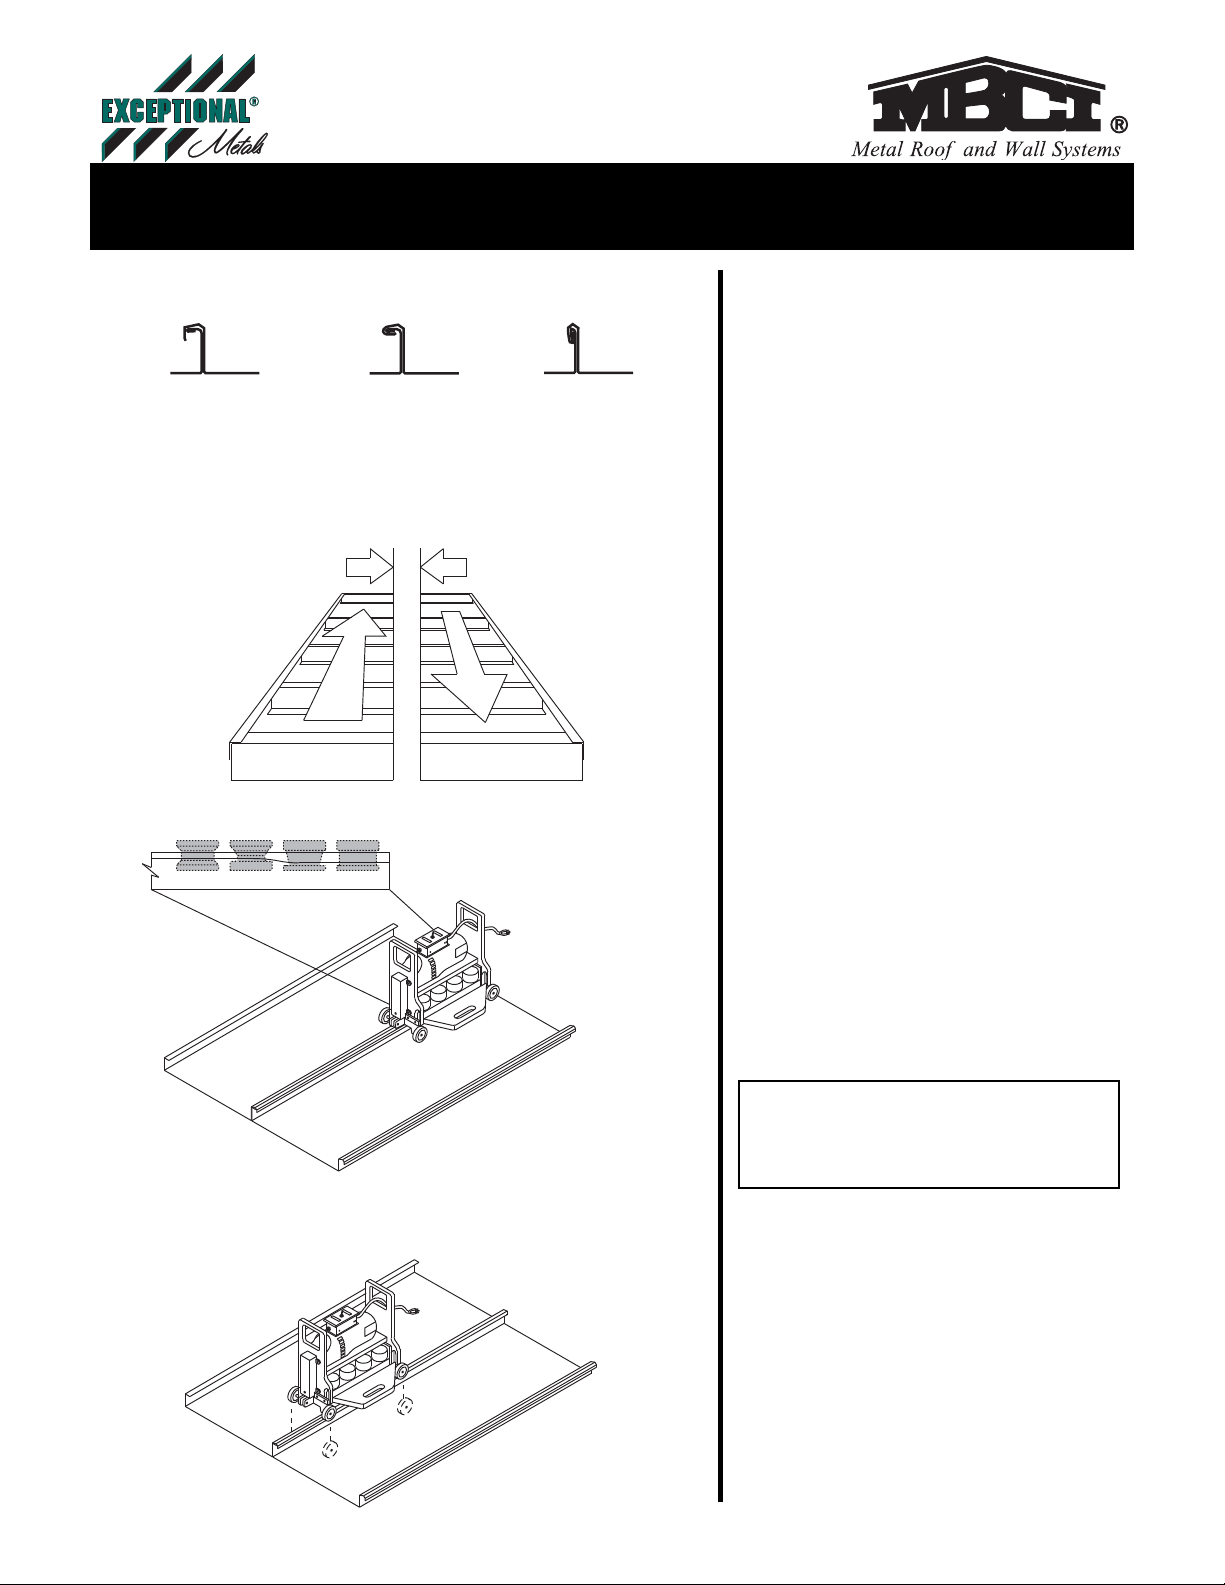
SEAMER SPECIFICATIONS
AND MAINTENANCE
Seamer will seam 20 to 30 F.P.M. depending on
gauge of panels and pitch of roof.
Seamer has 10 amp., 120 v., AC/DC motor.
All zerk fittings on seamer should be greased
with lithium based grease, once a day during
continuous duty.
Seamer should be cleaned with a nonflammable
solvent, often, to prevent a build-up of galval-
ume or sealant on the rolls. DO NOT SPILL
CLEANING SOLVENT ON ROOF PANELS.
THIS WILL VOID THE WARRANTIES ON THE
ROOF PANELS FINISHES.
Any adjustments, maintenance, modification, or
repair not otherwise specifically set forth in this
manual, must be conducted by MBCI.
If seamer motor should stop suddenly, check
reset button located on the side of the electrical
box on top of seamer motor. CONTINUED
RESETTING OF MOTOR COULD BE INDICA-
TIVE OF LOW VOLTAGE AND WILL CAUSE
DAMAGE TO SEAMING MACHINE. Check
size and length of electric cords. If problem still
persists, use an alternate power source.
SHIPPING INSTRUCTIONS
Replace the seaming machine in the box. All items
should be clean and in proper working condition.
A $50 minimum charge will be assessed for equip-
ment improperly cleaned or damaged.
Return seamer as soon as you are finished. For
seamer pick-up, please call FedEx Freight at 877-
918-6012 extension #5091070. If possible, call
the shipper the day before you are finished.
TOTAL SHIPPING WEIGHT — 177 LBS.
(Electric Seamer & Phase I/Phase II)
HAND CRIMPER SHIPPING WEIGHT - 42 LBS.
DESCRIPTIONS AND SPECIFICATIONS CONTAINED HEREIN WERE IN EFFECT AT THE TIME THIS PUBLICATION WAS APPROVED FOR
PRINTING. In a continuing effort to refine and improve products, MBCI reserves the right to discontinue products at any time or change spec-
ifications and/or designs without incurring obligation. To insure you have the latest information available, please inquire or visit our Web
Site at www.mbci.com. Application details are for illustration purposes only and may not be appropriate for all environmental conditions, build-
ing designs, or panel profiles. Projects should be engineered to conform to applicable building codes, regulations, and accepted industry prac-
tices. Insulation is not shown in these details for clarity. If there is a conflict between this manual and the erection drawings, the erection
drawings will take precedence.
For the most current information available, visit our Web Site at www.mbci.com
Houston,TX Lubbock, TX Oklahoma City, OK San Antonio, TX Dallas, TX Atlanta, GA Phoenix, AZ Richmond, VA
14031 West Hardy 5711 East FM-40 7000 S. Eastern Ave. 8677 I-10 East 1804 Jack McKay Blvd. 2280 Monier Ave. 660 South 91st Avenue 801 South Ave.
P.O. Box 38217 P.O. Box 10133 P.O. Box 95998 P.O. Box 69 Grand Prairie, TX 75053 P.O. Box 44729 P.O. Box 739 P.O. Box 239
Houston, TX 77238 Lubbock, TX 79408 Oklahoma City, OK 73143 Converse, TX 78109 800/653-6224 Atlanta, GA 30336 Tolleson, AZ 85353 Colonial Heights, VA 23834
877/713-6224 800/758-6224 800/597-6224 800/598-6224 877/512-6224 888/533-6224 800/729-6224
Indianapolis, IN Omaha, NE Memphis, TN Rome, NY Adel, GA Salt Lake City, UT Atwater, CA Tampa, FL (Sales Office)
1780 McCall Dr. 1011 Ellison Ave. 300 Highway 51 North 6168 State Route 233 1601 Rogers Rd. 1155 West 2300 North 550 Industry Way 402 N. Frontage Rd.
P.O. Box 657 P.O. Box 19085 P.O. Box 366 P.O. Box 4141 P.O. Box 1107 P.O. Box 16027 P.O. Box 793 P.O. Box 2418
Shelbyville, IN 46176 Omaha, NE 68119 Hernando, MS 38632 Rome, NY 13442 Adel, GA 31620 Salt Lake City, UT 84116 Atwater, CA 95301 Plant City, FL 33564
800/735-6224 800/458-6224 800/206-6224 800/559-6224 888/446-6224 800/874-2404 800/829-9324 800/359-6224