MBO ALPHA 1655 HS Plus User manual

BEDIENUNGSANLEITUNG
INSTRUCTION MANUAL
MODE D’EMPLOI
GEBRUIKSAANWIJZING
© by 4MBO International Electronic AG, Germany
ALPHA 1655 HS Plus
Schnurloses Telefon nach CT+ Standard
inklusive Headset

1
TABLE OF CONTENTS
TABLE OF CONTENTS ....................................................... . . . . . . . . . 1-2
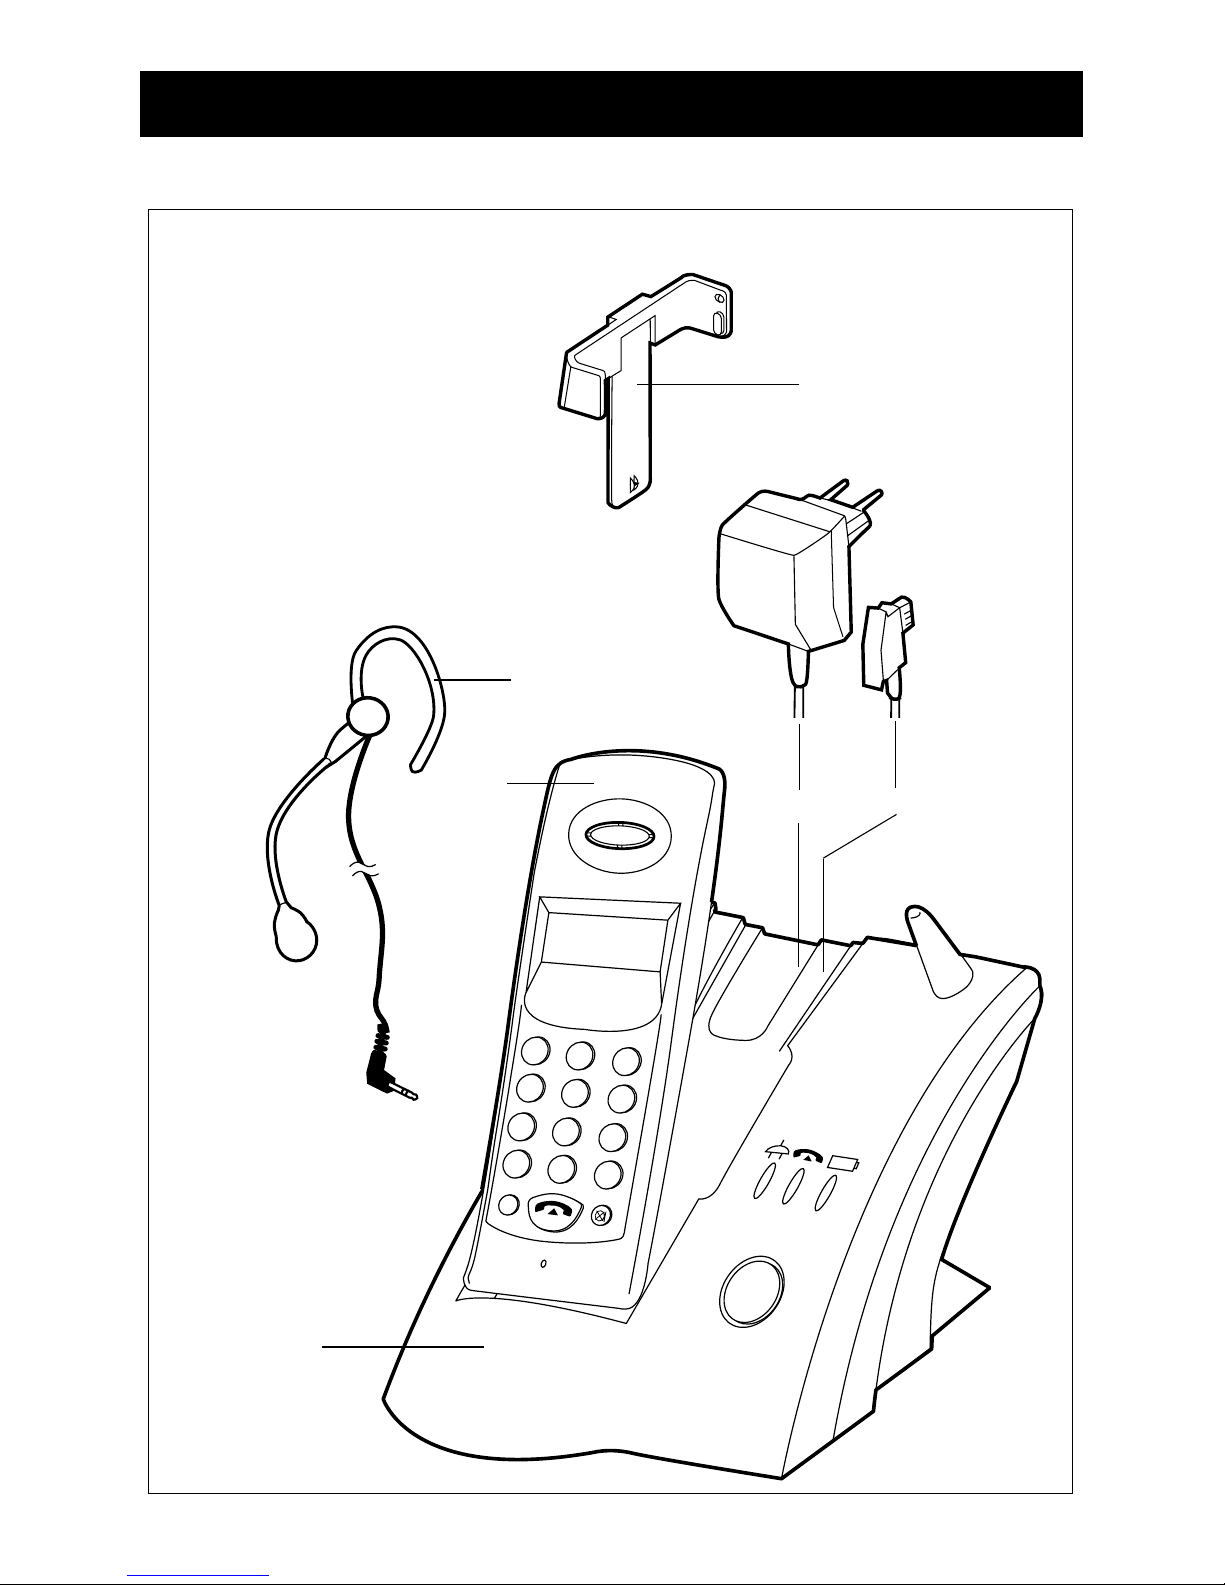
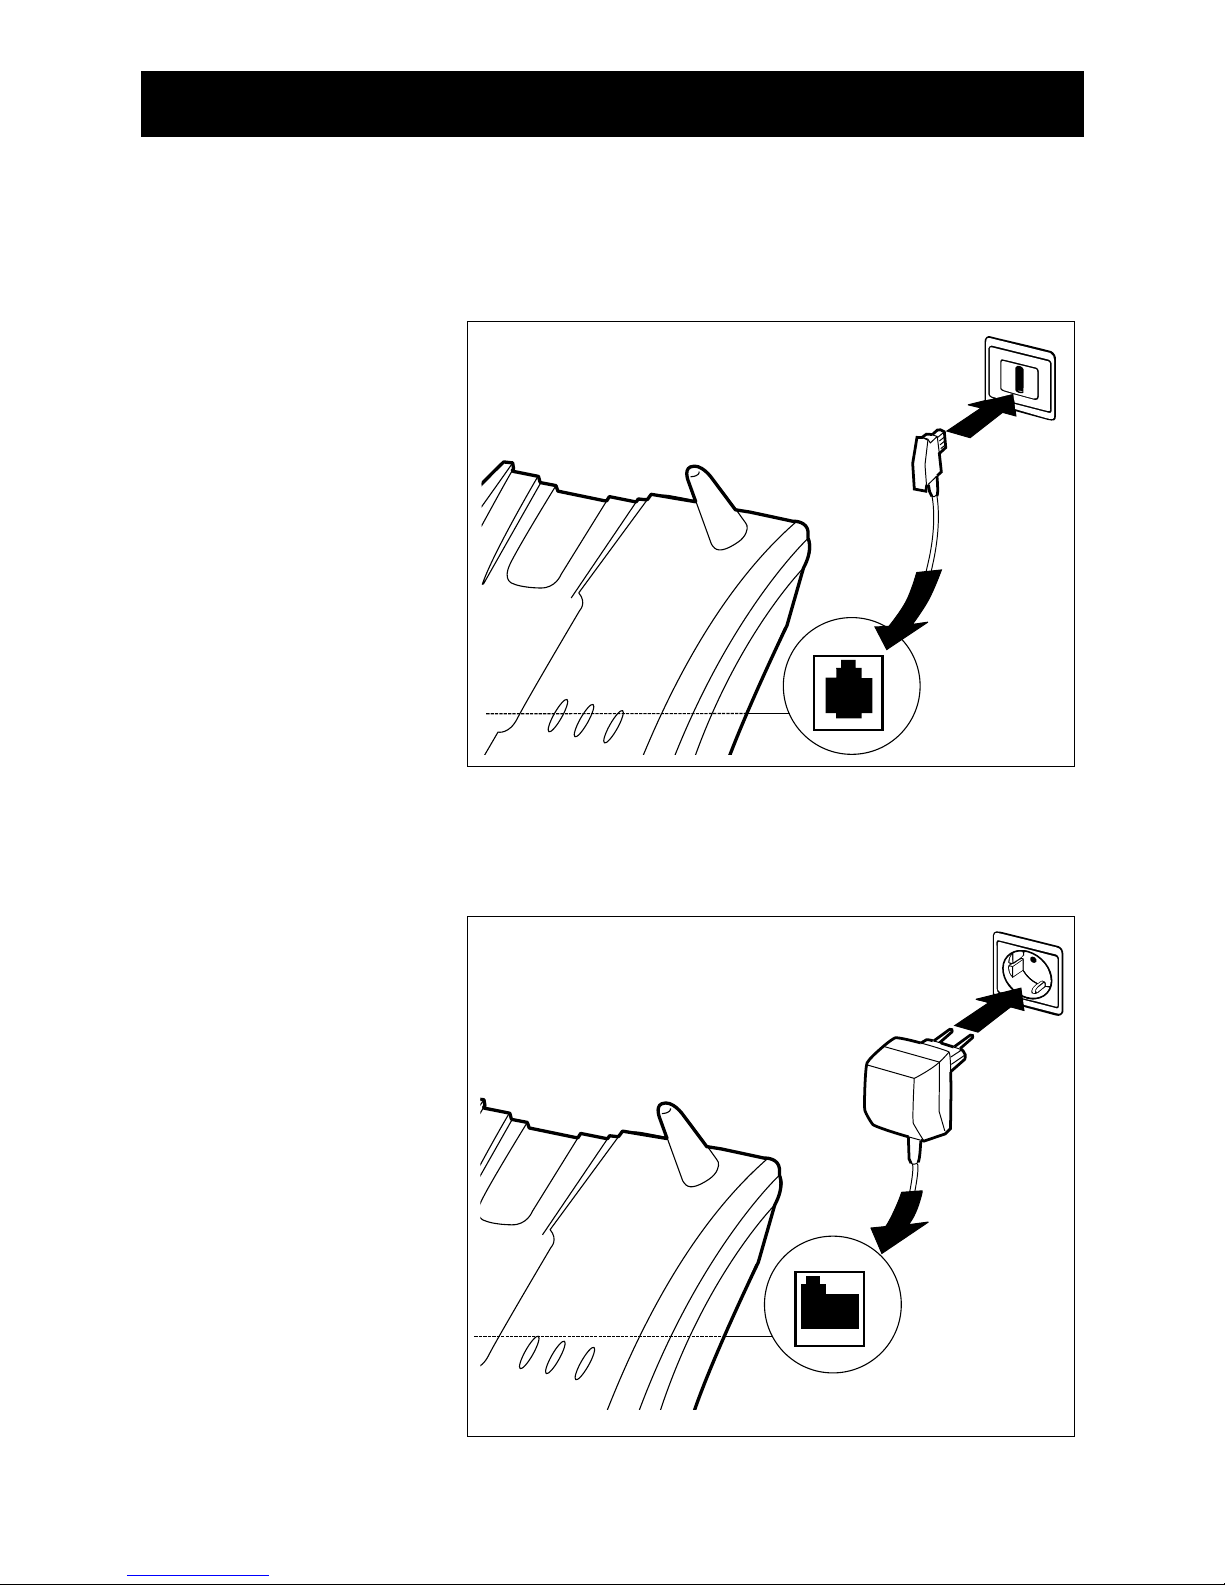
INTRODUCTION / BEFORE USE ................................................... . . . 3-7
SECTION A FUNCTION DESCRIPTION ............................................. 8
1. Phone On from Standby State . . . . . . . . . . . . . . . . . . . . . . . . . . . . . . . . . . . . . . . . . . . . . . . . . . 8
2. Phone Off . . . . . . . . . . . . . . . . . . . . . . . . . . . . . . . . . . . . . . . . . . . . . . . . . . . . . . . . . . . . . . . . . . . . . . . . . 8
3. Make Call ........................................................... . . . . . . . . . . . . . . 8
4. Make a New Call in the Phone state ........................................... 8
5. Call Answering ........................................................ . . . . . . . . . . . 8
6. Pre-dialing ......................................................... . . . . . . . . . . . . . . . 8-9
7. Last number Redial .. . . . . . . . . . . . . . . . . . . . . . . . . . . . . . . . . . . . . . . . . . . . . . . . . . . . . . . . . . . . . . 9
8. Memory dialing ....................................................... . . . . . . . . . . . . 9
9. Extended Redial ....................................................... . . . . . . . . . . . 9
10. Temporary Tone Mode (optional, country dependent) ........................ 9-10
11. Emergency Call /Baby Call .................................................. . . . . . 10
12. Microphone Mute ....................................................... . . . . . . . . . 10
13. Base Paging ......................................................... . . . . . . . . . . . . . . 10
14. Call Barring ......................................................... . . . . . . . . . . . . . . 10
15. Battery Low Warning ............................................................10-11
16. Battery Level indication ................................................... . . . . . . . 11
17. Out of Range Warning .. . . . . . . . . . . . . . . . . . . . . . . . . . . . . . . . . . . . . . . . . . . . . . . . . . . . . . . . . . 11
18. Key Lock . . . . . . . . . . . . . . . . . . . . . . . . . . . . . . . . . . . . . . . . . . . . . . . . . . . . . . . . . . . . . . . . . . . . . . . . . . 11
19. Recall . . . . . . . . . . . . . . . . . . . . . . . . . . . . . . . . . . . . . . . . . . . . . . . . . . . . . . . . . . . . . . . . . . . . . . . . . . . . . . 12
20. Awado mode .......................................................... . . . . . . . . . . . 12
21. Comfort Fearures in the Telekom Network ..................................... 12
SECTION B PROGRAMMING PROCEDURE DESCRIPTIO ........................... 13
1. Key Touch Tone Enable/Disable .................................................13
2. Ringer Tone Select ...................................................... . . . . . . . . . 13
3. Ringer Loudness Select .................................................... . . . . . . . 13
4. Auto Phone On ......................................................... . . . . . . . . . . 14
5. Baby Call .. . . . . . . . . . . . . . . . . . . . . . . . . . . . . . . . . . . . . . . . . . . . . . . . . . . . . . . . . . . . . . . . . . . . . . . . . 14

Precaution
Emergency calls (baby call function) are not avaible
in case of power failure.
Use only rechargeable batteries.
Replace only with the same or equivalent
type recommended by the manufacturer.
Attention should be drawn to the
environmental aspects of battery disposal.
2
TABLE OF CONTENTS
6. Key Lock . . . . . . . . . . . . . . . . . . . . . . . . . . . . . . . . . . . . . . . . . . . . . . . . . . . . . . . . . . . . . . . . . . . . . . . . . . 14
7. Setting Barring Number for Call Barring ........................................ 15
8. Setting tone/pulse dialing (Optional, country dependent) ..................... 15
9. Reset to default values ...........................................................15-16
10. Program Personal Identity Number (PIN) . . . . . . . . . . . . . . . . . . . . . . . . . . . . . . . . . . . . . . . . 16
11. Extended Redial ...................................................... . . . . . . . . . . . . 16
12. Programming Memory ..................................................... . . . . . .16-17
13. Selecting Signal [R] (Optional, country dependent) ............................ 17
14. Programming Key List .........................................................17-18
SECTION C DEFAULT SETTING .. . . . . . . . . . . . . . . . . . . . . . . . . . . . . . . . . . . . . . . . . . . . . . . . . . . . 19

3
INTRODUCTION / BEFORE USE
We are glad that you have decided for this Phone. The
product you have bought is state of the art, of highest
quality and has many advanced features.
Please read this Instruction Manual carefully so that you
get the most from your phone .
The purpose of the Instruction Manual is to provide
information. Its content is not the subject of contract.
All data in this booklet is merely nominal. The right to
technical modifications is reserved.
Closing date: 10/2001
DEAR CUSTOMER
NOTE
BATTERY
INSTALLATION
Fig. 1
a) The battery cover is on the back side of the unit. Push
it in the arrowed direction and remove it.
b) Insert the 3 supplied “AAA“ size, NiMH (3 x 550mAh)
storage batteries as shown here (Fig 1). Ensure correct
polarity.
c) Close the battery compartment.
Before first use, load up the storage batteries in the base
unit 10 hours at least.
NOTE
For user notes and tips
"How to extend the life
of your battery", see
pp. 19.

2
13
5
46
8
7
R
9
0
*
#
4
BEFORE USE
Fig. 2
PARTS AND ACCESSORIES
After unpacking the unit, please make
sure the parts below are counted for:
1 Handset with storage batteries
2 Base unit
3 Telephone connection with cord
4 Power supply adaptor with cord
5 Belt clip
6 Headset
7 Instruction manual (no figure)
3
4
2
1
6
5

5
BEFORE USE
CONNECTING
THE UNIT
Fig. 3
Fig. 4
TEL
DC IN
As shown in the figure below, insert one end of the
telephone cord into the wall jack and the other end into
the opening at the underside of the unit.
As shown in the figure below, insert one end of the
power cord into the 230 V AC outlet and the other end
into the opening at the underside of the unit.

6
BEFORE USE
BASE UNIT
(PARTS BY USING HANDSET)
Cradle
Power
LED
Fig. 5
Page
Button
Battery
LED
In use LED
Memory icon Tone icon
Mic icon Programming icon
Battery icon Barring icon
In use icon 7-Digit-sign
for numbers
Paging icon and letters
DISPLAY ICONS
(HANDSET)

7
BEFORE USE
R
1
4
7
*
3
6
9
#
2
5
8
0
HANDSET
1 Earpiece 6 Headset connection 11 Call key
2 LCD 7 Star key 12 Rhomb key
3 Memory key 8 Signal key 13 Redial key
4 Programming key 9 Mic 14 Sound opening
5 Number keys 10 Mic key 15 Battery cover
1
2
3
4
5
6
7
8
9
13
12
11
10
14
14
15
Fig. 6

8
SECTION A
1. Phone On from Standby State
• Press [ ] button, key tone will be heard, a phone
icon [ ] will flash on LCD.
• If linking success, [ ] is on. In use LED on base is
on . After 5 sec. and then in stead of Call Time.
• If linking fails after 5 sec. 3 long beep fail tone will
be heard.
2. Phone Off
• Press [ ] button again, Handset exits phone state.
• Return Handset to cradle also exits phone state.
• Phone_on icon [ ] on handset and In use LED on
base will be off.
• Call time on LCD is off after a while.
3. Make Call
• Press [ ] button to link up the line.
• Hearing dial tone and then dial telephone number.
• LCD shows the Telephone Number you dial.
4. Make a New Call in the Phone state
• During phone state, press and hold the [ ] button
for 1 sec. 2 beep tone will be heard.
• Hearing dial tone and dial the new telephone
number.
• LCD shows the Telephone Number you dial.
5. Call Answering
• During ring in, the special ring sound on H/S and
B/S will be heard, [ ] on LCD will flash.
• Press [ ] button to answer the call.
• When H/S is in cradle, pick up H/S, the call will be
received automatically if H/S is set to Auto Phone
on by programming.
6. Pre-dialing
• Before Phone on, Enter a Tel. no. (up to 24 digits
available) on LCD.
• Press [ ] button to make Phone on, the line will
FUNCTION
DESCRIPTION

9
SECTION A
be linked up and the Tel. no. will be sent automati-
cally.
• During digit entering, LCD will shows the Tel. no.
one by one. User can press [ ] button to perform
backspace function. If depress [ ] button for
1 sec., whole entry will be erased.
• Leave the handset without pressing any key for
15 sec., the pre-entered digit will be clear and the
handset will go back to normal.
7. Last number Redial
• During phone state, Pressing [ ] button, The last
number dialed will be shown on LCD and sent to
telephone line.
• It can also be used in pre-digit dialing. Pressing
[ ] button, LCD shows the last number dialed. If
it exceeds 24 digits, the process will be invalid.
8. Memory dialing
• During in phone state, press [ ] button and
memory location from ”0” to ”9”.
• The Tel. no. pre-stored by programming will be
dialed out.
• It can also be used in pre-dialing.
• The contents of memory stored will be stored or
cleared by programming process.
9. Extended Redial
• It is used to redial an extra memory for last number
dialed.
• During in phone state, press [ ] + [ ] to dial
out the pre-stored extending redial digits.
• The contents of extra memory will be stored or
cleared by programming process.
10. Temporary Tone Mode (optional, country
dependent)
• During pulse dialing, press [ *] button to change
pulse dialing to tone dialing temporarily.
• A 3s/6s pause (optional depend on deferent country)
FUNCTION
DESCRIPTION

10
SECTION A
will be attached automatically.
• The temporary tone function can also be used in
pre-dialing and storing memory redial.
11. Emergency Call (Baby Call)
• When emergency call function is enabled by program
setting, Only the pre-programmed Tel. no. (”mem
0”) can be dialed out if any button is pressed except
for [ ] key.
• The emergency call is invalid if ”mem 0” is not pre-
programmed.
NOTE:
When Emergency Call (Baby Call) is activated, H/S can
enter to Remote control mode.
12. Microphone Mute
• Press [ ] button to mute H/S microphone, Mute
icon [ ] is on, and press again to return normal.
13. Base Paging
• Press PAGE button on base to perform page func-
tion.
• The page tone on H/S will continue for 15 sec.
• Page icon [ ] will flash, ”bASE PAGE” message
is displayed on LCD.
14. Call Barring
• When a barring number is set by programming, any
dialing number start with this no. will be blocked.
• LCD on H/S will show ”bArring” message.
• The default barring number is NULL.
15. Battery Low Warning
• During power up, if battery low, H/S doesn’t make
any operation and LCD shows [ ] for 10s while
then go to sleep (LCD turns off) until the battery is
recharged to normal voltage.
• 5 minutes after battery low in standby state, H/S
doesn’t response to any buttons and LCD turns off
until the battery is recharged to normal voltage.
FUNCTION
DESCRIPTION

11
SECTION A
• During conversation, when battery power is lower
than a certain level, a short warning beep tone is
heard every 2 sec. and the normal operation of the
phone will be shut down in 3 minutes.
• Return Handset to cradle to re-charge to stop
warning tone.
•Notice: If the battery level is too low H/S may not
turn on after recharge battery to normal. In this case
the battery should be remove and re-plug to H/S to
turn H/S on.
•Notice: When handset is battery low, press [ ]
key the display will show ”Lo bAtt”.
16. Battery Level indication
• Battery level icon is shown on LCD.
• When battery level is high, LCD shows [ ].
• When battery level is low, LCD shows [ ], a
warning tone is heard if H/S in use.
•Notice: using a fully discharged battery, the battery
level indicator will show good after you placing the
handset on charge cradle a moment. It doesn’t
mean the battery is good, it will drop down rapidly
after off cradle. It is recommended that an over-
night charging could be performed for a new or
discharged battery.
17. Out of Range Warning
• During in conversation, if Handset is far away from
base unit, a 2-short alert beep tone will be heard in
every 2 sec. to remind the user that the RF linking is
at a poor condition.
• If the user do not return to range within 10 sec. the
base will disconnect the line automatically.
18. Key Lock
• When key lock is set enable by programming, no
key can be press except [ ] button.
• During ringing, phone key [ ] can bypass the
key-lock function.
FUNCTION
DESCRIPTION

12
SECTION A
19. Recall
• During in phone state, press [ R] button will break
the Line for short time.
• The function is used to access special services
offered by Telephone Company.
• Recall time can be selected by programming
function according to deferent
20. Awado mode
• The set cannot be used on an automatic change-
over switch junction box.
21. Comfort Features in the German Telekom
Network
• If the set is used in a PBX environment, you must
set the flash time* ("Setting the signal key function")
to use the comfort functions of the German Tele-
kom net
work, such as call waiting indication, broke-
ring, etc.
*) The flash time is specified in the user manual of
your telephone system.
FUNCTION
DESCRIPTION

13
SECTION B
During in programming mode, press the [ ]
button to cancel and escape, no any changing will
be performed.
1. Key Touch Tone Enable/Disable
Key Entered Display Shown Tone Indication
Press [ ] Pro-
Press [1] Pro-tonE @
Press [1] for
toggle on/off Pro-tonE on/oFF
Press [ ]
Confirmation tone
Programming icon [ ] flash during the process. @ for current
setting, default is on.
2. Ringer Tone Select
Key Entered Display Shown Tone Indication
Press [ ] Pro-
Press [2] Pro-ringtonE @
Enter the ringer
selection 1to 4Pro-ringtonE X
Corresponding ring
Press [ ] Confirmation tone
Programming icon [ ] flash during the process. @ for current
setting, default is 2, X for digit 1 to 4.
3. Ringer Loudness Select
Key Entered Display Shown Tone Indication
Press [ ] Pro-
Press [3] Pro-ring @
Press [1] to Select the
ringer off/Low/high Pro-ring oFF/Lo/Hi
Press [ ] Confirmation tone
Programming icon [ ] flash during the process. @ for current
setting, default ringer is high.
PROGRAMMING
PROCEDURE
DESCRIPTION

14
SECTION B
4. Auto Phone On
Key Entered Display Shown Tone Indication
Press [ ] Pro-
Press [4] Pro-Auto @
Press [1] for
toggle on/off Pro-Auto on/oFF
Press [ ] confirmation tone
Programming icon [ ] flash during the process. @ for current
setting, default is off.
5. Emergency call (Baby call)
Key Entered Display Shown Tone Indication
Press [ ] Pro-
Press [6] Pro-bAby @
Press [1] for
toggle on/off Pro-bAby on/oFF
Press [ ] confirmation tone
Memory [0] must be programmed. Programming icon [ ] flash
during the process. @ for current setting, default is off.
6. Key Lock
Key Entered Display Shown Tone Indication
Press [ ] Pro-
Press [7] Pro-Hold @
Press [1] for
toggle on/off Pro-Hold on/oFF
Press [ ] confirmation tone
Programming icon [ ] and Key-lock setting icon [ ] flash
during the process. @ for current setting, default is off.
After Key-lock is set to on, LCD shows [Hold] message if any key,
except , is pressed.
PROGRAMMING
PROCEDURE
DESCRIPTION

15
SECTION B
7. Setting Barring Number for Call Barring
Key Entered Display Shown Tone Indication
Press [ ] Pro-
Press [8] EntEr codE
Press 4-digit PIN codE ——
PIN entered is correct bArring @ Happy tone
Enter the 1.. 3-digit
barring no. / Press
[ ] erase barring
no. bArring X
Press [ ] confirmation tone
Programming icon [ ] flash during the process. @ for current
setting, default is NULL, X for 1..3-digit barring no.
8. Setting tone/pulse dialing (Optional,
country dependent)
Key Entered Display Shown Tone Indication
Press [ ] Pro-
Press [*] Pro-@ diAL
Press [1] for
toggle tone/pulse Pro-tonEdiAL/
Pro-PuLSE diAL
Press [ ] confirmation tone
Programming icon [ ] flash during the process. @ for current
setting, default is tone. If tone function is set, tone icon [ ] is
shown on LCD. Else [ ] is off.
9. Reset to default values
Key Entered Display Shown Tone Indication
Press [ ] Pro-
Press [0] EntEr codE
Enter 4-digit PIN codE ——
If PIN is correct,
process continue rESEt ? y Happy tone /
Else terminate Sad tone
PROGRAMMING
PROCEDURE
DESCRIPTION
*) To lift the bar, repeat
steps 1 to 4 of the bar
procedure. Then press
the microphone button,
followed by the memory
button.

16
SECTION B
Press [1] to
toggle y/n rESEt ? y/n
Press [ ] Confirmation tone
Programming icon [ ] flash during the process.
10. Program Personal Identity Number (PIN)
Key Entered Display Shown Tone Indication
Press [ ] Pro-
Press [#] EntEr codE
Enter the old 4-
digit PIN. codE ——
If PIN entered is
correct, process
continue EntEr codE a happy tone /
Else terminate a sad tone
Enter new 4-digit PIN
codE xxxx
Press [ ] confirmation tone
Programming icon [ ] flash during the process. xxxx for 4-digit
PIN, default is 0000.
11. Extended Redial (PIN)
Key Entered Display Shown Tone Indication
Press [ ] Pro-
Press [ ] Pro-rEdiAL
Show redial Tel. no.
Modify it if necessary XXXXX
Press [ ] confirmation tone
Programming icon [ ] flash during the process. If extended
redial Tel. no. exceed 24 digits, the process will be invalid.
XXXXX is telephone number. Extended redial memory content
will be cleared after programming reset.
12. Programming Memory
Key Entered Display Shown Tone Indication
Press [ ] Pro-
PROGRAMMING
PROCEDURE
DESCRIPTION
To delete the memory,
repeat steps 1 and 2, then
press the microphone
button and then the
memory button
It is possible to overwrite
the memory content with
a new number.

17
SECTION B
Key Entered Display Shown Tone Indication
Press [ ] SEL LocAtion
Select memory
location 0..9 EntEr no
Enter Tel. No. : 0..9,
# , *, pause entered digit
‘*’ for temp. tone
in pulse mode ”r” for recall
Pressing [ ] for
backspace ”P” for pause
”u” for ”*”,
”n” for ”#”
Press [ ] Confirmation tone
Programming icon [ ] flash during the process. All
memory contents will be cleared after programming reset.
13. Selecting Signal [R] (Optional, country)
Key Entered Display Shown Tone Indication
Press [ ] Pro-
Press [ R ] Pro-r @
Enter selection 1 to 3 Pro-r 100/260/600
Press [ ] Confirmation tone
programming icon [ ] flash during the process. @ for current
setting (1/2/3 for 100ms/260ms/600ms time break).
Note: For some country without this option, it is fixed at 100ms
and cannot be changed.

18
SECTION B
R
1
4
7
*
3
6
9
#
2
5
8
0
Auto-phone on
Key Lock
Barring no.
(must enter
PIN first)
Tone / pulse
Reset to
default
(must enter
PIN first)
PIN
(must enter
PIN first)
Emergency
Baby call
Recall
Selecting signal
14. Programming Key List
Key touch tone
Ringer pitch
Ringer level
Memory
Extend redial
Ringer Tone select . . . . . . . . . . . . . . . . . . . . . pitch 2
Key touch Tone . . . . . . . . . . . . . . . . . . . . . . on
Auto phone on . . . . . . . . . . . . . . . . . . . . . . . off
Baby call . . . . . . . . . . . . . . . . . . . . . . . . . . . . off
Key lock . . . . . . . . . . . . . . . . . . . . . . . . . . . . off
Barring number for Call Barring . . . . . . . . . . NULL
Tone/pulse dialing . . . . . . . . . . . . . . . . . . . . . tone
Personal identity numer . . . . . . . . . . . . . . . . 0000
Recall time break . . . . . . . . . . . . . . . . . . . . . 100 ms
Memory location 0..9 . . . . . . . . . . . . . . . . . . clear
Extended redial memory . . . . . . . . . . . . . . . . clear
DEFAULT SETTING

19
SECTION C
HOW TO EXTEND
THE LIFE OF YOUR
BATTERY
You can extend the life of the batteries if you follow
these tips:
Tip 1: The first charge is critical. Make sure that the
battery is fully charged before first use.
Tip 2: Exploit the power of the battery. Use all the power
the battery has until it is depleted. This maintains
the charge potential of the battery.
Tip 3: Do not charge the battery when it still has power.
If you charge the battery too often, the so-called
memory effect develops. This means the battery
"knows" that not much power is used and will
only provide as much power as is needed.
Tip 4: Completely discharge the battery once every
week. This is very useful: Fully discharge and then
charge the battery.
Tip 5:. If the battery has little "stamina", several comple
te discharges and recharges will help.
Tip 6: Do not overcharge! Make sure to charge the bat
tery for as long as it needs. Frequent overcharging
in the quick charger causes early ageing and
reduces the battery capacity.
Tip 7: Charge the battery at room temperature. Do not
charge the battery when it is cold. This damages
the cells.
Tip 8: Store the battery in a cool place. Batteries will
loose charge (about 20 % per month) even when
not used. If you want to store your battery for a
long time, put it in the fridge.
Table of contents
Other MBO Cordless Telephone manuals