McDonald's Antunes HEBT-3V User manual

HEBT-3V BUN TOASTER
1
P/N 1011377 Rev. G 07/17
McDonald’s
BUN TOASTER
HEBT-3V
9210859, 9210860, 9210861 & 9210863
Place this manual in the Toaster section
of your Equipment Manual.
Manufactured exclusively for
McDONALD’S®
BY
ANTUNES
180 KEHOE BLVD.
CAROL STREAM, ILLINOIS 60188, U.S.A.
PHONE: +1-630-784-1000
TOLL FREE: +1-877-392-7854
FAX: +1-630-784-1650
www.antunes.com
TABLE OF CONTENTS
This manual is for the exclusive use of licensees and employees of McDonald’s Systems, Inc..
© McDonald’s Corporation All Rights Reserved
Owner Information .....................................................2
General......................................................................2
Service/Technical Assistance ....................................2
Warranty Information .................................................2
Specifications .............................................................3
Electrical Specifications & Plug Configuration ..........3
Dimensions................................................................3
Important Safety Information ....................................4
Installation...................................................................5
Unpacking..................................................................5
Location .....................................................................5
Operation.....................................................................6
Operating Instructions ...............................................6
User Mode.................................................................6
Manager Mode ..........................................................6
Safety Features .........................................................7
Maintenance................................................................8
Daily Cleaning ...........................................................8
Quarterly..................................................................11
Clean Cooling Fans and Electrical Housings
(Annually) ................................................................13
Troubleshooting .......................................................14
Replacement Parts ...................................................17
Wiring Diagram.........................................................24
Notes..........................................................................25
Scan with mobile device or enter URL
for product and service information.
A.J. Antunes & Co.
HEBT-3V
http://tiny.cc/ajaHEBT3V
LIMITED WARRANTY
A.J. Antunes & Co. provides the following limited warranty to the original purchaser of all McDonald’s Equipment.
All components are warranted against defects in the material and workmanship for a period of two (2) years. If any part becomes inoperable during the period of this
warranty, A.J. Antunes & Co. will pay labor costs to an Authorized Service Agent to replace the part plus travel expenses.
A.J. Antunes & Co. reserves the right to make changes in design or add improvements on any products. The right is always reserved to modify Equipment because of
factors beyond our control and government regulation. Changes to Equipment do not constitute a warranty charge.
This warranty is exclusive and is in lieu of all other warranties, expressed or implied, including any implied warranty of merchantability or fitness for a particular pur-
pose, each of which is expressly disclaimed. The remedies described above are exclusive, and in no event shall A.J. Antunes & Co. or any of its Divisions be liable for
special consequential or incidental damages for the breach or delay in the performance of this warranty.
WARRANTY EXCLUSIONS
• The cost of installation.
• Equipment that has been damaged due to shipment. Purchaser should make
damage claim directly upon carrier.
• Alteration, misuse, abuse.
• Improper storage or handling.
• Improper maintenance.
• Failure to follow proper installation instructions, including electrical connec-
tion.
• Improper or unauthorized repairs.
• Scheduled Maintenance procedures as outlined in your MRC Card.
• Consumables such as Grill Covers (Release Sheets), gaskets, Conveyor Belt
Wraps, O-rings, removal of links, and light bulbs.
• Freight, foreign, excise, municipal, or other sales or use taxes.
• Consequential damages such as loss of profit, loss of time, the cost of repair-
ing or replacing other property which is damaged, or any other incidental
damage of any kind.
HEBT-3V BUN TOASTER
2P/N 1011377 Rev. G 07/17
McDonald’s
OWNER INFORMATION
Fill in the information below and have it handy when
calling Antunes Technical Service for assistance. The
serial number is on the specification plate located on
the rear of the unit.
Purchased From:
Date of Purchase:
Model No.:
Serial No.:
Mfg. No.:
Network ID Number:
Use only genuine Antunes replacement parts in this
unit. Use of replacement parts other than those sup-
plied by the manufacturer will void the warranty.
IMPORTANT! Keep these instructions for future reference. If the unit
changes ownership, be sure this manual accompanies the equipment.
Warranty Information
Please read the full text of the Limited Warranty in this
manual.
If the unit arrives damaged, contact the carrier imme-
diately and file a damage claim with them. Save all
packing materials when filing a claim. Freight damage
claims are the responsibility of the purchaser and are
not covered under warranty.
The warranty does NOT extend to:
• Damages caused in shipment or damage as result
of improper use.
• Installation of electrical service.
• Normal maintenance as outlined in this manual.
• Malfunction resulting from improper maintenance.
• Damage caused by abuse or careless handling.
• Damage from moisture into electrical components.
• Damage from tampering with, removal of, or
changing any preset control or safety device.
General
This manual provides the safety, installation, and
operating procedures for this unit. Please read this
manual prior to installing and operating the unit.
This unit is manufactured from the finest materials
available and assembled to Roundup’s strict quality
standards. This unit has been tested at the factory to
ensure dependable trouble-free operation.
Service/Technical Assistance
If you experience any problems with the installation
or operation of your unit, contact Antunes Technical
Service at +1-877-392-7854 (toll free).
HEBT-3V BUN TOASTER
3
P/N 1011377 Rev. G 07/17
McDonald’s
SPECIFICATIONS
CAUTION
All electrical connections must be in accordance with
local electrical codes and any other applicable codes.
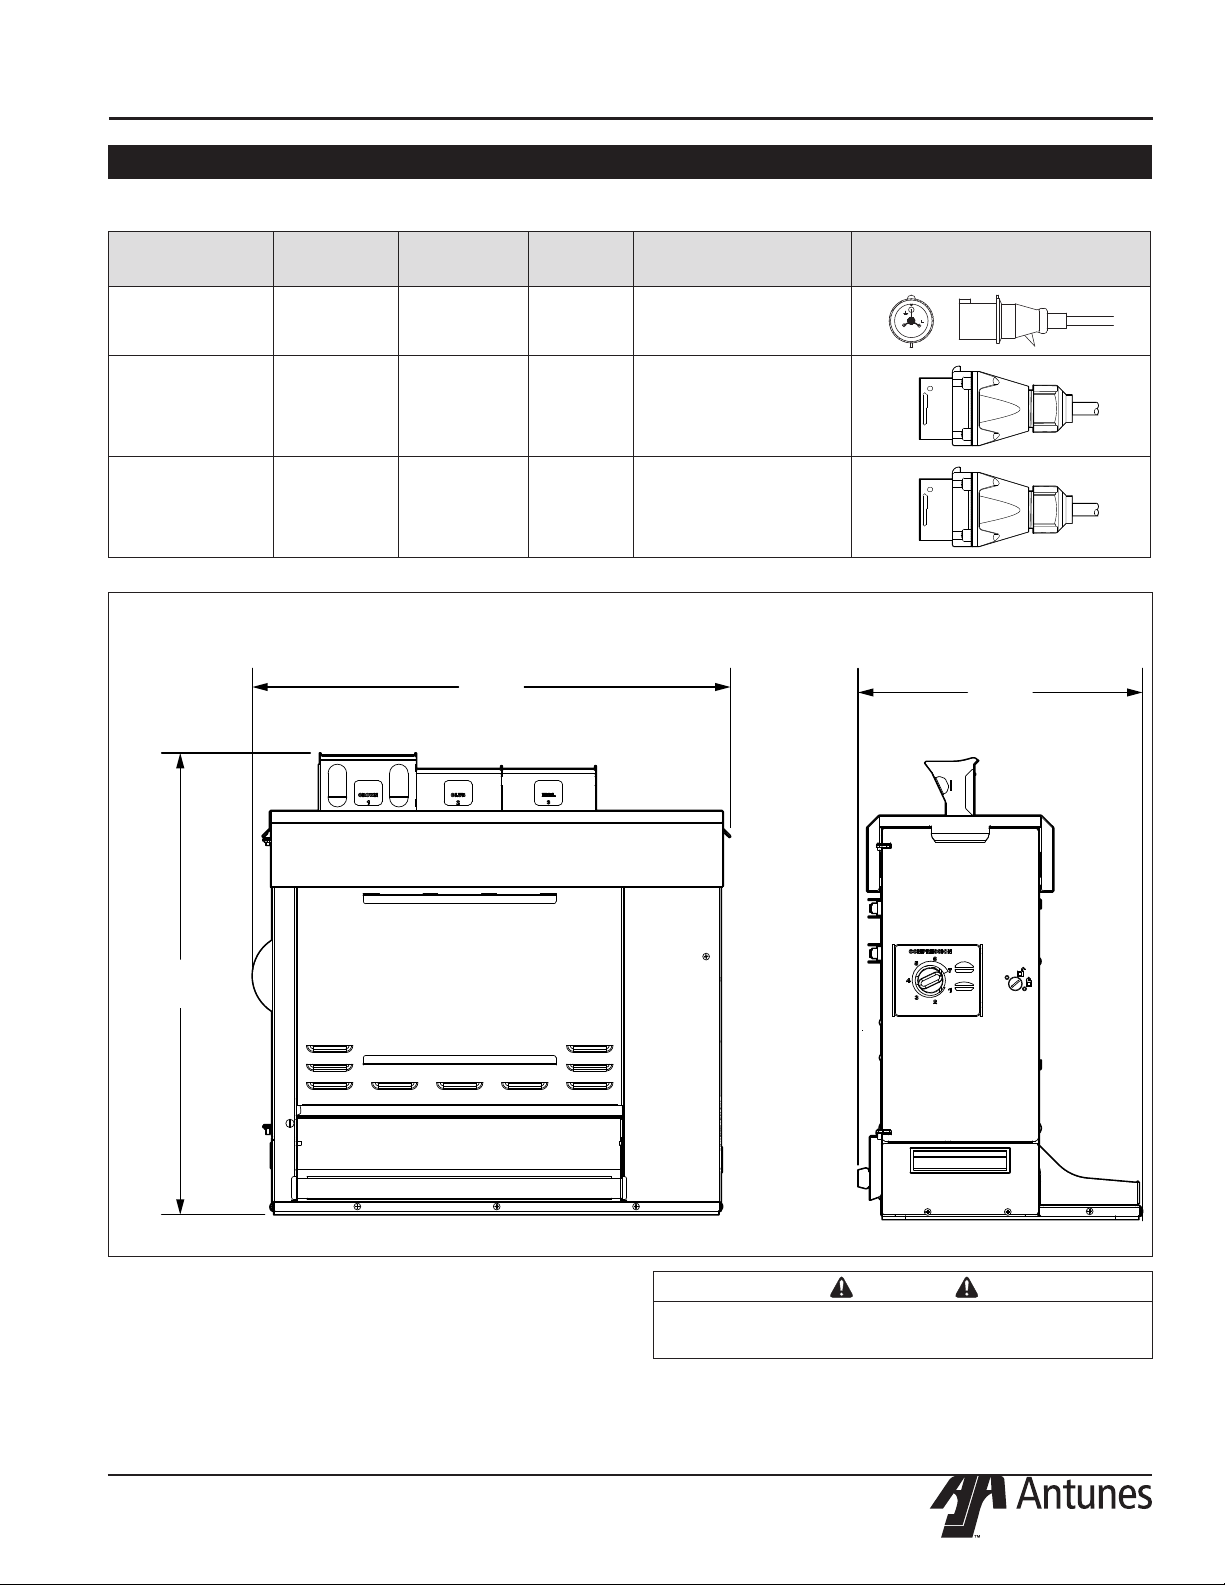
24 5/8”
(625 mm)
25 1/4”
(641 mm)
14 9/16”
(370 mm)
Dimensions
Electrical Specifications & Plug Configuration
Model &
Mfg. No Volt Watts Hz. Plug
Description
Plug
Conguration
HEBT-3V
9210859 (Korea)
9210861 (Europe)
220-240 3300 50/60 IEC-309 Pin & Sleeve,
16 Amp., 230 Volt
HEBT-3V
9210860
(Australia)
220-240 3180-3750 50/60
Marechal
Pin & Sleeve
32 Amp.,
220-250 Volt
HEBT-3V
9210863
(New Zealand)
220-240 3180-3750 50/60
Marechal
Pin & Sleeve
32 Amp.,
220-250 Volt

HEBT-3V BUN TOASTER
4P/N 1011377 Rev. G 07/17
McDonald’s
IMPORTANT SAFETY INFORMATION
In addition to the warnings and cautions in this manual,
use the following guidelines for safe operation of the
unit.
• Read all instructions before using equipment.
• For your safety, the equipment is furnished with
a properly grounded cord connector. Do NOT
attempt to defeat the grounded connector.
• Install or locate the equipment only for its intend-
ed use as described in this manual. Do NOT use
corrosive chemicals in and/or on this equipment.
• Do NOT operate this equipment if it has a
damaged cord or plug, if it is not working properly,
or if it has been damaged or dropped.
• This equipment should be serviced by qualified
personnel only. Contact the nearest Authorized
Service Agency for adjustment or repair.
• Do NOT block or cover any openings on the unit.
• Do NOT immerse cord or plug in water.
• Keep cord away from heated surfaces.
• Do NOT allow cord to hang over edge of table or
counter.
• Do NOT clean this appliance with a water jet.
The following warnings and cautions appear throughout
this manual and should be carefully observed.
• Turn the unit off, wait for the cool-down procedure
to complete its cycle, and disconnect the power
cord before performing any service or mainte-
nance on the unit.
NOTE: Turning off the power switch does NOT turn
off all power to the unit. When the unit is plugged
in and turned off, an LED light flashes to indicate
that the power cord is plugged in.
• The procedures in this chapter may include
the use of chemical products. These chemical
products will be highlighted with bold face let-
ters followed by the abbreviated HCS (Hazard
Communication Standard). See Hazard
Communication Standard manual for the appro-
priated Material Safety Data Sheets (MSDS).
• The equipment should be grounded according to
local electrical codes to prevent the possibility of
electrical shock. It requires a grounded recep-
tacle with separate electrical lines, protected by
fuses or circuit breaker of the proper rating.
• Bread may burn. Therefore toasters must not be
used near or below curtains or other combustible
walls and materials. Failure to maintain safe
operating distances may cause discoloration or
combustion.
WARNING
ELECTRICAL SHOCK HAZARD. FAILURE TO
FOLLOW THE INSTRUCTIONS IN THIS MANUAL
COULD RESULT IN SERIOUS INJURY OR DEATH.
• Electrical ground is required on this appliance.
• Do NOT modify the power supply cord plug. If
it does not fit the outlet, have a proper outlet
installed by a qualified electrician.
• Do NOT use an extension cord with this appliance.
• The toaster should be grounded according to local
electrical codes to prevent the possibility of electri-
cal shock. It requires a grounded receptacle with
separate electrical lines, protected by fuses or cir-
cuit breaker of the proper rating.
• Check with a qualified electrician if you are unsure
if the appliance is properly grounded.
CAUTION
Bread may burn. Therefore toasters must not be
used near or below curtains or other combustible
walls and materials. Failure to maintain safe oper-
ating distances may cause discoloration or com-
bustion.
CAUTION
All electrical connections must be in accordance
with local electrical codes and any other appli-
cable codes.
CAUTION
NEVER unplug the power cord while the unit is
running! Use the proper shutdown procedure
before unplugging the power cord.
WARNING
To avoid possible personal injury and/or dam-
age to the unit, all inspections, tests, and repair
of electrical equipment should be performed by
QUALIFIED SERVICE PERSONNEL. The unit MUST
be completely shut down and unplugged before
any internal servicing, except when electrical
tests are required. Use extreme care during elec-
trical circuit tests. Live circuits will be exposed.

HEBT-3V BUN TOASTER
5
P/N 1011377 Rev. G 07/17
McDonald’s
Location
When placing the toaster into service, pay attention to
the following guidelines:
• Make sure power is off and the toaster is at room
temperature.
• Do NOT block or cover any openings on the unit.
• Do NOT immerse cord or plug in water.
• Keep cord away from heated surfaces.
• Do NOT allow cord to hang over edge of table or
counter.
1. Place the toaster in the required position desig-
nated by McDonald’s.
2. Attach the Bun Feeder, Bun Buffer Frame, and
Crown\Heel Separator accessories (Figure 1.)
3. Plug the power cord into an appropriate power
outlet. Refer to the specification plate for
the proper voltage.
Unpacking
1. Open the large box. It contains:
• HEBT-3V toaster
• Accessories box
2. Remove the accessories box from the large box.
3. With the help of another person, carefully remove
the HEBT-3V from the large box.
4. Remove all protective coverings from the unit.
5. Open the Accessories Box. It contains:
• Owner’s Manual
• Bun Buffer Frame
6. Wipe the entire exterior of the toaster and the
accessories mentioned above with a clean towel
sprayed with a McDonald’s approved sanitizer.
Allow to air dry.
NOTE: Handle accessories with care. If an accesso-
ry becomes bent or damaged, it may not attach to
the unit correctly, which may affect normal opera-
tion.
NOTE: If any parts are missing or damaged, con-
tact Antunes Customer Service IMMEDIATELY at
+1-877-392-7856 (toll free).
INSTALLATION
Bun Buffer
Frame
Rear
Conveyor
Cover
Figure 1. HEBT-3V Components
Control
Panel
(Side of unit)
Front Conveyor
Cover and Feeder
Assembly
Compression
Knob
Bun Feeder
HEBT-3V BUN TOASTER
6P/N 1011377 Rev. G 07/17
McDonald’s
Operating Instructions
The HEBT-3V toasts Crowns, Heels, Clubs, and other
products. Follow these steps to start the HEBT-3V:
1. Turn on the toaster and wait for warm-up to com-
plete.
2. Set the Compression Knob to 4 (recommended).
If further adjustments are required see page 8
under Adjusting Toast Quality. Refer to the figure
on page 7.
3. When the unit reaches operating temperature, the
control panel displays “Ready”.
4. Insert product into the designated area of the Bun
Feeder Assembly with the cut side of the bun fac-
ing towards the front. Toasted product drops into
the Bun Buffer.
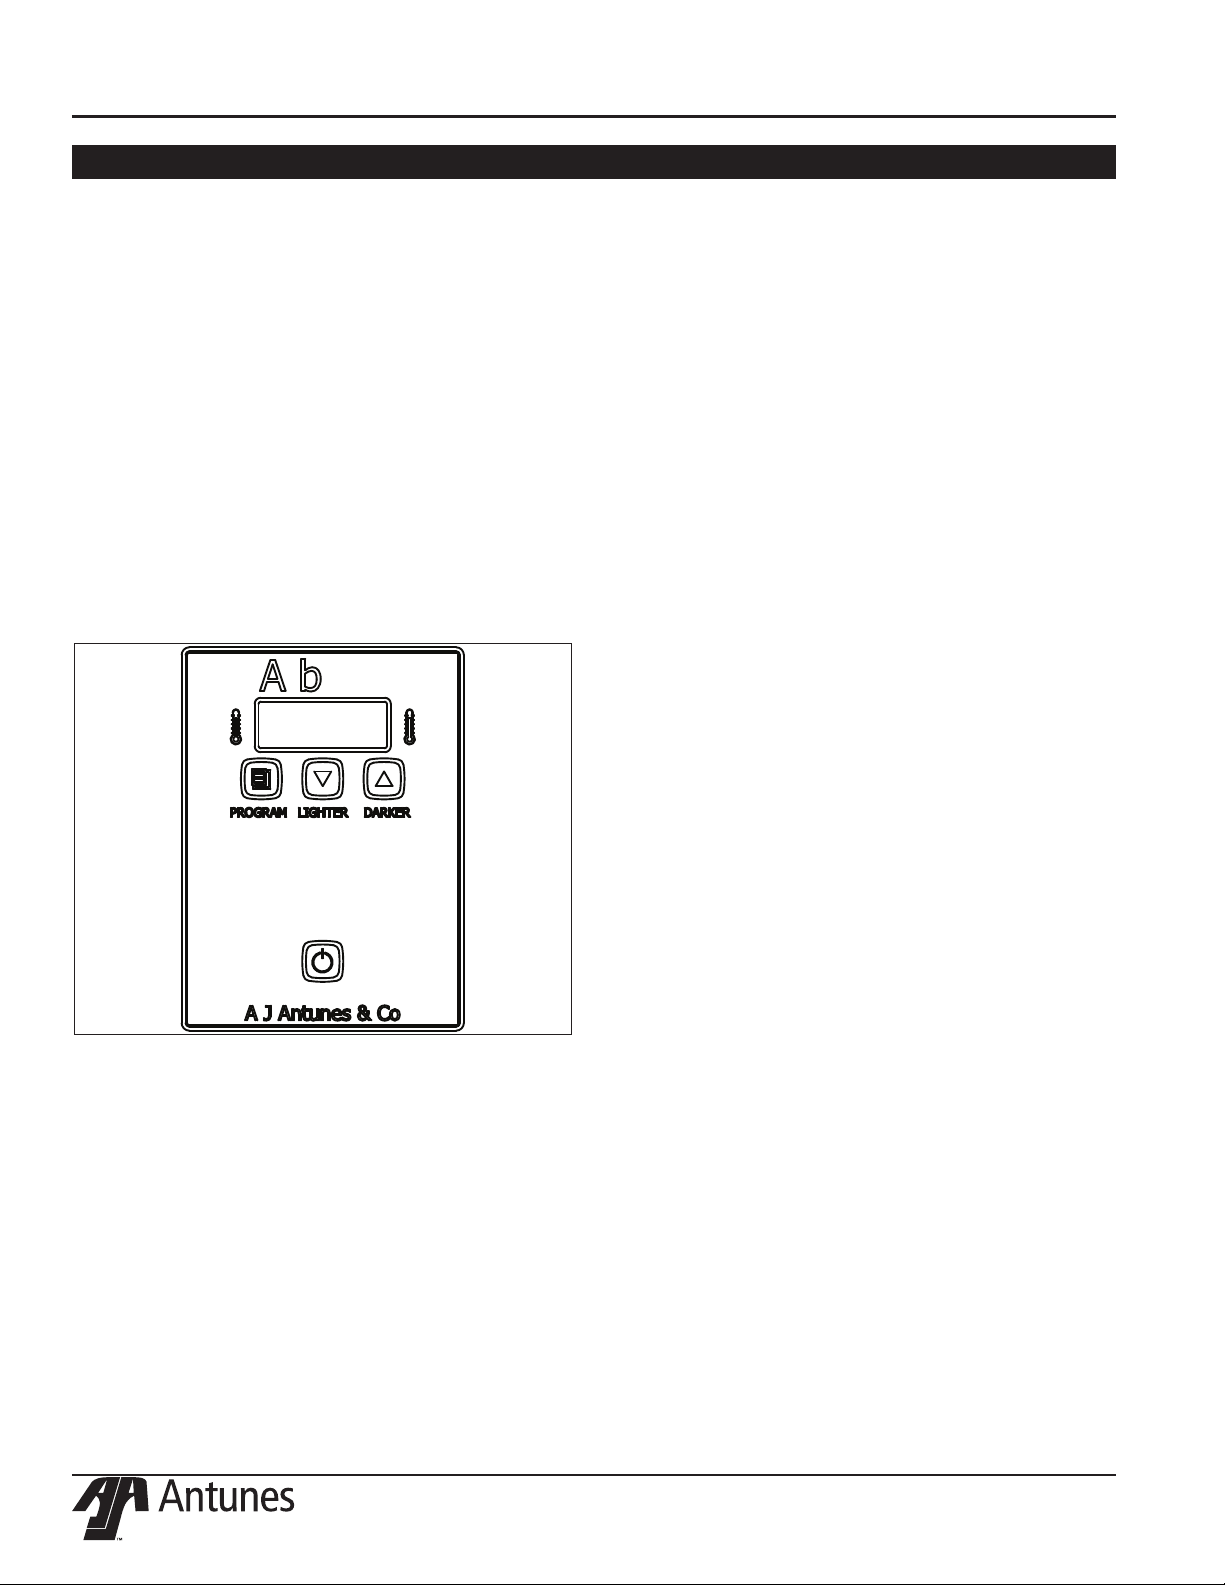
OPERATION
Figure 2. HEBT-3V Control Panel and Display
User Mode
User Mode allows an operator to view the toaster set-
tings but does not permit any adjustments.
1. Press and hold the PROGRAM button for 5 sec-
onds. After 5 seconds, the display will show the
actual temperature of Platen A (front).
2. Press the LIGHTER button to toggle between
the setpoint and actual temperature of Platen A
(front).
3. Press the PROGRAM button to proceed to the
Front Platen Heater menu. The display shows the
actual temperature of Platen B (rear).
4. Press the LIGHTER button to toggle between the
setpoint and actual temperature of Platen B (rear).
5. Press the PROGRAM button to proceed to the
Motor Menu. The display shows the actual speed
of the motor.
6. Press the LIGHTER button to toggle between the
setpoint and actual speed of the Motor.
NOTE: The unit will exit User Mode after 5 seconds
of keypad inactivity.
Manager Mode
Manager Mode allows an operator to view and adjust
the following settings:
• Platen A Temperature
• Platen B Temperature
• Motor Speed
• Temperature Units (Celsius or Fahrenheit)
• Current Selection: 208 or 240 volts
Manager Mode also allows an operator to view (but
not adjust) the Ambient Temperature of the Control
Compartment as well as the number of days of opera-
tion.
1. Turn the unit off.
2. Turn the power on while holding the PROGRAM
button. Hold the button for 5 seconds until the dis-
play shows “EnA.” Release the button.
3. To adjust the Platen A (front) Setpoint
Temperature, press the LIGHTER or DARKER
buttons to reach the desired temperature.
NOTE: The recommended temperature setting for
Platen A (front) is 271° C (520° F).

HEBT-3V BUN TOASTER
7
P/N 1011377 Rev. G 07/17
McDonald’s
OPERATION (continued)
4. Press the PROGRAM button to proceed to the
Platen B (rear) Setpoint Temperature.
5. To adjust the Platen B (rear) Setpoint
Temperature, press the LIGHTER or DARKER
buttons to reach the desired temperature.
NOTE: The recommended temperature setting for
Platen B (rear) is 271° C (520° F).
6. Press the PROGRAM button to procedure to the
Motor Speed Setpoint.
7. Adjust the Motor Speed Setpoint by pressing
the LIGHTER or DARKER buttons to reach the
desired speed.
NOTE: The Motor Speed is adjustable from 1-100.
The recommended setting is 66.
8. Press the PROGRAM button to proceed to the
Temperature Units.
9. To change the Temperatures units from
Fahrenheit or Celsius, press the LIGHTER or
DARKER buttons.
10. Press the PROGRAM button to proceed
to the Ambient Temperature of the Control
Compartment.
NOTE: No changes can be made to the Ambient
Temperature of the Control Compartment.
Temperatures under 150° F (66° C) are acceptable.
11. Press and hold the PROGRAM button to save
any changes.
NOTE: The unit exits Manager Mode after 30 sec-
onds of keypad inactivity.
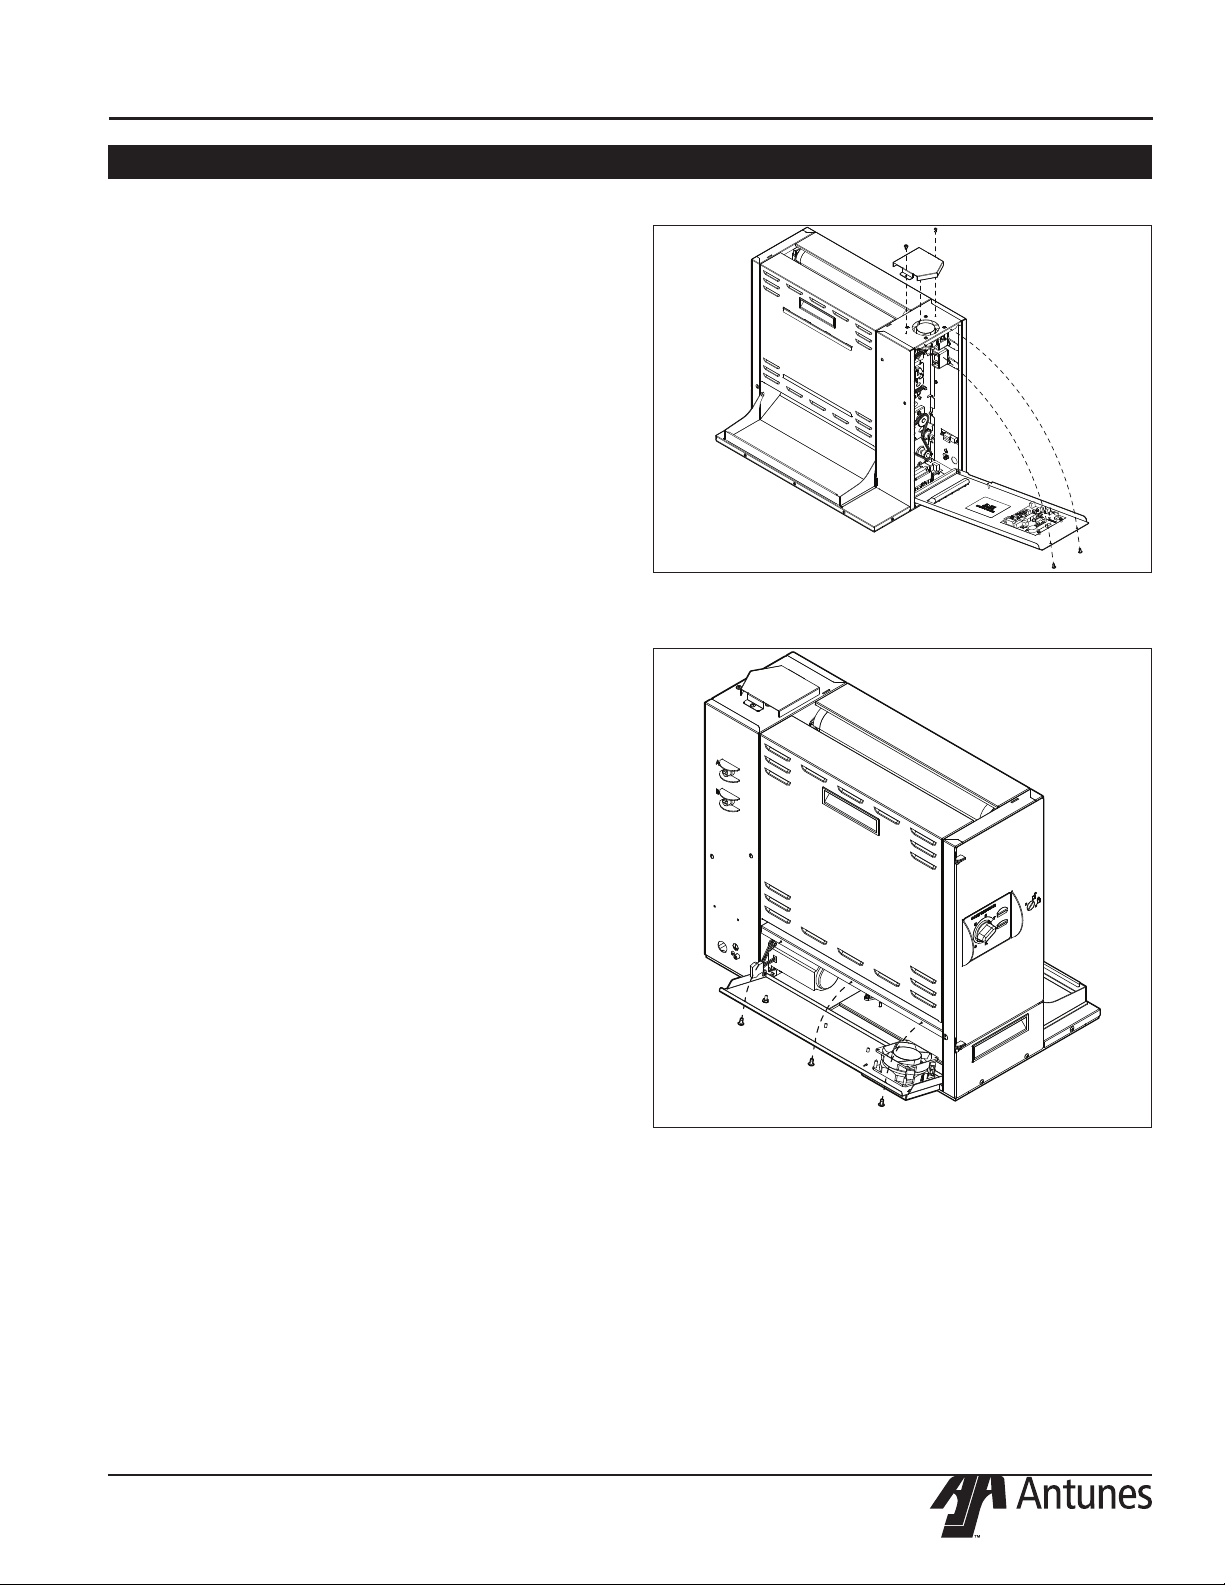
Safety Features
HI-LIMIT CONTROL
A Hi-Limit Control turns off electrical power to the heat-
ers and control circuits if the unit overheats. To reset
the control:
1. Allow 10 - 15 minutes for the unit to cool.
2. Locate the two Hi-Limit Controls on the rear of the
unit. Remove the two black protective caps.
3. Press and release both buttons. Reinstall the pro-
tective caps.
NOTE: If the Hi-Limit Controls require continuous
resetting, contact your Authorized Service Agency.
Purging buns from Toaster
If buns get stuck in the toaster, press and hold both
the UP and DOWN arrow buttons to increase the belt
speed until the buns are purged from the toaster.
There are variations in bun products Worldwide that are
used on the Antunes HEBT toaster such as moisture
content, bun formulations, age, tolerances etc. The
HEBT was designed to compensate for bun variations
by allowing user to adjust the compression, light/dark
(speed) & temperatures settings in order to achieve a
Gold Standard toasted product.
1.LIGHT DARK ADJUSTMENT: Adjust the light dark
setting with the ▲or ▼buttons. The default light/dark
setting on the HEBT from the factory is 0 but can be
adjusted from Lighter 0-10 to Darker 0-10. Light 10 is
the lightest setting and dark 10 is the darkest. Each
increase in “lighter” value will increase the pass through
time and each increase in “darker” value will decrease
the pass through time.
2.TEMPERATURE ADJUSTMENT: Adjust the set point
temperature on the platens in the program menu. The
default temperature settings on the HEBT are A Platen:
271°C (520°F) and B Platen: 271°C (520°F) . The tem-
peratures can be increased to +/- 50°F (10°C) if needed
to achieve an acceptable toast quality.
3.COMPRESSION ADJUSTMENT: Adjust the compres-
sion knob on the left side of the unit. The default com-
pression setting on the HEBT is 4 but is adjustable from
1-7. It is acceptable to adjust the compression from 1-7
as needed to achieve the desired toast quality and bun
compression.

HEBT-3V BUN TOASTER
8P/N 1011377 Rev. G 07/17
McDonald’s
Daily Cleaning
Clean the Toaster and Belt Wraps
1. Turn the toaster’s power switch to the off position.
The toaster enters a cool-down mode and will
automatically shut down when complete.
2. Remove the bun feeder and bun stop with heat-
resistant gloves.
3. Remove the front and rear conveyor covers with
heat resistant gloves.
4. Inspect the front belt for any tears, discoloration,
or dam-age to the Belt Wrap snaps. Replace
any damaged Belt Wrap as needed. With with
proper maintenance the belt can six months or
longer. Refer to PR 68 Q1 and PR 68 Q2 for belt
replacement instructions.
5. If the front belt is in good condition, spray a
clean, damp sanitized towel with Sink Detergent
solution. Wipe the front belt clean. Rinse the front
belt with a separate clean, damp sanitized towel.
Allow to air dry.
NOTE: The belt rollers will continue turning while
in cool-down mode. This allows you to clean the
entire belt. Only clean the belt where it is in front of
the Backing Plate to avoid causing dam-age to the
belt. Repeat this step several times if there is heavy
carbon buildup on the conveyor belt.
6. Inspect the rear belt for any tears, discoloration,
or damage to the Belt Wrap snaps. Replace
any damaged Belt Wrap as needed. With with
proper maintenance the belt can six months or
longer. Refer to PR 68 Q1 and PR 68 Q2 for belt
replacement instructions.
7. If the rear belt is in good condition, spray a clean,
damp sanitized towel with Sink Detergent solu-
tion. Wipe the rear belt clean. Rinse the rear belt
with a separate clean, damp sanitized towel.
Allow to air dry.
NOTE: The belt rollers will continue turning while in
cool-down mode. This allows you to the entire belt.
NOTE: Only clean the belt where it is in front of the
Backing Plate to avoid causing damage to the belt.
MAINTENANCE
Figure 3.
8. Wash, rinse, and sanitize the bun feeder and bun
stop in the three-compartment sink. Allow to air
dry
9. Wash, rinse, and sanitize the front and rear con-
veyor covers in the three-compartment sink.
10. Reinstall the clean front and rear conveyor covers.
11. Reinstall the clean bun feeder and clean bun stop.
12. Clean the outside surfaces of the toaster with
clean, damp sanitized towel sprayed with Heavy
Duty Degreaser Solution. Rinse with a clean,
sanitizer soaked towel and allow to air dry.
13. Turn the unit on.
14. Place all used towels into the soiled towel bucket.

HEBT-3V BUN TOASTER
9
P/N 1011377 Rev. G 07/17
McDonald’s
MAINTENANCE (continued)
Figure 4. Examples of Damaged Belts

HEBT-3V BUN TOASTER
10 P/N 1011377 Rev. G 07/17
McDonald’s
Figure 5. Example of Damaged Belt
BELT IS TORN AND FOLDED.
REPLACE BELT.
BELT IS MISSING SNAPS
AND IS DAMAGED. REPLACE BELT.
Figure 6. Example of Damaged Belt
Figure 7. Example of Damaged Belt
MAINTENANCE (continued)

HEBT-3V BUN TOASTER
11
P/N 1011377 Rev. G 07/17
McDonald’s
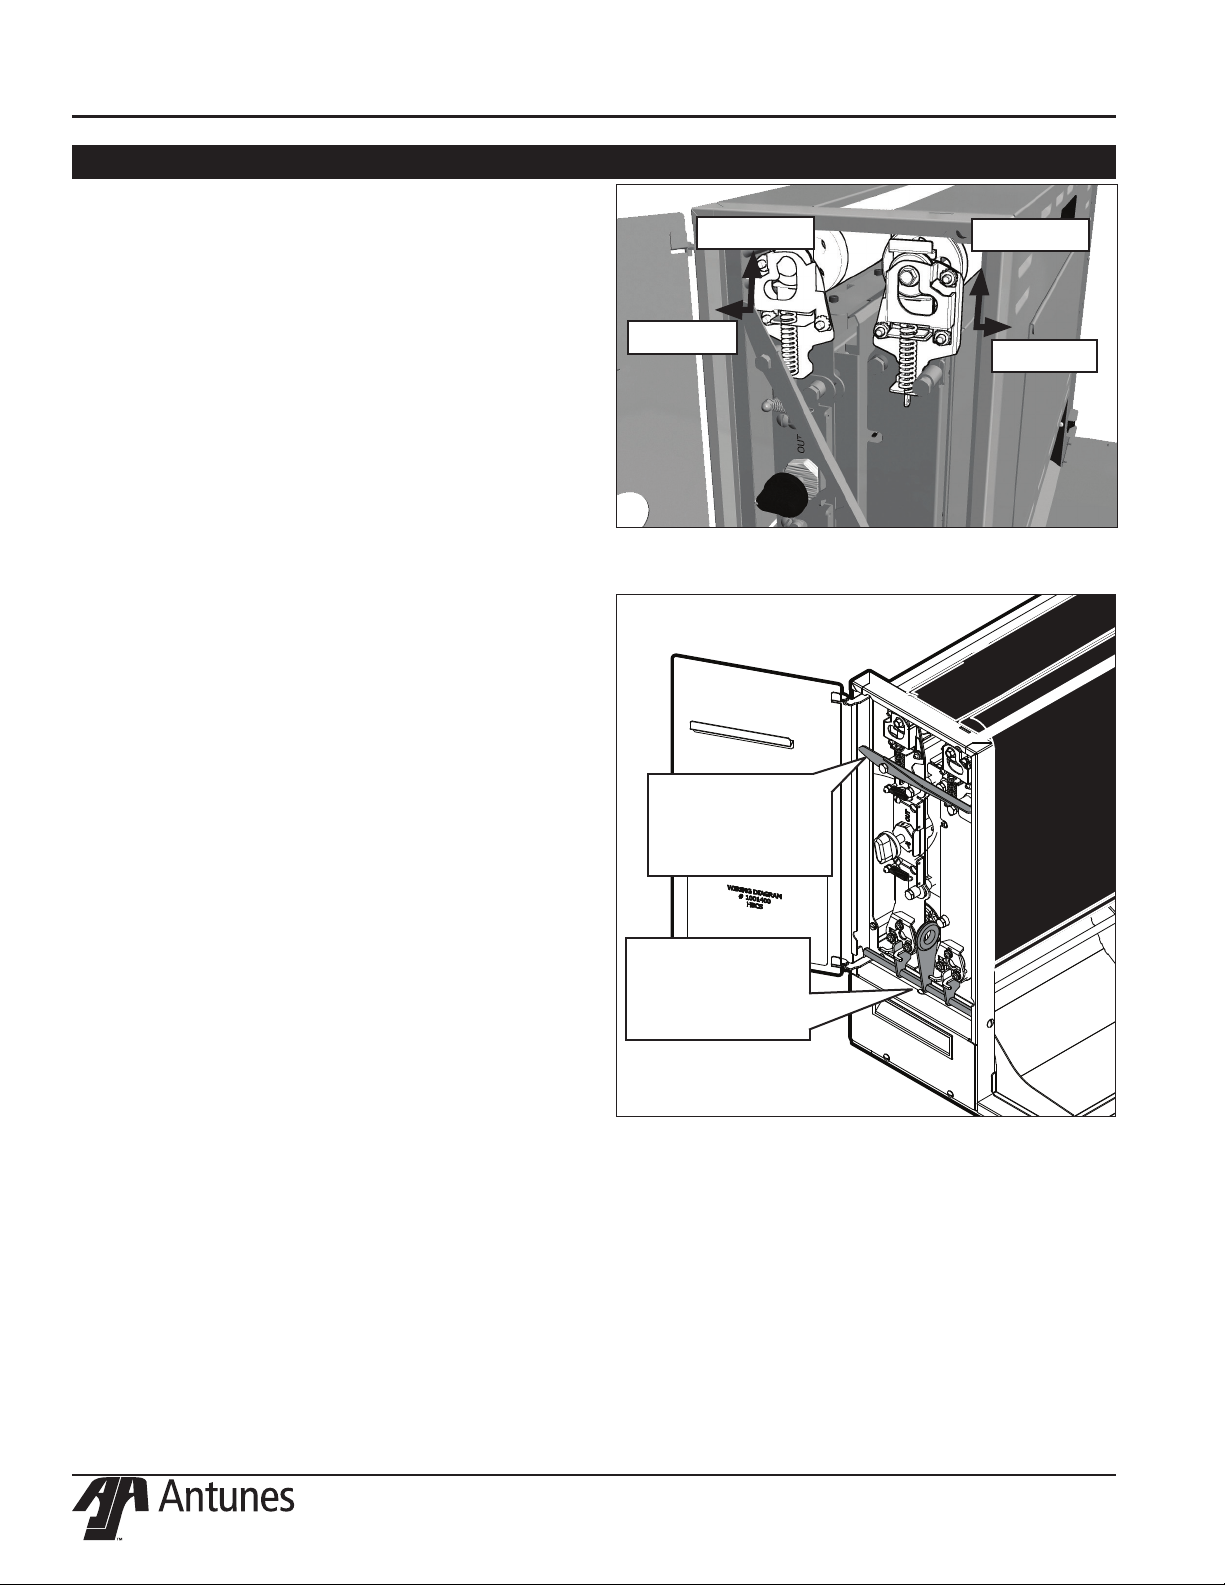
Figure 9. Conveyor Locks
Figure 8. Conveyor Rollers
MAINTENANCE (continued)
Quarterly
Remove Belt Wraps and Clean Rollers
1. Turn the toaster’s power switch to the off position.
The toaster enters a cool-down mode and will
automatically shut down when complete.
2. Unplug the power cord once the cool-down period
is complete.
NOTE: Wait for the cool-down period to complete
before unplugging the power cord.
3. Remove the bun feeder using heat-resistant
gloves.
4. Remove the front and rear conveyor covers by lift-
ing up and away from the unit. Set the compres-
sion knob to 7.
NOTE: Reposition the toaster as needed to perform
these steps.
5. Unlock the lock on the left side panel with a flat-
head screwdriver and open the panel. Set the bun
compression knob to 7.
6. Push down on the front and rear belt rollers and
move them away from the center of the toaster.
Use both hands. This removes tension and locks
the rollers in place.
7. Lift the upper belt frame lock. Then rotate down
so it rests on the camshaft of the rear belt roller.
8. Pull down the lower belt frame lock. This provides
access to the front and rear belt rollers and belts.
9. Carefully remove both of the belts from the toast-
er.
10. Wipe all four rollers and backing plates with a
clean, damp sanitized towel. Make sure to remove
all debris from the rollers and the backing plates
so they are as clean as possible.
11. Use a dry cloth towel or nylon-bristled brush to
remove all debris from both side compartments,
inside of the toaster, and underneath the rollers.
Upper Belt
Frame Lock
Lower Belt
Frame Lock
Tense
Loose Loose
Tense
Figure 10. Belt Wraps
Rear
Belt Wrap
Front Belt Wrap
HEBT-3V BUN TOASTER
12 P/N 1011377 Rev. G 07/17
McDonald’s
MAINTENANCE (continued)
Figure 11. Conveyor Rollers
Figure 12. Conveyor Locks
Install Belt Wraps
1. If you are installing the existing belt wraps, inspect
the belts. Replace belt wraps if worn or damaged.
If the belt wraps are in good condition put them
back on the toaster.
2. For new or existing belts, wipe both sides of the
belts with a clean, damp sanitized towel. Allow to
air dry.
3. Slide the belts gently over the appropriate top and
bottom roller. Make sure the belt lines up properly
on the rollers. The snaps on the belts should face
the inside of the roller.
4. Lift up the front and rear belt roller. Use both
hands. This will add tension and lock them in
place.
5. Lift the lower conveyor lock to lock the rollers into
place.
NOTE: Lift up on the camshaft of the rear conveyor
roller while lifting the conveyor lock.
6. Lift the upper belt frame lock and lock in place on
the conveyor assembly. Set the compression knob
to 4.
7. Close the side panel and lock the lock using a
flathead screwdriver on the side panel.
8. Re-install the front and rear conveyor covers so
they lock into place.
9. Re-install the bun feeder and bun stop onto the
top of the unit.
10. Plug in the power cord and turn the unit on.
Upper
Conveyor
Lock
Lower
Conveyor
Lock
Tense
Loose Loose
Tense
HEBT-3V BUN TOASTER
13
P/N 1011377 Rev. G 07/17
McDonald’s
MAINTENANCE (continued)
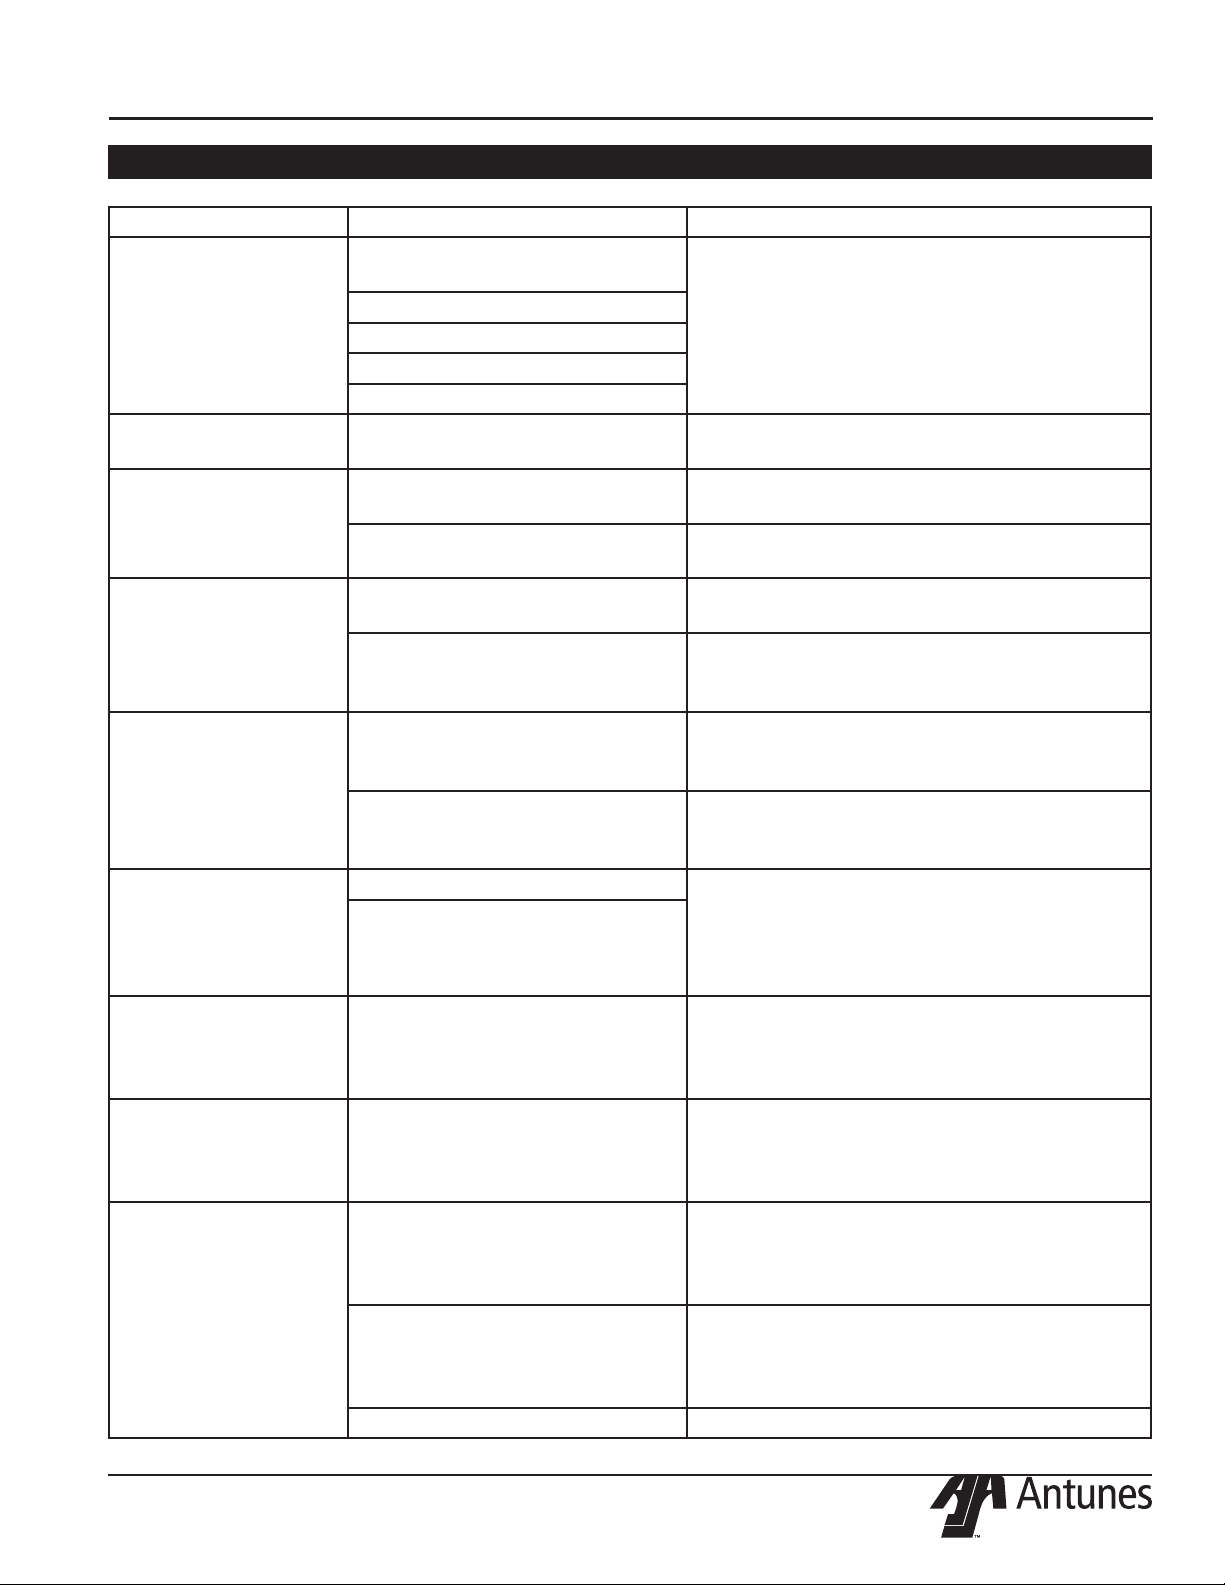
Figure 13. Accessing Top Cooling Fan
Clean Cooling Fans and Electrical
Housings (Annually)
1. Turn the toaster’s power switch to the off position.
The toaster enters a cool-down mode and will au-
tomatically shut down when complete. Unplug the
power cord.
2. Remove the bun feeder and set aside.
3. Remove the top two screws from the control hous-
ing cover and slowly lower the cover.
4. Remove any debris or dust from the cooling fan
with a small brush. Wipe away any debris with a
clean, dry towel Inspect the electrical compartment
for crumbs and debris. Clean out all crumbs and
debris using a clean, dry towel or nylon bristled
brush. Be careful not to disrupt any of the electrical
wiring.
5. Slowly close the control housing cover. Reconnect
with the screws.
6. Remove the screws from the bottom plate on the
rear of the unit and slowly lower the cover.
7. Remove any debris or dust from the cooling fan
with a small brush. Wipe away any debris with a
clean, dry towel. Inspect the electrical compartment
for crumbs and debris. Clean out the crumbs and
debris using a clean, dry towel or nylon bristled
brush. Be careful not to disrupt any of the electrical
wiring.
8. Close the bottom plate and re-install the screws.
9. Reattach the bun feeder. Plug in the power cord,
turn the power on, and test the unit before returning
it to service.
Figure 14. Accessing Rear Cooling Fan

HEBT-3V BUN TOASTER
14 P/N 1011377 Rev. G 07/17
McDonald’s
TROUBLESHOOTING
Problem Possible Cause Corrective Action
Control Display flashes
Err 5 continuously. Buns
not toasting properly.
The A Platen temperature has not
reached the setpoint temperature
within 20 minutes.
Allow the unit to warm up for 30 minutes and then
recheck. If the Control Display still flashes Err
5, contact your maintenance person or Antunes
Technical Service for service.
Failed A Platen Thermocouple. Contact your maintenance person or Antunes
Technical Service for service.
Failed Control Board
Control Display flashes
Err14 continuously.
Buns not toasting prop-
erly.
The B Platen temperature has not
reached the setpoint temperature
within 20 minutes.
Allow the unit to warm up for 30 minutes and
then recheck. If the Control Display still reads Err
14, contact your maintenance person or Antunes
Technical Service for service.
Failed Rear Platen Thermocouple. Contact your maintenance person or Antunes
Technical Service for service.
Failed Control Board.
Control Display flashes
Err 9 continuously.
Control Compartment ambient tem-
perature is above 150°F (66°C)
Verify side vents on toaster are unblocked and not
near other heating appliances. If problem persists,
contact your maintenance person or Antunes
Technical Service for service.
Failed Cooling Fan.
Failed Control Board
Control Display Flashes
Err 19 continuously.
Buns Burn.
Failed A Platen Solid State Relay. Contact your maintenance person or Antunes
Technical Service for service.
Failed Control Board.
Failed A Platen Thermocouple.
Control Display flashes
Err 18 continuously.
Buns Burn.
Failed B Platen Solid State Relay. Contact your maintenance person or Antunes
Technical Service for service.
Failed Control Board.
Failed B Platen Thermocouple.
Control Display flashes
Err 13 continuously.
Buns not toasting prop-
erly.
Loose A Platen Thermocouple con-
nection on Control Board or the
Front Platen Thermocouple is open.
Re-secure the A Platen Thermocouple to the
Control Board. If the Control Display still reads
Er 13, check the front Thermocouple for continu-
ity. Contact your maintenance person or Antunes
Technical Service for service.
Failed Control Board.
Control Display flashes
Err 11 continuously.
Buns not toasting prop-
erly.
Loose B Platen Thermocouple con-
nection on Control Board or the
Rear Platen thermocouple is open.
Re-secure the B Platen Thermocouple connection
to the Control Board. If the Control Display still
reads Er 11, check the Rear Thermocouple for
continuity. Contact your maintenance person or
Antunes Technical Service for service.
Failed Control Board.
Control Display flashes
Err 12 continuously.
Buns not toasting prop-
erly.
Shorted A Platen Thermocouple to
ground.
Disconnect and re-secure the A Platen
Thermocouple connection to the Control Board.
If the Control Display still reads Er 12, check the
Rear Thermocouple for continuity. Contact your
maintenance person or Antunes Technical Service
for service.
Failed Control Board
Control Display Flashes
Err 10 continuously.
Buns not toasting.
Shorted B Platen Thermocouple to
ground.
Re-secure the B Platen Thermocouple connection
to the Control Board. If the Control Display still
reads Er 10, check the Rear Thermocouple for
continuity. Contact your maintenance person or
Antunes Technical Service for service.
Failed Control Board.
HEBT-3V BUN TOASTER
15
P/N 1011377 Rev. G 07/17
McDonald’s
TROUBLESHOOTING (continued)
Problem Possible Cause Corrective Action
Control Display flashes
Err 20.
Mechanical bind in one or both con-
veyors.
Enter “user mode” to check the motor speed.
Check both conveyors for mechanical binds. Test
the motor. Replace necessary parts. Contact your
maintenance person or Antunes Technical Service
for service.
Worn or damaged Ball Bearings.
Drive chain or sprockets damaged.
Failed Motor.
Failed Control Board.
Control Display flashes
Err 8
Motor is running when it shouldn’t
be.
Contact your maintenance person or Antunes
Technical Service for service.
Crowns and/or Heels
must be forced into the
toaster. Buns sticking
and burning.
Belts not cleaned properly. Clean the Belts as described in the Maintenance
section of this manual.
Belts are dirty, worn, or damaged
(replace every 4-6 months).
Clean or replace Belts as described in the
Maintenance section of this manual.
Buns not toasting ade-
quately.
One of the Conveyor top shafts is
stuck in the lower lock position.
Inspect positions of the shafts as described in the
Maintenance section of this manual.
Either both Upper/Lower Conveyor
locks are not properly locked in
place.
Inspect the proper position of the locks as
described in the Maintenance section of this
manual.
Compression side door
will not close.
Either both Upper/Lower Conveyor
Locks are not properly locked in
place.
Inspect the proper position of the locks as
described in the Maintenance section of this
manual.
The lock on the Compression Side
Door is in the locked position when
trying to close the door.
Turn the lock to the unlocked position before clos-
ing the door.
Fan is making an unusu-
al sound.
Failed Cooling Fan. Verify vents on toaster are unblocked and not
near other heating appliances. Clean fans as
described in the Maintenance section of this man-
ual. If problem persists, contact your maintenance
person or Antunes Technical Service for service.
Cooling Fan is dirty and needs to
be cleaned.
Control Display flashes
Err 17 continuously.
Buns are not toasting
properly.
A platen Hi-Limit Control is tripped. Allow the unit to cool and reset the A platen
Hi-Limit Control. If it trips again, contact your
maintenance person or Antunes Technical Service
for service.
Control Display flashes
Err 16 continuously.
Buns are not toasting
properly.
B Platen Hi-Limit Control is tripped. Allow the unit to cool and reset the B platen
Hi-Limit Control. If it trips again, contact your
maintenance person or Antunes Technical Service
for service.
Control Display is blank. Power Cord is not plugged in. Plug the Power Cord into the appropriate out-
let. Turn the toaster on. If the Control Display is
still blank, contact your maintenance person or
Antunes Technical Service for service.
Circuit Breakers turned off or
tripped. Damaged electrical outlet,
plug, or Power Cord. Power Switch
damaged.
Reset Circuit Breakers. If they trip again, check
the Power Cord, Plug, and outlet for damage.
Contact your maintenance person, Authorized
Service Agency, and Electrician for service.
Faulty Transformer. Replace Transformer.

HEBT-3V BUN TOASTER
16 P/N 1011377 Rev. G 07/17
McDonald’s
TROUBLESHOOTING (continued)
Problem Possible Cause Corrective Action
Conveyors not turning. Motor Drive Chain is detached from
sprockets.
Reinstall the Drive Chain.
Drive Chain needs lubrication. Lubricate Drive Chain with Lubit-8 (P/N 2140152).
Failed Drive Motor. Contact your maintenance person or Antunes
Technical Service for service.
Control Display flashes
Err 1, 2, 3, 5, 6, 7, or
any number above Err
20.
Internal Control Board fault. The Control Board needs to be replaced. Contact
your maintenance person or Antunes Technical
Service for service.
HEBT-3V BUN TOASTER
17
P/N 1011377 Rev. G 07/17
McDonald’s
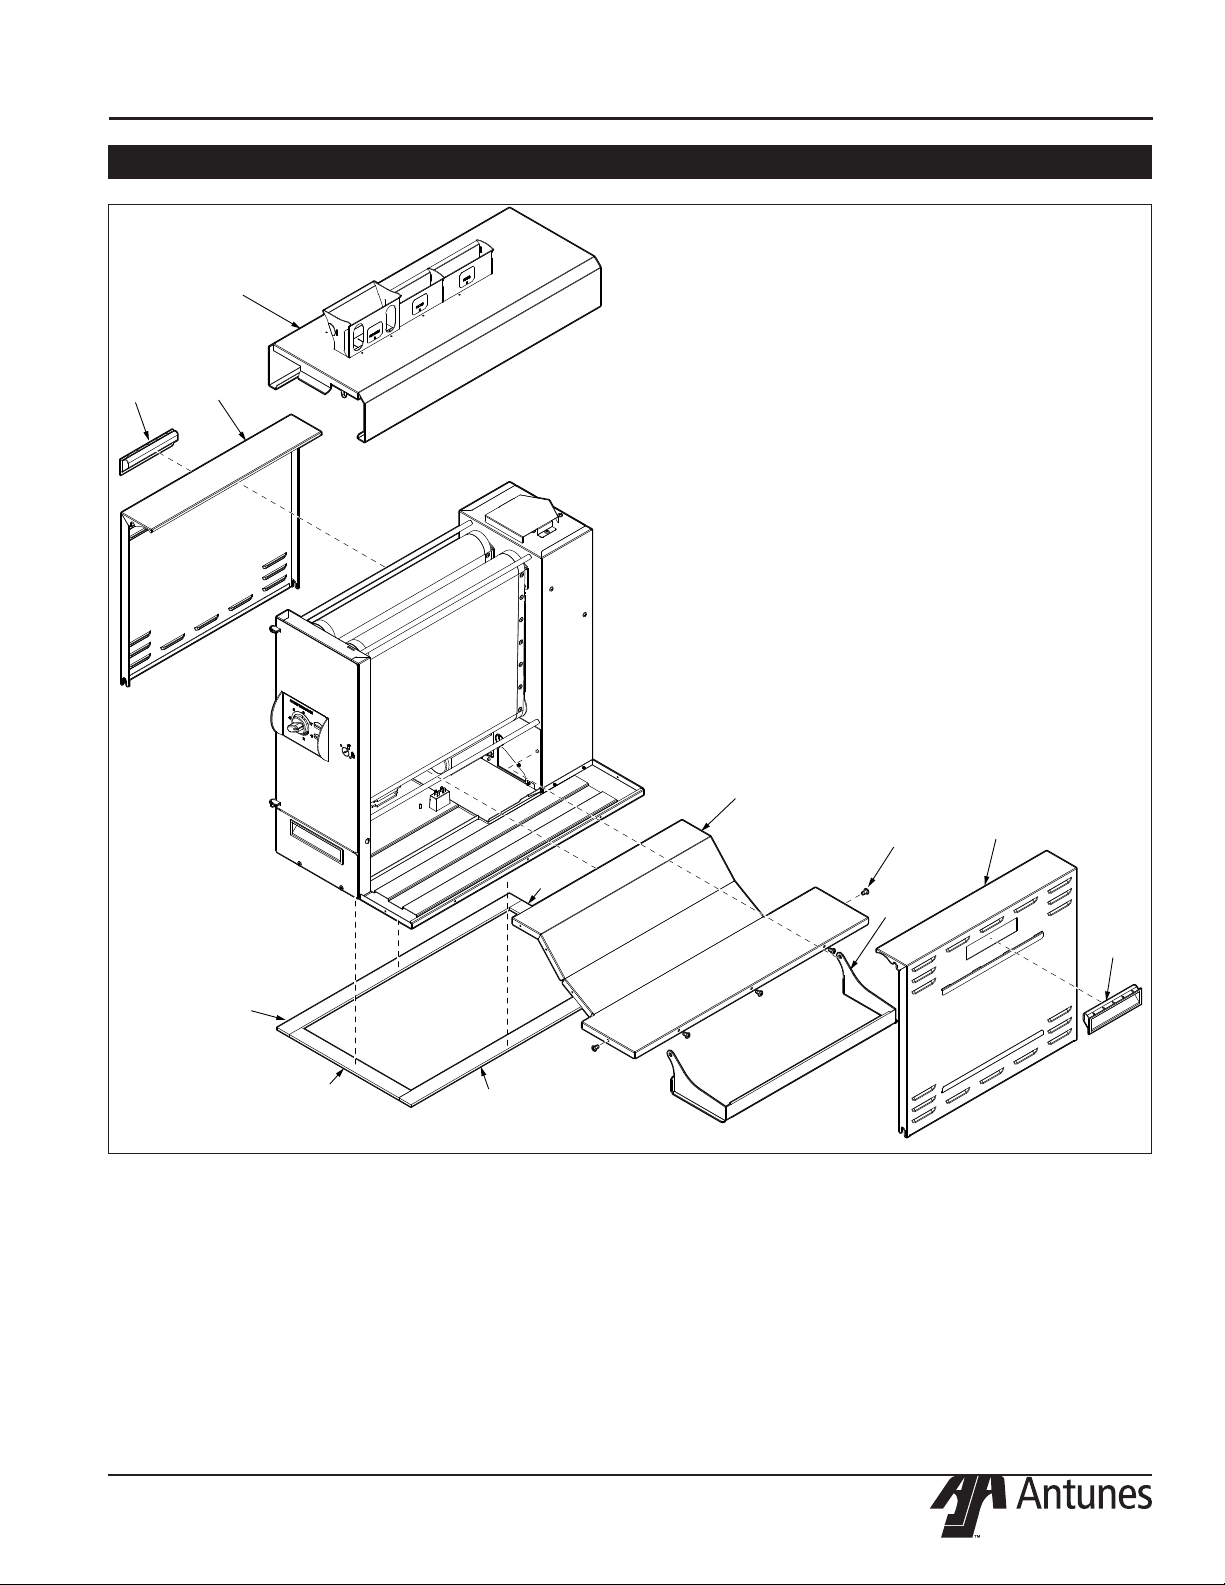
REPLACEMENT PARTS
1 0012603 Sprocket / Tensioner Bracket Assy 1
2 0012592 Sprocket /Bearing Assembly 1
3 0506185 Bracket, Chain Tensioner 1
4 2140109 Loctite # 242 (Blue) 1
5 3310101 Nut, Hex 5/16 - 18 1
6 3310103 Shoulder Bolt 3/8” X 1” 1
7 3310106 Lock Washer 1
8 0012604 Sprocket / Retainer Assy 1
9 0012592 Sprocket /Bearing Assembly 1
10 0506146 Retainer Idler 1
11 2120118 Washer, Flat 1
12 2140109 Loctite # 242 (Blue) 2
13 331P101* Nut, Hex 5/16 - 18 1
14 3310103 Shoulder Bolt 3/8” X 1” 1
15 331P106* Lock Washer 1
16 0012814 Cam Bracket And Thrust 1
Strip Assembly, LH
17 0013167 Housing Assembly 1
18 0013166 Base / Heater Assembly 1
19 0021689 Weldment, End Housing 1
20 0021714 Weldment, End Housing Rod Support 1
21 0022117 Weldment, Inner Base 1
22 0022118 Weldment, Control Housing 1
23 0200345 Base Gasket, 23.94” LG 2
24 0200355 Base Gasket, 11.30” LG 2
25 0400119 Bushing, Shorty 5/8” 2
26 0400418 Push In Grommet For 1-1/8” Dia. Hole 1
27 0506083 Spacer 2
28 0506174 End Covr Bottom 1
29 0800474 Rod, Belt Cover 4
30 2100212 Handle, Pocket Pull, Snap-In 1
31 2140101 Adhesive/ Sealant - RTV 1
32 2140109 Loctite # 242 (Blue) 1
33 308P144* Screw, #8-32 X 1/4” (#6 Head) 1
34 308P157* Screw, Tap 8-32 X 3/8”LG 1
35 3080203 Screw, Tap 8-32 X 3/8” W/Int. 11
Tooth Washer
36 310P102* Washer, Int. Tooth-Lock,#10 1
37 310P110* Screw, Mach. #10-32 X 1/2” 1
38 310P199! Scr, #10-32 X 3/8 Lg Socket HD Cap 1
39 310P204* Fillister Head Phillips Screw 1
# 10-32 X .25
40 0013178 Adj. Platen Assembly 1
41 0013181 Relay - Sink Bracket Assy 1
42 0507247 Heat Sink, Relay 1
43 308P157* Screw, Tap 8-32 X 3/8”LG 1
44 4010187 Transformer, 240 Vac/12Vac 1
45 4050240 Relay, Solid State Dual Pole 1
W/Conn-Recept
46 0013183 Motor / Sprocket Assembly 1
47 0506157 Motor Plate 1
Item Part No. Description Qty. Item Part No. Description Qty.
48 2140109 Loctite # 242 (Blue) 2
49 2150316 Sprocket, 25B12 3/8” Bore 1
50 310P199* Scr, #10-32 X 3/8 LG Socket HD Cap 1
51 4000186 Motor, 230V 1
52 0013184 Cam Brkt & Thrust Strip Assy, Rh 1
53 7001628 End Cover Assembly Kit 1
54 0013217 Bun Feeder Assembly 1
55 0013250 Electrical Panel Assembly 1
56 0022185 Electrical Panel Wldmnt 1
57 0506170 Fan Cover 1
58 1000900 Label - Warning 1
59 1001213 Label - Shock Hazard 1
60 21000-0043 Spacer, 3/8 CBS Thread Female 2
61 308P124* Screw, Mach One-Way #8-32 1
62 308P143* Nut, Hex ‘Keps’ #8-32 1
63 310P213* Screw, Phpnhd 1
#10-16 X 3/4” Thrd Form
64 4000202 Fan, Axial - 230V, Metal Hsg & Imp 1
65 4050236 Contactor, 2 Pole No 1
66 4070198 Snubber Board 1
67 0013307 Control Cover Assembly 1
68 0022110 Weldment, Control Housing Cover 1
69 1000900 Label - Warning 1
70 1001213 Label - Shock Hazard 1
71 1001561 Label, ID - A 1
72 1001562 Label, ID - B 1
73 1001599 Label, Control 1
74 1001650 Label Korean Translation 1
75 1002650 Wiring Diagram Label 1
76 2100212 Handle, Pocket Pull, Snap-In 1
77 2180445 Edge Trim Piece, 7” 1
78 304P105* Nut, Hex ‘Keps’ #4-40 1
79 4070230 Asy-Pcb, Main Go To Market (MCD) 1
80 0021983 Weldment, Thermocouple Tube 1
81 0022101 Weldment, Idler Roller Front Top 2
82 0022103 Weldment, Drive Roller Front Bottom 2
83 0022111 Weldment, Conveyor Cover - Front 1
84 0022114 Cover Weldment 1
85 0022115 Weldment, Adj. Platen Frame 1
86 0022116 Weldment, Fixed Platen Frame 1
87 0022283 Wment, Bearing Brkt & 2
Spring Guide- LG
88 0022284 Wment, Bearing Brkt & 2
Spring Guide - RG
89 0022294 Weldment, Filter Bracket 1
90 0100292 Platen, Main 230V, 2300W 1
91 0400147 Bushing, Shorty 7/8” 1
92 0400427 Insulation, Main Platen 1
93 0504320 Spacer 0.781 X 1.125 X 0.06” 10
94 0506144 Plate, Tensioner RG 2
95 7001431 Tensioner Bracket Kit 1

HEBT-3V BUN TOASTER
18 P/N 1011377 Rev. G 07/17
McDonald’s
REPLACEMENT PARTS (continued)
Item Part No. Description Qty. Item Part No. Description Qty.
96 0506167 Bracket, Bearing 2
97 0506278 Spacer, .312 X .187 X .105 3
98 7001431 Tensioner Bracket Kit 1
99 0506292 Bracket, Tensioner- End Hsg, Front 1
100 0506293 Plate, Tensioner - End Hsg, Rear 1
101 0506294 Plate, Tensioner - End Hsg, Front 1
102 0506736 Bracket, Housing Locking 1
103 0507112 Support Bracket, RG 1
104 0507113 Support Bracket, LG 1
105 0507114 Back Conveyor Cover 1
106 0507115 Bracket, Bun Stop 1
107 0507129 Insulation Plate 1
108 0507246 Cover, Duct Fan 1
109 0600143 Spring, Compression Setting 2
110 0600157 Spring, Chain Tension 2
111 0600158 Spring, Roller Tension 4
112 0600159 Spring, Cam Adj 2
113 0700956 Cable Assembly - Gnd 1
114 0700963 Wire Set, SSR Hi Voltage 1
115 0700964 Wire Set, Club Voltage 1
116 0700965 Wire Set, Control 1
117 0700966 Wire Set, Fan Xfmr 1
118 0700967 Wire Set, Line Filter 1
119 1001452 Label, Pvc Removal 1
120 2100212 Handle, Pocket Pull, Snap-In 2
121 2100253 Knob, 1/4” Shaft, Push-On 1
122 2100334 Thrust Strip, Teflon 4
123 2110197 Clip, Steel Cable 1
124 2120213 Spacer, Frame & Platen LG 4
125 2120216 Spacer,Upper Locking Plate, Front 1
126 2120217 Spacer,Upper Locking Plate, Rear 1
127 2120221 Spacer, 0.69 X 0.503 X 0.359 2
128 2120223 Sleeve Bearing, .50” Od X .75” LG 2
129 2120224 Sleeve Bearing, .50” Od X .375” LG 2
130 2120260 Spacer, Adjustable Frame Rh 2
131 2120263 Spacer, Platen RH 2
132 2140109 Loctite # 242 (Blue) 1
133 2140125 Lubricant, White, PTFE 1
134 2150185 Sprocket, 25B18, 1/2” Bore 2
135 2150285 Bearing, Single Groove S/S 8
136 2150324 Chain, Drive 1
137 2150362 Cam, HBCS 2
138 2150406 Cam Shaft 1
139 300P123* Ring, Retaining, External 1
140 304P105* Nut, Hex ‘Keps’ #4-40 1
141 306P130* Nut, Hex Keps #6-32 (Small Pattern) 1
142 308P102* Washer, Int. Tooth #8 1
143 308P124* Screw, Mach One-Way #8-32 1
144 308P142* Washer, Flat #8 1
145 308P143* Nut, Hex ‘Keps’ #8-32 1
146 308P145* Nut, Hex Acorn #08-32 Low Crown 1
147 308P157* Screw, Tap 8-32 X 3/8”LG 1
148 308P164* Screw, Mach. #8-32 X 1” 1
149 308P193* Scr, Mach #8-32 X 1 1/4” SLTFLTHD 1
150 308P203* Screw, Tap 8-32 X 3/8” 1
W/Int. Tooth Washer
151 308P340* Nut, Hex Acorn Lock #8-32 1
152 310P146* Nut, Hex ‘Keps’ #10-32 1
153 310P187* Screw Set, #10-32 X 3/8 1
Hex Socket-Cone Point
154 310P199* Scr, #10-32 X 3/8 Lg Socket HD Cap 1
155 310P213* Screw, PHPNHD #10-16 X 3/4” 1
Thrd Form
156 310P214* Screw, Hex #10-32 X 1/2” 1
157 325P109* Screw, Hexcap 1/4-20 X 1/2” 1
158 325P176* Screw, Flange Hex Head Cap 1
159 325P193* Screw, Hex Head, 1
#1/4-20 X 1.375”, S.S.
160 325P194* Screw, Hex Hd, #1/4-20 X 2.00”, S.S. 4
161 4000202 Fan, Axial - 230V, Metal Hsg & Imp 1
162 4010221 Cap-Mp, Motor Run 1
163 4030352 Thermostat, Hi-Limit 700°F 2
164 4050229 Filter, Line 1
165 4051045 Thermocouple Type “K” (Open End) 2
166 4060107 Cable Tie, 1/8W X 5” 1
167 4060374 Ground Lug 1
168 4060398 Terminal Block, S-Series 1
169 4070154 Varistor Board 1
170 0700947 Power Cord IEC-309 Pin & Sleeve, 1
16 Amp., 230 Volt
(Mfg. No. 9210859 & 9210861)
0700970 Power Cord Marechal Pin & Sleeve 1
32 Amp., 220-250 Volt
(Mfg. No. 9210860)
0700998 Power Cord Marechal Pin & Sleeve 1
32 Amp., 220-250 Volt
(Mfg. No. 9210863)
171 0400375 Strain Relief 1
172 0400376 Lock Nut, Conduit 3/4” NPT 1
173 7001070 Main (Front) Belt 1
174 7001071 Rear Belt 1
175 7001072 Belt Replacement Kit 1
(Incl. 1 of 173 and 1 of 174)
* Items available in packages of ten (10)
HEBT-3V BUN TOASTER
19
P/N 1011377 Rev. G 07/17
McDonald’s
REPLACEMENT PARTS (continued)
54
120 105
106
83
120
24
18
34
23
24
23
HEBT-3V BUN TOASTER
20 P/N 1011377 Rev. G 07/17
McDonald’s
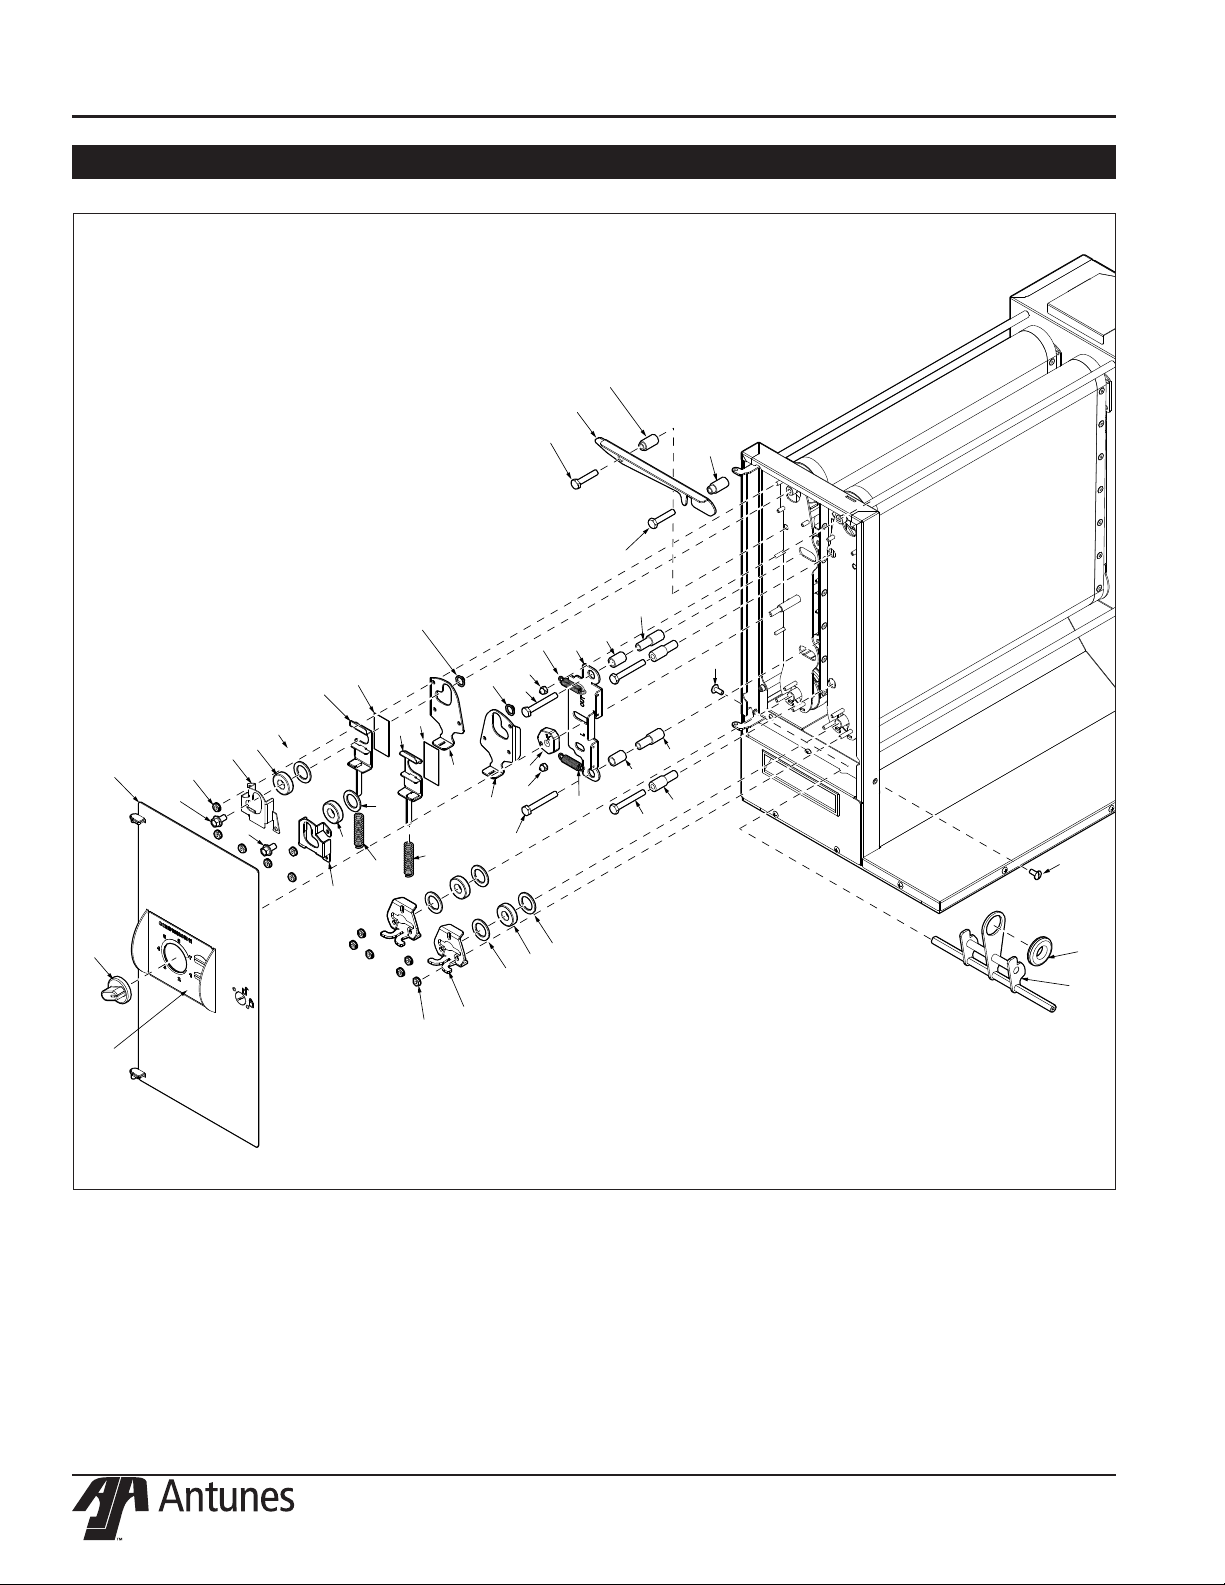
REPLACEMENT PARTS (continued)
126
125
159
159
102
26
20
124
128
16
109
112 124
160
124
128
37
151
160
139
139
151
137
160
101
100
122
122
88
87
93
135
98
152
158
53
53
121
152
99
158
96
93
135
93
111
111
93
135
37
This manual suits for next models
4
Table of contents
Other McDonald's Toaster manuals


