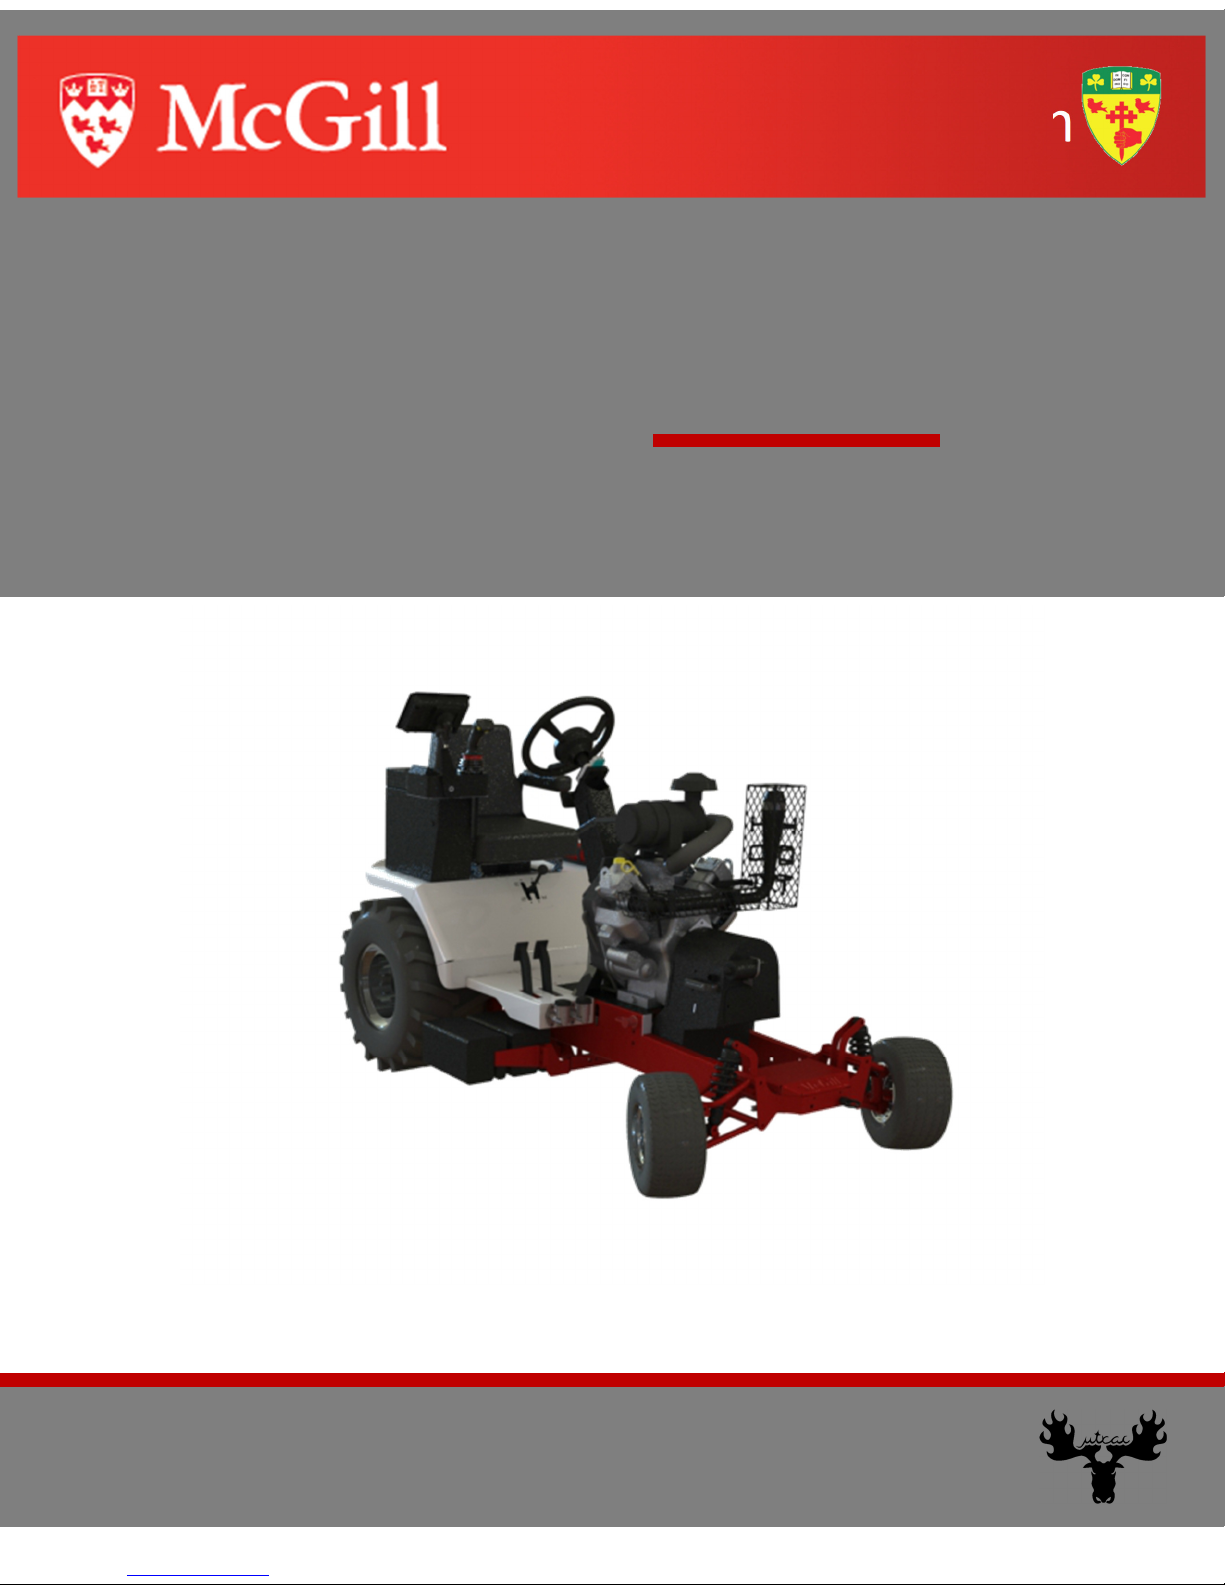
McGill utrac MR18 User manual

¼ Scale Tractor Team
µtrac MR18
Owner’s Manual

2
Using this Manual
●Read and understand this manual before the assembly and operation of the
machine.
●Be familiar with all the driving parts and know how to stop the unit quickly.
●Go through the safety checklist before each operation.
If situations occur that are not covered by this manual, act with care and good judgment. Call
professional assistance if needed.

Table of Contents
Using this Manual 2
Table of Contents 3
Overview of the Vehicle 6
Safety Equi ment and Practices 7
Seat Adjustment 7
Safety Decals 7
Knowing your MR18 8
Fuel Ca 8
Adjusting the Steering Wheel 8
Rigid Dis lay 8
Protecting your MR18 9
Pre-O eration Safe Use Checklist 9
O erations Safe Use Guidelines 9
Fuel Requirements 10
Engine Exhaust 10
Fire Hazard 10
S ecial Driving Conditions 11
Money Saving suggestions 11
Using your MR18 12
Instrument Cluster Overview 12
Entering Standby Mode 12
Starting the engine 13
Changing the throttle 13
Manual Transmission and CVT 14
Automatic Pull Mode 14
Foot Brakes 14
Electrically Actuated Steering 14
Dynamic Ballast System (DBS) 14
Heads-U Dis lay (HUD) 14
In Case of Emergency 15
Overheating 15
Emergency Starting 15
Fuses 16
Towing 16
Flat Tire 17
Front Tires 17

4
Rear Tires 17
A earance Care 18
Minimizing Paint Damage 18
Maintaining the Finish 18
Maintenance 19
Scheduled Maintenance 19
Genuine Engine Parts Recommendation 20
Engine Oil 21
How to check/add oil 22
How to Change the Oil 23
Oil Removal 23
Change Oil Filter 23
Addition of Oil 23
Air Filter 24
How to Change Air Filter 24
Cyclonic Air Filter System 25
Low Profile Air Filter System 25
Fuel Filter 26
How to Change the Fuel Filter 26
S ark Plugs 27
How to Re lace the S ark Plug 27
Customer Information 28
Customer Assistance 28
Mutrac Distributors 28
Add-On Non-Genuine Parts and Accessories 28
S ecifications 29
Tractor Type 29
Features 29
Chassis 29
ngine 29
lectrical System 29
Drivetrain 29
Dimensions 29
Linkage 30
Weight 30
Steering 30
Brakes 30
Wheels and Tires 30
Capacities/Lubricants 30
Service and maintenance 30
Gasoline consumption 31
Options 31

5
Overview of the Vehicle
Front Axle
Brake Pedals
Display
Armrest &
Joystick
Seat
Fire
Extinguisher
Gear Shifter
Steering
Wheel
Dynamic
Ballast
ECVT
Engine

6
Safety quipment and Practices
Seat Adjustment
The MR18’s driver seat can be slid forward and backward using the lever located under the seat on the
left-hand side. It is strongly recommended for the driver to adjust the seat in a comfortable and safe
position before driving the tractor.
Safety Decals
To make sure that every MR18 driver is aware of all warnings and danger zones on and around the
tractor, multiple warning labels complying with ASABE/ISO 767-1
(2)
are positioned at strategic
locations. These labels advertise the following (Figure 25):
●Hot surfaces
●Moving parts
●Missing shields
●Battery warning
●When to read owner’s manual

7
Knowing your MR18
Fuel Cap
To remove the filler cap, turn it counterclockwise. To replace the filler cap, turn it clockwise until it is
snugly held in the tank.
Adjusting the Steering Wheel
To change the tilt of the steering column, pull on the grey lever located at the top of the steering column
and adjust the angle to your comfort. The steering wheel can also telescope in and out by turning the
quick release lever on the left-hand side of the column and pulling the steering column to the desired
position. It can be telescoped by 4 inches.
Rigid Display
The MR18 is equipped with a DP-720 rigid display from Danfoss. This display is equipped with a touch
screen as well as buttons to navigate between pages. It will display the diagnostics of the tractor while
in use.
Warning
Fuel sprays can happen where there is pressure in the fuel tank and the fuel cap is
removed too quickly. When removing the fuel cap, loosen the cap slightly and wait for
any hissing to stop and then remove it.
Vapor from the fuel could be ignited by sparks or flames, causing serious burns and
injuries. Before refueling, stop the engine. Always keep sparks and flames away from
the filler neck.

8
Protecting your MR18
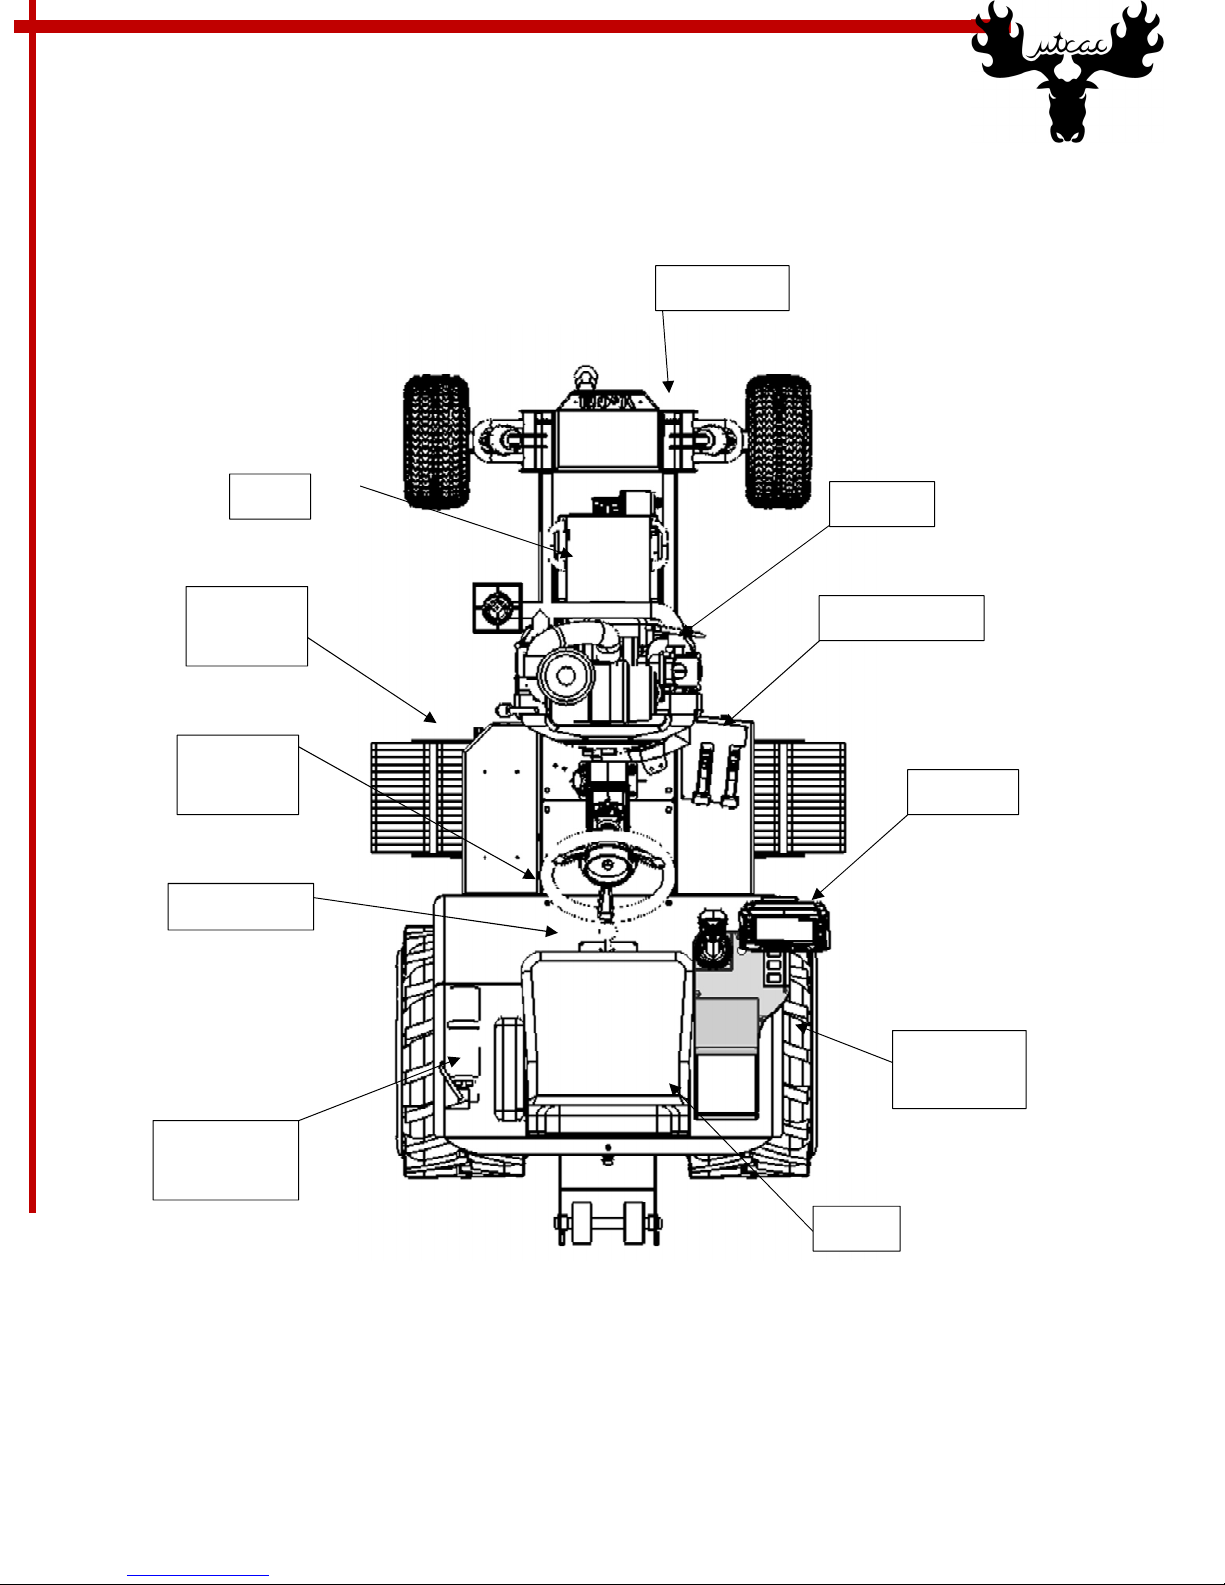
Pre-Operation Safe Use Checklist
●Clothing: Full coverage
o Long sleeves and pants or full-body suit
o Full-closed shoes
●Helmet: Approved DOT and/or CSA tested helmets
●ye protection: If helmet does not have visor use goggles or safety glasses
●Visual inspection must include, but is not limited to:
o Making sure all components look in proper condition
o Making sure that there are not any obstructing objects in the
wheels/axles/exhaust
o Check for proper levels of gasoline and oil, as well as secure tightening of the
caps
●Check that the belt is not visually worn out at any place
●Check proper working of the kill switch
Operations Safe Use Guidelines
●
Be aware of the location of the fire extinguisher and driving controls
●
Remain seated while driving the MR18
●
Always drive at a safe and prudent speed
o
Slow down before turning and avoid erratic operation
o
Operator must never drive at any speed at which there are difficulties in
maneuvering, stopping, or possible danger to observers or other personnel
o
Do not operate under the influence of alcohol or drugs
●
Never carry passengers
●
Turn off the engine beforehand if getting off the machine
●
Avoid contact with spinning parts and hot components
o
Shields and safety devices should not be removed during operation of the MR17
●
MR18 is not provided with any type of lights, use only during day or fully lit areas
●
Never use indoors or in poorly ventilated areas

9
Fuel Requirements
The fuel should meet the following requirements:
●
Only use clean and fresh unleaded gasoline, this will reduce exhaust emissions and
keep spark plug fouling to a minimum.
●
A minimum of 87 octane/87 AKI (91RON).
●
Gasoline with up to 10% ethanol or up to 15%MTB (methyl tertiary butyl ether) is
acceptable
ngine xhaust
Fire Hazard
●Use extra caution when handling fuel and oils
●Never put fuel in the tank while the engine is running
●If possible, refuel the tank when the engine is cool
●Always make sure the exhaust exit is unblocked and clean from debris
Note
To protect the fuel system from gum formation, mix a fuel stabilizer into the fuel.
Caution
Do not use unapproved gasoline, such as 85. Do not mix oil in gasoline or modify
the engine to run on alternate fuels. This will damage the engine components and
void the engine warranty.
Never use leaded fuel. This could result in a malfunction of the emission control
system, causing poor performance.
Warning
ngine exhausts Carbon Monoxide which can be dangerous. CO is colorless, odorless
and poisonous. If inhaled, it can cause loss of consciousness and death.
Running the engine inside an enclosed area is dangerous. Too high concentrations of
Carbon Monoxide could cause Loss of consciousness or even death.

10
Special Driving Conditions
When driving on ice or in water, snow, mud, sand or similar hazard be cautious and allow for extra
distance for braking. In those situations, it is also recommended to avoid sudden braking and quick
steering. Brake with the pedal by using a light up-down motion. Don’t hold the pedal down constantly. If
you get stuck, shift to 1 or 2 and accelerate slowly.
Money Saving suggestions
Use the following suggestions to help save money on fuel and repairs.
●
Avoid long warm-ups
●
Once the engine runs smoothly, begin driving
●
Avoid fast starts
●
Keep the tires properly inflated
●
Don’t carry unnecessary weight
●
Keep the wheels in correct alignment
Warning
Turning off the engine to coast down a hill can be dangerous. This could cause the
loss of the electrical steering and cause an accident.

11
Using your MR18
Instrument Cluster Overview
Throttle
Ballast
Pull
Mode
Dead
-
Man
Trigger (Back)
Ignition Button
(Back)

12
ntering Standby Mode
To start the electrical systems of the MR18, turn the switch on the armrest on. The operator must then
be properly seated and the hitch tether switch properly attached. From this mode, it is possible to start
the engine.
Starting the engine
Once the system has entered standby mode, it is now possible to start the engine. To do so, the
conditions listed below must be met.
●
The CVT guard must be in place
●
Both brakes pedals must be depressed
●
The operator should be seated properly
●
Operator present switch must be depressed
●
The hitch tether switch must be attached (to the tractor or the load)
Once all of these conditions are met, it is possible to press the ignition button and start the engine.
Changing the throttle
The throttle can be adjusted on the joystick, using the throttle roller. The throttle will increase by rolling
the roller forward. Once the desired RPM is achieved the operator must release the throttle roller and
the engine will remain at the desired. To decrease the RMP the roller must be rolled towards the user.
Manual Transmission and CVT
The MR18’s transmission is operated via a normal gears and reverse manual transmission, selected
from the shifter knob below the operator’s seat, which is coupled to a CVT transmission at the front of
the tractor.
The CVT can be controlled in the automatic mode, where the computer controls it. This mode will
optimize the performance of the MR18, and can be turned on by pressing the Auto button, as illustrated
here on the left.
Otherwise, the CVT is controlled by the back and forth axis on the joystick, which controls the CVT ratio.
The farther it is pushed forward, the faster the tractor will move.
Caution
If at any time the engine is running, the operator is off the seat for more than 1
second or the hitch is detached, the engine will shut down and the tractor will revert
back to prompting for the key.

1
Automatic Pull Mode
Automatic pull mode can be activated by pressing the automatic pull mode button located under the
two rollers. The mode adjusts the engine to provide optimum conditions for pulling.
Foot Brakes
The MR18 has two hydraulic brakes. Both are depressible by the right-hand foot and each control an
individual rear wheel, on the same side as it is relative to the driver.
lectrically Actuated Steering
Electrically Actuated Steering uses energy from the engine’s electrical system.
No maintenance is required for the linear actuator.
Dynamic Ballast System (DBS)
The Dynamic Ballast System is controlled via a roller. The position will be adjusted by moving the roller
forward or backwards. Once the desired position is achieved the roller must be released and the ballast
will hold at this position. The ballast can also be adjusted via the automatic ballast switch. Pressing the
auto switch, located on the console, will automate the movement of the DBS according to the load on
the front axle.
Heads-Up Display (HUD)
The display attached to the armrest presents information about the systems running on the MR18.
Navigation between pages is done with the use of buttons and same page adjustments are done using
the touch screen.
Caution
Due to the presence of the CVT it is highly recommended not to change gears while
the tractor is in movement. This could cause damage to the transmission.
Warning
If the engine is off or if the electrical steering system becomes inoperative, it will
become impossible to steer. It is then imperative to stop the tractor.

14
In Case of mergency
Overheating
If the temperature gauge indicates overheating, if you experience power loss or if you hear a loud
knocking or pinging noise, the engine is probably too hot.
In case this happens, drive to any area where it is safe to stop and set the transaxle in neutral position,
and then follow these steps:
1. Check whether steam is escaping from the engine compartment
2. If steam is coming from the engine compartment, don’t go near the front of the
tractor
. Stop the engine and let it cool
mergency Starting
Jump-starting is dangerous if done incorrectly. It is recommended to follow the following procedure
carefully:
1. Make sure the booster battery is 12 volts and that its negative terminal is grounded
2. If the booster battery is in another vehicle, don’t allow the vehicles to touch. Turn
off the engine of the vehicle with the booster battery and all unnecessary electrical
loads in both vehicles
. Connect the jumper cables in the exact sequence as listed below:
4. Connect one end of one cable to the positive terminal (red) on the discharged
battery
5. Attach the other end of this cable to the positive terminal (red) on the booster
battery
6. Connect one end of the other cable to the negative terminal (black) of the booster
battery
7. Connect the other end to the negative terminal (black) of the discharged battery
8. Start the engine of the booster vehicle and run it a few minutes. Then start the
engine of the other vehicle
9. When finished, carefully disconnect the cables in the reverse order described in
step 3
Note
It is not possible to push start the MR18.

15
Fuses
The MR18 is protected by 4 blade type fuses, which can be easily individually replaced. If any accessories
or controls don’t work, inspect the appropriate circuit protector. If a fuse has blown the inside element
will be melted.
The fuses and their respective uses are shown below (cover removed for visibility purposes):
To replace the fuses, follow these steps:
1. Turn of the tractor completely
2. Open the fuse panel on the under the hinged seat
. Pull the fuse straight out
4. Inspect it and replace if it’s blown
5. Push in a new fuse of the same rating, and make sure it fits tightly
Block
1. TEC PIN POWER
2. LIMIT SWITCHES
. SASA POWER
4. RELAY POWER IN
5. 12V-5V CONVERT PIN 6
6. DISPLAY/JOYSTICK POWER
7. MOTOR SHIELD POWER
8. REGULATOR
9. CPU POWER
10. CARBURATOR
Caution
Always replace a fuse with one of the same rating. Otherwise you may damage the
electric system.

16
Towing
●
Use only with a machine that has a hitch for towing. Attach equipment only using
the hitch point located at the front of the tractor
●
Follow manufacturer recommendations for weight limits and equipment
●
Avoid exceeding weight limit
●
Use extra care on slopes; the weight of towed equipment may cause loss of traction
●
Drive and stop slowly
●
Never shift to neutral and coast downhill
Flat Tire
Front Tires
The front wheels can be easily removed with a long nose plier to be replaced or to be maintained
Rear Tires
1. Use a hydraulic jack and place it under the transmission
2. Pump the hydraulic jack just enough to raise the tractor
. Stop pumping and make sure the jack has good
and safe contact with the tractor, as well as good
contact with the ground
4. Keep pumping until the wheel is about 5 inches
from the floor
5. Unscrew the nuts with a lug wrench.
6. Replace tire
7. Screw back the nuts in a star order (opposite
sides, as seen in the following figure)
8. Drop the tractor slowly to the ground and
remove the jack

17
Appearance Care
Minimizing Paint Damage
Environmental hazards can harm the MR18’s paint’s protective properties. Here are some tips on how to
prevent this:
●
It is necessary to wash and wax your vehicle to preserve its finish. This should be
undertaken immediately after you suspect that acid rain has settled on your
vehicle’s finish or after finding watermarks on the tractor’s finish
●
Bird droppings, insects and tree sap are best removed with a soft sponge and water
or a commercially available chemical cleaner
●
Keeping a safe distance between you and the vehicle ahead reduces the chances of
having your paint chipped by flying gravel
Maintaining the Finish
To help protect the finish from rust and deterioration, wash your MR17 thoroughly and frequently, at
least once a month, with lukewarm or cold water. If the tractor is washed improperly, the paint surface
could be scratched, here are some examples of how scratching could occur:
●
The tractor is washed without first rinsing off dirt and other foreign matter
●
The tractor is washed with a rough, dry or dirty cloth
●
Cleansers or wax containing abrasives are used
To minimize scratches on the tractor’s paint finish:
●
Rinse off any dirt or other foreign matter using lukewarm or cold water before
washing
●
Use plenty of lukewarm or cold water and a soft cloth when washing the vehicle.
Do not use a nylon cloth
●
Rub gently when washing or drying the tractor
●
Don’t use abrasive cleansers or wax that contain abrasives

18
Maintenance
Scheduled Maintenance
First
Five Hours
Change Oil
very 8 Hours or Daily
Check engine and transmission oil
Clean area around muffler and controls
Monthly
Check the fire extinguisher for the present pull pin, damage to the hose or valve and proper pressure
very 100 Hours or Annual
ly
Clean air filter*
Change engine oil and filter
Replace spark plugs
Check muffler and spark arrester
Check valve clearance**
very 250 Hours or Annually
Change transmission oil
very 400 Hours or Annually
Change air filter
Replace fuel filter
Clean air cooling system*
very 600 Hours or Annually
Change safety filter (if equipped)
Make a thorough check of the fire extinguisher; it may need to be refilled
* In dusty conditions or when airborne debris is present clean more often
** Not required unless engine performance problems are noted

19
Genuine ngine Parts Recommendation
We recommend using genuine parts from authorized Briggs & Stratton distributors such as the
following:
Service Part
Part Number
Air filter (cyclonic):
841497
Safety Filter
(cyclonic):
8211 6
Air filter (low
-
profile):
692519
Oil
-
SAE 0:
100028
Oil Filter:
842921
Fuel Filter:
6910 5
Fuel Additive:
5041, 5058
Resistor Spark Plug:
491055
Long Life Platinum Spark Plug:
5066
Spark Plug Wrench:
19 74

20
ngine Oil
Mutrac engineers recommend the use of Briggs & Stratton Warranty Certified oils for best performance.
Other high-quality detergent oils are acceptable if classified for service SF, SG, SH, SJ or higher. Do not
use special additives.
Oil type depends on the ambient temperature; choose the right kind of oil with the following chart:
Caution
Used oil is a hazardous waste product and must be disposed of properly. Do not
discard with household waste. Check with your local authorities for directions of the
proper disposal.
Table of contents