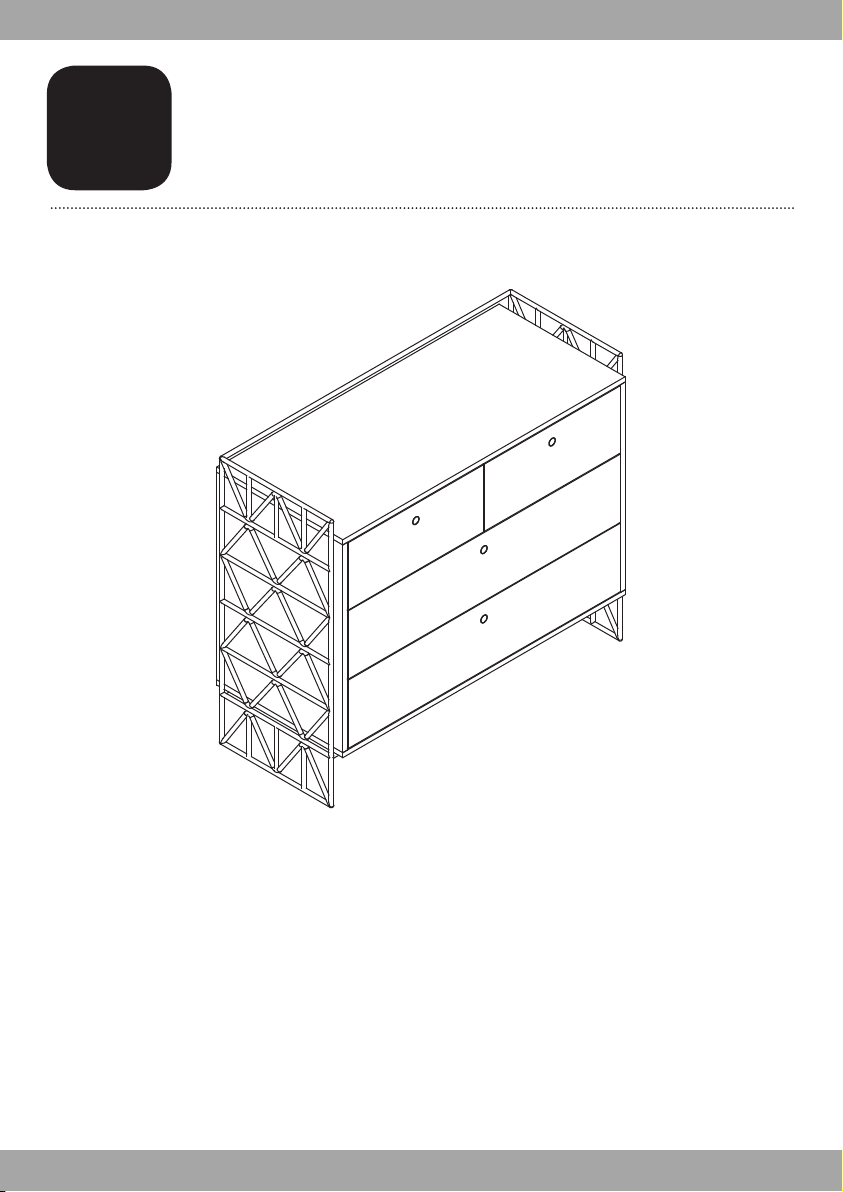
MDB ubabub Mod UB0340 User manual

Dresser
Product Code: UB0340
Mod
revised 16MAY17

2
Mod
Dresser
Instruction manual
PERSONS REQUIRED
Contents
Contents 3
Warning, Care & Maintenance 4
6AFurniture anti-tip kit
installation
10
Congratulations and
thank you for purchasing
an Ubabub product.
As for our entire line of
clearly modern nursery
furniture, during the design
and production of this
product we have selected
materials that are either
recyclable or derived from
sustainable practices.
BFinished assembly
TOOLS REQUIRED
– PHILLIPS HEAD SCREWDRIVER
ASSEMBLY TIME
15

3
Contents
(A) Dresser Body x 1

4
Storage:
Care and Cleaning:
• Solid woods exchange moisture with the air adjusting to major
changes in room temperature and humidity. Therefore, it is best
to place your furniture away from heating or air-conditioning
vents.
• Sunlight is not friendly to solid wood furniture and prolonged
direct exposure to harsh sunlight can discolor the finish. Be
careful not to place your furniture in direct sunlight for extended
periods of time. As with all your fine furniture, blot up spills
immediately.
• Do not scratch or chip the finish. Do not use abrasive chemicals
for cleaning. Clean with mild soap on a soft rag. Rinse and dry
thoroughly. If you ever refinish this furniture, be sure to use only
a non-toxic finish specified for children’s products. If you choose
to refinish this furniture, the warranty will be voided.
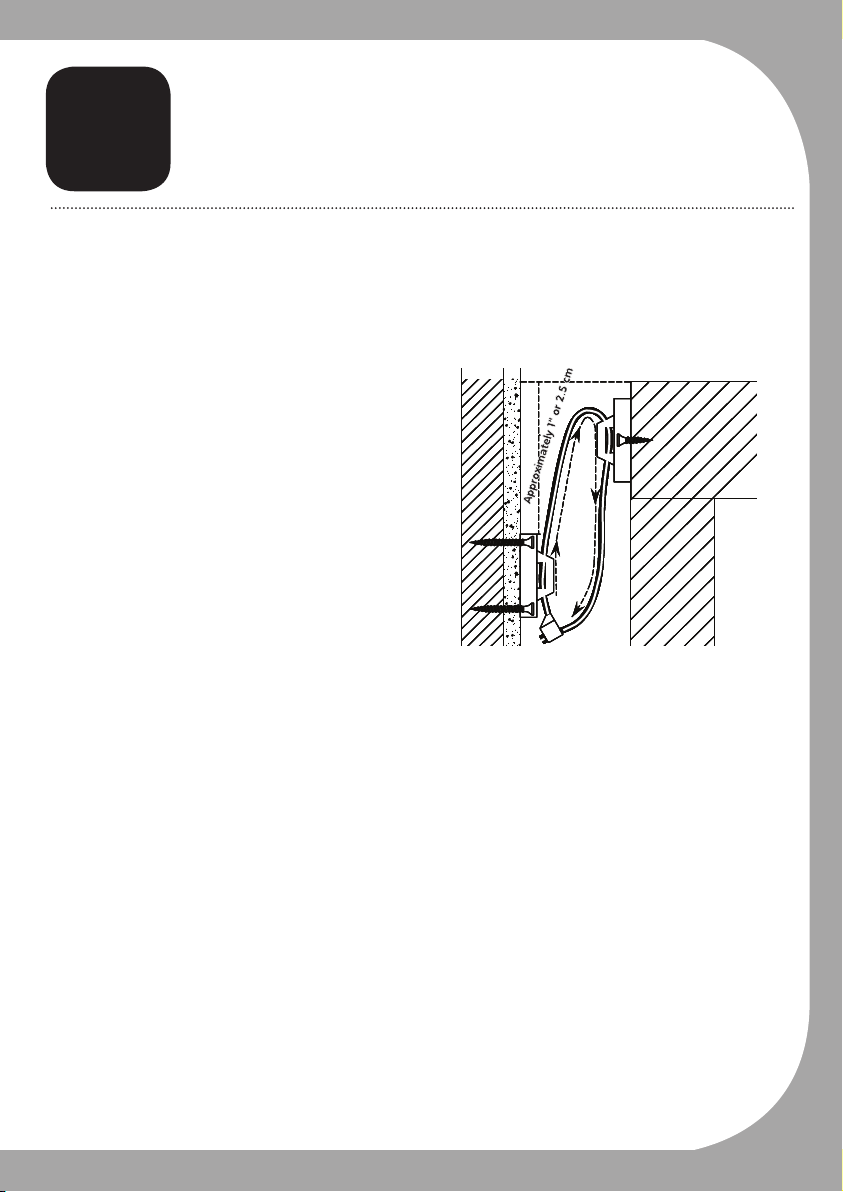
IMPORTANT:
As with all infant and baby furniture, it is important to
check fasteners, screws, and bolts periodically for
tightness. Parents should ensure a safe environment
for their children by checking the furniture regularly
before placing a child in the product.

5
Registering your product is even easier than before. You can register
your product on our website at: www.themdbfamily.com/registrations for
USA purchases.
IF YOU WOULD LIKE TO ORDER REPLACEMENT OR
MISSING PARTS. PLEASE VISIT US AT:
OR YOU CAN CONTACT US BY MAIL:
WWW.DESIGNKIDS.COM.AU
UBABUB INTERNATIONAL
PTY LTD
PO BOX 1149 COLLINGWOOD
VIC 3066
AUSTRALIA
WWW.THEMDBFAMILY.COM/SUPPORT
THE MDB FAMILY
855 WASHINGTON BLVD.
MONTEBELLO, CA 90640
USA

6
AFurniture Anti-tip kit
Installation
Serious or fatal crushing can occur when furniture tips over on children. To help
prevent tip-over, follow the steps below to install this anti-tipping strap.
WARNING
Use of tip-over restraints may only reduce,
but not eliminate, the risk of tip-over.
This is permanent label. Do not attempt to remove!
Serious or fatal crushing injuries can occur
from furniture tip-over. To help prevent
tip-over:
Place heaviest item in the lowest drawers.
Never allow children to climb or hang on
drawers, doors, or shelves.
Never open more than one drawer at a time.
(OR)
Do not defeat or remove the drawer interlock
system.
do not set TVs or other heavy objects on
top of this product.
Unless specifically designed to accommodate,
Install tipover restraint provided.
1-1/2” or 3.81 cm
Wood Screw x 2
3/4” or 1.9 cm
Wood Screw x 2
Bracket x 2 Safety Strap x 2
Hardware

7
Furniture Anti-tip kit
Installation
A
1Attach bracket to the wall with the 1-1/2" or 3.81 cm
wood screws provided:
It is recommended that you locate a wall stud behind the furniture unit.
If the wall stud is not used, a suitable "Hollow-Wall Anchor Bolt" (not
provided) should be used in lieu of the wall stud.
Position the wall bracket on the stud about 1" or 2.5 cm below the top the
furniture piece.
Mark the position for the bracket placement on the wall and drill a pilot
hole into the stud.
Attach the bracket to the wall with the 1-1/2" or 3.81 cm screws provided.
..
.
.
.
.
.
.
.
.
.
.
.
.
.
.
.
.
.
.
.
.
.
.
.
Wall Stud
Bracket
Wallboard

8
Furniture Anti-tip kit
Installation
A
2To attach a bracket to the Furniture Frame below
to top with the short screws provide:
Move the furniture piece temporarily to its final position to the wall.
.......
Mark the location of the bracket on the back of the furniture in relation
to the previously mounted wall bracket.
Move the furniture piece away from the wall mounted bracket and place
the other bracket on the mark position on the back of the furniture piece.
Drill a pilot hole as shown in the figure or into the back furniture frame.
.
.
.
.
.
.
.
.
.
.
.
.
.
.
.
.
.
.
Caution:
Make sure you do not drill completely through the back of the furniture.
Attach the bracket to the back of the furniture with the 3/4" or 1.9 cm
screws provided.
....
Furniture Top

9
Furniture Anti-tip kit
Installation
A
3To Attach the safety straps:
Move the furniture back to its
final position.
.......
Thread 2 safety straps through
both of the mounted brackets as
shown in the illustration.
Tighten the straps.
Do not over tighten.
.
.
.
.
.
.
.
.
.
.
.
.
.
.
.
.
.
.
!!PLEASE READ!
DO NOT USE THE DRESSER IF IT IS DAMAGED OR BROKEN.
Important:
Make sure the brackets are securely attached to the wall stud and furniture frame,
and the safety straps are tightened.
Warning:
This product should not be a substitute for proper parental supervision which is the
only proper deterrent to prevent improper use of this unit. The manufacturer
assumes no liability for improper installation or excessive loads placed on the safety
straps, bracket or mounting screws. This hardware will not insure against tipping.
Note:
For taller or heavier pieces of furniture, two safety brackets might be installed.
Furniture TopWallboard

10
Finished assembly
B
READ ALL INSTRUCTIONS BEFORE USING THE PRODUCT.
KEEP THE INSTRUCTIONS FOR FUTURE USE.
Recheck all screws and bolts to be sure they are
fastened securely. Do not overtighten.
Before using your product, please read all cautionary
statements on the insert sheet.

11

12
Made in Vietnam

13
Commode
Code de produit:UB0340
Mod

14
Mod
Table des matières
Contenu 15
PERSONNES
REQUISES
Félicitations et merci d’avoir
acheté un produit Ubabub.
Commode
Manuel d’instruction
Comme c’est le cas pour
l’ensemble de notre
gamme de meubles pour
bébé d’allure résolument
moderne, les matériaux
sélectionnés durant la
conception et la production
de ce produit sont soit
recyclables ou issus de
pratiques durables.
OUTILS REQUIS
- TOURNEVIS CRUCIFORME
15
TEMPS
D’ASSEMBLAGE
Avertissement, Entretien et nettoyage 16
18AInstallation du dispositif
antibasculement
22BFinition de l’assemblage

15
Contenu
(A) Cadre de la commode x 1

16
Le bois massif échange de l’humidité avec l’air en s’adaptant aux
principaux changements de température et d’humidité ambiante. Il
est donc préférable d’éloigner ce meuble des bouches de chaleur
et de climatisation.
Rangement :
Entretien et nettoyage:
•
•
•Éviter d’égratigner ou d’écailler le fini. Ne pas utiliser des nettoyants
abrasifs. Nettoyer le meuble avec du savon doux sur un chiffon non
rugueux. Le rincer et le sécher complètement. Si la finition de ce
meuble doit être refaite, utiliser un fini non toxique conçu pour les
meubles pour enfants. Si vous entreprenez de refinir ce meuble, sa
garantie sera annulée.
Les rayons du soleil ne font pas bon ménage avec les meubles en
bois massif et une exposition prolongée à la lumière directe du
soleil risque de décolorer le fini. Prendre garde de ne pas laisser
votre meuble directement au soleil pendant un temps prolongé.
Comme pour tous les meubles précieux, éponger immédiatement
toute éclaboussure.
IMPORTANT:
Comme pour tous les meubles de nourrissons et de
bébés, il est important de vérifier périodiquement le
serrage des attaches, des vis et des boulons. Les
parents doivent procurer un environnement sécuri-
taire à leur enfant en vérifiant régulièrement le
meuble avant de placer l’enfant sur celui-ci.

17
L’enregistrement de votre produit est plus facile que jamais. Veuillez
l’enregistrer sur notre site Web à: www.themdbfamily.com/registrations
pour les achats effectués aux États-Unis.
POUR COMMANDER DES PIÈCES DE RECHANGE OU
MANQUANTES VISITEZ-NOUS À :
OU CONTACTEZ-NOUS PAR LA POSTE :
WWW.THEMDBFAMILY.COM/SUPPORT
THE MDB FAMILY
855 WASHINGTON BLVD.
MONTEBELLO, CA 90640
USA
AUSTRALIA
WWW.DESIGNKIDS.COM.AU
UBABUB INTERNATIONAL
PTY LTD
PO BOX 1149 COLLINGWOOD
VIC 3066

18
Installation du dispositif
antibasculement
A
Le basculement du meuble sur un enfant peut entraîner des blessures graves ou
fatales par écrasement. Pour aider à prévenir le basculement, suivre les étapes
ci-dessous afin d'installer cette sangle antibasculement.
AVERTISSEMENT
L’utilisation de ce dispositif de retenue ne peut que
réduire mais pas éliminer le risque de basculement.
Cette étiquette est permanente. Ne pas essayer de l’enlever!
Installer le dispositif antibasculement fourni.
Placer les objets les plus lourds dans les tiroirs
du bas.
À moins que le meuble soit spécialement conçu
pour recevoir un téléviseur, ne pas placer un
téléviseur ni tout autre objet lourd sur ce produit.
Ne jamais laisser les enfants grimper ou
s’accrocher aux tiroirs, aux portes ou aux
tablettes.
Ne jamais ouvrir plus d’un tiroir à la fois.
(OU)
Ne pas défaire ni enlever le système de blocage
des tiroirs.
Le basculement du meuble peut entraîner
des blessures graves ou fatales par écrase-
ment. Pour aider à prévenir le basculement :
Vis à bois de
3,81 cm (1-1/2 po) x 2
Vis à bois de
1,9 cm (3/4 po) x 2
Bride x 2 Sangle de sécurité x 2
Accessoires

19
Installation du dispositif
antibasculement
A
1Fixez le support au mur avec les vis à bois de 3,81 cm
(1-1/2 po) fournies:
Il est recommandé de localiser un montant du mur derrière le meuble. Si
vous n’utilisez pas de montant du mur, un « dispositif d’ancrage pour mur
creux » doit être utilisé à la place du montant.
Positionnez le support sur le montant à environ 2,5 cm (1 po) sous le dessus
du meuble.
Marquez la position du support sur le mur et percez un avant-trou dans le
montant.
Fixez le support au mur avec les vis de 3,81 cm (1-1/2 po) fournies.
..
.
.
.
.
.
.
.
.
.
.
.
.
.
.
.
.
.
.
.
.
.
.
.
Montant
Support
Panneau du mur

20
Installation du dispositif
antibasculement
A
2Pour fixer le support au cadre du meuble sous le
dessus avec les vis courtes fournies :
Placez temporairement le meuble en position finale contre le mur.
.......
Marquez l’emplacement du support à l’arrière du meuble à l’endroit où
vous avez préalablement fixé le support au mur.
Éloignez le meuble du support fixé au mur et placez l’autre support à
l’endroit que vous avez marqué au dos du meuble.
Percez un avant-trou tel qu’illustré ou au dos du cadre du meuble.
.
.
.
.
.
.
.
.
.
.
.
.
.
.
.
.
.
.
Attention:
Prenez garde de ne pas transpercer complètement le dos du meuble.
Fixez le support à l’arrière du meuble avec les vis de 1,9 cm (3/4 po)
fournies.
....
Dessus du meuble
Table of contents
Languages:
Other MDB Indoor Furnishing manuals
Popular Indoor Furnishing manuals by other brands

Nimco
Nimco ZP 8000-59999 Installation instruction

Baker Bedford
Baker Bedford ST03 Step by step assembly instructions

Mocka
Mocka Archie Assembly instructions

Mocka
Mocka Aspen Assembly instructions

The Land of Nod
The Land of Nod Campaign Desk Assembly instructions

BLACK RED WHITE
BLACK RED WHITE MALTA B136-BUT1D/70 Assembly

BDI
BDI MILO 1055 manual

Vivo
Vivo DESK-V042KB instruction manual

Aspire
Aspire Monet user manual

Furniture of America
Furniture of America Daphne CM7556AR-1 Assembly instructions

Unfinished Furniture of Wilmington
Unfinished Furniture of Wilmington OT-3073 Assembly instructions

COTTA
COTTA ATHENE 3-OTM KLEIN Assembly instructions