MDH Vitea Care Umbrella 1 User manual

Instrukcja używania
Instructions for use
Umbrella
REHABILITATIVE
STROLLER
(DRVG0C)
BASIC UDI-DI 59017804DRVG0JN9
Umbrella
WÓZEK INWALIDZKI
SPECJALNY, DZIECIĘCY
(DRVG0C)
BASIC UDI-DI 59017804DRVG0JN9
232

Instructions for use
TABLE OF CONTENT
1. Introduction 3
2. Product description 3
3. Indications 6
4. Contradictions 6
5. Usage 6
6. Safety of use 12
7. Everyday use and maintenance 14
8. Technical parameters 28
9. Symbols 29
10. Contact details 30
MODEL: JUNIOR PLUS 2 & 3
LANGUAGE: ENGLISH VERSION: 2020-11
2 VITEACARE.COM
ATTENTION
Always follow the basic precautions according to the information included
below and regarding safety measures when using the device. Read the entire
instructions carefully before use. Keep this user’s manual for future reference.
Umbrella rehabilitative stroller is available in three sizes, further known as
Umbrella 1, Umbrella 2 & Umbrella 3. For detailed information please refer to
the Technical Parameters section.

MODEL: JUNIOR PLUS 2 & 3
LANGUAGE: ENGLISH VERSION: 2020-11 VITEACARE.COM 3
1. INTRODUCTION
Thank you for choosing our product. We are deeply convinced that it will meet
your expectations. Please read this document before rst use. This manual
was made in order to provide the necessary information on the safe use of
the device. The correct application of the recommendations will contribute
signicantly to extended durability and visual design of the product. We would
like to highlight that to date we are constantly improving the quality of our
products, which may result in minor changes that are not included in this
manual.
2. PRODUCT DESCRIPTION
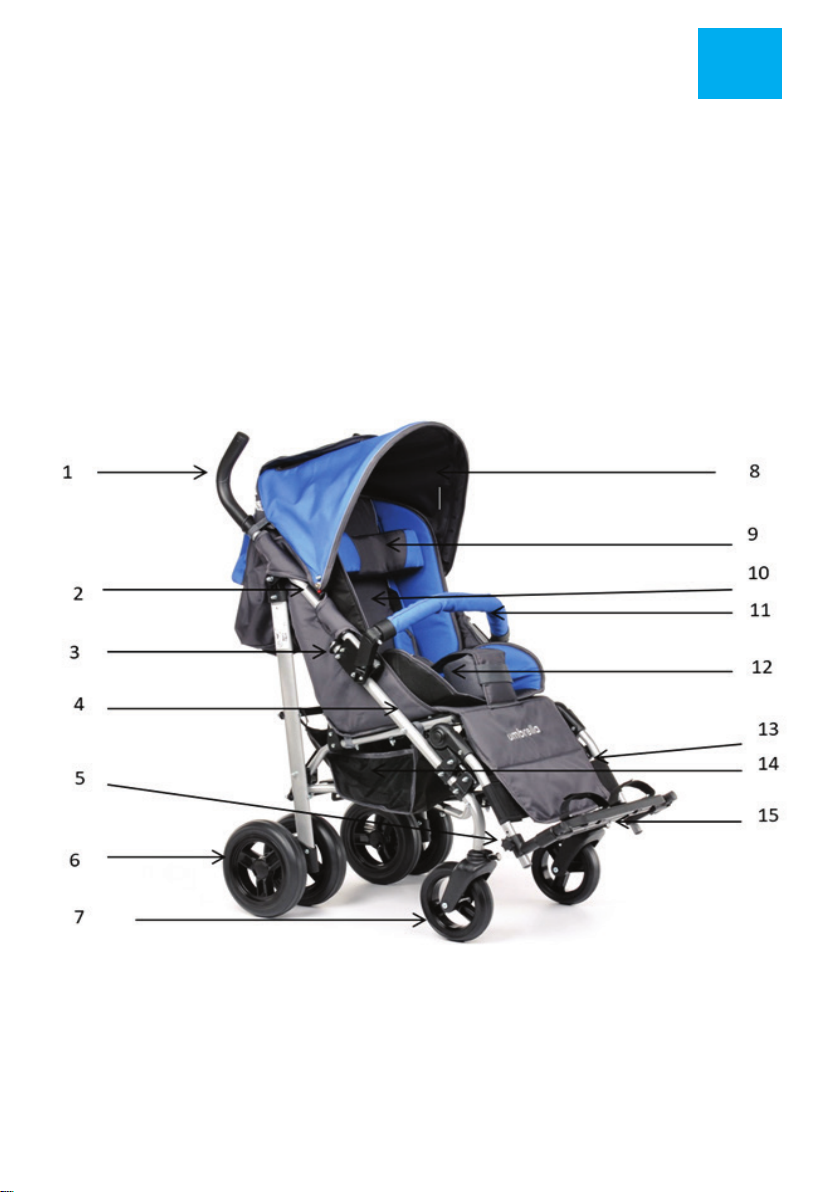
Fig. 1. Construction scheme of Umbrella rehabilitative stroller.
1. Handle, 2. Canopy handle, 3. The side lock, 4. Stroller frame, 5. Footrest length
adjustment knob, 6. Dual rear wheels (or single in Umbrella 3), 7. The front swivel wheel
with possibility of straight ahead ride lock, 8. Canopy, 9. Head stabilizer, 10. Backrest
upholstery (with side pelottes and lumbar roller support), 11. Front guard, 12. Abduction
wedge, 13. Calf stabilizing belt, 14. Basket for small items, 15. The footrest.

4 VITEACARE.COM
MODEL: JUNIOR PLUS 2 & 3
LANGUAGE: ENGLISH VERSION: 2020-11
EQUIPMENT OF THE STROLLER’S PACKAGE
Fig 2. Stroller
Fig 3. Canopy
Fig 4. Wheels
Fig 4. Head stabilizer, front guard (2 versions, black - additional option), abduction wedge, set of
side pelottes with lumbar roller support

MODEL: JUNIOR PLUS 2 & 3
LANGUAGE: ENGLISH VERSION: 2020-11 VITEACARE.COM 5
Fig 5. Basket for small items, umbrella (additional option), table (additional option), cup
Fig 6. Sleeping bag Fig 7. Raincover

6 VITEACARE.COM
MODEL: JUNIOR PLUS 2 & 3
LANGUAGE: ENGLISH VERSION: 2020-11
3. INDICATIONS
The stroller is designed for children with disabilities and / or dysfunctions movement activities
as a result of damage of the CNS Central Nervous System. It can be used in children with CP
Cerebral Palsy, myelomeningocele, muscle disorders, dysfunctions of the lower limbs.
The maximum weights are 30 kg (Umbrella 1) 45 kg (Umbrella 2) & 75 kg (Umbrella 3).
4. CONTRAINDICATIONS
Contradictions against sitting position.
5. USAGE
• After unpacking the package, check if it contains all parts in accordance with the list of
elements set out above.
• Ensure that all components have no visible damage. If any doubts, please contact the
manufacturer.
• Do not use the stroller until all parts are properly connected.

MODEL: JUNIOR PLUS 2 & 3
LANGUAGE: ENGLISH VERSION: 2020-11 VITEACARE.COM 7
UNFOLDING THE STROLLER
Fig 8. Unfolding the stroller
• Unfolding the stroller should begin with pulling the stroller handles in a direction which is shown
in Figure 8. In order to make it easier, you can hold with hand the seat of the stroller.
• When the stroller is partially unfolded, press foot on the stroller blockade (Figure 9.) to the point
where stabilizing elements will stop in a horizontal position (Figure 10).
Fig 9. Rear lock of the stroller Fig 10. Correct position of rear lock
Rear lock of
the stroller

8 VITEACARE.COM
MODEL: JUNIOR PLUS 2 & 3
LANGUAGE: ENGLISH VERSION: 2020-11
Fig 11. Stroller frame with lock
Fig 13. Assembled and locked
rehabilitative stroller
• To prevent unplanned movement of the stroller, lock the possibility of rotation the two
rear wheels.
• To do this, press the foot brake lever, located at the rear wheel.
• It is necessary to make sure that the brake has been launched on both wheels.
• Stroller frame is equipped with the side lock. To lock the side frame, the side lock
eyelet should be put on the free end of the frame (Figures 11., 12.).
Side lock
eyelet
Fig 12. Locked eyelet on the stroller

MODEL: JUNIOR PLUS 2 & 3
LANGUAGE: ENGLISH VERSION: 2020-11 VITEACARE.COM 9
• By using the snaps attach the upholstery belt to the front guard. But rst you need to
fasten abduction wedge to the upholstery belt.
• In the same way table can be attached to the stroller (Figure 16).
• Abduction wedge is connected to velcro which should be wrapped around the
upholstery waist (Figure 16.).
Fig 14. Front guard lock button (open)
Fig 16. Abduction wedge, table and upholstery waist assembled
• To install the front guard, put the plastic ends into the guides on the stroller frame in
the direction from top to bottom (Figures 14., 15.).
Fig 15. Front guard lock button (closed)
• Then install the backrest. Unfasten the velcro fasteners of head stabilizer at the rear
part of the upholstery, select the appropriate location of the head stabilizer. Drag velcro
headrest through the holes in the top of the backrest upholstery, then fasten velcro.
• To install the canopy put the plastic ends into the guides on the stroller frame in the
direction from top to bottom. (Figures 17., 18.)
• The footrest should be lowered on the footrest frame and push it until total blockade.

10 VITEACARE.COM
MODEL: JUNIOR PLUS 2 & 3
LANGUAGE: ENGLISH VERSION: 2020-11
• The back part of the canopy should be located on the outer side of the backrest.
Velcro strips on both sides of the canopy should be fastened on the wheelchair frame
under the handles.
Fig 18. Canopy lock (closed)
Fig 17. Canopy lock button (open)
Fig 19. Canopy assembled to the stroller Fig 20. Basket assembled to the stroller
• Basket for small items must be installed between the seat and the cross frame. (Figure
20.) The basket is equipped with velcro to be wrapped around four the furthest located
stroller frame.

MODEL: JUNIOR PLUS 2 & 3
LANGUAGE: ENGLISH VERSION: 2020-11 VITEACARE.COM 11
FOLDING THE STROLLER
WARNING! Failure to follow these guidelines can result
in damage to the wheelchair.
• To fold the stroller, unclip the footrest from one side. Unfasten the upholstery belt.
Slide rail in the direction from the bottom to the top by pressing at the same time two
front guard lock buttons located at both ends of the rail.
• In order to remove the canopy, press the canopy lock button and slide in the direction
from the bottom to the top.
• Unlock two side lock at both side.
• Unlock the rear lock of the stroller by lifting it upwards.
• Now you are ready to fold the stroller by directing the handle to the front wheels and
by directing the side frames to each other to the point where the stroller will be looking
like as shown in Figure 7.
• The last stage is fastening a safety belt.

12 VITEACARE.COM
MODEL: JUNIOR PLUS 2 & 3
LANGUAGE: ENGLISH VERSION: 2020-11
6. SAFETY OF USE
a) Before using the stroller, refer to this manual and keep it for future reference.
b) Your child’s safety may be compromised case of non-compliance of rules contained in
this manual.
c) Never leave a child unattended. Always watch the child when he/she is in the stroller.
Caretakers are responsible for the safety of the child.
d) The seat is not suitable for children under 6 months.
e) Always use the seat belts to avoid serious injuries caused by the child falling out or
sliping out of the stroller.
f) It is important to fasten seat belt properly and its adjustment to the user.
g) The seat and belts do not replace proper supervision of caretaker.
h) While adjusting the parameters of the stroller, the child should not be in a stroller.
i) All repairs must be carried out by qualied personnel. And during the warranty period only
by the manufacturer’s service.
j) The stroller is not suitable for running or ice-skating and roller skating.
k) The stroller is designed for transporting only one child.
l) It is unacceptable to use the stroller, if you found visible or palpable damage, or worn out
parts and stroller parts indicates a potential risk of an accident (e.g. Consumption wheels,
upholstery, cracks, etc.).
m) Always check before use if the stroller is properly unfolded. Ensure that all locks blocked
before use.
n) To avoid injury to make sure that the child is far away when the product is being folded
and unfolded.
o) When moving the stroller through doors and other passages, make sure that on both
sides there is enough space to avoid injury of hands or damage the stroller.
p) Do not allow your child to play with this product.
q) Do not allow your child to stand on the stroller or footrest. The stroller might fall over and
hurt the child.
r) When in motion, always hold the handle of the stroller.
s) Be especially careful while using the wheelchair near to steps and stairs.
t) The stroller is not intended for use on stairs and escalators.
u) Do not to move the stroller if a child is sitting in it.
v) Do not to move the stroller by holding the front guard. If there is a need to move your
stroller, you should hold the xed elements of the frame.
w) In order to avoid accidental rolling o the stroller, always put on the brakes and turn
on the lock of driving direction when the stroller is stopped, when patient get in, get o,
changing the position.

MODEL: JUNIOR PLUS 2 & 3
LANGUAGE: ENGLISH VERSION: 2020-11 VITEACARE.COM 13
x) Do not let the child stand on the footrest. Never leave the stroller unattended on sloping
ground, even if the brakes are on.
y) The stroller is designed for children up to 30 kg (Umbrella 1), 45 kg (Umbrella 2)
and 75 (Umbrella 3).
z) Stroller should always be easy to fold out. In case of problems with unfolding. You should
re-read the user’s manual or contact the manufacturer.
aa) Keep extreme caution while passing an obstacle. Extreme use of the stroller could
cause damage or destroy it.
bb) Never use the stroller as a seat for the transportation of people in cars, buses or any
motor vehicles.
cc) During transport (e.g. In the trunk), do not burden stroller, it may weaken or damage its
structure.
dd) Do not leave the stroller with the user close to open sources of re
ee) Be aware that the surface temperature of the upholstery and the frame parts may
be increased after exposure to the sun or other heat source. Furthermore, with low
temperatures there is a danger of overcooling metal parts of stroller. It may cause burns or
frostbite parts of the body.
) Keep caution while moving on sloping surfaces. The maximum allowable slope angle up
and down is 5%.
gg) With the stroller you can only use on surfaces where all four wheels touching the ground
are to use all of four wheels.
hh) Stroller is designed for use indoors and outdoors only on paved and even surfaces.
ii) Use of the product i.e. The icy, wet, greasy, strongly gritty surfaces is unacceptable - it
creates a risk of falling.
jj) It is extremely important to keep all strollers’ components clean in order to maintain the
product parameters.
kk) Do not add additional loads (bags, etc.) on the stroller handles.
ll) Storing the stroller in areas with very high humidity (baths, laundry, etc.) or in the open
air, also the lack of hygiene causes rapid loss of operating parameters and aesthetic of the
product.
mm) Do not leave the child in the stroller for longer, because persons with neurological
aections who stay in unchanged positions may experience problems with skin nourishment
and develop bedsores.
nn) When the footrests will not be removed before folding the stroller, it can cause damage.
oo) During use, handing of the product and during its assembly, regulating mechanisms,
it might happen trapping and / or squeeze user’s or caretaker’s body part in holes / gaps
between the elements.
pp) Perform these steps with extreme caution. After adjustment, stabilize the position by
carefully tightening the nuts / bolts.

14 VITEACARE.COM
MODEL: JUNIOR PLUS 2 & 3
LANGUAGE: ENGLISH VERSION: 2020-11
7. EVERYDAY USE AND MAINTENANCE
BRAKE AND TWISTING MOTION LOCK
• The rear wheels are equipped with brake system.
• To prevent unplanned movement of the stroller (Umbrella 1, Umbrella 2), switch on brakes
on two rear wheels. (Figure 21A.).
• To do this, press the foot brake, located at the both rear wheels.
• It is necessary to make sure that the brake lever has been launched on both wheels.
• To unlock the brake, lift up the brake lever.
• To prevent unplanned movement of the stroller (Umbrella 3), push on horizontal brakes on
two rear wheels. (Figure 21B.).
• It is necessary to make sure that the brake lever has been launched on both wheels.
• To unlock the brake, push the horizontal brake levers, toward the centre of stroller.
Brake lever
Switching on brake
Switching o brake
Fig 21A. Rear brake mechanism (Umbrella 1 & 2)
Fig 21B. Rear brake lever mechanism - unlocked & locked (Umbrella 3)
Unlocked brake
Locked brake

MODEL: JUNIOR PLUS 2 & 3
LANGUAGE: ENGLISH VERSION: 2020-11 VITEACARE.COM 15
• It is also possible to lock driving direction on the front wheel - drive only straight ahead.
• To lock of driving direction of the front wheel must be set in direction of travel ahead.
• On the two front wheels turn the lock pin of driving direction from the position shown in
Figure 22. to the position shown in Figure 23. to the point where the pin is placed in a lock.
• Then check if the wheels do not twist.
• At this point the turning movement of the front wheels is blocked.
Fig 22. Lock pin of driving direction (o)
• To allow again turning movement of the front wheels pull the lock pin of driving direction on
both wheels and turn it by 90 degrees from the position shown in Figure 23. to the position
shown in Figure 22.
The lock pin
of driving
direction
Fig 23. Lock pin of driving direction (on)

16 VITEACARE.COM
MODEL: JUNIOR PLUS 2 & 3
LANGUAGE: ENGLISH VERSION: 2020-11
LENGTH OF THE FOOTREST ADJUSTMENT
• The footrest has a ve stage length adjustment. Every 25 mm.
• To change the length of the footrest, unscrew the knob of length adjustment, remove the
black plate securing the screw, and then unscrew the screw (Figure 24.)
• Select required length of the footrest, by using the holes in the footrest frame.
• Next, insert the screws into the holes, screw the footrests length adjustment knobs and
secure them with the black plates.
• It is important that each side of the screws were placed in holes at the same height.
Fig 24. Footrest length adjustment knob
• The stroller is equipped with a headrest that can be placed in two positions.
• To change the position of the head stabilizer, unfasten the velcro fasteners of head
stabilizer at the rear part of the upholstery, select the appropriate location of the head
stabilizer. Drag velcro headrest through the holes in the top of the backrest upholstery, then
fasten velcro.
ADJUSTMENT OF THE HEADREST SETTING
• To change angle of the BACKREST TILT, adjust the belts of backrest adjustment. (Figure
25.) To do this, press the button on the buckle and slightly tilt it to the rear (Figure 25). The
backrest will start to fall. When you set a desired angle, release the button.
• If you want to tilt the backrest forward, press the button and pull the strap below at the
same time.
ADJUSTMENT OF THE BACKREST TILT ANGLE

MODEL: JUNIOR PLUS 2 & 3
LANGUAGE: ENGLISH VERSION: 2020-11 VITEACARE.COM 17
Button
Fig 25. Belts of backrest adjustment
Fig 26. Security system
SECURITY SYSTEM
Shoulder belts
Adjustment belts
elements
Three point-seat belt
Central belt

18 VITEACARE.COM
MODEL: JUNIOR PLUS 2 & 3
LANGUAGE: ENGLISH VERSION: 2020-11
Head stabilizer
Side pelottes
Lumbar roller
Abduction wedge
Fig 26B. Security system - head stabilizer, side pelottes with lumbar roller support
• The stroller is equipped with a stabilizing strap that can be placed in two dierent positions
with length adjustment, abduction wedge head stabilizer and set of side pelottes with lumbar
roller (Figures 26A. & 26B.)
• Settings of all stabilizing elements should be discussed with your doctor or physiotherapist.
• To change belt position, they should be removed from the current position at the top of the
backrest upholstery and drag through the hole in the upper part of the backrest upholstery.
• To ensure safety, after placing a child in the stroller, caretaker should immediately buckle
them into stabilizing belts.

MODEL: JUNIOR PLUS 2 & 3
LANGUAGE: ENGLISH VERSION: 2020-11 VITEACARE.COM 19
Fig 27. Seatbelt (open) Fig 26. Seatbelt (locked)
• Security system include ve-point seat belts with central buckle. Shoulder belts should run
along the child body from the shoulders to the waist. Both buckle elements should be placed
in the central buckle. To do this, press the button on the buckle and place the elements
(Figures 27., 28.)
• While placing elements of buckle into central buckle there must be a click. Only if click is
heard, belts are properly fastened.
• To properly protect your child, adjust the length of the belt using the adjustment belt
elements.
• To unfasten ve-point belts, press the button on the central part of seat belt ve-point.

20 VITEACARE.COM
MODEL: JUNIOR PLUS 2 & 3
LANGUAGE: ENGLISH VERSION: 2020-11
• To remove the rear wheel, press of quick connect handle towards the axis of the wheel,
then pull wheel in the line of wheel axis.
• To install the wheel, press quick connect handle and slip the wheel in axle.
• Releasing the handle will lock the wheels on the axle.
• To mount or dismount the inner wheel, the stroller must be unfolded.
• Make sure the wheels after assembling are properly locked.
• For stroller Umbrella 3, use a standard ring wrench to unscrew the wheels.
ASSEMBLING AND DISASSEMBLING OF THE REAR WHEELS
Fig 29. Quick connect handle
• Sleeping bag is equipped with a press stud, which should be connected to the press stud
located at the bottom part of the canopy. The bottom part of the sleeping bag should hitch
onto footrest.
SETTING THE SLEEPING BAG
Fig 30. Sleeping bag setting Fig 31. Sleeping bag (bottom part of the canopy)
This manual suits for next models
3
Table of contents
Languages:
Other MDH Stroller manuals