Meaco MeacoMist Deluxe User manual

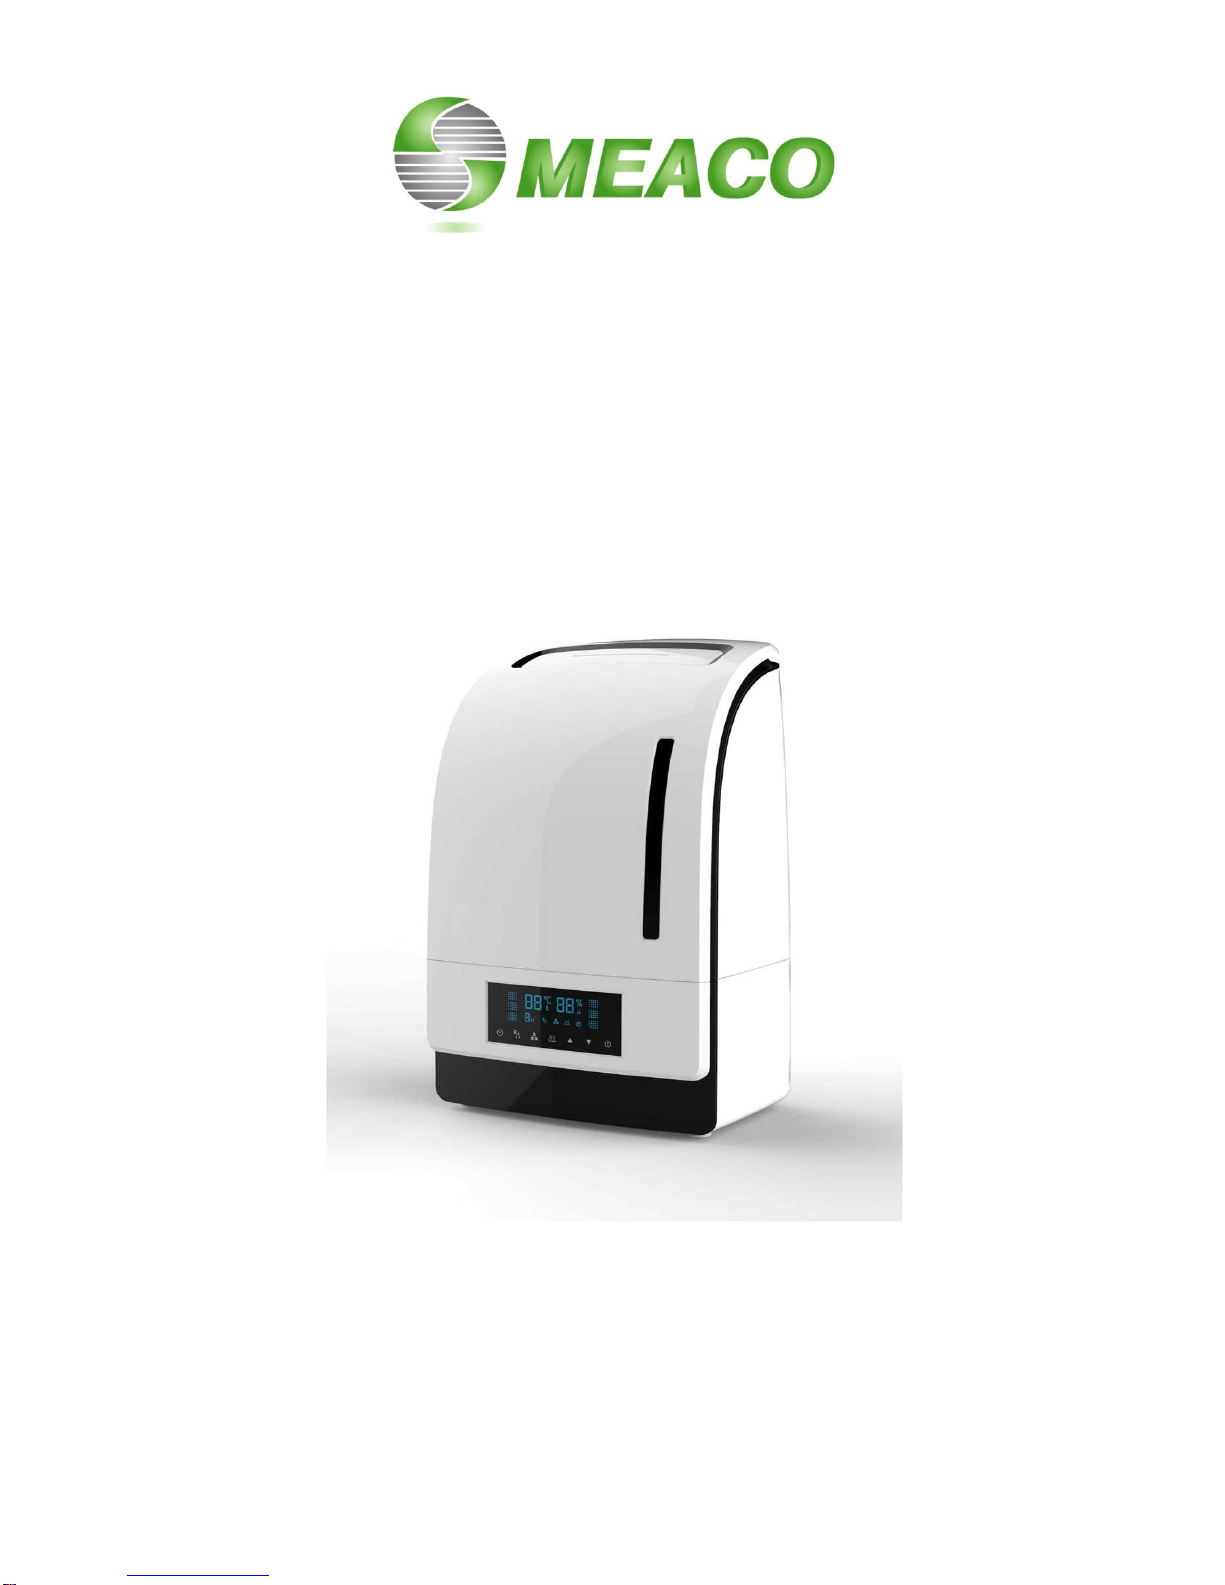
MeacoMist Deluxe
Ultrasonic Humidifier
Instruction Manual
October 2013 edition
Please read this instruction manual before using the humidifier and keep safe
for future reference.
Thank you for choosing Meaco, we really do appreciate it.

2
PRODUCT DESCRIPTION
To remove the tank lift by the handle on the
rear of the tank. Unplug the mains cable first.
Unscrew the tank lid.
Fill with tap water, distilled water or cooled
boiled water and screw back on the lid.
Carefully place the lid back onto the
humidifier supporting it front and back.
To empty, repeat the process and drain the
water away. Clean the tank and remove any
scale.
Water filter that needs replacing to prevent
limescale deposits from being blown into the
room. Important: Soak the water filter in tap
water for 2 hours before inserting it into the
humidifier. This helps to activate the filter for
it to work at maximum efficiency.

3
SAFETY INSTRUCTIONS
PLEASE READ ALL INSTRUCTIONS CAREFULLY BEFORE OPERATING.
In case of a failure whilst under warranty we will collect the humidifier from you for repair/replacement, therefore please save the
packaging and keep it safe away from children. When you do dispose of the packaging please recycle.
WARNING - This appliance is intended for use in a domestic environment only. Any other use is not
recommended by the manufacturer and may cause fire, electrical shocks or other injury to person or property.
When using electrical appliances, basic safety precautions should always be followed:
1. Do not operate the unit with a damaged cord or plug, after it malfunctions or has been dropped or damaged in any way.
Return to an authorized service facility for examination and repair.
2. This unit should always be kept in an upright position to avoid any damage. Locate the unit on a flat stable surface.
3. Check the incoming voltage to ensure it matches the units rated specification before operating.
4. Operate this unit in an ambient temperature between 5°C and 37°C.
5. Ensure that the air inlets and outlets are not blocked or covered.
6. Do not place the unit too close to curtains or other objects - min 30cm.
7. Don’t let the mist blow directly onto a surface to avoid damp and mould growth or damage to electrical items.
8. Never place anything on top of the unit and do not cover with any kind of material while in use.
9. This product is intended for domestic and light office use ONLY and not for commercial, industrial or outdoor use.
10. To protect against electrical shocks, do not immerse unit, plug or cord in water, or spray with liquids.
11. Never unplug the power cord without press the "Power" key to off first, as this could damage the unit.
12. Always unplug the unit when not in use or moving location. To disconnect from the power supply, grip the plug and pull
from the power socket. Never pull by the cord.
13. Always empty the water tank and dry all parts before storing the unit away.
14. Close supervision is necessary when any appliance is used by or near children and pets.
15. Do not run power cord under carpeting, or cover with rugs or runners. Arrange the cord away from areas where it may be
tripped over.
16. Never operate or store the unit in direct sunlight, the plastic is likely to discolour.
17. To repair the unit, take it to a qualified service engineer. Repairs carried out by unqualified people may cause damage to
the unit or injury to persons or property and void the warranty.
18. Where possible, avoid the use of an extension cable as they may overheat and cause a risk of fire. Only use an extension
cord after ensuring it is in perfect condition. Extension leads can also cause voltage drop which will affect the humidifier.
19. Do not use the unit without the air filter as this will allow dirt to gather inside the humidifier and could invalidate the
warranty.
20. Check the water and air filters regularly in order to keep it clean. Adirty air filter will restrict the air flow into the machine
which will increase the resistance on the fan and could result in damage and might invalidate the warranty. If you do not
4
clean/change the water filter often enough then small particles of limescale (as a white dust) will appear in the mist and land
on surfaces in the room.
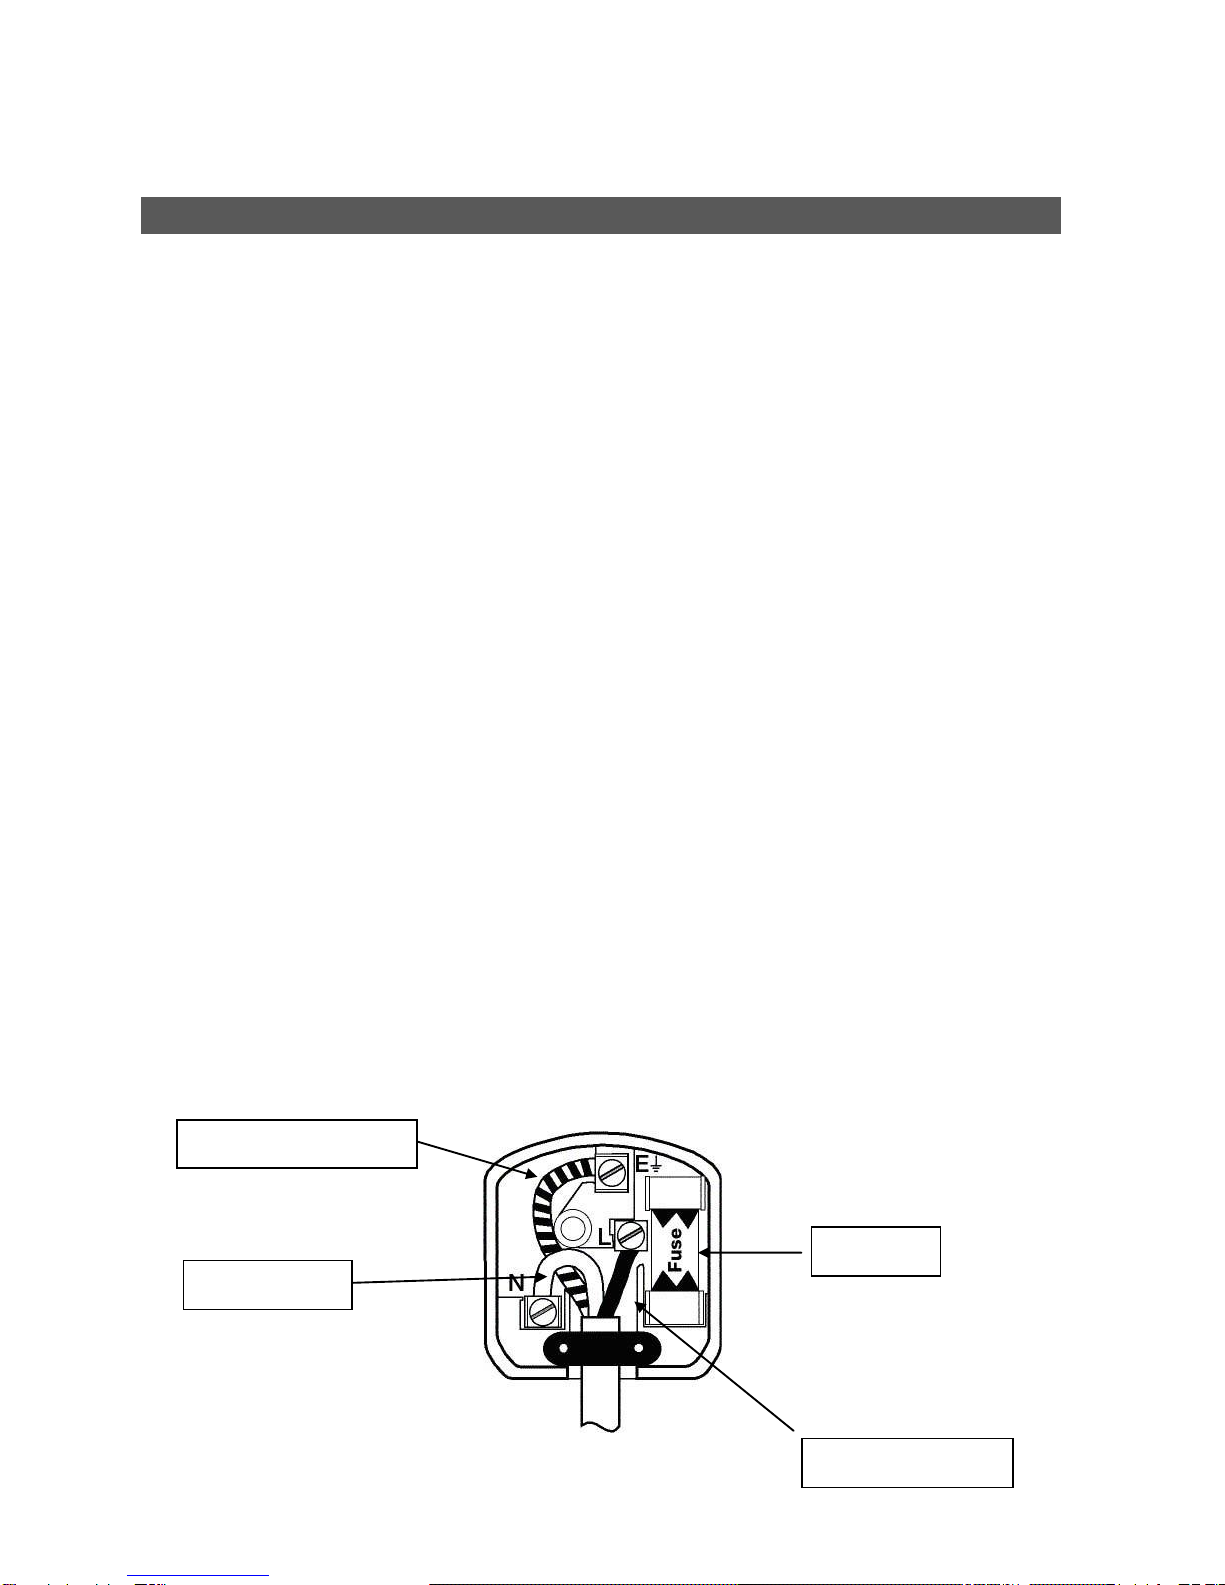
BS PLUG WIRING
Wiring Instructions: Should it be necessary to change the plug please note the wires
in the mains lead are coloured in accordance with the following code :
BLUE - NEUTRAL
BROWN - LIVE
GREEN AND YELLOW –EARTH
As the colours of the wires in the mains lead of this appliance may not correspond with the coloured markings
identifying the terminals in your plug, proceed as follows:
1. The BLUE wire is the NEUTRAL and must be connected to the terminal which is marked with the letter Nor
coloured BLACK.
2. The BROWN wire is the LIVE and must be connected to the terminal which is marked with the letter Lor
coloured RED.
3. The GREEN/YELLOW is the EARTH and must be connected to the terminal which is marked with the letter
Eor or coloured GREEN OR GREEN/YELLOW.
4. Always ensure that the cord grip is positioned and fastened correctly.
If a 13A (BS 1362) fused plug is used it must be fitted with a 13A fuse. If in doubt consult a qualified electrician.
Wiring for a 13Amp Plug (BS1362)
Please note. The Earth Terminal is marked with the letter Eor Earth Symbol.
Earth –E (Green / Yellow)
Live –L (Brown)
13amp Fuse
Neutral –N (Blue)

5
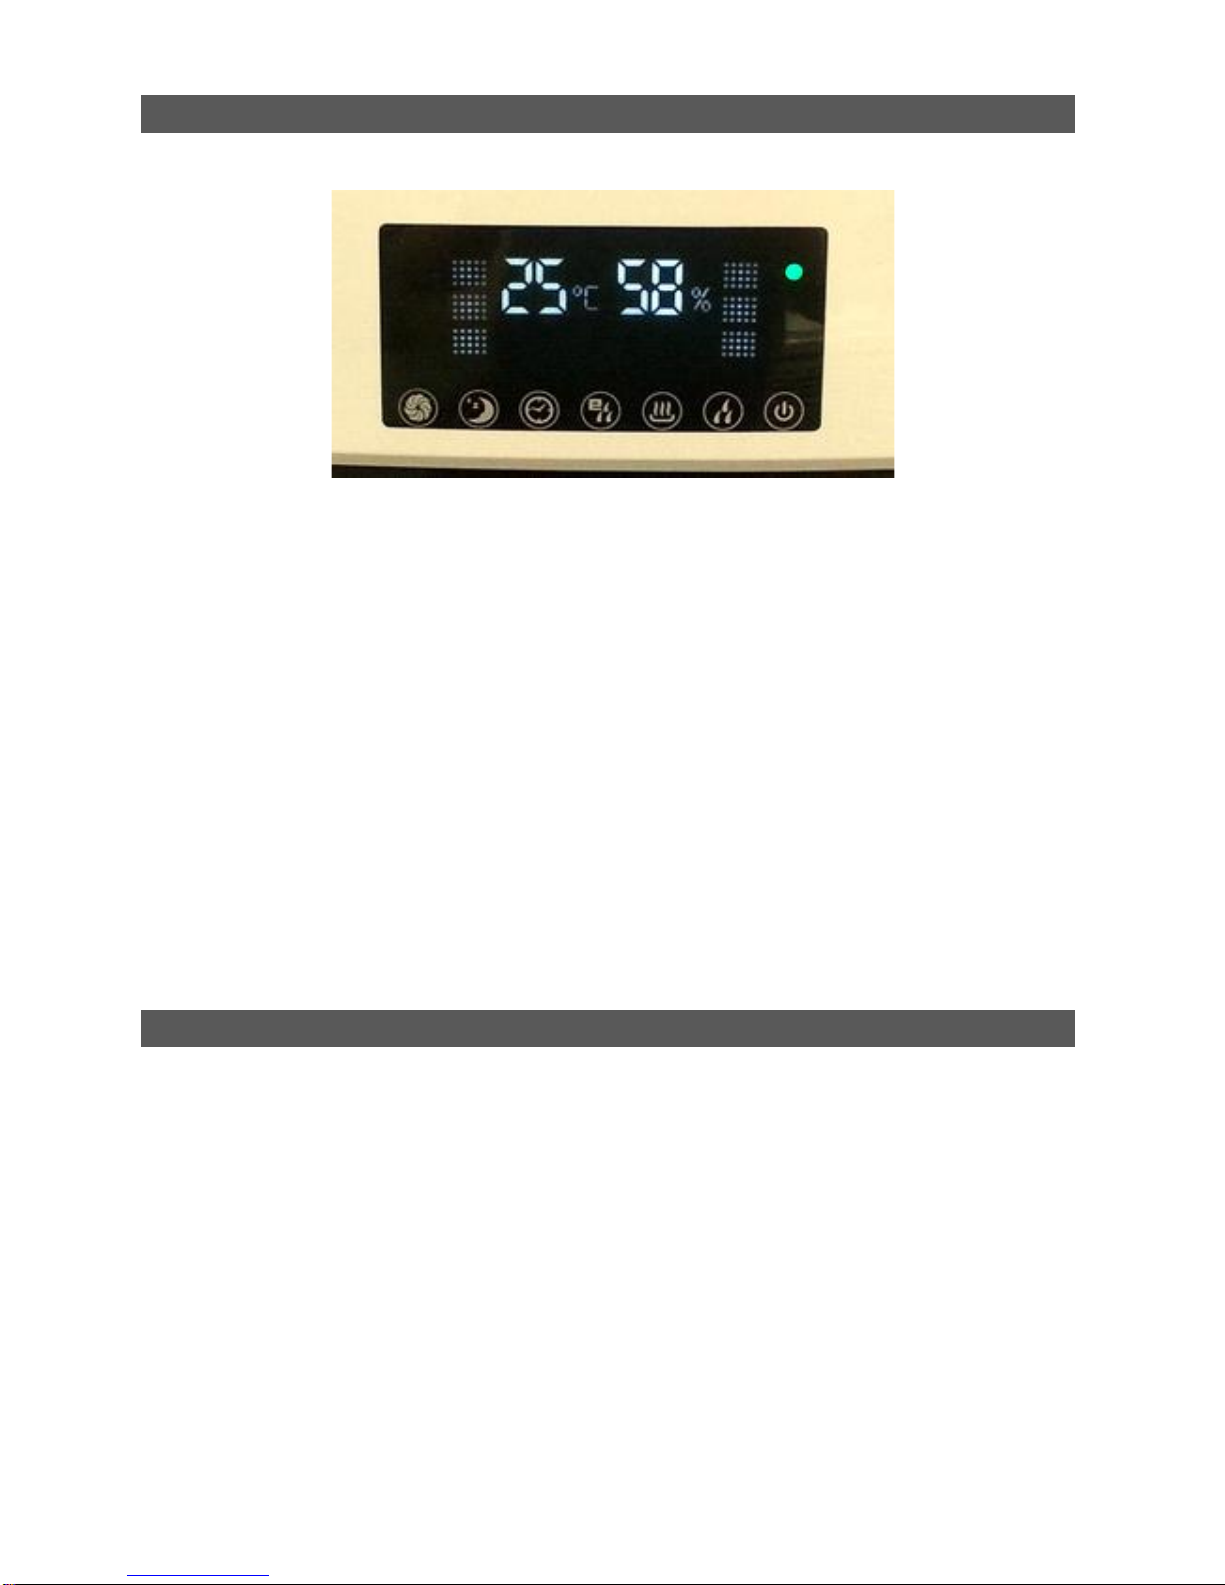
THE CONTROL PANEL
The buttons on the control panel from right to left are
Power Press once to turn the humidifier on, press again to turn it off
Output control Press to cycle through the three outputs –Low/Middle/High. High puts the most moisture into the air
and low put the least.
Warm Mist Press to pre-heat the water before it is humidified.
Humidistat Allows you to set a target relative humidity at which the humidifier will turn off and then back on again
when the relative humidity falls below that set point.
Timer Set to turn the humidifier off after between 1 –9 hours use.
Sleep Mode Press to turn the display and tank back light off (after about one minute) and the humidifier
will try to maintain a relative humidity of 65 –70%rh. Press the button again to return to normal operation.
Fan When pressed the fan turns on and the green light at the top right illuminates. The fan has
three effects, the mist is projected further into the room, the ionizer is turned on and the room air is drawn into over
the HEPA and active charcoal filters which all will help to purify the room air.

6
UNDERSTANDING AND USING YOUR HUMIDIFIER
How does an ultrasonic humidifier work?
High speed vibrations inside the humidifier create tiny water particles that are blown into the room from the top of the
humidifier.
What relative humidity should I set?
For most people a relative humidity between 40 –60%rh is fine. You don’t want to take the relative humidity much
higher than 60%rh because mould could form quite quickly.
How do the fan and filters help?
The fan pushes the moisture further into the room and draws air across the HEPA filter and the Active Charcoal filter
as well as activating the ioniser. A HEPA filter removes particles from the air, active charcoal filter removes smells
and the ioniser helps to clean the air by pulling dust particles to the ground.
Is it expensive to run?
The humidifier uses about 30 watts in normal operation and about 70 watts in warm mist mode with the fan on. So
no more than a couple of light bulbs.
What is the humidistat?
Just as you have a thermostat that you set on your central heating you have a humidistat on your humidifier. This
will allow the humidifier to turn off and on as required without you having to worry about it.
Should I turn the humidifier on for just a few hours a day?
No just let the humidifier’s humidistat decide when to humidify and to turn off.
Will it help with dry skin?
A humidifier will increase the relative humidity in the room, which will prevent the air from drying outand your skin and
throat should not feel dry and you should find that you get fewer static shocks in that room.
Can I use it in a baby’s room?
There is no reason why the humidifier cannot be used in a baby’s room. As you would do with any other electrical
appliance just make sure that the humidifier is safely out of reach. Don’t allow the mist output to fall directly onto the
baby because this will cool the baby down and babies are not great at regulating their body temperature.

7
HUMIDIFIER SETUP AND USE (see photos on page 2)
Place the humidifier in an upright position on a stable, flat surface.
Please ensure the unit is a safe distance away from a wall or furniture. Do not allow the mist to blow directly onto furniture,
surfaces, ceilings or walls.
Always unplug the humidifier before you remove or refit the water tank. Water is likely to drip from the tank whenever you
remove it.
Ensure the tank is correctly fitted, if the tank is empty or is not in place, the “Empty Tank” light comes on, an alarm will
sound and the humidifier will turn off.
Do not use with softened water as you may find that it leaves sodium deposits from the water softening process within the
room.
Those in hard water areas might like to use filtered, distilled or cooled boiled water instead of tap water.
If you are unsure if your water is hard you can check with your water supplier via their website or their customer service
department.
Important: Soak the water filter in tap water for 2 hours before inserting it into the humidifier. This helps to activate the filter
for it to work at maximum efficiency.
To operate safely
Do not insert small objects into the unit or this will damage it and cause a hazard.
Do not remove the tank when the humidifier is running or water may leak.
Minimum operating condition 5°C to avoid the water from freezing.
Do not add water that is above 40°C.
Aroma tray.
Your MeacoMist deluxe includes an aroma tray at the bottom left of the humidifier. Push the tray gently inwards and the
tray will pop out. Add a few drops of your favourite fragrance and this will be circulated into the air when the fan is turned
on.
CLEANING –Switch off and unplug from the mains before cleaning
The exterior
ATTENTION !
Never use the device with a damaged power cord, plug, cabinet or control panel. Never trap the power cord or allow
it to come into contact with sharp edges.
Always unplug the mains cable from the wall socket when removing or replacing the water tank.
Failing to follow the instructions may lead to the guarantee becoming void.
8
Clean the exterior with a soft, dry cloth. If the device is extremely dirty, use a mild cleaning agent. Wipe the humidifier with
a slightly damp cloth. Never spray the device with water.
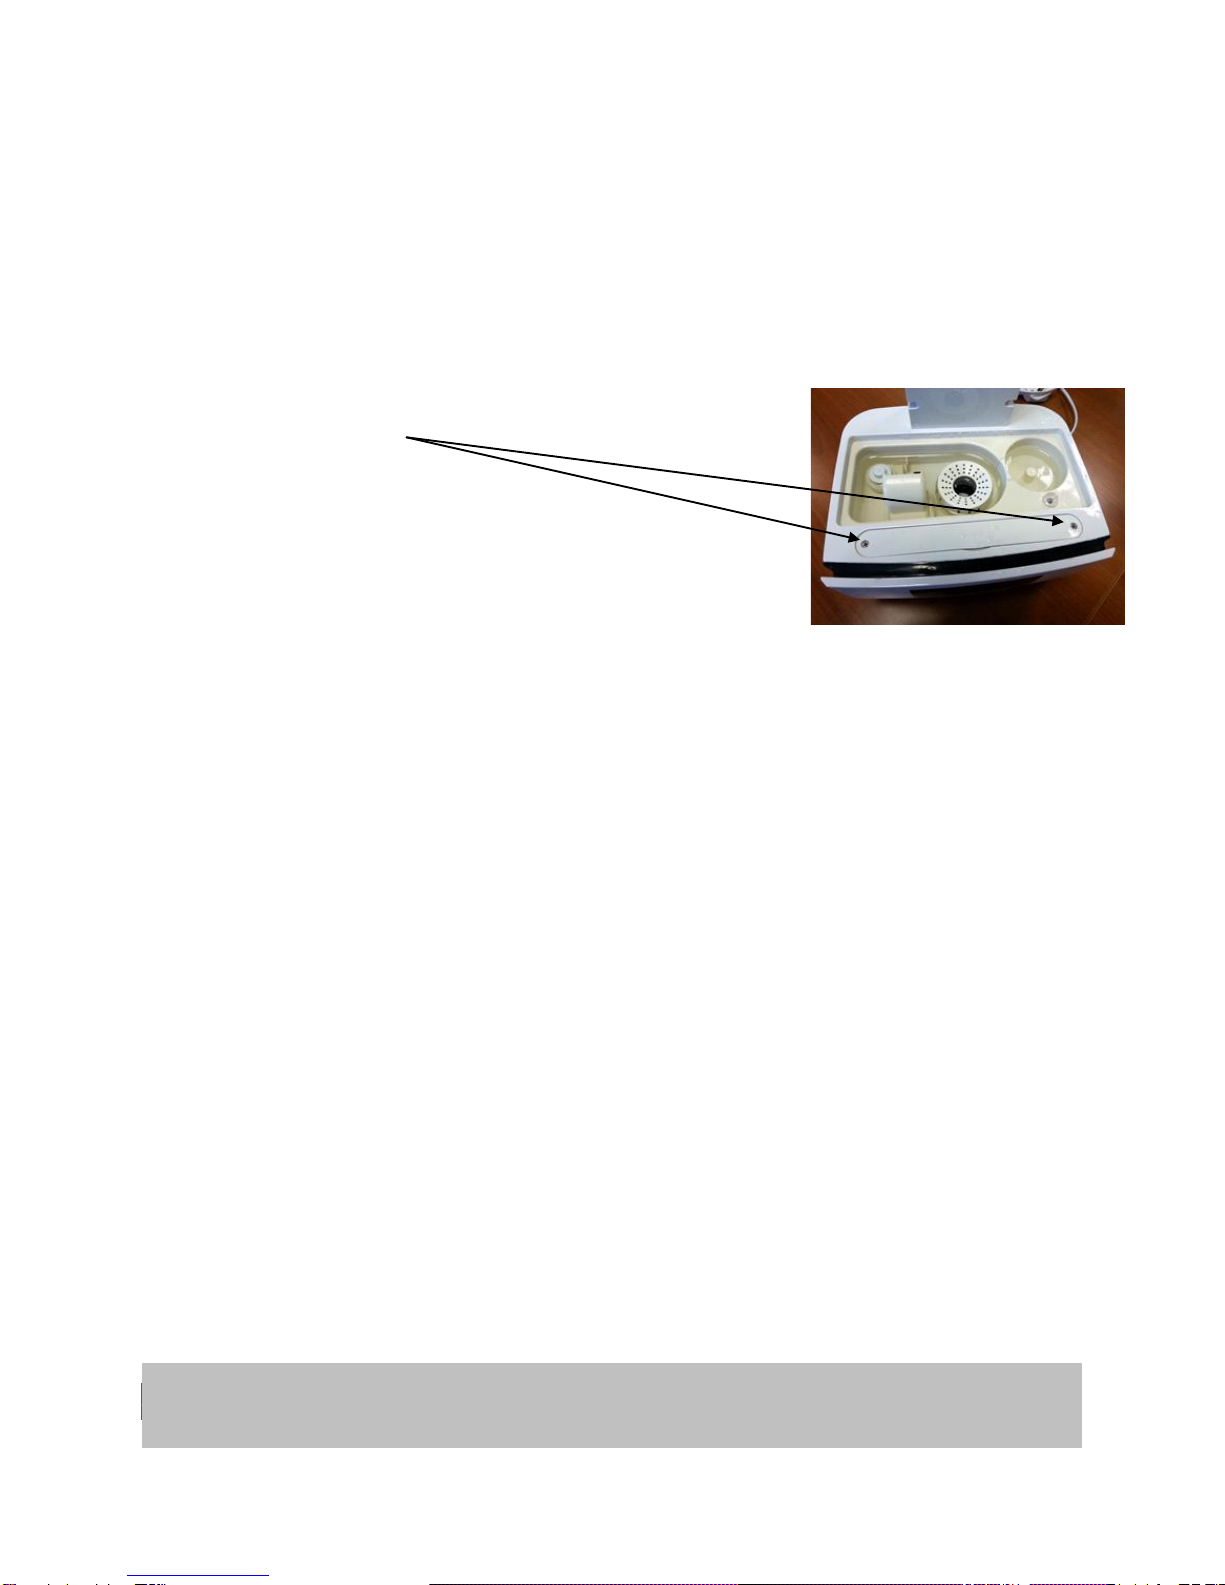
The air filter
When used regularly, the filter may become clogged with dust and particles. Therefore the filter should be cleaned at least
every two weeks. Follow these steps:
1. Unplug the humidifier from the mains and lift off the water tank. The air filter holder
is kept in place by two screws.
Once removed it can be lifted upwards. For cleaning or replacement.
2. Clean the filters with a vacuum cleaner or with a mild solution of washing up liquid.
Make sure that the filter is rinsed, drained and dried before putting it back in the
humidifier.
Calcium Deposits
Every 2-3 weeks (more often in hard water areas) unplug the humidifier and wipe away any signs of scale or mould and rinse
out the tank.
The water filter (see photo on page 2)
The water filter is there to protect the humidifier from the limescale that comes from hard water and will prolong the life of the
humidifier and will stop the white dust from the limescale from being blown into the room with the humidified air. Depending
on how hard your water is you may have to change your water filter every few months, the harder the water the more often
you have to change the filter. Customers with very hard water might find it better to use boiled water that has been allowed
to cool or distilled water. Those in soft water areas will find that their filter will last a lot longer.
You can check on the performance of your water filter by placing a piece of dark paper or card in the mist. If calcium
deposits are starting to build up then these will appear on the card and in the form of a white dust, this will give you an early
indication that you need to change the water filter.
Important: Soak the water filter in tap water for 2 hours before inserting it into the humidifier. This helps to activate
the filter for it to work at maximum efficiency.
STORAGE
Never use the device without the air or water filters.

9
Storage
If the machine will not be used for a long period of time, take the following steps:
1. Remove the plug from the socket and empty the container. Dry the water container and the inside of the humidifier
completely.
2. Clean and dry the air filter.
3. Store the device in a dust-free location away from direct sunlight, preferably covered with a sheet of plastic.
4. Never leave the unit with water in it in a room whereby the temperature will fall below 0°C to prevent the water from
freezing.
10
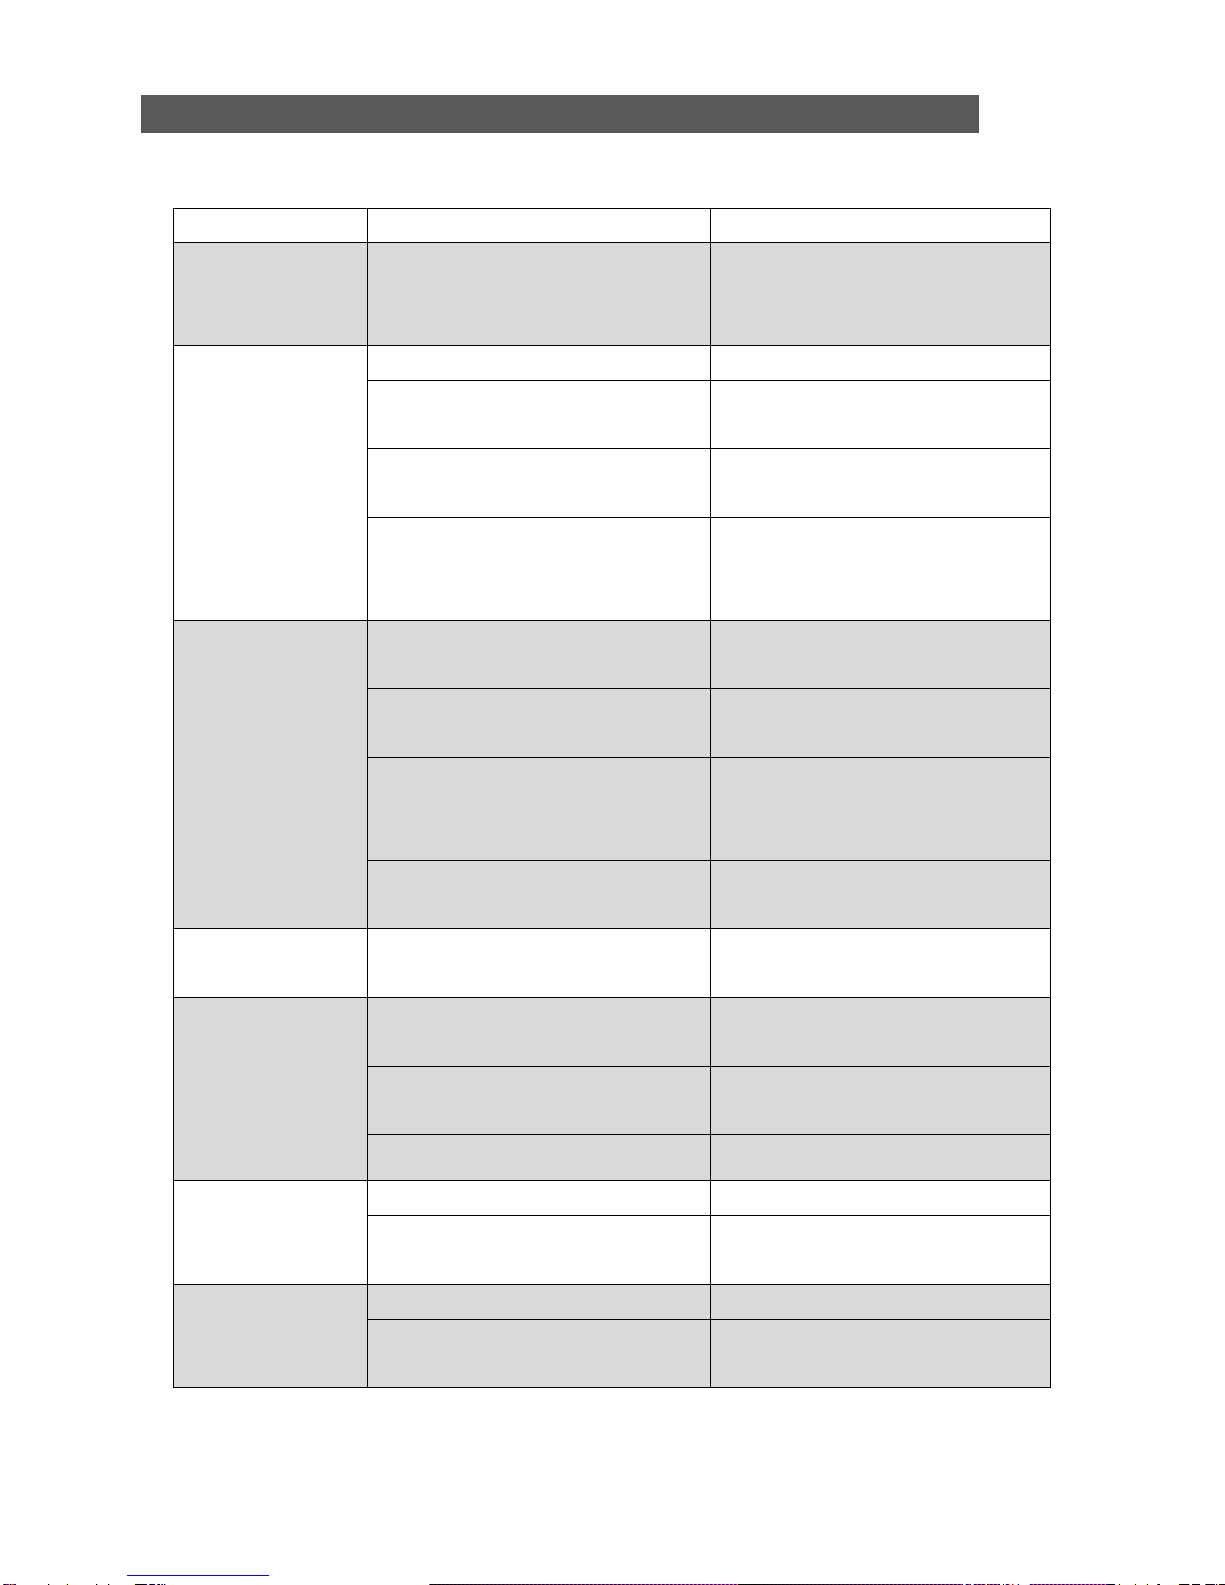
TROUBLESHOOTING
Check the following before contacting technical support:
Problem
Cause
Solution
The unit does not work,
the display is blank.
The power is not connected or the humidifier is
in night/sleep mode.
Insert the plug into the wall outlet and press the
power button. If there is power connected then
press the sleep button.
The device does not
humidify.
The water container is empty.
Add water to the container.
The water container has not been replaced
correctly.
Place the water container in the correct position.
The temperature in the room where the
humidifier is operating is too low.
The machine does not humidify below 5°C.
The relative humidity in the room where the
humidifier is operating is too high.
The humidifier humidifies up to to the target
relative humidity set and then turns off until the
relative humidity goes below the set point again.
The humidifier works, but
increases the relative
humidity insufficiently.
The space is too large.
We recommend using more than one humidifier
in the space.
The room heating is too high and is drying the air
too much.
Turning the heating down will help the relative
humidity to increase.
There is too much ventilation.
In winter the outside air can at times be very dry
and this means that the humidifier has more
work to do.
The water filter is blocked and the reduced flow
is affecting performance.
Clean or replace the water filter.
White dust is appearing
on the furniture
The water filter is blocked with limescale from
the hard water.
Replace the calcium water filter and follow the
advice on the cleaning page of this manual.
Damp patches are
appearing on the
wall/ceiling/windows/other
surfaces.
Humidification output is too high.
Use the humidistat to prevent humidification
from going above 60%rh.
Mist is hitting the walls.
Move the humidifier so that the mist does not hit
the effected surfaces.
Humidification output is too high.
Turn down the three stage humidification output.
The mist smells
Left over fragrance in the aroma tray
Clean the fragrance tray
The water in the tank is not clean
Remove the water tank, pour the water away
and clean the tank.
Mist output is reduced
There is scale on the ultrasonic plate
Clean the ultrasonic plate.
The water is dirty from being in the tank too long
Remove the water tank, pour the water away
and clean the tank.

11
CONDITIONS OF WARRANTY
There is a one year warranty on your humidifier from the date of purchase.
All material or manufacturing defects will be repaired free of charge.
The following applies:
Any repairs or replacement of components during the warranty period will not result in an extension of the
warranty period.
The warranty will expire if any alterations have been made to the humidifier, if third party components have been
fitted or if the humidifier has been repaired by a third party.
Components subject to normal wear and tear, such as the air filter, are not covered by the warranty.
The warranty is only valid on presentation of the original, unaltered, and date-stamped purchase receipt.
The warranty does not cover damage caused by actions that deviate from those as described in the user’s
manual or by neglect.
All claims for compensation, including consequential damage, will not be entertained.
The warranty can be invalidated if the humidifier is found to be dirty or if the filter has not been clean often
enough.
To prevent unnecessary expenses, we recommend that you always carefully read the user’s manual first. If this
does not provide a solution, then call Meaco (U.K.) Limited on 01483 234900 between Monday to Friday 9am to
5pm.
This appliance is not intended for use by person (including children) with reduced physical, sensory or mental
capabilities, or lack of experience and knowledge, unless they have been given supervision or instruction
concerning use of the appliance by a person responsible for their safety.
Children should be supervised to ensure that they do not play with the appliance.

12
TECHNICAL SPECIFICATIONS
Model
MeacoMist Deluxe Ultrasonic Humidifier
Power consumption
35 to 70 watts
Power supply
220-240V / 50Hz
Humidifying capacity
Maximum 400ml/hour
Capacity water container
6 litres
Operating range
5 –37°C
Dimensions (w x d x h)
233 x 190 x 386mm
Net weight
2.6Kgs
Gross weight
3.3Kgs
Sound pressure level
<35dB(A)
This marking indicates that this product should not be disposed with other
household wastes throughout the EU. To prevent possible harm to the
environment or human health from uncontrolled waste disposal, recycle it
responsibly to promote the sustainable reuse of material resources. To return
your used device, please use the return and collection systems or contact the
retailer where the product was purchased. They can take this product for
environmental safe recycling.

13
CUSTOMER SERVICE
This humidifier has been imported into the U.K. by;
Meaco (U.K.) Limited
Meaco House
Parklands
Railton Road
Guildford
GU2 9JX
Telephone: 01483 234900
Website: www.meaco.com
Fax: 01483 232700
Meaco are specialists in humidifiers and would welcome your comments and questions on this humidifier. If you
do develop a fault within the first year then please do call us and if we cannot fix the problem over the phone we
will be happy to collect the humidifier from you at our expense and repair or replace as appropriate.
Please save the box just in case this happens.
Meaco 10/13 –version 1.0
Please record, for future reference, your date of
purchase and where you bought the humidifier
from here.
Date of purchase…………………..…………..
Purchased from www.meaco.com (if not then
please record the supplier’s name below).
……………………………………………………..
14
MeacoMist Deluxe
Ultrasonisk Luftfugter
Brugsvejledning
Udgave: Oktober 2013
Læs denne brugsvejledning omhyggeligt igennem, inden apparatet tages i
brug, og gem den til eventuelt senere brug.
Tak fordi at du valgte Meaco. Det sætter vi stor pris på.
Du kan finde mere information på www.meaco.dk

15
PRODUKTBESKRIVELSE
For at fjerne tanken løfter du i håndtaget på
bagsiden. Husk at frakoble strømmen først.
Skru låget på beholderen af.
Fyld tanken med vand fra hanen, destilleret
vand eller kogt og nedkølet vand.
Sæt låget tilbage på plads
Sæt beholderen forsigtig tilbage på luftfugteren
mens du holder den fast både foran og bagi
For at tømme tanken udføres processen
modsat. Rengør beholderen og fjern eventuelle
aflejringer.
Vandfilteret kan skiftes for at forhindre at
aflejringer og forureninger kommer ind i
luftfugteren og bliver blæst ud i rummet.

16
SIKKERHEDSINSTRUKTIONER
LÆS ALLE INSTRUKTIONER NØJE FØR DU TAGER PRODUKTET I BRUG.
Hvis der opstår en fejl på produktet i garantiperioden skal det sendes tilbage til os for at blive repareret. Pas derfor
på original emballagen og opbevar den uden for børns rækkevidde. Emballagen destrueres som genbrugsmateriale.
ADVARSEL –Dette produkt er til indendørs privat brug. Anden brug af produktet kan forårsage brand, elektrisk
stød eller anden skade på personer eller ejendele. Når du bruger elektriske apparater skal følgende
sikkerhedsanvisninger altid følges:
1 . Brug ikke apparatet, hvis der er en skade på ledningen eller stikket, en fejlfunktion eller den er tabt eller skadet på anden
måde. Returner apparatet til en autoriseret forhandler til undersøgelse og reparation.
2 . Apparatet skal altid stå i oprejst position for at undgå skader. Placer enheden på et fladt og stabilt underlag.
3 . Kontroller at spændningsangivelsen svarer til den lokale netspænding, før du tilslutter apparatet.
4 . Brug apparatet i en rumtemperatur mellem 5 °C og 37 °C.
5 . Sørg for at luftindtag og udløb ikke er blokeret eller tildækket.
6 . Placer ikke apparatet for tæt på gardiner eller andre genstande - min 30cm.
7 . For at undgå fugt og mug eller skade på elektriske artikler, må dampen ikke blæse direkte på en overfalde
8 . Placer aldrig noget på apparatet eller tildæk det med nogen former for materiale under brug.
9 . Dette produkt er beregnet til privat- og let kontorbrug og ikke til kommercielt, industrielt eller udendørs brug.
10 . For at beskytte mod elektrisk stød, må apparatet, stikket eller ledningen ikke sænkes ned i vand eller sprayes med
væsker.
11 . Strømledningen må aldrig frakobles uden først at trykke på "TÆND/SLUK knappen, da dette kan skade apparatet.
12 . Træk altid strømledningen ud når apparatet ikke er i brug eller skal flyttes. Hvis strømforsyningen skal frakobles, så grib
fat i stikket og træk det ud af stikkontakten. Træk aldrig i ledningen.
13 . Tøm altid vandtanken og tør alle dele før opbevaring af apparatet.
14 . Opsyn er nødvendig når apparatet er i brug eller i nærheden af et barn og kæledyr.
15 . Før ikke strømledningen ind under tæpper eller løbere. Hold kablet væk fra områder, hvor man kan snuble eller på anden
måde komme til skade.
16 . Opbevar aldrig apparatet i direkte sollys, da plasten sandsynligvis vil blive misfarvet.
17 . Alle reparationer skal foretages af en kvalificeret servicetekniker. Reparationer udført af ukvalificerede personer kan
forårsage skade på apparatet, personer eller ejendele og gøre garantien ugyldig.
18 . Undgå brug af forlængerledning, da den kan overophedes og forårsage brandfare. Brug kun forlængerledning efter at
have forsikret dig om at den er i perfekt stand. Forlængerledninger kan også forårsage spændningsfald, hvilket vil påvirke
luftfugteren.
19 . Brug ikke apparatet uden luftfilter, da det tillader skidt at samle sig inde i luftfugteren og kan ophæve garantien.
20 . Kontroller vand- og luftfilter regelmæssigt for at holde det rent. Et beskidt luftfilter begrænser luftstrømmen ind i maskinen
som vil øge modstanden på viften og kan føre til skade og ugyldiggøre garantien. Hvis du ikke rengører eller skifter vandfilter
ofte nok, så vil små partikler af kalk (der viser sig som hvidt støv i dampen) lægger sig på overflader i rummet.

17
LEDNINGSINSTRUKTIONER
Ledningsinstruktioner: Udskiftning af stik til strømforsyningen, skal udføres af en autoriseret person.
Ledningerne har følgende farver:
BLÅ - NEUTRAL
BRUN - STRØMFØRENDE
GUL OG GRØN –JORD
Da farverne på ledningerne i strømnettet til dette apparat ikke nødvendigvis svarer til de farvede mærker som
identificerer polerne, skal du gøre følgende:
1. Den BLÅ ledning er NEUTRAL og skal kobles til polen som er markeret med bogstavet N eller farven sort.
2. Den brune ledning er STRØMFØRENDE og skal kobles til polen som er markeret med bokstavet L eller
farven RØD.
3. GRØN / GUL er JORD og skal kobles til polen, som er markeret med bogstavet E eller farven grøn eller grøn
/ gul.
4. Sørg altid for at ledningens greb er placeret og fastgjort korrekt.
Hvis der skal anvendes en 13A(BS 1362) sikring i stikket skal den udstyres med en 13A sikring.
Hvis du er i tvivl, kontakt en autoriseret elektriker.
Jord - (Grøn/gul)
Live –L (Brun)
13amp
sikring
Neutral –N (Blå)
18
KONTROLPANELET
Knapperne på kontrolpanelet er (fra højre til venstre):
Tænd/ Sluk Tryk én gang for at tænde luftfugter, tryk igen for at slukke den
Effektstyring Tryk for at se tre udgange - Lav / Middel / Høj. Høj afgiver mest fugtighed i luften og lav mindst.
Varm damp Tryk for at varme vandet før det fugter .
Hygrostat Her kan du angive et niveau for den relative fugtighed så luftfugteren slukker og tænder igen når den
relative luftfugtighed kommer under det ønskede niveau.
Timer Bruges til at slukke luftfugteren efter 1-9 timers brug.
Nat modus Tryk for at slukke skærmen og tanken bag lyset og luftfugteren vil prøve at opretholde en
relativ fugtighed på 65 - 70 % RF. Tryk på knappen igen for at gå tilbagetil normal drift.
Vifte Trykker du her tænder viften og det grønne lys øverst til højre lyser. Viften har tre
funktioner, dampen kastes længere ind i rummet, ioniseringen tænder og luften renses via
HEPA-filter og aktive kulfiltre som alt sammen bidrager til at rense luften i rummet.
FORSTÅELSE OG BRUK AV EN LUFTFUGTER
Hvordan virker en ultrasonisk luftfugter?
Højhastigheds vibrationer inde i luftfugteren laver små vandpartikler som blæses ud i rummet fra toppen
af luftfugteren.
Hvilken relativ fugtighed bør jeg bruge?
For de fleste er en relativ fugtighed mellem 40 - 60 % rh fint. Du ønsker ikke en relativ luftfugtighed som
er meget højere end 60 % rh fordi der kan dannes mug ganske hurtig.
Hvilken hjælp gør viften og filtrene?
Viften sender fugtigheden længere ind i rummet og trækker luften gennem HEPA-filteret og det aktive

19
kulfilter samt aktiverer ioniseringen. Et HEPA-filter fjerner partikler fra luften, det aktive kulfilter fjerner
lugte og ioniseringen bidrager til at rense luften ved at trække støvpartikler ned til bakken.
Er det dyrt at bruge en luftfugter?
Luftfugteren bruger ca 35 watt i normal drift og ca 70 watt i varm damp modus med viften på. Dette er
ikke mere end et par lyspærer .
Hvad er hygrostat?
Akkurat som du har en termostat som du sætter på dine varmeapparater har du en hygrostat på din
luftfugter. Dette vil gøre at luftfugteren slukker og tænder igen efter behov uden at du behøver at
bekymre dig om det .
Bør jeg slukke luftfugteren nogle få timer om dagen?
Nej, bare lad luftfugterens hygrostat bestemme hvornår du skal fugte og hvornår den skal slukke.
Vil det hjælpe dem med tør hud?
En luftfugter vil øge den relative luftfugtighed i rummet, noget som vil forhindre at luften udtørrer huden
Svælg, luftveje og slimhinder føles ikke så tørre og du vil opleve at du får færre statisk elektriske stød.
Kan jeg bruge den i et børneværelse?
Der er intet til hinder for at bruge luftfugteren i et børneværelse. Sørg dog for at luftfugteren er ude for
rækkevidde og lad ikke dampen lande direkte på barnet, fordi det vil nedkøle barnet og babyer er ikke
gode til at regulere kropstemperaturen.

20
OPSTART OG BRUG
Placer luftfugteren i oprejst position på et stabilt, fladt underlag.
Sørg for at apparatet er placeret med god afstand fra væg eller møbler. Lad ikke dampen blæse direkte på møbler,
overflader, loft eller vægge.
Fjern altid strømtilførslen til luftfugteren før du fjerner eller monterer vandtanken, da der er risiko for at der drypper
vand fra tanken. Sørg for at tanken er rigtig monteret. Hvis tanken er tom eller ikke monteret korrekt , lyser "tom tank" og
en alarm udløses og luftfugteren slukker.
Anvend ikke afkalkningsmidler i apparatet, da det kan efterlade støv i rummet. Hvis man bor i områder med hårdt
vand bør man i stedet bruge filtreret, destilleret eller afkølet kogt vand.
Hvis du er i tvivl om vandet er hårdt, kan du kontakte dit vandværk via deres hjemmeside eller deres kundeservice.
Sikker brug
Placer ikke små genstande inde i apparatet da det vil skade den og forårsage en fare.
Fjern ikke tanken når luftfugteren er i gang, da vandet kan lække.
Minimum temperatur er 5 °C for at undgå at vandet fryser.
Tilsæt ikke vand som er over 40 °C.
Aromabeholder
Din MeacoMist deluxe indeholder en aromaskuffe nederst til venstre i luftfugteren. Skub skuffen forsigtig indover og
magasinet vil komme ud. Tilsæt nogle dråber af din favoritduft, og dette vil blive sendt ud i luften når viften tændes.
ADVARSEL !
Brug aldrig apparatet med skadet strømledning, kontakt, kabinet eller kontrolpanel. Fastgør aldrig strømledningen eller i
tæt kontakt med skarpe kanter. Træk altid strømledningen ud af stikkontakten når du fjerner eller monterer
vandtanken. Undlader du at følge instruktionerne kan det resulterer i at garantien ugyldiggøres.
Other manuals for MeacoMist Deluxe
1
This manual suits for next models
1
Table of contents
Languages:
Other Meaco Humidifier manuals


