Mech Marvels MM43MC User manual

MECH MARVELS
CULTIVATOR
MM43MC
INSTRUCTION MANUAL
READ ALL INSTRUCTIONS AND WARNINGS BEFORE USING THIS PRODUCT.
Thank you for purchasing a Mech Marvels Cultivator. This manual provides important information on
proper operation & maintenance. Readandsavetheseinstructions. Every effort hasbeen made to ensure
the accuracy of this manual. These instructions are not meant to cover every possible condition and
situation that may occur. We reserve the right to change this product at any time without prior notice.
IF THERE IS ANY QUESTION ABOUT A CONDITION BEING SAFE OR UNSAFE,
DO NOT OPERATE THIS PRODUCT!
DO NOT RETURN THIS CULTIVATOR TO THE RETAILER
If you experience a problem, have questions, or need parts for this product, please call Customer Service at
1-800-832-2966, Monday-Friday, 9 AM - 6 PM Central Time
. A copy of the sales receipt is required.
FOR CONSUMER USE ONLY NOT FOR PROFESSIONAL USE.
KEEP THIS MANUAL, SALES RECEIPT & APPLICABLE WARRANTY FOR FUTURE
REFERENCE. UNIT SERIAL #________________________
FOR FURTHER INFORMATION AND MANUAL UPDATES VISIT:
WWW.MECHMARVELS.COM
Version 20211230

NEED HELP? 1-800-832-2966
2
*
CARBON MONOXIDE
Running this Cultivator indoors
CAN KILL YOU IN MINUTES
Engine exhaust contains carbon monoxide (CO). This is a poison you cannot see or smell. If you
can smell the exhaust, you are breathing CO. But even if you cannot smell the exhaust, you could
be breathing CO.
CALIFORNIA PROPOSITION 65
WARNING: This product, or the exhaust from this product, may contain chemicals known to
the State of California to cause cancer, birth defects, or other reproductive harm.
For more information, view OEHHA's Proposition 65 page: https://www.P65warnings.ca.gov
Contains LEAD. May be harmful if eaten or chewed. May generate dust containing lead. Wash hands
after use and keep out of reach of children.

NEED HELP? 1-800-832-2966
3
Contents
SAFETY SYMBOLS, WORDS, AND LABELS.............................................................................................................................. 4
Operator Responsibilities................................................................................................................................................... 6
Fuel Safety ........................................................................................................................................................................ 6
Site Preparation and Safety............................................................................................................................................... 7
Operational Precautions During Use ................................................................................................................................. 7
Safety of Children .............................................................................................................................................................. 8
Maintenance and Adjustment ............................................................................................................................................ 8
PACKAGE CONTENTS ............................................................................................................................................................... 9
MACHINE COMPONENTS ........................................................................................................................................................ 10
ASSEMBLY INSTRUCTIONS .................................................................................................................................................... 11
Unboxing the Cultivator ................................................................................................................................................... 11
Handlebars (Middle) ........................................................................................................................................................ 11
Handlebars (upper).......................................................................................................................................................... 11
Depth Regulator .............................................................................................................................................................. 12
PREPARING THE MACHINE FOR USE.................................................................................................................................... 12
Using this Machine for the First-Time .............................................................................................................................. 12
STARTING THE CULTIVATOR.................................................................................................................................................. 13
Pre-Start Inspection......................................................................................................................................................... 13
USING THE MACHINE .............................................................................................................................................................. 14
Engine Speed Adjustment ............................................................................................................................................... 14
Cultivating........................................................................................................................................................................ 14
STOPPING THE MACHINE ....................................................................................................................................................... 15
Cultivator Use and Adjustments ................................................................................................................................................. 15
Transport/Cultivating Modes............................................................................................................................................ 15
Depth Regulator Adjustment............................................................................................................................................ 16
MAINTENANCE/CARE .............................................................................................................................................................. 17
Recommended Maintenance Schedule........................................................................................................................... 17
To Maximize Product Life ................................................................................................................................................ 17
Engine:.................................................................................................................................................................... 17
Axle Shaft:
.............................................................................................................................................................. 18
Tines:
...................................................................................................................................................................... 18
Air Filter:
................................................................................................................................................................. 18
Cleaning the Machine
.................................................................................................................................................... 19
STORAGE PROCEDURES........................................................................................................................................................ 19
TROUBLESHOOTING
.............................................................................................................................................................. 20
SPECIFICATIONS AND WARRANTY........................................................................................................................................ 21

NEED HELP? 1-800-832-2966
4
SAFETY SYMBOLS, WORDS, AND LABELS
Warning and Important Safety Instructions appearing in this manual are not meant to cover all possible conditions and
situations that may occur. Common sense, caution and care must be exercised when operating or cleaning tools and
equipment.
Always contact your dealer, distributor, service agent or manufacturer about problems or conditions you do not understand.
This is the safety alert symbol. It is used to alert you to
potential personal injury hazards. Obey all safety
messages that follow this symbol to avoid possible
injury or death.
DANGER indicates an imminently hazardous situation
which, if not avoided, will result in death or serious injury.
WARNING indicates a potentially hazardous situation which,
if not avoided, could result in death or serious injury.
CAUTION indicates a potentially hazardous situation which,
if not avoided, may result in minor or moderate injury.
CAUTION used without the safety alert symbol indicates a
potentially hazardous situation which, if not avoided, may
result in property damage.
Safety Warning Symbols—The following symbols may be present on your machine. Carefully read and understand their meaning.
Look for this symbol to point out important safety precautions. It means: Attention! Become Alert! Your Safety Is Involved.
Read operator’s manual before operating this machine. Failure to follow directions could result in serious injury.
Thrown objects. Remove all rocks, stones, and foreign objects which could be thrown by machine. Work protective clothing and keep
all children and bystanders clear of the work area.
Do NOT touch hot muffler or cylinder. These parts are extremely hot from operation and may remain hot for a period of time after
operation.
Rotating tines can cause serious injury. Keep hands, feet, and clothing away.
Engine exhaust contains carbon monoxide, an odorless and deadly gas. NEVER run unit indoors or in a poorly ventilated area.
To reduce risk of fire, clean up any spilled gas or oil and keep unit free from debris. Gasoline is extremely flammable. Allow machine to
cool completely before refueling.
Disconnect spark plug wire prior to clearing the tines or servicing the machine.
Wear eye protection when using this machine.
Wear hearing protection when using this machine.

NEED HELP? 1-800-832-2966
5
Control and Operating Symbols—The following symbols may be present on your machine. Carefully read and understand their meaning.
Ignition Switch, move to “STOP” to shut engine off.
Fuel Mixture: 50:1 Unleaded Gasoline with 2 Cycle Oil.
Choke Lever: Move choke lever to start position (closed) for cold engine starting. Gradually move the choke
lever to the run (open) position once the engine is started, or for warm engine starting.
Fuel Primer: Push 6 times to prime fuel system for starting.
Throttle Lever: Press/squeeze to handle to increase engine speed and engage tines.
IMPORTANT SAFETY INSTRUCTIONS
Before using this machine and if you have any questions regarding the hazard and safety notices listed in this manual and/or on this machine,
call 1-800-832-2966, Monday - Friday, 9 AM - 6 PM Central Time.
Carbon Monoxide Gas: When in operation, the exhaust from this machine contains poisonous carbon monoxide gas.
Carbon monoxide gas is both odorless and colorless and may be present even if you do not see or smell gas. Breathing this poison gas
can lead to headaches, dizziness, drowsiness, loss of consciousness and eventually death.
Use this machine ONLY outdoors in non-confined areas.
Keep at least several feet of clearance on all sides to allow for proper ventilation for this machine.
High Temperatures: This machine produces heat when in operation. Temperatures near the exhaust can exceed 150° Fahrenheit (65° Celsius).
Do not touch hot surfaces. Observe all warning placards on this machine denoting hot surfaces.
Allow this machine to cool for several minutes after use before touching the engine, muffler, or other areas that are hot during operation and before storing or
transporting the machine.
Hot exhaust may ignite some materials. Keep flammable materials away from this machine.
Keep several feet of clearance on all sides of this machine during operation. Do not enclose this machine in any structure.
Usage: Prolonged exposure to high noise levels can be hazardous to hearing.
Always wear ANSI-approved hearing protection when operating or working around the machine when it is running.
Anytime you are servicing this machine:
To prevent accidental starting, turn the engine kill switch to the “Off” position.
Disconnect the spark plug lead from the spark plug, and secure it away from the spark plug.
Keep hands, feet, and clothing away from moving parts of the machine until it is made safe.
Carefully inspect the area where the cultivator will be used:
Thoroughly inspect the area where the cultivator is to be used and remove all foreign objects
Your equipment can propel small objects at high-speed causing personal injury or property damage.
Stay away from breakable objects, such as house windows, auto glass, greenhouses, etc.
Check that all nuts and bolts are tight and equipment is in good condition before each use.

NEED HELP? 1-800-832-2966
6
Operator Responsibilities
➢Carefully read and follow these safety instructions. Failure to do so can result in serious injury.
➢Know your product. Read and understand this manual before use. Compare the illustrations to unit. Learn location and
function of all controls.
➢Thoroughly understanding the unit before use will result in the best performance and safety.
➢Keep area of operation clear of all bystanders, particularly small children and pets.
➢Only allow responsible individuals, who are familiar with the instructions, to operate the Cultivator.
➢Do not operate the cultivator while under the influence of alcohol, drugs, or other medication which can cause drowsiness
or affect your ability to operate this machine safely.
➢Do not use this machine if you are mentally or physically unable to operate the machine safely.
➢Never operate the cultivator without good visibility or light.
➢Follow all instructions when assembling the unit. If the unit was purchased in assembled condition, the operator must
check the unit carefully to make sure it was assembled according the instructions in the manual before use.
➢Regularly inspect the machine. Make sure parts are not bent, damaged, or loose.
➢Use this equipment for its intended purpose only.
➢Operate the unit only with guards, shields, and other safety items in place and working correctly.
➢Service the unit only with authorized or approved replacement parts.
➢Complete all unit maintenance and adjustments according to the instructions in this manual
Fuel Safety
➢Gasoline is extremely flammable, and gasoline vapors can explode if ignited. Handle with care.
➢Use only approved containers for transport and storage.
➢Check fuel supply before each use, allowing space for expansion when filling, as the heat of the engine and/or sun can
cause fuel to expand.
➢Fill fuel tank outdoors with extreme care. Never fill fuel tank indoors.
➢Never remove gas cap or add fuel with the engine running. Allow engine to cool before refueling.
➢Do not smoke while refueling.
➢Never fill gasoline containers or the cultivator fuel tank inside of a vehicle or in a truck bed. Accidental electrical static
discharge can ignite fuel vapors which could result in serious injury or death.
➢After refueling, replace fuel tank cap securely and wipe up spilled fuel.
➢Never store fuel, or a cultivator with fuel in the tank, inside a building where fumes may reach a source of ignition. Ignition
sources that may be present are items such as water heaters, space heaters, and clothes dryers.
➢To reduce the risk of fire, keep the cultivator free of grass, leaves, or other debris build-up.
➢Allow the engine to cool completely before storing in any enclosure.
➢Always refer to the storage instructions for important details if the cultivator is to be stored for an extended period of time.

NEED HELP? 1-800-832-2966
7
Site Preparation and Safety
➢Thoroughly inspect the area where the cultivator is to be used and remove all foreign objects. Your equipment can propel
small objects at high-speed causing personal injury or property damage. Stay away from breakable objects, such as house
windows, auto glass, greenhouses, etc.
➢Keep area of operation clear of all bystanders, particularly small children and pets.
➢After striking a foreign object, stop the engine. Remove the wire from the spark plug and keep the wire away from the plug
to prevent accidental starting. Thoroughly inspect the cultivator for any damage. If damaged, have the equipment repaired
by a trained technician before restarting and operating.
➢Only allow responsible individuals, who are familiar with the instructions, to operate the cultivator.
➢Never allow children or young teenagers to operate the cultivator.
Operational Precautions During Use
➢Always wear ANSI compliant safety goggles or safety glasses with side shields when operating the cultivator to protect
your eyes from foreign objects, which can be thrown from the unit.
➢Wear appropriate clothing such as a long-sleeved shirt or jacket. Also wear long trousers or slacks. DO NOT wear shorts.
DO NOT wear loose clothing which could get caught in this equipment.
➢Always wear work gloves and sturdy footwear such as leather work shoes or short boots. These will protect ankles and
shins from small sticks, splinters, and other flying debris, and improve traction.
➢Do not put hands or feet near or under rotating parts.
➢Disengage clutch lever and stop engine before leaving the cultivator in operating position. Wait until the tines come to a
complete stop before removing debris or making any adjustments to the cultivator.
➢Do not attempt to till hard soil, till too deep or till at too fast a rate that can overload the cultivator.
➢If the cultivator should start to vibrate abnormally, stop the engine, disconnect the spark plug wire and prevent it from
touching the spark plug. Check immediately for the cause. Vibration is generally a warning of trouble
➢Exercise extreme caution when operating on or crossing gravel drives, walks, or roads. Stay alert for hidden hazards or
traffic.
➢Exercise caution to avoid slipping or falling. Always be sure of your footing; keep a firm hold on the handle and walk; never
run. Never operate the cultivator at high speeds on slippery surfaces.
➢Watch for holes, ruts, bumps, or other rough ground. Tall grass can hide obstacles.
➢Never attempt to start the cultivator unless the wheels are in a stable position. Always start the cultivator on a level
surface.

NEED HELP? 1-800-832-2966
8
Safety of Children
➢Tragic accidents can occur if the operator is not alert to the presence of children. Children are often attracted to the
cultivator and the cultivating activity.
➢Keep children out of the area and under the watchful care of a responsible adult.
➢Never assume that children will remain where you last saw them.
➢Be alert and turn cultivator off if children enter the area.
➢Before and while moving backwards, look behind and down for small children.
➢Never allow children to operate the cultivator.
➢Use extra care when operating near blind corners, shrubs, trees, or other objects that may obstruct vision.
Maintenance and Adjustment
➢Stop the engine before cleaning, repairing, or inspecting the unit. Make sure all moving parts have stopped. Let the engine
cool, disconnect the spark plug wire and move it away from the spark plug.
➢Keep the cultivator in safe working condition. Check all fasteners at frequent intervals for proper tightness.
➢When servicing or repairing the cultivator, do not tip the machine over or up unless specifically instructed to do so in this
manual. Service and repair procedures can be done with the cultivator in an upright position. Some procedures will be
easier if the machine is lifted on a raised platform or working surface.
➢Use only original equipment or authorized replacement parts.
➢Never tamper with safety devices. Check their proper operation regularly.
➢Clean and replace safety and instruction decals as necessary.
➢To guard against engine over-heating, always have engine filters mounted and clean.

NEED HELP? 1-800-832-2966
9
PACKAGE CONTENTS
The following items are supplied with this MECH MARVELS machine. Verify that all items are included.
STOP!
If there are missing items,
call 1-800-832-2966 Monday - Friday, 9 AM - 6 PM Central Time
for customer service.
DO NOT RETURN THIS MACHINE
TO THE RETAILER.
Item List:
(1) Locking pin for wheels (already installed)
(3)
Locking pin and clip for depth regulator and tines (already installed)
Zip ties
(1)
Depth regulator (already installed)
(4) Sets of saddle bolts and handlebar knobs
NEED HELP? 1-800-832-2966
10
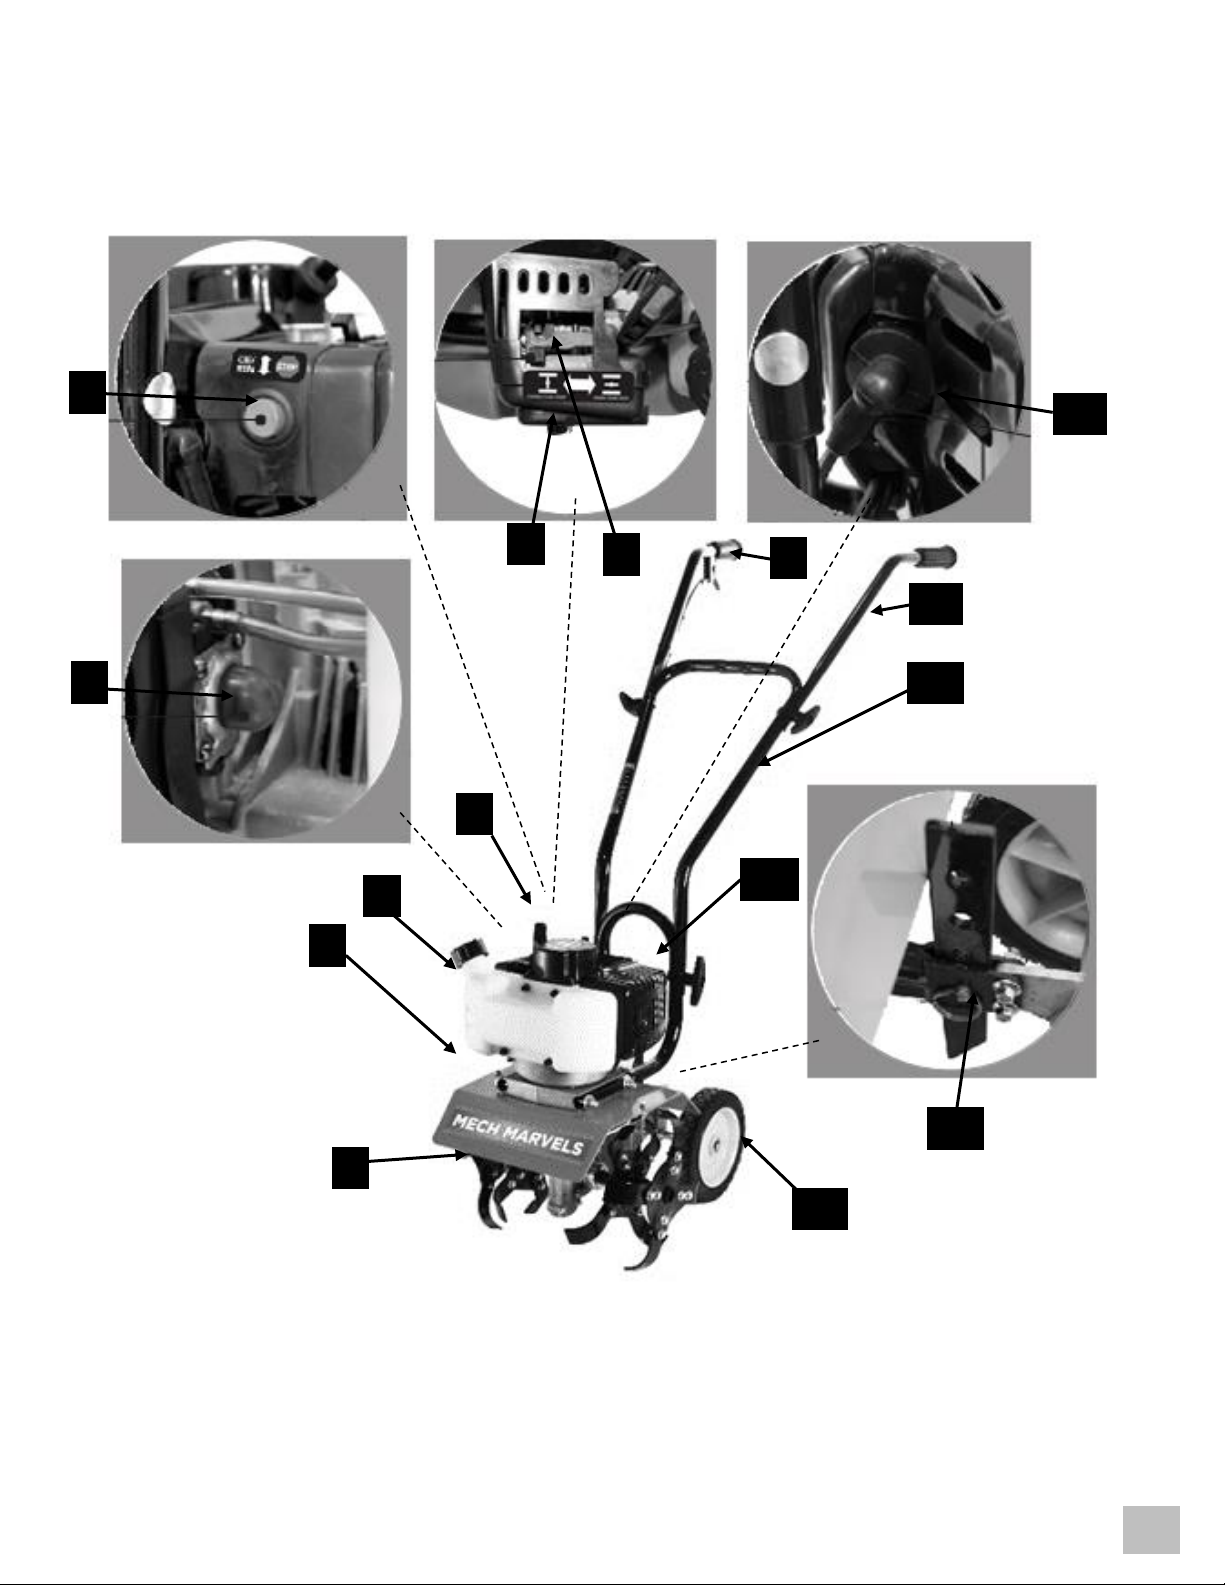
MACHINE COMPONENTS
Observe the locations and functions of the various components and controls of this machine.
1.
Throttle Control Lever
7.
Fuel Tank
13.
Middle Handle
2.
Choke Lever
8.
Tine Shield
14.
Upper Handle
3.
Air Filter Housing
9.
Tines
15.
Spark Plug
4.
Engine Switch
10.
Transport Wheels
5.
Primer Bulb
11.
Muffler
6.
Recoil Starter
12.
Depth Regulator
15
14
13
11
9
2
3
7
6
4
10
8
5
1
12
NEED HELP? 1-800-832-2966
11
ASSEMBLY INSTRUCTIONS
Unboxing the Cultivator
➢The cultivator comes with the majority of assembly completed.
➢Remove all parts and packaging components.
➢Use a utility knife to cut all four vertical edges and lay the box side panels flat around the cultivator.
➢Remove any remaining packaging.
➢Assembly can be done sitting on the cardboard to protect the finish.
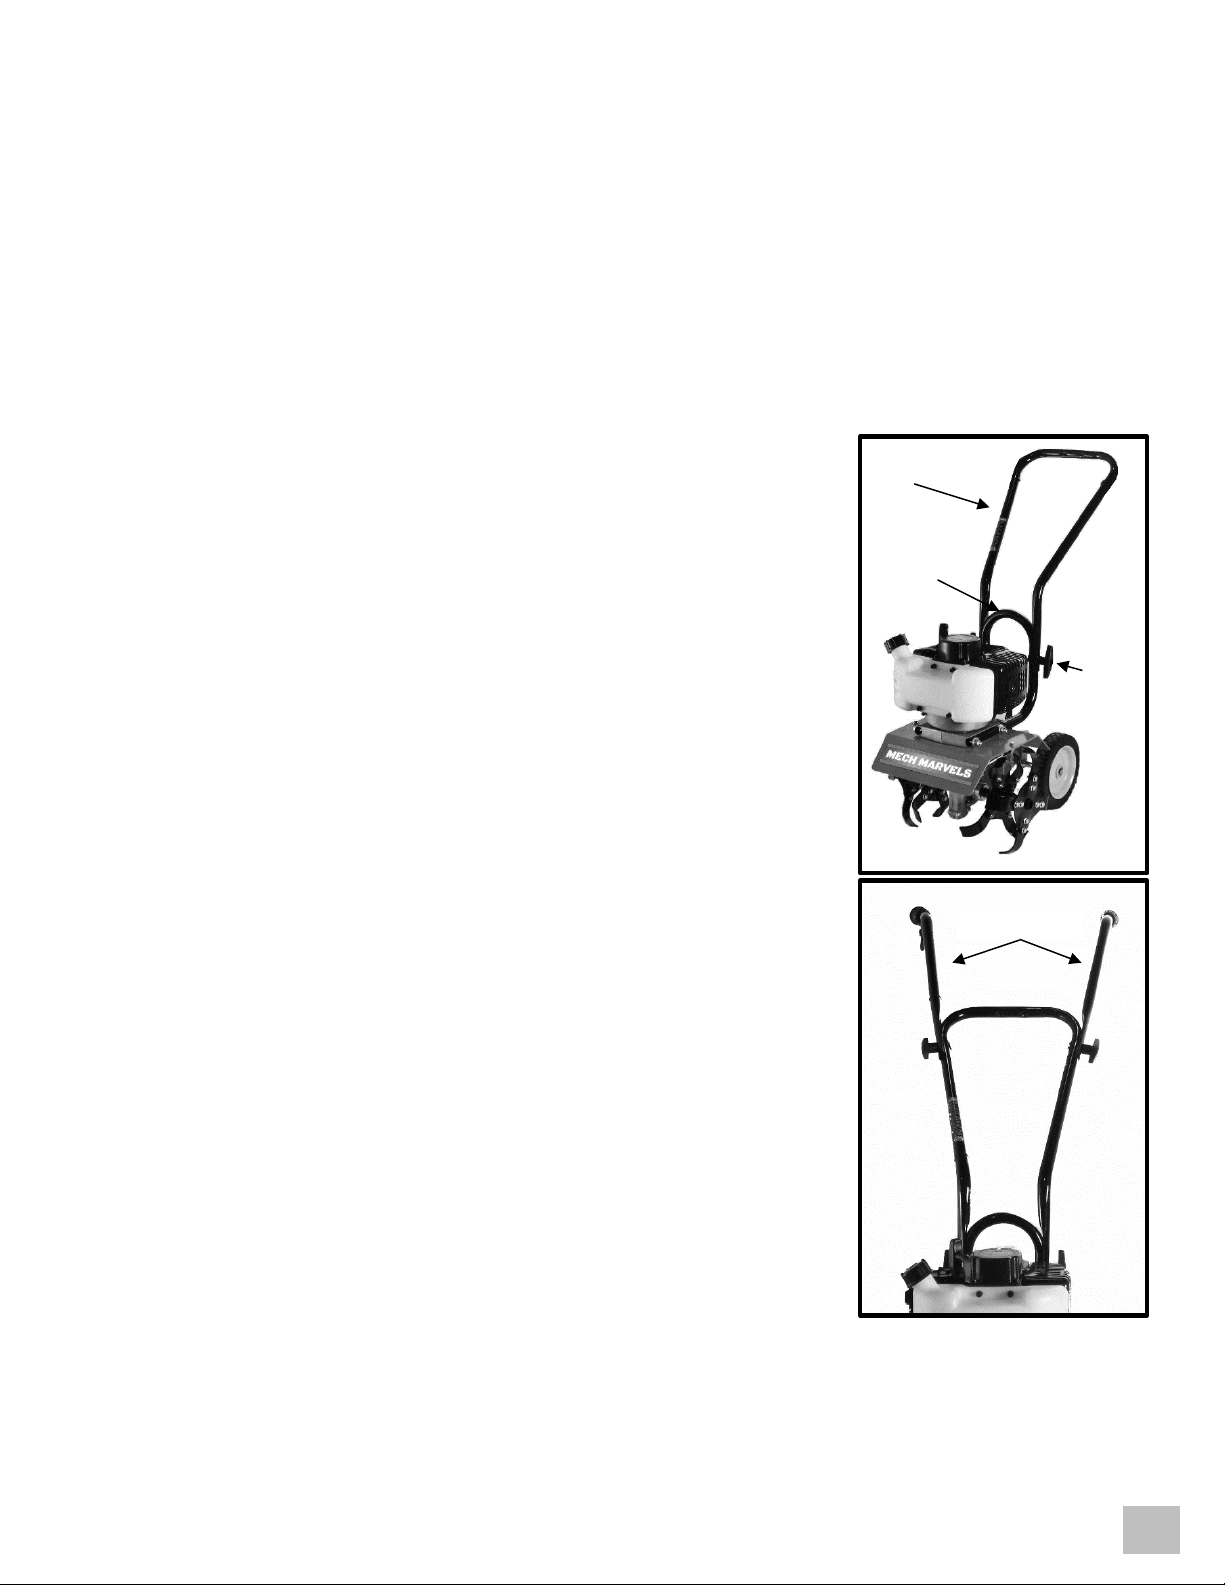
Handlebars (Middle)
1) Make sure the wheels are locked in the transport position for the most
stable platform.
2) Slide the middle handle over the lower handle with the bend facing the
back of the machine.
3) Secure the middle handle to the lower handle using (2) saddle bolts
and handle knobs (one per side).
Handlebars (upper)
1) Make sure the wheels are locked in the transport position for the most
stable platform.
2) The upper handle bars are directional. The throttle should be on the right-
hand side when facing the back of the machine.
3) The upper handle bars are shaped. Ensure the concave portion of the
bar rests tightly against the middle handle and align the holes.
4) Use (1) saddle bolt and knob per side to secure the upper handle bar to
the middle handle.
5) Secure throttle cable to handlebar assembly using the provided zip ties.
Middle Handle
Saddle
Bolt &
Knob
Lower
Handle
Upper Handles

NEED HELP? 1-800-832-2966
12
Depth Regulator
1) The depth regulator is installed with the point facing upwards for shipping.
2) Remove the depth regulator securing pin and clip.
3) Flip the depth regulator over and re-install with the point down.
4) Secure once more with the pin and clip.
PREPARING THE MACHINE FOR USE
Using this Machine for the First-Time
STOP!
The following section describes the required steps for preparing this machine for the first use. Improper assembly or failure to correctly
perform these steps can damage this machine and/or shorten its life. If you are still unsure about how to perform any of these steps
after reading this section, call 1-800-832-2966 Monday - Friday, 9 AM - 6 PM Central Time for customer service.
Once assembled, if this machine is being used for the first time, the following steps are required to prepare it for operation:
Step 1 –Mix Fuel and 2-Cycle Oil
This machine requires 2-cycle engine oil to be mixed with the fuel to function. FAILURE TO USE A 50:1 FUEL/OIL MIX WILL RESULT IN
SERIOUS ENGINE DAMAGE! FOR THE PROPER RATIO ADD 2.6 OUNCES OF HIGH QUALITY 2-CYCLE OIL TO EACH GALLON OF
GASOLINE. Do not mix fuel in the cultivator’s fuel tank, use a separate fuel rated container.
A bottle of 2-cycle oil is included for your
convenience.
Step 2 –Fueling
Use only unleaded gasoline only with an octane rating of 89 or higher for the fuel/oil mix.
DO NOT USE E85, OR FUEL WITH
MORE THAN 10% ETHANOL CONTENT. DOING SO CAN CAUSE ENGINE DAMAGE.
Add fuel mix to the fuel tank, be sure to
avoid overfilling, leave 1 inch of air space in the top of the tank when fueling to allow for expansion. Maximum Capacity: .85 Liters
Depth Regulator

NEED HELP? 1-800-832-2966
13
Throttle Lever
STARTING THE CULTIVATOR
The controls required to start and run the cultivator are located on the engine and are marked with
the icons for choke, prime, and engine on/stop.
Pre-Start Inspection
➢Make sure all safety guards are in place and all nuts and bolts are secure.
➢Inspect air cleaner for cleanliness.
➢Check the fuel supply. Use fresh unleaded gasoline with an octane rating of 89 or higher mixed at 50:1 with
high quality 2-cycle oil. Do not use gasoline containing more than 10% ethanol. Use of non-ethanol fuel is
best. We recommend the continuous use of a fuel additive/stabilizer to counteract the effects of ethanol.
These additives also prolong the shelf life of gasoline. Fill the fuel tank no closer than 1 inch from top of tank
to provide space for expansion.
➢Be sure spark plug wire is attached and spark plug is tightened securely.
➢Check position of wheels, and ensure unit is level and in a stable position.
➢Check depth regulator lever position.
➢Examine underneath and around engine for signs of leaks.
➢Inspect fuel hoses for tightness and fuel seepage.
➢Look for signs of engine damage.
➢Remove any debris from muffler area and recoil starter.
Starting a Cold Engine
1) Place the cultivator on a flat surface and ensure it is stable.
2) Turn the engine switch to the “on” position.
3) Push the primer 6 times, slowly.
4) Close the choke lever, the “start” position.
5) Pull starter cord rapidly, and allow rope to return normally, maintaining control of the starter cord at all times,
do not allow it to “snap back”. Repeat until the engine starts.
6) When the engine starts, after 10-15 seconds of running, gradually move the choke lever to the “run” position.
Restarting a Warm Engine
1) Normally a warm engine will not require the use of the choke.
2) Turn the engine switch to the “on” position, leave the choke in the “run” position.
3) Pull starter cord rapidly, and allow rope to return normally, maintaining control of the starter cord at all times,
do not allow it to “snap back”. Repeat until the engine starts.
Starting a Flooded Engine
If you suspect the engine has been flooded (too much gasoline):
1) Place the cultivator on a flat surface and ensure it is stable.
2) Turn the engine switch to the “on” position.
FAST

NEED HELP? 1-800-832-2966
14
3) Open the choke, the “run” position.
4) Lean the machine back slightly so the tines are clear of the ground.
5) Squeeze the throttle trigger completely to the handlebar (fast position).
6) Pull the recoil starter handle rapidly and repeatedly until the machine starts.
7) This could require multiple pulls depending upon how badly the unit is flooded.
8) If the engine still doesn’t start, allow the unit to sit for at least 15 minutes, then try steps 1-5 again.
Please do not start your cultivator until you have read this manual in its entirety, especially the sections regarding operator
safety. Always perform the pre-start checklist before starting the engine.
Gasoline is highly flammable and must be handled with care. Never fill the tank when the engine is hot or running. Always move
outdoors to fill the fuel tank.
The cultivator must be in a stable position when the engine is running. Never start the machine on uneven terrain, or where it
will not rest solidly on its own.
The depth regulator should be adjusted properly before starting the machine. Keep hands and feet away from all rotating parts
when starting the machine.
USING THE MACHINE
Engine Speed Adjustment
➢This cultivator is equipped with a centrifugal clutch, so the tines will not turn until the engine speed is
increased. To increase the engine speed, lift up on/squeeze the throttle trigger. To slow the engine
down, slowly release the throttle trigger. Completely releasing the throttle lever will return the engine to
idle and will stop the tines from rotating.
Cultivating
1) Adjust the depth regulator to the desired height.
2) Remove the securing pin and rotate the transport wheels upward. Resecure with the pin.
3) Lift up/squeeze the throttle trigger. This will start the tines moving and the cultivator will begin to turn
the dirt.
4) You can stop the cultivator’s movement at any time by releasing the throttle lever.
5) The depth regulator provides resistance and helps control the machines forward movement and the
cultivating depth.
6) You can also typically slow the forward movement when cultivating by applying slight downward
pressure on the handlebars.
7) Adjust the depth regulator one step at a time to till more deeply. It is always best to make multiple
passes adjusting the depth regulator one step at a time.
8) The throttle control lever is non-locking for safety.
9) Do not lock the throttle control lever in place by any means, doing so is extremely dangerous! The lever
is designed to release automatically without input from the Operator. Releasing the lever stops the tines
from rotating and brings the machine to a complete stop.

NEED HELP? 1-800-832-2966
15
STOPPING THE MACHINE
➢To stop the machine from moving, release the lever. This stops movement of the tines, but leaves the
machine running.
➢Once the tines have stopped rotating, allow the engine to idle for a few moments.
➢Turn the Engine On/Off Switch to “Off/STOP” to stop the engine.
➢Never use the choke control to stop the engine. Backfire or engine damage may occur.
To stop the tines at any time, release throttle control lever. Always release the control lever AND ENSURE THE TINES
HAVE STOPPED ROTATING before releasing the machine.
Raise or lower the depth regulator one hole at a time, testing cultivator operation after each adjustment. Adjusting the
depth regulator too high or low can result in loss of control of the cultivator! It is easier and safer to make multiple
passes and allow the machine to do the work.
Temperature of muffler and nearby areas may exceed 150˚F. Avoid these areas. Engine and surrounding parts become
extremely hot during normal use and will cause serious burn injuries if touched before the engine has cooled. Allow
engine to cool completely before touching these hot surfaces.
Cultivator Use and Adjustments
The machine should always be on flat, level ground, and the engine should always be off before making any of these
adjustments to the machine.
Transport/Cultivating Modes
To place the machine in cultivating or transport modes.
To place the wheels in the transport position:
1) Raise the depth regulator.
2) Remove the wheel securing pin.
3) Rotate the wheels backwards and down.
4) Replace the wheel securing pin to lock the wheels in transport mode.
To place the wheels in the cultivating position:
1) Remove the wheel securing pin.
2) Rotate the wheels backwards and up.
3) Replace the wheel securing pin to lock the wheels in tilling mode.
4) Adjust the depth regulator to the desired position.

NEED HELP? 1-800-832-2966
16
Depth Regulator Adjustment
Cultivating depth is controlled by the height of the depth regulator.
To adjust cultivating depth:
1)
Remove locking pin and clip.
2)
Raise the depth regulator to position tines at the chosen cultivating depth.
3)
Align hole in the depth regulator with hole in depth regulator bracket and replace pin and clip.
4)
Depth Regulator Down (lowered towards the ground) = Deeper cultivating.
5)
Place the pin so the depth regulator clears the ground for transport mode.
6)
Depth Regulator Up (raised away from the ground) = Shallower cultivating.
7)
Place the pin in the bottom hole of the depth regulator for lightest cultivating.
Do not adjust the cultivating depth setting without releasing the drive lever first. Always release drive control levers AND
ENSURE THE TINES HAVE STOPPED MOVING before adjusting the position of the depth regulator.
Cultivating Tips
The key to successful cultivating is to begin with a shallow cut on the first pass, and then work deeper on
each successive pass.
➢Cultivating depth will vary with ground conditions.
➢When beginning to work unbroken ground or in extremely hard soil, set the pin in the lowest hole of the
depth regulator still allowing it to break ground. This will allow for shallow cultivating. With the depth
regulator in this position, make several light passes over the area to be tilled.
➢Reset for deeper depths with successive passes.
➢If cultivator jumps or skids uncontrollably, lower the depth regulator by placing the pin in a higher hole.
This will allow for greater resistance to forward movement. Hold firmly to the handlebars to control
sudden movements of the machine.
➢If weeds, tall grasses, vines, or other materials clog or jam the tines, stop the cultivator before you
unwind vegetation from around the tines.
Immediately release the drive control lever if the tines jam or you strike a foreign object. With throttle control lever in the
neutral position, stop the engine. Once the engine is off, disengage the spark plug wire to safely be able to remove
foreign objects and check for damage.
Extreme caution must be taken in selecting cultivating depth. If you attempt to cut too deeply for soil conditions loss of
control could result. If removing material from the tines by hand, stop engine and remove spark plug wire first

NEED HELP? 1-800-832-2966
17
MAINTENANCE/CARE
Proper routine maintenance of this machine is essential for safe, economical, and trouble-free operation. It will help prolong the life of this machine
as well as help reduce air pollution. Perform maintenance checks and procedures according to the schedule below. It is recommended to use
genuine Mech Marvels parts for any replacement needs. Use of non-Mech Marvels parts can damage or reduce the life of your machine. Before
performing any maintenance, turn engine off and remove the wire from the spark plug to prevent accidental starting and serious injury. If you have
questions about maintenance procedures described in this manual, call 1-800-832-2966 Monday - Friday, 9 AM - 6 PM Central Time.
Recommended Maintenance Schedule
Service Records-
Fill in dates as you complete regular
service
Before
Each Use
After
Every
10 Hours
of Use
After
Every
25 Hours
of Use
After Every
50 Hours of
Use
After
Every
100 Hour
of Use
Before
Each
Season
Before
Storage
See
Note
Below
Clean Debris from Unit
√
√
√
Lubricate All Pivot Points
√
√
√
Check Fasteners for Tightness
√
√
1
Check Tines for Wear or Damage
Replace if Necessary
√
√
Check Fuel Line
Replace if Necessary
√
√
Lubricate WheelAxles
√
√
√
Check Spark Plug
Replace if Necessary
√
√
Clean Air Filter
Replace if Necessary
√
√
√
2
Replace Spark Plug
√
Clean Combustion Deposits from
Cylinder, Piston, and Valves
√
Check Transmission Lubrication
√
√
Important notes about the maintenance schedule:
1.
Re-check tightness of all fasteners after first 2 hours of initial use.
2.
Clean air filter every 10 hours if operating under dusty conditions.
Use only GENUINE Mech Marvels replacement parts. Other parts may damage the unit and could result in injury.
To Maximize Product Life
Engine:
➢Replace spark plug yearly or every 100 hours of operation.
➢Service air cleaner regularly.
➢Keep engine and machine parts clean.
➢Check engine and equipment often for loose nuts and bolts, keep these items tightened.

NEED HELP? 1-800-832-2966
18
Axle Shaft:
➢Tip the cultivator back and secure it to allow access to the axle shaft.
➢Remove any accumulated material such as vegetation, string, wire, or other materials. Pay extra
attention to the area around the axle at the transmission housing. Any material/debris in this area
will damage the seals and shorten the life of the transmission.
➢It may be easier to clear debris by removing the tines.
➢Lower the cultivator to the normal operating position.
Tines:
➢Always check tine condition prior to use.
➢Damaged or obstructed tines will result in poor cultivating performance.
➢Check tines for obstructions and clear all debris.
➢If tines are bent, broken, or excessively worn, replace them as a set.
➢Using the cultivator with damaged tines will result in accelerated wear of the machine.
Air Filter:
➢Always check the air filter assembly prior to use.
➢Remove the air cleaner cover.
➢Clean and clear any built-up debris from the air filter
housing and the air filter assembly prior to further
disassembly.
➢Remove the air filter assembly.
➢Carefully remove the foam pre-filter.
➢Clean the foam pre-filter with mild soap and water.
➢Rinse foam pre-filter well, gently squeeze out excess
water, and allow foam pre-filter to air dry.
➢Examine both the foam pre-filter and paper element for
damage or excessive contamination.
➢If both are found to be in good condition, the pre-filter
and the air filter element can be reinstalled and returned
to service.
➢If excessive build up or wear is present, replace the air filter assembly prior to returning the
machine to use.
Engine should always be off with the spark plug wire disconnected for safety prior to beginning any repair or
maintenance on the machine.

NEED HELP? 1-800-832-2966
19
Cleaning the Machine
➢Remove all dirt, leaves, debris, grease, etc. from the cultivator - including cylinder cooling fins, recoil starter
cover holes, under fuel tank, and under the muffler.
➢A bucket with mild soapy water may be used to clean the cultivator. Keep water away from the air filter and
air intake. Do not soak, wash and rinse by hand! Do not use a pressure washer to clean the unit! If
water is used, start the engine and allow to warm up to help dry the unit completely.
➢Check the cultivator for worn or damaged parts.
➢Have damaged parts replaced if necessary.
➢Tighten any loose hardware found during cleaning and inspection.
➢Lubricate as directed in Maintenance section.
STORAGE PROCEDURES
Any time the machine will be stored for 30 days or more, the following procedure should be followed.
➢
Clean the cultivator prior to storage.
➢
Store the unit in a sheltered location, protected from the elements. Be sure the storage area is free of
excessive humidity, and dust.
o
Keep heat, sparks, and flames away from the machine.
o
Handle fuel only outdoors.
o
Wipe up spills immediately.
o
Keep out of reach of children andpets.
➢
Drain the fuel:
o
Turn the engine switch to “Off” and allow the engine to cool completely.
o
Drain all gasoline from the fuel tank
into an approved container.
o
When all the fuel is drained, follow the starting procedures and allow the unit to run until it quits to
use up any fuel in the carburetor.
o
To maintain the fuel while in storage, it is beneficial to use a fuel stabilizer formulated for ethanol
fuels. Follow the stabilizer manufacturer’s instructions for use.
➢
Remove the spark plug and add a few drops of clean 2 cycle engine oil into the cylinder. Crank the engine
slowly through several revolutions to distribute the oil, then reinstall the spark plug.
➢
Inspect the spark plug and replace as necessary. Reinstall the spark plug cap on the spark plug.
Never store the cultivator indoors with fuel in the fuel tank. Never store in an enclosed, poorly ventilated area where fumes
could reach an open flame, a spark, or a pilot light like those on a furnace or water heater. Allow engine to cool before storing
unit.

NEED HELP? 1-800-832-2966
20
TROUBLESHOOTING
PROBLEM POSSIBLE CAUSE(S) SOLUTION(S)
Engine difficult to start 1. Out of fuel 1. Add fresh fuel.
2. Engine Switch “Off” 2. Turn engine switch “On”.
3. Engine is not primed 3. See Stating Instructions.
4. Spark plug wire disconnected 4. Attach spark plug wire to spark plug.
5. Fouled spark plug 5. Remove and inspect spark plug, replace if necessary.
6. DirtyCarburetor 6. Take unit to an authorized service center for carburetor cleaning.
7. Clogged air filter 7. Remove and clean air filter.
8. Contaminated Fuel 8. Drain and clean fuel tank. Fill with fresh fuel.
Engine Problems: 1. Incorrect fuel mix 1. Drain fuel tank and refill with properlymixed fuel.
Engine smokes excessively 2. Air filter dirty 2. Remove and clean or replace air filter.
Engine runs very “rough” 3. Fouled spark plug 3. Remove spark plug and inspect. Replace if necessary.
Engine runs erratically 4. Fuel delivery problem 4. Check fuel lines for cracks, kinks, or damage. Repair or replace.
Engine cannot maintain full speed 5. Excess carbon buildup 5. Check muffler for excessive carbon build up, service if needed.
6. Carburetor out of adjustment 6. Take unit to an authorized service center for carburetor adjustment.
7. Low compression 7. Take to and authorized service center for repair.
Excessive vibration / noise 1. Loose parts 1. Tighten all fasteners.
2. Engine problems (above) 2. Refer to engine solutions (above).
Tines will not rotate 1. Debris interfering with tines. 1. Remove debris from around tines.
2. Tines loose 2. Replace tine bolts and nuts
3. Damaged drive components 3. Take to and authorized service center for repair.
Tines continue to rotate when drive lever is not engaged 1. Damage to drive components or incorrect idle 1. Take to and authorized service center for repair.
Engine will not stop Check switch and wiring Replace switch
Tines will not cut properly Tines assembled incorrectly Verifytine installation.
Frequent engine stalling 1. Excessive cultivating speed / depth. 1. Cultivate at a moderate pace. Make multiple passes.
2. Engine problems (above). 2. Refer to engine solutions (above).
Table of contents
Other Mech Marvels Tiller manuals


