MEDCHECK SFBG01 User manual

www.getmedcheck.com
User Manual
Bluetooth
Self-Monitoring Blood Glucose System
Model No. SFBG01


Introduction
3
This booklet has important information you must know about MEDCHECK
Self-Monitoring Blood Glucose System (SMBG System in short) with
detailed directions and illustrations.
To ensure that you use properly and obtain the best test results possible,
please read the entire User Manual before testing.
This package contains 2 new AAA “LR03” (1.5V) Alkaline batteries. Insert
them into SFBG01 by following steps in this manual to ensure normal
function.
If you have any concerns, or need any assistance about maintenance,
please call SMARTFUTURE PTE LTD office or authorized distributor
during business hours.

Caution
4
To make sure that you operate MEDCHECK SMBG System safely and
accurately, please follow the user manual.
Please keep MEDCHECK SMBG System away from any liquid or sprays,
keep them dry.
Do not use MEDCHECK SMBG System on purposes outside “Intended
Use”.
Only use accessories supplied or recommended by the manufacturer.
Avoid severe impact on the meter. It may cause malfunction.
Do not take SFBG01 Blood Glucose Meter apart, or modify anything. Such
action may void your warranty.
Do not place anything on top of SFBG01 Blood Glucose Meter.
Keep the whole MEDCHECK SMBG System away from children. They
may choke on battery, or tiny component parts by accident.
Keep SFBG01 Blood Glucose Meter free from dust, hair, etc. Store the
meter in its container after use.
If you feel you are suffering from severe dehydration, stop using and
consult healthcare professionals right away.
If your symptoms are not consistent with blood glucose test results and
you have followed all instructions this manual, seek your healthcare
professional for help.
Dispose of medical waste per local regulations.
Warning for potential biohazard: Healthcare professionals using this
system on multiple patients should be aware that all products or objects
that come in contact with human blood, even after cleaning, should be
handled as if capable of transmitting viral disease. So the healthcare
professionals should wear disposable gloves and have an inoculation
regularly to prevent infections.

Appendices
5
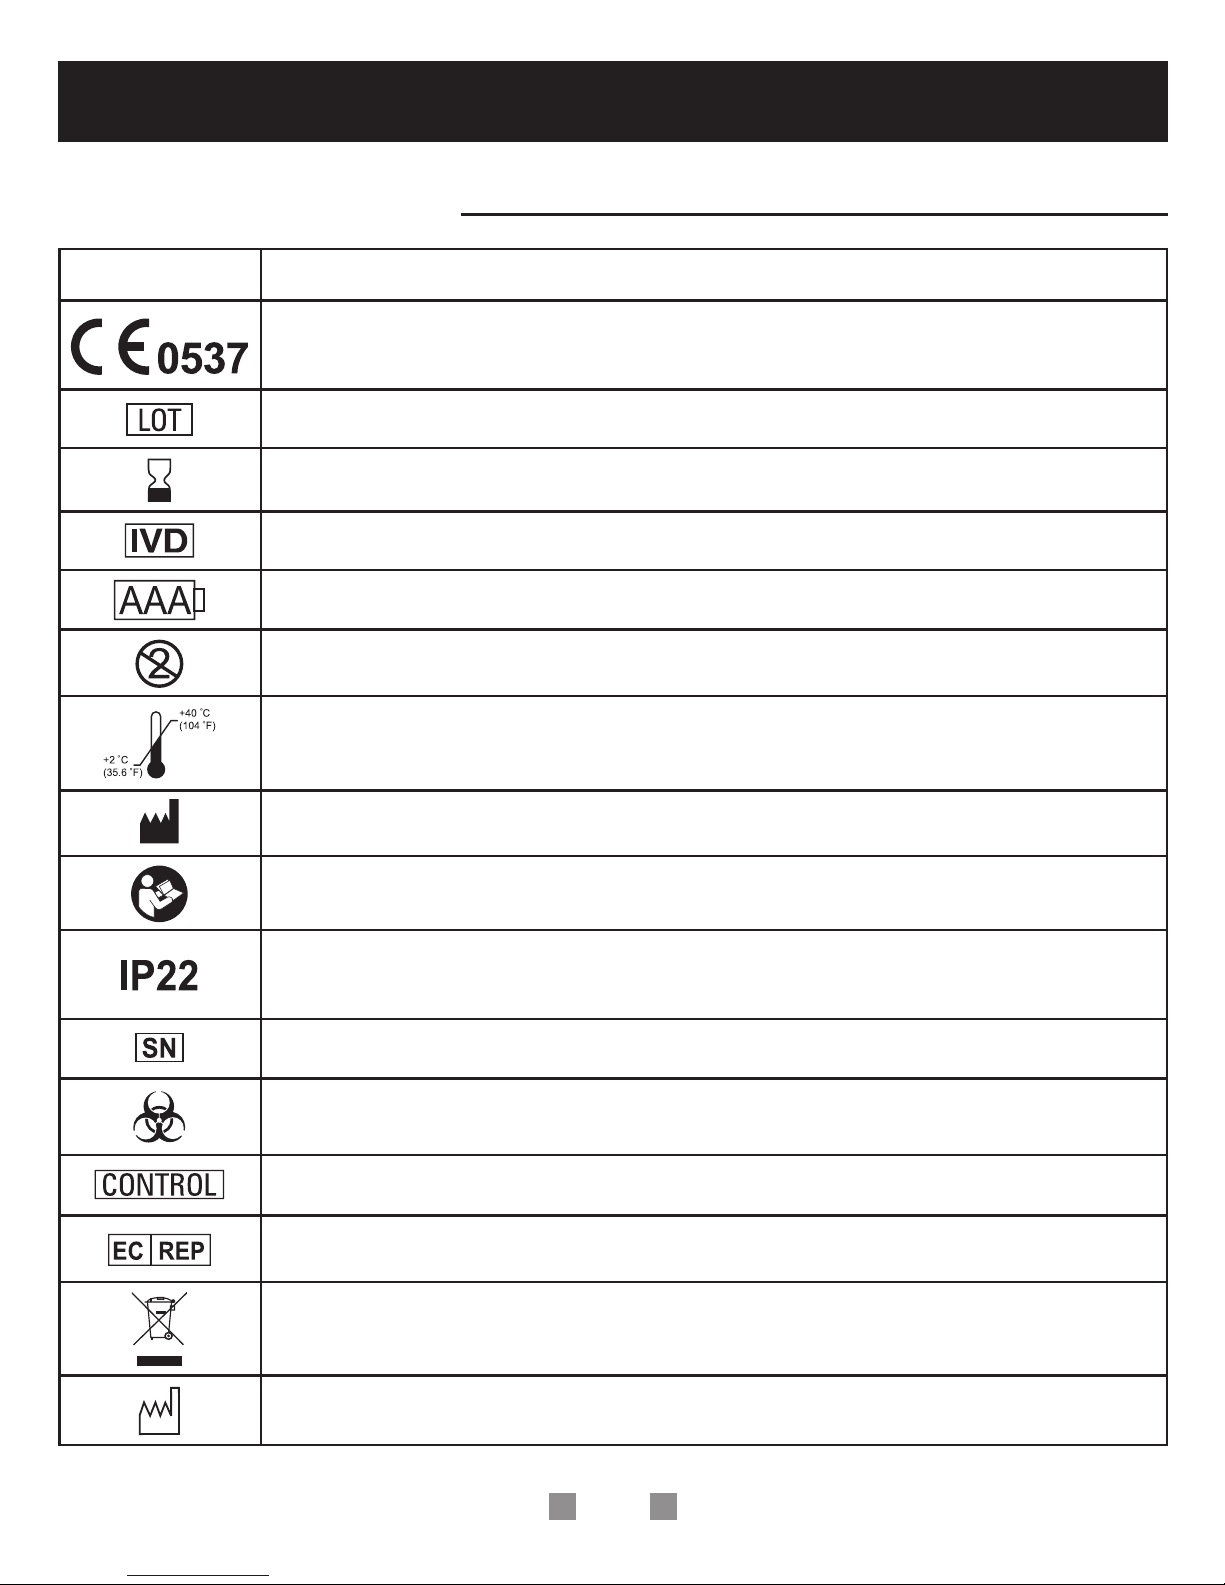
Explanation of Symbols
Explanation
This product meets the requirements of Directive 98/79/EC
in vitro diagnostic medical devices
Lot Number
Use-By date
in vitro diagnostic medical device
AAA “LR03” (1.5V) Alkaline Batteries
Do not reuse
Temperature Limitation
Manufacturer
Follow Instructions for Use
Meter only
Degrees of protection provided by enclosures
Serial Number
Biological Risks
Precision control material for a diagnostic test
Authorized Representative in the European Community
Discard the used product to the recycling collection point
according to local regulations
Date of manufacture
Item

Table of Contents
6
About MEDCHECK SMBG System................................…………………. 07
Intended Use
Measuring Principle
System Kit
Component Description
Key Features……………………………….........................………………… 14
Bluetooth Data Transmission
Meal Comment Function
Ketone Warning
Get Ready for Testing……………………………..........................……….. 17
Battery Installation
Presetting Date and Time
Quality Control of the System……………………............................……. 20
Using Glucose Control Solution
Perform the Blood Glucose Test……………….................………………. 22
Perform the Blood Glucose Test
LO and HI Readings
Memory Recall
Bluetooth Data Transmission.................................................................. 30
Maintain Your Meter……………………………...........................…………. 31
System Specifications……………………………..........................………. 32
Limitations
Product Specifications
Bluetooth Specifications
Display Messages and Troubleshooting………….............................…. 35
Device Information……………………………………...........................….. 37

About MEDCHECK SMBG System
7
Thank you for choosing MEDCHECK SMBG System. Designed for ease of
use, the device can help you and your healthcare professional monitor and
adjust your treatment plan to gain better control of your diabetes.
Important Information !
Expected Results for Non-Diabetic, Non-Pregnant Adults: The normal
fasting glucose range is 3.9 ~ 5.6 mmol/L (70 ~ 100 mg/dL)
Two hours after meals, normal glucose values should be less than 7.8
mmol/L (140 mg/dL)
Severe dehydration resulting from excessive water loss may cause
false results. If you feel you are suffering from severe dehydration,
consult the healthcare professionals immediately.
●Test results below 3.9 mmol/L (70 mg/dL) mean low blood glucose
(hypoglycemia).
●Test results greater than 13.3 mmol/L (240 mg/dL) mean high blood
glucose (hyperglycemia).
●If you get results below 3.9 mmol/L (70 mg/dL) or above 13.3 mmol/L
(240 mg/dL), and do not have symptoms, repeat the test.
●If you have symptoms or continue to get results that fall below 3.9
mmol/L (70 mg/dL) or above 13.3 mmol/L (240 mg/dL), follow the
treatment advice of your healthcare professional.
Record the opening date of test strips on its vial. Discard all unused strips
90 days after opening date. The strips are for single use only.
If your symptoms are not consistent with blood glucose test results and
you have followed all instructions this manual, seek your healthcare
professional for help.
Warning of potential biohazard: Healthcare professionals using this
system on multiple patients should be aware that all products or objects
that come in contact with human blood, even after cleaning, should be
handled as if capable of transmitting viral disease.

About MEDCHECK SMBG System
8
Intended Use
MEDCHECK SMBG System is self-test medical device and intended for both
home testing and for professional use to monitor the blood glucose
(β-D-glucose) levels from fresh capillary whole blood obtained from the finger
tip.
It is indicated to be used by diabetics at home or in a clinical setting by
professional healthcare personnel to measure the glucose concentration for
aiding diabetes management. The owner can only use SFBG01 Blood
Glucose Meter with SFTS01/SFTTS02 Blood Glucose Test Strips.
Measuring Principle
We design MEDCHECK SMBG System by using the latest biosensor
technology. It measures the glucose levels of the blood specimen by using a
disposable dry reagent strip which can produce an electrical current. And the
current will transfer to the meter for measurement. The amount of the current
is proportional to the amount of glucose present in the blood sample. Test
results are “plasma equivalent”.
The system consists of two main products: SFBG01 Blood Glucose Meter,
and SFTS02 Blood Glucose Test Strips. These have been designed, tested,
and proven to work together and perform accurate results.
Note
The accuracy of MEDCHECK SMBG System was compared with YSI
2300 Analyzer.
The patient is an intended operator.

About MEDCHECK SMBG System
9
System Kit
●SFBG01 Blood Glucose Meter
●SFTS02 10pcs Blood Glucose Test Strips
●SFCS01 Glucose Control Solution (Sold Separately)
●SFTS01 25pcs Blood Glucose Test Strips (Sold Separately)
●Lancing Device
●10 Lancets
●2 AAA “LR03” (1.5V) Alkaline Batteries
●Wallet
●Complete instructions:
● User Manual for SFBG01 SMBG System
● Quick Reference Guide
Note
Please consult your provider/local distributor for extra Blood Glucose
Test Strips .
If contents of your package do not meet the system kit list above,
please return the whole package to local distributor.
If the equipment is used in a manner not specified by the
manufacturer, the protection provided by the equipment may be
impaired.

About MEDCHECK SMBG System
10
Component Description
LCD Screen
Displays blood
glucose results,
messages, and
glucose results
stored in memory.
S Button
Press to adjust
settings and digits
Test Strip Slot
Insert test strip here.
M Button
Press to enter
different mode.
SFBG01 Blood Glucose Meter

About MEDCHECK SMBG System
11
Component Description
SFBG01 Blood Glucose Meter
k
5
2
1
3
14
11
1
&
2
3
4
5
6
7
8
9
10
11
12
13
14
15
16
Hour & Minute
Month or Year
Day or Year
MEM
AVG
Appear while LCD
displays average of
past 7 days result.
CODE
Appear while LCD displays
code number of the test strips
Apply Blood Symbol
Your meter is ready to
measure.
Decimal Point
Appears when LCD displays
blood glucose result in mmol/L
unit.
ketone Symbol
mmol/L & mg/dL
Temperature Symbol
Appears when ambient
temperature exceeds
operating temperature.
BT Symbol
Appears when turn on the
BT function
Pre-meal or Post-meal
Symbol
Indicates whether the test
result is taken before or
after meal.
Control Solution Test
Symbol
Appears while performing
Control Solution Mode.
Appear while LCD
displays past results.
Low Battery Symbol
Appears when blood glucose
result is equal to or higher
than 13.3mmol/L (240 mg/dL).
This device can display results
in mmol/L unit and mg/dL.
Appears when battery
is low
4
6
12
15
16
13
10
7
9
8

About MEDCHECK SMBG System
12
Component Description
Blood Glucose Test Strips
Note
Only use SFTS01/ SFTS02 Blood Glucose Test Strips with SFBG01
Blood Glucose Meter only.
Do not touch the strip when your hands are wet.
Record the first opening date on the vial, and use them within 90
days after first opening. If not, discard them in case inaccurate
results may occur.
Do not use strips beyond the expiration date printed on the vial since
it may cause inaccurate results.
Blood Glucose Test Strips are for single use only. Never reuse.
Keep Blood Glucose Test Strips in vial always.
Bending, cutting, or twisting strips are prohibited.
WARNING
Keep the strip vial away from children; in case any choking hazard
happens. The desiccate reagent in the vial may cause skin or eye
irritation by contact.
Contact Electrode
Insert into the test strip slot.
Insert the test strip as far as it will go.
Top Edge (Collection Zone)
Move blood sample or glucose control solution
close to the top edge of the test strip.

About MEDCHECK SMBG System
13
Component Description
Lancing Device
It is used with sterile lancet to obtain the blood for the testing.
Lancets
It is used with lancing device to obtain the blood for the testing.
Cap
Depth Settings & Indicator
Lancet Ejector
Release Button Cocking Handle
Protective
Cap
Needle Handle

Key Features
14
SFBG01 features a built-in “Bluetooth Data Transmission” function, which
enables the device to transmit measured results to paired Bluetooth
Smartphone via MedCheck Android or iOS App.
Bluetooth compatibility with blood glucose meter for Bluetooth-enabled
device is:
●Bluetooth 4.0 for Android 4.4 or above,
●Bluetooth 4.0 for iOS 8.0 or above
Note
●SFBG01 is subject to and complies with electromagnetic compatibility
(EMC) standard of IEC 60601-1-2 rules, EN 301 489-1, EN 301 489-17,
and EN 300 328 and U.S. federal guidelines, Part 15 of the FCC
(Federal Communications Commission) rules for devices with RF
capability. These guidelines help ensure that your device will not affect
the operation of other nearby devices. Additionally, other devices should
not affect the use of your device.
●Other wireless devices that are in use nearby, such as a cell or mobile
phone, or a wireless network, may prevent or delay the transmission of
data from your device to paired Bluetooth device. Moving away from the
source of the interference or turning off these devices will resolve the
problem.
●Make sure SFBG01 and paired Bluetooth device are within acceptable
distance (no more than 5 meters) with each other. If not, put them closer.
About Bluetooth Transmission Function
The Bluetooth transmission function might not be workable to some
Bluetooth devices because of the compatibility of operation system, and/
or hardware specification.
Please ensure the compatibility before using the Bluetooth data
transmission function.
Bluetooth Data Transmission

Key Features
15
Component Description
Meal Comment Function enables our user to add pre-meal or post-meal
symbols on each test result. AC symbol represents pre-meal results,
while PC symbol represents post-meal results.
It benefits user to better manage the glucose control plan and also your
healthcare professional by providing data when diagnosing and prescribing.
Follow below steps to activate Meal Comment Function:
Under Standby Mode (Right Figure), press
S button to enter Meal Comment Setting
Mode.
Our default setting is off (Upper Right).
Press Sbutton to switch the function on
(Lower Right), or off.
When done, press Mbutton and return to
Standby Mode.
1
2

Key Features
16
When having over-intake of calories or
insufficient insulin secretion, human body tends
to consume fat as energy source. In this case,
Ketone, an acid waste, is produced, which can
cause damage or cell death. Human body
accumulates excessive Ketone in blood and
excretes it through urine.
LCD screen displays Ketone Symbol when test result is equal to or higher
than 13.3 mmol/L (240 mg/dL). Do not panic, and please test again. If this
symbol shows up constantly, promptly consult your physician or medical
professional.
For users who have Type 1 diabetes, there is a possibility of ketoacidosis or
ketone accumulation.
Note
For those who do not wish to change meal comment to test results,
simply remove test strip from test strip port after measurement ends.
Meter will automatically store your test result in its memory with
previous set symbol.
With Meal Comment Function on:
Pre-meal: Test result appears with Symbol .
Post-meal: Our default setting. Test result appears with Symbol .
When measurement ends, users can replace or Symbol by
pressing S button, depending on their physical status.
Ketone Warning

Get Ready for Testing
17
The meter uses 2 pieces of AAA “LR03” (1.5V) Alkaline Batteries. For new
users, please insert 2 new batteries before use, and please replace old
batteries with new ones when Low Battery Symbol shows up
To avoid inaccurate results caused by electromagnetic interference
between electrical and electronic equipments, do not use the device
near a mobile phone or microwave oven.
Note
If the symbol flashes, that means the power is too low to work.
Previously stored memories will not be erased when batteries are replaced.
After batteries are replaced, please reset year, date and time again.
All batteries used must be the same type. Do not mix alkaline, standard
(carbon-zinc) or rechargeable (cadmium) batteries
Do not mix new and old batteries.
To save the power, please take out the batteries if you do not use the meter
for a long period (approx. 2 months or more).
Batteries are hazardous waste. Do not dispose of them together with the
household garbage. Please discard worn-out batteries to the recycling site
according to local regulations.
Battery Installation
Slide battery cover
from back of meter.
Install 2 new AAA alkaline
batteries in accordance
with correct polarities.
Put the battery cap
back.

Get Ready for Testing
18
Presetting Date/ Time/ Unit
Please pre-set your meter whenever you insert or replace the batteries.
See following steps for details.
Under Standby Mode, press and hold M
button for 3 seconds to enter Setting Mode.
Note: After battery replacement, meter
automatically activates Setting
Mode.
When YEAR digits flash, press S button to
select current year. When done, press M
button to confirm.
To complete date and time settings, repeat
above steps by setting MONTH, DATE,
HOUR and MINUTE in sequence.
After setting the correct year, select
preferable unit by pressing S button.
When done, press M button to confirm.
1
2
3
M
S

Get Ready for Testing
19
Note
●After the screen displays the symbol, press Mbutton, you can return
to the Code Setting Mode.
●Before measurement, make sure the code number on the vial matches
number you set in order to get an accurate result.
●After inserting a new strip, user can directly activate Code Number
Setting Mode by pressing Mbutton. Follow above two steps to
complete setting.
Setting Test Strip Code Number
There are two ways to set the strip code: 1)
press Sbutton for 3 seconds in standby
mode or 2) insert the strip at any time and
press the M button.
LCD displays upper right figure, adjust
numeral digit per following steps:
●Press S button to adjust numeral digits until
it matches with code number printed on the
Test Strip vial.
●When done, press M button to confirm.
C03
C03
M
S

Quality Control of the System
20
C03
C03
M
S
Using Glucose Control Solution (Sold Separately)
The purpose of SFCS01 Glucose Control Solution is to perform a quality
control test to verify whether your meter and test strips are working together
properly. Please contact Smartfuture Pte Ltd or local distributor to buy
SFCS01 Glucose Control Solution.
There are two levels of Glucose Control Solutions for different acceptable
ranges: High Level and Low Level. We recommend testing with both levels of
Glucose Control Solution.
●How does it work?
A known amount of glucose in the control solution reacts with SFTS02
Blood Glucose Test Strip.
●Who or when to perform a control solution test?
Strong impact on the meter.
When your symptoms do not agree with the way you feel, or when the
result is higher or lower than expectation.
Whenever users wish to check whether Blood Glucose Test Strip and
Blood Glucose Meter are working properly.
Insert test strip into test strip slot.
Meter displays previous set Code Number.
Check whether the code number on the vial
match with the code number displayed.
If not, see “Setting Test Strip Code Number”
section to adjust it.
1
2
Note
For accurate results on both blood glucose measurements and quality
control tests, use SFCS01 Glucose Control Solution only.
Results of quality control tests will not be stored in the memory.
M
S
Table of contents
Popular Measuring Instrument manuals by other brands

Aquametro
Aquametro AMTRON X-50 Mounting and operating instructions

AutomationDirect
AutomationDirect ProSense DPM1 Series user manual

Promax
Promax RANGER Neo 2 user manual

red lion
red lion PAX2A installation guide

ECU Master
ECU Master EGT to CAN user manual

EGAmaster
EGAmaster COD.66265 operating instructions