Medema MC Concept 1121 User manual

P9-0220-B ver. 2.0.2 - March 2011 GB
Quick guide
MC Concept 1121
medemagroup

Quick guide P9-0220-Q 2 of 24 Version 2.0.2/2011
Medema Production A/S

Quick guide P9-0220-Q 3 of 24 Version 2.0.2/2011
Medema Production A/S
Contents
Quick Guide - MC Concept 1121 .............................................................4
Introduction................................................................................................4
Part names.................................................................................................5
Joystick parts ............................................................................................6
Operating....................................................................................................6
Clock on/off ............................................................................................7
Set Speed...............................................................................................8
Setting the seat - back and leg supports................................................9
Light on / off..........................................................................................10
Setting the display environment...........................................................11
Setting the Clock..................................................................................12
Error Code................................................................................................14
Charging...............................................................................................15
Safety check.............................................................................................16
Serial number...........................................................................................16
Driving the MC Concept 1121.................................................................17
11 tips for driving the MC Concept:......................................................18
Driving on public roads:........................................................................19
Driving on stairs/escalators:.................................................................19
Brakes.......................................................................................................20
Motor braking: ......................................................................................20
Parking brake:......................................................................................20
Disengagement:...................................................................................20
Your own notes:.......................................................................................22

Quick guide P9-0220-Q 4 of 24 Version 2.0.2/2011
Medema Production A/S
Quick Guide - MC Concept 1121
Introduction
Congratulations on your new MC Concept 1121 electric mobility wheelchair.
You are now the owner of an electric mobility wheelchair developed for use
indoors as well as outdoors. It is what is called a Class B vehicle according
to the European classification of electric wheelchairs.
For optimum enjoyment of this vehicle - and to avoid breakdowns and
accidents - we recommend that you read the User Manual carefully. If you
are a new user, you should pay particular attention to the section “Driving
the MC Concept 1121”.
Note:
This Quick Guide is to be regarded as a supplement to the User Manual.
The information in the Quick Guide cannot, therefore, be expected to be
complete.
NB: Errors and omissions excepted. Specifications subject to change.
We reserve the right to update this guide as required.
Warning!
The vehicle must not be lent to persons who are not completely familiar
with it.
The vehicle is designed for one person only.
Max. user weight 150 kg. The vehicle can be specially adapted at the
factory for users weighing up to 180 kg.
Mini Crosser A/S is not responsible for any damage or injuries caused by
inappropriate or unsafe use of the MC Concept 1121.
Quick guide P9-0220-Q 5 of 24 Version 2.0.2/2011
Medema Production A/S
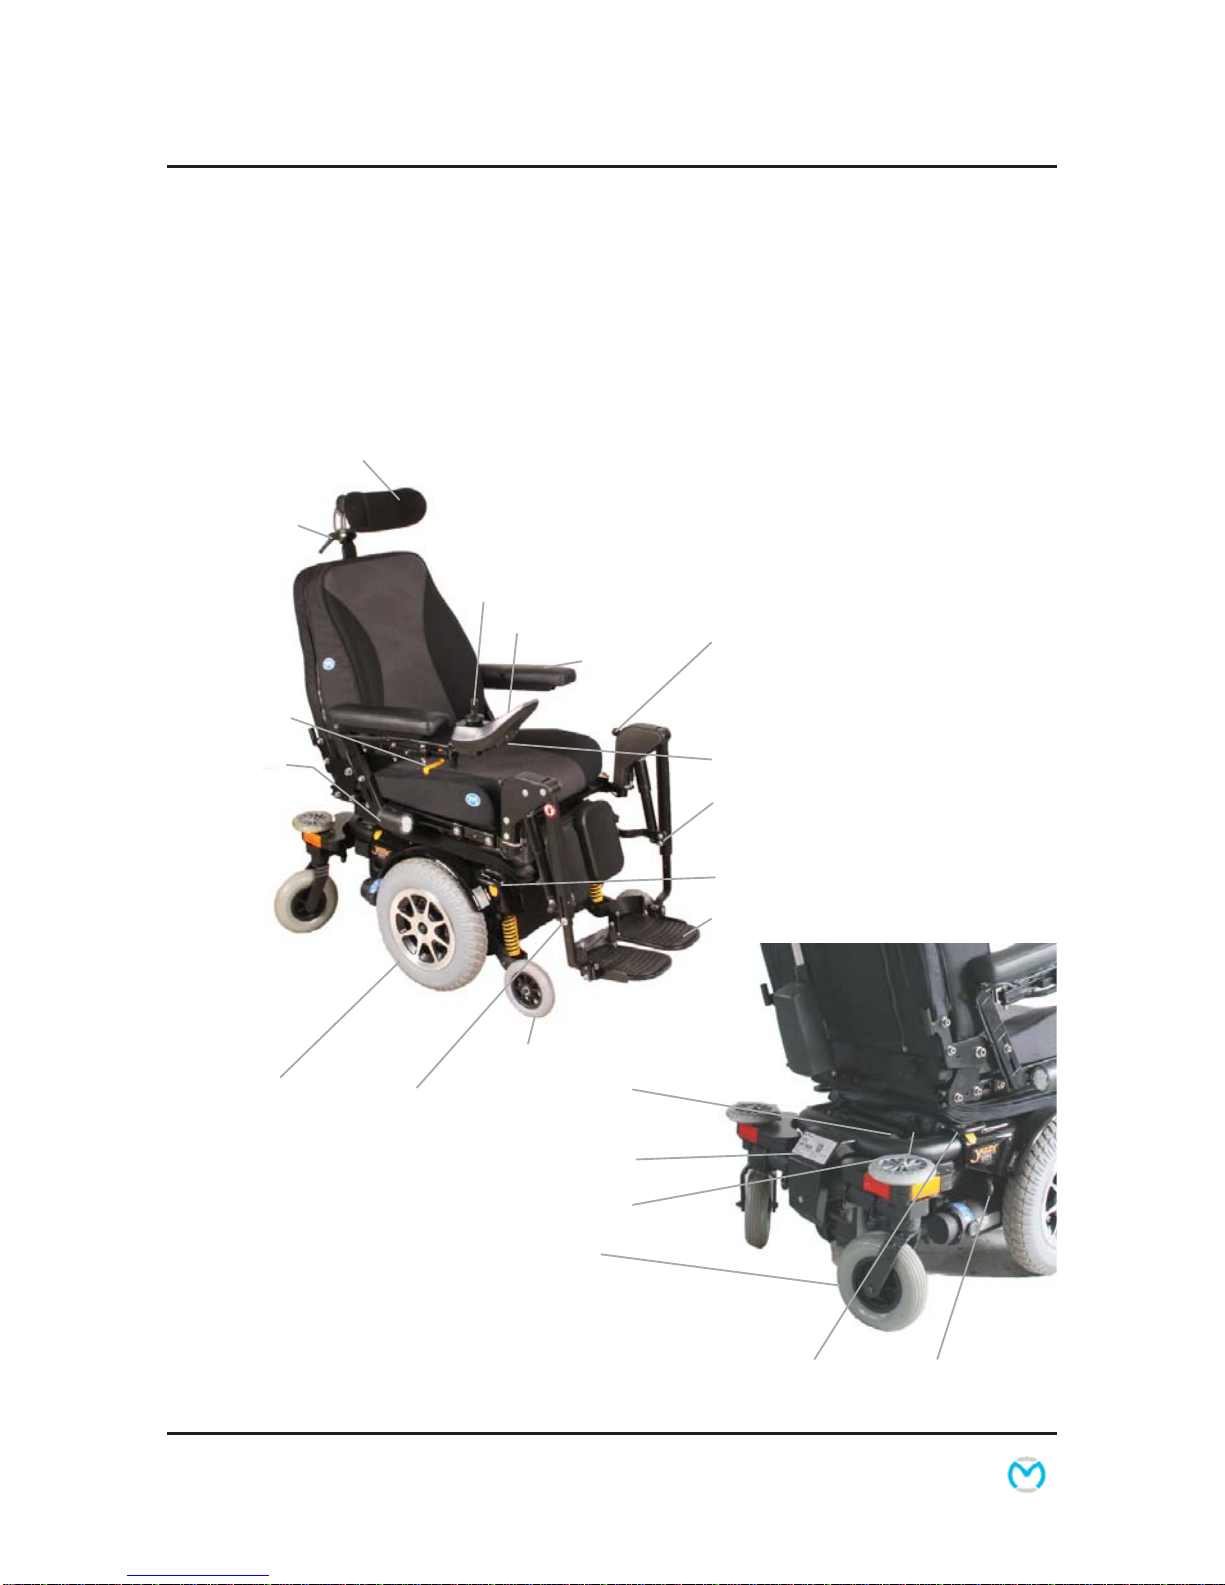
Part names
The part names given below refer to the descriptions later in the this guide.
Disengagement
lever. Both sides of
the vehicle.
Pivot wheel
Central
wheel
Anti-tilt wheel
Footplate or footrests
Charging socket
Serial number on
vehicle
Control panel
Armrest
Joystick
Indicators
(optional extra)
Swing-away
release
Headrest
Thermal fuse
to right of serial
number plate
Finger screw to
loosen seat
Eye for restraints
Adjusting the
headrest
Release for
leg supports
Leg length
adjustment
Calf pad
adjustment
Eye for restraints

Quick guide P9-0220-Q 6 of 24 Version 2.0.2/2011
Medema Production A/S
Joystick parts
Dynamic DX2 AJR 1 Start/stop button
2 Indicator left
3 Indicator right
4 Select
5 Display
6 Speed selector
7 Accessory Selector
8 Horn
Operating
At the top of the display you will find the status bar. Battery indicator is
displayed constantly. The clock can be turned on or off as you wish. The
other is lit when the corresponding function is active.
1 Battery indicator
Green = fully charged
Yellow = least half full
Red = almost empty - charge now!
2 Indicator left is active
When hazard warning lights are active, both icons blinks.
3 Lights on
4 Error code - see section on error codes.
5 Indicator right is active
When hazard warning lights are active, both icons blinks.
6 Real time
1
3
5
4
7
8
2
6
1 2 3 4 5 6

Quick guide P9-0220-Q 7 of 24 Version 2.0.2/2011
Medema Production A/S
Clock on/off
Press arrow up/down or joystick (push forward) until the above icon is
showed in the center of the screen.
Use ”Select” to switch between X and .
Accept by pressing the arrow up/down button.

Quick guide P9-0220-Q 8 of 24 Version 2.0.2/2011
Medema Production A/S
Set Speed
When you turn the joystick on, the image shown below will be presented in
the display. The number in the centre shows the speed you have chosen as
max speed. Change the Speed by selecting the plus / minus key. Maximum
speed is 5, lowest is 1.
Find the features in the bottom with the “Select” button.
Chosen speed
Select

Quick guide P9-0220-Q 9 of 24 Version 2.0.2/2011
Medema Production A/S
Chosen speed
Press the arrow up / down until the image shows the chair. Use the “Select”
to choose the function you want modified. Use the joystick to change
example angle of the seat back.
Setting the seat - back and leg supports
Select
Function Icon
Seat angle (Tilt)
Backrest angle
Seat height
Left footrest
Function Icon
Right footrest
footrest both
Lying down
Headrest
Only the available options will be displayed.
Quick guide P9-0220-Q 10 of 24 Version 2.0.2/2011
Medema Production A/S
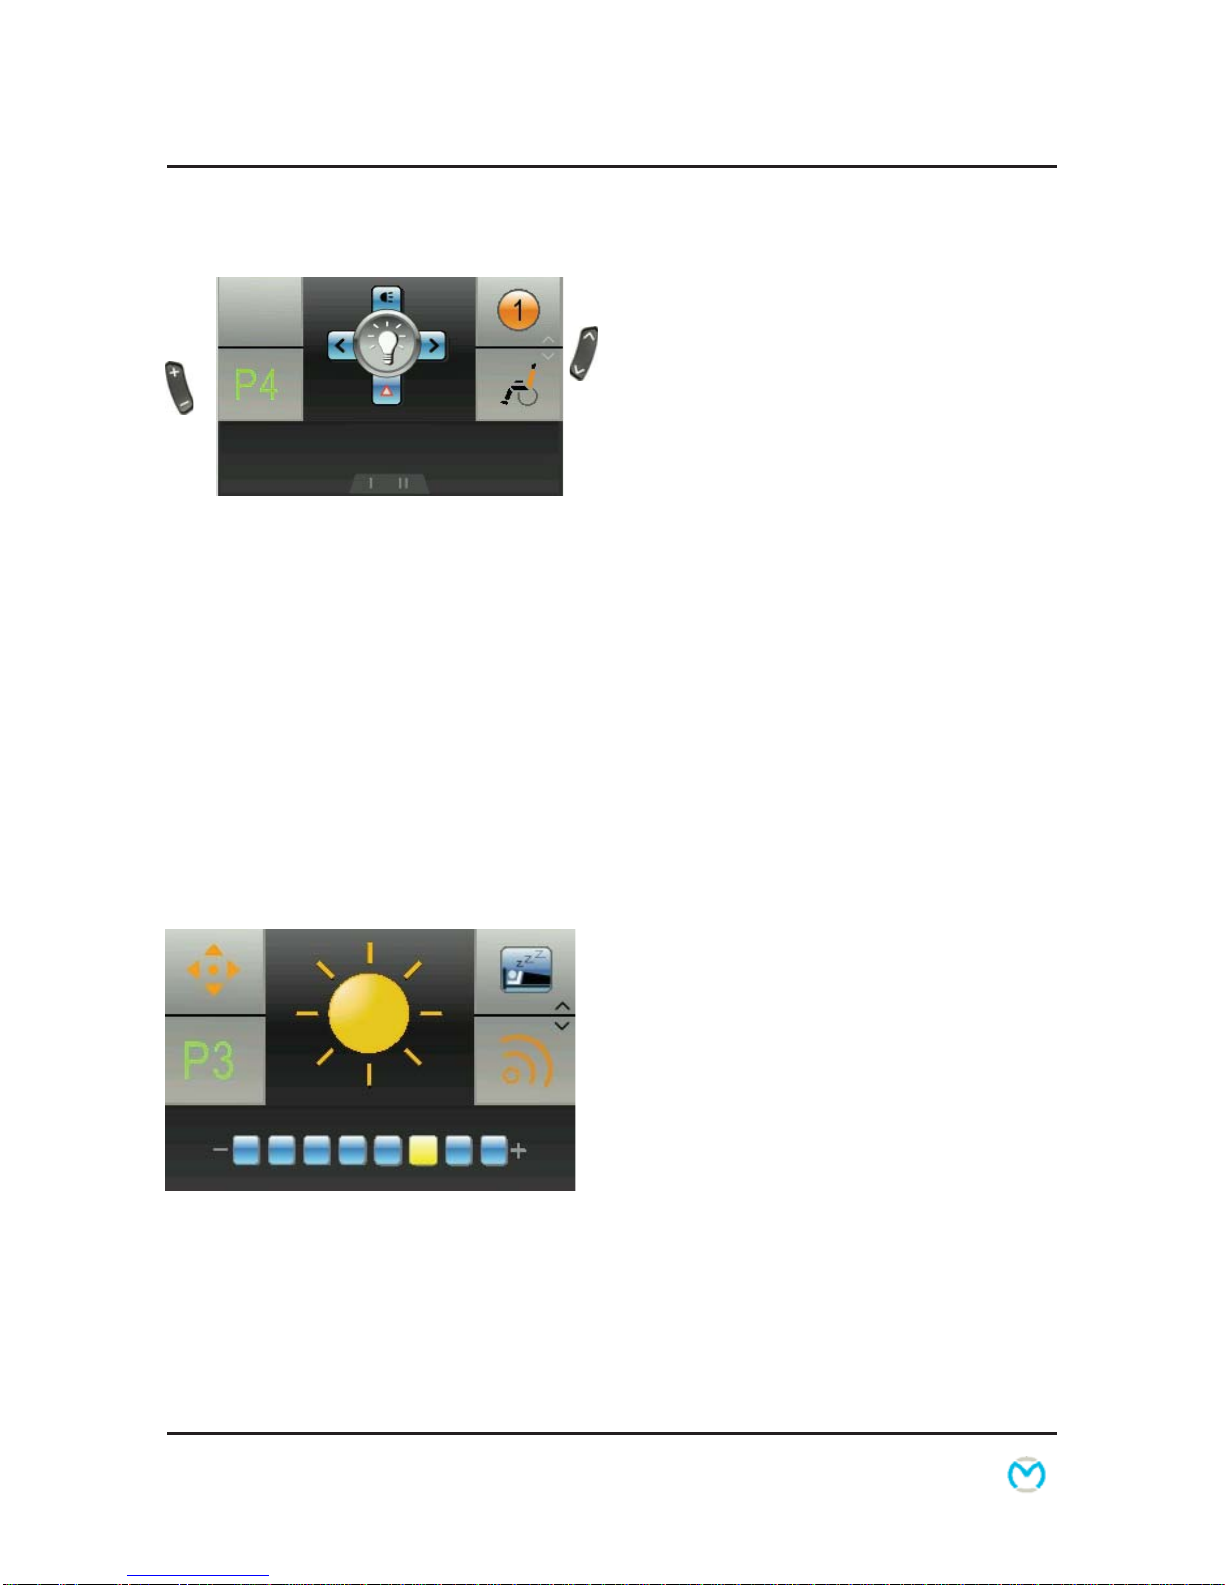
Light on / off
Push the arrow up / down until the image for light is shown in the centre.
Push the joystick forward to turn the light on. And again to turn of the light.
Push the joystick back to activate the hazard warning lights. Push the
joystick back again to turn it of.
Push the joystick right or left to activate the indicators right or left. Turn of
the indicators by puching the joystick to the same side again.
Press the arrow up / down until the sun i shown i the centre. Push the
joystick forward to enter the settings. Use the Select button or joystick right
/ left to change the brightness.
Use Joystick forward / back or arrow up / down to accept the new settings
and return to the main menu.

Quick guide P9-0220-Q 11 of 24 Version 2.0.2/2011
Medema Production A/S
Setting the display environment
Use the arrows up /down until “day / night” icon i shown in the centre. Push
the joystick forward to enter settings. The image below will show.
1 2 3
Setting Result
1 - Indoor The display will show a black background color.
2 - Outdoor The display will show a white background color.
3 - Automatic The background color will change (black/white) accordingly to the
surrounding light.
Use ”Select” or joystick right / left to select setting.
Push the joystick forward to accept the new settings and return to the main
menu.
If you push the Joystick back or use the arrow up / down, the new setting
will be dismissed and you will return to the main menu.
Exit / Cancel
Exit / Cancel
Quick guide P9-0220-Q 12 of 24 Version 2.0.2/2011
Medema Production A/S
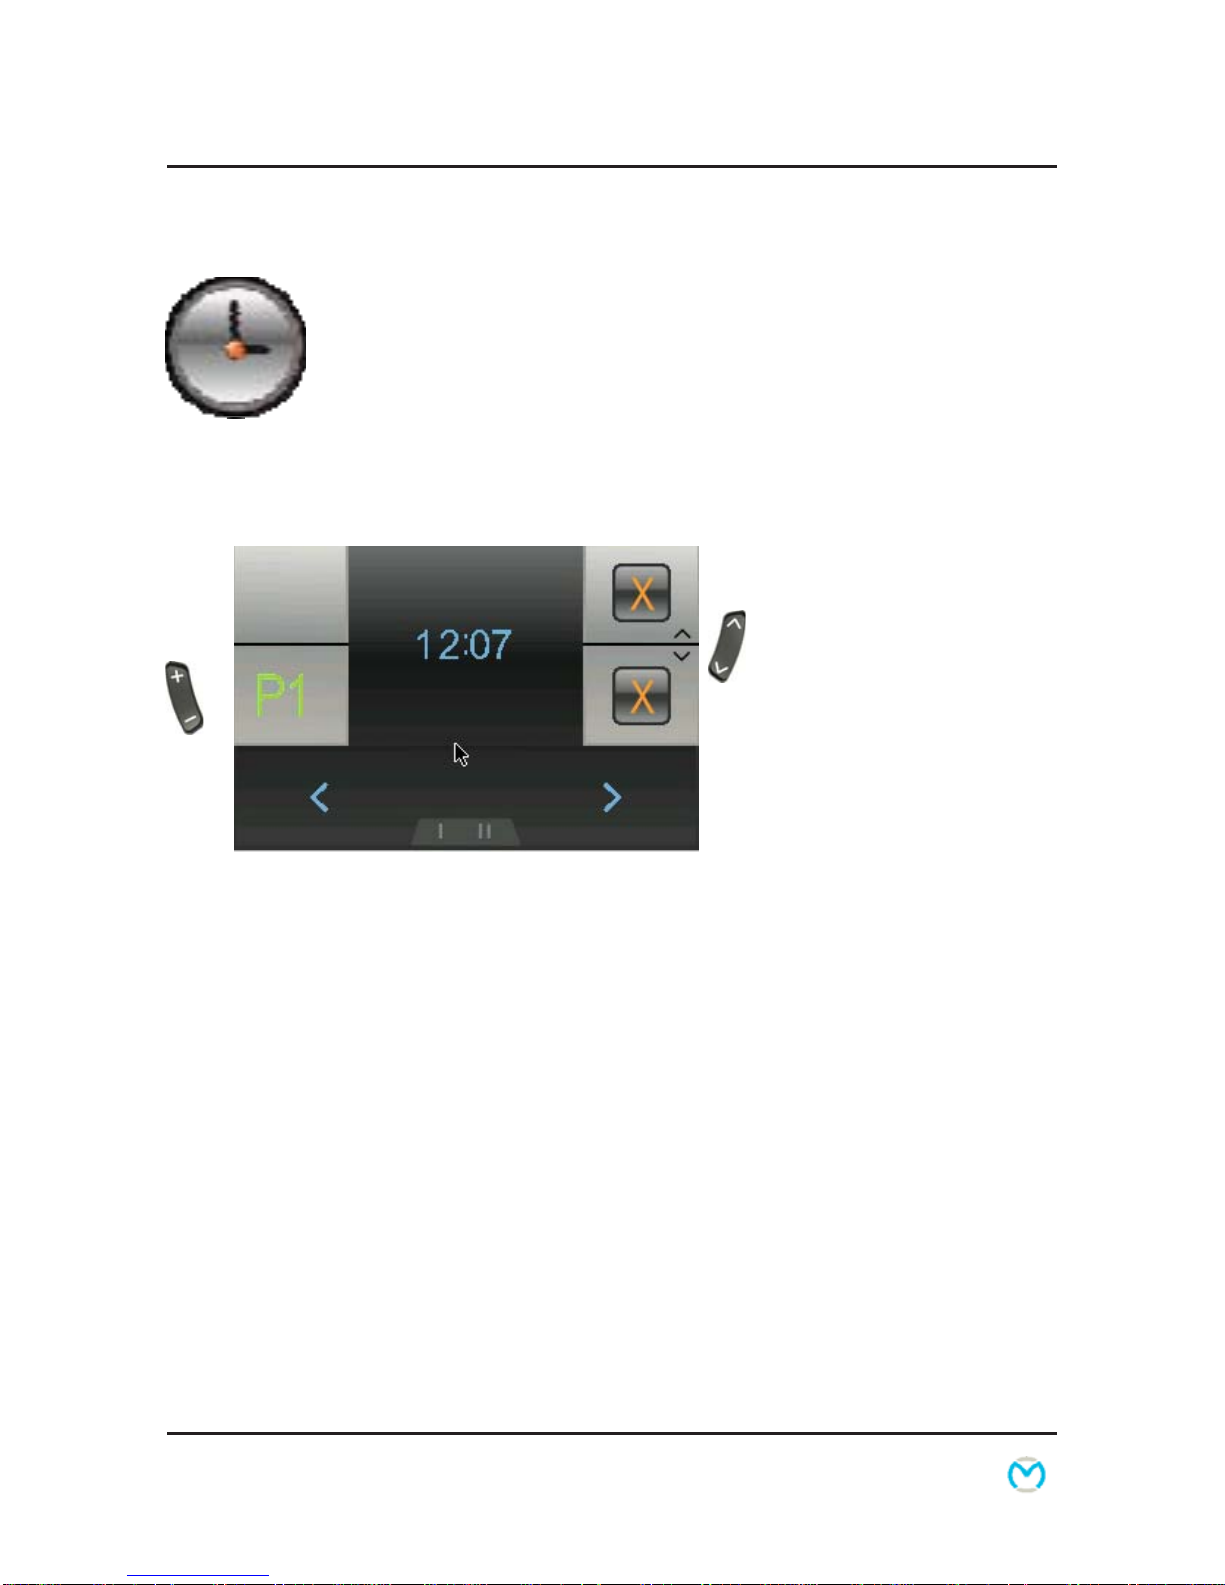
Setting the Clock
Use arrow up / down until the clock is shown in the centre. Push the
joystick forward to enter settings. The image below will show.
Press the Select button or push the joystick right / left to choose the digit to
change.
Joystick forward make the number count forward.
Joystick back accept the new settings and return to the main menu.
Arrow up / down dismiss the new settings and return to the main menu.

Quick guide P9-0220-Q 13 of 24 Version 2.0.2/2011
Medema Production A/S
System lock
To lock the DX system
Press the on / off button, for 4 sec. while the system is turned on. The system
will now shut down in locked condition.
To unlock the DX system
Press the on / off button. The system will show a lock in the display.
Press the horn twice within 10 seconds. The system will boot normally.
Quick guide P9-0220-Q 14 of 24 Version 2.0.2/2011
Medema Production A/S
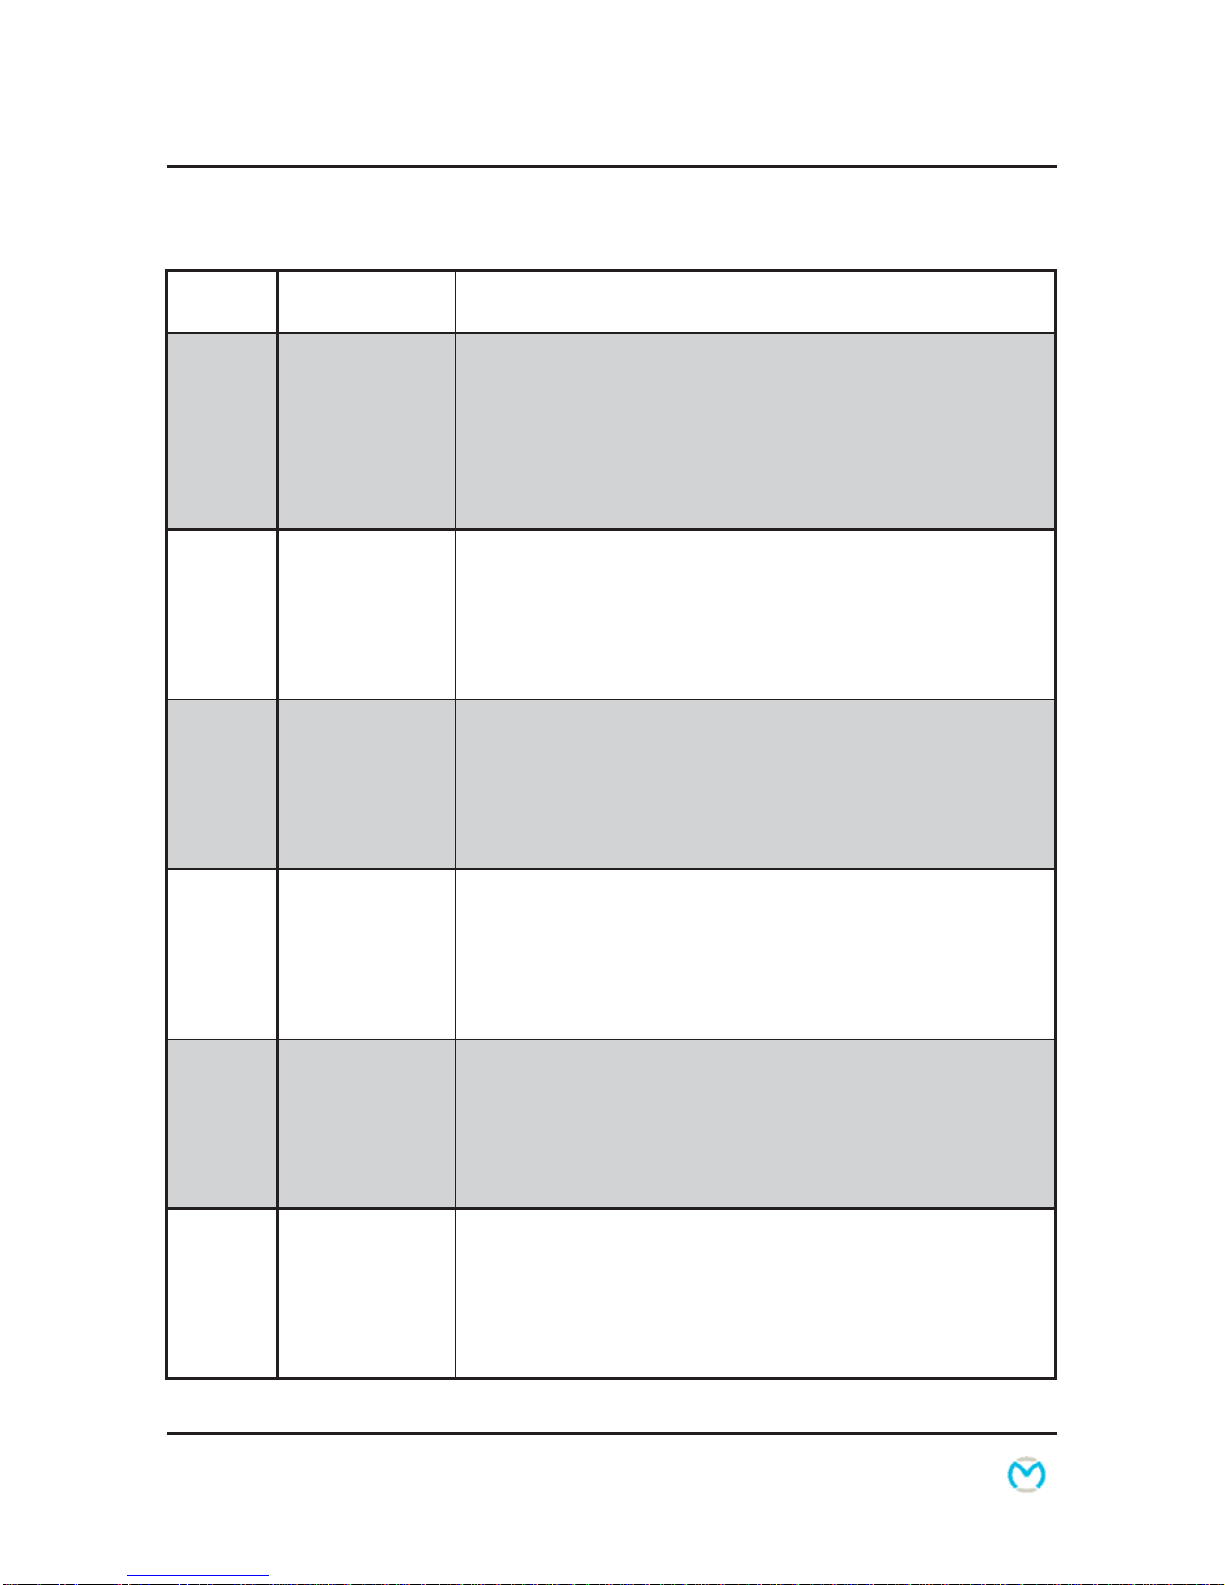
Error Code
Code Cause Meaning
1 DX Module Could mean:
- Errors in programming
- Error in wire connection
- Internal fault in a module
Turn off the chair and turn on again. If it doesn’t works,
contact qualified technician (HMC or therapist).
2 DX Accessory Could mean:
- driving slowly because of raised seat.
(programming). Not an arror.
Lower the seat as much as possible. If it doesn’t works,
contact qualified technician (HMC or therapist).
3 Motor 1 / L (M1) Could mean:
- Loose connection from the engine to power module
- Short circuit
Check that no plug is loose.
Contact competent technician (HMC or therapist).
4 Motor 2 / L
(M2) Could mean:
- Loose connection from the engine to power module
- Short circuit
Check that no plug is loose.
Contact competent technician (HMC or therapist).
5 Parking brake 1
(M1 left) Could mean:
- Loose connection
- Short circuit
Check that no plug is loose.
Contact competent technician (HMC or therapist).
6 Parking brake 2
(M2 right) Could mean:
- Loose connection
- Short circuit
Check that no plug is loose.
Contact competent technician (HMC or therapist).
Quick guide P9-0220-Q 15 of 24 Version 2.0.2/2011
Medema Production A/S
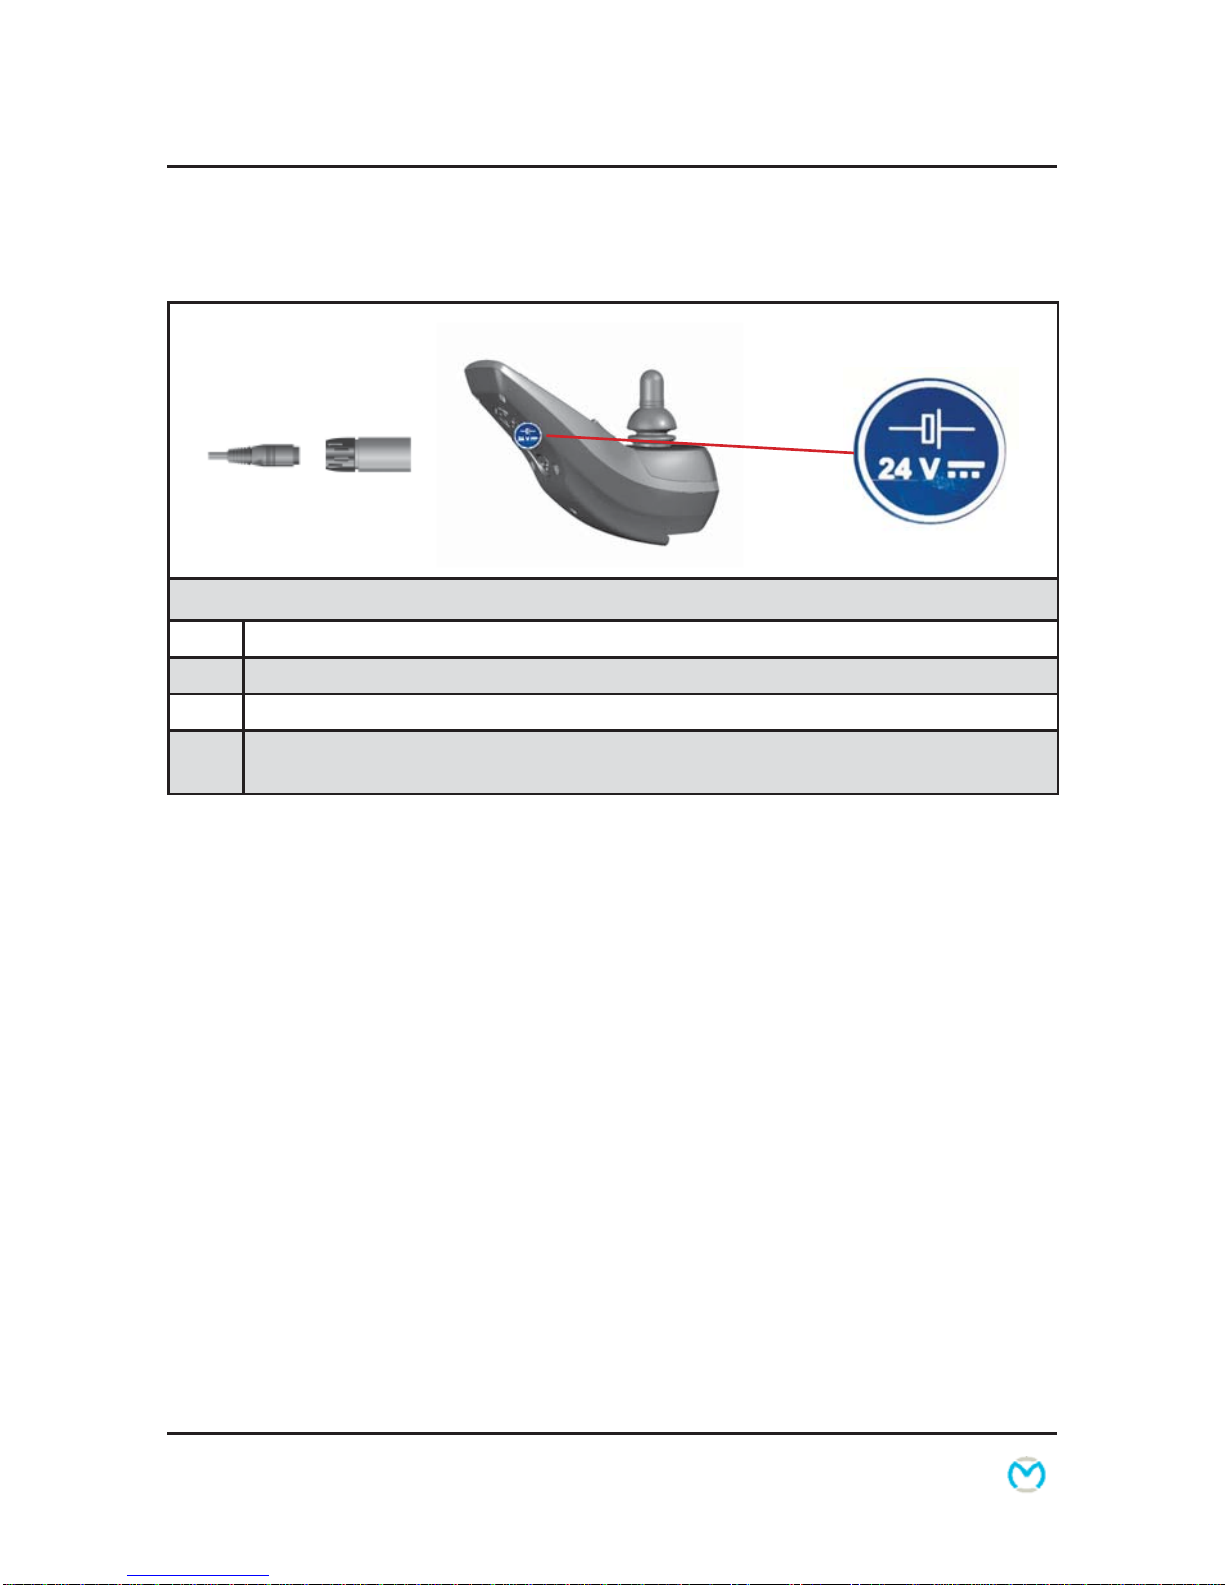
Charging
Charging
1 Plug the cable into the control box on the wheelchair
2 Plug the charger into the outlet or switch it on
3 Use the indicator lights on the charger to check that charging has started.
4 When charging has finished, switch off or unplug the charger, and then remove the
charger cable from the control box.
You are recommended to charge the batteries every night after you have
used the wheelchair. (Further information in the User Manual)
Note:
If the batteries are damaged or are leaking, you should avoid touching them
because you may burn yourself.
Contact a qualified workshop immediately!
Old batteries must be delivered to an approved facility for safe disposal.
Further information in the User Manual.

Quick guide P9-0220-Q 16 of 24 Version 2.0.2/2011
Medema Production A/S
Safety check
See the User Manual
Serial number
All wheelchairs have a serial number plate showing the year of production,
month and serial number. The same serial number can also be found on
the front of the User Manual.
Please quote the serial number when making inquiries about
servicing, spare parts, etc.

Quick guide P9-0220-Q 17 of 24 Version 2.0.2/2011
Medema Production A/S
Driving the MC Concept 1121
Before getting on or off the vehicle, you must check the following:
A. That the wheelchair is switched off and that it is not disengaged.
B. That the wheelchair and the seat you are moving to are both stable.
C. Avoid placing your full body weight on the footrests. This may tip
the wheelchair forwards.
While driving, you must place your arms on the armrests and your feet on
the footrests.
Cables and leads must be fixed using ties.
Never attempt to climb onto raised objects or kerbs higher than 7 cm, and
always approach changes of level head on, with the front and back wheels
moving in a straight line.
Warning!
The seat should NEVER be hoisted while driving on uneven surfaces,
slopes or up and down kerbs. The higher the seat is raised, the more
unstable the chair becomes.
Note:
If your MC Concept/vehicle is fitted with a docking system from Dahl
Engineering, note that the clearance changes to
5.5 cm.
See the User Manual for details about driving on hills, inclines and declines,
and driving on public roads.

Quick guide P9-0220-Q 18 of 24 Version 2.0.2/2011
Medema Production A/S
11 tips for driving the MC Concept:
• Reduce the speed when turning corners and also when going downhill.
• Reduce the speed when driving on inclines. Max. incline = 10° = 17%
• Reduce the speed when driving on a sideways incline.
Max. sideways incline = 10°
• Avoid driving and parking in the rain.
• Avoid parking on snow and ice.
• Always park on a level (flat) surface.
• Avoid driving off-road.
• Avoid driving on icy surfaces, or smooth surfaces (for example snow or
freshly mown grass).
• Never attempt to climb kerbs higher than 7 cm. If the wheelchair has a
docking system, the clearance is reduced to 5.5 cm.
• Avoiding driving over kerbs diagonally. There is a risk of tipping over.
• Not to be used for towing other vehicles, etc.
Note:
Do not drive the MC Concept when under the influence. This applies to
both medicine and alcohol.

Quick guide P9-0220-Q 19 of 24 Version 2.0.2/2011
Medema Production A/S
Driving on public roads:
When driving on public roads, footpaths, pedestrian streets, car parks,
shopping centres, etc. you must make sure you adjust your speed and
distance for other users. At 7 km/h you must follow the traffic rules
applicable to cyclists. This also means that your lights must be switched on
during lighting-up time. (Optional extra)
On footpaths, the maximum speed is 6 km/h. In this situation you are
regarded as a pedestrian.
Note:
You should assume that other road users cannot see you while you are
sitting in the MC Concept. So take great care and wait for the road to clear
before crossing.
Driving on stairs/escalators:
The wheelchair is not designed for use on stairs or escalators and any
attempt to do so may cause serious injury to yourself and others.

Quick guide P9-0220-Q 20 of 24 Version 2.0.2/2011
Medema Production A/S
Brakes
The MC Concept is equipped with two sets of brakes: the motor brake and
the parking brake.
Motor braking:
When you drive downhill, the control unit of the MC Concept applies the
motor brake.
Parking brake:
When the vehicle is stationary and the joystick is not moved, a magnetic
brake is automatically applied to each drive unit.
Note:
You must NEVER brake the MC Concept by switching off with the 1/0
button while moving, as this applies the magnetic brake with considerable
force, with a resulting risk of tipping.
Disengagement:
The MC Concept is equipped with two disengagement levers, one on each
side of the vehicle. Always disengage on both sides.
Warning!
When the wheelchair is disengaged, the braking system is deactivated.
You must NEVER disengage on sloping terrain
Table of contents
Other Medema Mobility Aid manuals


Popular Mobility Aid manuals by other brands


Sunrise Medical
Sunrise Medical GEMINO 30 user manual

Mobilex
Mobilex Kakadu user manual

Rehab and Mobility Products
Rehab and Mobility Products RM533 Assembly instructions

Bestcare
Bestcare BESTSTAND SA228 manual

Ossenberg
Ossenberg KLASSIKER Instructions for use

Moretti
Moretti MOPEDIA RP754S instruction manual


