Media Technologies SimpleSpec 300.43 User manual


Overview
Create a private space, contain
sound, and build a more comfortable
environment with this absorptive,
wall mounted, modular tile system.
Sound Mosaic is a series of
lightweight tiles made from Sola
Felt and boasts an NRC rating of .80.
Use Sound Mosaic to create unique
features that will leave a lasting
impression.
Available Sizes and Shapes
24"
24"
Sound Mosaic 2'2'
24"
24"
Sound Mosaic Triangle 2'2'
12"
12"
Sound Mosaic 1'1'
12"
24"
Sound Mosaic 1'2'
12"
36"
Sound Mosaic 1'3'
12"
48"
Sound Mosaic 1'4'
For more information, please visit mediatechnologies.com 1
Installation Manual
Sound Mosaic
SimpleSpec 300.43TM


Contents Overview
1⅝"Drywall Screw
385110
Required Tools
PH2 BitDrill PencilLaser Level
Installation
Preparation
Determine placement of Sound Mosaic feature. Mark a level bottom line on the wall.
a
Sound Mosaic
(Number, size and shape according to coniguration)
For more information, please visitmediatechnologies.com 3
Installation Manual
Sound Mosaic
SimpleSpec 300.43TM
Installation
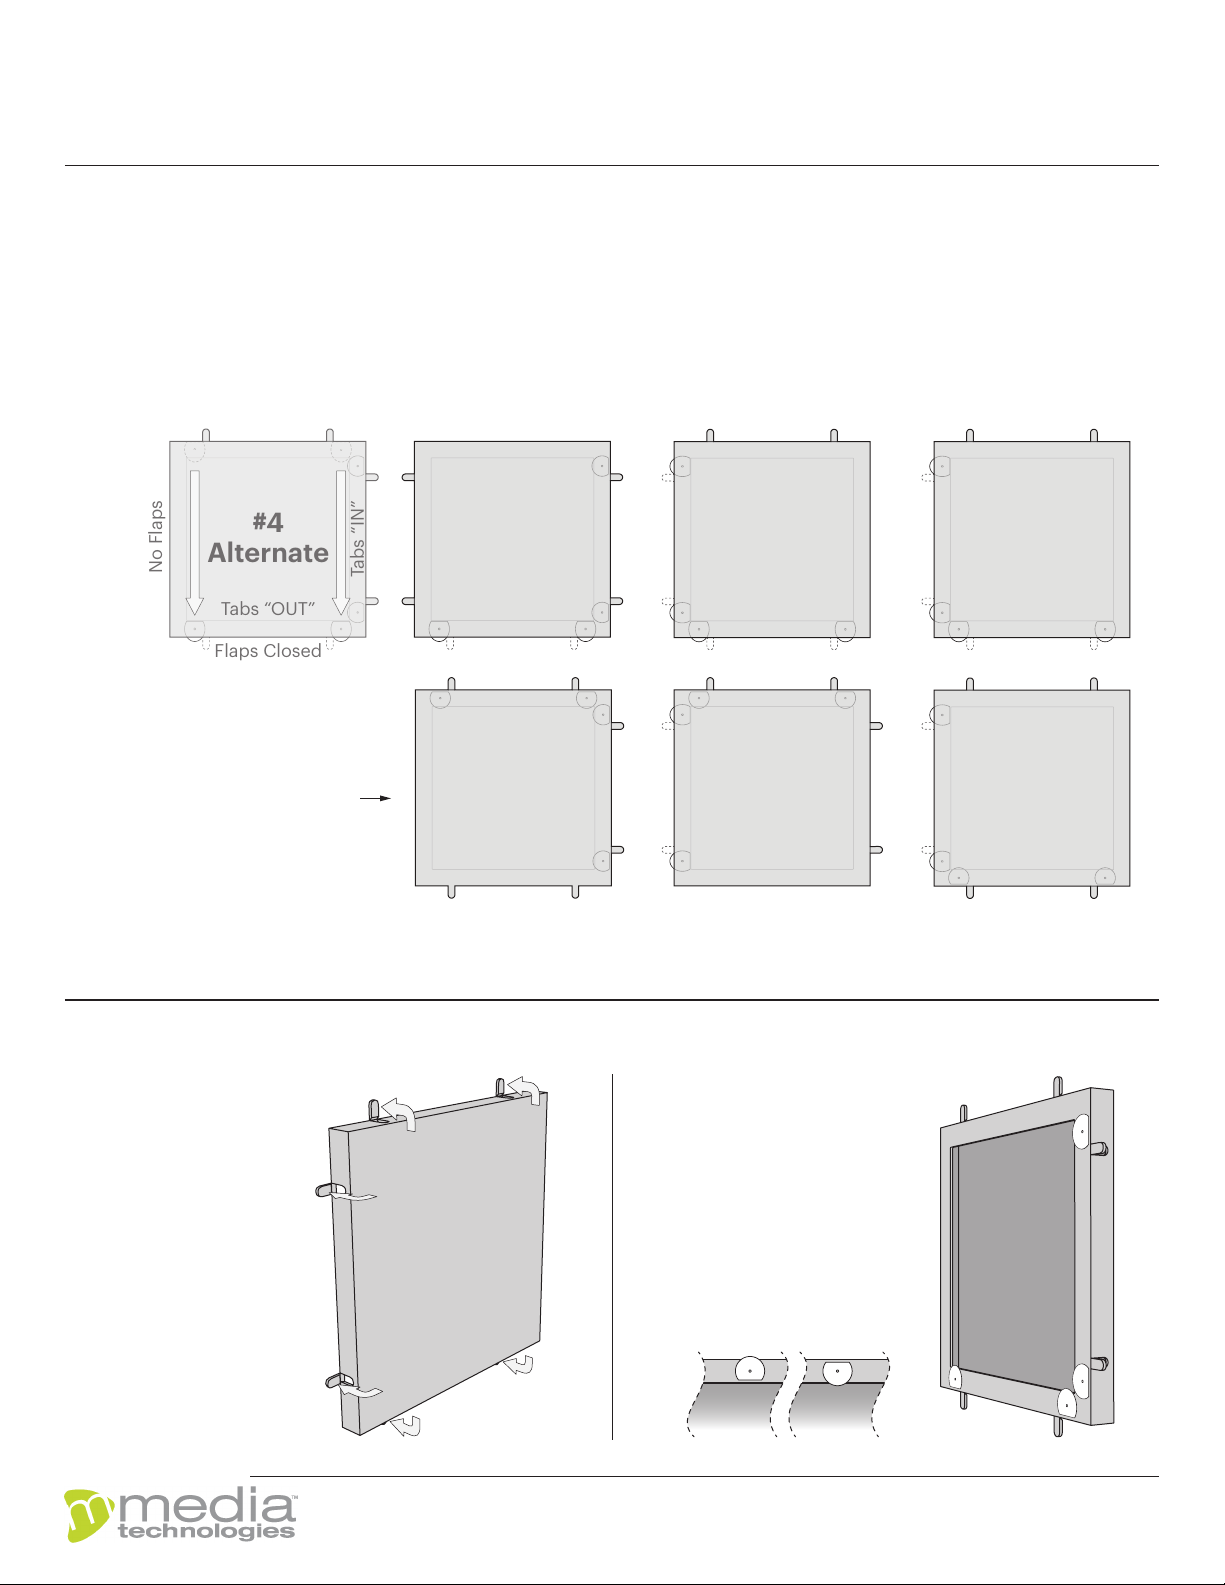
"IN""OUT"
bEnsure that steel tabs are all
rotated to the “in” position
on the irst Sound Mosaic.
Open the felt laps
on all (3) sides of
the irst Sound
Mosaic.
a
breference this diagram as you prepare the Sound Mosaic for installation. Install starting at the bottom left corner (#1) ,
installing the first row of blocks, then install additional rows starting from the left side.
No Flaps
No Flaps
No Flaps
Flaps Closed
Flaps Closed
Tabs “IN”
Tabs “IN”
Tabs “OUT”
Tabs “IN”
Tabs “IN”
Tabs “OUT”
No Flaps
No Flaps
No Flaps
Tabs “IN”
Tabs “OUT”
Tabs “OUT”
Tabs “OUT”
Tabs “OUT”
Tabs “OUT”
Flaps Closed Flaps Closed
Flaps Closed
Flaps Closed
Flaps Closed
Install this
block first
Install this
row first #1
#2 #3
#6#5#4
Flaps Closed
No Flaps
Tabs “IN”
Tabs “OUT”
#4
Alternate
Preparation cont. . .
Install First Sound Mosaic
Note: If it is visually important to have no laps showing on the sides of the system, rotate the irst block on rows 2+ and
relocate the steel stabs to the bottom (See #4 Alternate below).
For more information, please visit mediatechnologies.com 4
Installation Manual
Sound Mosaic
SimpleSpec 300.43TM

Installation
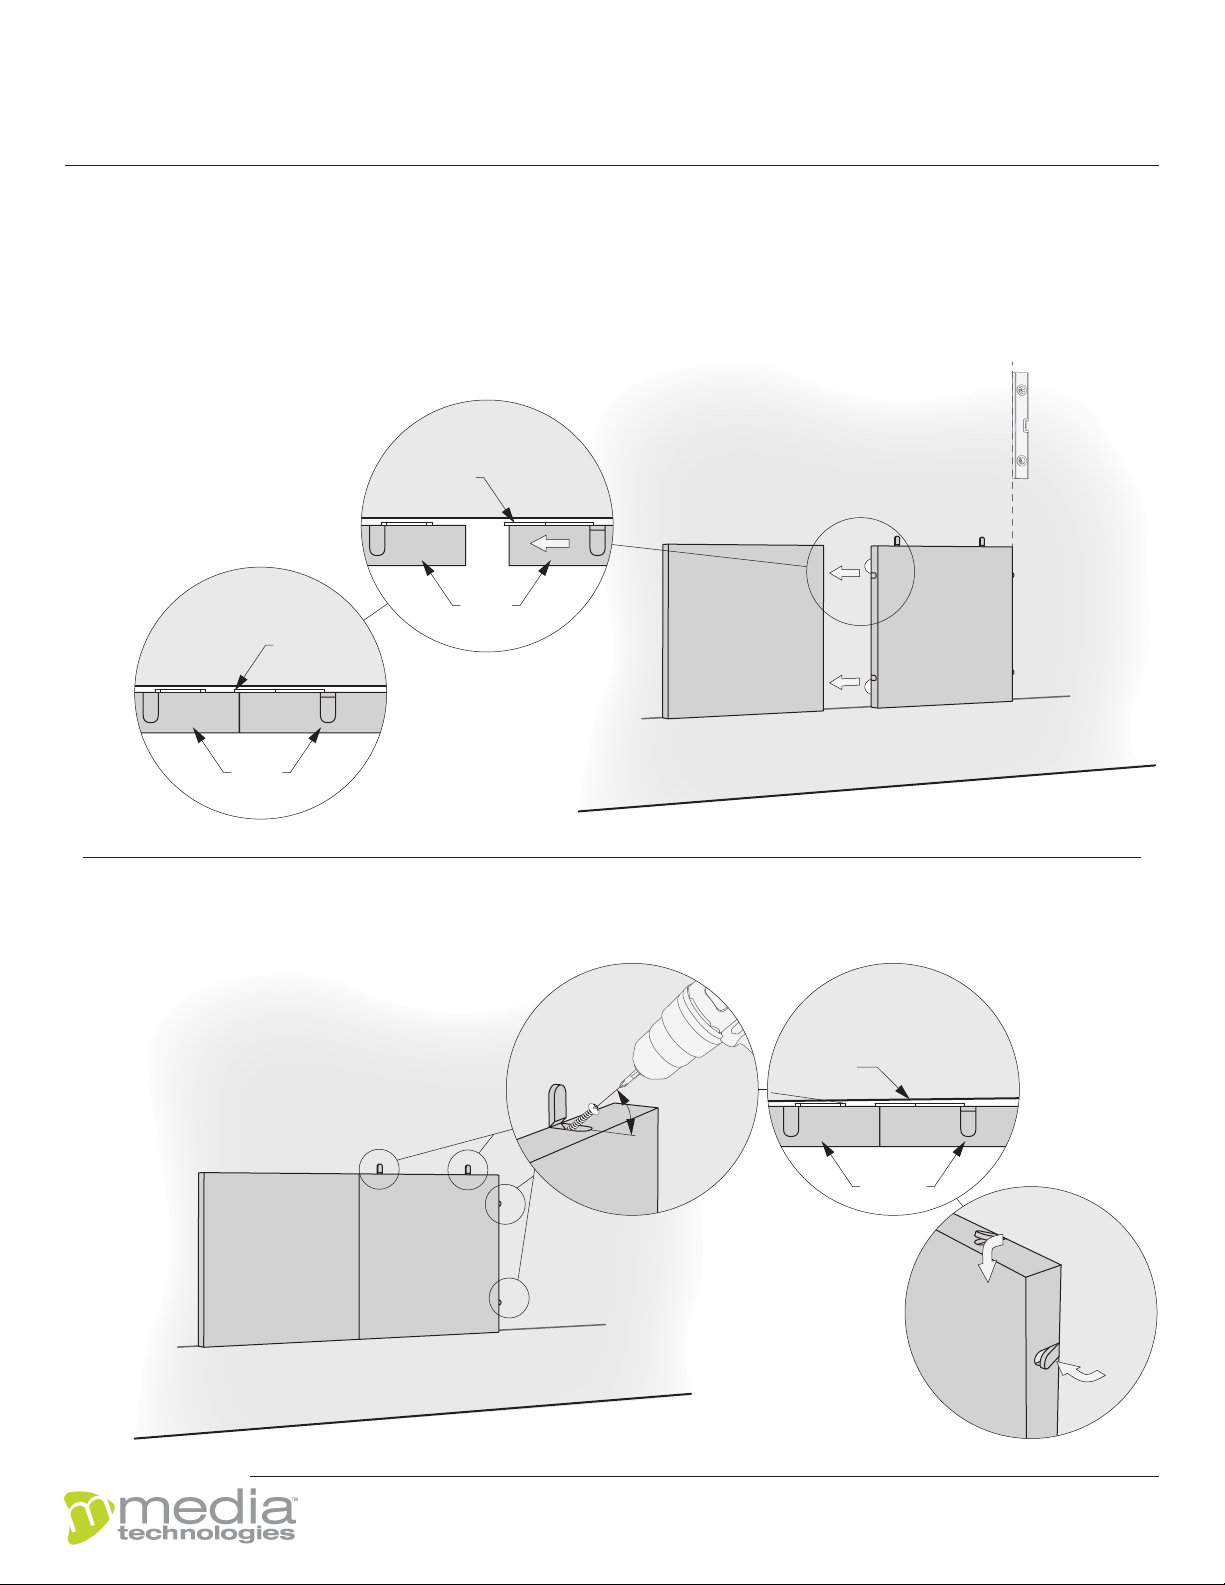
*Double verify
edge of Hush
Block is plumb
40°
3-85-110
1
2
Starting at the bottom left corner, position the block so the side without felt laps is on the visible outside edge of the
feature and the bottom of the block is even with the line drawn on the wall.
1Secure in place with 1⅝" drywall
screws (3-85-110). Fasten all
available sides with screws
and make sure block is secure
and flush to the wall.
2Close felt laps until
lush with the block.
c
Install First Sound Mosaic cont. . .
"IN""OUT"
To install the next block, rotate the steel tabs that will be
adjacent to the irst block you installed to the “out” position
and ensure the other tabs are rotated to the “in” position.
a
Install Bottom Row of Sound Mosaics
Flush
On the side where the steel
tabs are “out”, the felt laps
should be closed/lush. On
the other sides the felt laps
should be open.
For more information, please visit mediatechnologies.com 5
Installation Manual
Sound Mosaic
SimpleSpec 300.43TM
Install Bottom Row of Sound Mosaics cont...
*Double verify
edge of Sound
Mosaic is
plumb
Wall
Sound
Mosaics
Steel
Tabs
1
Wall
Sound
Mosaics
Steel
Tabs
2
bSlide tabs behind irst
block until lush and tight.
Installation
c
3
Wall
Sound
Mosaics
Shim
under
screw
#1 #2
2
40°
1
3-85-110
1Proceed to install drywall screws
into all available openings.
2Shim if necessary to make sure
front faces of blocks are lush.
3Close felt laps until
lush with the block.
For more information, please visit mediatechnologies.com 6
Installation Manual
Sound Mosaic
SimpleSpec 300.43TM

Installation
Install Remaining Sound Mosaics
aRotate the steel tabs on the bottom to the “out” position and ensure
the other tabs are rotated to the “in” position.
On the bottom the felt laps should be closed/lush. On the other
sides the felt laps should be open.
"IN""OUT"
Repeat the same process for additional blocks on the bottom row.
For best aesthetic appearance ensure the side without felt laps is on the visible outside edge whenever possible.
See diagram in Step 1.
Note: Important to check level and plumb with each new column. It is very easy for blocks to get out of alignment.
d
Install Bottom Row of Sound Mosaics cont...
For more information, please visit mediatechnologies.com 7
Installation Manual
Sound Mosaic
SimpleSpec 300.43TM

Installation
*Double verify
edge of Sound
Mosaic is
plumb
*Double verify
edge of Sound
Mosaic is
plumb
40°
1
3-85-110
2
bStart from the left side. Install the
irst block on the second row (and
subsequent rows) by sliding the
tabs behind irst block (on bottom
row) until lush and tight.
Note: If there is negative space
in the design, repeat Step 2
Install Remaining Sound Mosaics cont...
c1Proceed to install
drywall screws
into all available
openings.
2Close felt laps
until lush with
the block.
Negative Space
Negative Space
For more information, please visit mediatechnologies.com 8
Installation Manual
Sound Mosaic
SimpleSpec 300.43TM

Installation
Install Remaining Sound Mosaics cont...
Continuing toward the right side,
install the next block.
Rotate all the steel tabs to the “out”
position. On the side where the steel
tabs are “out”, the felt laps should be
closed/lush. On the other sides the
felt laps should be open.
Slide tabs behind both adjacent
blocks until lush and tight.
d
*Double verify
edge of Sound
Mosaic is
plumb
1Proceed to install drywall
screws into all available
openings as shown in Step 4c.
2Close felt laps until lush with
the block as shown in Step 4c.
e
Repeat the same process for
additional blocks and additional
rows until the entire feature is
installed.
For best aesthetic appearance
ensure the side without felt laps
is on the visible outside edge
whenever possible.
f
g
For more information, please visit mediatechnologies.com 9
Installation Manual
Sound Mosaic
SimpleSpec 300.43TM
Product Description and Speciications
Create a private space, contain sound, and build a more comfortable environment with this absorptive, modular tile system.
Sound Mosaic is a series of lightweight 24"24" tiles made from Sola Felt and boasts an NrC rating of .80.
Use Sound Mosaic to create unique features that will leave a lasting impression.
Cleaning Instructions
Sound Mosaics should be cleaned periodically. A regular,
seasonal cleaning program will dramatically help prevent
noticeable weathering and dirt build-up.
To remove airborne debris and dust, it is recommended to
periodically vacuum Sound Mosaics. Please note the slight
shedding of fibers from the felt is normal and not indicative of any
defect.
To treat liquid stains, remove spills immediately using a clean
damp cotton cloth or with detergent soap and warm water.
Carpet and fabric cleaners can usually be used; always test an
inconspicuous area before the actual stain.
Do:
•Vacuum or use a soft brush to clean Sound Mosaics
Do not:
• Use strong solvents, highly alkaline or abrasive cleaning
agents.
• Do not completely saturate module with cleaning solution
or water.
Features and Beneits
• Variety of color options
• Noise Reduction Coeicient (NRC) of 0.80
• Cost-eective decorative feature
• Easy to specify
• Easy to install
Panel Weight
lb/ft kg/mFelt ¼" mm
Material Thickness Weight Flux
Class A: -
Material
Felt Flame Spread
Smoke Generated
Test - ASTM E Sound
Mosaics Result
Sound Absorption Test Results
Felt Noise Reduction Coeicient
Material Test - ASTM C Result
MHFelt Alpha - W
Panel Sizes and Tolerances
Sound Mosaics are offered in various sizes. All dimensions and
squareness are subject to a 2% tolerance.
Available Finishes
Sound Mosaics can be speciied in a variety of color options.
See mediatechnologies' felt colors at:
www.mediatechnologies.com/resources/finishes
Flammability and Smoke Test Results
- Building Code Approvals
Sound Mosaics have been independently tested and meet the
criteria for approved interior inishes as described in the 2015
International Building Code®.
For more information, please visit mediatechnologies.com 10
Installation Manual
Sound Mosaic
SimpleSpec 300.43TM
Other Media Technologies Indoor Furnishing manuals


