Media Technologies 31 Series Guide

Installation and Assembly
Instruction Guide
www.mediatechnologies.com
Bookmark
Heritage
Malibu
31 Series
Charleston
Denions
Lexington
Metro

Assemble units only as described in this guide.
All screws, nuts & bolts and other fasteners must
be tightened securely and checked regularly.
Failure to do so could cause instability and injury.
!
C A U T ION
2

Wood Frame Shelving (All Lines)
Single Sided .......................................... 5-9
Double Sided .................................... 10-14
Steel Frame Shelving
31 Series & Revaes ........................... 15-18
31 Series Magazine Shelving ..................19
31 Series Mobile Shelving ......................20
Carrels (All Lines)
Panel End.......................................... 21-23
Hex ................................................... 24-26
Wood Tables (All Lines)........................ 26
Charleston ..............................................29
Newspaper Rack .................................... 30
www.mediatechnologies.com • email: sales@mediatechnologies.com
Phone: 231-861-2194 • Fax: 231-861-6678
Table of Contents

Assemble units only as described in this guide.
All screws, nuts & bolts and other fasteners must
be tightened securely and checked regularly.
Failure to do so could cause instability and injury.
!
C A U T ION
4

Assemble units only as described in this guide.
All screws, nuts & bolts and other fasteners must
be tightened securely and checked regularly.
Failure to do so could cause instability and injury.
!
C A U T ION
5
Wood Frame Shelving
Single Faced
Bookmark • Metro •
Lexington • Charleston
Heritage • Malibu
Bookcases - shelving per unit
Dimension # of shelves
30" H 1 adjustable
36" H 2 adjustable
42" H 2 adjustable
48" H 2 adjustable
60" H 3 adjustable
72" H 4 adjustable
84" H 5 adjustable
90" H 6 adjustable

Assemble units only as described in this guide.
All screws, nuts & bolts and other fasteners must
be tightened securely and checked regularly.
Failure to do so could cause instability and injury.
!
C A U T ION
6
⁄-18 x 3 ½”
bolts
⁄-18 x ¾”
bolts
⁄-18 x 1 ¾”
bolts
⁄ nuts
washers
“Z” brackets
#8 x ⁄” screw #8 x 1 ½” screw
Tools Required:
Two 5/16 wrenches
Philips head screwdriver
Parts Included:
Wood Frame Shelving, Single Faced
STEP 1 - Aaching the booms to the sides
For Inial Bookshelf Unit:
55
/
1616
-18 x 1
33
/
44
''
• Save second end panel for the end of run- if assembling
•
groove in side panel.
For Adder Units:
55
/
1616
-18 x 3
11
/
22
•
Lay out all inial, adder and end units but
DO NOT ghten bolts, yet.
• must
•
be spun to level. If no glides are purchased you may have to
shim, if necessary.
Side Panels
Top
Back
Shelves
A
ATTENTION: UNITS ARE ASSEMBLED STANDING UP
General Assembly:
Special applications may require
shelving unit be oor-anchored.
Failure to do so could cause
instability and injury.
!
C A U T ION
B
C
A

7
STEP 2 - Aaching the backs
•
scratch the side panels.
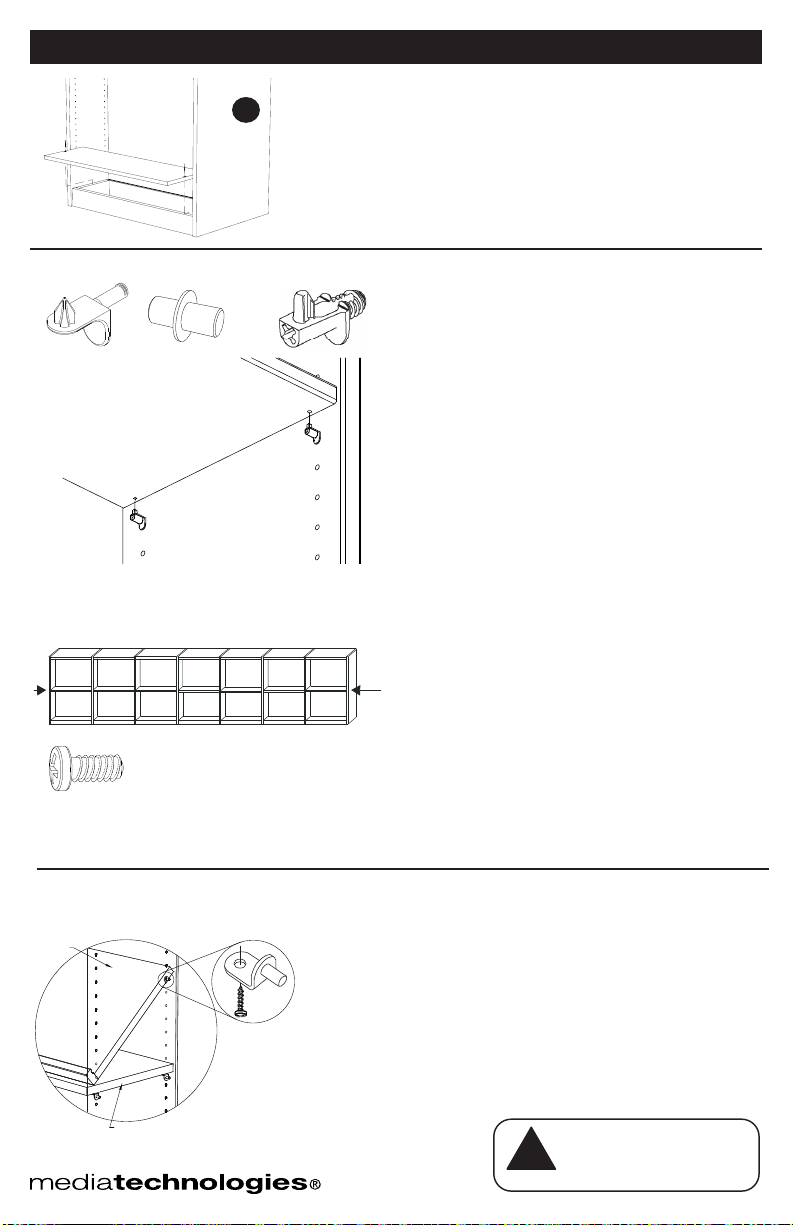
STEP 3 - Aaching the “Z” brackets
(For units taller than 72" skip to STEP 5)
For Inial Bookshelf Unit:
/
-18
x
33
/
44
" bolts.
For Adder Units:
55
/
1616
-18 x 1
33
/
44
brackets on either side of each end panel
STEP 4 - Aaching the tops
55
/
88
• A groove in the rear valance of a single-sided top captures
the back panel.
•
panel
B
Wood Frame Shelving, Single Faced
groove for single-sided
shelving
Assemble units only as described in this guide.
All screws, nuts & bolts and other fasteners must
be tightened securely and checked regularly.
Failure to do so could cause instability and injury.
!
C A U T ION
For Aaching Common Tops: See separate instrucon sheet insert
common tops.
• End panels do not receive edgebanding on top edge.
•
Groove for
Back Panel

Assemble units only as described in this guide.
All screws, nuts & bolts and other fasteners must
be tightened securely and checked regularly.
Failure to do so could cause instability and injury.
!
C A U T ION
8
(For units 72" and shorter skip to STEP 7)
STEP 5 - Aaching “Z” brackets - units taller than 72"
For Inial Bookshelf Unit:
55
/
1616
-18 x
33
/
44
"
bolts.•
For Adder Units:
55
/
1616
-18 x 1
33
/
44
brackets on either side of each end panel.
STEP 6 - Aaching the tops to units taller than 72"
Angle the back of the top higher than the front to slide it under
grooves on either end of the top of the top.
55
/
88
55
/
1616
-18 bolts.
STEP 7 - Now ghten all bolts!
STEP 8 - Aaching the boom shelf
11
/
22
Wood Frame Shelving, Single Faced
FLUSH
hex bolts
LAST
REMEMBER
STEP 7
C

9
STEP 9 - Installing shelves
shelf clip is inserted into pre-drilled holes on underside of shelf.
For steel shelves: Slip shouldered pins into aligned holes in side
For xed wood shelves on units taller than 48":
For xed STEEL SHELVES on units taller:than 48"
middle shelf of the each book case in the run.
STEP 10 - Installing magazine shelves
Note: There is one less magazine/standard shelf combo
per face than on a similar height standard shelving unit.
Insert one shelf clip into pre-drilled hole in underside of magazine
55
/
88
Wood Frame Shelving, Single Faced
magazine
shelf clip
magazine
shelf
standard adjustable shelf
NOTE FOR STABILITY:
All single faced units 48"H and higher must be secured to the wall
by
For all single faced units under 48"H we still recommend that they
are secured to the wall with screws through the valance and into
the wall.
Steel
Wood
Fixed shelf pin

Assemble units only as described in this guide.
All screws, nuts & bolts and other fasteners must
be tightened securely and checked regularly.
Failure to do so could cause instability and injury.
!
C A U T ION
10
Wood Frame Shelving
Double Faced
Bookmark
Metro
Lexington
Charleston
Heritage
Malibu

Assemble units only as described in this guide.
All screws, nuts & bolts and other fasteners must
be tightened securely and checked regularly.
Failure to do so could cause instability and injury.
!
C A U T ION
11
⁄-18 x 3 ½”
bolts
⁄-18 x ¾”
bolts
⁄-18 x 1 ¾”
bolts
⁄ nuts
washers
“Z” brackets
#8 x ⁄” screw #8 x 1 ½” screw
Tools Required:
Two 5/16 wrenches
Philips head screwdriver
Parts Included:
STEP 1 - Aaching the booms to the sides
For Inial Bookshelf Unit:
55
/
1616
-18 x
1
33
/
44
• Save second end panel for the end of run- if assembling
•
panel.
For Adder Units:
55
/
1616
-18 x 3
11
/
22
•
groove in side panel.
Lay out all inial, adder and end units but DO NOT
ghten bolts, yet.
• must
•
to be spun to level. If no glides are purchased you may
have to shim, if necessary.
A
Side
Panels
Top
Back
Shelves
A
B
C
C
ATTENTION: UNITS ARE ASSEMBLED STANDING UP
Wood Frame Shelving, Double Faced
Special applications may require
shelving unit be oor-anchored.
Failure to do so could cause
instability and injury.
!
C A U T ION

Assemble units only as described in this guide.
All screws, nuts & bolts and other fasteners must
be tightened securely and checked regularly.
Failure to do so could cause instability and injury.
!
C A U T ION
12
Back sits on
for double-sided
shelving
STEP 2 - Aaching the backs
(For units taller than 72" skip to STEP 5)
the top
Therefore these backs are 1-
77
/
1616
" shorter than singles.
•
STEP 3 - Aaching the “Z” brackets
For Inial Bookshelf Unit:
55
/
1616
-18 x
33
/
44
" bolts.
Wood Frame Shelving, Double Faced
Back
Panel
B
STEP 4 - Aaching the tops
55
/
88
• A groove in the center of a double-sided top captures the
back panel.
For Aaching Common Tops: See separate instrucon sheet insert
common tops.
• End panels do not receive edgebanding on top edge.
•
For double faced units, common top overhangs on all four edges.
Note:
For Adder Units:
55
/
1616
-18 x 1
33
/
44
" bolts and nuts to bolt through

13
STEP 5 -
Aaching “Z” brackets - units taller
than 72"
(For units 72" and shorter skip to STEP 7)
For Inial Bookshelf Unit:
the
55
/
1616
-18 x
33
/
44
" bolts.
•
For Adder Units:
55
/
1616
-18 x 1
33
/
44
" bolts and nuts to bolt through both
only one side of all double sided bookstacks.
STEP 6- Aaching the tops to units taller
than 72"
Angle one front edge of the top higher than the other slide
middle of the double-sided top captures the back panel.
the top of the top.
double side of the bookstack using the
55
/
1616
-18 x
33
/
44
" bolts.
•
55
/
88
"
Make sure the top is centered over both sides of the book
55
/
1616
-18 bolts.
STEP 7- Now ghten all bolts and brackets!
Wood Frame Shelving, Double Faced
Assemble units only as described in this guide.
All screws, nuts & bolts and other fasteners must
be tightened securely and checked regularly.
Failure to do so could cause instability and injury.
!
C A U T ION
REMEMBER
STEP 7
Assemble units only as described in this guide.
All screws, nuts & bolts and other fasteners must
be tightened securely and checked regularly.
Failure to do so could cause instability and injury.
!
C A U T ION
14
Wood Frame Shelving, Double Faced
STEP 8 - Aaching the boom shelf
edge slightly overhanging the front of the toe frame.
11
/
22
STEP 9 - Installing shelves
For wood shelves: Slip round pin of shelf clips into
pre-drilled holes on underside of shelf.
For steel shelves: Slip shouldered pins into aligned
For xed wood shelves on units taller than 48":
shelves may be located on either side of the double
faced units.
shelf.
For xed STEEL SHELVES on units taller than 48":
pins on a middle shelf of each bookcase in the run. Fixed
shelves should be installed on one side of double faced
FIXED SHELVES ARE REQUIRED ON MOBILE UNITS:
each bookcase in
the run.
STEP 10 - Installing magazine shelves
Note: There is one less magazine/standard shelf combo
per face than on a similar height standard shelving unit.
Insert one shelf clip into pre-drilled hole in underside
55
/
88
" or
second clip to underside of shelf.
magazine
shelf clip
magazine
shelf
standard adjustable shelf
SteelWood Fixed shelf pin
C
Fixed shelf receives
shelf pin

Assemble units only as described in this guide.
All screws, nuts & bolts and other fasteners must
be tightened securely and checked regularly.
Failure to do so could cause instability and injury.
!
C A U T ION
15
⁄-18 x 3 ½”
bolts
⁄-18 x ¾”
bolts
⁄-18 x 1 ¾”
bolts
⁄ nuts
washers
“Z” brackets
#8 x ⁄” screw #8 x 1 ½” screw
Tools Required:
Two 5/16 wrenches
Philips head screwdriver
Parts Included:
STEP 1 - Aaching the caster frame and toe unit to
the sides for Mobile Bookshelf Unit:
Bolt both caster frame and toe assembly to end panel using 5/16-
Finger ght for now.
•
• Washers are used in the center locaons only.
• Repeat for second side panel
• Set unit upright
A
Side
Panels
Caster Frames
Top
Back
Shelves
A
B
C
C
Wood Frame Shelving, Double Faced, Mobile
ATTENTION: UNITS ARE INITIALLY ASSEMBLED LAYING ON SIDE
Align these
STEP 2 - Aaching the back panel
onto the top
frame. Therefore these backs are 1-
77
/
1616
" shorter than singles.
•
side panels.
Back sits on
for double-sided
shelving
Back
Panel

Assemble units only as described in this guide.
All screws, nuts & bolts and other fasteners must
be tightened securely and checked regularly.
Failure to do so could cause instability and injury.
!
C A U T ION
16
STEP 3 - Aaching the “Z” brackets
For Inial Bookshelf Unit:
55
/
1616
-18 x
33
/
44
" bolts.
STEP 4 - Aaching the tops
55
/
88
• A groove in the center of a double-sided top captures the
back panel.
Wood Frame Shelving, Double Faced, Mobile
B
STEP 6 - Aaching the boom shelf
#8 x 1
11
/
22
STEP 7 - Installing shelves
Faced.
STEP 5- Now ghten all bolts and brackets!
REMEMBER
STEP 5
C

Assemble units only as described in this guide.
All screws, nuts & bolts and other fasteners must
be tightened securely and checked regularly.
Failure to do so could cause instability and injury.
!
C A U T ION
17
Steel Frame Shelving
31 Series
Bookcases - shelving per unit
Dimension # of shelves
30" H 1 adjustable
36" H 2 adjustable
42" H 2 adjustable
48" H 2 adjustable
60" H 3 adjustable
72" H 4 adjustable
84" H 5 adjustable
90" H 6 adjustable

Assemble units only as described in this guide.
All screws, nuts & bolts and other fasteners must
be tightened securely and checked regularly.
Failure to do so could cause instability and injury.
!
C A U T ION
18
Steel Frames- see STEP 1a
Back Panels- see STEP 1b
Steel Frame Shelving
STEP 1- Aaching side panels to steel frames
For Starter Units:
33
/
44
•
•
end panels
• Single and Double-sided units 48" and shorter use
1 tubular frame
• Single and Double-sided units over 48" use 2
tubular frames
•
For Adder Units:
Bolt through one steel frame, then an intermediate panel,
33
/
44
bolt and nut
•
Lay out all inial, adder and end units but
DO NOT ghten bolts, yet.
• must
shim if necessary.

19
Cam
Steel Frame Shelving
STEP 2 - Aaching the Toes
#8 x
55
/
88
55
/
88
•
•
provided for each double-sided unit
STEP 3 - Aaching the Tops
at the top of each face of each side panel.
• 2 holes in a single end panel, 4 holes in a single
intermediate panel or double-sided end panel, 8
holes in an double-sided intermediate panel
Insert cams into pre-drilled holes in top, then align cams
11
/
44
•
to the rear
STEP 4 - Installing Fixed Shelves in units taller
THAN 48"
(For Units 48" and shorter, skip to STEP 5.
Mobile units proceed to STEP 4a)
VARIANTA SCREWS MUST BE
INSTALLED ON TALLER UNITS
mid-height shelves of all the bookcases in the run.
Note:
Assemble units only as described in this guide.
All screws, nuts & bolts and other fasteners must
be tightened securely and checked regularly.
Failure to do so could cause instability and injury.
!
C A U T ION

Assemble units only as described in this guide.
All screws, nuts & bolts and other fasteners must
be tightened securely and checked regularly.
Failure to do so could cause instability and injury.
!
C A U T ION
20
STEP 4a - Installing Fixed Shelves in Double Faced
units taller than 48"
(For Units 48" and shorter, skip to STEP 5.
Mobile units see below)
For xed STEEL SHELVES on units taller than 48":
middle shelf of each bookcase in the run. Fixed shelves should be
Drive.
FIXED SHELVES ARE REQUIRED ON ALL MOBILE UNITS:
A xed shelf is required on mobile units.
each bookcase in the run.
STEP 5 - Installing Shelves
Slip shouldered pins into aligned holes in side panels and install
•
above the toe
Steel Frame Shelving
31 Series Magazine Shelf
Standard 31 Series Shelf
This manual suits for next models
7
Table of contents
Other Media Technologies Indoor Furnishing manuals


Popular Indoor Furnishing manuals by other brands


DHP
DHP DL8832 Assembly instructions

Classic Exhibits
Classic Exhibits VISIONARY DESIGNS VK-2959 Setup instructions

Walker Edison
Walker Edison AF44MOL2DR Assembly instructions

PENCO
PENCO Stadium 86190 Assembly instructions

FourStarGroup
FourStarGroup 11223063C quick start guide

BRW
BRW VIS-A-VIS vdk/20/8 Assembly manual

Steelcase
Steelcase Solo Sit-to-Stand user guide

PAIDI
PAIDI OSCAR 135 6504 instructions

ETI
ETI WP-78-850-MV Use and care guide

Furniture of America
Furniture of America CM3710PC-2PK Assembly instructions

Lee & Plumpton
Lee & Plumpton Duty 1200mm Assembly instructions

Flexa
Flexa 82-70131 Series Assembly instructions