MediaKind MPTS User manual

Quick Start Guide
SD Transcoder - Quick Start Guide - P/N S16986 RC
NOTE: The back panel components are SELV (Safety Extra Low Voltage) components.
ASI Output - port 2
1 GbE - eth0 for Management
Quad 1GbE - eth2 for input multicast from the main transcoder
Power input
1. ASI output: connect the ASI cable to the rear of the SD transcoder, on port 2 .
2. Connect an Ethernet cable to the rear of the SD transcoder on eth0 for management and UI access .
3.a. For installations using IP outputs (with or without ASI output):
• Connect an Ethernet cable from eth2 of the main RX1 to the IP switch.
• Connect an Ethernet cable from eth2 of the SD transcoder to the same IP switch
3.b. For installations using ASI outputs only:
• Connect an Ethernet cable from eth2 of the main transcoder to eth2 of the SD transcoder .
4. Connect the power cord to the back of the SD transcoder . Plug the power cord into the grounded outlet,
then power up the appliance.
1
2
3
3
4
Step 1: Connections/Power
NOTE: See back panel connector locations below.
The SD transcoder receives the MPTS output of the main transcoder receiver via IP multicast.
1
2
3
4
SD Transcoder back panel
eth5 eth4 eth3 eth2
PSU1 PSU2
Eth0 Eth1
1 Gbe (default: Eth 0 for management,Eth1 for input/output
PSU1 PSU2eth0 eth1
12 3 4 5
SD Transcoder - Quick Start Guide - P/N S16986 RC
The Ethernet interfaces can be configured using the LCD panel:
5. From the root menu, navigate to Network by pressing .
6. Select Eth0 bypressing .Press again.
7. For Method, press ENTER, and the arrows to select Manual. Press ENTER.
8. Press to select IP Address.
Press ENTER, then and to enter the address for the management network.
Press ENTER to apply the value.
9. Press to select Subnet Mask.
Press ENTER, then and to enter the mask for the management network.
Press ENTER to apply the value.
10. Press to select Gateway.
If using a gateway, press ENTER, then and to enter the gateway.
Press ENTER to apply the value.
11. Press and then twice to select Eth2.
Adjust the IP Address and Subnet Mask in the same way as you edited Eth0.
a. For installations using IP outputs edit the address and mask according to the network plan.
b. For installations using ASI outputs and an Ethernet cable direct to the main RX1, use the
IP Address 192.168.2.2 and Subnet Mask 255.255.255.0.
12. Do not edit Eth2 Gateway.
Step 2: Configure the network interfaces
1. Launch a web browser:
HTTP://{IP-Address} where {IP-Address} is the Management network address set in Step 2.
1. When the Login page displays, login with username admin and password admin.
2. Navigate to the Services Page.
3. Click the button to configure each Transcoder service:
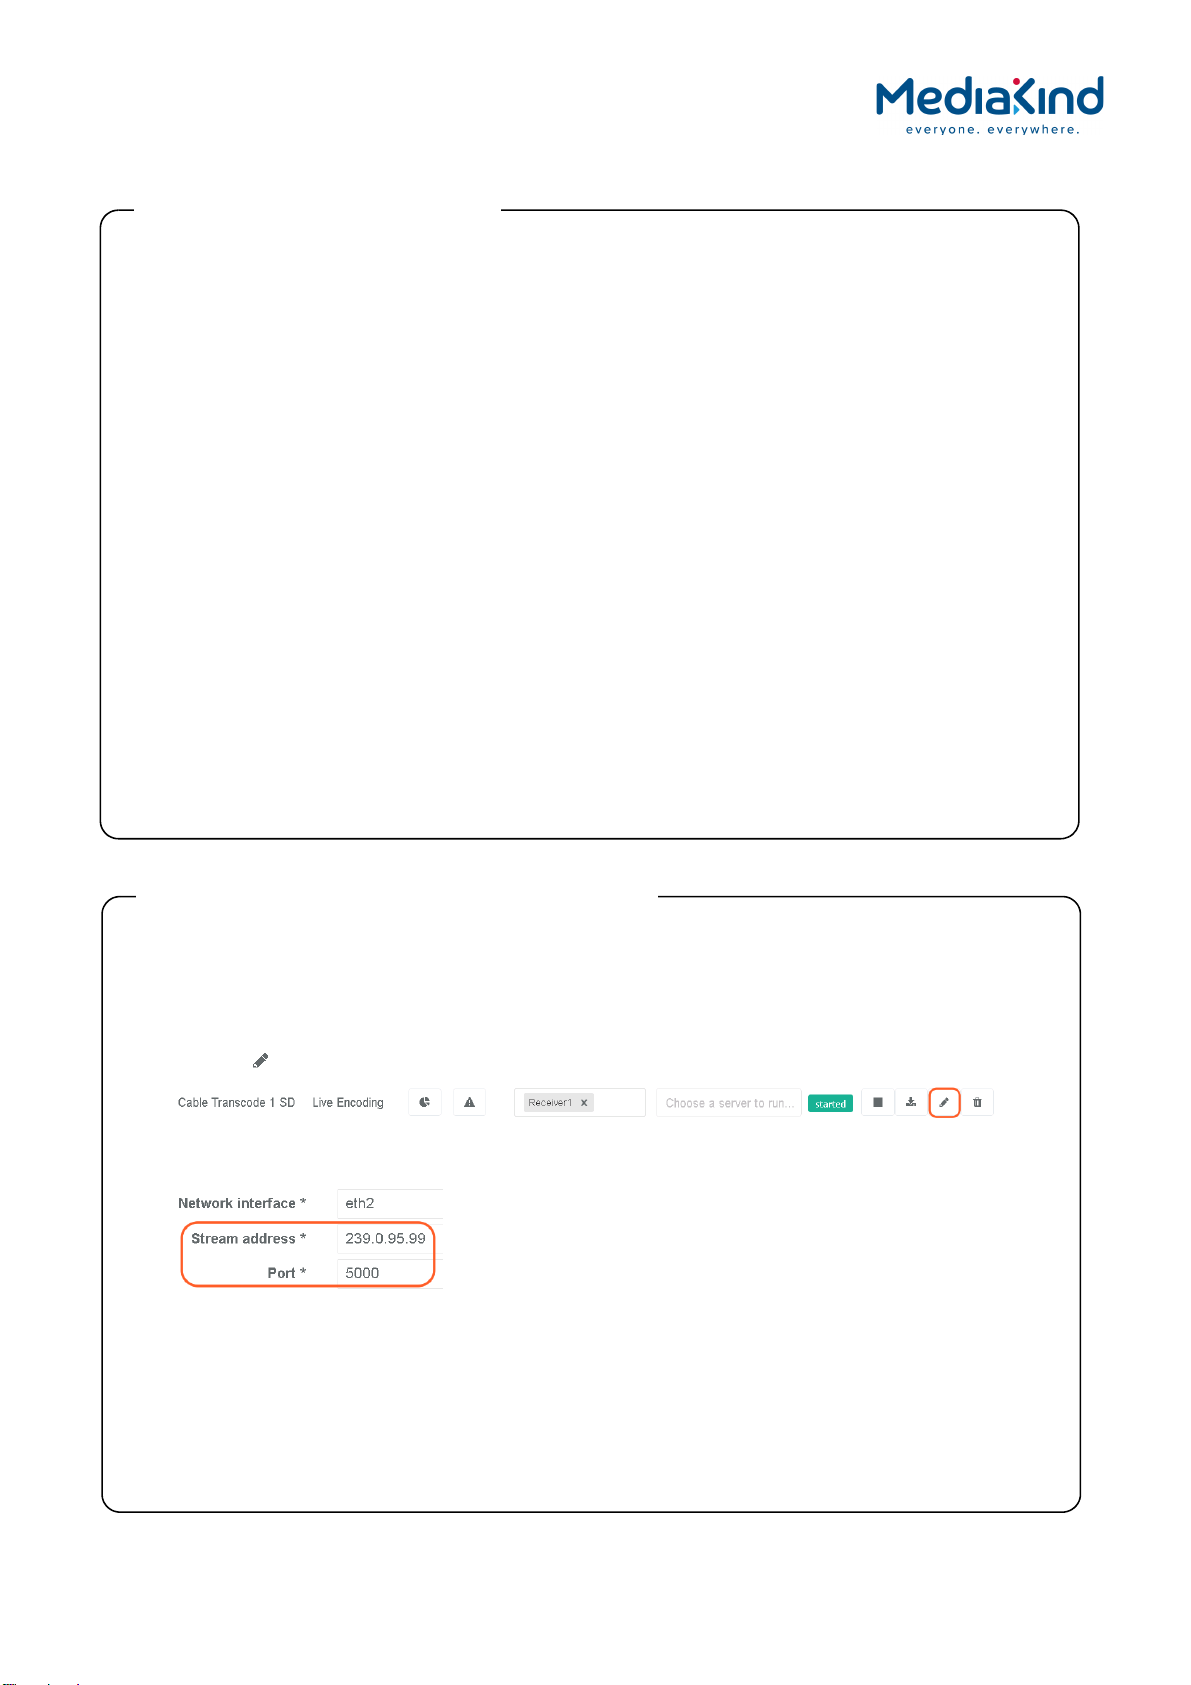
4. On the Input tab, set the multicast destination to that set on the output of the main transcode receiver.
The default is 239.0.95.99 port 5000:
IMPORTANT: Do not change any other parameters.
5. Click Save and Exit.
Result: The transcoder service will restart.
6. Repeat steps #4 to #6 for each of the transcoders.
IMPORTANT: Set them to the same multicast destination.
Result: MPTS output containing all the SD programs is now available on the ASI output.
Step 3: Log in to the unit and set up the Transcoder inputs

SD Transcoder - Quick Start Guide - P/N S16986 RC
SD Transcoder MPTS output
Service PIDs Resolution
Service Name Service ID PMT Video/PCR Audio 1 Audio 2 SCTE-35
SD 1 1 100 101 102 103 107 SD
SD 2 2 200 201 202 203 207 SD
SD 3 3 300 301 302 303 307 SD
SD 4 4 400 401 402 403 407 SD
SD 5 5 500 501 502 503 507 SD
SD 6 6 600 601 602 603 607 SD
An electronic copy of this document is available for download at:
https://www.mediakind.com/rx1-quick-start-guide
Scan to connect to
MediaKind website and
get this Quick Start
Guide.
Table of contents
Other MediaKind Media Converter manuals


Popular Media Converter manuals by other brands


ELNA
ELNA XCHANGE instruction manual

Siemens
Siemens SIMOVERT MV Series Commissioning instructions

SKYDANCE
SKYDANCE D4-P user manual

Z-Band
Z-Band Z-IP Encode 004 User guide and installation manual

Alpha Technologies
Alpha Technologies LPR12/48-150-IP68 manual

Crystal Vision
Crystal Vision DDAA132 user manual


